Arduino Proteus Simulation Basics with Practical Examples
Table of Contents
Arduino Proteus Simulation Basics, Description:
Arduino Proteus– Proteus simulation software has been my best friend for years. I remember those student life days when I was in hostel and I had no access to maximum of the hardware components, I was also low on budget and my pocket won’t allow me to purchase these components. This was when I made friendship with Proteus Simulation Software. I was making intermediate and advanced level projects without even spending a single penny. Proteus simulation software really helped me a lot in learning the Electronics basics. Many boys and girls ask me about the Proteus simulation software, finally I decided to share my knowledge and experience with you guys so that you can easily get started with this amazing Tool called Proteus.
If you have the Proteus software then don’t wait for any hardware components, because Proteus have thousands of electronics components models which you can use to build and test your projects. There are certain controller boards like Arduino boards, and sensors which don’t come with the Proteus. You will need to download different Proteus Model libraries. In this article I will explain everything from downloading a Proteus model part and then how to use it in a simulation. I will also explain how to write the Arduino Code and then how to upload that code to make a working simulation. Without any further delay, let’s get started!!!
Following are the Amazon links of the most commonly used Arduino boards and some tools if in case you need them?
Amazon Links:
Arduino Nano USB-C Type (Recommended)
Other Tools and Components:
ESP32 WiFi + Bluetooth Module (Recommended)
Super Starter kit for Beginners
PCB small portable drill machines
*Please Note: These are affiliate links. I may make a commission if you buy the components through these links. I would appreciate your support in this way!
Proteus Simulation Software:
If you have already installed the Proteus Software then it’s great, you are all set, if not, then you can download a free or paid version from the Labcenter Electronics official website. I highly recommend to start with Proteus7.8 SP2 or a higher version. I have already installed the Proteus7.8 SP2 and I have been using it for years and it still works just fine.
Don’t worry if you are using a Latest version of the Proteus Simulation Software because the use is exactly the same.
Getting Started with Proteus:
Before, I am going to explain how to add the Arduino Uno Proteus Model, Arduino Mega Proteus Model, Ultrasonic Sensor Proteus Model, or MQ2 Gas Sensor Proteus Model, etc. First, let me explain how to use the pre-installed Proteus library models. Anyways, open your Proteus Simulation software.
The very first thing that you need to learn is how to add a part in Proteus software.
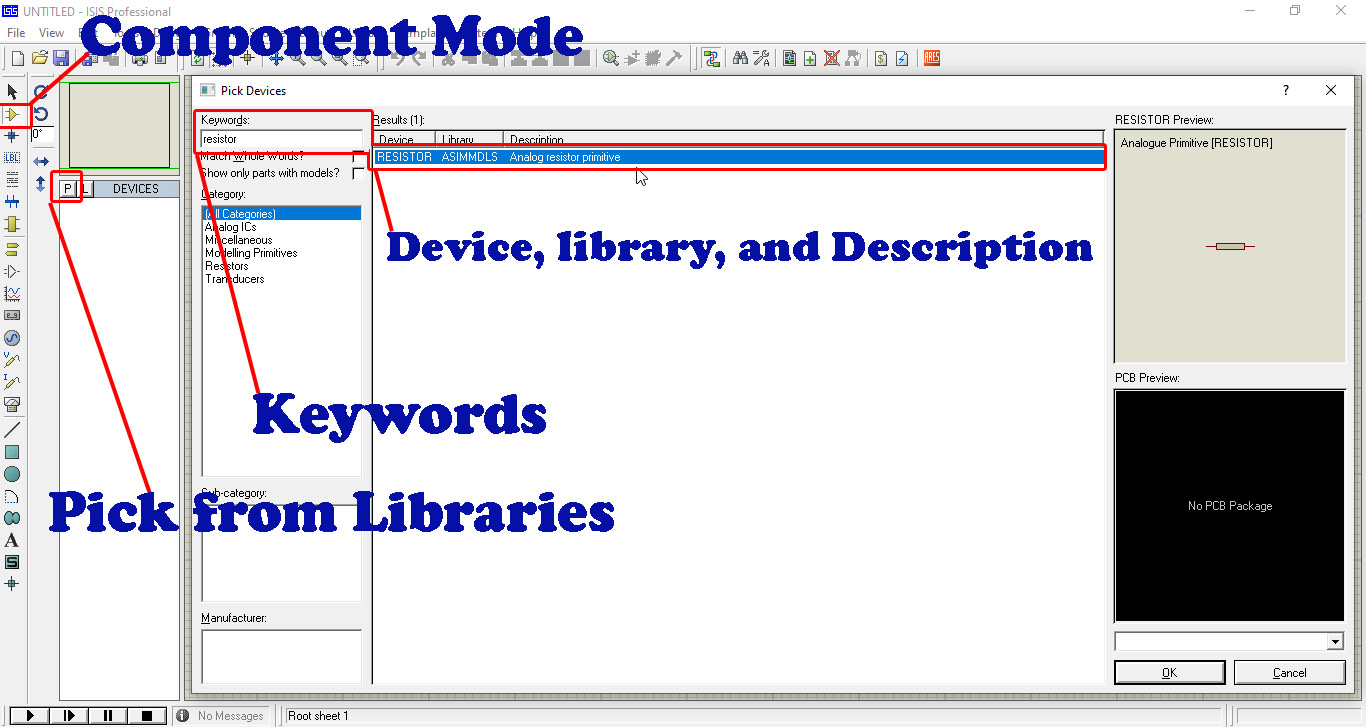
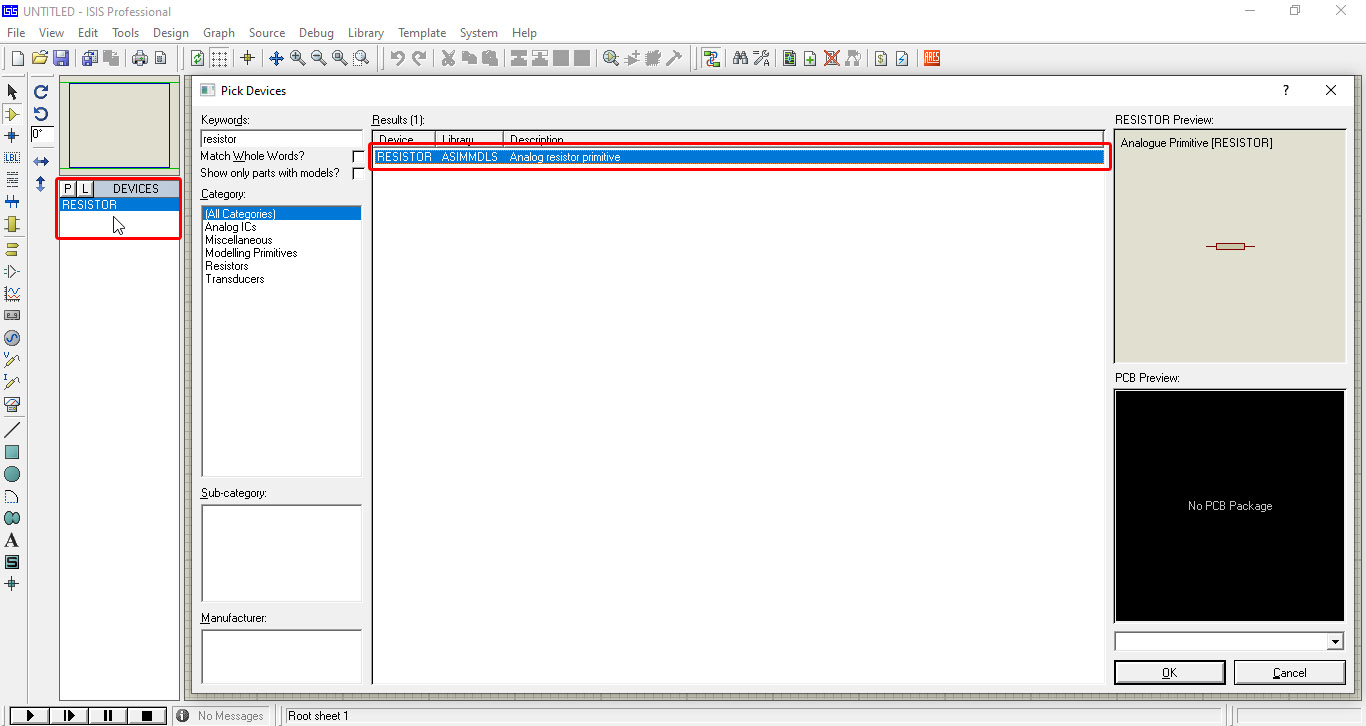
While your Proteus software is opened, click on the Component Mode button, and then click on the Pick from libraries button, this will open the Pick Devices window, in the Keywords box type the name of the component you want to search for, on the right side in the Results section you will see the component with Device name, library information, and description. In my case I searched for the Resistor. Now double click on the resistor to add it to the list, as you can see in the image given below.
Now, next I am going to add an LED. So, this time I will write leds in the Keywords box. You can see in the image below, a long list is displayed, from this list you can select any LED, simply double click on it and it will be added to the list.
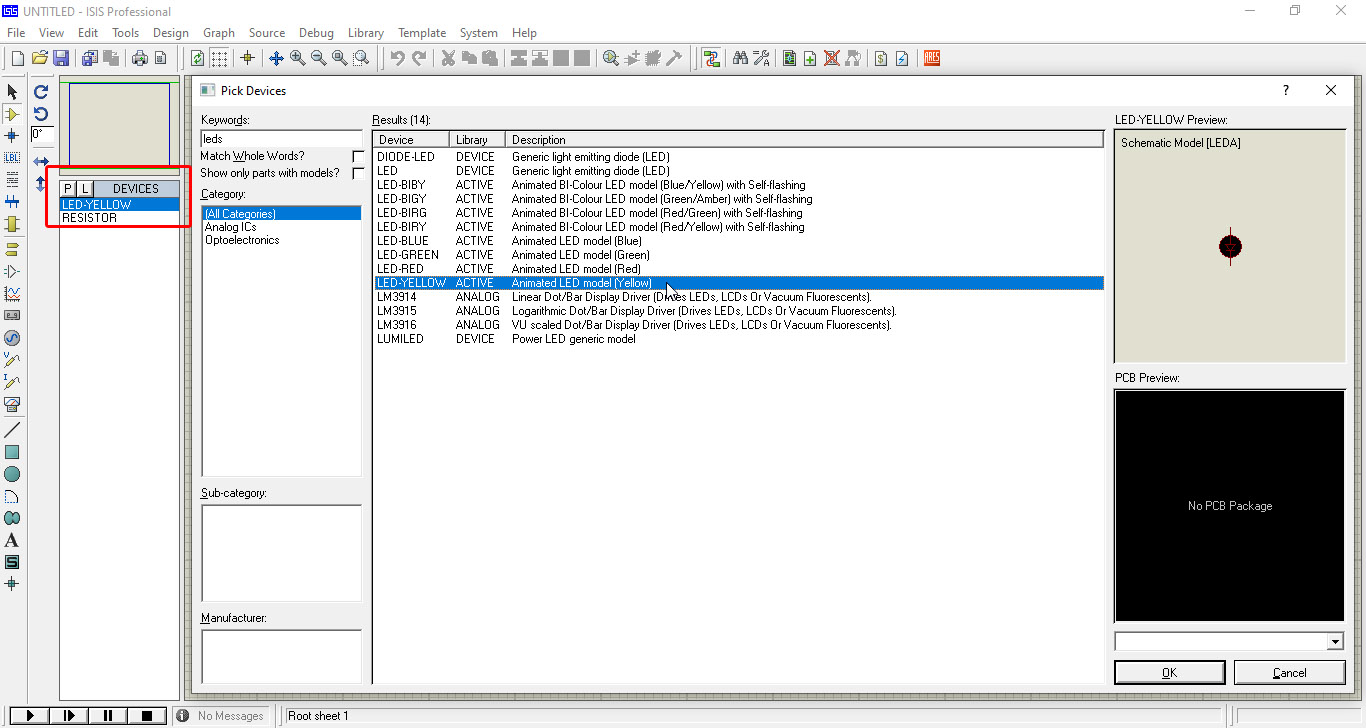
For now, I only need these two components. Now, you can close the Pick Devices window. Now we will add these components to make a simulation.
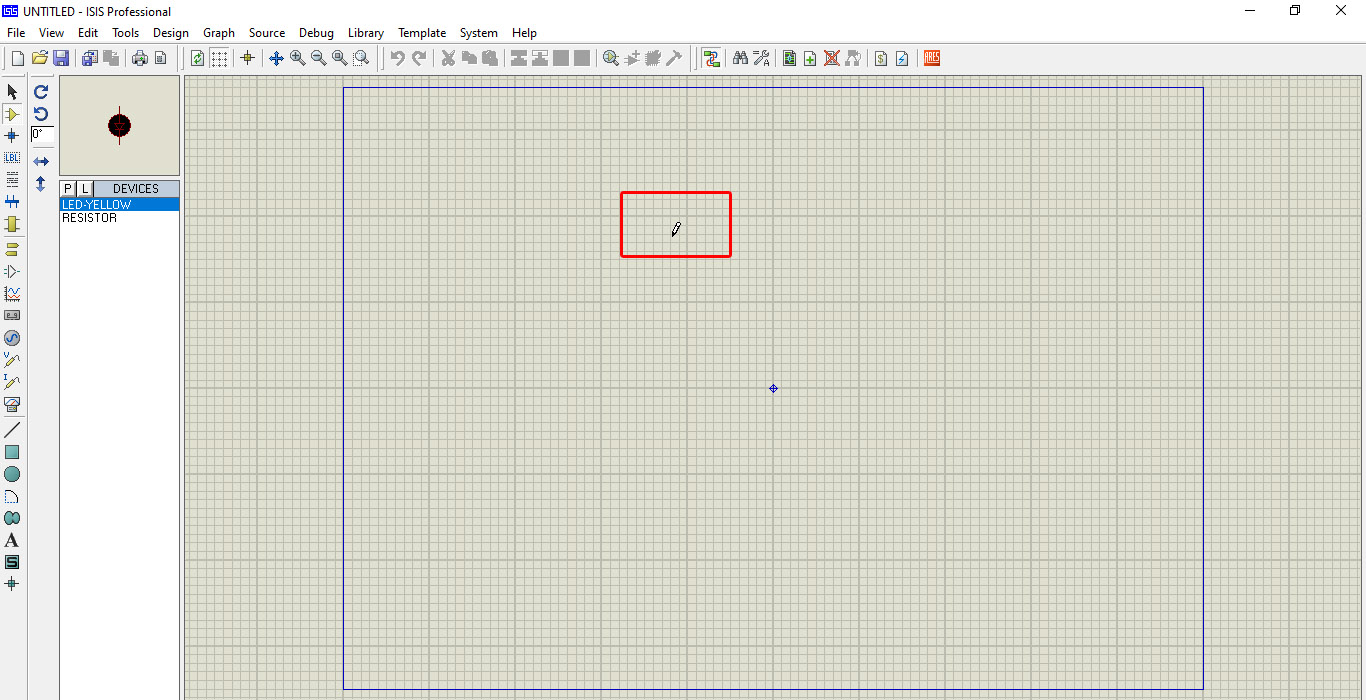
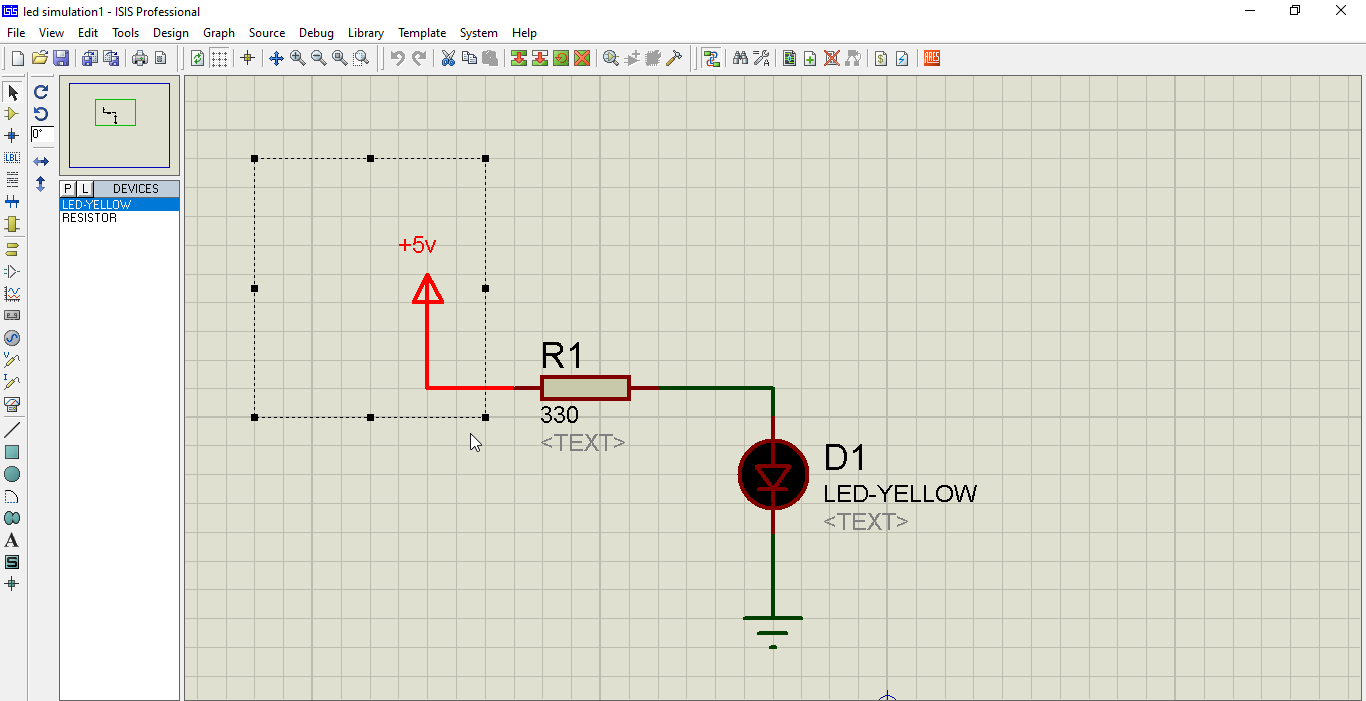
You can clearly see in the list we have two components the one LED-YELLOW and the other one is the Resistor. Now simply click one of these components to select it and the mouse cursor will change to the pen style. Now you can click the mouse left button to add this LED.

Now, you can see the LED is added. Now to add the resistor, simply click on the resistor and add it.
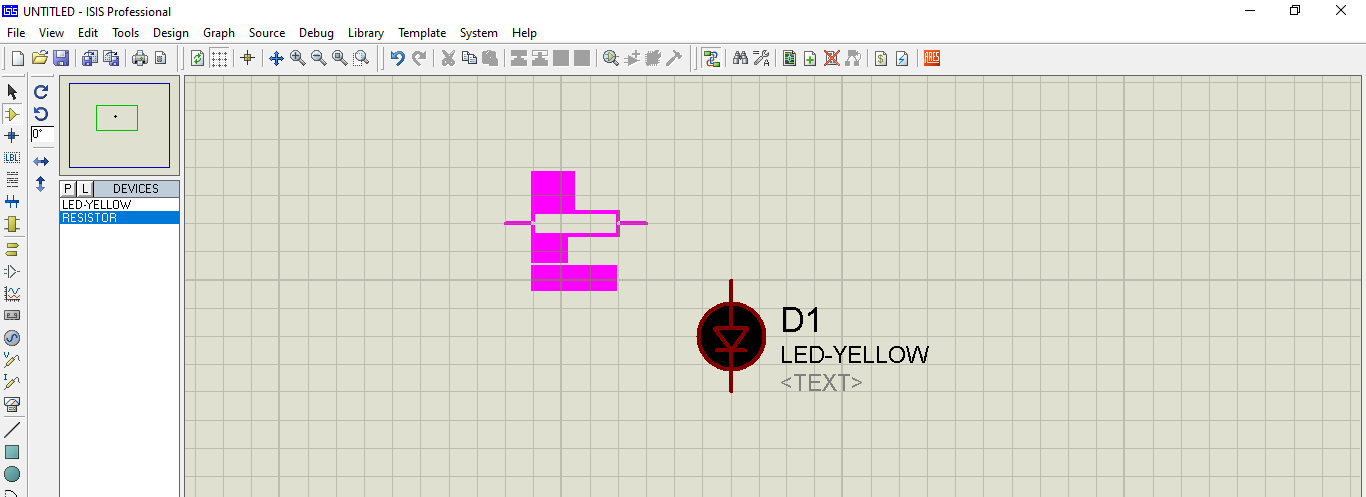
Simply click the mouse left key and the resistor will be added. The resistor I added was 10K ohm. To change the value of the resistor or any other component you will need to double click on the value. I simply double clicked on the 10K and the Edit Component Value window was opened. I entered the 330 value and then closed the window by clicking on the OK button.


After changing the resistor value. Now it’s time to connect it with the Led. While the Arrow cursor is selected, when you bring mouse cursor near the component lead the cursor shape is changed to the pen style this means you are ready to draw a line, so click and a line will appear and then click on the LED leg and a wire will be connected.
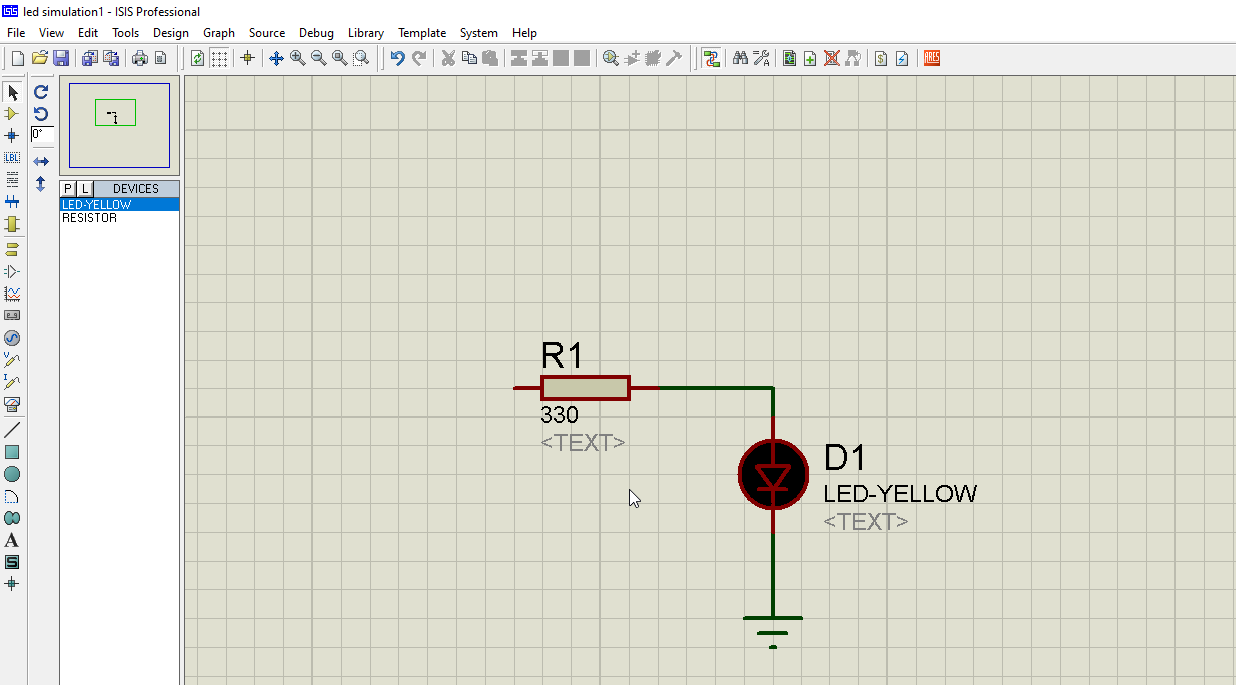
Now to turn ON this LED we will need the voltage and ground connections.
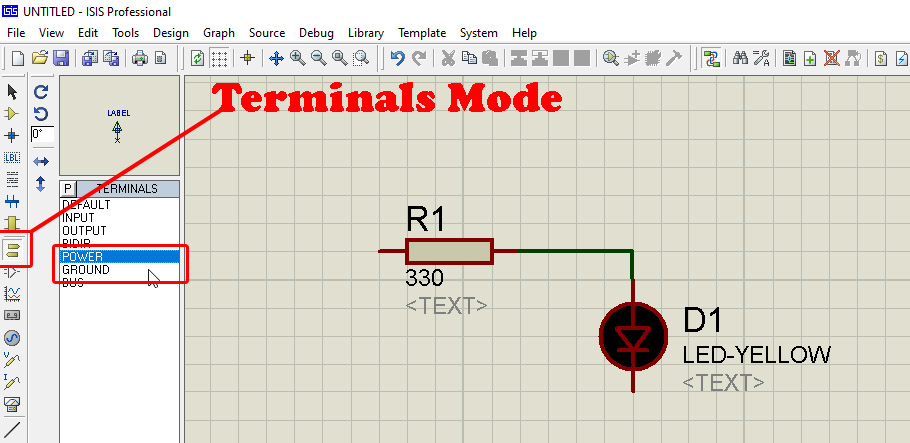
Click on the Terminals Mode button and this will display the TERMINALS list. From this list you can select the Power and ground. Select the power terminal and click anywhere in the simulation window and then repeat the same for the ground terminal.
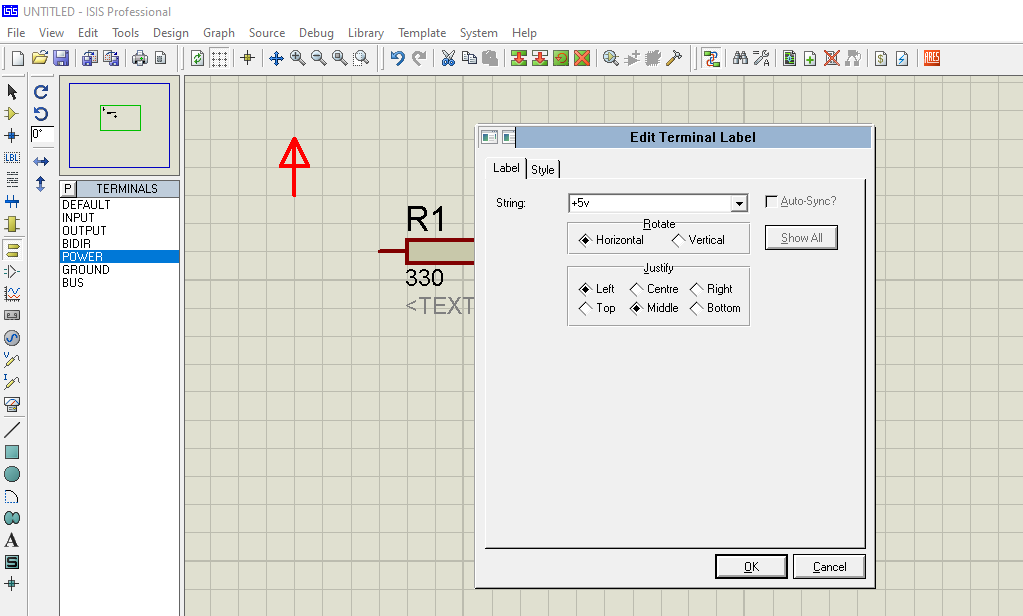
First I did for the Power terminal, after adding the power terminal, I double clicked on the power terminal to change its value. I simply wrote +5v and then clicked on the Ok button.
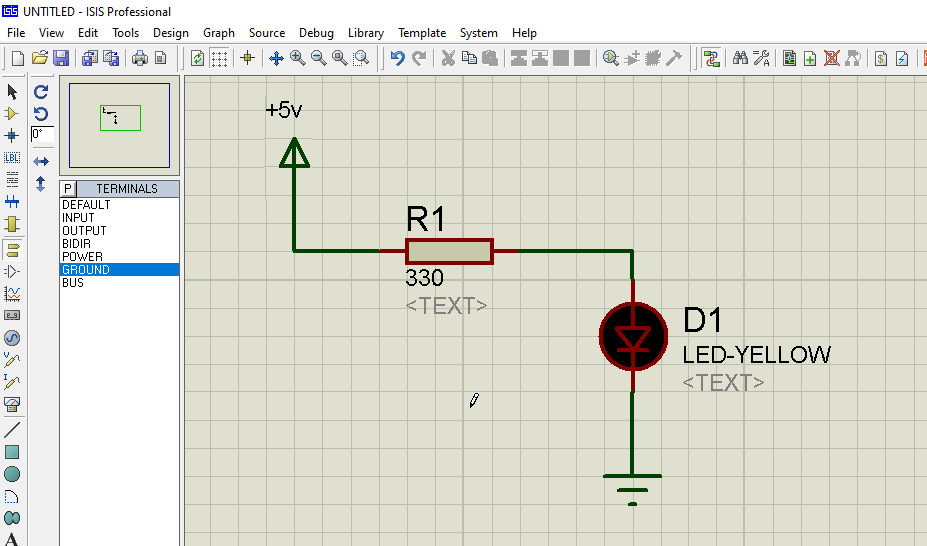
Finally, I connected the wires. My circuit is ready. Now you can click on the Play button to run the simulation.
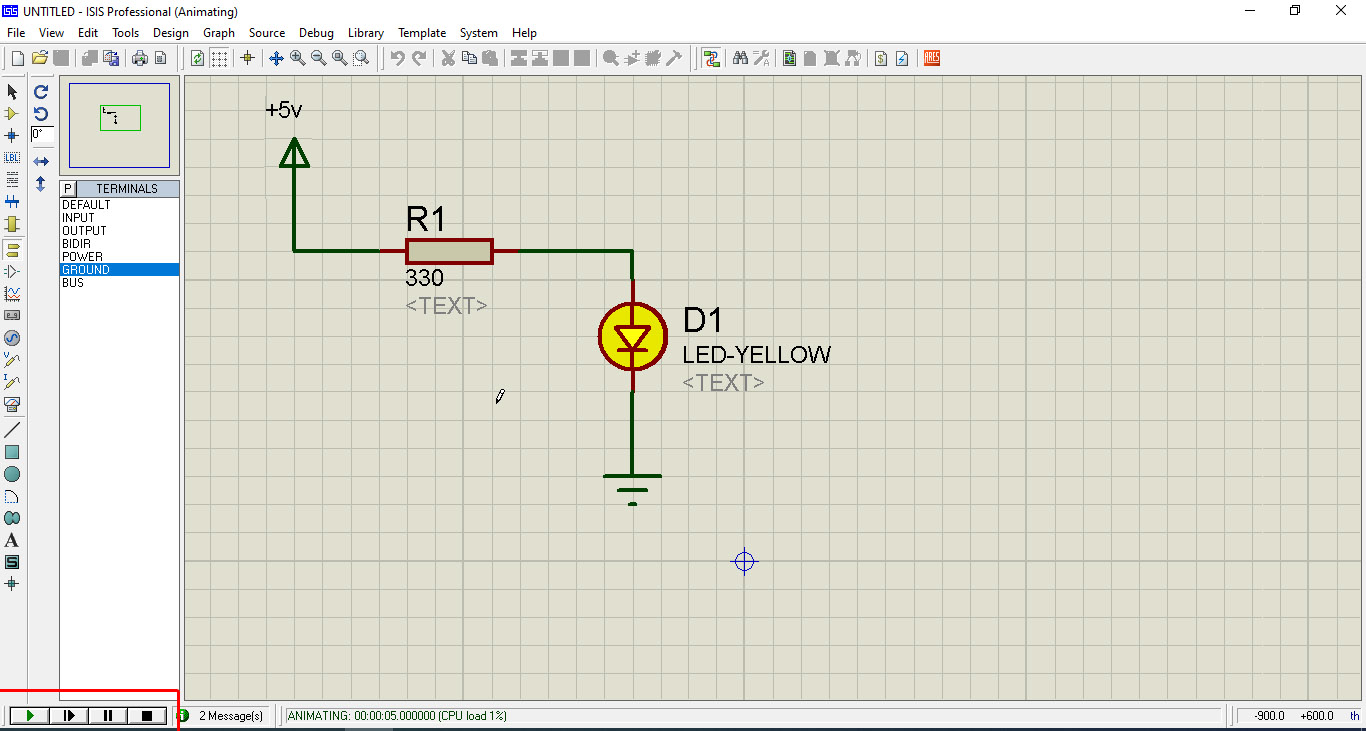
Isn’t it amazing? We have no hardware components but we just tested a circuit and which is working just fine. I have been using this circuit with the 7805 regulator. Now, I am sure you have got the idea, how to make and run a simulation. This simulation was really easy because we had all these parts in the Proteus components library. Now, let’s say if we want to control this LED using the Arduino board then?
This version of the Proteus doesn’t come with the Arduino board, I don’t know about the newer versions. But for now, I don’t have the Arduino board. Now what I can do is to add the Arduino boards library which is very simple.
Download Proteus Models:
Arduino Uno and Ultrasonic Sensor Proteus Models
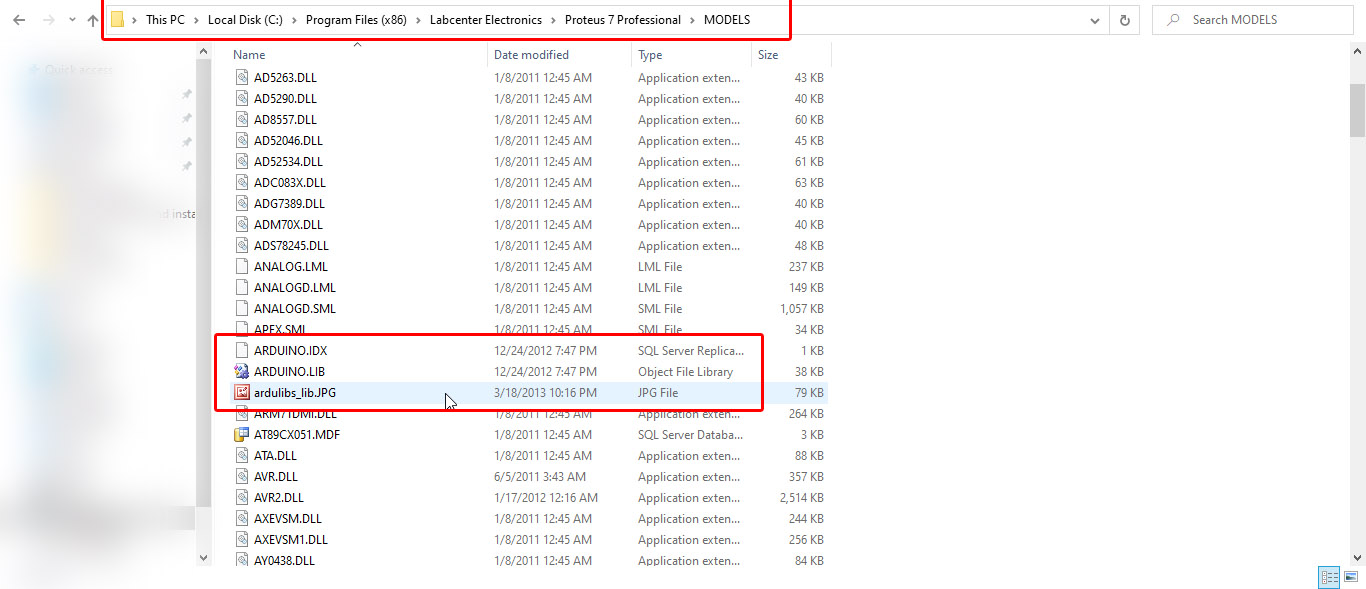
After downloading the Arduino Uno Proteus Model and the Ultrasonic Sensor Library for Proteus which you can find inside the folder which you just downloaded. The folder you have downloaded is the RAR type you will need to extract it. Then open the folder and copy all the files and folders inside it and paste it into the MODELS and LIBRARY folders.
You can see, how easy it is to add the parts in the Proteus. If you need another part you can simply search on the Google, download the desired model for the Proteus and then following the same steps you can add the part in Proteus. Now, let’s make a simulation to control the LED using the Arduino Board in Proteus.
Arduino Proteus:
So, let’s continue with the same circuit. I started by modifying the circuit, I don’t need this 5v power terminal so select this and press the delete button. Why I did it? Because this time I will supply 5 volts to the LED using Arduino Uno.
Now, you can repeat the same exact steps.
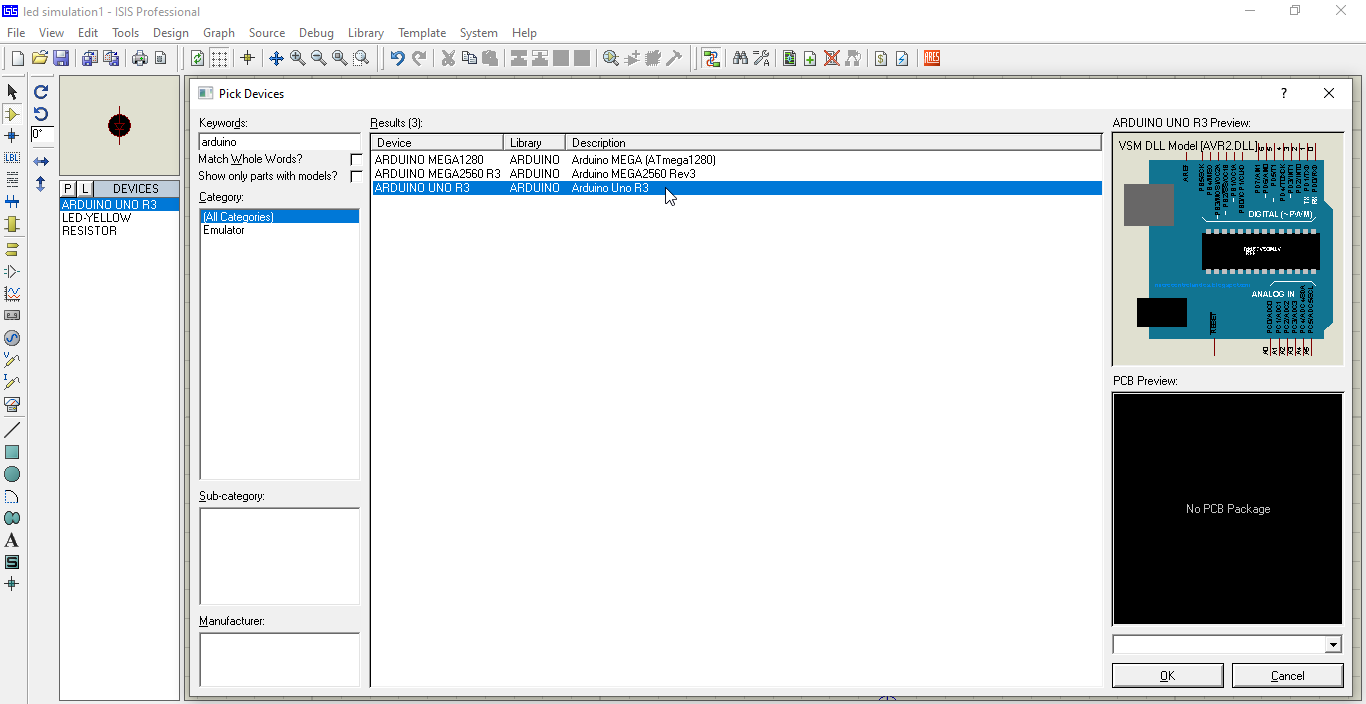
You can double click on the Arduino Uno R3 and it will be added in the list. Now on the left side you can see, in the list we got three components.
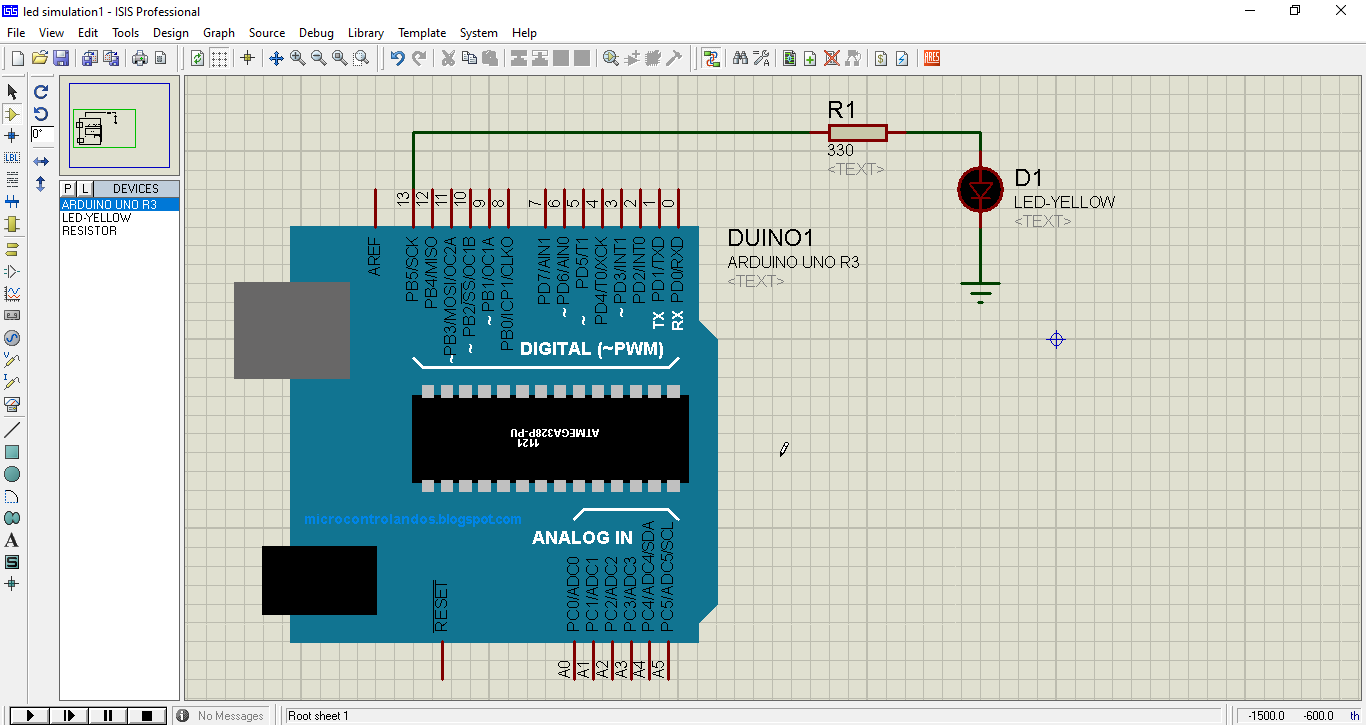
The Arduino Uno board is added in the Proteus and I connected the resistor with the digital Pin13 of the Arduino Uno. Now I will use this Pin to control the Led. So, as we are done with the connections, now it’s time to write a program and then we will generate the hex file, I will explain this in a minute.
Arduino Program to Control an LED:
|
1 2 3 4 5 6 7 8 9 10 11 12 13 14 15 16 |
// https://www.electroniclinic.com/ int LED = 13; void setup() { // put your setup code here, to run once: pinMode(LED, OUTPUT); digitalWrite(LED, OUTPUT); } void loop() { // put your main code here, to run repeatedly: digitalWrite(LED, HIGH); delay(1000); digitalWrite(LED, LOW); delay(1000); } |
How to Generate the Hex code using Arduino IDE
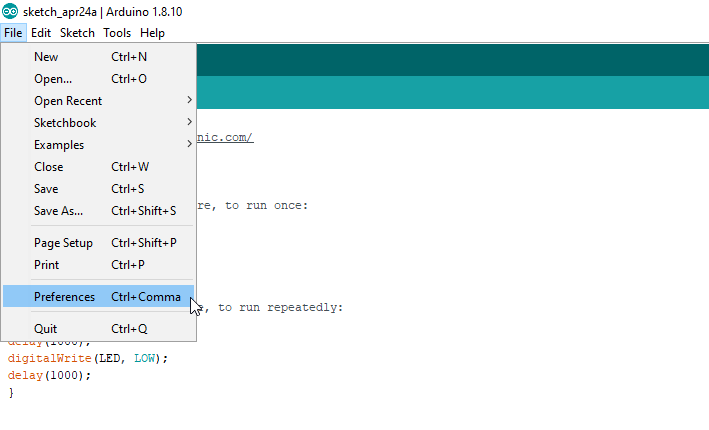
To generate the Hex code, click on the file and then click on the Preferences. This will open a new window.
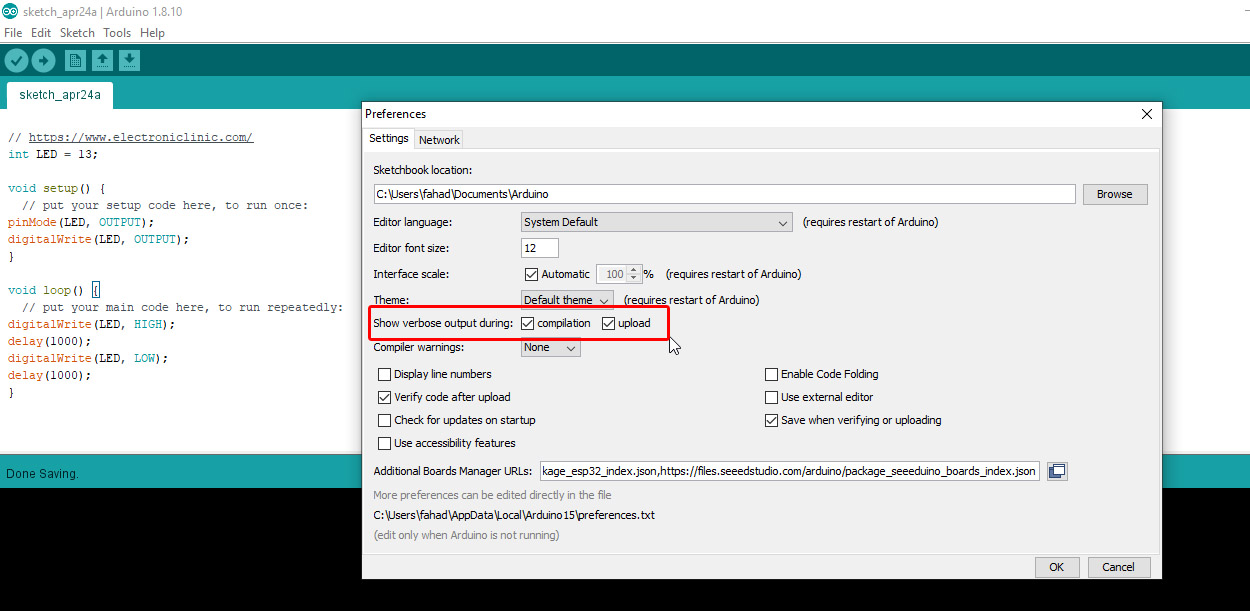
Check both the compilation and upload boxes and then you can click on the OK button to close the Preferences window and you are all set.
Next, you can click on verify/compile button and wait for a while, and look for the hex code link, select it and press Ctrl+C on the keyboard to copy the link.
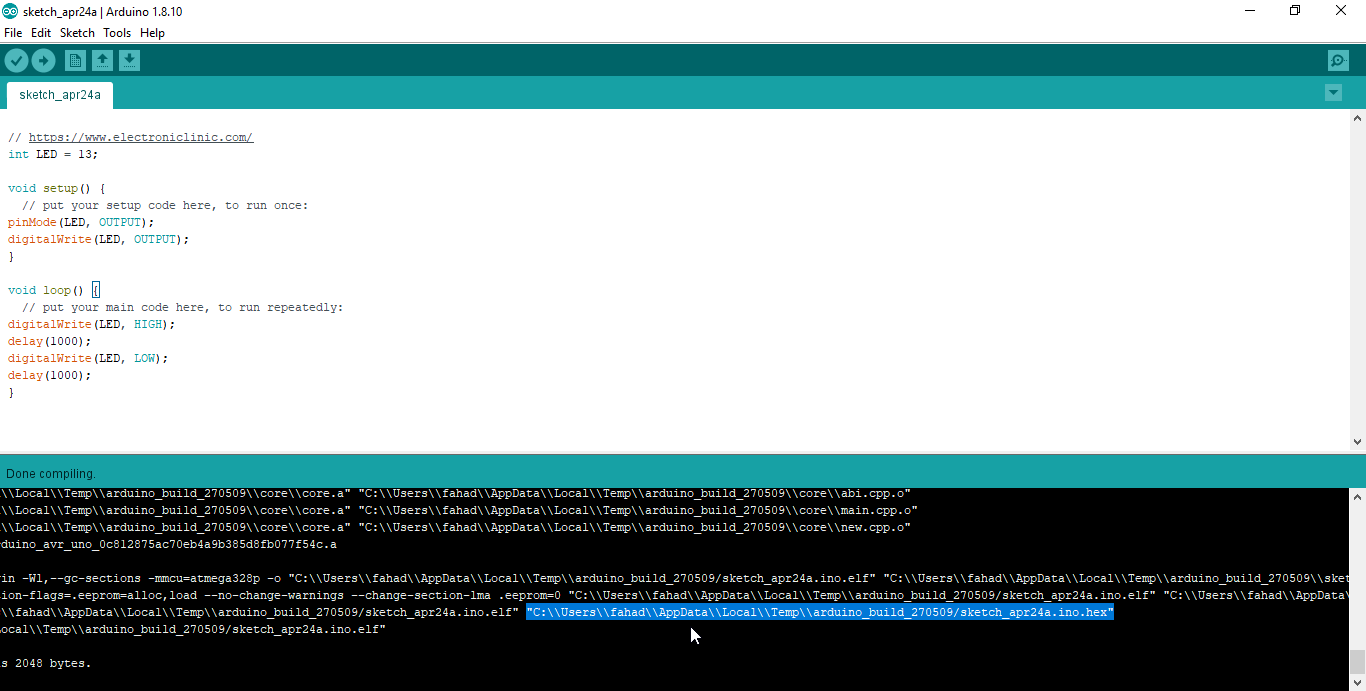
When you click on the compile or verify button, below you will see many lines you can scroll down and search for this link. Select it and copy this as mentioned before. You can see at the end it has the .hex.

Paste the link in the box next to the Program file and press the OK button. Now all you need to do is to click on the play button to run the Proteus simulation.

Great! The LED is blinking. Proteus is such an amazing software for making simulations, you can test your code and circuit connections before you make a hardware. So, if you are a beginner and you want to learn Arduino programming, then you don’t need to wait for the hardware, just download the Proteus software and start learning.
My other Proteus related Articles:
Serial communication between two Arduino Boards
16×2 LCD with Arduino programming and Simulation
Hybrid Relay Proteus Simulation
Voltage Divider or Potential Divider and LDR Simulation