Common Anode and Common Cathode seven segment display “Arduino project for beginners”
Table of Contents
Description:
Common Anode and Common Cathode Seven segment display
In this tutorial, you will learn how to use a seven segment display with Arduino Uno. Common Anode and common cathode type seven segment displays are widely used in electronic meter, Temperature display system, RPM monitoring gadgets, digital clocks, and other electronic devices that display numerical information. Due to its popularity, I decided to make a very detailed tutorial on how to use the common Anode and common Cathode seven segments with Arduino.
Amazon Links:
Arduino Nano USB-C Type (Recommended)
Other Tools and Components:
ESP32 WiFi + Bluetooth Module (Recommended)
Super Starter kit for Beginners
PCB small portable drill machines
*Please Note: These are affiliate links. I may make a commission if you buy the components through these links. I would appreciate your support in this way!
Common Anode & Common Cathode Displays:
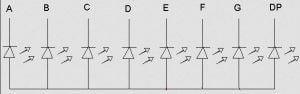
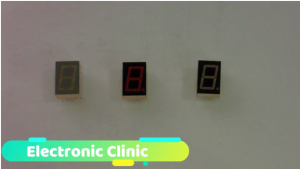
Seven Segment Display

As you can see in the picture above, the pinout of both the 7 segments is exactly the same, the only difference between the two displays, is in the connection of the leds. These are called 7 “seven” segment displays because both the displays consist of 7 led’s, each segment which is an led is labeled the English letters…
A
B
C
D
E
AND
F
By turning ON and turning OFF each segment or led we can make different symbols or numbers from 0 to 9 and some English letters.
Types of 7 Segment display:
There are mainly two types of seven segment displays
- Common Anode seven segment display
- Common Cathode seven segment display
Common Anode 7-segment display:
in common anode type 7-segment display, the anode side of all the led’s or segments are connected together and are connected to the desired voltage. During the practical connections, current limiting resistors are connected in series with each led if needed. Then each led or segment can be easily turned ON by applying logic 0 or low signal through a current limiting resistor to the cathode of any particular led or segment. So, for a common anode type seven segment
0 means ON
1 means OFF
Common Cathode 7-segment display:
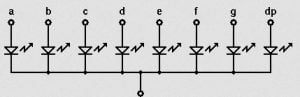
In common cathode type 7-segment display, the cathode side of all the led’s or segments are connected together to logic 0 or ground. Then each led or segment can be turned ON by applying log 1 or a high signal through a current limiting resistor to the anode of particular led or segment.

Depending on the decimal digit to be displayed, the particular set of LEDs is turned on or forward biased. For example, to display the numerical digit 0 “Zero”, we will need to light up six of the LED segments corresponding to a, b, c, d, e, and f. this way digits from 0 to 9 can be displayed on Common Anode or Common Cathode type seven segments display.
Each seven segment display has a total of 10 pins, 5 pins on the upper side and 5 pins on the bottom side. The middle pins of both the seven segments are internally connected and can be connected with a 5v or GND depending on the type of seven segment display. If it’s a common anode type then this pin will be connected with 5v or else it will be connected with the ground if this is common cathode type seven segment display.
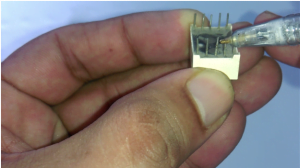
only by looking at the seven segment display it’s hard to tell whether this is a common anode or common cathode type. Before we can apply the voltage lets first calculate the value of a resistor
Normally for a standard red colored seven segment display, each leg “light emitting diode” segment can draw around 15 mA to illuminate correctly; so as we are planning to use this seven segment display with the Arduino Uno, the value of the current limiting resistor would be about 200Ω.
(5v – 2v)/15mA,
Or
220Ω to the nearest higher preferred value but currently I have a 330-ohm resistor available so I will use this one. First, let’s check this for the common anode type seven segment display.
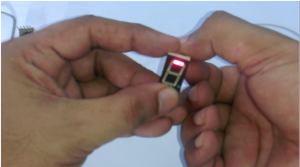
Connect 5v from the Arduino with the common pin of the seven segment. now connect a 330-ohm resistor with a wire, connect one side with the Arduino GND and connect the other side of the wire with any pin of the seven segment. As you can see the led or segment can turn on so it means this seven segment is common anode type.
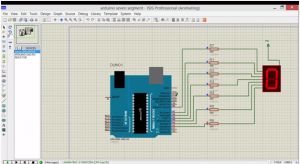
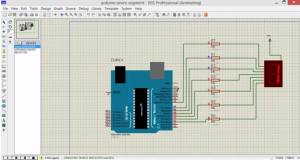
we have covered all the basics now its time to use this seven segment with Arduino Uno. Before you start the practical connections I highly recommend, first you should make a Proteus simulation and understand the basics.
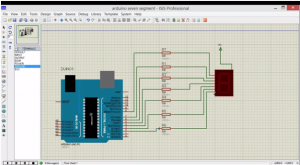
while Proteus is open, click on the pick from libraries button and search for Arduino, double click to add, now click the mouse left button to add Arduino and then select the Arduino, right click and select rotate. again click on pick from libraries button and search for common anode type seven segment, look for the common anode type seven segment and double click or click ok to add it to the list. again click on the pick from libraries button write resistor, select the resistor and click ok to add it to the list. Now add seven resistors and change their values from 10k to 330 ohm. now connect these resistor with pin2…3….4….5….6….7 …and 8. connect 5 volts with the common of seven segment. connect pin8 of the Arduino to pina of the seven segment, similarly connect pin7 of the Arduino to pinb of the seven-segment and so on …. after the connections are completed now its time to start the Arduino programming.
Seven Segment Display Arduino Programming:
Common Anode and Common Cathode 7 segment display
|
1 2 3 4 5 6 7 8 9 10 11 12 13 14 15 16 17 18 19 20 21 22 23 24 25 26 27 28 29 30 31 32 33 34 35 36 37 38 39 40 41 42 43 44 45 46 47 48 49 50 51 52 |
int pina = 8; int pinb = 7; int pinc = 6; int pind = 5; int pine = 4; int pinf = 3; int ping = 2; void setup() { pinMode(pina ,OUTPUT); pinMode(pinb ,OUTPUT); pinMode(pinc ,OUTPUT); pinMode(pind ,OUTPUT); pinMode(pine ,OUTPUT); pinMode(pinf ,OUTPUT); pinMode(ping ,OUTPUT); } void loop() { // for zero digitalWrite(pina, LOW); digitalWrite(pinb, LOW); digitalWrite(pinc, LOW); digitalWrite(pind, LOW); digitalWrite(pine, LOW); digitalWrite(pinf, LOW); digitalWrite(ping, HIGH); delay(1000); digitalWrite(pina, HIGH); digitalWrite(pinb, LOW); digitalWrite(pinc, LOW); digitalWrite(pind, HIGH); digitalWrite(pine, HIGH); digitalWrite(pinf, HIGH); digitalWrite(ping, HIGH); delay(1000); digitalWrite(pina, LOW); digitalWrite(pinb, LOW); digitalWrite(pinc, HIGH); digitalWrite(pind, LOW); digitalWrite(pine, LOW); digitalWrite(pinf, HIGH); digitalWrite(ping, LOW); delay(1000); } |