Diy RC Plane for Beginners with Amazing Stability and Design Calculations
Table of Contents
Diy RC Plane for Beginners, Description:
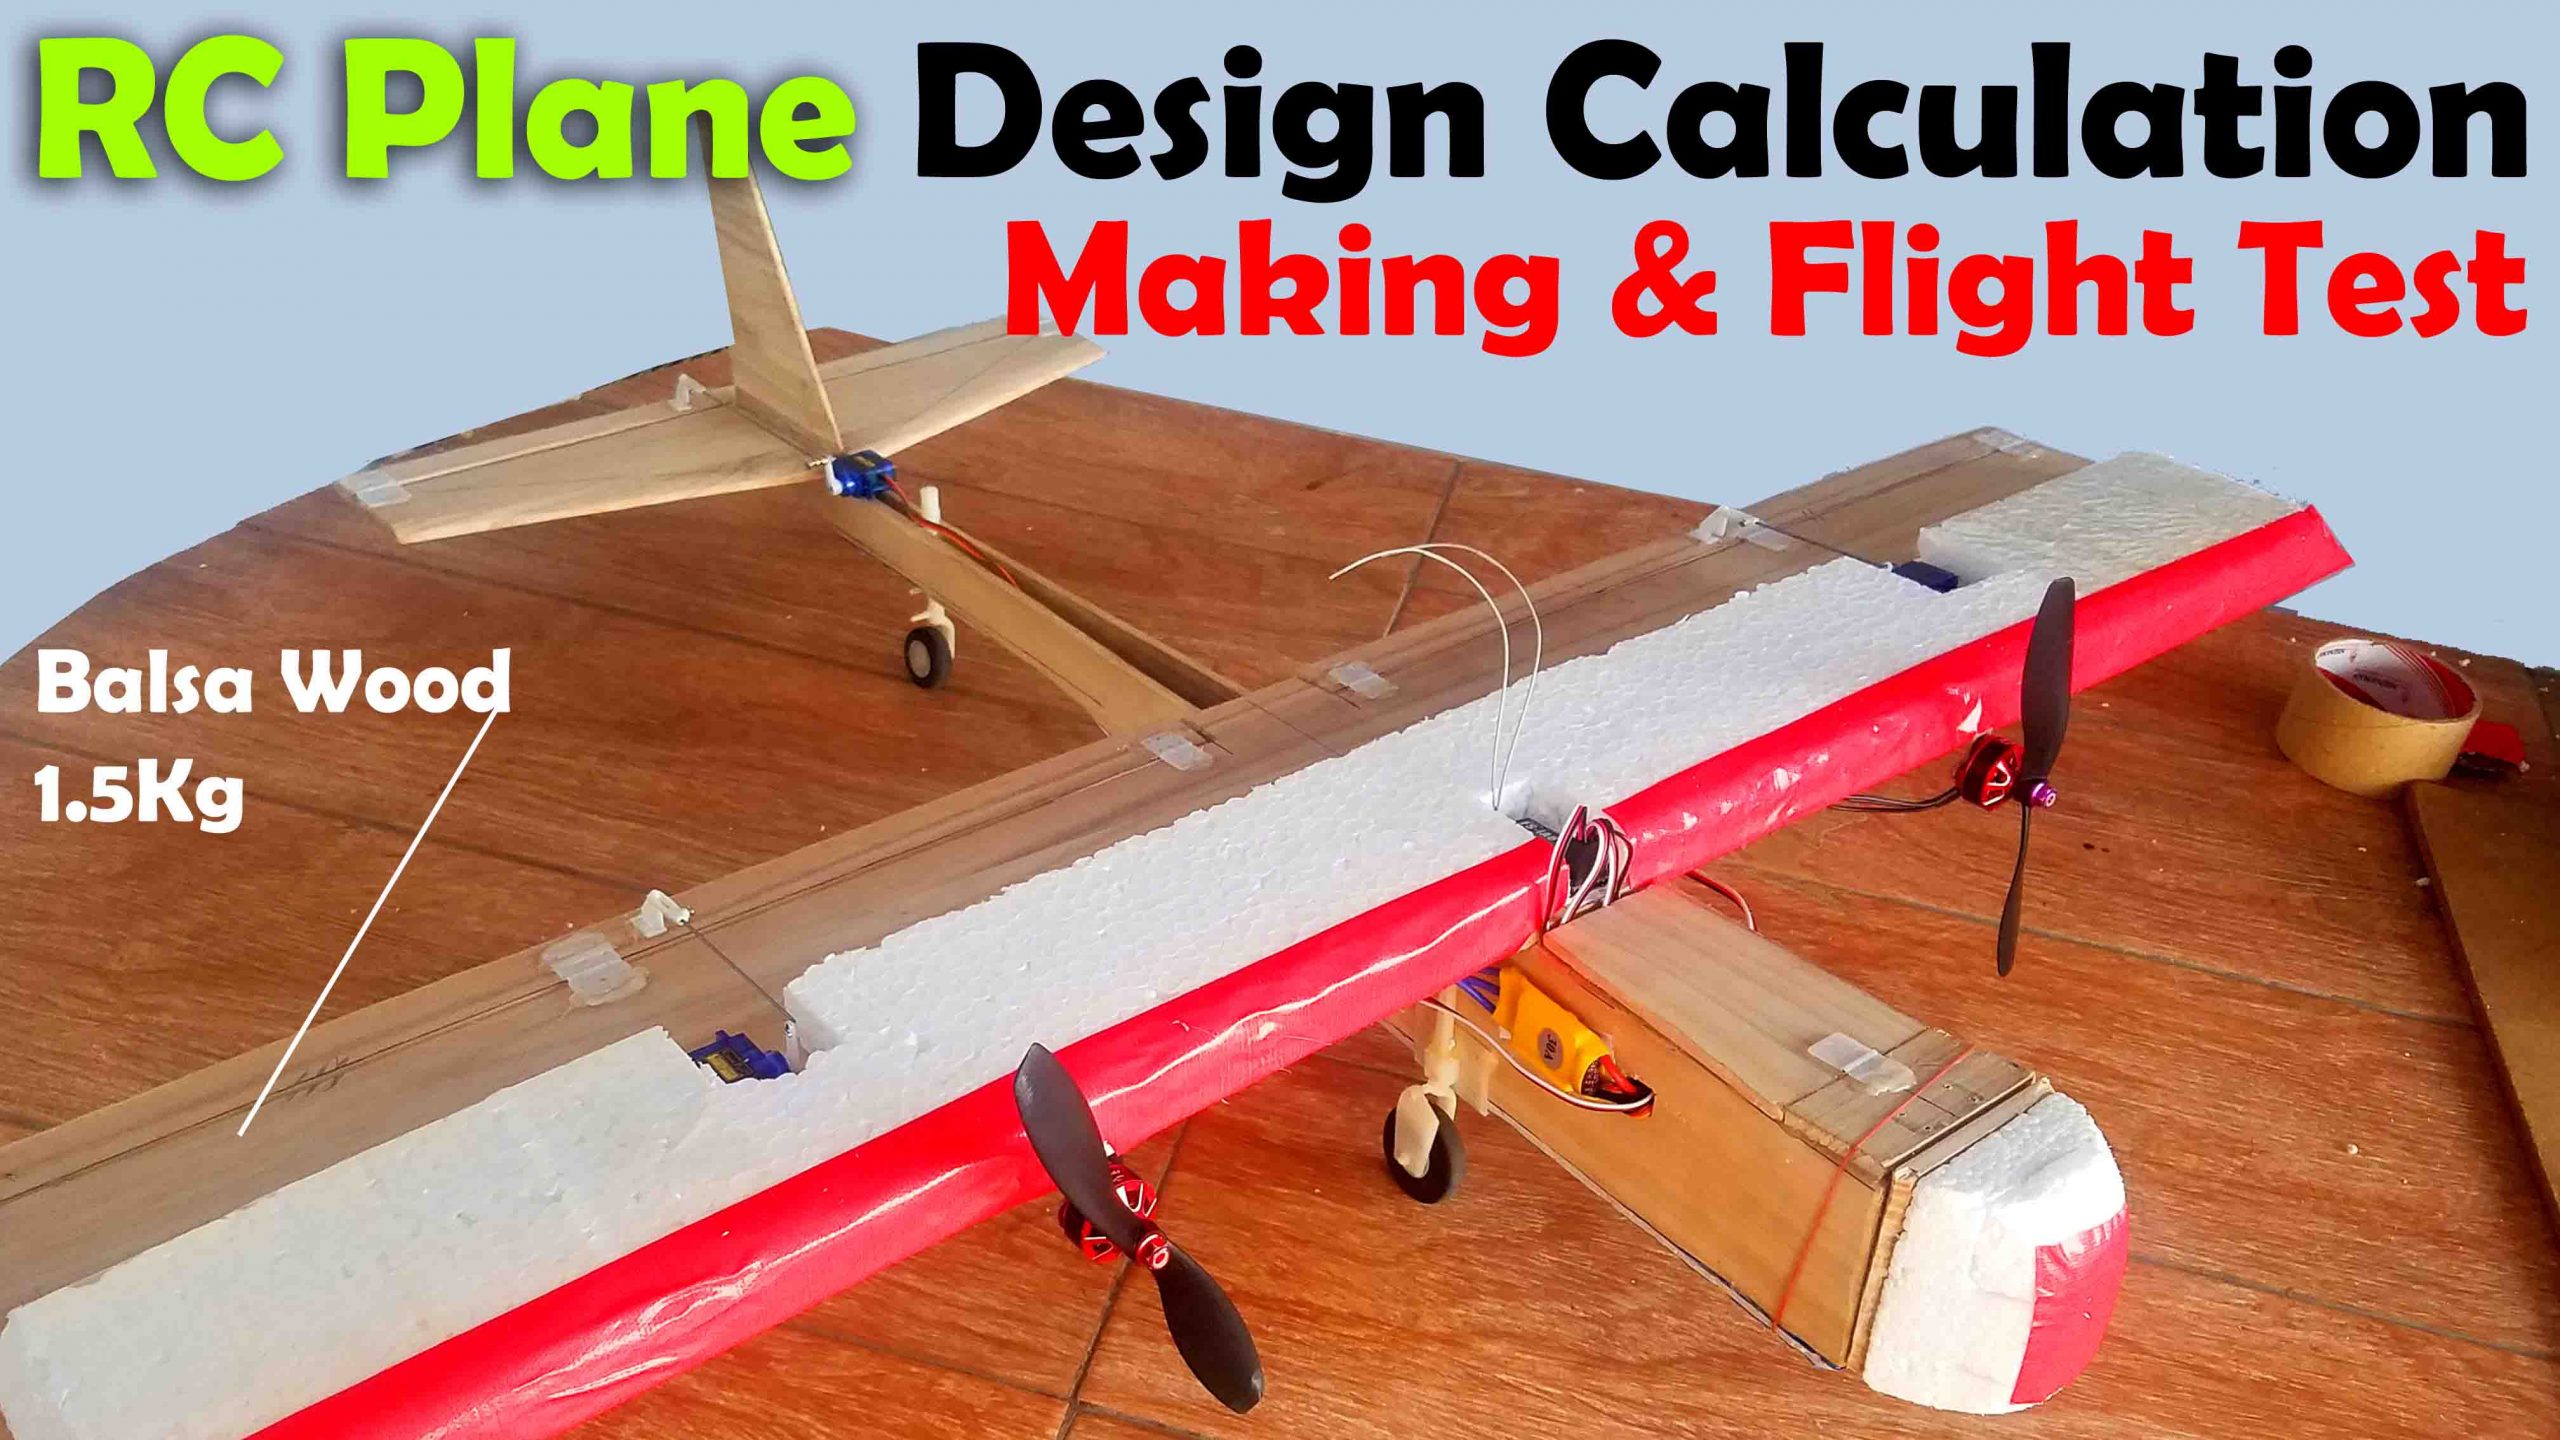
Diy RC Plane for Beginners– In my previous tutorial, I explained the design calculations for a twin’s motor RC airplane which flew with nice stability, but I crashed it due to my bad piloting skills. This was built using Balsa wood and was weighing around 1.5kg.
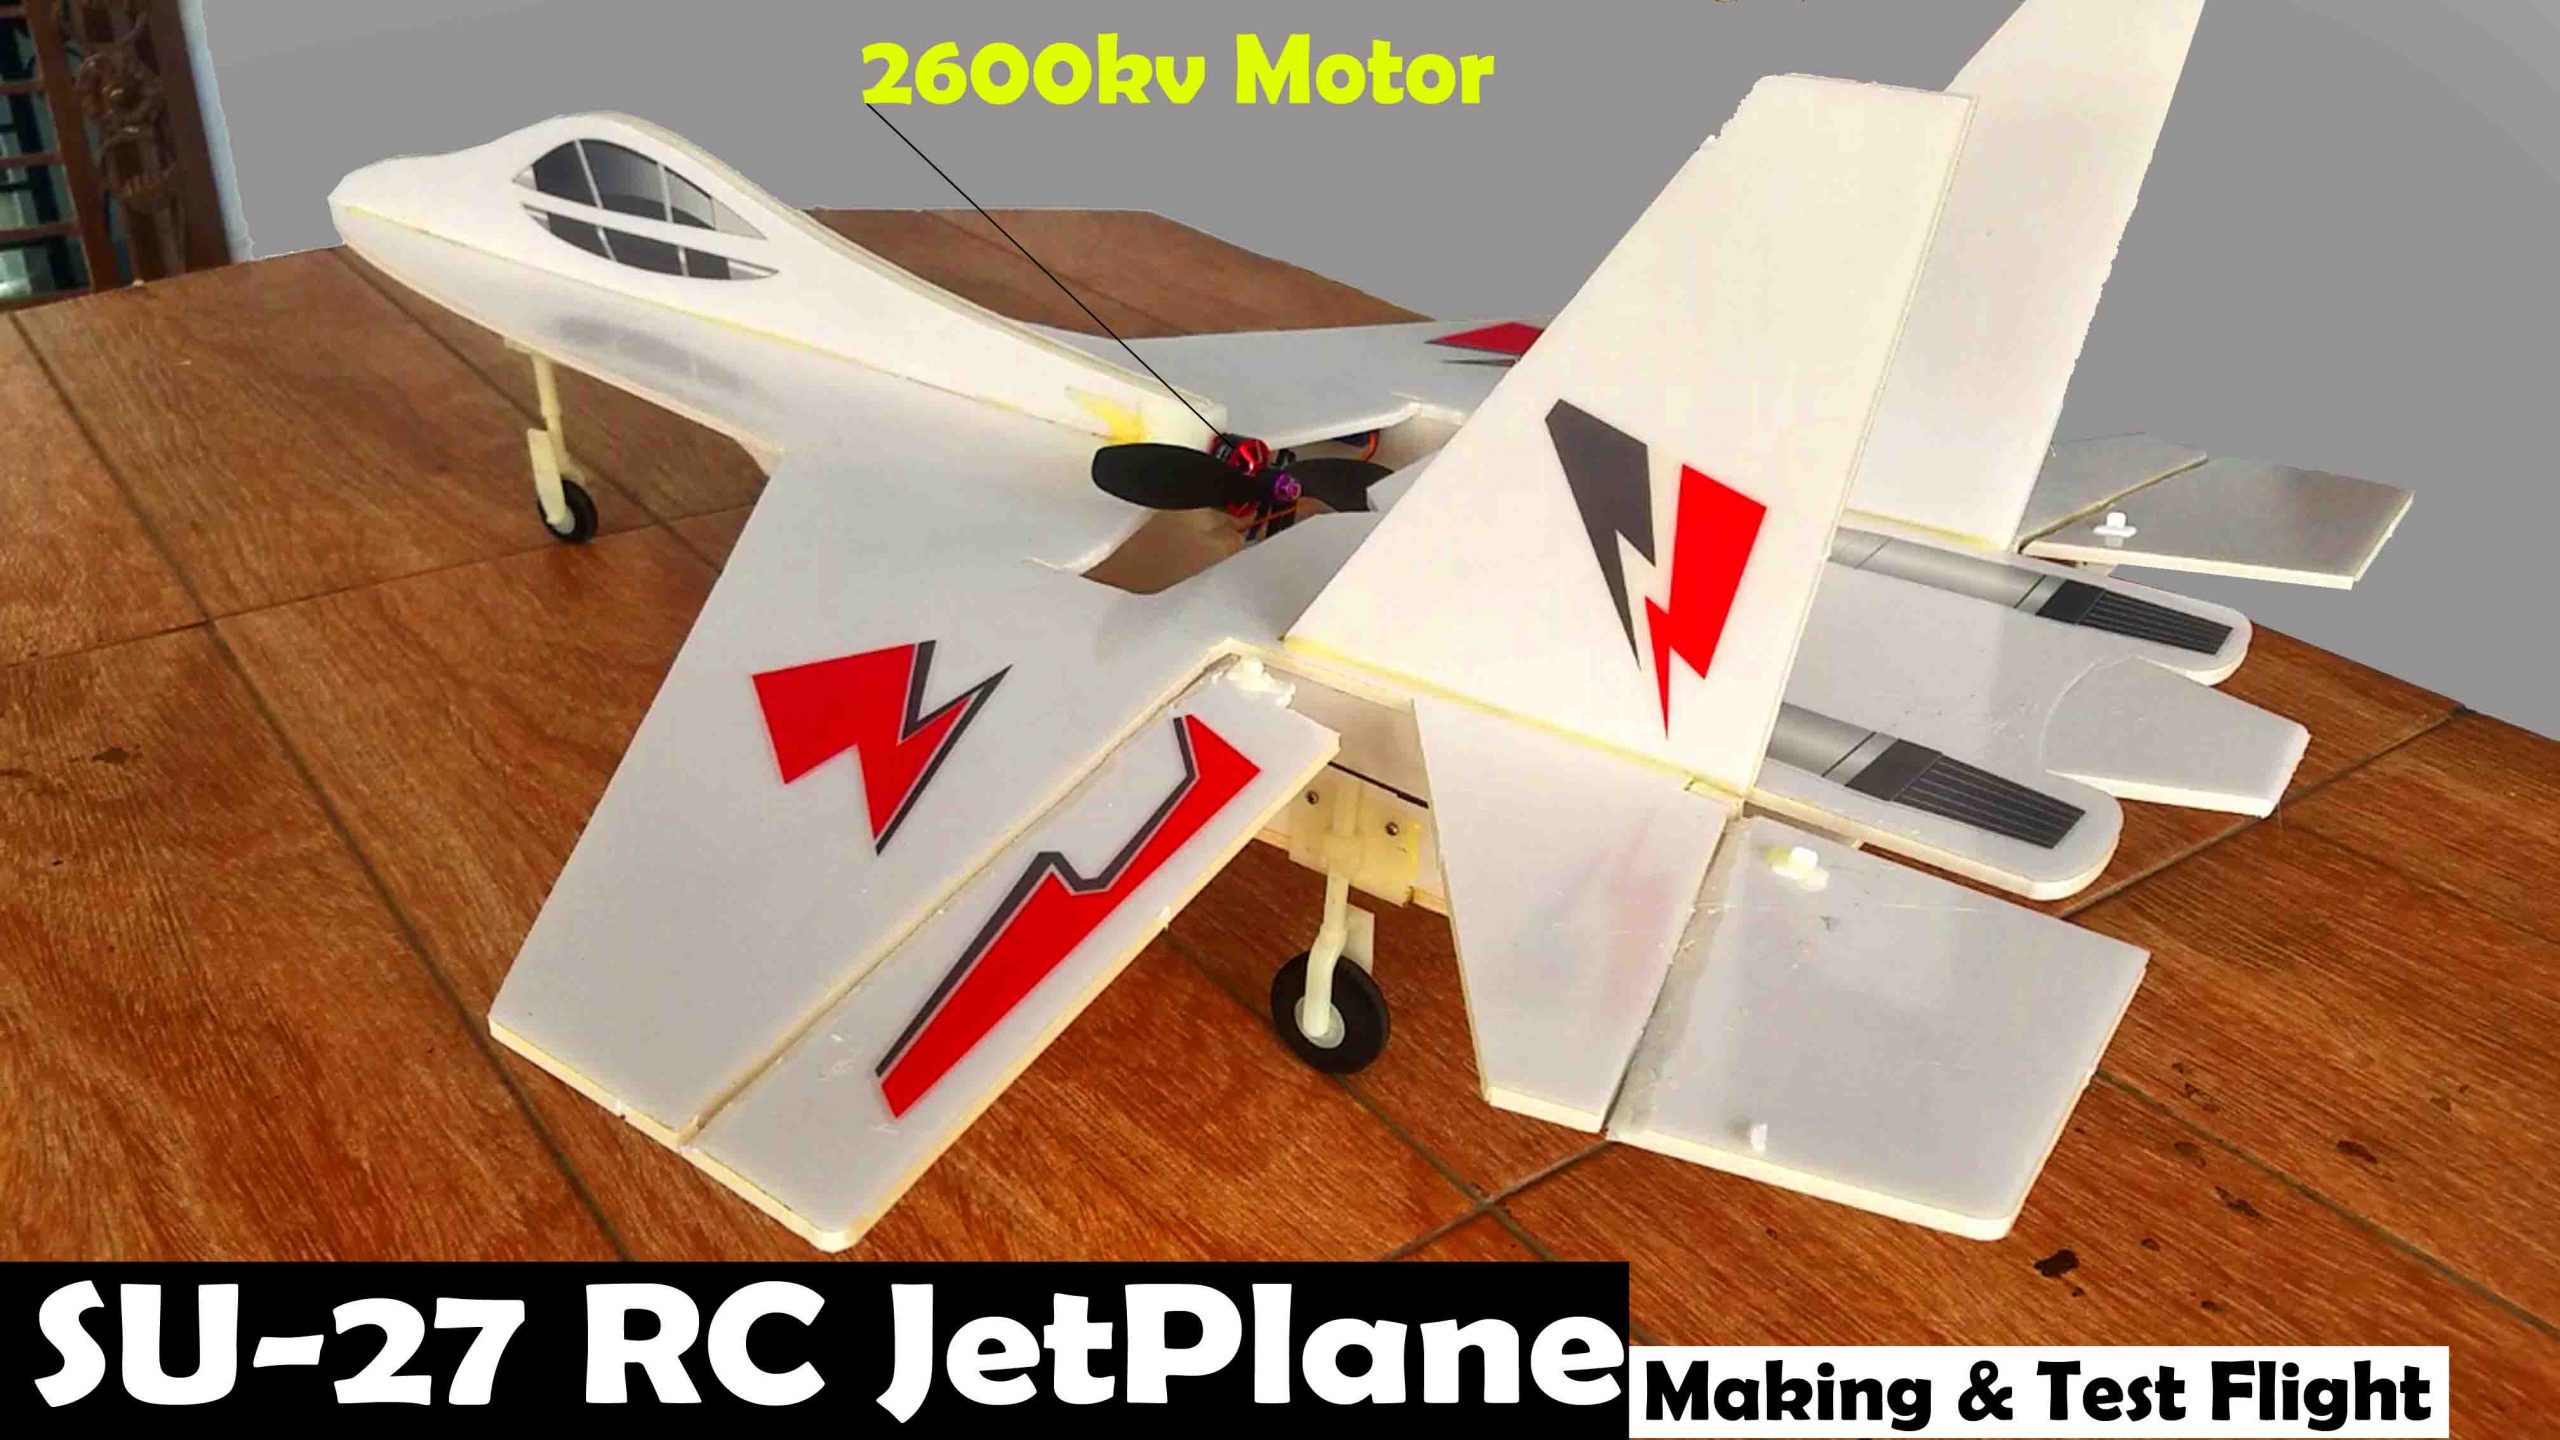
I did all the calculations and I also explained the very basics using 3d models which I designed in SolidWorks. Anyhow, after crashing this twin’s motor RC airplane I decided first to improve my piloting skills; before, I design and make new RC airplanes. So, I decided to start with the SU-27 RC Jet Plane, I purchased a readymade template, assembled all the parts, checked the control surfaces, and the center of gravity.
As usual my first attempt ended up in a crash, this was 100% my mistake. The nose part was little damaged which I fixed.
Anyhow, I corrected myself and kept reminding myself not to repeat the same mistake, and finally I learned how to fly an RC airplane. In this tutorial, I explained so many basic things which I believe as a beginner you should know and if you follow my words then you will be able to fly almost any type of RC plane. Trust me building an RC Plane is very simple, but flying an RC plane is extremely difficult if you don’t know the very basic things as I have already crashed around 4 to 5 RC airplanes. So, if you are a beginner then I highly recommend watch my previous videos and also read my articles; if you don’t want to crash your first RC airplane.
About the Sponsor, JLCPCB:

$2 for 1-4 Layer PCBs, sign up to get $18 new user coupons.
This project is sponsored by JLCPCB. Feel free to visit their website JLCPCB to not only find out what awesome PCB and Assembly services they offer, but also to easily upload your Gerber files and thus order affordable and highly quality PCBs quickly. Besides this the new members also get a 5 dollars Coupon balance. So, what are you waiting for, go and get your first prototype order for free.
As promised, after improving my piloting skills, I am back with another RC airplane which I specially designed for beginners.
This RC Plane is light weight, highly stable, and is made of Styrofoam and cardboard sheet. I will explain the design calculations, making of the airfoil, Wing, and how to properly set up, ailerons, Elevator, and Rudder. After reading this article, you will be able to design your own small, medium, or large size RC airplanes using my calculations. Without any further delay, let’s get started!!!
Amazon Purchase links:
Best RC planes and Accessories
Flysky FS i6 Transmitter and Receiver
1000KV Brushless Motor, 30A Speed controller, and Propellers
4-Hole Nylon Pin Control Horns
Balsa Wood Sheets for RC Airplane
Other Tools and Components:
Super Starter kit for Beginners
PCB small portable drill machines
*Please Note: These are affiliate links. I may make a commission if you buy the components through these links. I would appreciate your support in this way!
RC Plane Designing Calculation:
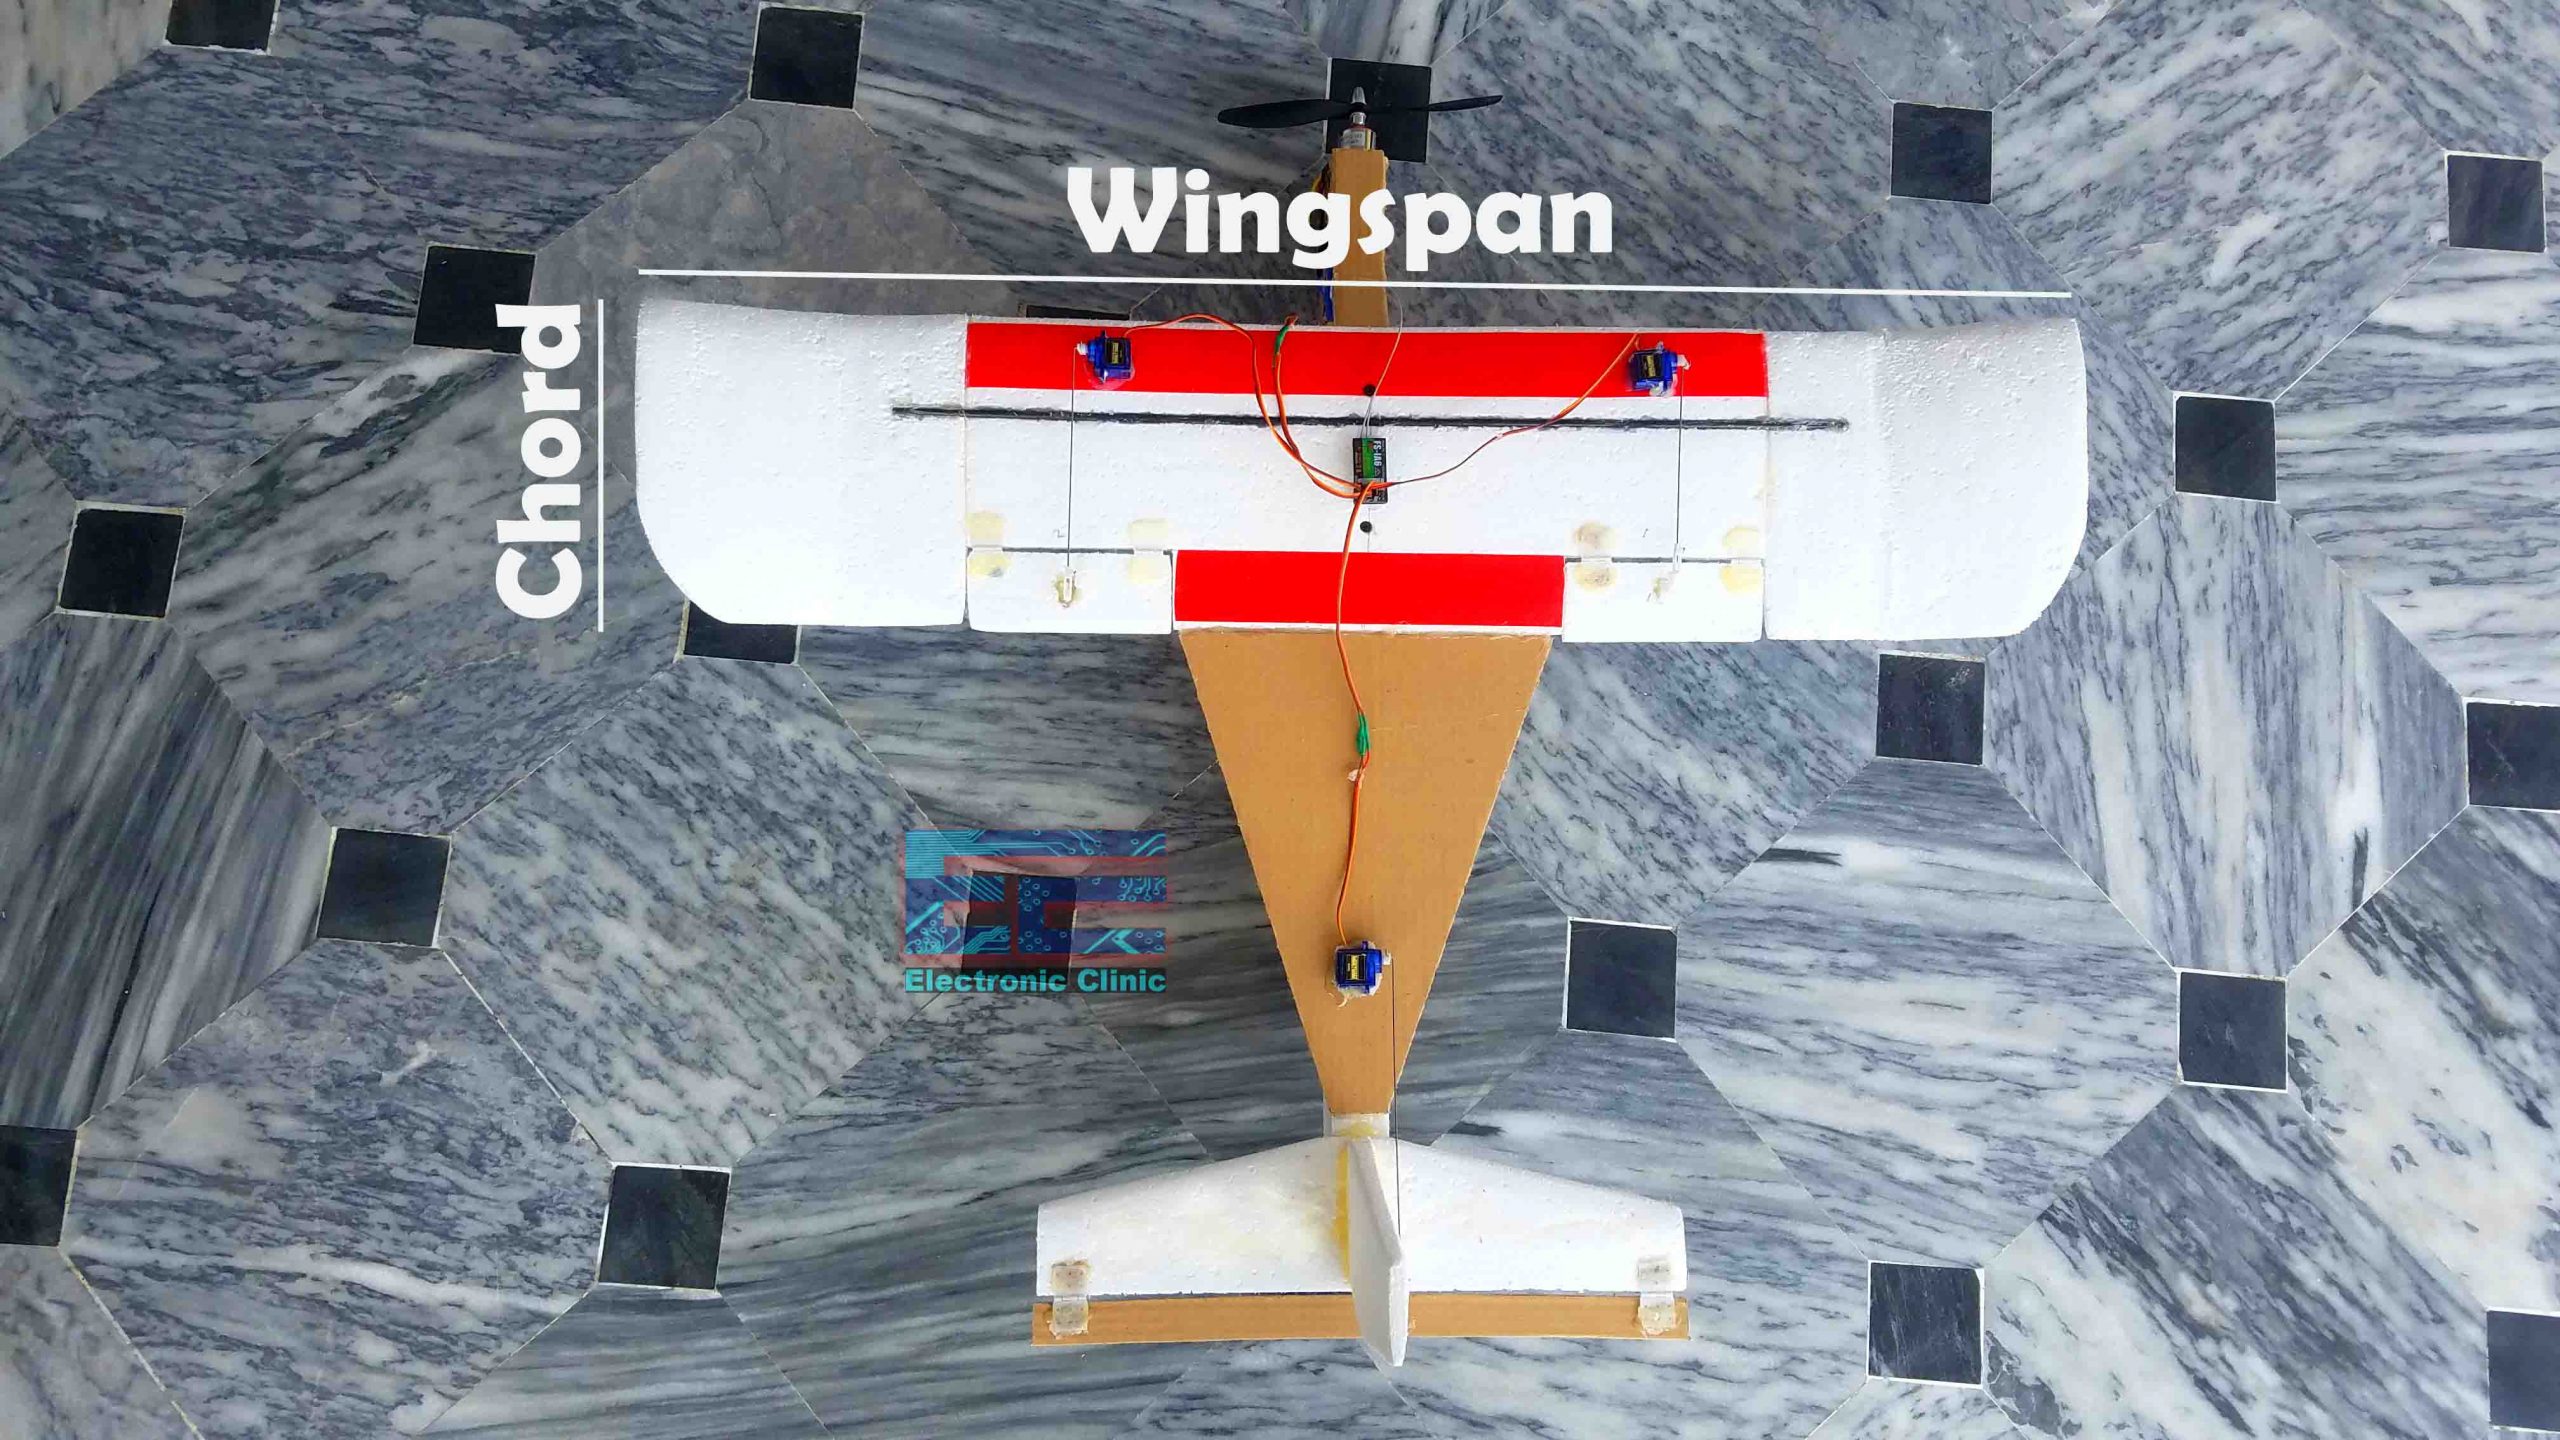
Chord Length:
While designing an RC plane, we usually start by fixing the Chord length or the Wingspan. Let’s start by fixing the chord length. So,
Chord length “C” = 8 inches
Wingspan:
Wingspan is the length of the Wing. There are a few thumb rules which are used in aero modeling. So, according to these rules the Wingspan should be 5 to 6 times of the chord length. As, our chord length is 8 inches. So, technically the wingspan should be 40 inches. This is considered to be the most recommended wingspan for the 8 inches chord which has the aspect ratio of 5 to 1. Now the question is what happens if you increase or decrease the Wingspan?
If you increase the Wingspan the gliding performance will increase, but the speed of the RC Plane will be reduced, but on the other hand if you reduce the Wingspan the gliding performance will be reduced but the speed of the RC plane will be increased.
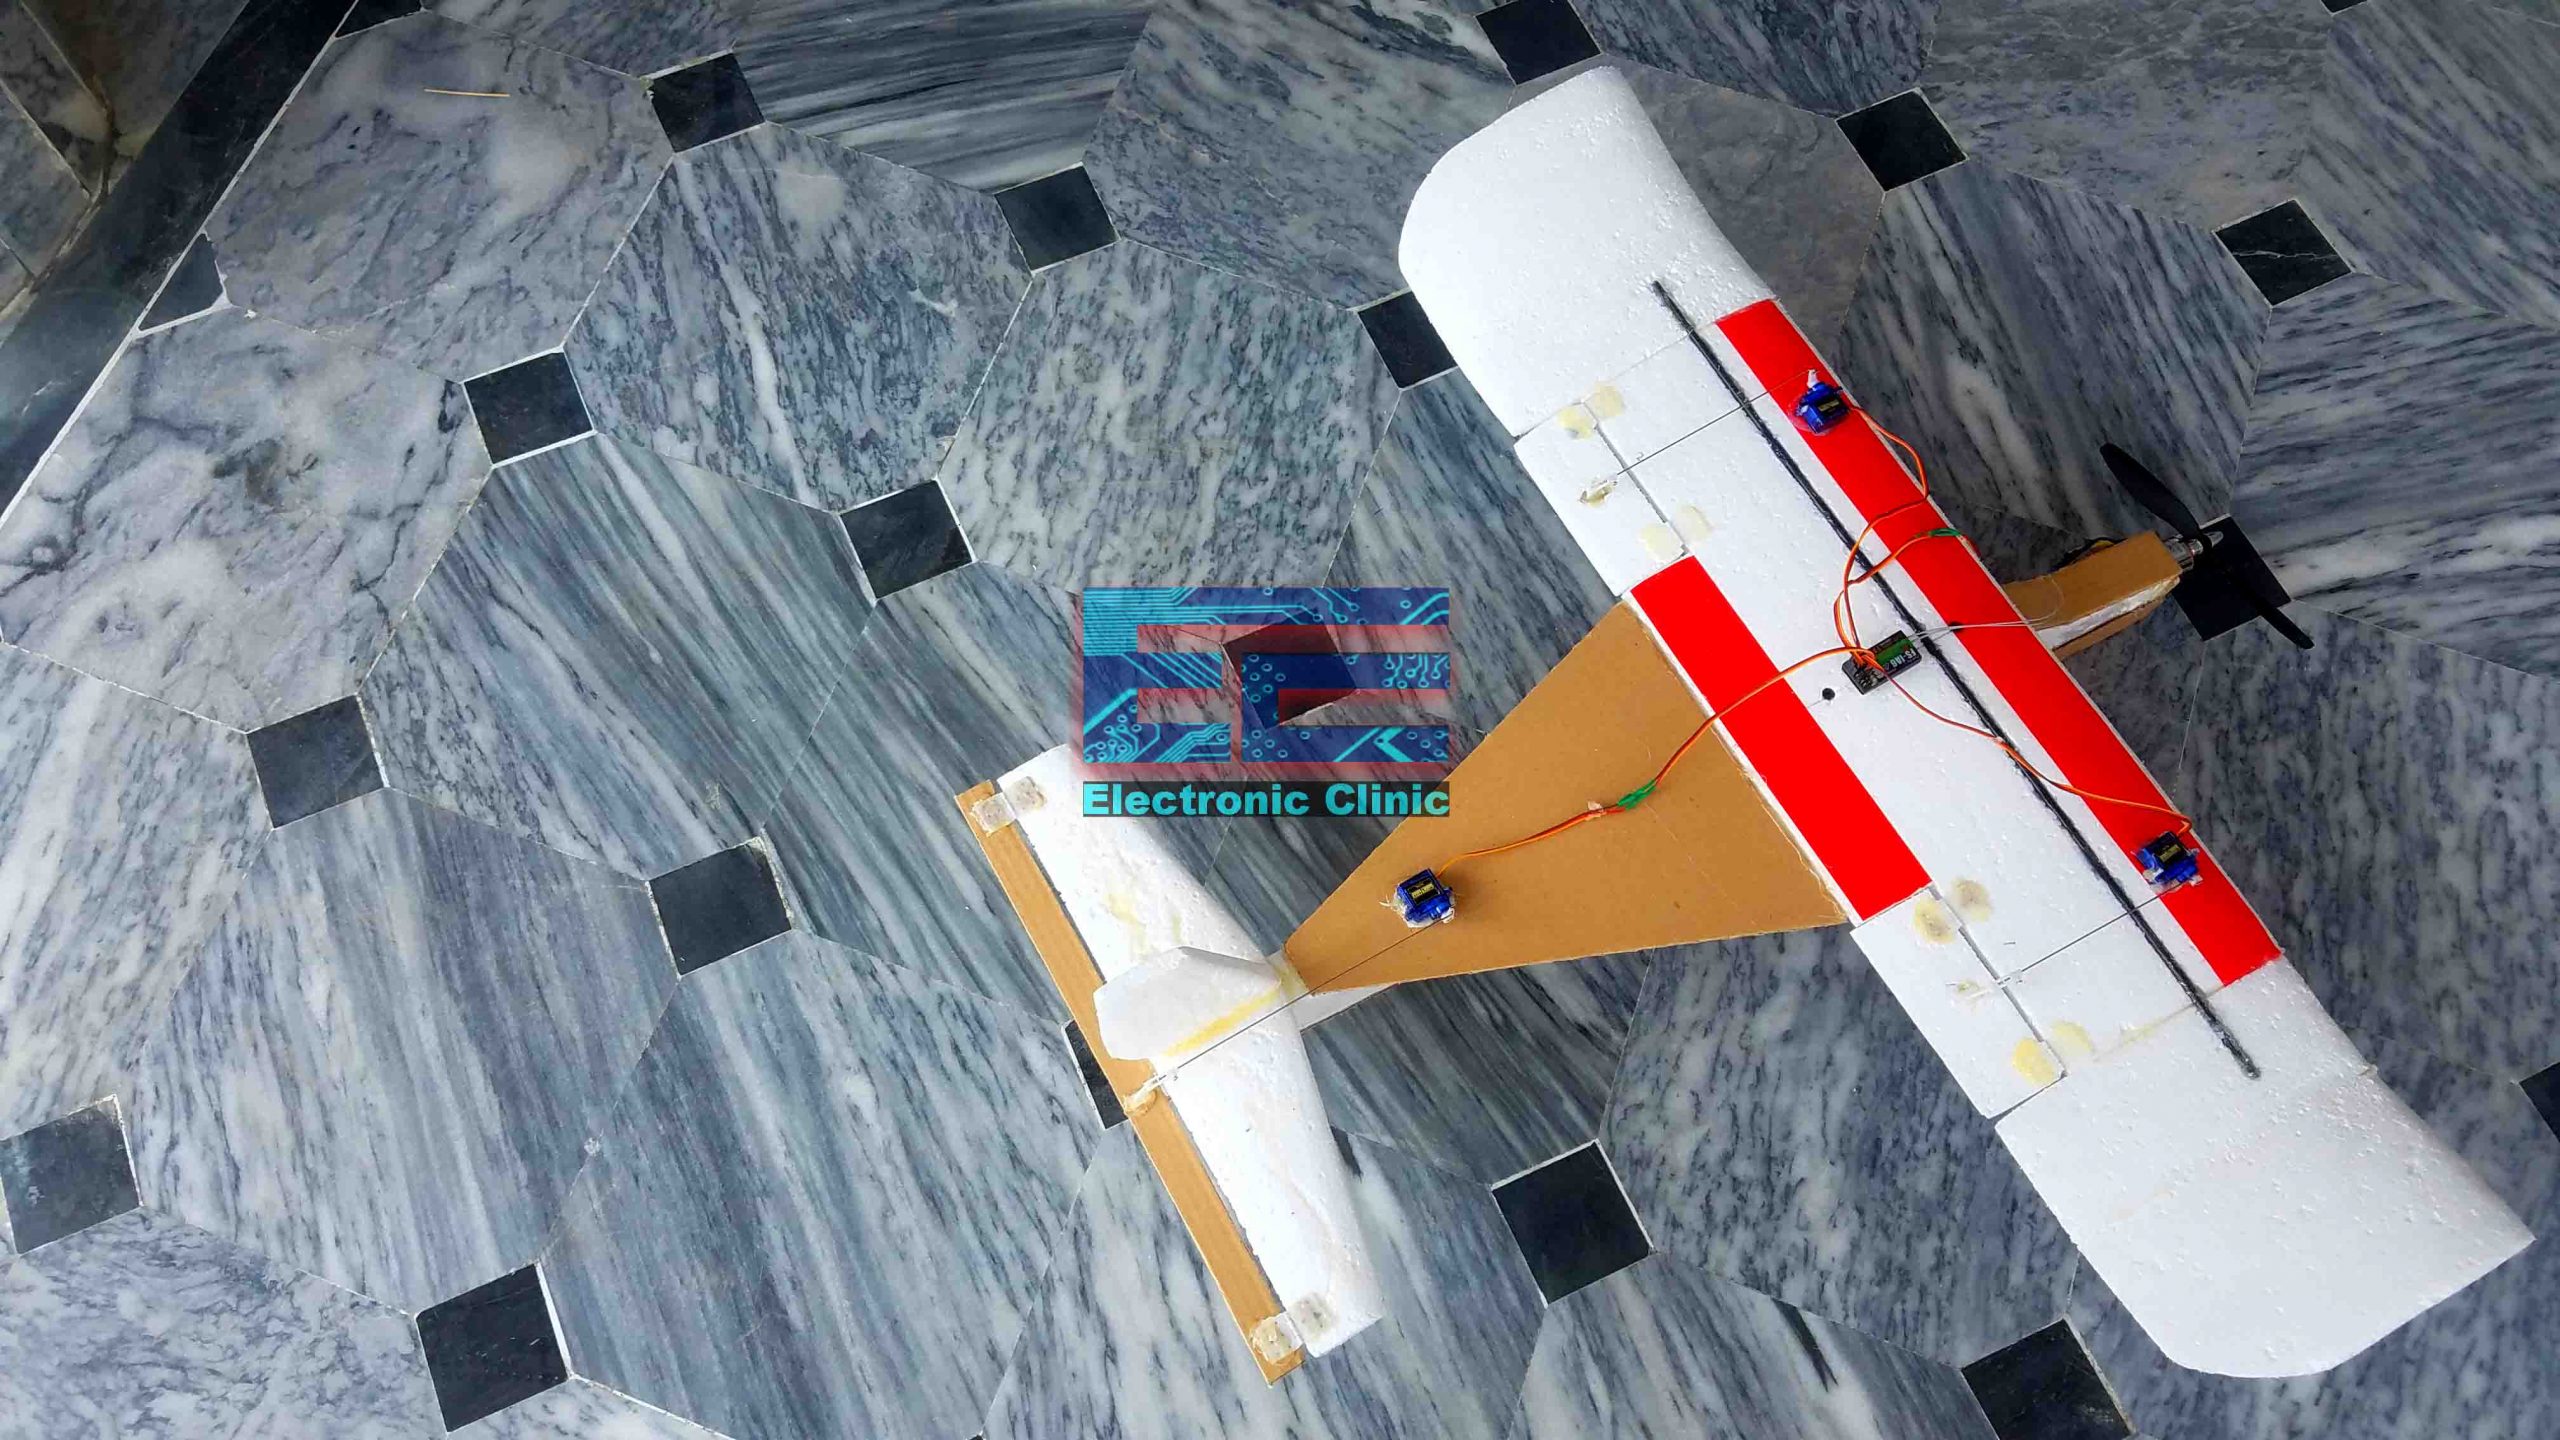
As I am designing this RC plane for beginners, so my main focus is to make it light weight, so that a normal low cost brushless dc motor can be used to lift this RC plane up in the air. I am also planning to reduce the wingspan a little to improve the speed, and for the amazing stability I am going to add the Winglets in the end of the RC Plane Wing.
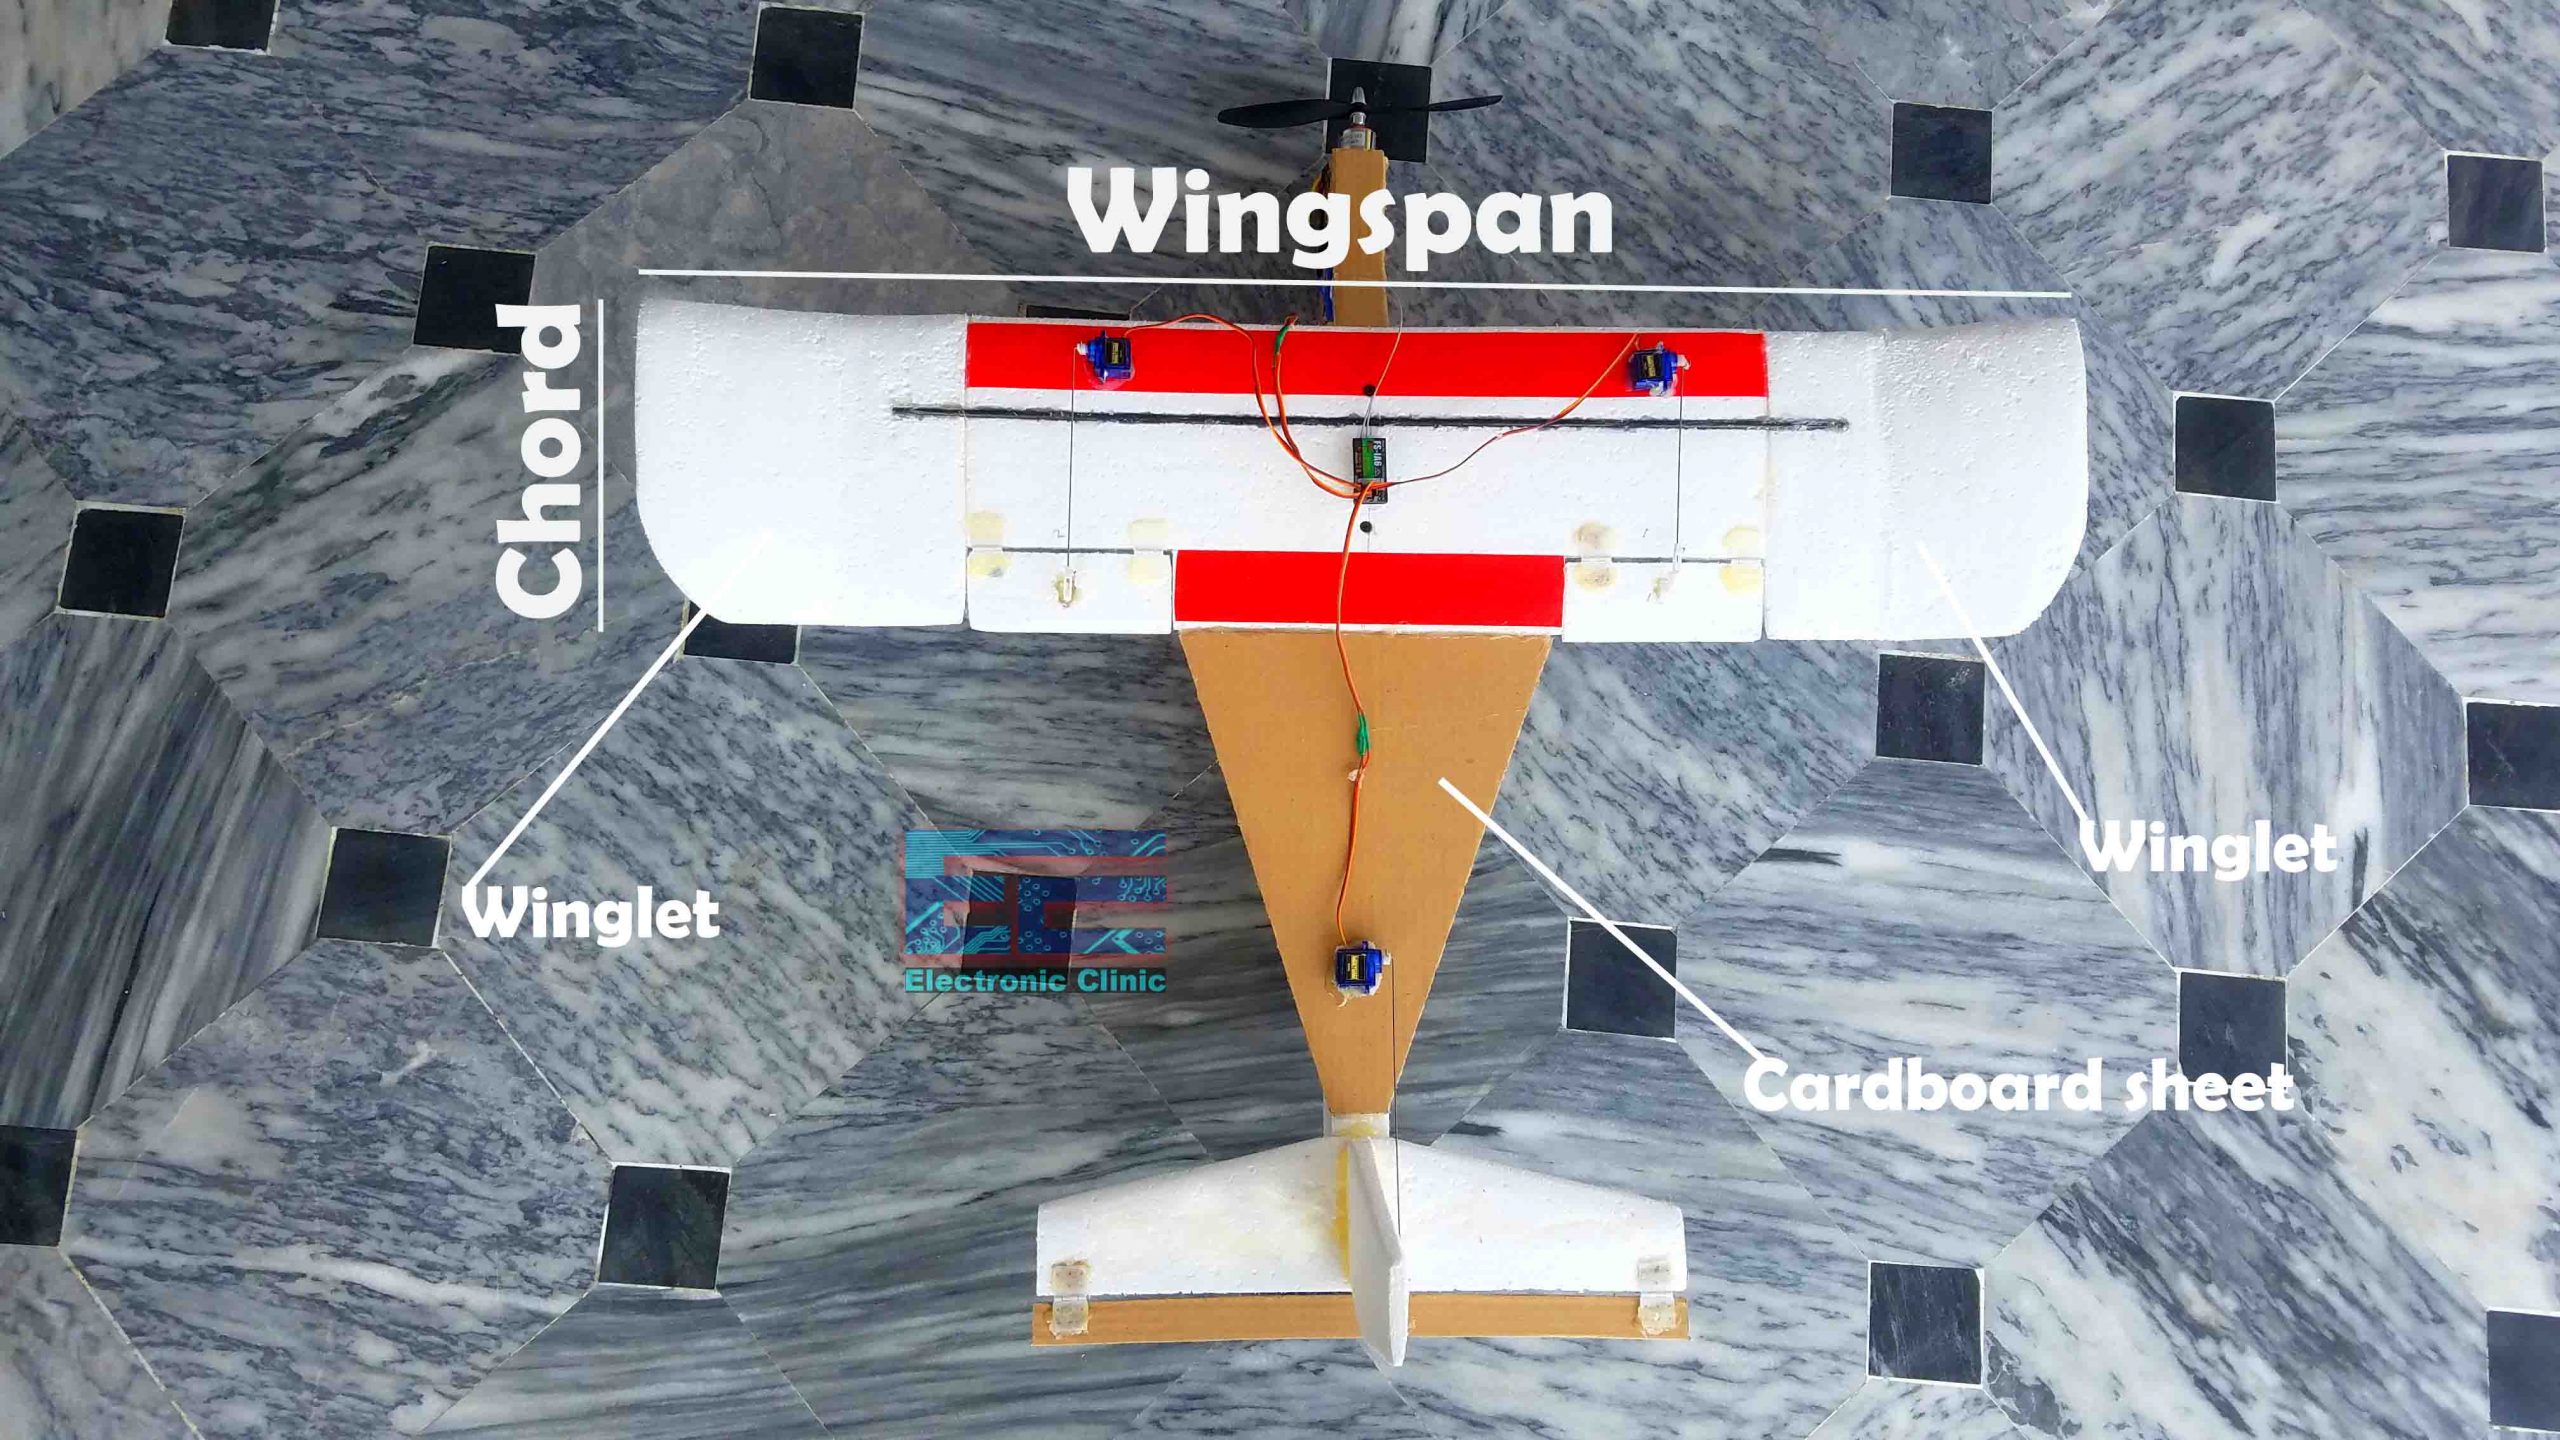
As you can see in the final model, I also added the cardboard sheet which even added more stability, so by adding the Winglets and the cardboard sheet the gliding performance of the RC plane will be amazingly increased. This is going to be really good for guys with bad piloting skills, as this plane won’t crash easily.
So, I am going to start with a wingspan of 35.5 inches.
Wingspan = 35.5 inches
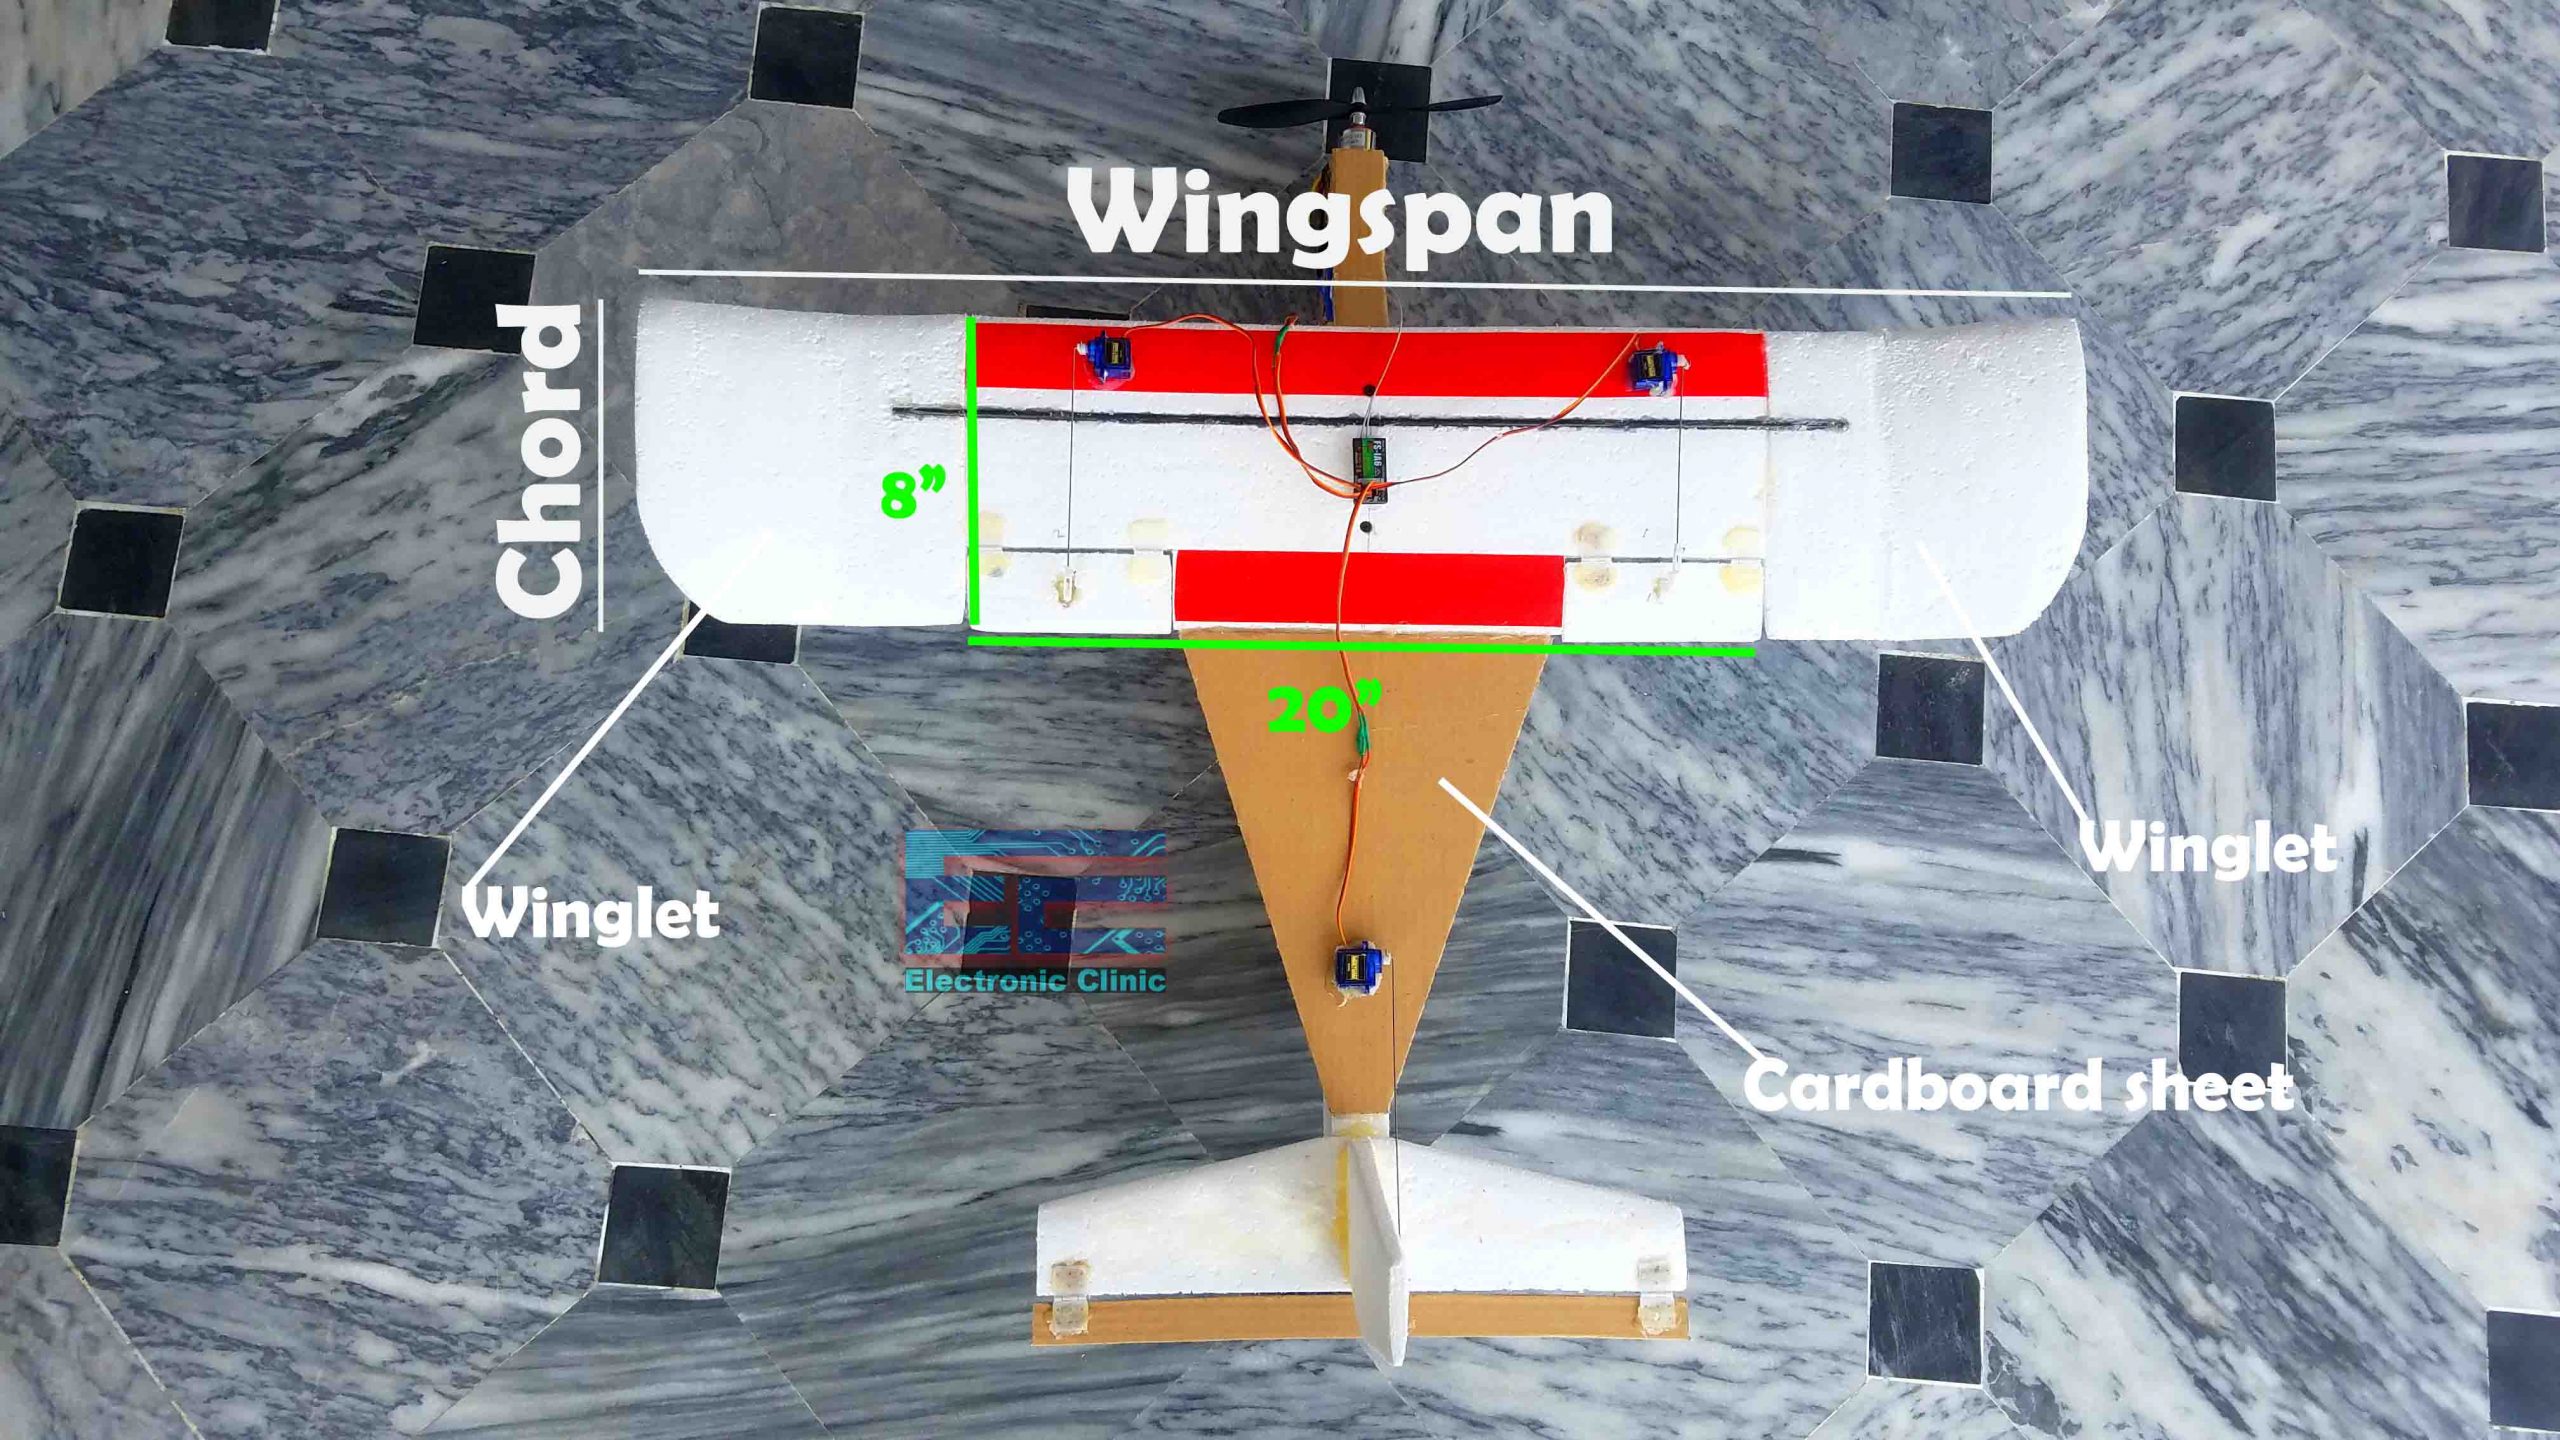
Initially I started with a 20 by 8 inches wing, to which later I attached these Winglets, and the overall Wingspan became 35.5 inches.
I used jigsaw for cutting this 1.4 inch thick Styrofoam, but you can also use a hot wire, or a Knife.
Aspect Ratio:
The Aspect ratio determines the gliding performance of the RC plane. Wingspan is directly proportional to the aspect ratio. So, as the wingspan increases your aspect ratio also increases. That is as the wingspan increases the gliding performance of your wing increases. So, for this particular RC plane the Aspect ratio is 4.44.
Aspect Ratio = (Wingspan) 2 / Wing area
Aspect Ratio = (Wingspan X Wingspan) / (Wingspan X Chord length)
Aspect Ratio = Wingspan / chord length
Aspect Ratio = 35.5 inches / 8 inches
Aspect Ratio = 4.44
Total Wing Area for Rectangular type Wing:
As we are using a rectangular type wing, so its area can be calculated by multiplying the wingspan with the chord length. So, the wing area is 284 square inches.
Wing Area = Wingspan X chord length = 35.5 X 8 = 284 square inches
Wing Area = 284 square inches
Airfoil Thickness, Flat bottom type:
In my previous tutorial, I used the KFM-2 type airfoil which is ideal for lifting heavy RC airplanes. But, as the one I am making today is light weight, so I will use the flat bottom type airfoil, and moreover this is the most commonly used airfoil.
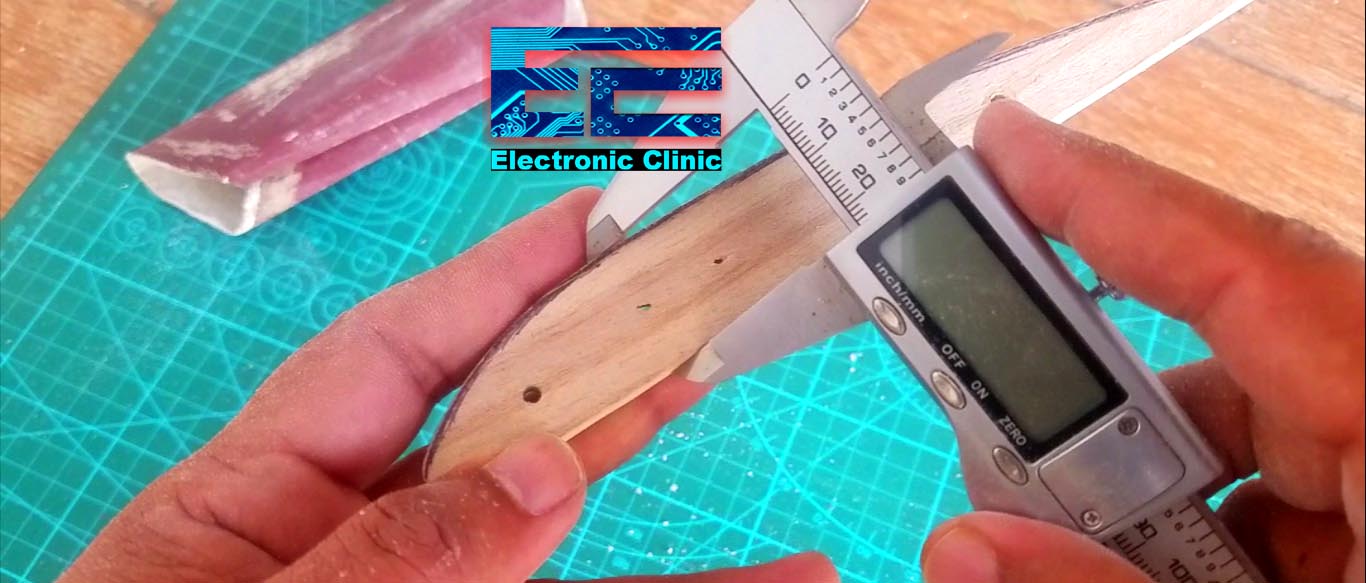
Airfoil thickness should be 12 to 15% of the chord length. So,
Airfoil thickness = 12% X 8inches = .96 inches
I started with the basic flat bottom type airfoil template. I used a sandpaper to remove the excess wood. You can see the thickness is .96inches. I made two of these, so that I can sandwitch a Styrofoam between the two airfoil templates, so that I can easily modify the block of Styrofoam into a wing. For step by step explanation watch video tutorial given at the end of this article.
You have a couple of options you can use a sand paper or a hot wire, or a knife, or a grinder, or any other method which you can think of. All you need is to give it the shape of a wing and don’t forget the airfoil thickness which is .96 inches. While sanding the Styrofoam don’t forget to wear the Mask.
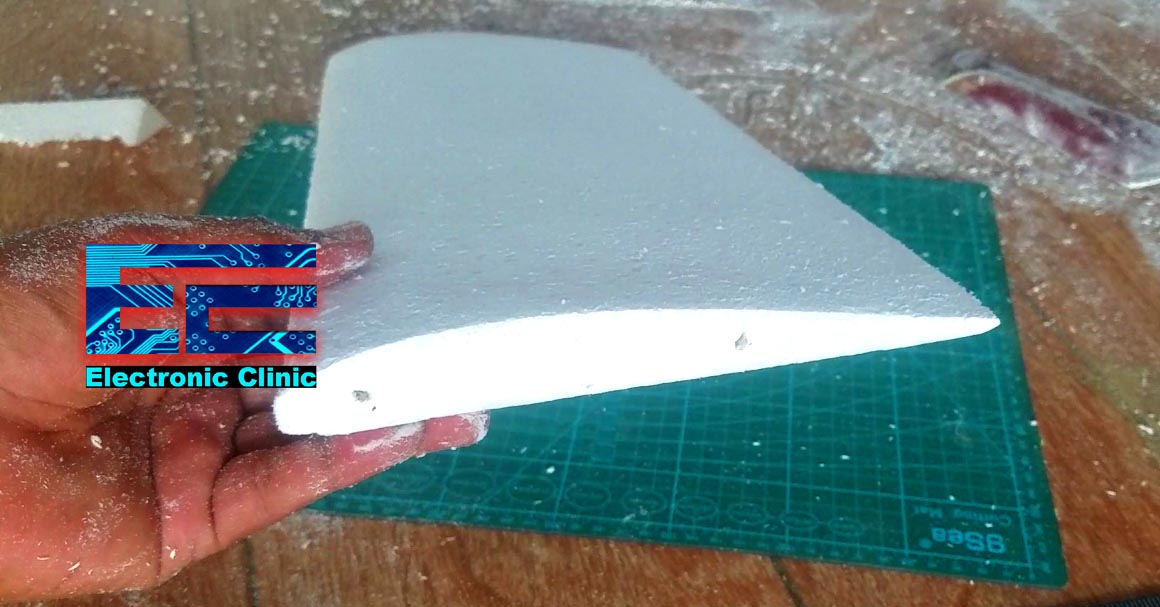
Our 20 inches long wing with a chord length of 8 inches, and airfoil thickness of .96 inches is ready. Now we will add 7.75 inches Winglets on both sides of the wing to make it 35.5 inches long.

Each Winglet is 7.75 inches. Each winglet is made of two parts glued together at an angle of 45 degrees. Now all you need is to glue these Winglets and your wing is ready. Which I am sure you can do it easily. So, this is how the wing look after attaching the Winglets. Next we are going to talk about the sizing of the Control surfaces Ailerons.

Sizing of the Control Surfaces, Ailerons:
The Ailerons size should be ¼ of the Wingspan. So
Ailerons size = ¼ x 35.5 inches = 8.9 inches
So, as per the 35.5 inches wingspan the ailerons size should be 8.9 inches. But, As I said earlier this RC plane is for beginners and you know such long size ailerons can be very responsive which may lead to a crash. So, I am going to reduce the size to 5 inches to make it less responsive when you move the control stick. But if you have good piloting skills then you should use 8.9 inches long Ailerons. But for now I will continue with 5 inches.
The width of the ailerons should be ¼ of the chord length. Our chord length is 8 inches. So
Ailerons width = ¼ x 8 inches = 2 inches.
So, the Ailerons on the Left and Right sides of the Wing are 5 inches long and 2 inches wide.
Fuselage Length:
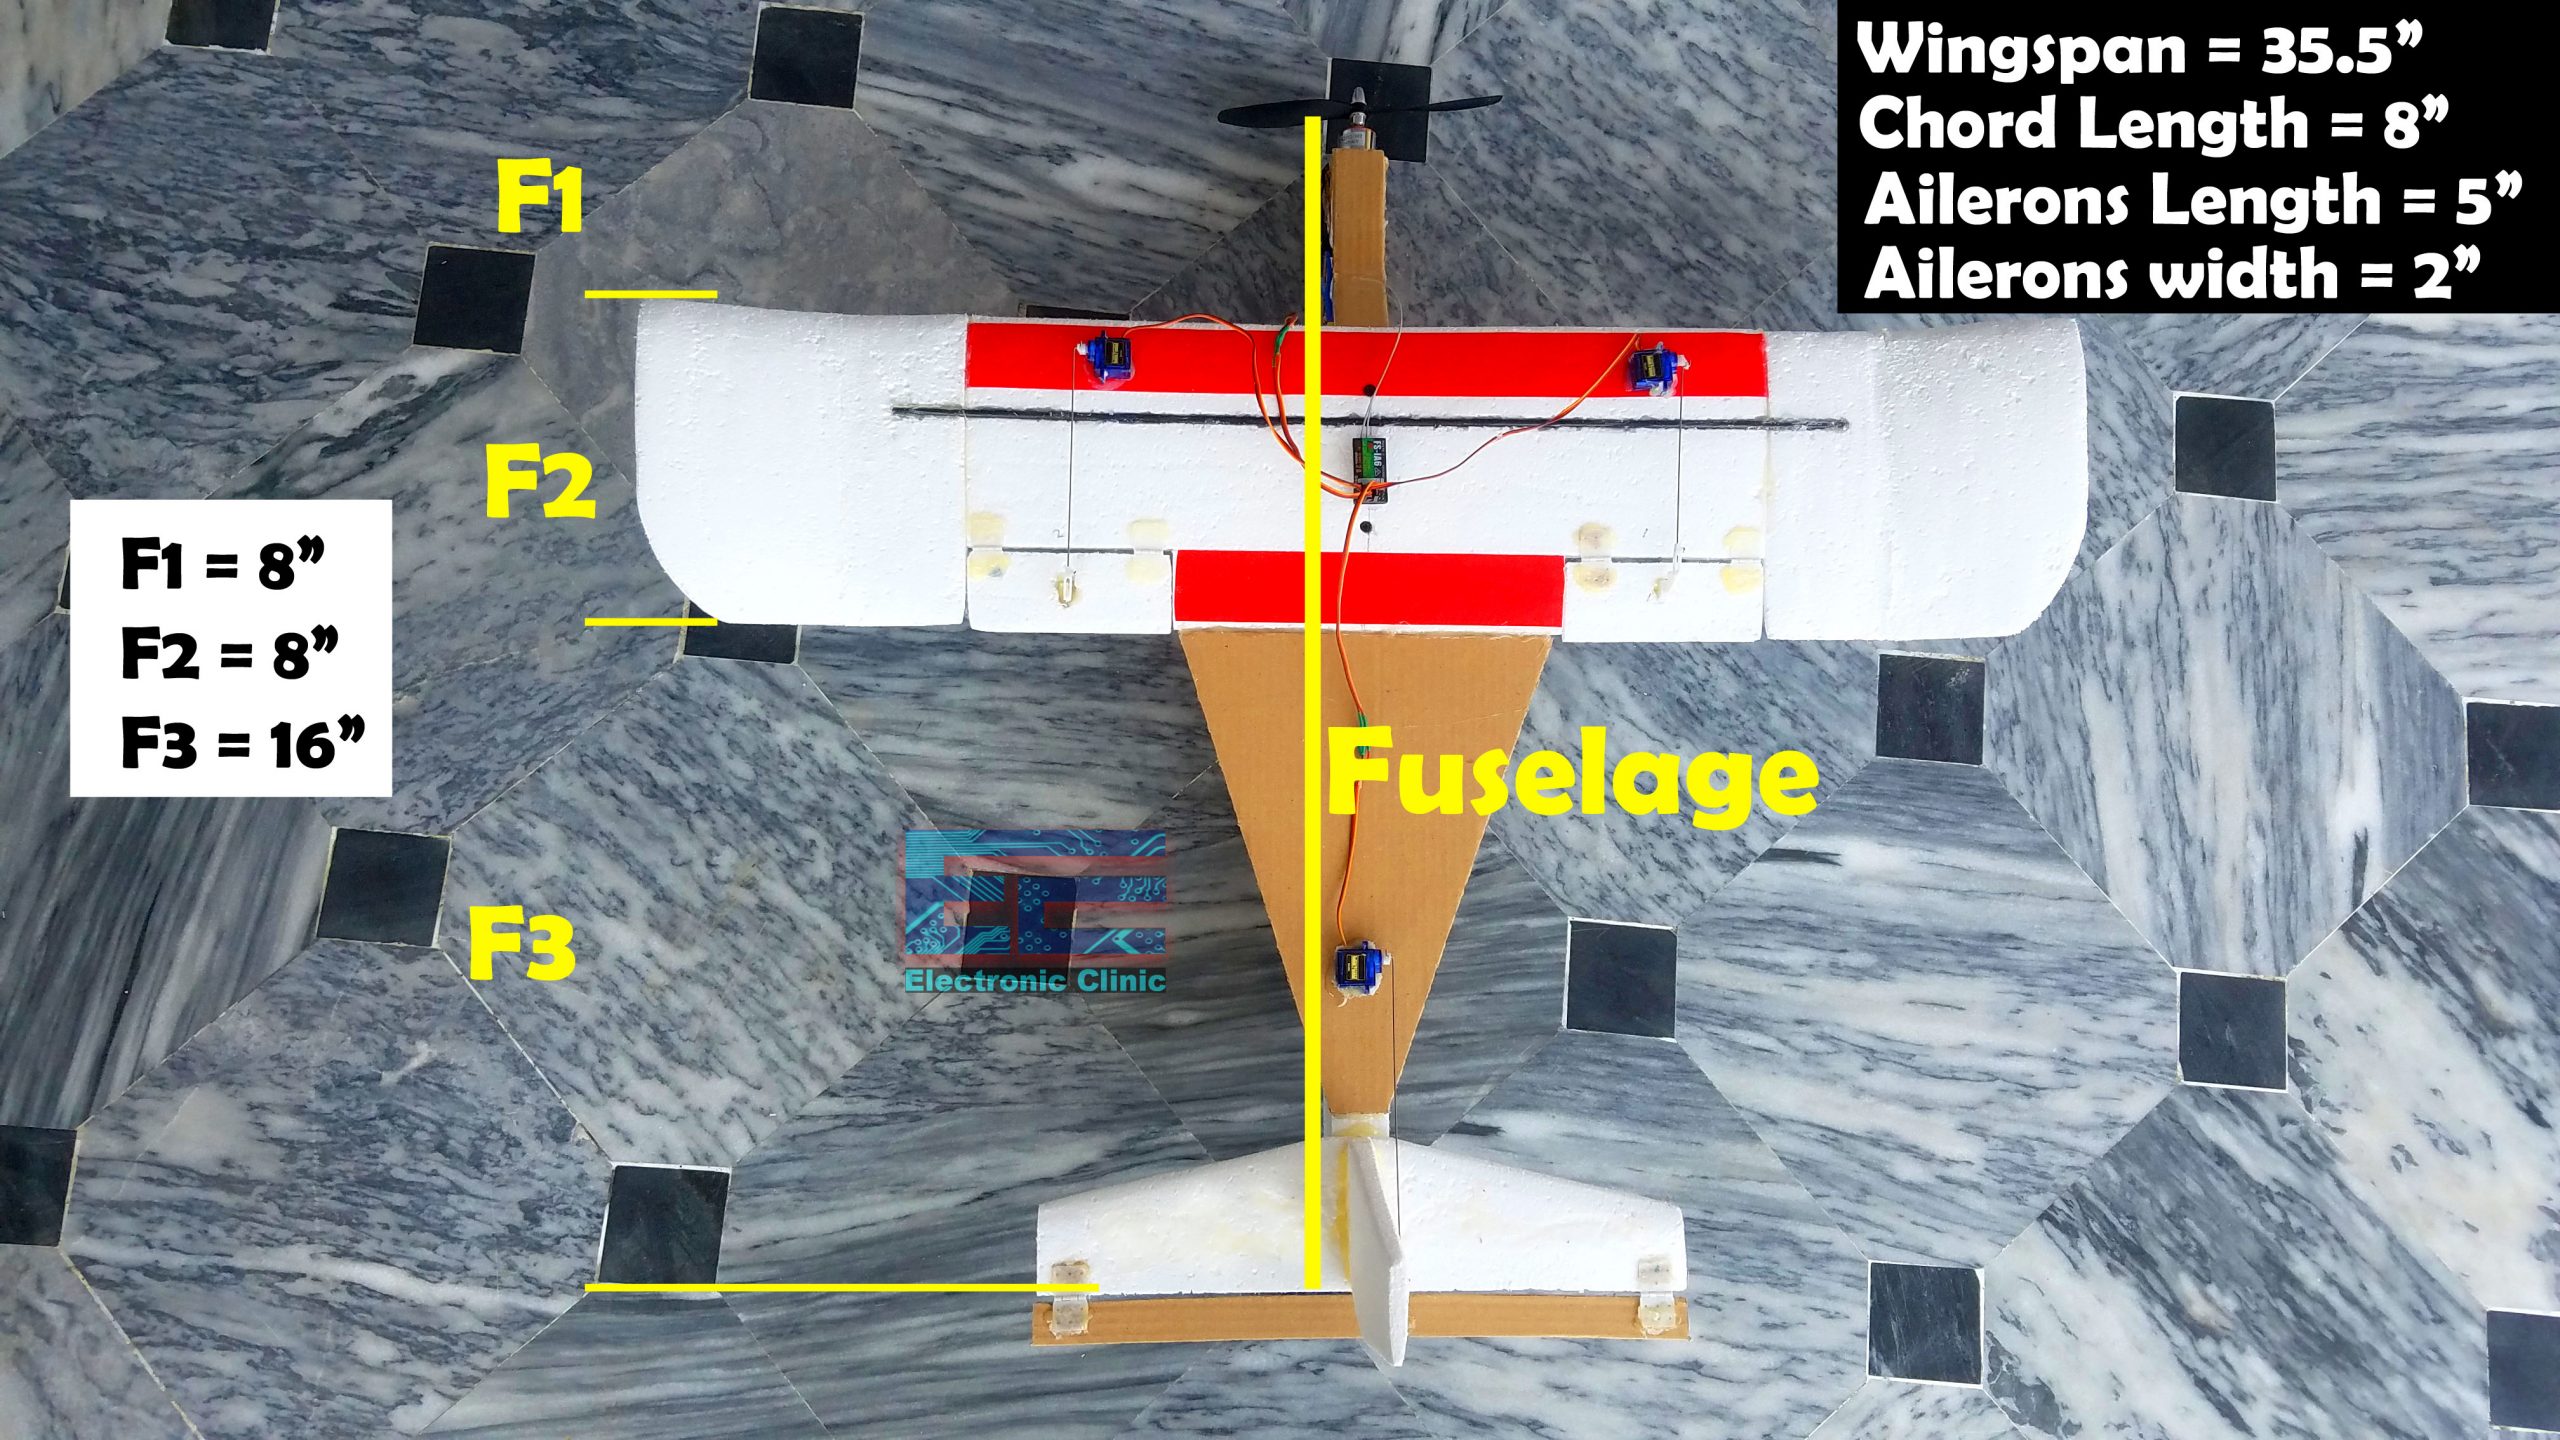
The fuselage length is calculated from the wing chord. Our Wing chord is 8 inches.
The fuselage is divided into 3 parts. F1, F2, and F3.
F1 is the Nose length and it should be around 1 to 1.5 times the chord length. It should be measured from the back of the motor prop to the leading edge of the wing. So
F1 = 8 inches
F2 is the Chord length itself, so
F2 = 8 inches
F3 is the tail length and it should be 2 to 3 times the chord length, and it is from the wing trailing edge to the trailing edge of the horizontal stabilizer. So,
F3 = 2 x 8 = 16 inches
So,
F3 = 16 inches
Fuse length = F1 + F2 + F3 = 8 + 8 + 16 = 32 inches
So the total fuselage length should be 32 inches including the brushless motor size.
Fuselage Height:
The fuselage height should be 10 to 15% of the fuselage length. So,
I am going to select 13%
Fuselage Height = 13% X 32 = 4.1 inches
Fuselage Height = 4.1 inches
I will do some sanding, to get around 4 inches, which is just fine.
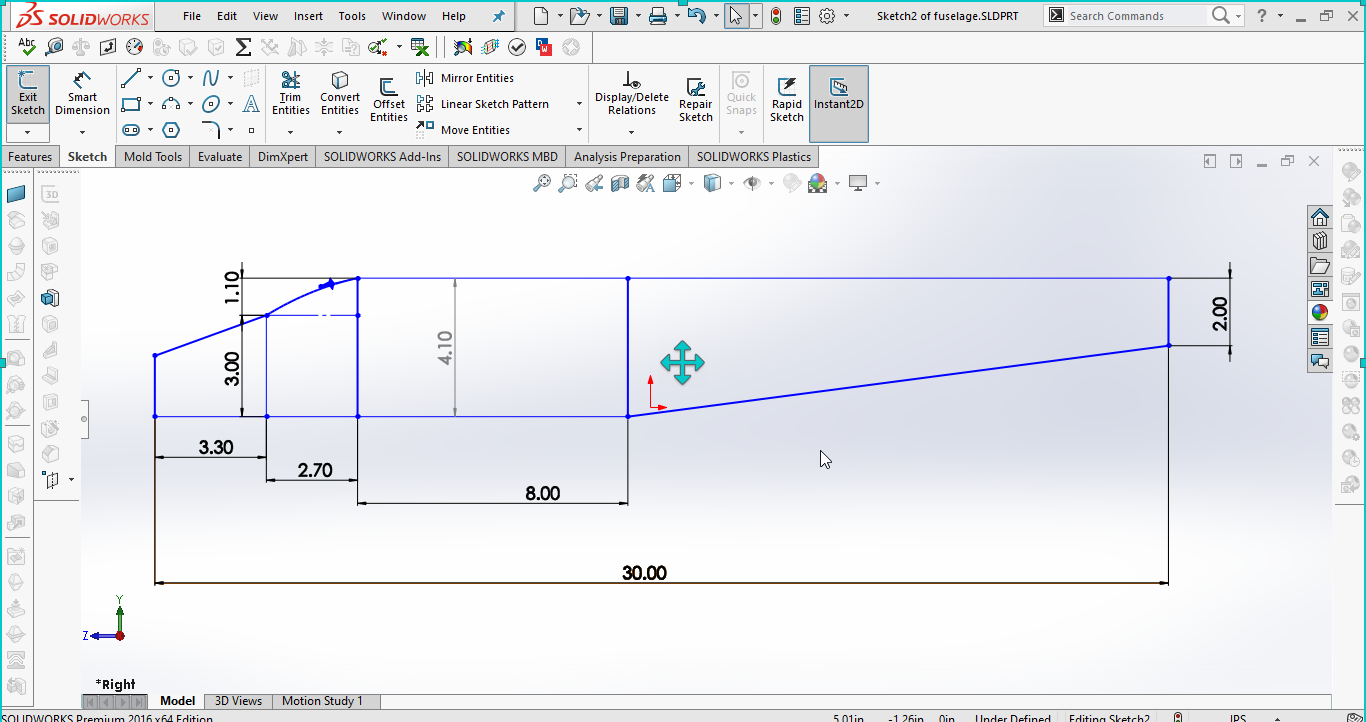
I draw a basic sketch in the SolidWorks designing software for shaping the fuselage. Right now you can see the fuselage length is 30 inches, because currently the brushless motor is not added. After adding the motor the length will become 32 inches.
You can play with the shape of the fuselage; you can modify the nose part and the bottom part. I draw the same sketch on the cardboard sheet to make a template for cutting the Fuselage. As you know the Styrofoam’s are quite fragile so I added strips of cardboard sheet on the top and sides.
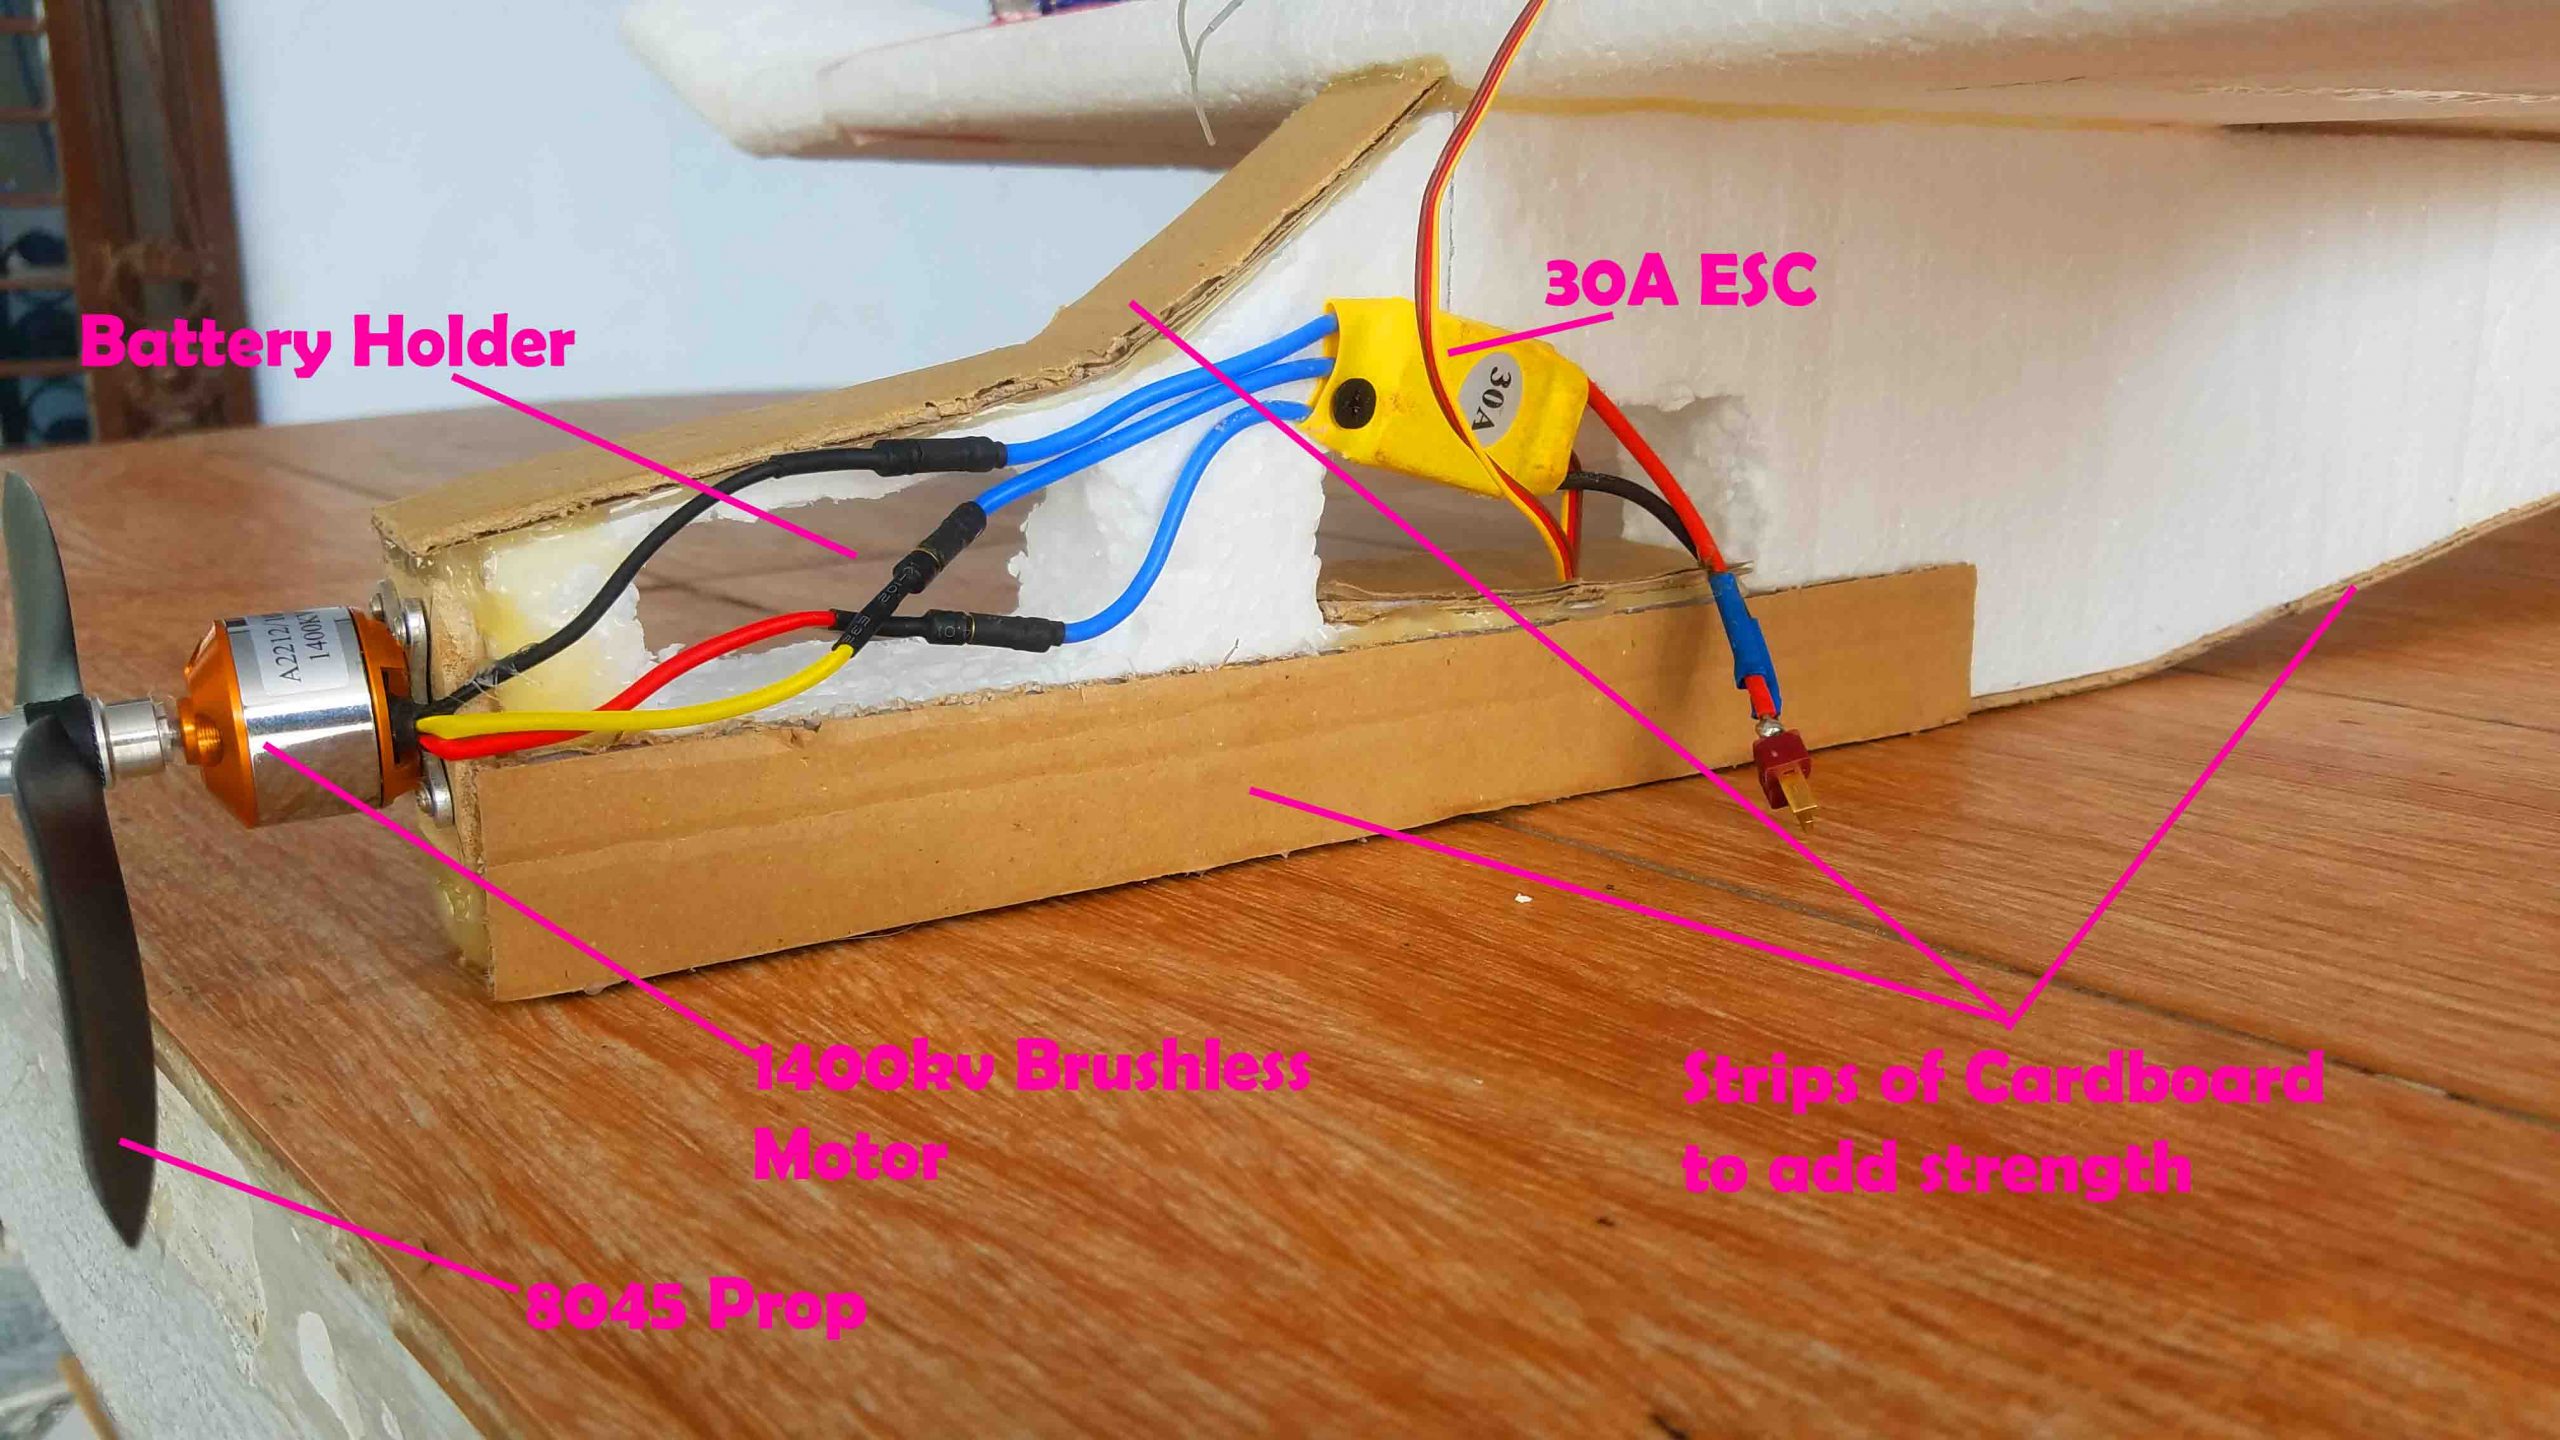
I also made this opening for the lipo battery, so this is going to be the battery holder. I also added the card board on the bottom side. This will add strength to the RC Plane. The weight will increase a few grams but it doesn’t matter.
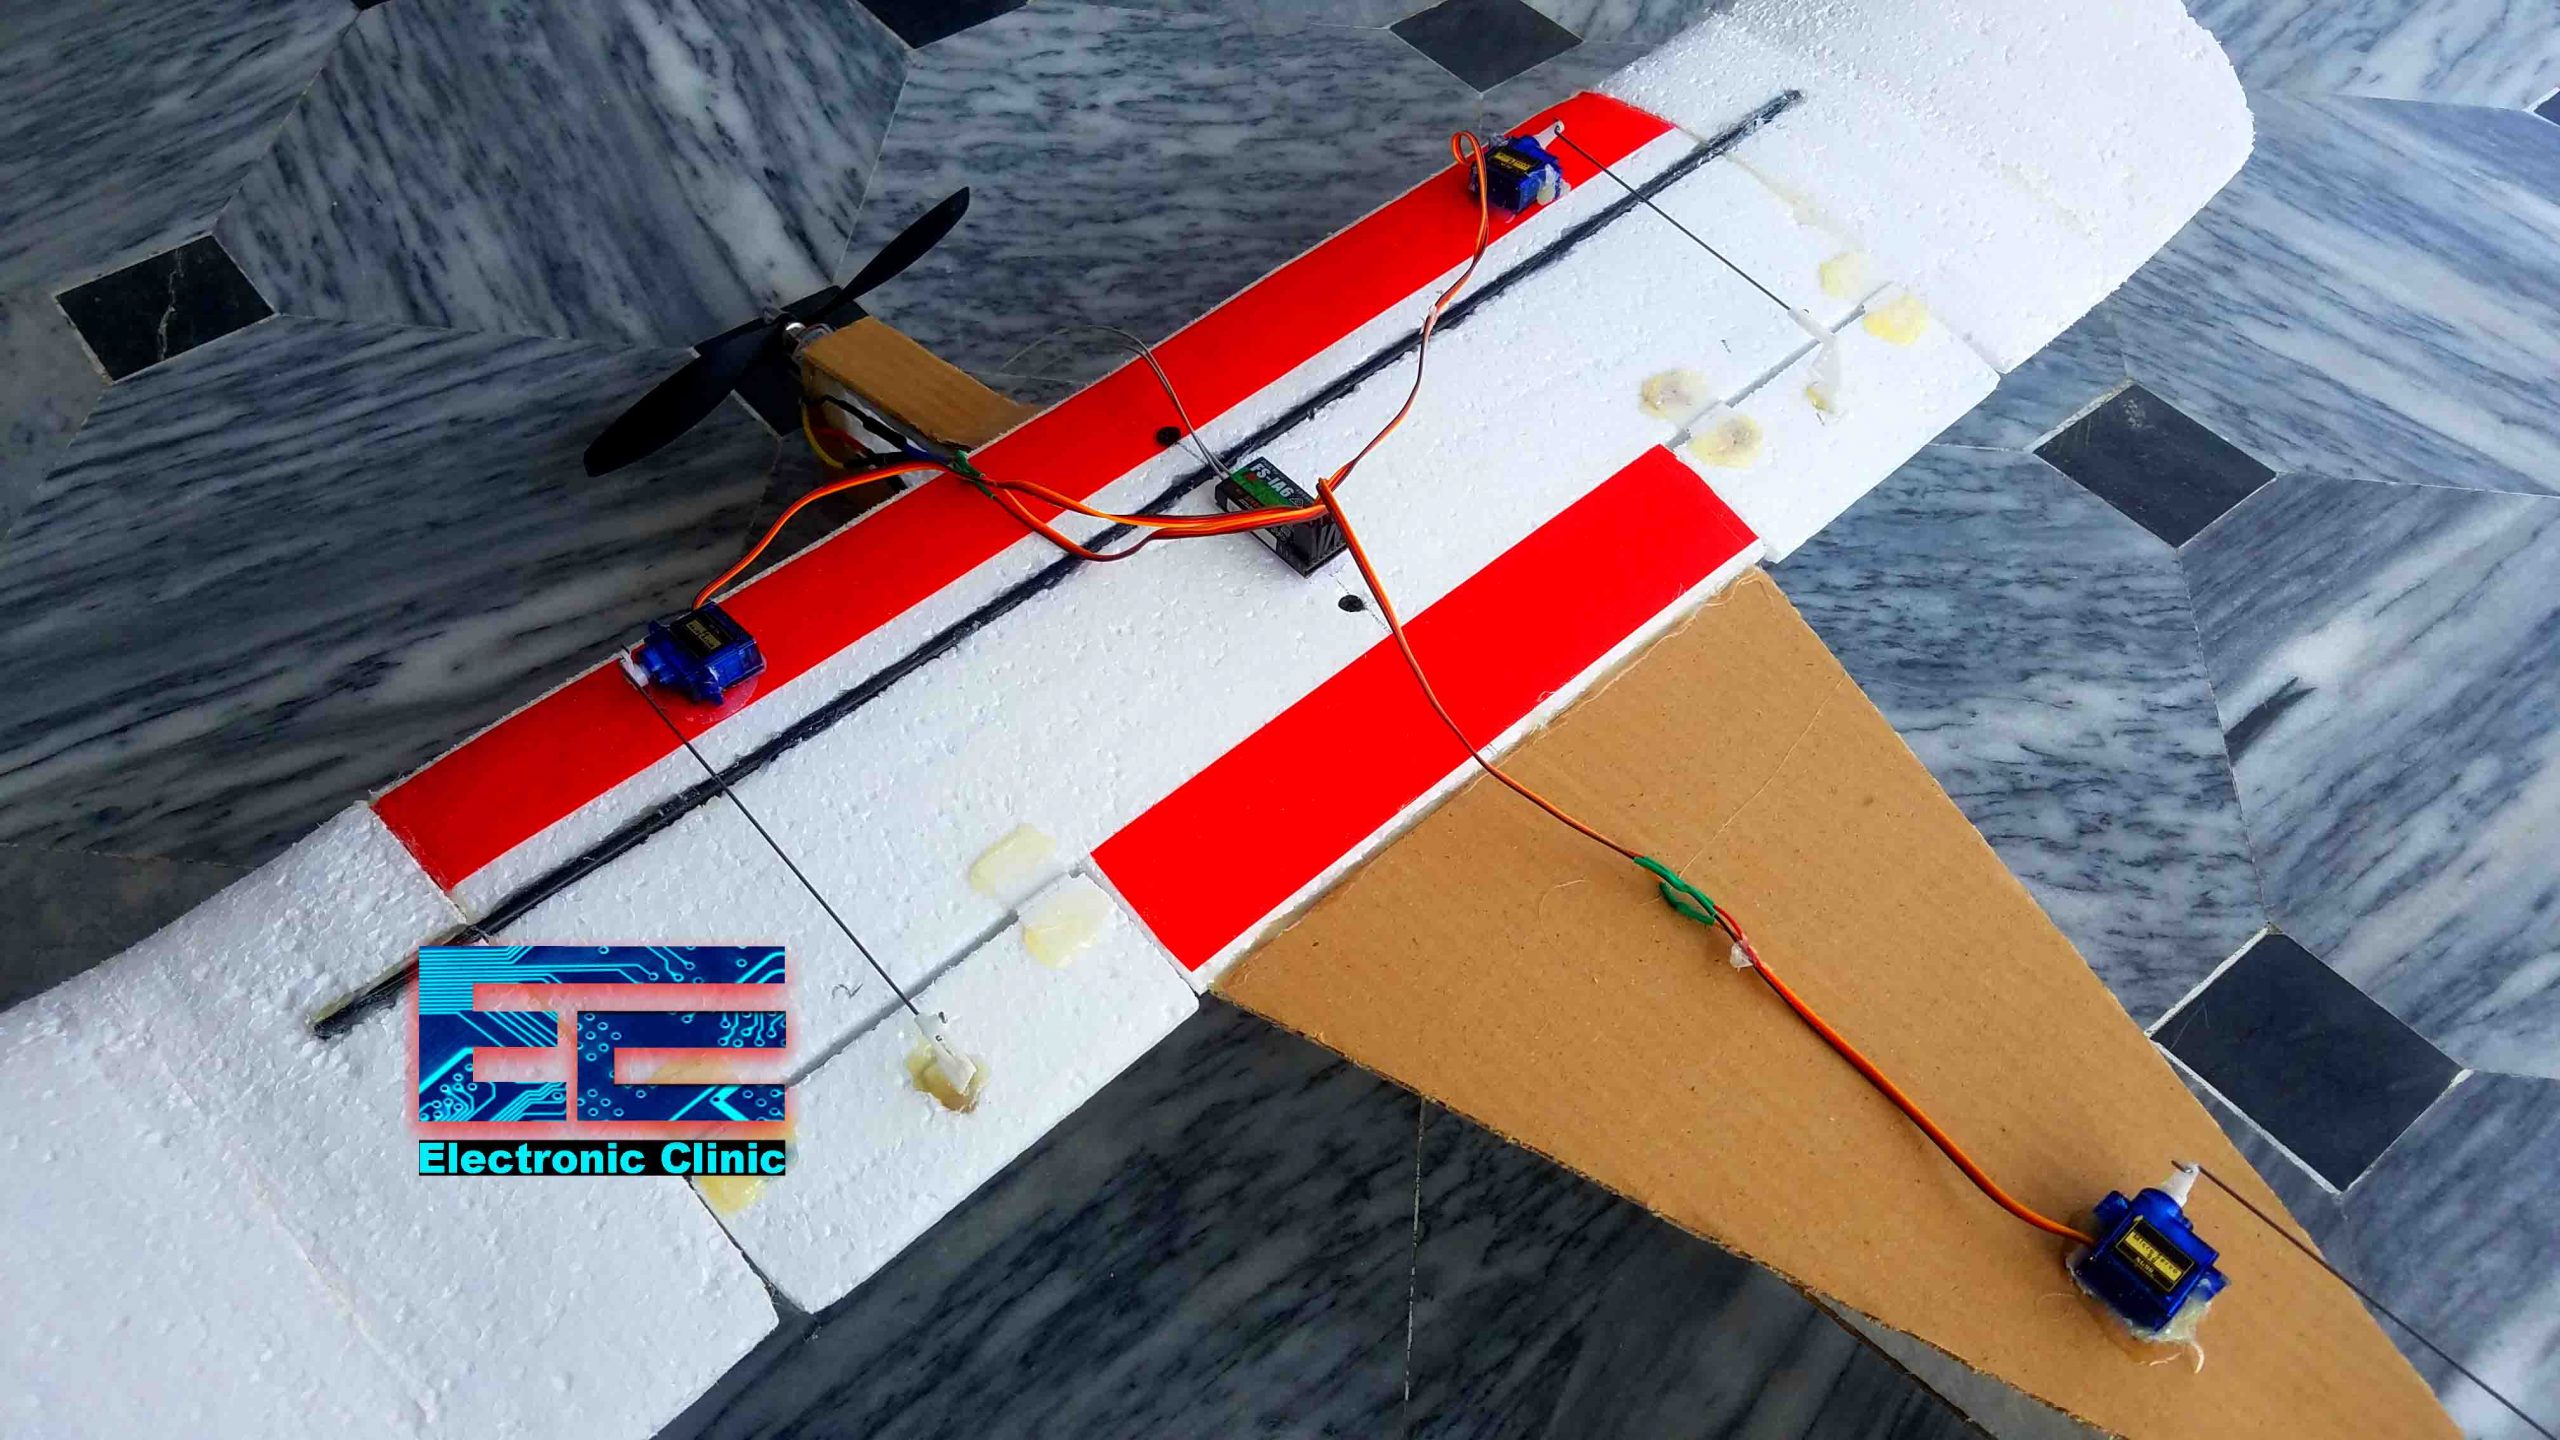
Fixing the Brushless Motor:
I am using the 8045 Propeller with the 1400kv brushless motor. Now, let’s take a look at the sizing of the horizontal and vertical stabilizers.
Horizontal Stabilizer Area:
The horizontal stabilizer area should be 15 to 20% of the Wing Area.
Our calculated wing area was 284 square inches, so
Horizontal Stabilizer area = 284 X 15% = 42.6 square inches
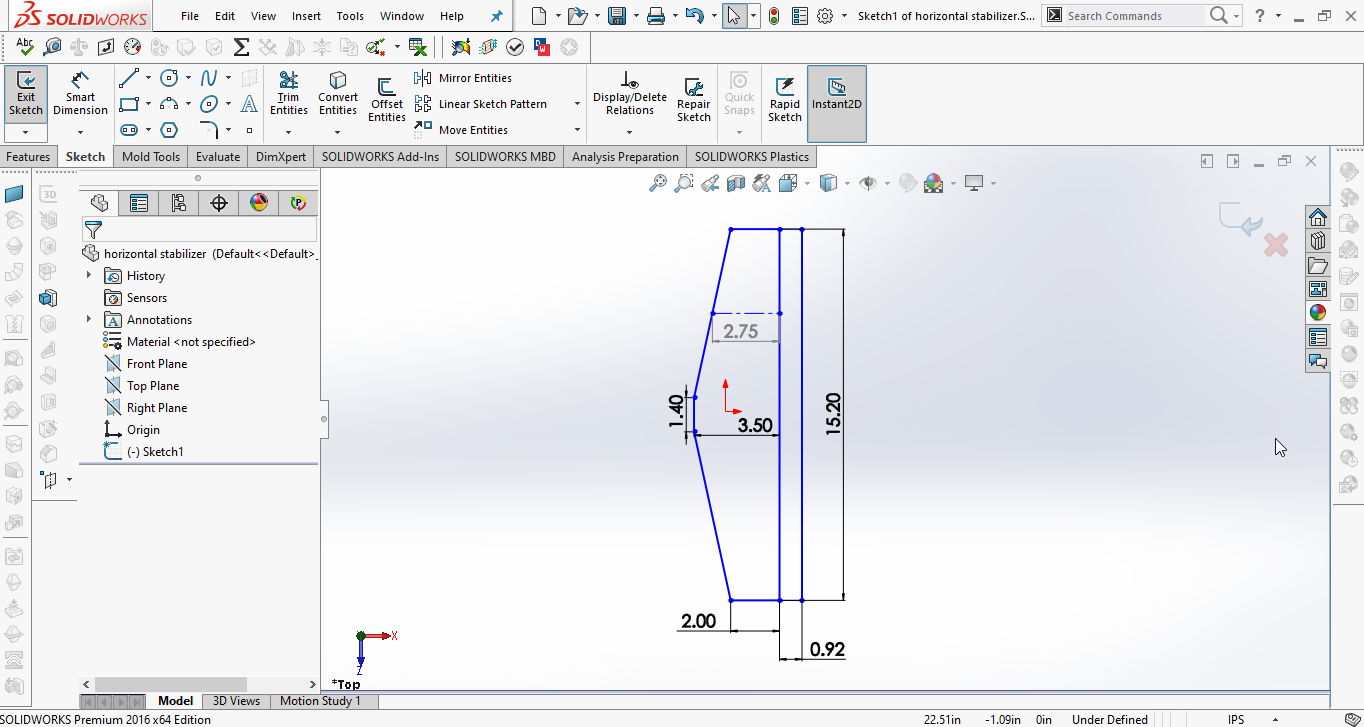
Horizontal Stabilizer Length:
Our horizontal stabilizer area is 42.6 square inches. We know that area = length x width. So, 42.6 = length x width.
Area = length x width
42.6 = length x width
Now we have two options, we can start by fixing the stabilizer width or length. Let’s fix the stabilizer length. Let’s say the stabilizer length is 1/3 of the wingspan so, the stabilizer length is 12 inches. So, now we can easily find the Stabilizer width which is going to be 3.5inches.
1/3 x 35.5 = 12 inches
Stabilizer length = 12 inches so
42.6 = 12 x width
Width = 42.6 / 12
Width = 3.5 inches
These values are for the rectangular type stabilizer, If we do any cutting for the aerodynamics then we will need to increase the length or width, I have already explained this in my previous RC plane designing.
So the final values are
Stabilizer width = 3.5 inches
Stabilizer length = 15.2 inches
The final area is 42.85 square inches, I increased the area a little, because of the fuselage width which is 1.4 inches. So, this way the stabilizer area which is covered by the fuselage width will be compensated by increasing the area a little.
Elevator Sizing:
The Elevator should be 1/3 of the horizontal stabilizer width.
As per the solidworks design, the average width of the horizontal stabilizer is 2.75 inches so,
1/3 x 2.75 = .92 inches
And the length of the elevator is same as the horizontal stabilizer length.
Elevator width = .92 inches
Elevator length = 15.2 inches
Airfoil for Horizontal Stabilizer:
Airfoil thickness of the horizontal stabilizer should be 12 to 15% of the chord length
Stabilizer width + Elevator width = chord length
3.5 + .92 = 4.42 inches, so
12% x 4.42 = 0.53 inches
So the airfoil thickness of the horizontal stabilizer should be .53 inches.
Horizontal Stabilizer Airfoil thickness = .53 inches
Vertical Stabilizer:

Area of the vertical stabilizer should be 33% of the Horizontal stabilizer area. So
Vertical Stabilizer area = 33% X 42.6 square inches = 14.1 square inches
Vertical Stabilizer area = 14.1 square inches
Let’s keep the width of the vertical stabilizer same as the horizontal stabilizer width, so
Vertical Stabilizer width = 3.5 inches
Vertical stabilizer Area = Height x Width
14.1 = Height x 3.5
Length or height = 4 inches
So,
Vertical Stabilizer Height = 4 inches
After doing some cutting the Vertical stabilizer height changed to 6.32 inches.
Vertical stabilizer height = 6.32 inches
Even though I changed the vertical stabilizer height from 4 inches to 6.32 inches but still the area is same which is 14.1 square inches. No matter how much cutting you are going to do, the area should remain exactly the same. You can calculate the area, but the easiest way is to check the area using SolidWorks.
Rudder width:
The rudder width should be 1/3 of the Vertical Stabilizer width. The average width as per the SolidWorks design which is 2.25. So
1/3 x 2.25 = .75 inches
In the final model, the rudder area is added into the vertical stabilizer. But I am not using it. I didn’t add any servo motor for this. For you guys, I highly recommend to add it. Because as a beginner you might find it quite hard to control the left and right movements of the RC plane only using the Ailerons.
Center of Gravity “CG”:
CG should be set at 25% to 33% of the Chord length from the leading edge of the Wing. Our chord length is 8 inches so; the CG is at 2 inches from the leading edge if we use 25%. For 33% it’s going to be 2.64 inches. For this RC plane I selected 2.32 inches.
CG = 25% to 33% X chord length
CG = 25% X 8 inches
CG = 2 inches
And
CG = 33% x 8 inches
CG = 2.64 inches
CG = 2.32 for this RC Plane
Our calculations are done. For now you don’t need to know about the dihedral, angle of attack, and wing loading. We will talk about these in upcoming videos and articles. As a beginner, you should stick with, what I just explained.
How to improve the stability and Gliding performance of the RC Plane?
As a beginner you can improve your piloting skills if the RC plane has good gliding performance. Now to improve the gliding performance as I said earlier you can increase the wingspan but this will increase the weight and will take more time to make such a long wing. So the question is then how we can increase the gliding performance?

Well, inspired by the Wingsuit which adds nice stability and gliding performance.
I decided to add this extra sheet of cardboard to the RC Plane, and this is definitely going to make difference.
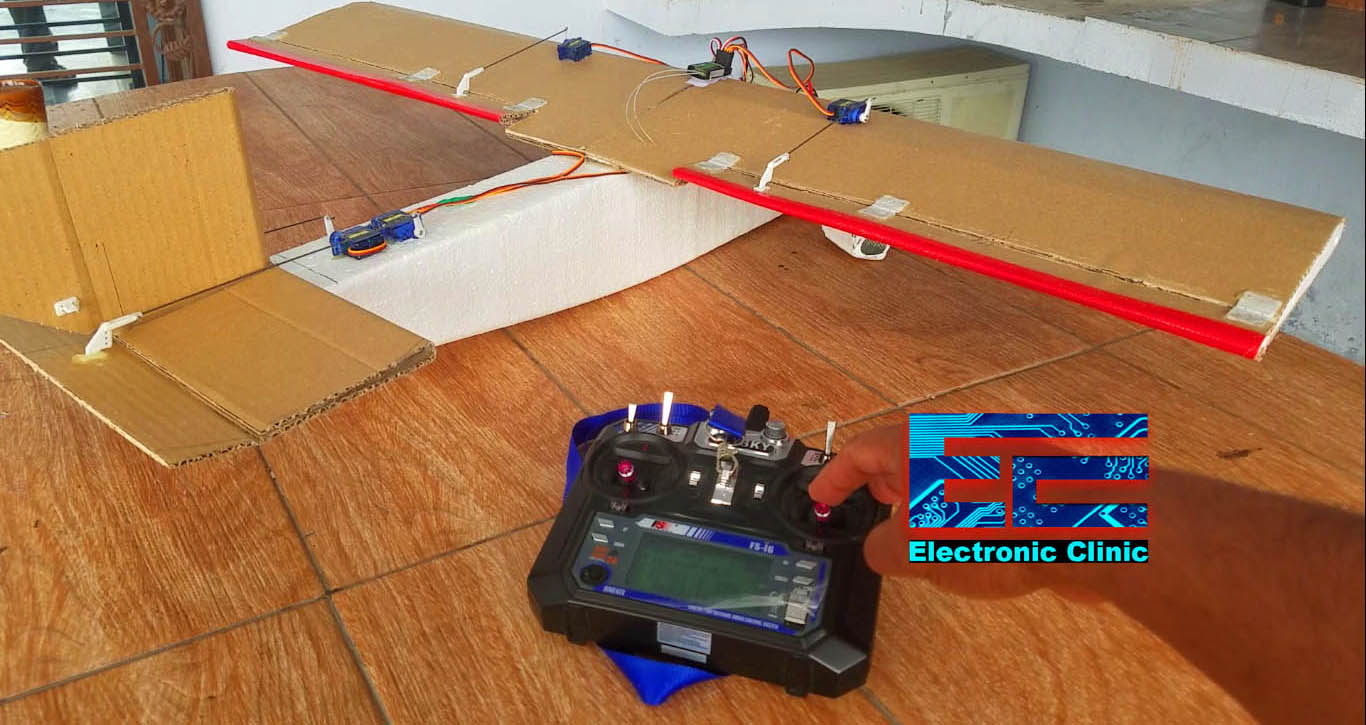
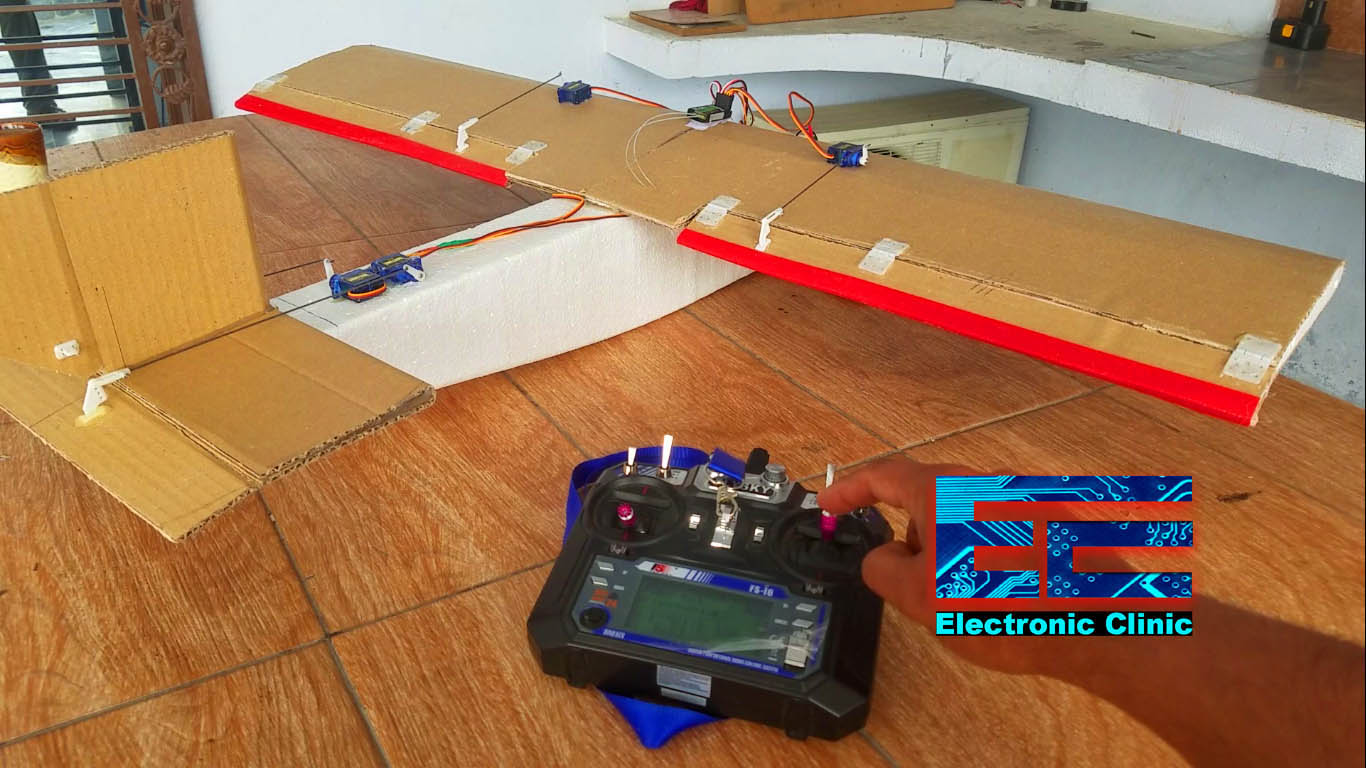
How to control the RC plane Ailerons and Elevator?
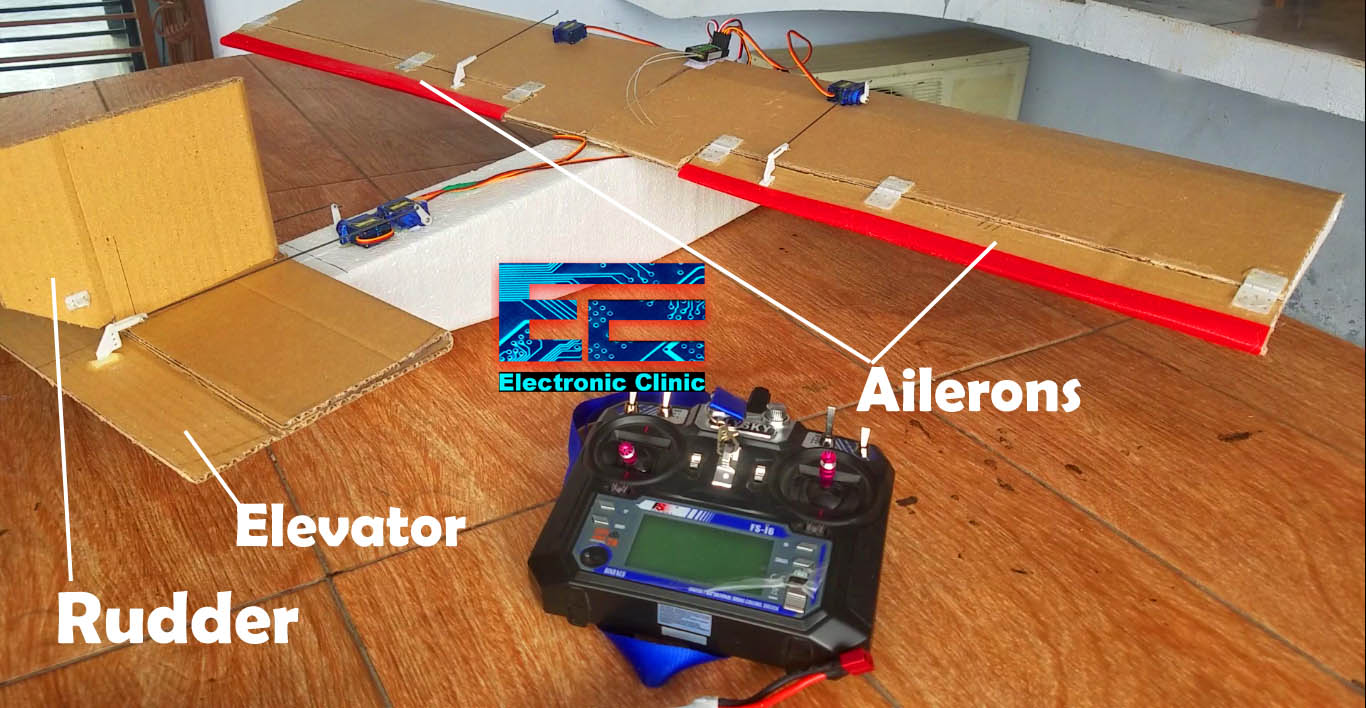
Most of the RC planes are crashed by the beginners when they don’t know exactly how to setup the Ailerons, Elevator, and Rudder. Next, I am going to explain, how the control surfaces should responds to the control signals.
 When you move the control stick in the downward direction the Ailerons and elevator should move up. This will lift the RC plane up in the Air.
When you move the control stick in the upward direction the ailerons and elevator should move down.
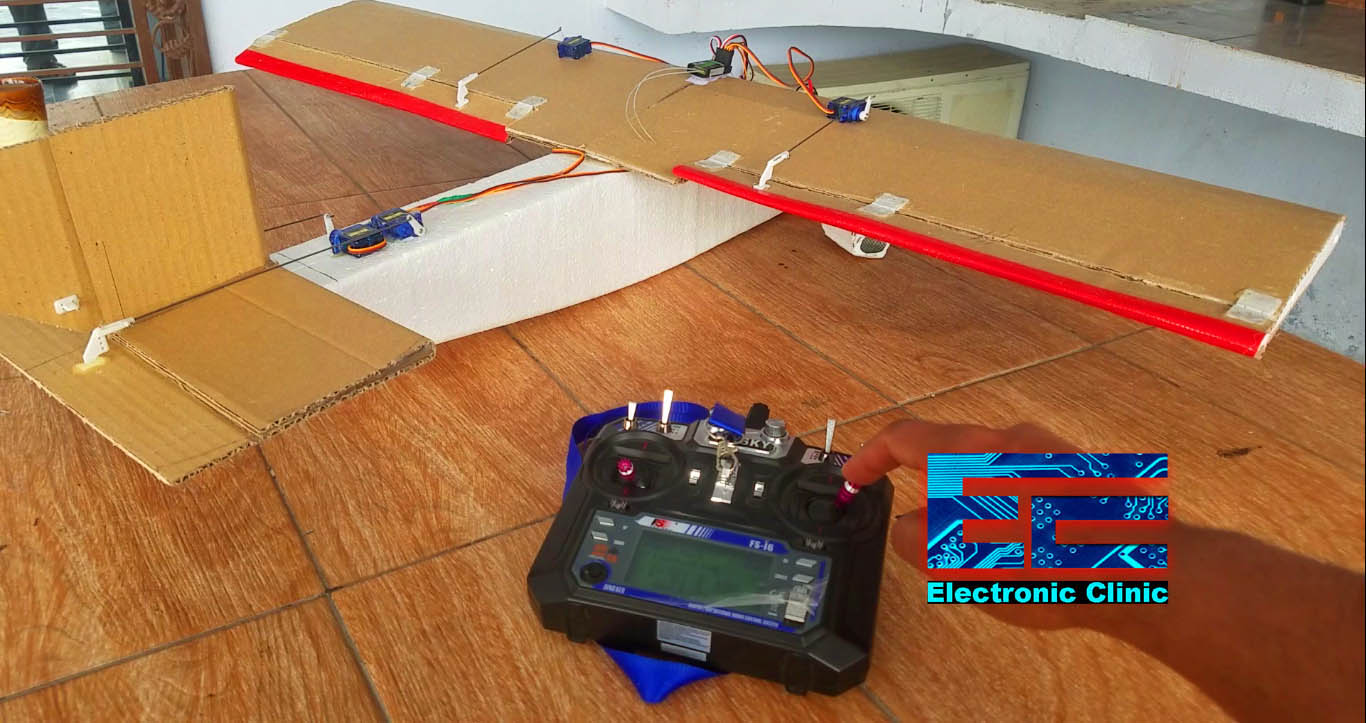
When you move the control stick to the right, your Aileron on the right side should move up and the Aileron on the left side should move down. The opposite should happen when you move the control stick to the left.
For the rudder, when you move the throttle stick to the right, the rudder should move to the right, and similarly when you move the throttle stick to the left, the rudder should move to the Left.
Finally, by moving the throttle stick forward and backward this will control the speed of the brushless motor. So, that’s all about how to properly set up your control surfaces and motor. I have a very detailed tutorial on how to set up your Flysky FS-i6 Transmitter and Receiver. I will provide a link in the Description.
So, my RC plane is ready, I have double checked everything. And now it’s time to power up all the electronics. I am using a 3S 11.1V 1500mAh Lipo Battery, and a 30A ESC “Electronic Speed Controller” which is going to work great with my 1400kv brushless motor.
Before, the test flight I checked my RC Plane center of gravity. Remember, your RC plane should be a little nose heavy, never fly an RC plane with tail heavy. I also checked all the control surfaces; my RC plane is ready for the first flight test.
During the Launch keep the throttle stick at around 60 to 70% and don’t touch the control stick. When the plane gets stable then you can use your control stick to control the up down and left right movements. Move the control stick slowly and see how your RC plane responds.

This was a great success. This RC plane was amazingly stable. I really enjoyed working on this RC plane. Next, I am thinking of something different.
Watch Video Tutorial:
Hey I am also a beginner I have an tc plane not completed due to financial purpose any way am using a 8inch prop for a a2212 10t 1400kv motor so can it lift a plane that wiegh 800g to 1kg
Hi there, great tutorial! Do you have any references for the calculations and ratios that you used? Would love to be able to use them in a report I’m writing for my design course.