How to make a Quadcopter Drone using KK 2.1.5 Flight controller
Table of Contents
Quadcopter Drone using KK 2.1.5 Flight Controller, Description:
Quadcopter Drone Using KK 2.1.5 Flight Controller, complete setup and flight test– In this tutorial, you will learn how to make a Quadcopter Drone using the KK 2.1.5 Flight Controller, which I think is the best flight controller for beginners and why I am saying this, I will explain this in a minute with practical demonstration and I will also share with you the flight results. Anyways, in my previous tutorial, I used the OpenPilot CC3D flight controller which is one of the cheapest flight controllers on the market and I know most of the beginners prefer to start with this flight controller and this is the reason first I started with this flight controller just to find out if it really worth getting started with this OpenPilot CC3D flight controller. But, after working on the KK 2.1.5 Flight controller I decided I will never use the OpenPilot CC3D flight controller in any of my upcoming Quadcopter projects. Although it was a nice experience, but searching for the correct version of the OpenPilot GCS software and programming it was really annoying. I faced many issues which I fixed one by one and in the end I was able to fly my Quadcopter. (watch video given at the end of this article) You can see the flight result is good but still I don’t recommend this for the beginners. The CC3D flight controller is very unpredictable, sometime it works just great and then at the next moment it will just stop working, you won’t even be able to upgrade the driver. Personally, I faced these issues and now I have two of these flight controllers and none is working. So, if you are planning to build your first Quadcopter Drone then don’t use the CC3D Flight Controller.
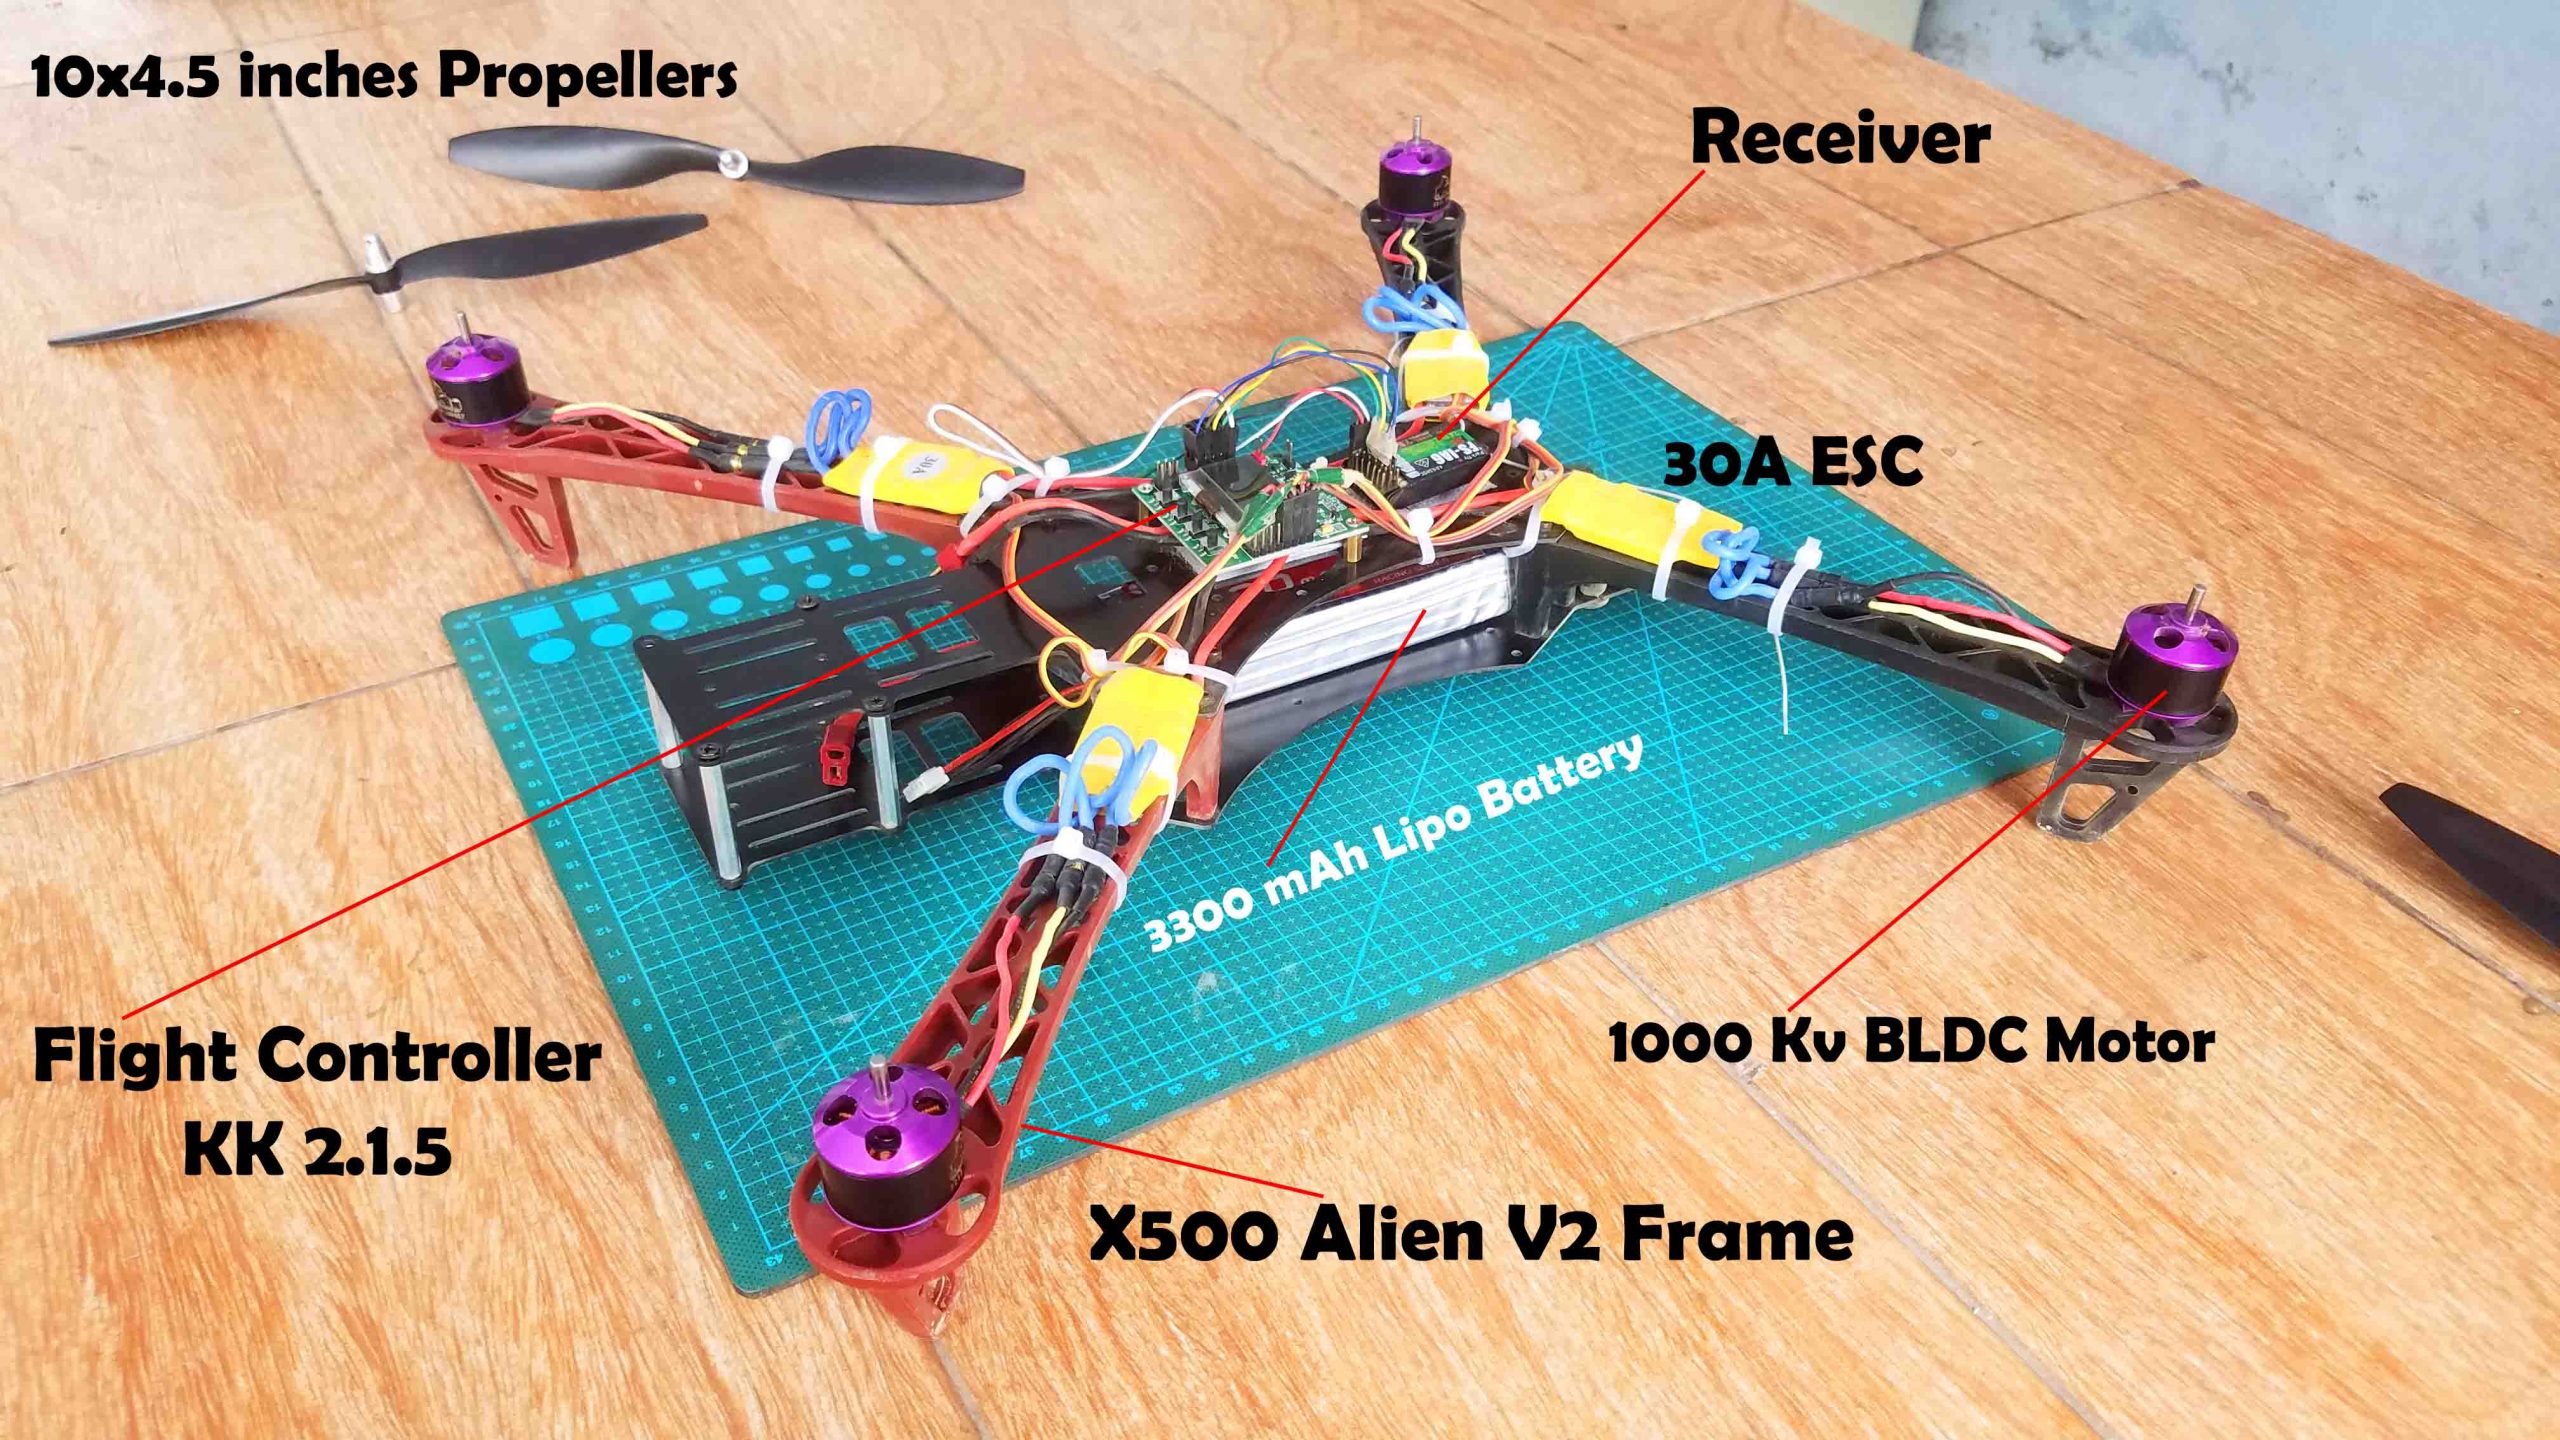
So, to explain the whole point, I decided to upgrade my Quadcopter, I simply replaced the CC3D flight controller with the KK 2.1.5 flight controller while all the other parts remain exactly the same. I am still using this X500 Alien V2 Frame, the same 1000Kv brushless motors, the same 30A ESCs, the same 3300mAh Lipo battery, the same 10×4.5 inches propellers, and the same Flysky Fs-i6 Transmitter and Receiver. The soldering and assembling I have already explained in my previous tutorial.
One more upgrade that you can see is I shifted the 3300mAh Lipo Battery to the bottom plate and the Flysky receiver and flight controller to the top plate, so this way I get easy access to the KK 2.1.5 flight controller as I will be using these buttons for the Quadcopter complete settings. So, before I am going to explain the connections and complete setup first let’s take a look at the final flight test result and if you like the stability then you can continue reading this article(watch video given at the end).
Isn’t it amazing? It’s very controllable, you can easily set the gain, and you can activate and de-activate the self level during the flight using a button which greatly increases the Drone stability which is best for the beginners. This is my first flight result and it’s simply amazing. Seriously I didn’t expect such a good result from such a low cost flight controller. Anyway, now you have got the idea of what you are going to learn after reading this article. Without any further delay, let’s get started!!!
Amazon Purchase Links:
X500 Alien and other top Quadcopter Frame
1000KV Brushless Motor, 30A Speed controller, and Propellers
Flysky FS i6 Transmitter and Receiver
Other Tools and Components:
Super Starter kit for Beginners
PCB small portable drill machines
*Please Note: These are affiliate links. I may make a commission if you buy the components through these links. I would appreciate your support in this way!
About the Sponsor:

Altium Designer is the world’s most trusted PCB design system. Altium Designer enables engineers to effortlessly connect with every facet of the electronics design process. Over 35 years of innovation and development focused on a truly unified design environment makes it the most widely used PCB design solution. With Altium Designer you can create PCB designs with an intuitive and powerful interface that connects you to every aspect of the electronics design process. Route it your way through any angle, tune for the delay, Push, Slide, and Walkaround faster than ever. Interact and collaborate with mechanical designers like never before in a photo-realistic, 3D design environment. If you want to get started with the Altium designer?
About the KK 2.1.5 Flight Controller:
KK 2.1.5 Flight Controller Description:
2018 New Firmware KK 2.1.5 RC Multirotors kk 2 Mini Flight Controller Board with LCD Fixed-Wing VTOL
Firmware Details:
The next evolution of the rotor revolution is here!! The KK2.1 is packing newfound power with updated sensors, memory and header pins.
Designed by the grandfather of the KK revolution, Rolf R Bakke, exclusively for HobbyKing, the KK2.1 is the evolution of the first generation KK flight control boards. The KK2.1 was engineered from the ground up to bring multi-rotor flight to everyone, not just the experts. The LCD screen and built-in software makes install and setup easier than ever. A host of multi-rotor craft types are pre-installed, simply select your craft type, check motor layout/propeller direction, calibrate your ESCs and radio and your are ready to go! All of which is done with easy-to-follow on-screen prompts!
The original KK gyro system has been updated to an incredibly sensitive 6050 MPU system making this the most stable KK board ever and allowing for the addition of an auto-level function. At the heart of the KK2.1 is an Atmel Mega644PA 8-bit AVR RISC-based microcontroller with 64k of memory. An additional header has been added for voltage detection, so no need for on-board soldering. A handy piezo buzzer is also included with the board for audio warning when activating and deactivating the board.
If your are new to multi-rotor flight or have been unsure about how to setup a KK board then the KK2.1 was built for you. The 6 Pin USBasp AVR programming interface ensures future software updates will be quick and easy.KK 2.1.5
Flight Controller Specifications:
Size: 50.5mm x 50.5mm x 12mm
Weight: 21 gram (Inc Piezo buzzer)
IC: Atmega644 PA
Gyro/Acc: 6050MPU InvenSense Inc.
Auto-level: Yes
Input Voltage: 4.8-6.0V
AVR interface: standard 6 pins.
Signal from Receiver: 1520us (5 channels)
Signal to ESC: 1520us
Firmware Version: V1.17S1:
Pre-installed firmware.
Dualcopter
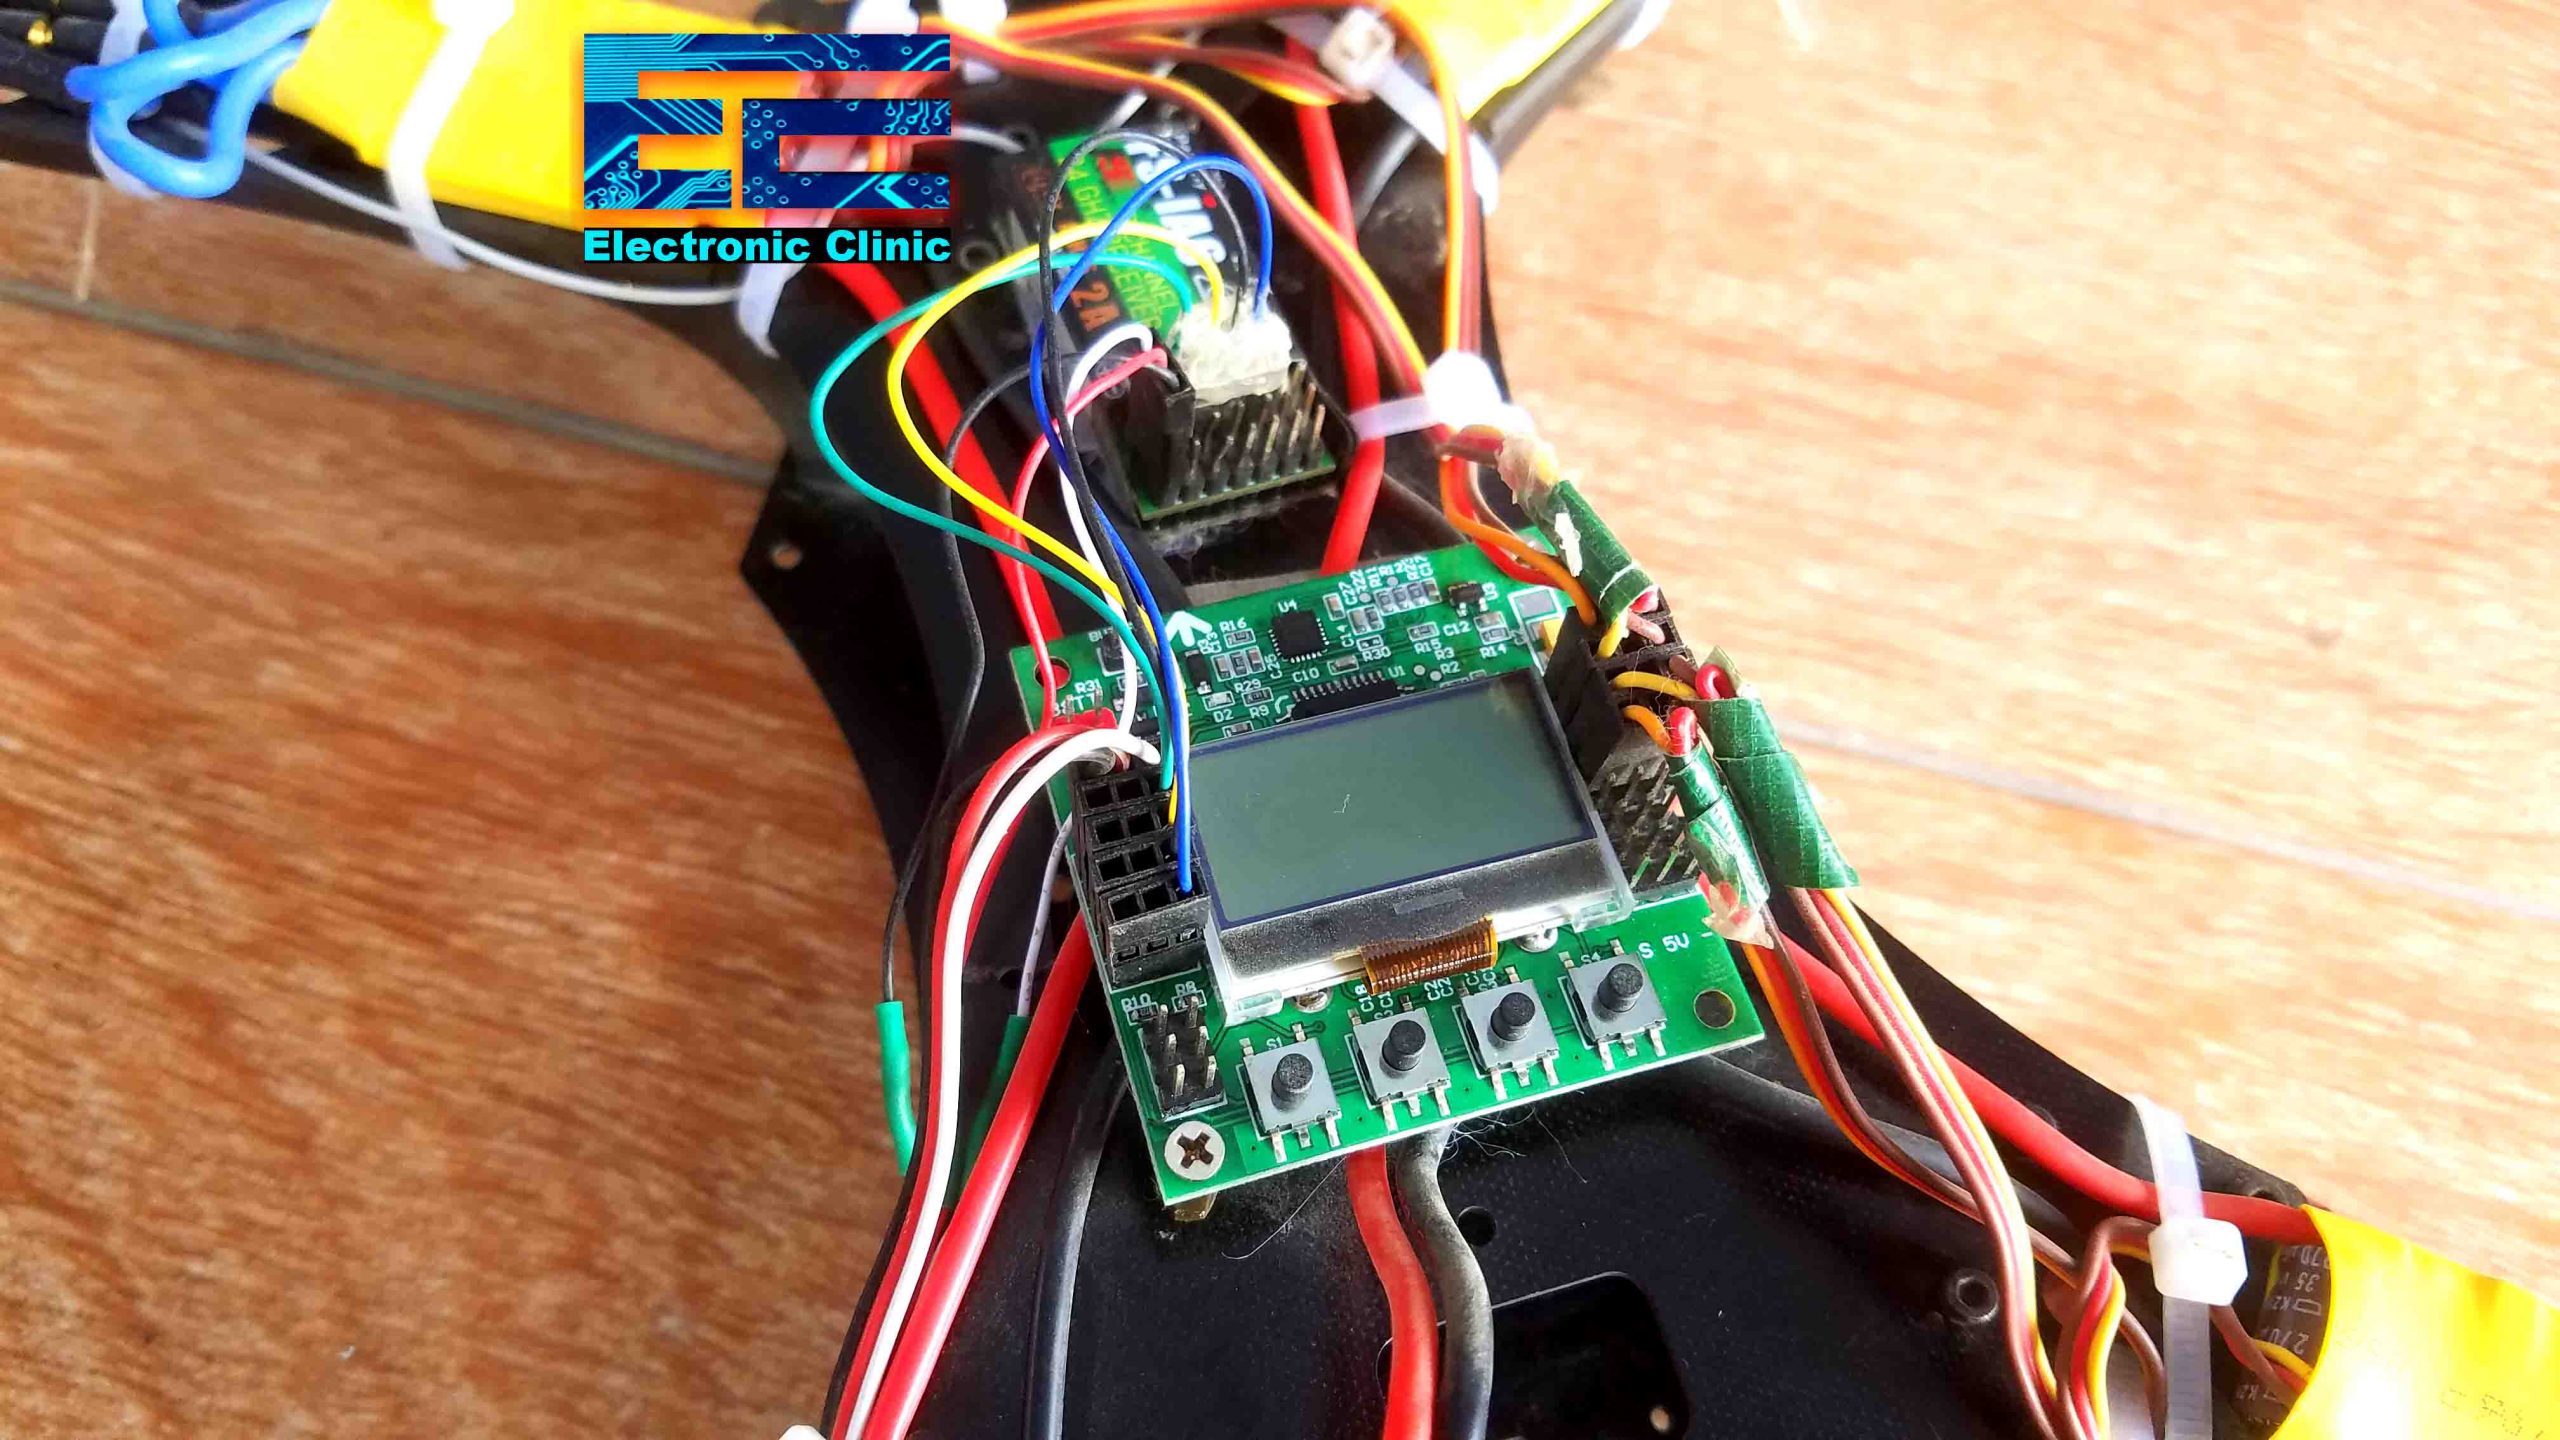
KK 2.1.5 Flight Controller Pinout:
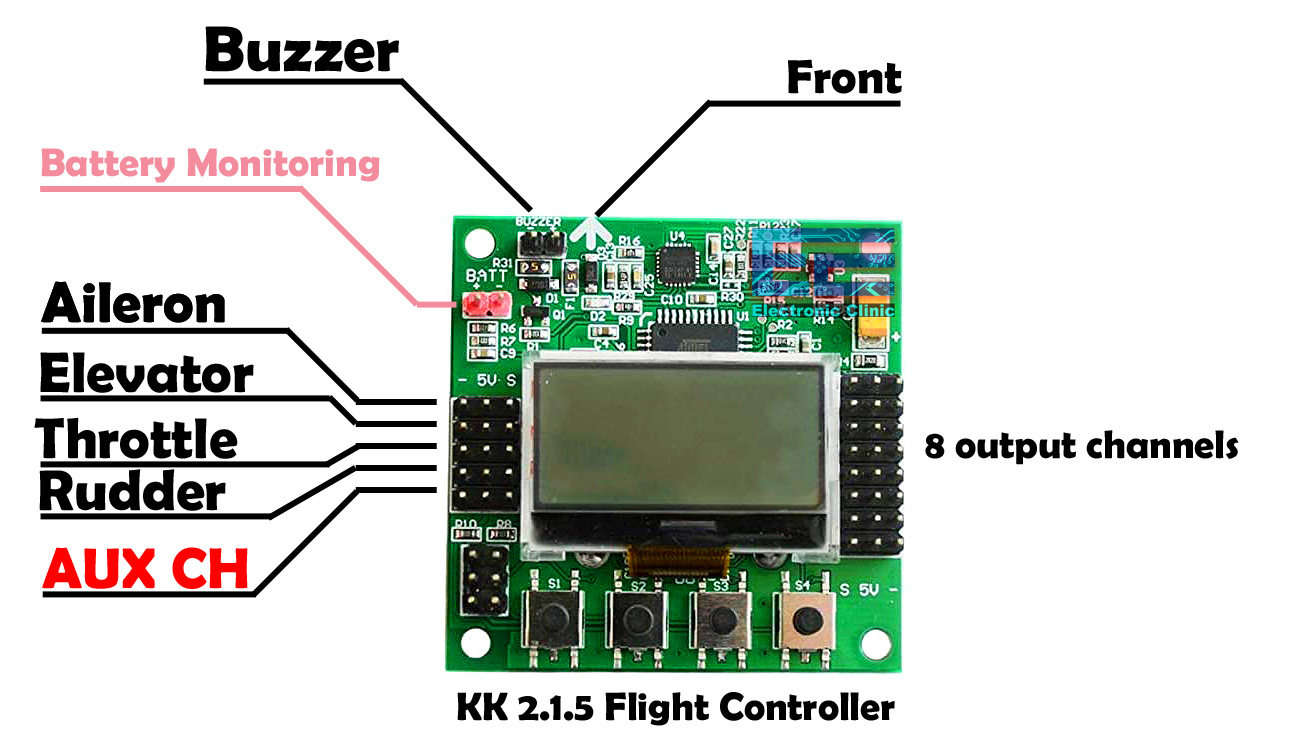
This is the KK 2.1.5 Flight Controller provided with 5 input channels on the left side and 8 output channels on the right side. These 5 input channels are connected with the Receiver while the 8 output channels are connected with the ESCs for controlling BLDC motors. The input male headers are labeled with the Gnd, 5v, and signal. The output male headers are also labeled.
The Arrowhead at the top shows the direction. It should be in parallel with the Quadcopter front.
A 5v buzzer can be connected with the two male headers at the top labeled with + and – signs. The time you purchase the KK 2.1.5 Flight Controller along with it you also get the buzzer. There are two more male headers that are labeled with BATT, these two male headers are used for monitoring the battery voltage. As a beginner you don’t need to use these male headers, right now your only focus should be on how to make your Quadcopter fly and how to make it stable, and how to make it less responsive so that you can easily control it. Anyways, You don’t need a computer or laptop to setup the KK 2.1.5 Flight Controller and this is why this flight controller is provide with these 4 switches. I really liked it, all you need assemble all the parts, connect the battery, and start setting up your Quadcopter using these switches. Now, let’s take a look at the connections.
KK 2.1.5 Flight Controller Connections:
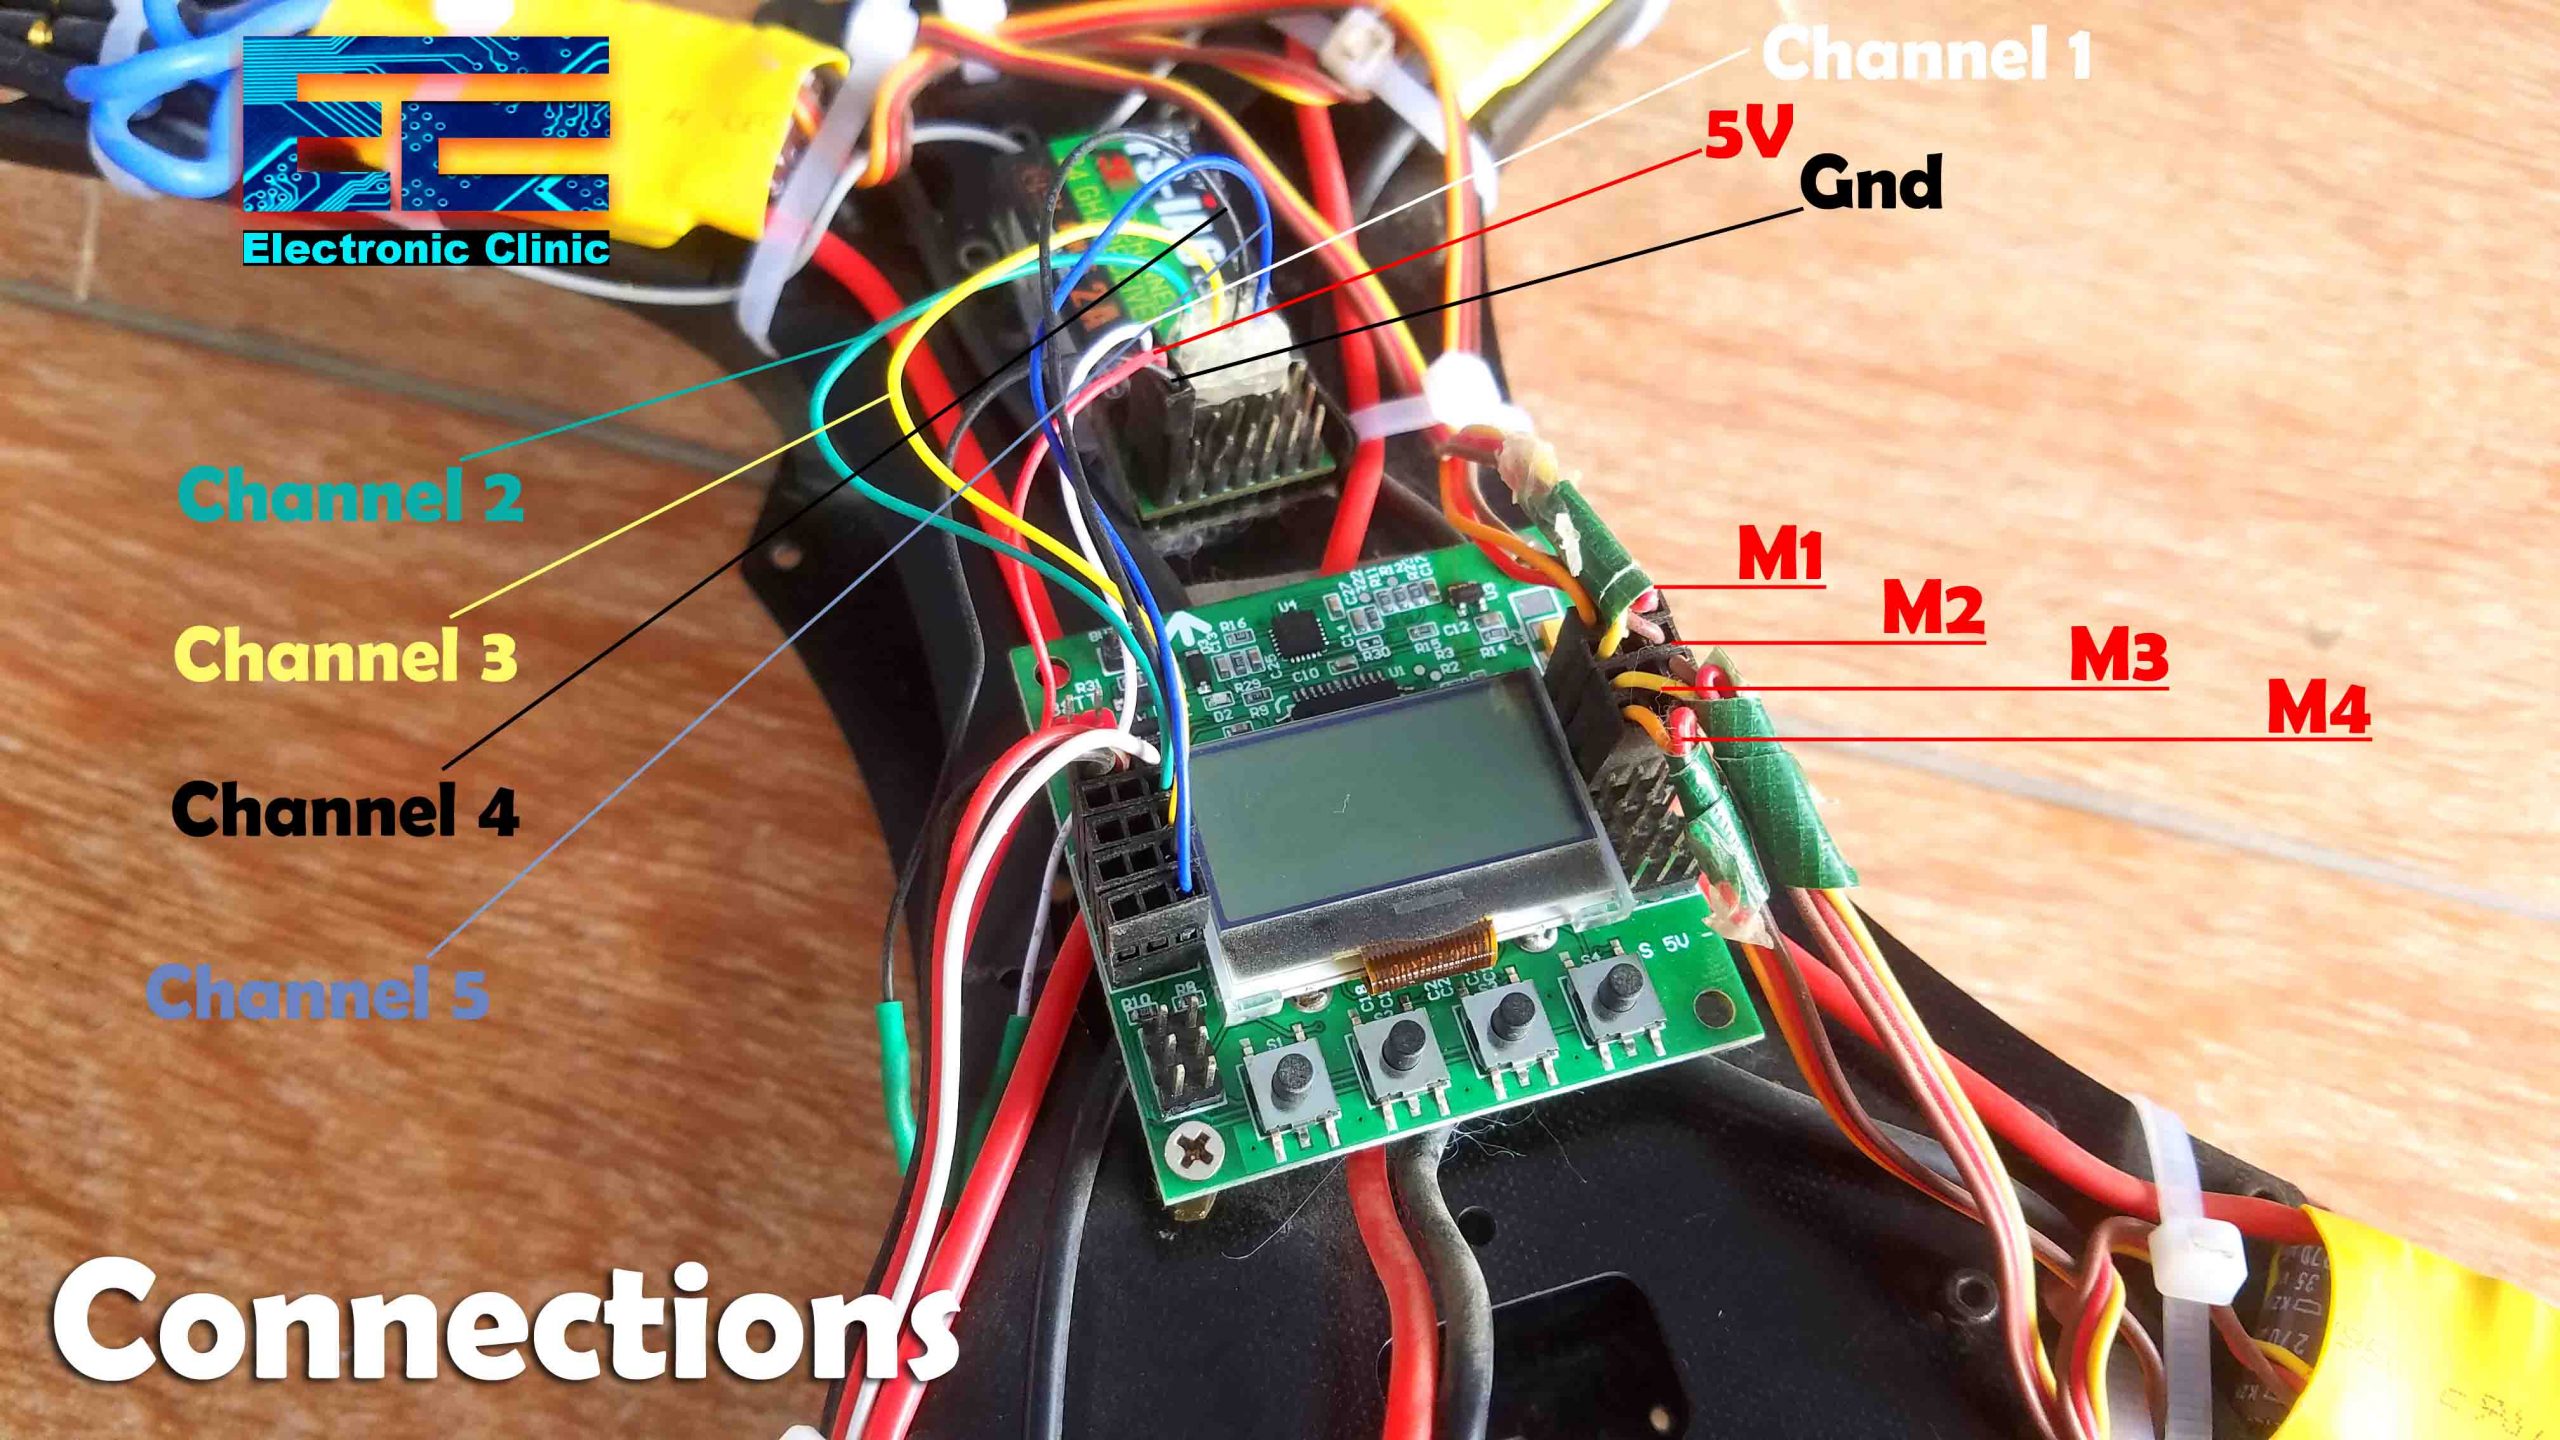
The five channels from the receiver module are connected with the 5 channels of the KK 2.1.5 Flight controller. Channel 1 is connected with the input 1, channel 2 with input 2, channel 3 with input 3, channel 4 with input 4, and channel 5 with the input 5. To power up the Receiver connect 5v and Gnd wires from any input channels with the 5v and Gnd pins of the receiver. Your wires color may be different, just follow the same order.
The 4 outputs are connected with the 4 ESCs. Only one ESC has the 5v wire connected with the 5v pin to power up the KK 2.1.5 Flight Controller. This 5v wire from the other 3 ESCs is not connected. The motor1 is connected with output1, motor2 with output 2, motor3 with output 3, and motor 4 with the output 4.
The type of the Quadcopter Drone I am making is called the type X, as you can see it closely resembles the English letter X. The motors numbering I have already explained in my previous article, the top left motor is the motor number 1 and so on. Motor number 1 should spin in clockwise direction, motor number 2 should spin in counter clockwise direction, motor3 should spin in clockwise, and motor number 4 should spin in counter clockwise direction. So, that’s all about the connections and motors direction. The Quadcopter is ready for the setup.
KK 2.1.5 Flight Controller Setup:
Before you setup the KK 2.1.5 Flight Controller remove the Propellers, and one more time take a look at all the connections, place your Quadcopter drone on a flat surface, and then you can start be connecting your Lipo Battery. There is nothing complicated just follow the same exact steps as explained in the video.
Now, for the ESCs calibration move the throttle stick to its maximum position, and before you connect the Lipo Battery first press and hold the rightmost and leftmost buttons…connect the battery and wait for the motor beeps…move the throttle stick to its minimum position and wait for the motor beeps, and your calibration is completed…
The self level can be activated and deactivated using the Switch A on the transmitter. The self-level control will always be in your control, while you are flying your drone in the Acro mode you can switch to the self level with just the click of a button. The is really good for the beginners.
PI Editor:
Enables you to adjust the control loop feedback parameters for Roll, Pitch and Yaw. The proportional term (P) produces an output value that is proportional to the current error value. A high proportional gain results in a large change in the output for a given change in the error. If the proportional gain is too high, the multicopter will overshoot and start to oscillate. Since the control loop compensates for errors 400 times a second too high a P gain will result in a high frequency oscillation. If the proportional gain is too low, the control action will be too slow to react on the multicopter and it will be difficult to control.
PI limits:
The PI limits are the percentage of motor power that can be used to apply the correction. These should be left at default. For example, a limit of 20 (20% motor power to apply the correction) will allow 80% of motor power to be used for commanding a change in direction from the receiver.
Stick Scaling:
These settings enable you to adjust the sensitivity of the transmitter stick. A higher number gives a more sensitive response. It is used in preference to increasing the rates in your transmitter. The default values are low for beginners that may not appreciate how sensitive the transmitter sticks can be in controlling a multicopter.

So, my Quadcopter Drone based on the KK 2.1.5 Flight controller is ready for its first flight test. I hope after reading this article and after watching my video now you can decide whether you need to get started with the CC3D Flight Controller or the KK 2.1.5 flight controller. I won’t stop here, in my next video and article I will replace these 1000kv brushless motors with the DJI 920Kv branded motors; I will perform some tests to check if its performance can be further increased. So that’s all for now.
Watch Video Tutorial: