IoT based Patient monitoring System using ESP8266, Arduino & Android Bluetooth App
Table of Contents
Description:
IoT based Patient Monitoring System– In this tutorial, you will learn how to make an IoT based Patient monitoring system using Nodemcu ESP8266 Wifi module, Arduino, HC-05 Bluetooth Module and Cell phone Applications. This is an advanced level project and is entirely different from all the existing Patient monitoring systems available.
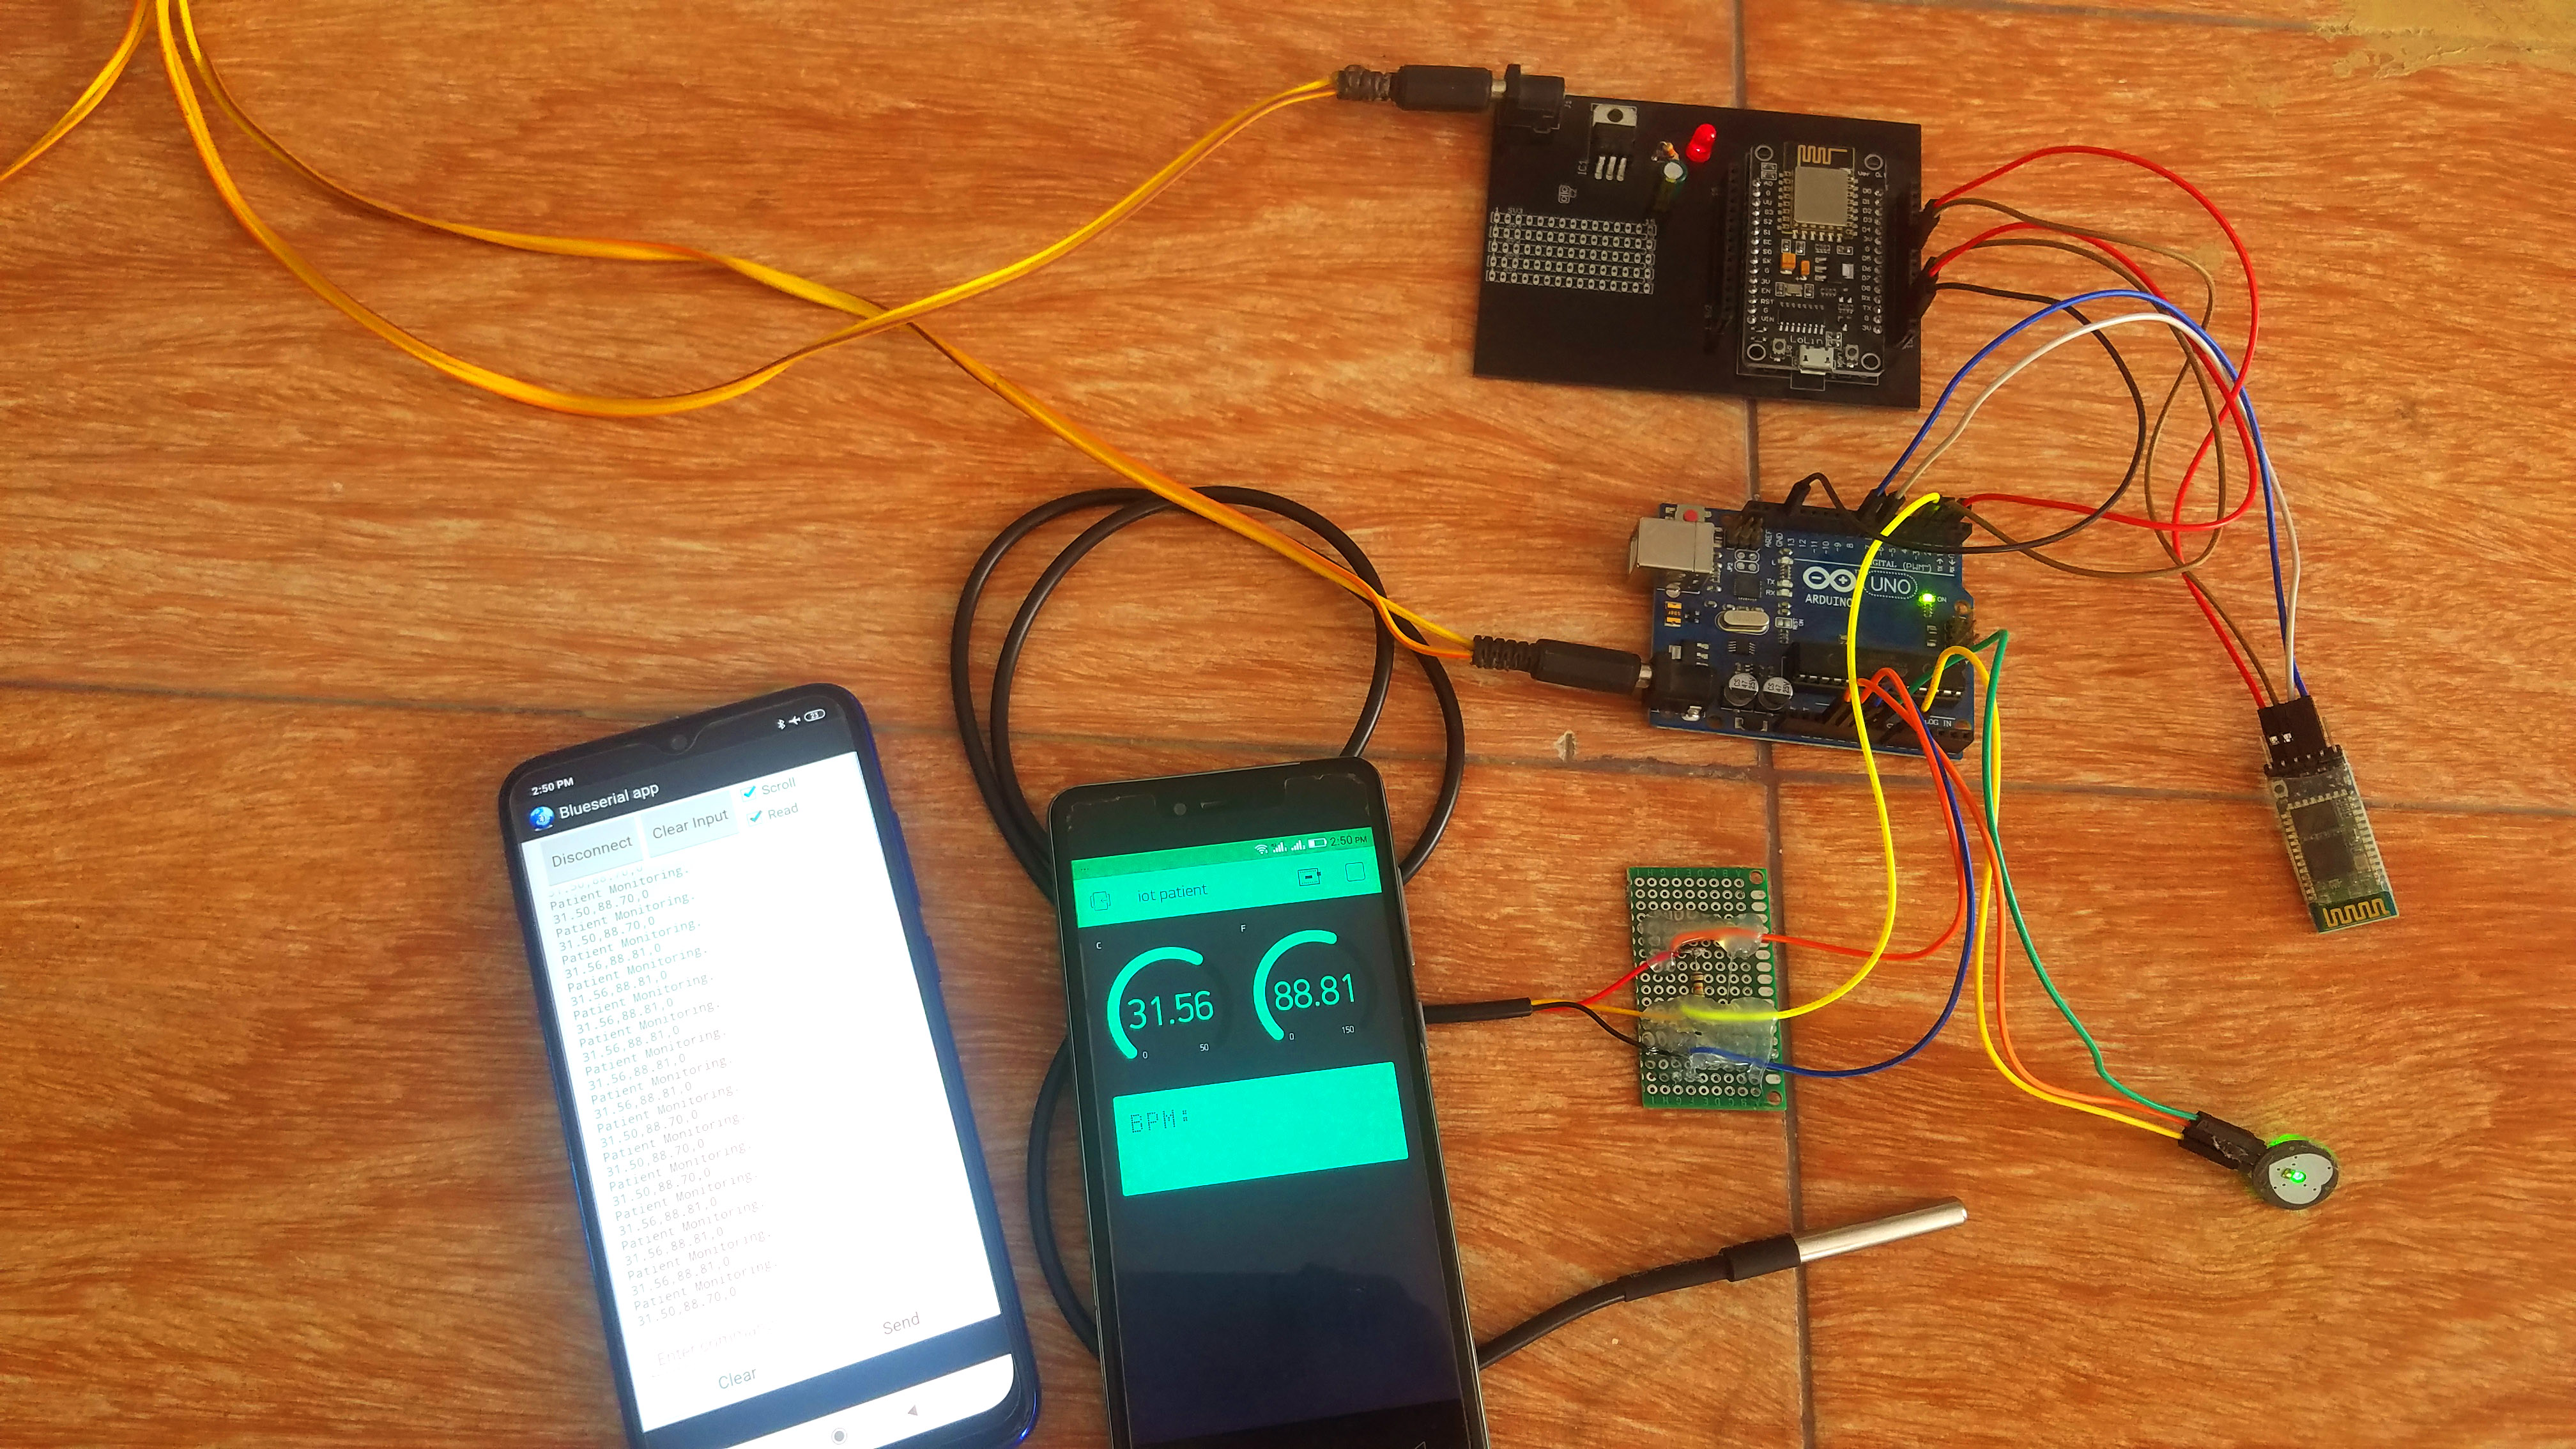
In this project, two different cell phone applications are used for monitoring the patient temperature and BPM “Beats Per Minute”. One application is designed in Blynk while the other Cell Phone application is designed in Android Studio.

With the help of this application the patient BPM, temperature in centigrade and Fahrenheit with two decimal points precision can be monitored from anywhere around the world. With the help of this application, the Doctor can monitor the patient in real-time from anywhere so far the internet connection is available.
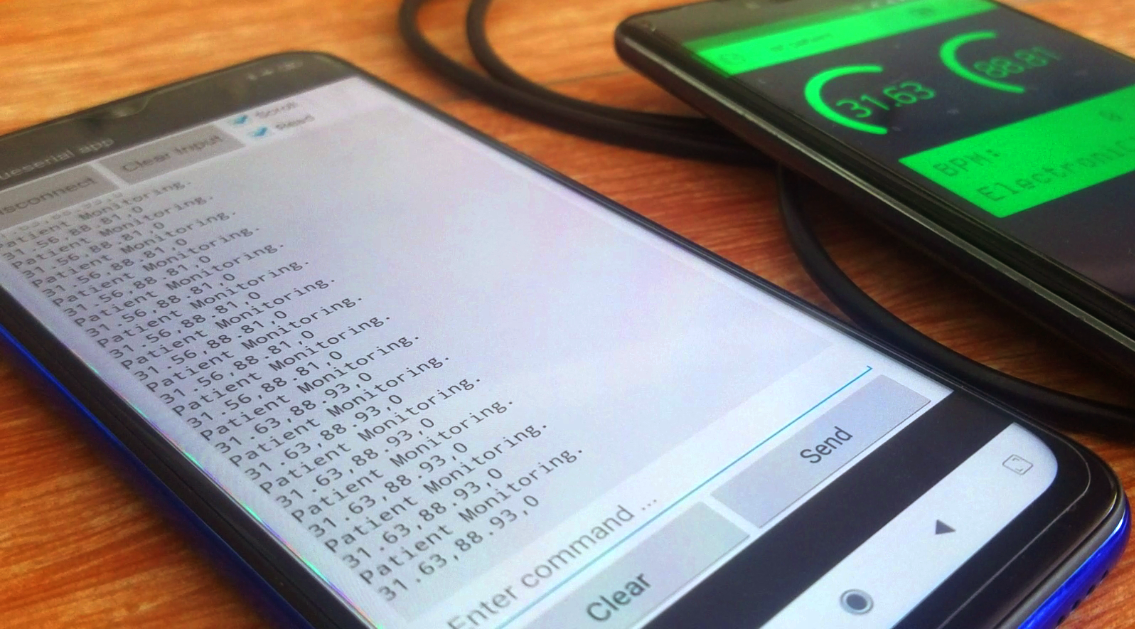
While this application can be used by the family members to wirelessly monitor the patient temperature and BPM. I have a separate video on the android cell phone application designing for the Bluetooth. I will provide a link in the related projects section given at the end of this article.
This project is designed in a way that it can be easily modified by anyone and more sensors can be interfaced. To accommodate more sensors I am using Arduino and Nodemcu esp8266 Wifi module together.
Amazon Links:
Other Tools and Components:
Super Starter kit for Beginners
PCB small portable drill machines
DISCLAIMER:
Please Note: these are affiliate links. I may make a commission if you buy the components through these links. I would appreciate your support in this way!
IoT based Patient Monitoring System Circuit Diagram:

This is the complete circuit diagram designed in Cadsoft Eagle 9.1.0 version. If you want to learn how to make a schematic and PCB, then watch the video tutorial.
Let’s start with the DS18b20 waterproof one-wire digital temperature sensor. As you can see a 330-ohm resistor is connected between the VCC and data wires. You can also use a 4.7k resistor. The VCC is connected with 3.3 volts. The data wire is connected with the Arduino’s digital pin 4. While the ground is connected with the Arduino’s ground.
The VCC pin of the pulse sensor is connected with the Arduino’s 3.3 volts, but you can also connect this with the 5 volts. The S Pin of the pulse sensor is connected with the analog pin A0 and the ground pin of the pulse sensor is connected with the Arduino’s ground.
This Power Supply is based on the famous LM7805 voltage regulator. J1 is the female power jack and this is where we connect a 12v adaptor or battery. Two 470uf capacitors are connected at the input and output sides of the voltage regulator. A 330-ohm resistor is connected in series with a 2.5v led. This is a current limiting resistor. The output of the voltage regulator is connected with the Vin pin of the Nodemcu esp8266 wifi module and the ground is connected with the ground. SV1 and SV2 are the female headers.
The HC05 or HC06 Bluetooth module is powered up using 3.3 volts from the Nodemcu Module. The ground of the Bluetooth module is connected with the ground of the Nodemcu Module, make sure you connect the ground of the Nodemcu Module with the Ground of the Arduino. The TX and RX pins of the Bluetooth module are connected with the Arduino’s Pin number 7 and Pin number 8. Pin number 7 is the RX while pin number 8 is the TX which will be defined in the programming.

This is the final Nodemcu ESP8266 Wifi Module Power Supply circuit board. I have a separate video on how to design the PCB, how to place an online order.
I also have a separate video on how to change the name of the Bluetooth module and how to change the password. This tutorial explains everything you need to know about the HC-05 or HC-06 Bluetooth Module.
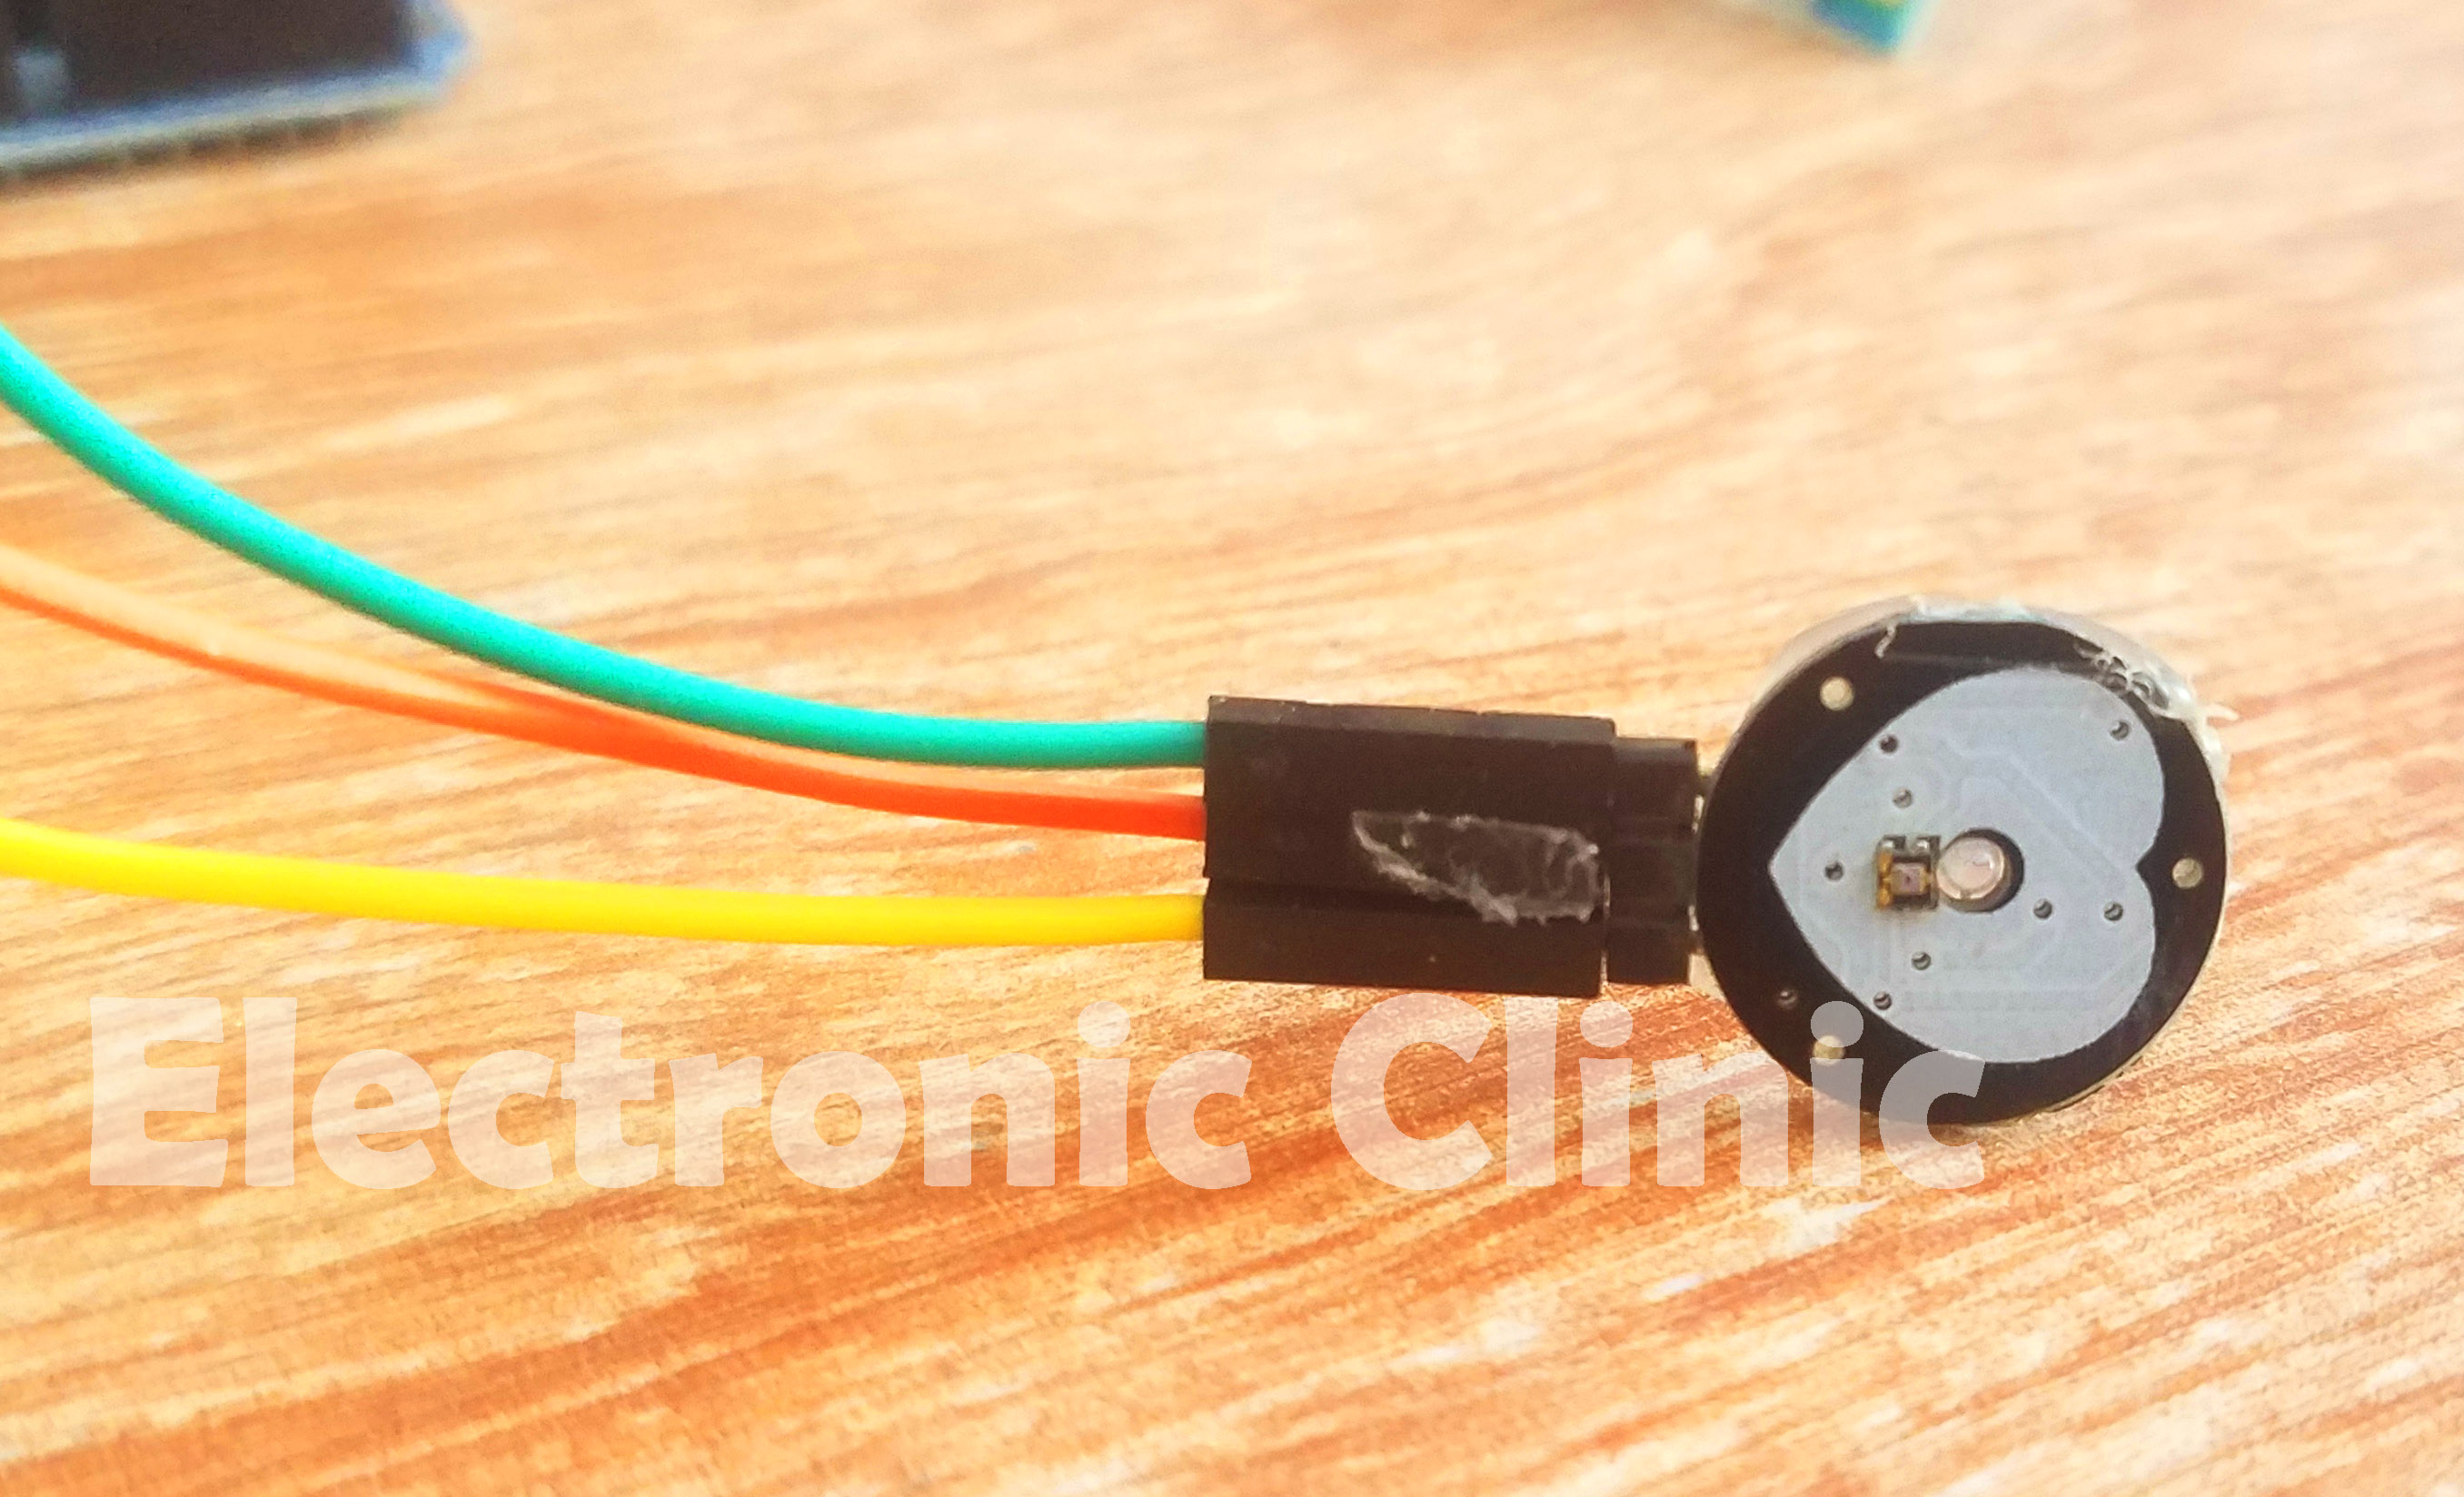
This is the Pulse Sensor which I am using in this project for measuring the heartbeats, I personally don’t like this sensor and I am searching for another sensor, but right now this is what I have for now. If you have never used this sensor then I recommend you should watch my previous two tutorials on the Pulse Sensor which explains everything. You can find links in the related projects section.
Android cell phone Application:
The Bluetooth cell phone application is designed in Android Studio. I have a very detailed tutorial on how to design your own android cell phone application. The APK file of this project can be downloaded by clicking on the following link.
Download Patient Monitoring Application: patient monitoring application
If you want to learn how to make your own android application then you can watch my video tutorial.
Note: this old version of the Blynk app is no more functional. For the blynk mobile App setup and Blynk.cloud dashboard setup ready my article on the New Blynk V2.0. In this article I have explained how to migrate your projects from Blynk 1.0 to the new Blynk V2.0. You can also watch the video.
Blynk Application Designing:
- First of all, open the Blynk application…
- Set the project name as IoT Patient…
- Click on the choose device and select Nodemcu….
- Make sure you set the connection type to wifi and then click on the create button, an authentication token will be sent on your email id, which will be then used in the programming, simply copy and paste it in the programming …
- Click anywhere on the screen and search for the gauge and add it…
- Now click on the gauge set the name…
- Click on the pin and select virtual pin V3…
- Set the maximum value to 50, Change the Font size, click on the push button and select 1 second…
- Now again click on the screen and add another gauge, follow the same exact steps but select virtual pin V4…
- Now again click on the screen and this time search of the LCD widget and add it…
- Select the input type as advanced…
- Click on the pin and select virtual pin V5. That’s it.
If you find it difficult to follow these steps then you can watch my video given at the end of this article, which practically explains all the steps.
IoT Based Patient Monitoring System Programming:
In this project two programs are used, one program is written for the Arduino while the other program is written for the Nodemcu ESP8266 Wifi Module. Before you start the programming, first of all, make sure that you download all the necessary libraries used in the making of the IoT based Patient Monitoring System.
Let’s first start with the Arduino programming.
IoT Based Patient monitoring system Arduino Programming:
|
1 2 3 4 5 6 7 8 9 10 11 12 13 14 15 16 17 18 19 20 21 22 23 24 25 26 27 28 29 30 31 32 33 34 35 36 37 38 39 40 41 42 43 44 45 46 47 48 49 50 51 52 53 54 55 56 57 58 59 60 61 62 63 64 65 66 67 68 69 70 71 72 73 74 75 76 77 78 79 80 81 82 83 |
#define USE_ARDUINO_INTERRUPTS true // Set-up low-level interrupts for most acurate BPM math. #include <PulseSensorPlayground.h> // Includes the PulseSensorPlayground Library. #include <OneWire.h> #include <DallasTemperature.h> #include <SoftwareSerial.h> #include <stdlib.h> SoftwareSerial nodemcu(2,3); SoftwareSerial blue(7,8); // bluetooth module connected here // Variables const int PulseWire = 0; // PulseSensor PURPLE WIRE connected to ANALOG PIN 0 const int LED13 = 13; // The on-board Arduino LED, close to PIN 13. int Threshold = 550; // Determine which Signal to "count as a beat" and which to ignore. // Use the "Gettting Started Project" to fine-tune Threshold Value beyond default setting. // Otherwise leave the default "550" value. PulseSensorPlayground pulseSensor; // Creates an instance of the PulseSensorPlayground object called "pulseSensor" // for ds18b20 temperature sensor #define ONE_WIRE_BUS 4 OneWire oneWire(ONE_WIRE_BUS); DallasTemperature sensors(&oneWire); float Celcius=0; float Fahrenheit=0; String cdata; // complete data, consisting of sensors values int sdata1 = 0; // temperature centigrade int sdata2 = 0; // temperature Farenheit char buff[10]; String tempc; String tempf; void setup() { Serial.begin(9600); // For Serial Monitor nodemcu.begin(9600); blue.begin(9600); // set up the LCD's number of columns and rows: // Configure the PulseSensor object, by assigning our variables to it. pulseSensor.analogInput(PulseWire); pulseSensor.blinkOnPulse(LED13); //auto-magically blink Arduino's LED with heartbeat. pulseSensor.setThreshold(Threshold); // Double-check the "pulseSensor" object was created and "began" seeing a signal. if (pulseSensor.begin()) { Serial.println("We created a pulseSensor Object !"); //This prints one time at Arduino power-up, or on Arduino reset. } } void loop() { int myBPM = pulseSensor.getBeatsPerMinute(); // Calls function on our pulseSensor object that returns BPM as an "int". // "myBPM" hold this BPM value now. if (pulseSensor.sawStartOfBeat()) { // Constantly test to see if "a beat happened". Serial.println(myBPM); } delay(20); sensors.requestTemperatures(); Celcius=sensors.getTempCByIndex(0); Fahrenheit=sensors.toFahrenheit(Celcius); //TEMPERATURE SENSOR DS18B20 tempc = dtostrf(Celcius, 3, 2, buff); tempf = dtostrf(Fahrenheit, 3, 2, buff); cdata = cdata + tempc+","+tempf +","+myBPM; // comma will be used a delimeter Serial.println(cdata); nodemcu.println(cdata); blue.println("Patient Monitoring."); blue.println(cdata); delay(20); cdata = ""; } |
IoT Based Patient Monitoring System Arduino Program Explanation:
The Arduino communicates with the Nodemcu Module and Bluetooth module using Serial communication. As you know in Arduino we have only one serial port which is on pin number 0 and pin number 1. This is the Arduino’s Default serial port which I am going to use only for the debugging purposes.
To communicate with the Nodemcu module and Bluetooth module I defined two serial ports with the names Nodemcu and blue. The Nodemcu module is connected with the Arduino’s pin number 2 and pin number 3. While the Bluetooth module is connected with the Arduino’s pin number 7 and pin number 8.
The pulse sensor is connected with the Analog pin A0 of the Arduino.
const int LED13 = 13; // The on-board Arduino LED, close to PIN 13.
int Threshold = 550; // Determine which Signal to “count as a beat” and which to ignore.
// Use the “Gettting Started Project” to fine-tune Threshold Value beyond default setting.
// Otherwise leave the default “550” value
PulseSensorPlayground pulseSensor; // Creates an instance of the PulseSensorPlayground object called “pulseSensor”
// for ds18b20 temperature sensor
#define ONE_WIRE_BUS 4
OneWire oneWire(ONE_WIRE_BUS);
DallasTemperature sensors(&oneWire);
float Celcius=0;
float Fahrenheit=0;
String cdata; // complete data, consisting of sensors values
int sdata1 = 0; // temperature centigrade
int sdata2 = 0; // temperature Farenheit
char buff[10];
String tempc;
String tempf;
These lines are already explained in my previous pulse sensor based projects and DS18B20 Water proof temperature sensor based projects. I simply combined the two programs. Check the related projects section.
In the void setup function, I activated the serial communication. The rest of the functions are exactly the same as explained in my previous tutorials.
Then starts the void loop function. The Beats Per Minute value is stored in the variable myBPM.
sensors.requestTemperatures();
Celcius=sensors.getTempCByIndex(0);
Fahrenheit=sensors.toFahrenheit(Celcius);
These instructions are used to read the temperature in Celsius and Fahrenheit.
The temperature values are converted into string values with 2 decimal points precision. Finally, I created a complete message consisting of the temperature and BPM values. Then these values are sent to the serial monitor, Nodemcu module and Bluetooth module. Now let’s discuss the Nodemcu Programming.
IoT Patient Monitoring System Nodemcu ESP8266 Programming:
|
1 2 3 4 5 6 7 8 9 10 11 12 13 14 15 16 17 18 19 20 21 22 23 24 25 26 27 28 29 30 31 32 33 34 35 36 37 38 39 40 41 42 43 44 45 46 47 48 49 50 51 52 53 54 55 56 57 58 59 60 61 62 63 64 65 66 67 68 69 70 71 72 73 74 75 76 77 78 79 80 81 82 83 84 85 86 87 88 89 90 91 92 93 94 95 96 97 98 99 100 101 102 103 104 105 106 107 108 109 110 111 112 113 |
/* * lcd.print(x,y,"messsage"); * where x is a symbol position(0 to 15) * y is a line number (0 or 1) * lcd.clear(); */ #define BLYNK_PRINT Serial #include <ESP8266WiFi.h> #include <BlynkSimpleEsp8266.h> #include <SoftwareSerial.h> #include <SimpleTimer.h> WidgetLCD lcd(V5); char auth[] = "4X3sM0gYDQmB6ZuAuo_zhvMK8jmdc_4F"; // Your WiFi credentials. // Set password to "" for open networks. char ssid[] = "ZONG MBB-E8231-6E63"; char pass[] = "janikhan1"; SimpleTimer timer; String myString; // complete message from arduino, which consists of snesors data char rdata; // received characters String firstVal, secondVal,thirdVal; // sensors // This function sends Arduino's up time every second to Virtual Pin (1). // In the app, Widget's reading frequency should be set to PUSH. This means // that you define how often to send data to Blynk App. void myTimerEvent() { // You can send any value at any time. // Please don't send more that 10 values per second. Blynk.virtualWrite(V1, millis() / 1000); } void setup() { // Debug console Serial.begin(9600); Blynk.begin(auth, ssid, pass); timer.setInterval(1000L,sensorvalue1); } void loop() { if (Serial.available() == 0 ) { Blynk.run(); timer.run(); // Initiates BlynkTimer } if (Serial.available() > 0 ) { rdata = Serial.read(); myString = myString+ rdata; // Serial.print(rdata); if( rdata == '\n') { String l = getValue(myString, ',', 0); String m = getValue(myString, ',', 1); String n = getValue(myString, ',', 2); firstVal = l; secondVal = m; thirdVal = n; myString = ""; // end new code } } } void sensorvalue1() { // You can send any value at any time. // Please don't send more that 10 values per second. Blynk.virtualWrite(V3, firstVal); Blynk.virtualWrite(V4, secondVal); lcd.clear(); lcd.print(0,0,"BPM:"); lcd.print(11,0,thirdVal); lcd.print(0,1,"ElectroniClinic"); } String getValue(String data, char separator, int index) { int found = 0; int strIndex[] = { 0, -1 }; int maxIndex = data.length() - 1; for (int i = 0; i <= maxIndex && found <= index; i++) { if (data.charAt(i) == separator || i == maxIndex) { found++; strIndex[0] = strIndex[1] + 1; strIndex[1] = (i == maxIndex) ? i+1 : i; } } return found > index |
IoT Based Patient Monitoring System Nodemcu ESP8266 Program explanation:
If you are using the Nodemcu Module for the first time, then I highly recommend first watch my getting started tutorials, in which I explained how to install the Nodemcu board and how to write a basic program to control an LED and how to monitor the LDR. These tutorials will help you how to use the Nodemcu module for the first time. These tutorials are available on my YouTube channel “Electronic Clinic”. I have a dedicated playlist for Nodemcu based projects and tutorials.
This is exactly the same program which I used in the IoT based weather station monitoring system. In this program, I did a few changes. I defined a virtual pin for the LCD widget and
Increased number of variables from two to three.
lcd.clear();
lcd.print(0,0,”BPM:”);
lcd.print(11,0,thirdVal);
lcd.print(0,1,”ElectroniClinic”);
Added these instructions which are used to display the BPM value on the LCD widget.
String getValue(String data, char separator, int index)
{
int found = 0;
int strIndex[] = { 0, -1 };
int maxIndex = data.length() – 1;
for (int i = 0; i <= maxIndex && found <= index; i++) {
if (data.charAt(i) == separator || i == maxIndex) {
found++;
strIndex[0] = strIndex[1] + 1;
strIndex[1] = (i == maxIndex) ? i+1 : i;
}
}
return found > index ? data.substring(strIndex[0], strIndex[1]) : “”;
}
This is the same function I have been using in all of my Arduino + Nodemcu projects. This function is used to split the string message using the comma as the delimiter. So that’s all about the programming. For the practical demonstration and step by step designing watch video tutorial given below. Support my YouTube channel by Subscribing, and don’t forget to like and share this video. If you have any questions, let me know in a comment.
Watch Video Tutorial:
How it is said be entirely different project
why are you giving two codes ? Is it possible using only one code
yes it is possible, you can use esp32, this way you can use the builtin bluetooth as well, Visit my Youtube Channel “Electronic Clinic” and watch my video on ESP32 BLUETOOTH AND WIFI TOGETHER. Its article is also available on website.
if i use only second code then it can work properly or not?
if i only wants blynk server not that android app then what are the changes in circuit diagram and in the code.
Why we use Bluetooth module because we have esp and blynk?
Can you please suggest any other/better pulse sensor now?