List of electronics components with images and function, Must have components
Table of Contents
List of Electronics Components:
List of Electronics Components with Images and Amazon Links- While working on any electrical or electronics projects, you will need certain tools and electronics components to complete different projects. The list of electronics components that I am going to share with you in this article are the type of components that I have been using for years in different electronics projects. Today I will share with you the images of these electronics components and the basic function, and I will also share with you the projects links, this way you can easily learn how to use any of the following electronics components.
It took me days to gather all these electronics components with Amazon links. I will start with the most basic electronics components first and then I will continue with other components that can be used in some amazing intermediate and advanced level projects. I gave you my words if you have all of the below listed electronics components then you can make hundreds of videos for your YouTube channel and of course you can write hundreds of Articles for your website. You can take my website as an example. If you want to study in more detail about any of these electronics components then you can simply make a search on my website or you can go through all the menus.
Another reason that I am writing this article is that, most of the time people ask me where to purchase these components, they keep asking about the prices. The electronics components given in the list below are provided with Amazon links, you can select components from different suppliers, compare their prices, and then finally you can purchase the one which best suits your need.
*Please Note: These are affiliate links. I may make a commission if you buy the components through these links. I would appreciate your support in this way!
Without any further delay, let’s get started!!!
List of Electronics Components with Amazon Links:
Power Supplies, Readymade:
While working on any electrical or electronics projects you will need a power supply to power up your electronics. You can use a readymade voltage adaptor or you can make a power supply yourself. We will discuss each one in detail. Let’s first start with the 12V and 5V adaptors.
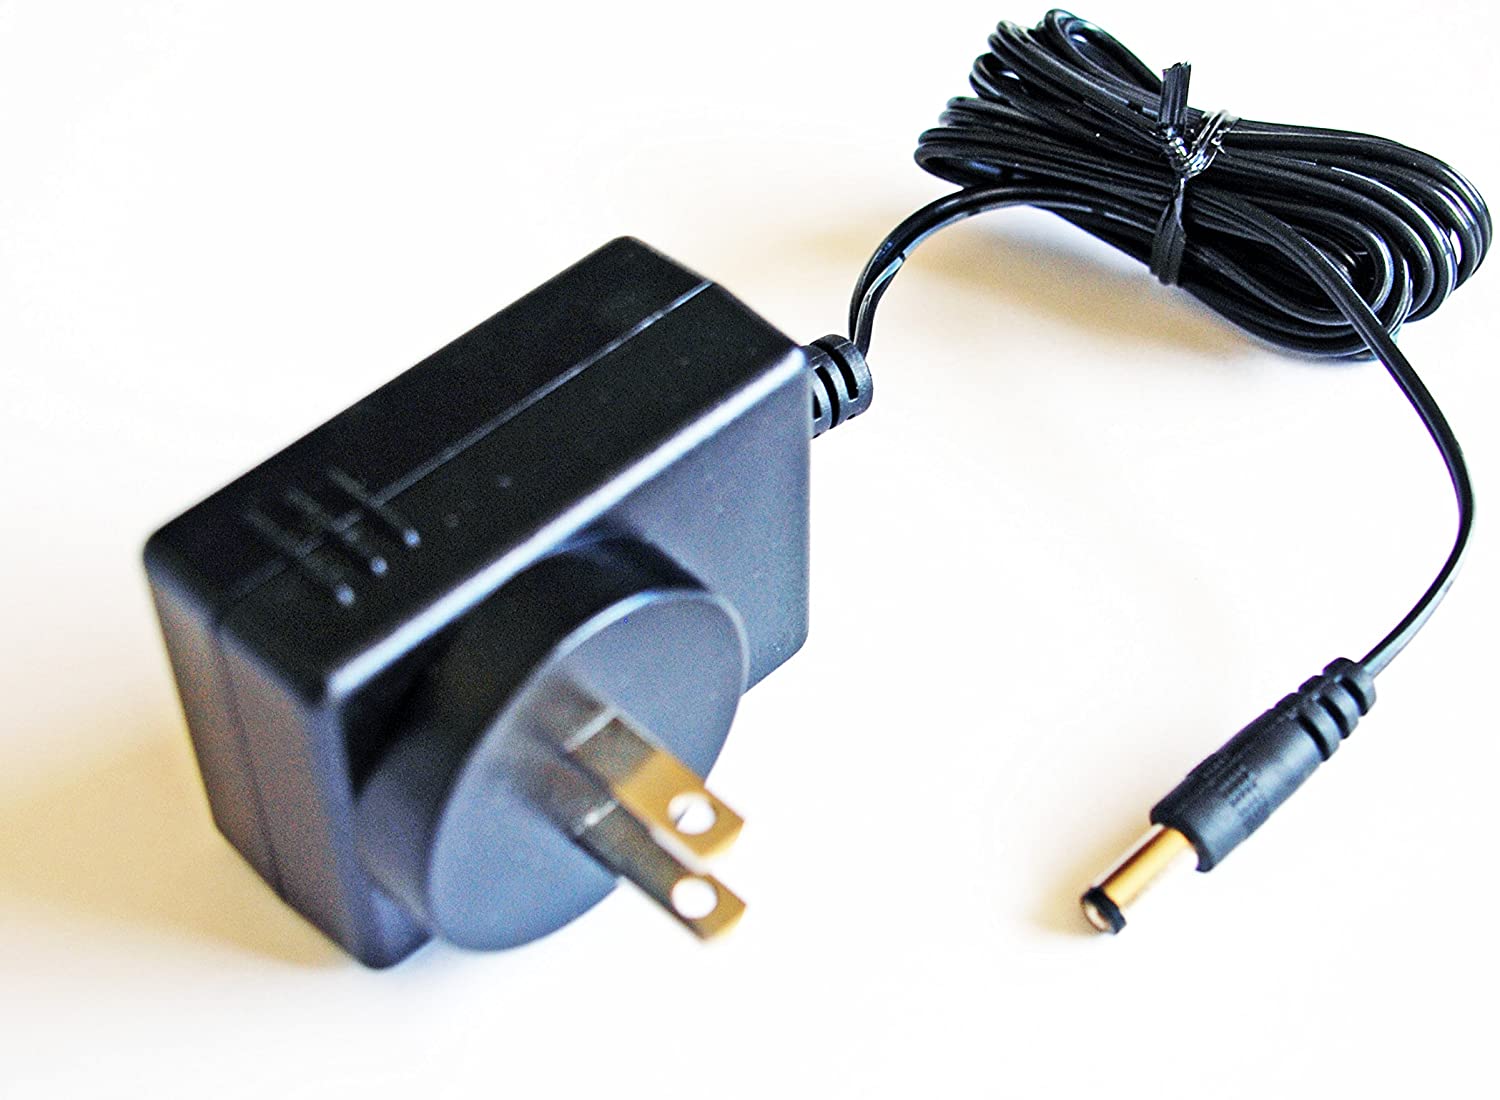
12V Adaptor:
Amazon Link:
The adaptor you can see in the image above is 12V and 1A. Above you can also see the Amazon link which you can use to explore different types of voltage adaptors. These are available in different sizes; you can order the one which best suits your requirement. Now such 12V adaptors can be used to power up 12V DC motors, different Arduino boards, 12V relays, etc. This is the must have electronic device and as a beginner you can start with any 12V and 1A to 5A adaptor rather than purchasing expensive Power supplies. There are hundreds of projects available on my website and YouTube channel in which I have been using 12V adaptors.
5V Adaptor:

Amazon Link:
The Adaptor as you can see in the image above is 5V and 2A. The shape is very similar to the 12V adaptor but the specifications are different. Now, there are thousands of electronics components which need 5V. In a situation like this you can use this 5V and 2A adaptor. Above is the Amazon links which can be used to explore different 5V adaptors and then you can select the one which fulfills your needs. Personally, I have been using this 5V and 2A adaptor for powering up the GSM Sim900A module, 5V relays, 5V dc motors, 5V PIR Sensors, and 5V buzzers, etc.
DIY, Regulated Power Supplies:
While working with controller chips likes Atmega328, Logic gates, and other sensitive electronics components you will regulated voltage. The problem with the readymade adaptors is that the output voltage fluctuates a bit and this may damage these controller ICS, in situation like this we use regulators. We have 3.3v regulators, 5V regulators, 6V regulators, 8V regulators, 9V regulators, 12V regulators, and so on. In fact we have a complete 78xx series of regulators. Although in this series we have many fixed voltage regulators, but personally I have been using the 7812 and 7805 voltage regulators. Apart from the fixed value voltage regulators we also have the variable adjustable voltage regulators; the most famous one is the LM317T variable adjustable voltage regulator.
7812 Voltage Regulator:

Amazon Link:
With this voltage regulator you can make a 12V regulated power supply. This voltage regulator accepts a wide range of input voltages and outputs only 12 volts. The recommended input voltage is 13v < V < 28v. So, you can connect any voltage in this range and it will give you regulated 12 volts. You can use this regulated 12 volts to power up relays, small 12V dc motors, and so many other electronics components that need 12 volts.
7805 Voltage Regulator:

Amazon Link:
The 7805 regulator looks just like the 7812, but this one outputs 5volts. 7805 voltage regulator is the most popular one and is most frequently used to power up microcontroller chips like Atmega328, PIC microcontroller, 8051 family of microcontrollers, Nodemcu ESP8266, ESP32, etc. There are thousands of electronics components which needs only 5volts. The pinout of the 78xx series of controllers is exactly the same. The use is same but the output is different. Read more 78xx and 79xx regulators…
LM317T Variable Voltage Regulator:

Amazon Link:
LM317T Variable Voltage Regulator:
The construction of the LM317T variable voltage regulator is just like the 78xx and 79xx series of voltage regulators. LM317T is not as famous as the 78xx series but it has its use. I have also used this regulator for powering up the GSM SIM900A module and some other electronic circuits and sensors. The 78xx series of regulators gives fixed output voltage while the output of the LM317T can be adjusted. You can set different output voltages as per your need. Read more about the LM317T…
Controller Boards:
To make an efficient, durable, and cost effective automatic monitoring and control system, you will need some kind of a controller board that can be easily programmed. Today, we have different types of controller boards like for example, the 8051 family of microcontrollers, PIC microcontrollers, Arduino Boards, STM32 controller boards etc. I have used all these boards in different types of beginners, intermediate, and advanced level projects. As a beginner you can start with the Arduino boards and the STM32 controller boards.
Arduino Boards:

Amazon Links:
Many boys and girls call Arduino as the controller. Arduino is not a controller but it is a controller board. Arduino is a family of different type of controller boards, including Arduino Uno, Arduino Nano, Arduino Mega, Arduino Micro, Arduino micro mini etc. Arduino Uno board is the most popular controller board in the Arduino Family and is used throughout the world. All these different Arduino boards can be programmed in the Arduino IDE. It totally depends on your requirement which Arduino board you want to start with. If you want to reduce the size and cost of your project then you can start with the Arduino Nano, Arduino pro Mini or micro etc. All the things that you can do with the Arduino Uno can also be done using the Arduino Nano board which is small in size and also cheap. If you need more i/o pins, more serial ports, more analog pins, more interrupts pins then you can start with the Arduino Mega. Read more about Arduino Uno Vs Arduino Mega Vs Arduino Nano.
STM32 Controller Board:

Amazon Link:
The STM32 Blue Pill controller board is becoming very popular and is considered to be the best alternative to Arduino Uno. STM32 is best than Arduino in every regard. STM32 is also programmed using the Arduino IDE. Read more STM32 Vs Arduino Uno.
IoT supported Controller Boards:

Amazon Links:
ESP32 Wifi + Bluetooth Module:
There are things “IoT applications” that you can’t do with Arduino, PIC microcontroller boards, 8051 family of microcontrollers, etc. If we only talk about the Arduino boards, they are not provided with any such feature, you will need extra hardware like some sort of extension board to use it for remote monitoring and controlling using WiFi connection, this will definitely increase the cost and size, and seriously this is something that we don’t want. Nodemcu ESP8266, ESP8266 D1 Mini, and ESP32 WiFi + Bluetooth module are IoT supported Controller boards. These are developed by the Espressif Systems. These are small in size and cheap. I have used Nodemcu ESP8266 and ESP32 in hundreds of projects. You can check my IoT based projects. Nodemcu ESP8266 and ESP32 both looks pretty much the same but they are different. Nodemcu ESP8266 has only one Analog pin while ESP32 has multiple analog pins. Nodemcu ESP8266 has no built-in Bluetooth module while the ESP32 has a Bluetooth. Both the boards “Nodemcu ESP8266 and ESP32” can be programmed using the Arduino IDE.
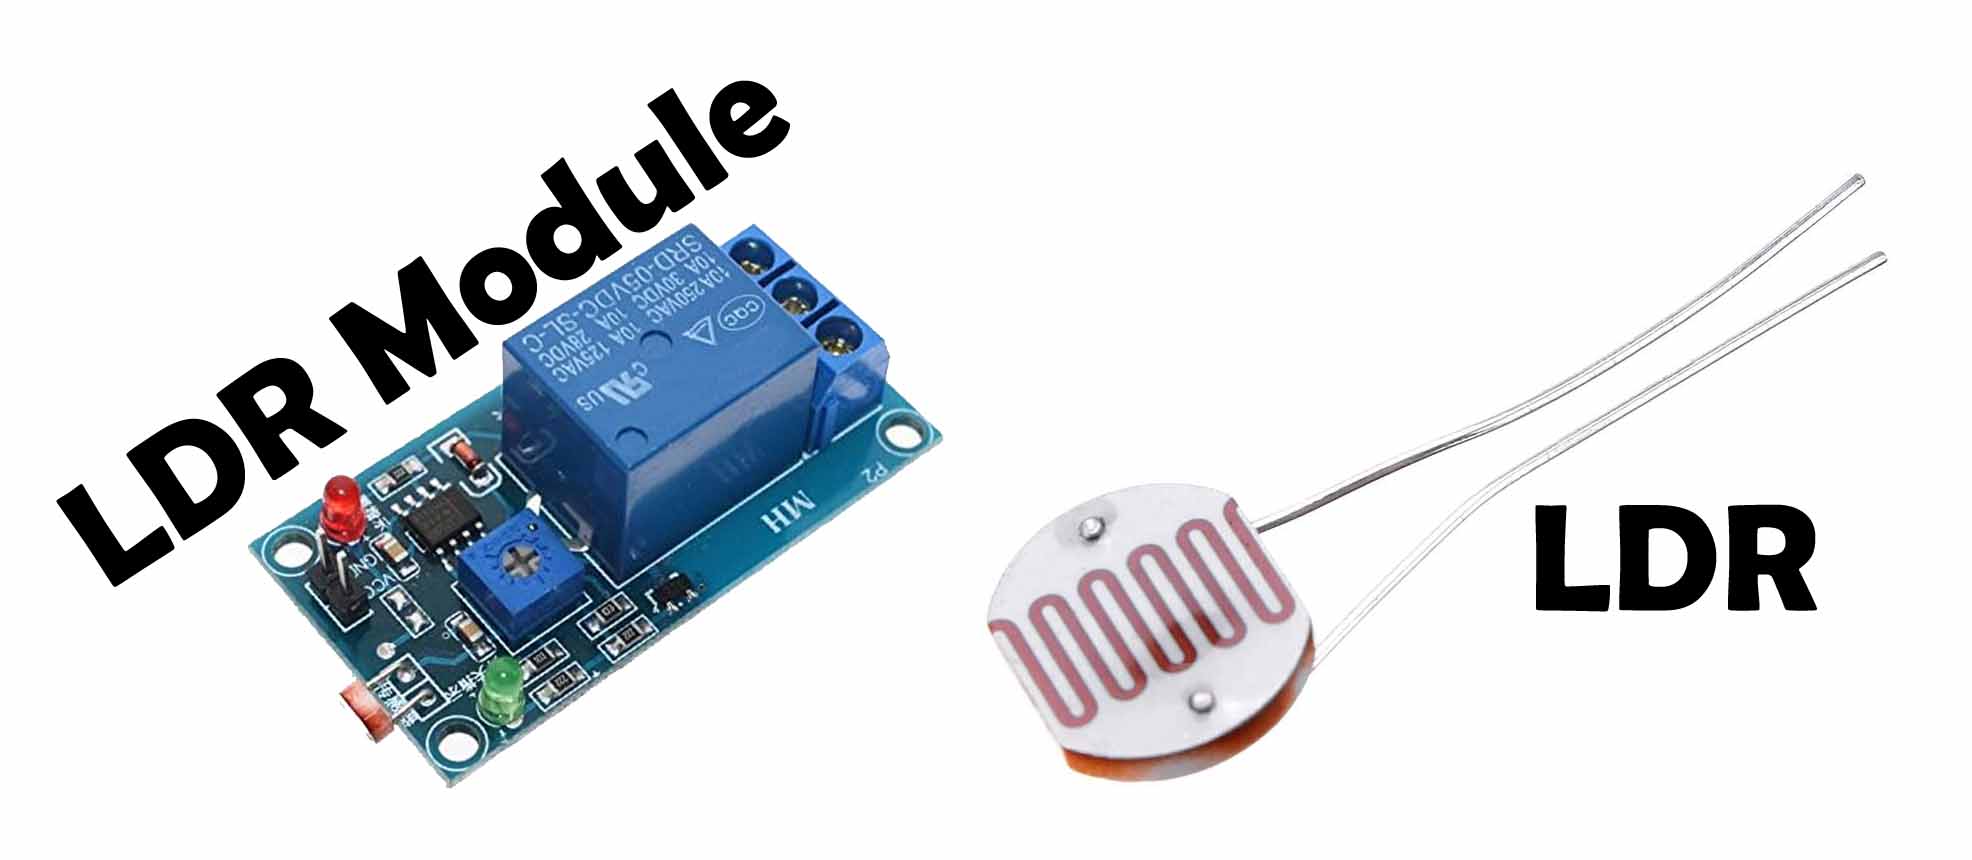
LDR “Light dependent resistor”:
Amazon Links:
LDR “light dependent resistor”:
LDR stands for Light Dependent Resistor i.e. the resistance changes with the light intensity. In the image above you can see, one is a simple LDR sensor, while the other one is an LDR module. Both can be used with the Arduino. With the help of LDR sensor you can make a laser security system, you can make the day and night detection system, etc. want to read more about the LDR Sensor and how to use it with Arduino in this article I have explained each and every detail with the help of circuit diagrams and Arduino programming.
Temperature Sensors:
Amazon Links:
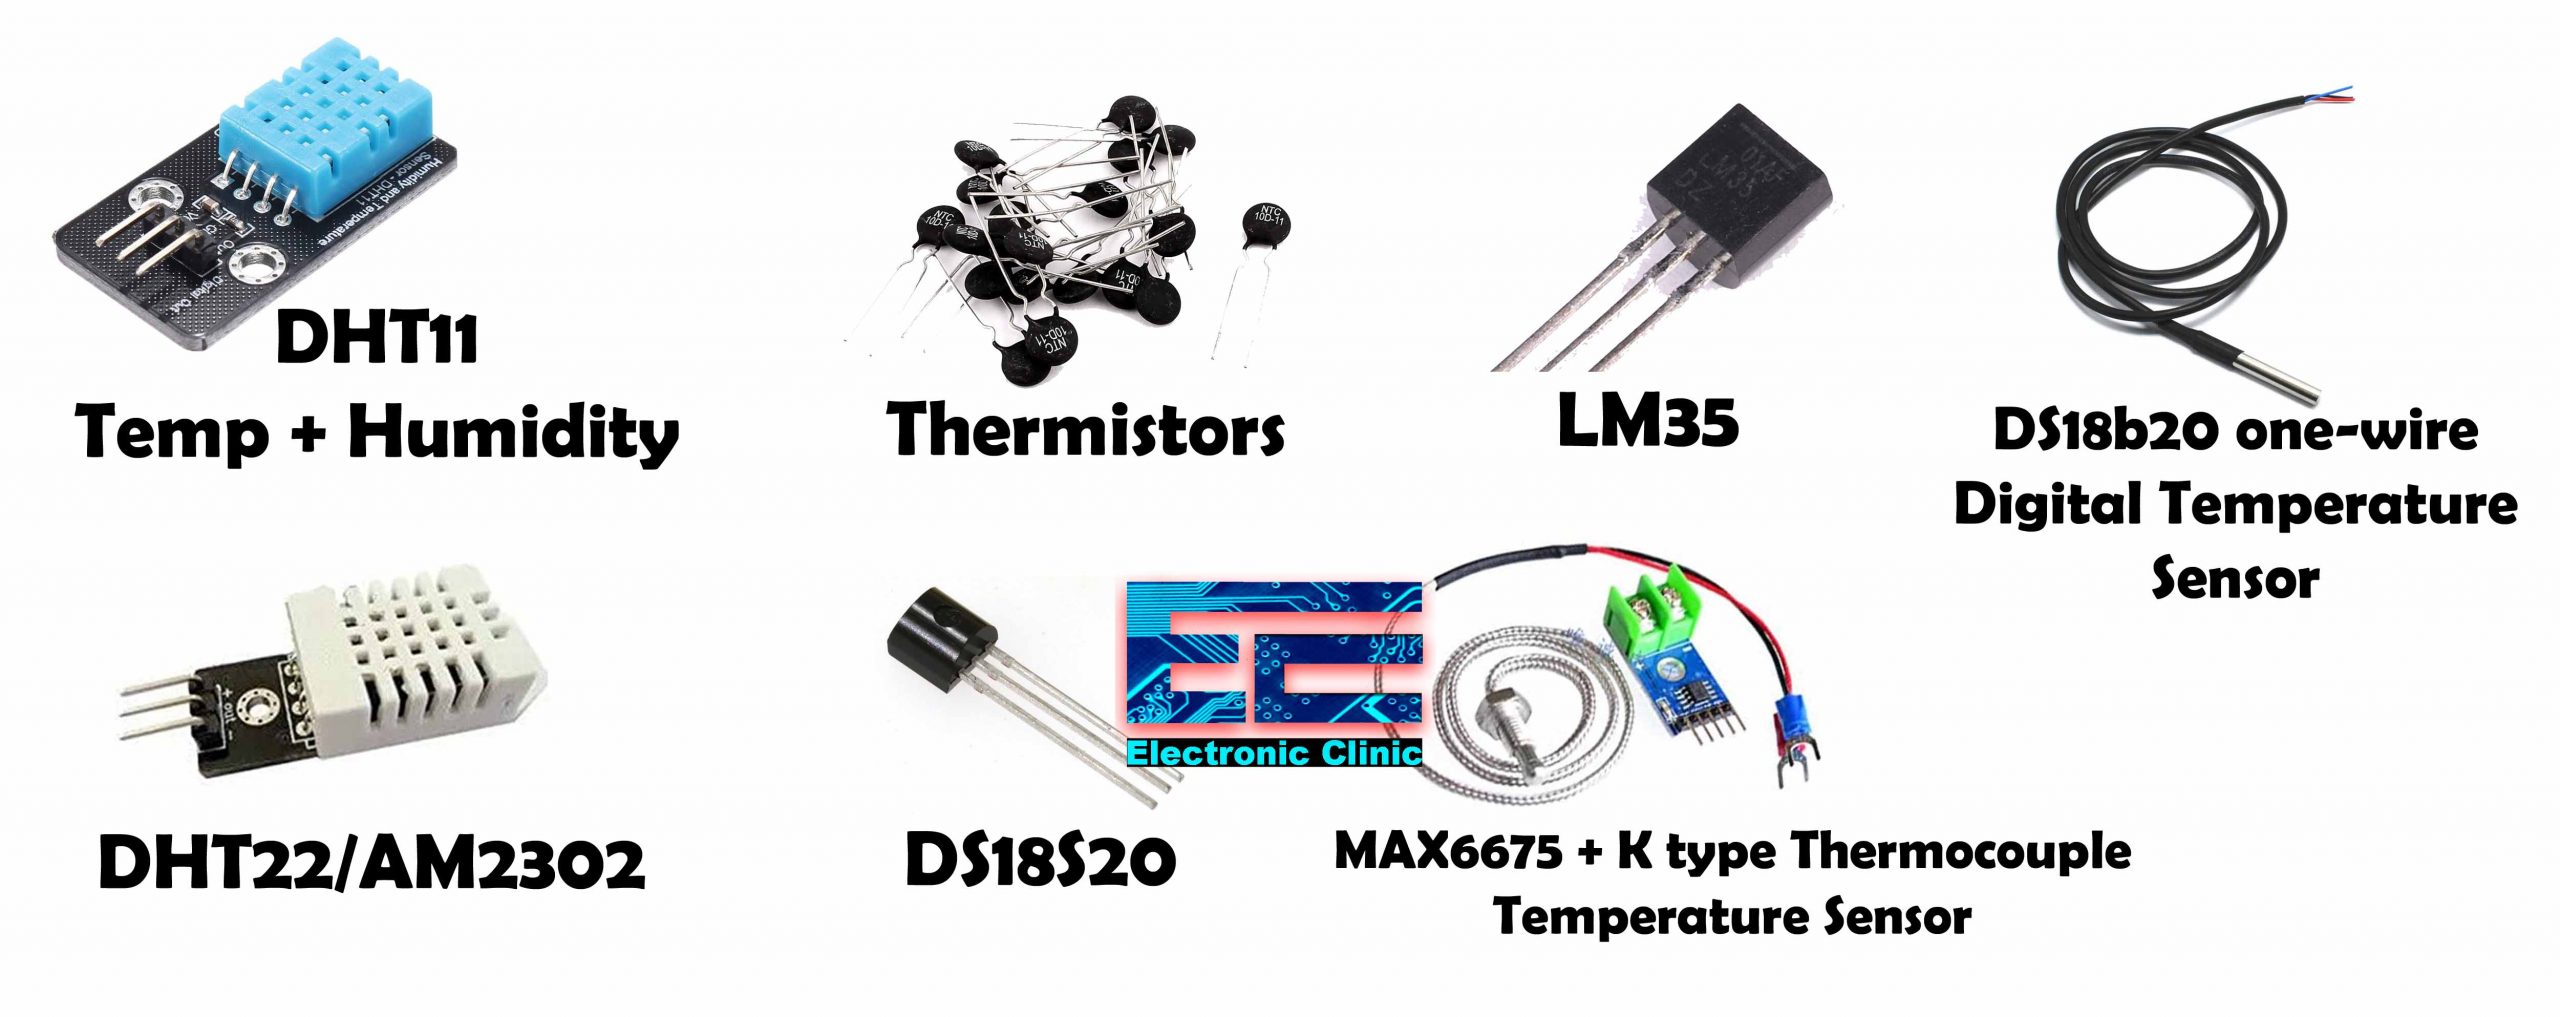
DHT11 Temperature and Humidity Module:
DS18B20 one-wire digital temperature sensor:
MAX6675 k type thermocouple and driver:
In the picture above you can see the most popular 7 different types of temperature sensors which I have used in different types of projects available on this website and on my YouTube channel. All these different sensors are used for temperature monitoring. These sensors have different ranges and are used in different ways. After reading their specs then you can decide which temperature sensor best suits your needs. We will discuss each one and I will also share links of the projects these temperature sensors are used in.
DHT11 Temperature and Humidity Sensor:
DHT11 Temperature and Humidity sensor is quite popular as it can be easily used with 5V and 3.3V compatible controller boards like Arduino Boards, Nodemcu ESP8266, and ESP32, etc. With the help of the DHT11 sensor you can monitor Temperature and humidity.
Temperature Range: 0°C to 50°C.
Humidity Range: 20% to 90% Resolution:
Temperature and Humidity both are 16-bit. Accuracy: ±1°C and ±1%
Read more about the DHT11 and how to use it with Arduino and GSM for monitoring temperature and humidity wirelessly.
DHT22/AM2302
The DHT22 / AM2302 humidity and temperature sensor is a sensor that measures temperature and humidity values and also outputs this via the 1-Wire protocol. The sensor has a larger, easy-to-install housing (see Figure 3). So he doesn’t have to be forcibly soldered on a circuit board. The DHT22 / AM2302 humidity and temperature has a measuring range of –40 ° C to +80 °C with a tolerance less than ±0.5 °C. The humidity can range from 0% to 100% with a tolerance value of ±2% can be measured. I have a very detailed on the DHT22/AM2302 and DS18b20.
DS18S20 Temperature Sensor:
The DS18S20 temperature sensor measures temperatures in a measuring range between –55 °C and +125 °C. The temperature is transmitted as a 9 or 12 bit number. Since each DS18S20 temperature sensor has a unique Serial number, several elements can be connected in parallel. I have a very detailed on the DHT22/AM2302 and DS18b20.
MAX6675 and K Type Thermocouple Temperature Sensor:
The K type thermocouple is the most commonly used thermocouple in industries. This is quite famous among all the professionals due to its cost, its accuracy, its reliability and on the top of all this it has a wide temperature range. This temperature sensor can be used in plastic injection molding machines, heaters, etc.
Temperature Range:
-270 to 1260C
Extension wire, 32 to 392F (0 to 200C)
Read more about the Max6675 and K type thermocouple and how to use it with Arduino.
LM35 and DS18B20 Temperature Sensor:
LM35 temperature sensor is among the oldest temperature sensors and are still very popular. The LM35 device is rated to operate over a −55°C to 150°C temperature range, while the LM35C device is rated for a −40°C to 110°C range (−10° with improved accuracy).
Local sensor accuracy (Max) (+/- C): 0.5
Operating temperature range(C): -40 to 110, -55 to 150, 0 to 100, 0 to 70
Interface type: Analog output
Supply voltage(Max)(V): 30
Supply voltage(Min)(V): 4
DS18B20 One-Wire waterproofed digital temperature sensor communicates over one wire interface and can measure temperatures from -55 degrees Celsius to +125 degrees Celsius with an accuracy of ±0.5 degrees Celsius. Multiple of DS18B20 temperature sensors can be connected with the same pin. Read more about DHT11 Vs DHT22 Vs LM35 Vs DS18B20.
Thermistor:
Thermistor is the type of a variable resistor whose resistance changes as the temperature increases or decreases. Use of the Thermistor is different from all the other temperature sensors that we just discussed. Thermistors are also available in different shapes and sizes. Read more about the Thermistor…
Display Modules:
Amazon Links:
SSD1306 128×64 Oled i2c display Module
A display Module is one of the must have electronics components that you should have while learning Arduino or building any project, because you will need a display module for displaying the data so that you or someone else can easily read the final data. Let’s say you want to monitor temperature or you want to monitor the RPM of a DC motor, you did all the calculation, and the final values are stored in different variables. Now, these values are inside the controller memory which you can’t see until you use some kind of display device to print these values on. You can print these values on the Serial monitor, but it seems quite impractical to use your laptop screen all the time for displaying the sensors data. An easiest solution can be, you can simply connect a display module with your Arduino and then you can display the data. We have so many different types of display modules, but as a beginner you can start with one of the following types of the display modules.
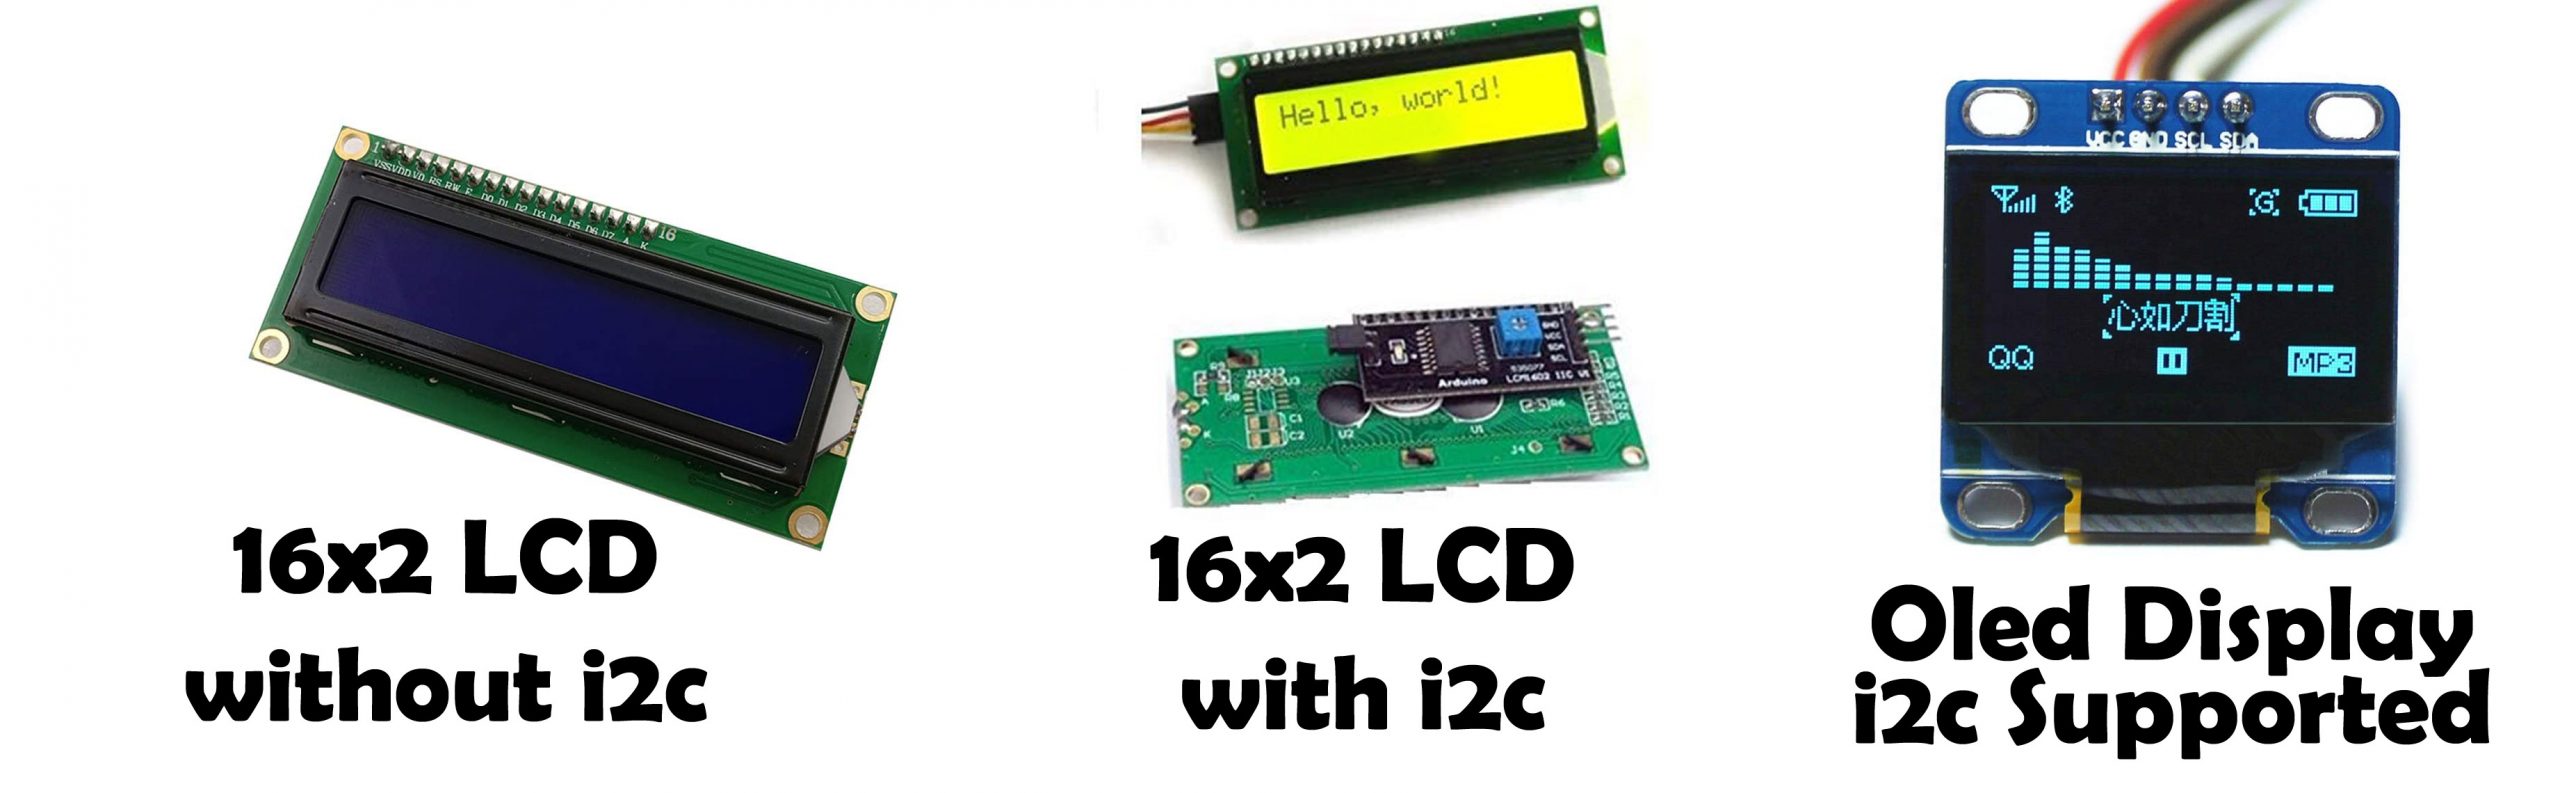
16×2 LCD Module:
We have actually two versions of the same 16×2 LCD, the first one is the normal 16×2 LCD which uses many wires when interfaced with the Arduino and the other version is the I2C 16×2 LCD.
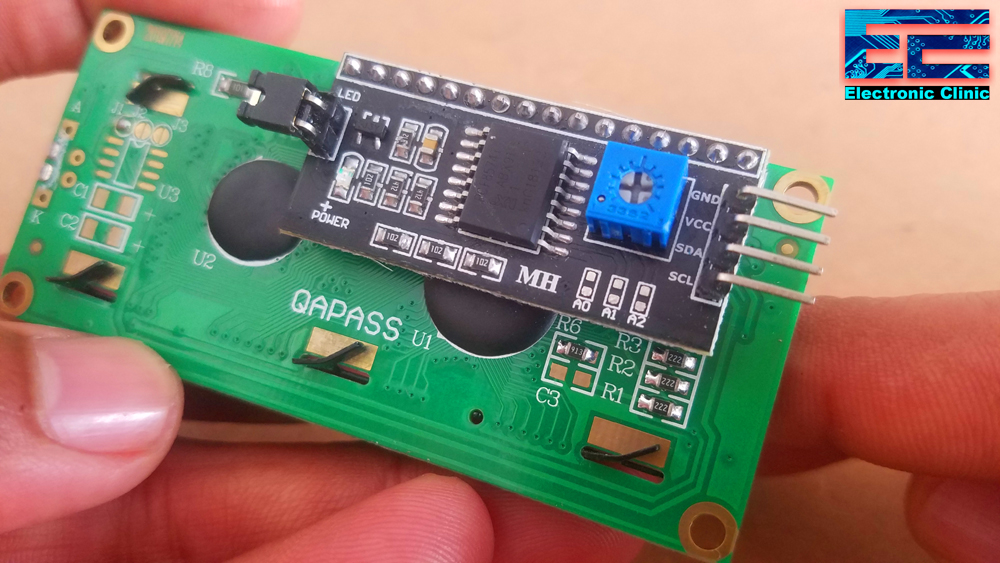
This is just a normal 16×2 LCD which is converted into an i2c supported type LCD by using the PCF8574 i2c Driver module. The four male headers are clearly labeled as GND, VCC, SDA, and SCL. A 10K variable resistor which is used for the adjustment of the LCD contrast.
I have used both the types of the 16×2 LCD modules in so many intermediate and advanced level projects.
16×2 LCD based projects:
16×2 LCD with Arduino, getting started tutorial.
16×2 I2C LCD with Arduino and Nodemcu ESP8266
Real-Time Clock with Arduino and 16×2 LCD
Count Down Timer using Arduino and I2C 16×2 LCD
I2C Oled Display Module:

Organic light-emitting diodes or Oleds. These were developed during the 20th century the very first commercial device to use old LEDs was a Kodak camera in 2003. in 2013 Samsung became the first company to release OLED televisions and they’re now the biggest manufacturer in the world of OLED television screens. The Oled displays are the kinds of devices you’ll see on items like mp3 radios and smart watches and they’re very nice. These things have a lot of excellent properties to use with an Arduino as a display, they are very easy to read, they take a very small current and you can read them from different angles.
We have two popular versions of the Oled Display module the one is the SSD1306 and the other one is the SH1106. I have used both the Oled display modules and personally I like the SSD1306 version. The SH1106 can also be used but I think you need to more about the SH1106 and how it is used with the Arduino. The SH1106 Oled display I used it only one time and never used it again. I used the SSD1306 version of the Oled Display Module in so many projects. As a beginner I highly recommend this for you and you should keep this display module with you all the time.
SSD1306 Oled display Module based Projects:
SSD1306 Oled Display with Arduino, Hydroponics System
SSD1306 Oled display with Nodemcu ESP8266
Laser Range Finder TOF10120 and SSD1306 Oled Display
SSD1306 Oled display with ESP32 WiFi + Bluetooth Module
SSD1306 Oled Display with the Seeeduino Xiao
SSD1306 Oled Display with the Raspberry PI
Relays:
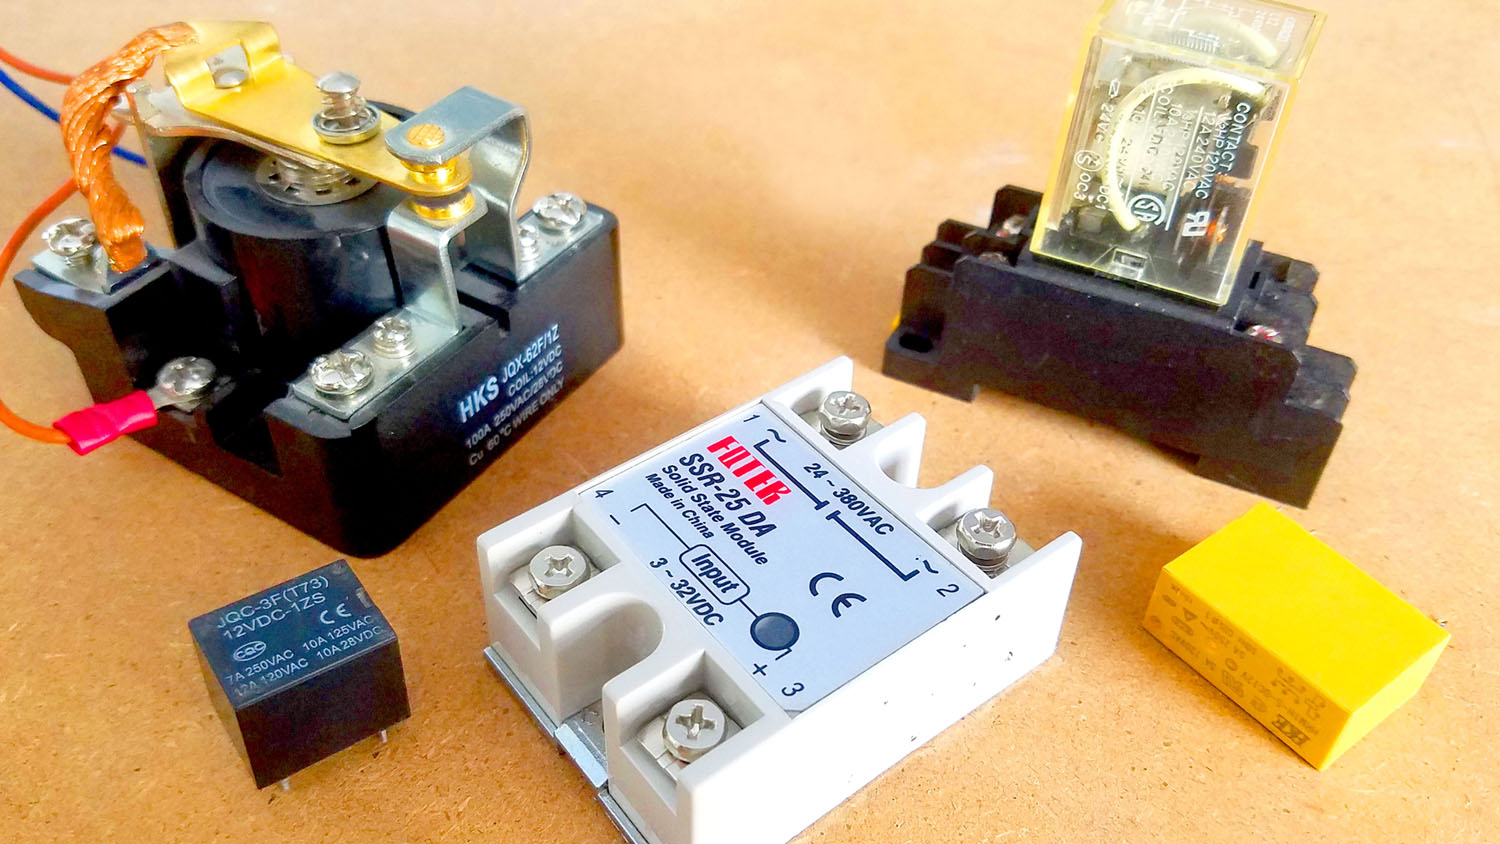
Amazon Links:
12v readymade 1 channel Relay Module
5v readymade 1 channel Relay Module
Relays are electro-mechanical switches used to control AC and DC loads. There is also SSR Solid State relay which doesn’t make any sound when operated. You can use a Relay to control your 110/220Vac Bulbs, Fans, Motors, Water Pumps, TV, CD players, etc. You will need relays for building home or office automation system. I know very well after learning the very basics you will attempt to make an automation system and for this you will need relays.
There are many types of the Relays but the most commonly used one is the SPDT type. SPDT stands for “Single Pole Double Throw”. Once you learn how to use the SPDT type relay then you can use all the other types, because the working principle of all the relays is exactly the same. I have also used the DPDT type relay, but for now you can only concentrate on the SPDT type relay. Relays are available in different shapes, Sizes, current ratings, and voltage ratings. In one of my previous projects I used even a 100A SPDT type relay, this project was based on the IoT power relay. As a beginner I highly recommend you should start with the 5v and 12v SPDT type relays. You can also try the readymade modules.
Relays based Projects:
Arduino based talking RFID system
ESP32 based IoT Smart Home Automation system
Arduino HMI based electrical loads controller
Raspberry Pi based Home Automation using RFID
Transistors and Mosfets:
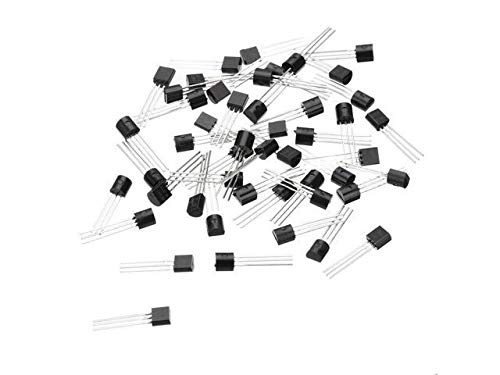
Amazon Links:
IRF1404 N-channel Power MOSFETs:
These are some of the most commonly used transistors and MOSFETs that I believe you should have. I trust me you will need these sooner or later, because while working on electronics projects, you may need to control a relay, a buzzer, or you may need to control the speed of a DC motor, or you may need to control the brightness of an ultra bright white LED. The transistors and Mosfets which are listed above have different current ratings. I have a very detailed tutorial on how to use the 2n2222 and BC547 in some cool projects. The 80NF70 and IRF1404 MOSFETs are used in High ampere applications; I built an electric bike speed controller with these. The TIP122 is my most favorite one, I normally use it for controlling the speed of DC motors with current ratings between 500mA and 4A.
LEDs:

Amazon Link:
More than 90% of boys and girls start with the LEDs when learning electronics. I myself started with the LEDs, I remember my first project which was to control an LED with and without using the Arduino. You will need LEDs while learning the Arduino programming, or while making some electronics based projects. You can use LEDs in power supplies; you can use them as an output signal. You can use LEDs as the level indicator, etc. LED is the must have electronics component.
Push Buttons:

Amazon Link:
After learning how to control LEDs using Arduino then the next thing immediately you are interested in is to control the same LED using a push button. When you push a button the LED start blinking and then turn OFF. A push button will really help you in understanding the input signals to the Arduino. Apart from the basics, you will also need push buttons for beginners, intermediate, and advanced level projects. You can make keypads, you can control electrical devices, and you can control the direction of a DC motor, etc. I have a very detail tutorial on how to use a push button with Arduino.
5v Buzzer:

Amazon Link:
You will need this 5V buzzer for a security based project or Fire Alarm system, or as a notifier if the sensor values crosses a predefined value. Recently, I used this 5V buzzer in a fire alarm system based on Arduino, Flame Sensor, and GSM module.
Must have Electronics Components:

Amazon Links:
PCB screw Terminal block connector:
The above components are the must have type of the electronics components that everyone should have. I know you are familiar with the diode, capacitors, and resistors. 1n4007 can be used in rectifier circuits for converting AC voltage in to DC voltage, this diode is also used with the relay coil pins against the back emf protection etc. So get yourself these 1n4007 diodes.
The 10Uf and 470Uf electrolytic capacitors are used in power supplies as the decoupling capacitors. You can use these capacitors with the 7812 and 7805 voltage regulators.
330-ohm, 1K, 10K, 4.7K, 1M are the most commonly used resistors and this is the reason I included these resistors in the must have electronics components.
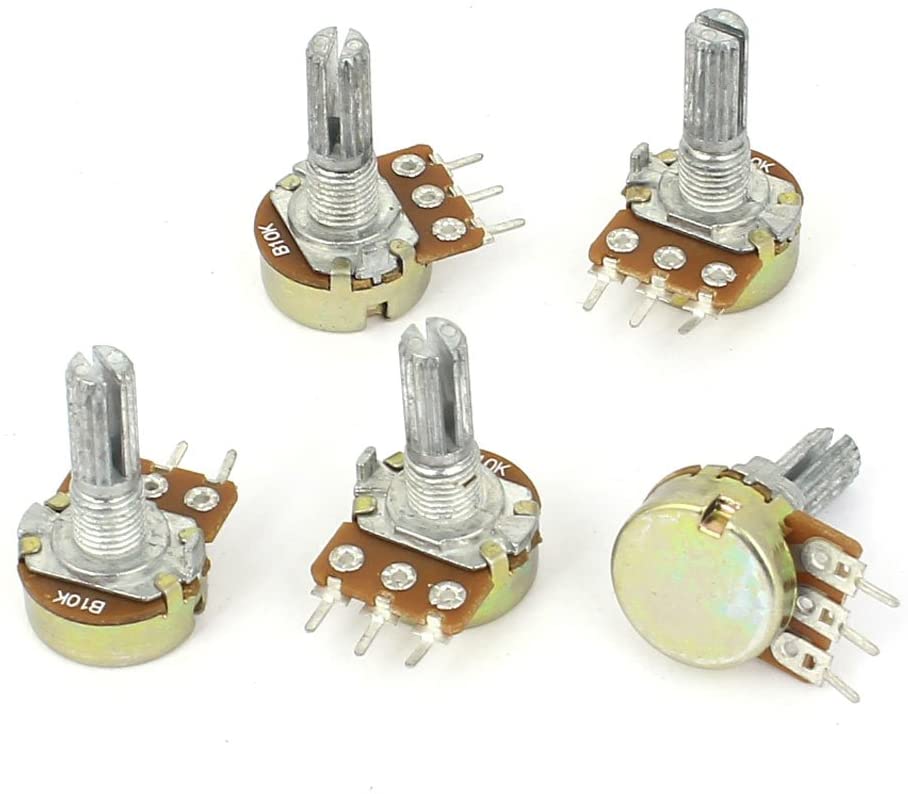
This is a variable resistor or Potentiometer which can be used with the Arduino’s Analog pins for controlling the speed of a DC motor, brightness of an LED, for controlling the 16X2 LCD contrast etc.
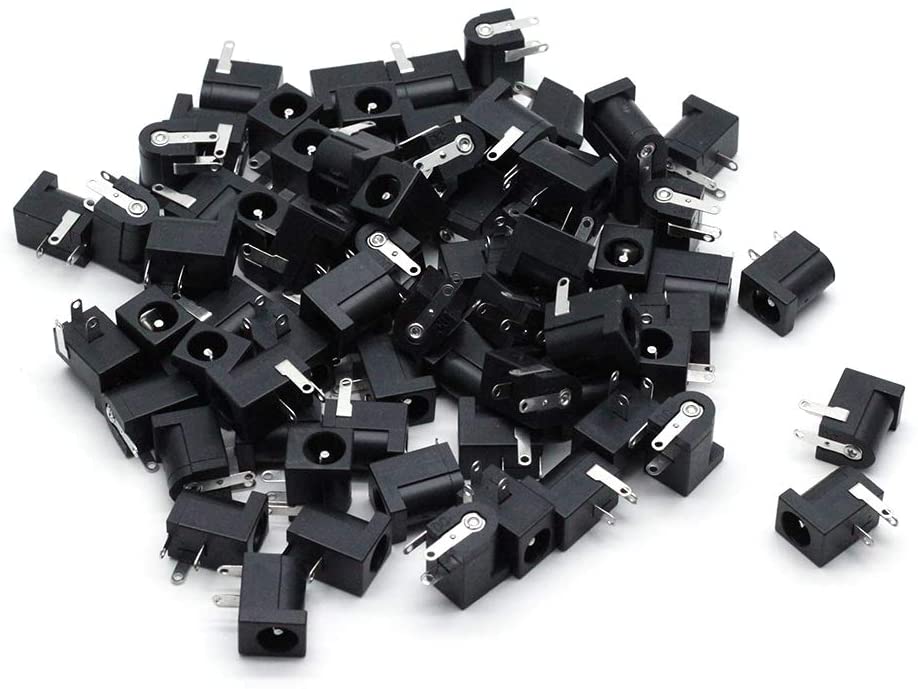
DC female power jack, You will need these for supplying power to your project. If you are using a 12V adaptor or 5V adaptor to power up your circuit than you will need these DC female power jacks.

The male and female type headers can be found on the Arduino boards. You will need these headers for Display modules, for connecting different sensors, etc.

Get yourself these perforated board called Vero boards. You will need these small Vero Boards for making prototype circuits. These Vero boards are best alternatives to PCB boards.

You will need these terminal block connectors for connecting AC or DC loads. These terminal block connectors are normally used with relays. These are also used for connecting external power supplies. These are available in different pins numbers, configuration, sizes, shapes, and prices.
Some other Electronics Components:
Here are some other electronics components that can be used in intermediate and advanced level projects. I have used all the above and below listed electronics components in different projects.
MFRC522 RFID module with tags:
12v Electronic Door Lock / Elock / Solenoid Lock:
MAX7219 8X8 LED Matrix module:
IR Remote and Sensor for Arduino
433 MHz Transmitter and Receiver Modules:
Reyax rylr890 Lora Transceiver Module:
IR adjustable infrared Proximity Sensor 2v to 24V:
Gravity: Analog pH Sensor / Meter Kit For Arduino by DFrobot:
HX711 Load cell / Strain Gauge:
MLX90614 Infrared Temperature Sensor for Arduino
5V to 3.3V Bi-directional Logic Level Converter for Arduino
Capacitive Soil Moisture Sensor V1.2:
You can make a search on my website. Simply type the component name in the search box and press enter.