Microwave Sensor with Arduino for humans and objects detection behind walls
Table of Contents
Microwave Sensor with Arduino, Description:
Microwave Sensor with Arduino for humans and objects detection behind walls– I have made so many basic, intermediate, and advanced level security systems and lights control systems; but the security system and the light control system that I am going to make today is just at another level.
I am going to use this digital Microwave Sensor with Arduino for moving humans and objects detection behind the walls. This digital microwave Sensor uses doppler radar to detect moving objects using microwaves. This differs from the method used by regular Infrared Sensor, Ultrasonics Sensor, PIR Sensor, TOF10120 sensor, etc. I have used all of these sensors in beginners, intermediate, and advanced level projects. I am not saying these sensors are bad but this microwave sensor is just at another level as the microwaves are sensitive to a variety of objects and the amazing thing is its sensor readings are not affected by ambient temperatures. So, that’s why, this type of sensor is widely used in industrial, transportation, and civil applications such as measuring liquid levels, automatic washing, measuring a vehicle’s speed, automatic door motion detection,car reversing, production line material detection, automatic lights control system, high level security systems, and so on.
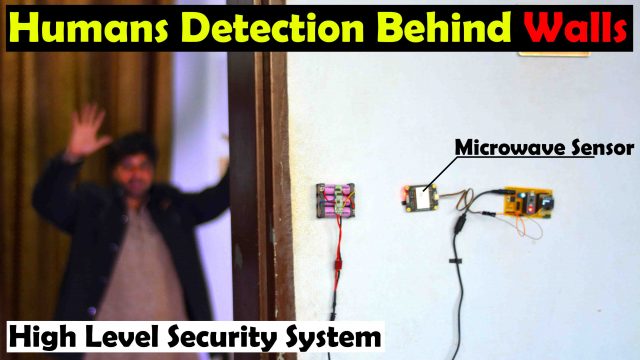
As you know Microwaves can penetrate through walls, so, I am going to use this digital microwave sensor for humans and objects detection behind the walls.
Since, I am using this digital microwave sensor for the first time, so that’s why I decided to start with a very basic project that is to control a light whenever there is any movement. This can be a street light, or a corridor light, or your lawn lights, or a light inside a room. It totally depends on your application. This microwave sensor is simply perfect for indoor and outdoor applications.
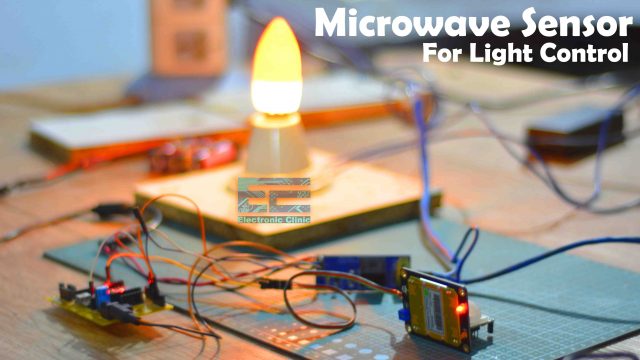
PIR sensor is quite famous for motion detection but you know it fails in outdoor applications during the daytime just because of the Sun’s infrared light and temperature. But the infrared light and temperature has no affect on the microwave sensor. You can see it’s working just perfectly, the light ON time duration can be changed as per the requirement. So, if you are planning of making a high-level lights control system then you should definitely use this microwave sensor. Now, in this next example, I am going to demonstrate how to detect moving objects or humans behind the walls.
Altium Designer:

Altium Designer is the world’s most trusted PCB design system. Altium Designer enables engineers to effortlessly connect with every facet of the electronics design process. Over 35 years of innovation and development focused on a truly unified design environment makes it the most widely used PCB design solution. With Altium Designer you can create PCB designs with an intuitive and powerful interface that connects you to every aspect of the electronics design process. Route it your way through any angle, tune for the delay, Push, Slide, and Walkaround faster than ever. Interact and collaborate with mechanical designers like never before in a photo-realistic, 3D design environment. If you want to get started with the Altium designer, you can click on the get started.
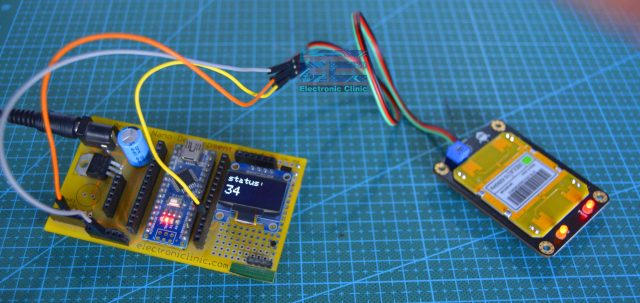
For this next example, I interfaced with this OLED display module for displaying the number of interrupts generated within 3 seconds. These interrupts are only generated when there are any moving objects or humans. So, a higher value means lots of movements. This microwave sensor has a distance range of 2 to 16 meters which can be adjusted using this blue color potentiometer. So, let’s go ahead and fix this microwave sensor on the door and let’s see if it can detect my brother, while fixing the sensor make sure the front of the sensor is towards the detection area.
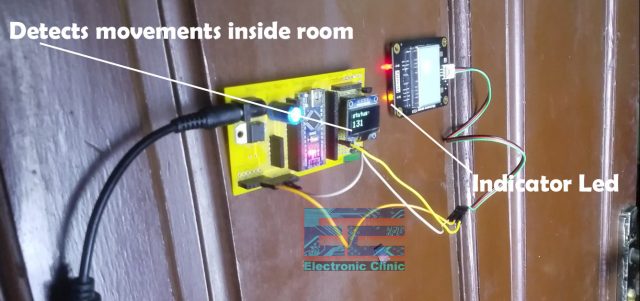
This is simply amazing. This microwave sensor successfully detected my brother inside the room. How about fixing this sensor inside? When there is someone at the door you will be notified, for this, you can interface a small buzzer with the Arduino. Now, let’s go ahead and check this sensor with the wall.
This is pretty awesome; it has passed all the tests. For this test, I set the detection range to the maximum value. Now, you can convert this project into some high-level security system by adding a GSM module and this way you will get a notification on your cell phone. You can also use this microwave sensor with ESP32 and ESP8266 and this way you can get notifications on your cell phone using IoT platforms like the Blynk application, Thingspeak, ubidots, Telegram, etc. Now, I am going to share with you the technical specifications, circuit diagrams, and programming. Without any further delay, let’s get started!!!
Amazon and DFrobot Links:
Arduino Nano USB-C Type (Recommended)
Gravity Microwave Sensor from DFrobot
SSD1306 128×64 Oled i2c display Module
Other Tools and Components:
ESP32 WiFi + Bluetooth Module (Recommended)
Super Starter kit for Beginners
PCB small portable drill machines
*Please Note: These are affiliate links. I may make a commission if you buy the components through these links. I would appreciate your support in this way!
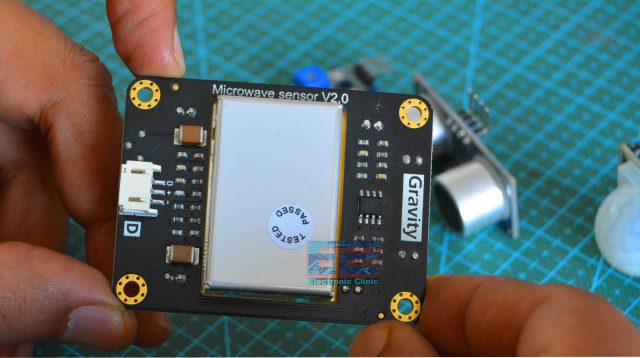
Digital Microwave Sensor V2.0:
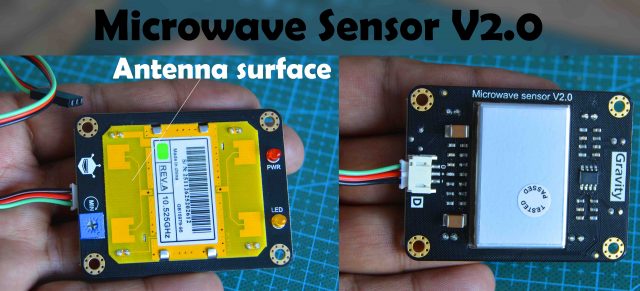
This is the Gravity Digital Microwave Sensor V2.0 from the DFrobot. This microwave sensor is able to detect objects without physical contact. Its readings are not affected by temperature, humidity, noise, air, dust, or light which makes it suitable for harsh environments. This sensor also has strong resistance to radio frequency interference. Due to it’s low output, it’s not harmful to the human body. Since this sensor uses microwaves and you know microwaves have a wide detection range and velocity equal to the speed of light. This digital microwave sensor also supports non-life-class object detection.
It’s working voltage is 5 volts.
Working current is 60mA maximum and 37mA typical.
The detection range is from 2 meters to 16 meters which is adjustable. You can use this blue color potentiometer to set the detection range.
The angle of detection is 72 degrees with the antenna in a parallel direction and the vertical direction of the antenna is 36 degrees. For other technical specifications read my article available on electroniclinic.com I will provide a link in the description.
- Emission:
- Detection Distance: 2-16M continuously adjustable
- Emission Frequency: 10.525 GHz
- Precision Frequency Setting: 3MHz
- Output Power (Minimum): 13dBm EIRP
- Harmonic Emission: < -10dBm
- Average Current: 2mA typ.
- Pulse Width (Min.): 5uSec
- Load Cycle (Min.): 1%
- Reception:
- Sensitivity (10dB S/N ratio) 3Hz to 80Hz bandwidth: -86dBm
- 3Hz to 80Hz Bandwidth Clutter: 10uV
- Antenna Gain: 8dBi
- Vertical 3dB Beam Width: 36 degrees
- Level 3dB Beam Width: 72 degrees
The Red color LED is the power LED and the Yellow color LED is the Signal Indicator LED. The indicator LED remains off, when there are no moving objects. The indicator LED will only turn ON when the sensor detects a moving object. The Yellow color PCB is the Antenna surface.
The red wire is the 5V, Black wire is the GND, and Green wire is the output wire. Now, let’s take a look at the circuit diagram of the automatic light control system using this Microwave Sensor.
Automatic Light Control, Circuit Diagram:
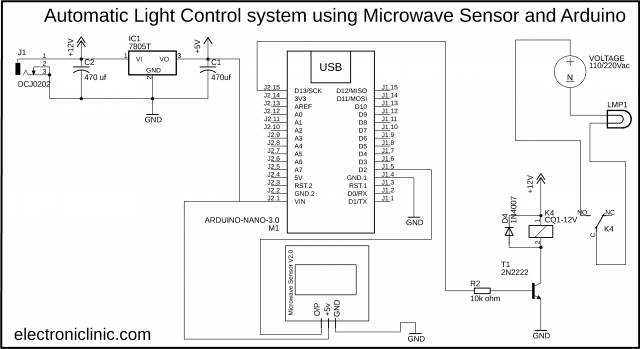
This is the circuit diagram of the Automatic Light Control system. The output pin of the microwave sensor is connected with the digital pin D2 of the Arduino while the +5v and GND pins are connected with the Arduino’s 5v and GND pins.
On the top left side is the regulated 5V power supply based on the LM7805 voltage regulator. J1 is the DC female power jack and this is where we connect a 12v adaptor, battery, or a solar panel.
On the right side is the 12v relay module which is connected with the digital pin 13 of the Arduino. This relay is used to control the bulb. You can see the neutral wire is directly connected with the bulb while the hot wire is connected with the bulb through this relay. Now, let’s take a look at the programming.
Before, you start the programming first of all, make sure you download this MsTimer2 library.
Automatic Light Control, Arduino Programming:
|
1 2 3 4 5 6 7 8 9 10 11 12 13 14 15 16 17 18 19 20 21 22 23 24 25 26 27 28 29 30 31 32 33 34 35 36 37 38 39 40 41 42 43 44 45 46 47 48 49 50 51 52 53 54 |
#include <MsTimer2.h> //Timer interrupt function library int pbIn = 0; // Define interrupt 0 that is digital pin 2 int ledOut = 13; // Define the indicator LED pin digital pin 13 int number=0; //Interrupt times volatile int state = LOW; // Defines the indicator LED state, the default is not bright void setup() { Serial.begin(9600); pinMode(ledOut, OUTPUT);// attachInterrupt(pbIn, stateChange, FALLING); // Set the interrupt function, interrupt pin is digital pin D2, //interrupt service function is stateChange (), when the D2 power //change from high to low , the trigger interrupt. MsTimer2::set(1000, Handle); // Set the timer interrupt function, running once Handle() function per 1000ms MsTimer2::start();//Start timer interrupt function } void loop() { Serial.println(number); // Printing the number of times of interruption, which is convenient for debugging. delay(1); if(state == HIGH) //When a moving object is detected, the ledout is automatically closed after the light 2S, //the next trigger can be carried out, and No need to reset. Convenient debugging. { delay(2000); state = LOW; digitalWrite(ledOut, state); //turn off led } } void stateChange() //Interrupt service function { number++; //Interrupted once, the number + 1 } void Handle() //Timer service function { if(number>2) //If in the set of the interrupt time the number more than 2 times, then means have detect moving objects, //This value can be adjusted according to the actual situation, which is equivalent to adjust the threshold //of detection speed of moving objects. { state = HIGH; digitalWrite(ledOut, state); //light led number=0; //Cleare the number, so that it does not affect the next trigger } else number=0; //If in the setting of the interrupt time, the number of the interrupt is not //reached the threshold value, //it is not detected the moving objects, Clear the number. } |
Now, let’s take a look at the circuit diagram of the moving objects and humans detection behind the walls.
Moving objects and humans detection circuit diagram:
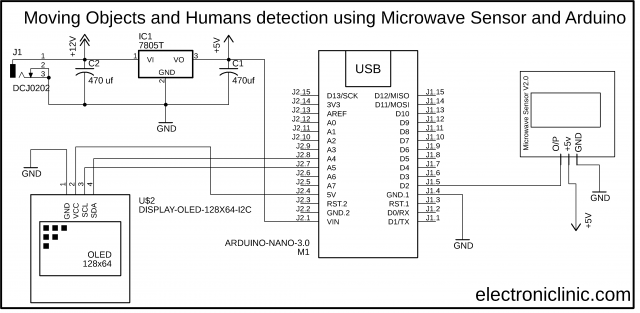
This time I removed the relay module and added the i2c supported SSD1306 Oled display module. The SCL and SDA pins of the Oled display module are connected with the A5 and A4 pins of the Arduino. While the microwave sensor connection with the Arduino remains exactly the same. Now, let’s take a look at the programming.
Download libraries for the SSD1306 Oled Display Module.
Microwave Sensor Arduino Programming:
|
1 2 3 4 5 6 7 8 9 10 11 12 13 14 15 16 17 18 19 20 21 22 23 24 25 26 27 28 29 30 31 32 33 34 35 36 37 38 39 40 41 42 43 44 45 46 47 48 49 50 51 52 53 54 55 56 57 58 59 60 61 62 |
#include <SPI.h> #include <MsTimer2.h> //Timer interrupt function library #include <Adafruit_GFX.h> #include <Adafruit_SSD1306.h> #define SCREEN_WIDTH 128 // OLED display width, in pixels #define SCREEN_HEIGHT 64 // OLED display height, in pixels // Declaration for an SSD1306 display connected to I2C (SDA, SCL pins) #define OLED_RESET -1 // Reset pin # (or -1 if sharing Arduino reset pin) #define SCREEN_ADDRESS 0x3D Adafruit_SSD1306 display(SCREEN_WIDTH, SCREEN_HEIGHT, &Wire, OLED_RESET); int pbIn = 0; // Define interrupt 0 that is digital pin 2 int ledOut = 13; // Define the indicator LED pin digital pin 13 int number=0; //Interrupt times volatile int state = LOW; // Defines the indicator LED state, the default is not bright void setup() { Serial.begin(9600); pinMode(ledOut, OUTPUT);// attachInterrupt(pbIn, stateChange, FALLING); // Set the interrupt function, interrupt pin is digital pin D2, //interrupt service function is stateChange (), //when the D2 power change from high to low , the trigger interrupt. MsTimer2::set(3000, Handle); // Set the timer interrupt function, running once Handle() function per 1000ms MsTimer2::start();//Start timer interrupt function display.begin(SSD1306_SWITCHCAPVCC, 0x3C); display.clearDisplay(); display.display(); } void loop() { display.setTextSize(2); display.setTextColor(WHITE); display.setCursor(0,5); display.println("status: "); display.setTextSize(3); display.setTextColor(WHITE); display.setCursor(0,30); display.println(number); display.display(); display.clearDisplay(); delay(10); } void stateChange() //Interrupt service function { number++; //Interrupted once, the number + 1 } void Handle() //Timer service function { number = 0; } |
Watch Video Tutorial:
It is something new with Arduino
Sir, why do we use IC7805, Capacitors before sending supplying to Arduino? I mean we could had directly input some voltage supply to Arduino like we do in other circuits
Nice project but what about the presence of animals such as cat. Dog will it sense them if yes then this sensor is another toy.