Multiple Nodemcu esp8266 network monitoring using Blynk
Nodemcu ESP8266 Network Description:
In this Article” Nodemcu Esp8266 Network” you will learn how to monitor multiple Nodemcu esp8266 wifi modules using only one Blynk application. This project can be really helpful in situations where you need to monitor multiple sensors installed at different locations.
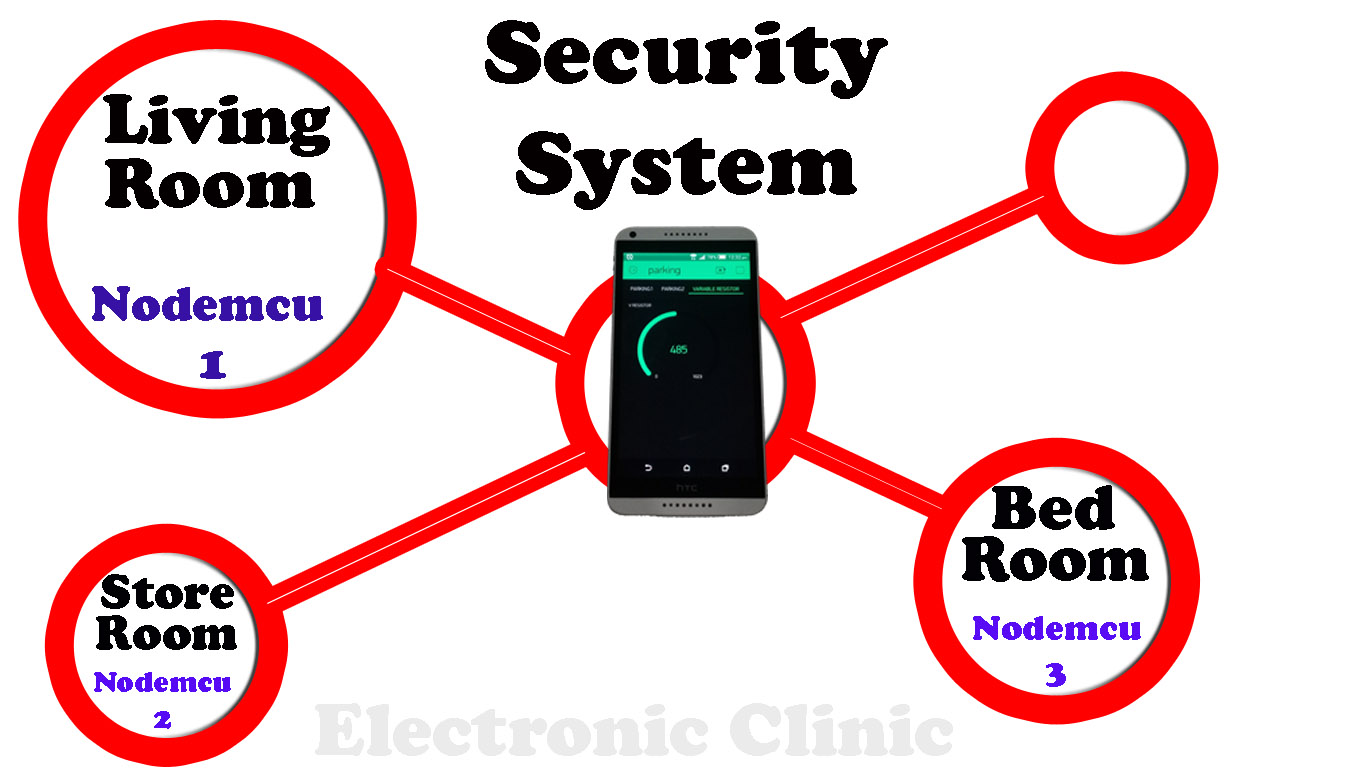
Let’s say you want to make a security system and you want to monitor Living room, Storeroom, bedroom and so on…In a situation like this, you can install Nodemcu modules at different locations and monitor all the sensors using only one application… In a situation like this the Nodemcu Esp8266 Network can be very helpful; this way you won’t need a lot of wiring.

The distance between the Nodemcu modules really doesn’t matter so far the wifi connection is available, even if the Nodemcu modules are installed in different countries like for example Pakistan, INDIA, USA, CANADA, and so on. we can monitor all the Nodemcu modules using only one Blynk application. The Nodemcu Esp8266 Network based on the WIFI is not bound by the distance so far the wifi connection is available.
In this tutorial, I am going to combine my previous two projects.
I have already explained these projects in very detail.
So in this Article “Nodemcu Esp8266 Network”, I am only going to explain the changes in the Nodemcu programming, and will also explain how to modify the application which was designed for the car parking monitoring system. The components used in this project are already explained in my previous tutorials and their purchase links are given below. Without any further delay, let’s get started.
Note: this old version of the Blynk app is no more functional. For the blynk mobile App setup and Blynk.cloud dashboard setup ready my article on the New Blynk V2.0. In this article I have explained how to migrate your projects from Blynk 1.0 to the new Blynk V2.0. You can also watch the video.
Amazon Links:
Other Tools and Components:
Super Starter kit for Beginners
PCB small portable drill machines
DISCLAIMER:
Please Note: these are affiliate links. I may make a commission if you buy the components through these links. I would appreciate your support in this way!
As I said earlier this project “Nodemcu Esp8266 Network” is based on my previous two Tutorials. The circuit connections used in both the projects remains the same, and also the programming remains the same except the Authentication Token and the Virtual Pins which will be changed, and this is what I am going to explain.
Let’s call the Car Parking Slots monitoring system as Nodemcu1 and Analog Sensor Monitoring as the Nodemcu2. So we have a total of two Nodemcu Esp8266 wifi Modules if you want you can also increase the number of the Nodemcu Modules. Our main Aim is to monitor both the Nodemcu Modules using only one Blynk application.
For Monitoring multiple Nodemcu esp8266 wifi modules the only thing that we need to take care of is, we have to use the same authentication token in all the Nodemcu Esp8266 Modules. Never use a virtual pin which is already used in another Nodemcu module. In simple words all the Virtual pins which are used in another Nodemcu module never use those virtual Pins in another Nodemcu Module, otherwise, the blynk application will be confused.
So I Made changes only in the Nodemcu2 Programming and I didn’t even change a single instruction in the Nodemcu1 programming. Let me tell you once again, use same authentication token for all the Nodemcu modules as we will be using only one application to monitor all the Nodemcu modules and second important point is, use different virtual pins. For example, if you have used virtual pin 30 in Nodemcu 1 never use the same virtual pin 30 in Nodemcu 2 or Nodemcu 3 if you are using three Nodemcu modules.
Nodemcu ESP8266 Network Programming:
The following are the Modified codes of the two projects mentioned above. For the step by step explanation, you can watch the video given at the end of this Article.
Nodemcu 1 Programming: Car parking Slots Monitoring
|
1 2 3 4 5 6 7 8 9 10 11 12 13 14 15 16 17 18 19 20 21 22 23 24 25 26 27 28 29 30 31 32 33 34 35 36 37 38 39 40 41 42 43 44 45 46 47 48 49 50 51 52 53 54 55 56 57 58 59 60 61 62 63 64 65 66 67 68 69 70 71 72 73 74 75 76 77 78 79 80 81 82 83 84 85 86 87 88 89 90 91 92 93 94 95 96 97 98 99 100 101 102 103 104 105 106 107 108 109 110 111 112 113 114 115 116 117 118 119 120 121 122 123 124 125 126 127 128 129 130 131 132 133 134 135 136 137 138 139 140 141 142 143 144 145 146 147 148 149 150 151 152 153 154 155 156 157 158 159 160 161 162 163 164 165 166 167 |
//Nodemcu1 programming "car parking slots monitoring" #define BLYNK_PRINT Serial #include <ESP8266WiFi.h> #include <BlynkSimpleEsp8266.h> #include <SoftwareSerial.h> #include <SimpleTimer.h> char auth[] = "ac173b0527c94a91a6cde0dcdfe6bdef"; // Your WiFi credentials. // Set password to "" for open networks. char ssid[] = "ZONG MBB-E8231-6E63"; char pass[] = "08659650"; SimpleTimer timer; String myString; // complete message from Arduino, which consists of sensors data char rdata; // received characters int firstVal, secondVal,thirdVal; // sensors int led1,led2,led3,led4,led5,led6; // This function sends Arduino's up time every second to Virtual Pin (1). // In the app, Widget's reading frequency should be set to PUSH. This means // that you define how often to send data to Blynk App. void myTimerEvent() { // You can send any value at any time. // Please don't send more that 10 values per second. Blynk.virtualWrite(V1, millis() / 1000); } void setup() { // Debug console Serial.begin(9600); Blynk.begin(auth, ssid, pass); timer.setInterval(1000L,sensorvalue1); timer.setInterval(1000L,sensorvalue2); timer.setInterval(1000L,sensorvalue3); timer.setInterval(1000L,sensorvalue4); timer.setInterval(1000L,sensorvalue5); timer.setInterval(1000L,sensorvalue6); } void loop() { if (Serial.available() == 0 ) { Blynk.run(); timer.run(); // Initiates BlynkTimer } if (Serial.available() > 0 ) { rdata = Serial.read(); myString = myString+ rdata; // Serial.print(rdata); if( rdata == '\n') { Serial.println(myString); // Serial.println("fahad"); // new code String l = getValue(myString, ',', 0); String m = getValue(myString, ',', 1); String n = getValue(myString, ',', 2); String o = getValue(myString, ',', 3); String p = getValue(myString, ',', 4); String q = getValue(myString, ',', 5); // these leds represents the leds used in blynk application led1 = l.toInt(); led2 = m.toInt(); led3 = n.toInt(); led4 = o.toInt(); led5 = p.toInt(); led6 = q.toInt(); myString = ""; // end new code } } } void sensorvalue1() { int sdata = led1; // You can send any value at any time. // Please don't send more than 10 values per second. Blynk.virtualWrite(V10, sdata); } void sensorvalue2() { int sdata = led2; // You can send any value at any time. // Please don't send more than 10 values per second. Blynk.virtualWrite(V11, sdata); } void sensorvalue3() { int sdata = led3; // You can send any value at any time. // Please don't send more than 10 values per second. Blynk.virtualWrite(V12, sdata); } void sensorvalue4() { int sdata = led4; // You can send any value at any time. // Please don't send more than 10 values per second. Blynk.virtualWrite(V13, sdata); } void sensorvalue5() { int sdata = led5; // You can send any value at any time. // Please don't send more than 10 values per second. Blynk.virtualWrite(V14, sdata); } void sensorvalue6() { int sdata = led6; // You can send any value at any time. // Please don't send more than 10 values per second. Blynk.virtualWrite(V15, sdata); } String getValue(String data, char separator, int index) { int found = 0; int strIndex[] = { 0, -1 }; int maxIndex = data.length() - 1; for (int i = 0; i <= maxIndex && found <= index; i++) { if (data.charAt(i) == separator || i == maxIndex) { found++; strIndex[0] = strIndex[1] + 1; strIndex[1] = (i == maxIndex) ? i+1 : i; } } return found > index ? data.substring(strIndex[0], strIndex[1]) : ""; } |
Car Parking Slots monitoring system Arduino programming:
|
1 2 3 4 5 6 7 8 9 10 11 12 13 14 15 16 17 18 19 20 21 22 23 24 25 26 27 28 29 30 31 32 33 34 35 36 37 38 39 40 41 42 43 44 45 46 47 48 49 50 51 52 53 54 55 56 57 58 59 60 61 62 63 64 65 66 67 68 69 70 71 72 73 74 75 76 77 78 79 80 81 82 83 84 85 86 87 88 89 90 91 92 93 94 95 96 97 98 99 100 101 102 103 104 105 106 107 108 109 110 111 112 113 114 115 116 117 118 119 120 121 122 123 124 125 126 127 128 129 130 131 132 133 134 135 136 137 138 139 140 141 142 143 144 145 146 147 148 149 150 151 152 153 154 155 156 |
#include <SoftwareSerial.h> SoftwareSerial nodemcu(2,3); int parking1_slot1_ir_s = 4; // parking slot1 infrared sensor connected with pin number 4 of arduino int parking1_slot2_ir_s = 5; int parking1_slot3_ir_s = 6; int parking2_slot1_ir_s = 7; int parking2_slot2_ir_s = 8; int parking2_slot3_ir_s = 9; String sensor1; String sensor2; String sensor3; String sensor4; String sensor5; String sensor6; String cdata =""; // complete data, consisting of sensors values void setup() { Serial.begin(9600); nodemcu.begin(9600); pinMode(parking1_slot1_ir_s, INPUT); pinMode(parking1_slot2_ir_s, INPUT); pinMode(parking1_slot3_ir_s, INPUT); pinMode(parking2_slot1_ir_s, INPUT); pinMode(parking2_slot2_ir_s, INPUT); pinMode(parking2_slot3_ir_s, INPUT); } void loop() { p1slot1(); p1slot2(); p1slot3(); p2slot1(); p2slot2(); p2slot3(); cdata = cdata + sensor1 +"," + sensor2 + ","+ sensor3 +","+ sensor4 + "," + sensor5 + "," + sensor6 +","; // comma will be used a delimeter Serial.println(cdata); nodemcu.println(cdata); delay(6000); // 100 milli seconds cdata = ""; digitalWrite(parking1_slot1_ir_s, HIGH); digitalWrite(parking1_slot2_ir_s, HIGH); digitalWrite(parking1_slot3_ir_s, HIGH); digitalWrite(parking2_slot1_ir_s, HIGH); digitalWrite(parking2_slot2_ir_s, HIGH); digitalWrite(parking2_slot3_ir_s, HIGH); } void p1slot1() // parkng 1 slot1 { if( digitalRead(parking1_slot1_ir_s) == LOW) { sensor1 = "255"; delay(200); } if( digitalRead(parking1_slot1_ir_s) == HIGH) { sensor1 = "0"; delay(200); } } void p1slot2() // parking 1 slot2 { if( digitalRead(parking1_slot2_ir_s) == LOW) { sensor2 = "255"; delay(200); } if( digitalRead(parking1_slot2_ir_s) == HIGH) { sensor2 = "0"; delay(200); } } void p1slot3() // parking 1 slot3 { if( digitalRead(parking1_slot3_ir_s) == LOW) { sensor3 = "255"; delay(200); } if( digitalRead(parking1_slot3_ir_s) == HIGH) { sensor3 = "0"; delay(200); } } // now for parking 2 void p2slot1() // parking 1 slot3 { if( digitalRead(parking2_slot1_ir_s) == LOW) { sensor4 = "255"; delay(200); } if( digitalRead(parking2_slot1_ir_s) == HIGH) { sensor4 = "0"; delay(200); } } void p2slot2() // parking 1 slot3 { if( digitalRead(parking2_slot2_ir_s) == LOW) { sensor5 = "255"; delay(200); } if( digitalRead(parking2_slot2_ir_s) == HIGH) { sensor5 = "0"; delay(200); } } void p2slot3() // parking 1 slot3 { if( digitalRead(parking2_slot3_ir_s) == LOW) { sensor6 = "255"; delay(200); } if( digitalRead(parking2_slot3_ir_s) == HIGH) { sensor6 = "0"; delay(200); } } |
Nodemcu 2 Programming: Analog Sensor Monitoring
|
1 2 3 4 5 6 7 8 9 10 11 12 13 14 15 16 17 18 19 20 21 22 23 24 25 26 27 28 29 30 31 32 33 34 35 36 37 38 39 40 41 42 43 44 45 46 47 48 49 50 51 52 53 54 55 56 57 58 59 60 61 62 63 |
// nodemcu 2 Programming "analog sensor" #define BLYNK_PRINT Serial #include <ESP8266WiFi.h> #include <BlynkSimpleEsp8266.h> #include <SimpleTimer.h> // You should get Auth Token in the Blynk App. // Go to the Project Settings (nut icon). char auth[] = "ac173b0527c94a91a6cde0dcdfe6bdef"; // Your WiFi credentials. // Set password to "" for open networks. char ssid[] = "ZONG MBB-E8231-6E63"; char pass[] = "08659650"; SimpleTimer timer; // sensors int vr = A0; // variable resistor connected int sdata = 0; // sensor data will be stored in this variable. // This function sends Arduino's up time every second to Virtual Pin (1). // In the app, Widget's reading frequency should be set to PUSH. This means // that you define how often to send data to Blynk App. void myTimerEvent() { // You can send any value at any time. // Please don't send more that 10 values per second. Blynk.virtualWrite(V1, millis() / 1000); } void setup() { // Debug console Serial.begin(9600); pinMode(vr ,INPUT); Blynk.begin(auth, ssid, pass); // Setup a function to be called every second timer.setInterval(1000L,sensorvalue); } void loop() { Blynk.run(); timer.run(); // Initiates BlynkTimer } void sensorvalue() { sdata = analogRead(vr); // You can send any value at any time. // Please don't send more that 10 values per second. Blynk.virtualWrite(V20, sdata); } |
If you look at the programming of both the Nodemcu Esp8266 wifi modules you can find that both the Nodemcu Modules share the same Authentication Token and different Virtual Pins. For the best understanding watch video given below.
Blynk Application Designing:
The Blynk application designing is already explained in the iot based car parking slots monitoring system. For further explanation and App modification watch Video given at the end of this Article.
Watch Video Tutorial: