PIR Sensor with ESP8266 Nodemcu and Arduino IoT Cloud
Table of Contents
PIR Sensor with ESP8266 Arduino IoT Cloud:
PIR Sensor with ESP8266 Nodemcu and Arduino IoT Cloud- In this tutorial, we will use PIR sensor with ESP8266 through Arduino IoT cloud to control the light through a relay. When a person or animal will move in front of the sensor a notification will be sent to the Arduino IoT Cloud or Arduino IoT App and the light will turn on and when there is nothing in front of the sensor the light will be turned off. We can also use other thing in place of light such as a door lock or a buzzer. This project will be very useful because it will turn on the light when there is any motion in front of the sensor due to which the energy will be saved. In the application we are using status widget which will change when the light is turned on and off and the notification will be sent through the messenger.
The heart of this project is the PIR sensor and Nodemcu ESP8266.
Amazon Links:
Other Tools and Components:
Super Starter kit for Beginners
PCB small portable drill machines
*Please Note: These are affiliate links. I may make a commission if you buy the components through these links. I would appreciate your support in this way!
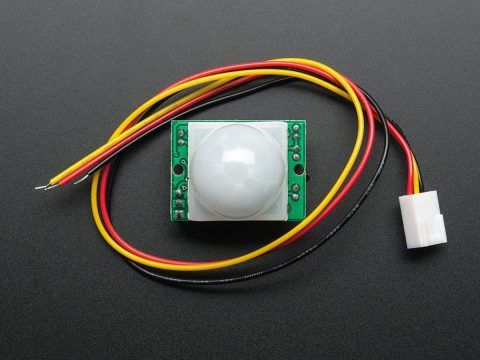
PIR sensor:
PIR sensors are used to detect motion from pets/humanoids from about 20 feet away (possibly works on zombies, not guaranteed). This one has an adjustable delay before firing (approx 2-4 seconds), adjustable sensitivity and we include a 1 foot (30 cm) cable with a socket so you can easily reposition the sensor or mount it using the two drills on either side Runs on 5V-16V power (if you need to run it off of 3V you can do that by bypassing the regulator, but that means doing a bit of soldering). Digital signal output is 3.3V high/low. Sensing range is about 7 meters (120 degree cone).
Specifications:
Product Type: HC–SR501 Body Sensor Module
Operating voltage range: DC 4.5-20V
Quiescent Current: <50uA
Delay time: 5-18S(adjustable) the range is (0.xx second to tens of second)
Block time: 2.5S(default)Can be made a range(0.xx to tens of seconds
Board Dimensions: 32mm*24mm
Angle Sensor: <100 ° cone angle Lens size
Sensor Diameter:23mm(Default)
Applications:
Security Products
The human body sensors toys
The human body sensor lighting industrial automation and control, etc
Use:
It can automatically and quickly open various types of incandescent, fluorescent lamps, buzzer, automatic doors, electric fans,automatic washing machine and dryer Machines and other devices,is a hightech products. Especially suitable for enterprises, hotels, shopping malls, warehouses and family aisles, corridors and other sensitive Sense of region, or for the security zone automatic lighting, lighting and alarm systems.
Interfacing the PIR sensor with ESP8266 NodeMCU:
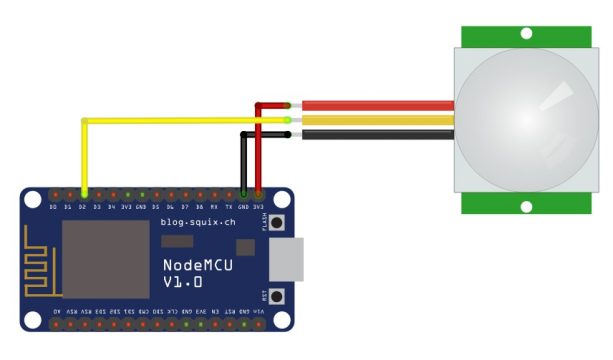
As we know that the PIR sensor consists of three pins which are:
- VCC
- Out
- Ground
So connect the VCC pin of the PIR sensor with the 3.3V of the ESP8266 NodeMCU. Connect the Output pin of the PIR sensor with the digital pin 2 of the NodeMCU ESP8266 and connect the ground pin of the PIR sensor with the ground of the NodeMCU ESP8266.
Application design in Arduino IoT Cloud:
Now we will design the application on Arduino IoT Cloud, as we have already discuss in detail how to get started with the Arduino IoT Cloud. If you are a new user then you must see our get starting Arduino IoT tutorial.
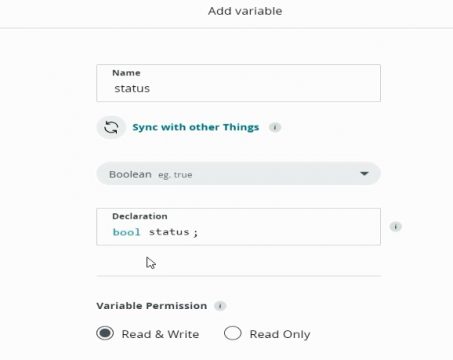
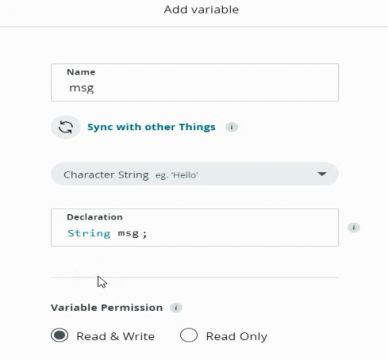
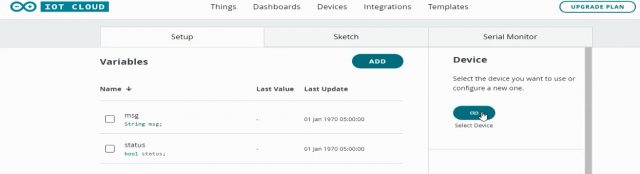
First of all, we will open the Arduino IoT Platform and click on the things. Now first we will click on the create things in which we will click on the add variable. In this project, we will use two variable one for the messenger and other for the light status. So first of all we will create status variable and select the Boolean type and click on the add variable.
Then again click on the add variable and create msg variable of string type and click on the add variable.
Now the two variables are created.
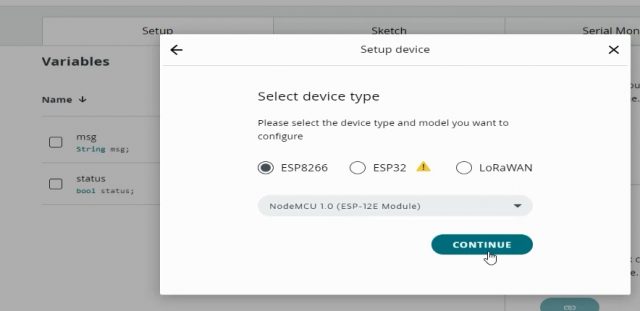
Then we will select the device in which we will upload the code. So click on the set up device and click on the set up a third party device. Then select the NodeMCU and click on the continue
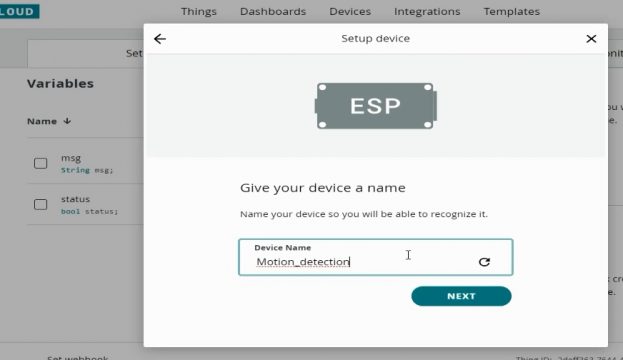
After that give the name to the device, in our case we are using the name motion detection for the project and click on the next button.
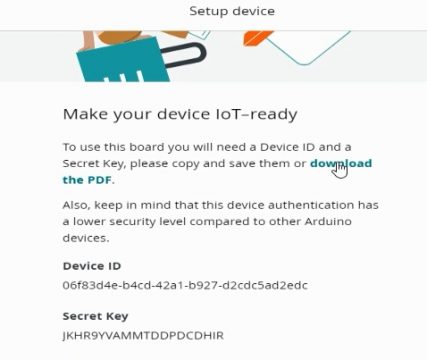
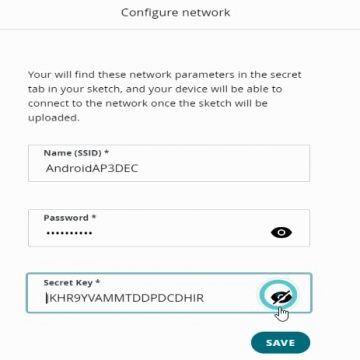
Then click on the download button to download the secret key and device id which we will use in the network setting.
Now click on continue and the device is added then we will configure the network in order to connect to the internet.
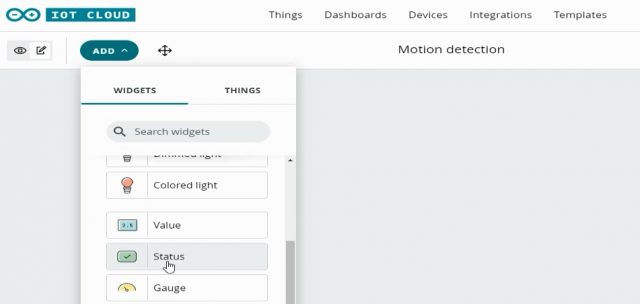
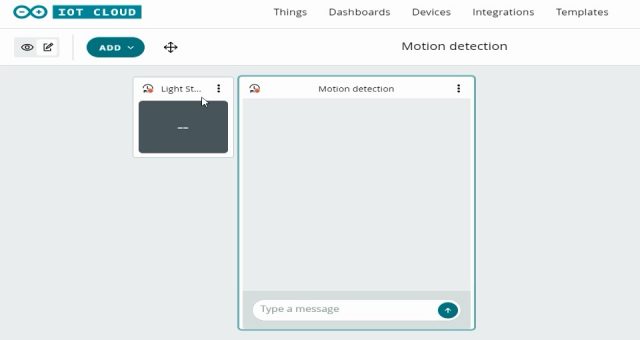
After configuring the network we will click on the dashboard in order to add the widgets and click on the build dashboard. So first of all we will add status widget which will change to ON and OFF when the light will be turned on and off. We will click on the add and select the status widget and link it to the status variable.
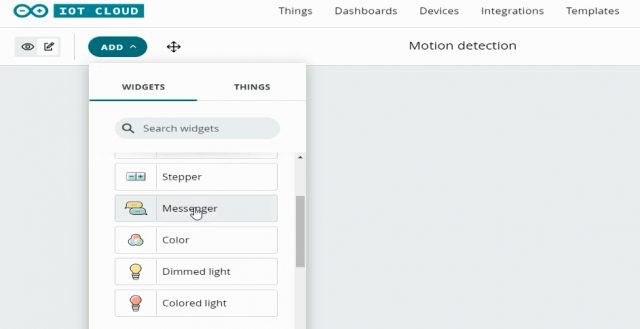
Then we add the messenger and link it to the msg string variable.
Now the two widgets are added and we will click on the things in which we will click on the sketch in order to write the code.
Complete code:
|
1 2 3 4 5 6 7 8 9 10 11 12 13 14 15 16 17 18 19 20 21 22 23 24 25 26 27 28 29 30 31 32 33 34 35 36 37 38 39 40 41 42 43 44 45 46 47 48 49 50 51 52 53 54 55 56 57 58 59 60 61 62 63 64 65 66 67 68 69 70 71 72 73 74 75 76 77 78 79 80 81 82 83 84 85 86 87 |
/* Sketch generated by the Arduino IoT Cloud Thing "Motion detection" https://create.arduino.cc/cloud/things/2deff363-7644-4497-8f23-f201ee4f1056 Arduino IoT Cloud Variables description The following variables are automatically generated and updated when changes are made to the Thing CloudLight status; String msg; Variables which are marked as READ/WRITE in the Cloud Thing will also have functions which are called when their values are changed from the Dashboard. These functions are generated with the Thing and added at the end of this sketch. */ #include "thingProperties.h" #define led D0 #define pirsensor D2 #define light D4 bool pir; void setup() { // Initialize serial and wait for port to open: Serial.begin(9600); // This delay gives the chance to wait for a Serial Monitor without blocking if none is found delay(1500); pinMode(pirsensor,INPUT); pinMode(light,OUTPUT); digitalWrite(light, LOW); // Defined in thingProperties.h initProperties(); // Connect to Arduino IoT Cloud ArduinoCloud.begin(ArduinoIoTPreferredConnection); /* The following function allows you to obtain more information related to the state of network and IoT Cloud connection and errors the higher number the more granular information you’ll get. The default is 0 (only errors). Maximum is 4 */ setDebugMessageLevel(2); ArduinoCloud.printDebugInfo(); } void loop() { ArduinoCloud.update(); // Your code here pir_sensor_getdata(); } void onStatusChange() { // Do something } void onMsgChange() { // Do something } void pir_sensor_getdata() { pir=digitalRead(pirsensor); if(pir==HIGH) { Serial.println("Human detected"); digitalWrite(light, HIGH); msg="human detected"; digitalWrite(led,HIGH); status=HIGH; delay(1000); } else { Serial.println("Human not detected"); digitalWrite(light, LOW); digitalWrite(led,LOW); status } } |
After uploading the code to the NodeMCU ESP8266, we will be able to monitor the motion through Arduino IoT through web and mobile app. For the mobile you can read my previous article or you can watch a video tutorial on my YouTube channel “Electronic Clinic”.