Python GUI, Python Tkinter Canvas tutorial, Python User Interface, Python Tk
Table of Contents
Description:
Python GUI, Python Tkinter Canvas tutorial– I have been using Python in Raspberry Pi based projects for monitoring different sensors and controlling electrical loads. Recently, I published an article about the Industrial Automation, Raspberry Pi Industrial Automation HMI/GUI designing using PYQT5, In this project I designed a simple Python GUI “Graphical User Interface” using PYQT5 for controlling different electrical loads. If you want to learn how to make a python GUI using PYQT5, then I highly recommend you should read this article.
I have been getting requests from my followers on YouTube Channel “Electronic Clinic” about Python GUI designing using Tkinter Canvas. Here is a complete tutorial for you guys. In this tutorial you will learn the extreme basics explaining how to design a graphical user interface using Python Tkinter. In this tutorial, you will also learn how to draw a line, Oval, and a rectangle using the Tkinter Canvas. I will explain everything through simple program examples. I will add images to help you understand what am I doing?
Without any further delay, let’s get started!!!
Amazon Purchase Links:
*Please Note: These are affiliate links. I may make a commission if you buy the components through these links. I would appreciate your support in this way!
Adding Buttons In Window Using Python GUI Tkinter Pack Method:
In this section, we are going to understand two concepts of Python GUI,
- How to add buttons and functions to our actual Tkinter widget and
- How the Tkinter Pack function actually works, how we can place objects in different locations of our Python GUI window.
How to add buttons and functions to our actual Tkinter widget
|
1 2 3 4 5 6 |
from tkinter import * root = Tk() root.geometry('400x400') button1=Button(root, text='click me') button1.pack() root.mainloop |
Code explanation:
I started by importing the tkinter widget.
from tkinter import *
Next, I initialized a variable root and passed the Tk() method.
root = Tk()
Next, I set the geometry of the window.
root.geometry(‘400×400’)
Next, I initialized the button1 variable which is equal to Button. Button is a function which takes two arguments as the input, the root and the text which is displayed on the button, which is the caption. In this example we will display the text “click me”, you can change this text if you want, for now we will go with this text.
|
1 2 3 |
button1=Button(root, text='click me') button1.pack() root.mainloop |
So, now let’s run the Python GUI.
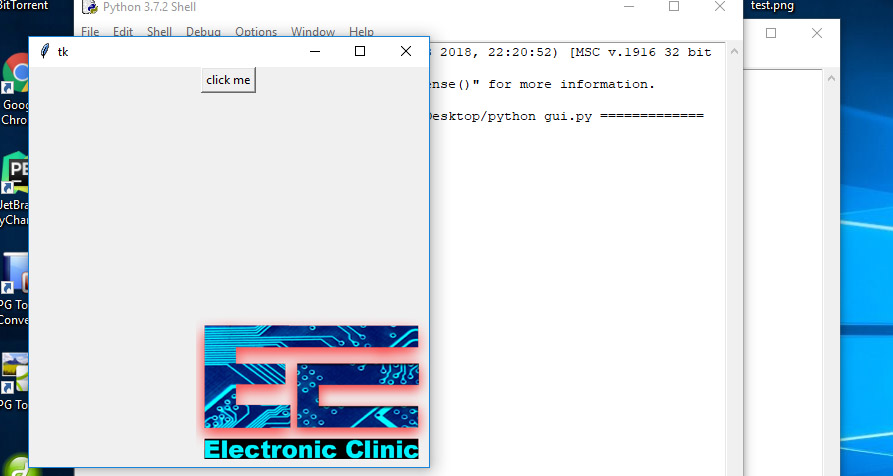
Fantastic, we just created a very simple Python GUI using Tkinter. As you can see a button with the text “click me” is just added to the window. Right now, if you click this button, nothing will happen, because there is no code for the click event on this button.
Now, let’s modify the above program, so that when someone clicks the button, we want something to happen there should be some function some action that gets triggered, so, in this scenario I am going to go ahead and create a function that just prints out hello Tkinter text when the button is clicked.
|
1 2 3 4 5 6 7 8 9 |
from tkinter import * root = Tk() root.geometry('400x400') def funBtn(): print("Hello tkinter") button1=Button(root, text='click me', command=funBtn) button1.pack() root.mainloop |
As you can see in the above program I created a function
def funBtn()
Inside this function there is only one instruction
print(“Hello tkinter”)
Each time this function is called, the Hellow tkinter message will be printed
This time we did only one change, which is we also added the command which is equal to the funBtn.
button1=Button(root, text=’click me’, command=funBtn)
This will make a button, with the text “click me”, and when this button is clicked a message will be printed. After you have modified the code, now go ahead, save the program and run the Python GUI program, you can simply press F5.
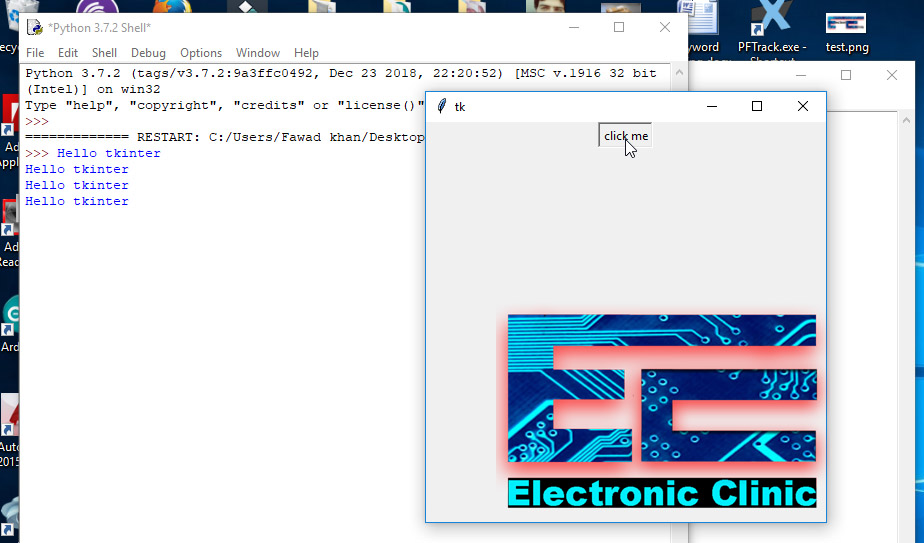
As you can see when the button is clicked the message “Hello tkinter” is printed on the screen. there’s a lot of different attributes buttons as well you can change the color, the background color, the size of the button, and stuff like that; but just for understanding how a simple button is added to your Python GUI window this is the code necessary.
We just created a simple Python GUI using the tkinter, this is a fully functional button, you can click this button and it will print a message. Now let’s take this to another level, what if you need two, three, or even more buttons? Now you should pay a very close attention, we will solve some basic issues. To understand how the pack method works, right now, whenever we add an object to our Python GUI you will see that it’s put one underneath the other. We will be using the same program, copy the button code command C and command V to paste the code call this button2. button2.pack and go ahead and run this Python GUI code given below.
|
1 2 3 4 5 6 7 8 9 10 11 12 13 14 |
from tkinter import * root = Tk() root.geometry('400x400') def funBtn(): print("Hello tkinter") button1=Button(root, text='click me', command=funBtn) button1.pack() button2=Button(root, text='click me', command=funBtn) button2.pack() root.mainloop |
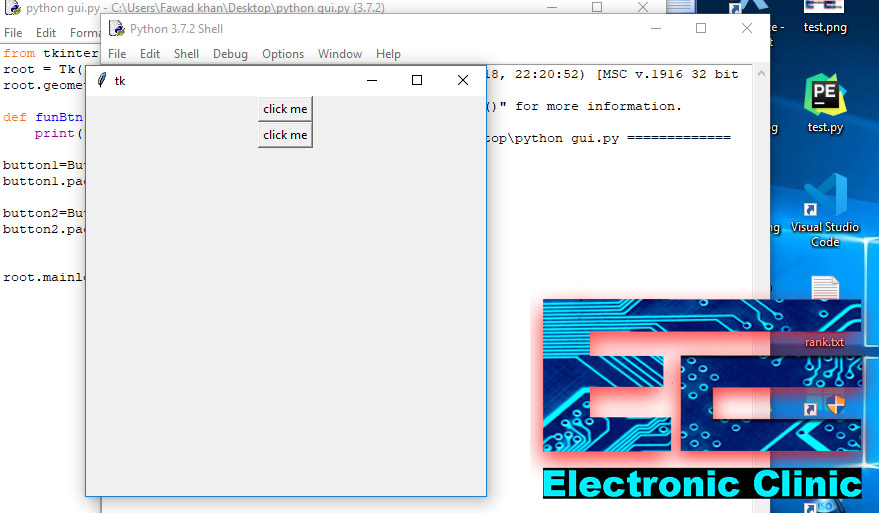
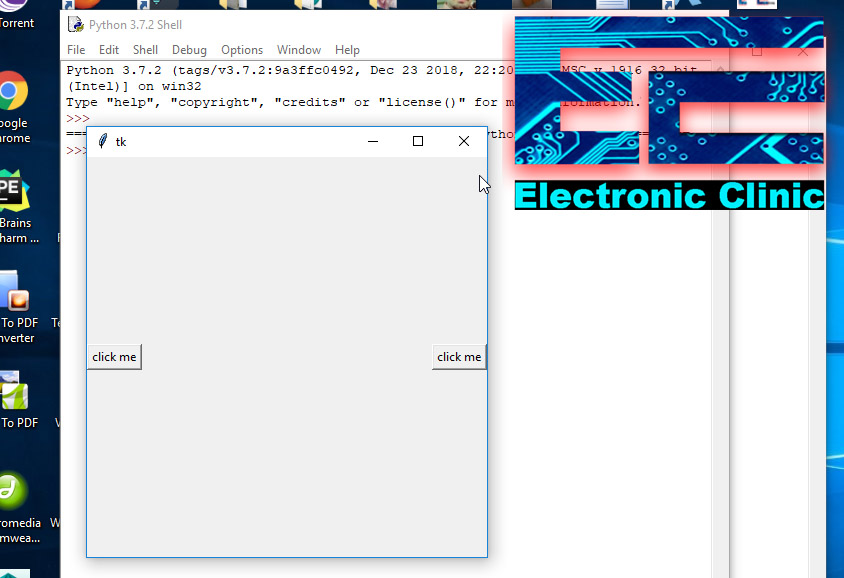
You can see in the picture above, two buttons are added to the Python GUI window, but the problem is the new button we just added comes underneath. There are basically four different positions in Python tkinter, you have top, bottom, left, and right. So, you can go ahead and specify how your objects should be placed if I go ahead and say button1.pack side is equal to left and button2.pack side is equal to left.
|
1 2 3 4 5 6 7 8 9 10 11 12 13 |
to the left from tkinter import * root = Tk() root.geometry('400x400') def funBtn(): print("Hello tkinter") button1=Button(root, text='click me', command=funBtn) button1.pack(side=LEFT) button2=Button(root, text='click me', command=funBtn) button2.pack(side=LEFT) root.mainloop |
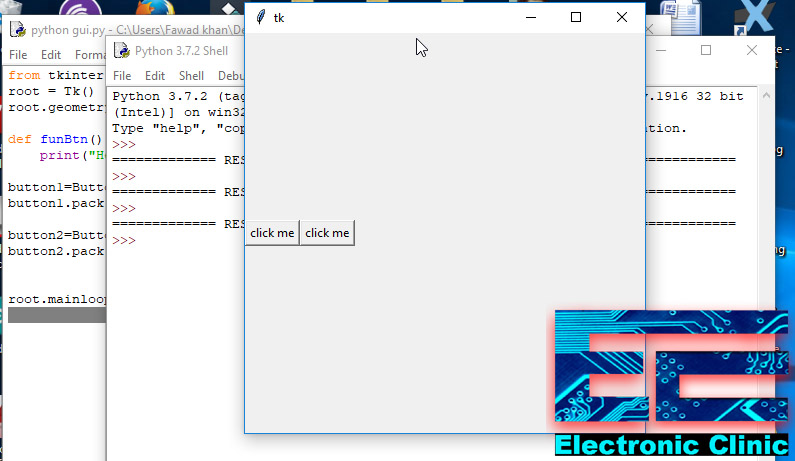
As you can see in the picture above, the two buttons are placed side by side.
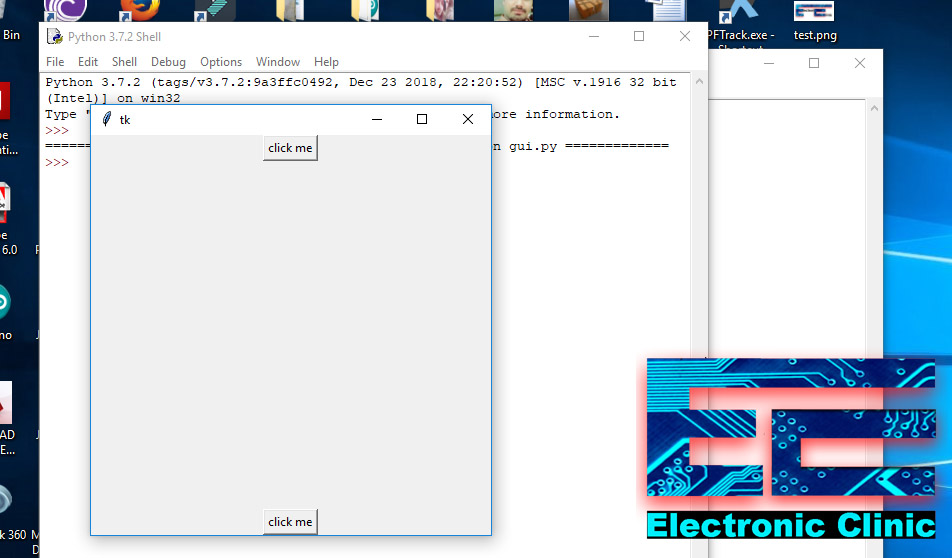
If I make my button2 side equals right what is going to happen to happen? Let’s check this by modifying the code.
|
1 2 3 4 5 6 7 8 9 10 11 12 13 14 |
from tkinter import * root = Tk() root.geometry('400x400') def funBtn(): print("Hello tkinter") button1=Button(root, text='click me', command=funBtn) button1.pack(side=LEFT) button2=Button(root, text='click me', command=funBtn) button2.pack(side=RIGHT) root.mainloop |
As you can see in the picture above, on the Python GUI widow, one button is pushed all the way to the left side of the window and the other button is pushed all the way to the left side of the GUI window.
Now, other than the left and right, you also have top and bottom I could make my button1 to top and button2 to bottom. Let’s do it.
|
1 2 3 4 5 6 7 8 9 10 11 12 13 14 |
from tkinter import * root = Tk() root.geometry('400x400') def funBtn(): print("Hello tkinter") button1=Button(root, text='click me', command=funBtn) button1.pack(side=TOP) button2=Button(root, text='click me', command=funBtn) button2.pack(side=BOTTOM) root.mainloop |
As you can see, this time one button is pushed all the way to the top of the Python GUI window and the other button is pushed all the way to the bottom of the Python GUI window. Now you can modify your layout by putting objects as you want. You can add multiple objects.
Making shapes using tkinter canvas Python GUI:
In this section, we are going to understand the tkinter canvas Python GUI. So, what is the canvas in Python the Canvas is basically a drawing tool that tkinter provides on top of the canvas. You can go ahead and draw shapes. You can draw lines, circles, ovals, rectangles, etc, and basically any sort of 2D game that you want to make. You will be using tkinter canvas to draw those items on the GUI screen. So, let’s go ahead and understand how to actually create a tkinter canvas on our tkinter code.
|
1 2 3 4 5 6 |
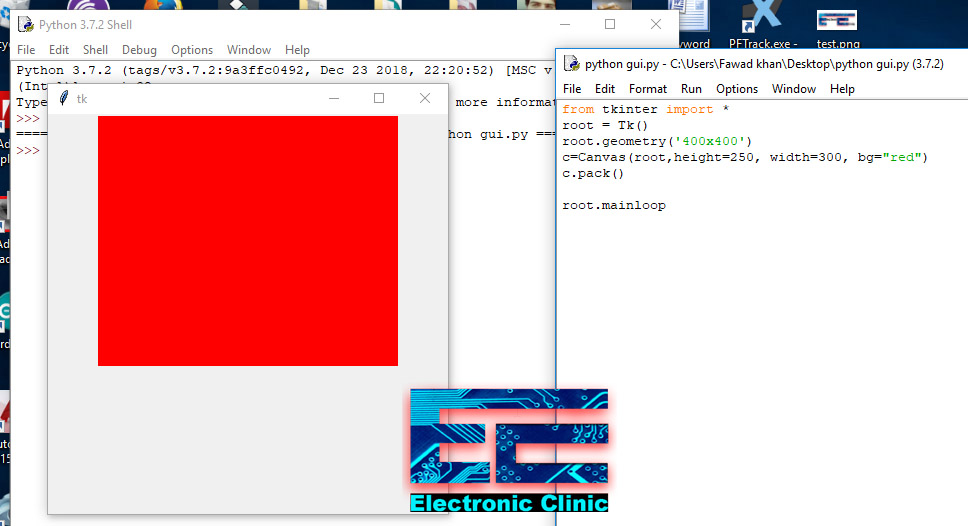
from tkinter import * root = Tk() root.geometry('400x400') c=Canvas(root,height=250, width=300, bg="red") c.pack() root.mainloop |
The above code looks similar to the very first program I explained in the beginning, except the 4th and 5th lines of code.
I initialized the canvas I created a variable c which is going to be equal to Canvas and then inside the brackets just like we did previously for the button, we’re going to pass in the home where our canvas is located, in our scenario it’s root after that you can give your canvas a height and a width, right now we’ve given our view root geometry our 400 by 400 view; so what we can do now is, give our tkinter canvas let’s say height is equal to 250 and width is equal to 300. So this is going to create a canvas inside of our Python GUI window, after that I gave it a background color so the property bf is equal to background color and I am going to select RED as the background color. After running the above code, you will see a RED color window as you see in the picture below.
Draw a line using canvas Python GUI tkinter:
So, the first item that we are going to create on our tkinter canvas is going to be a line. Now the function for that is canvas variable, in my case my canvas variable is c so the function is c.create_line. when you are creating a line it takes in four parameters the XY of your initial position and the XY of your ending position.
|
1 2 3 4 5 6 7 8 |
from tkinter import * root = Tk() root.geometry('400x400') c=Canvas(root,height=250, width=300, bg="red") l=c.create_line(5,5,200,5, width=5) c.pack() root.mainloop |
Code explanation:
To draw a line on a tkinter canvas for that I initialized l for line, in this scenario the l is equal to c.create_line and then I passed in some coordinates so again the initial point 5 comma 5 and then the ending point which is slightly more width so 200 and then let’s move down to pixels 5. So, we created a line 5 comma 5, 200, 5 and line thickness width is 5. Save the above program, simply run the code, you should be able to see a line as you can see in the picture below.

Now I am moving my line diagonally across the screen for that just change the line position from 5 to 200
|
1 2 3 4 5 6 7 8 |
from tkinter import * root = Tk() root.geometry('400x400') c=Canvas(root,height=250, width=300, bg="red") l=c.create_line(5,5,200,200, width=5) c.pack() root.mainloop |
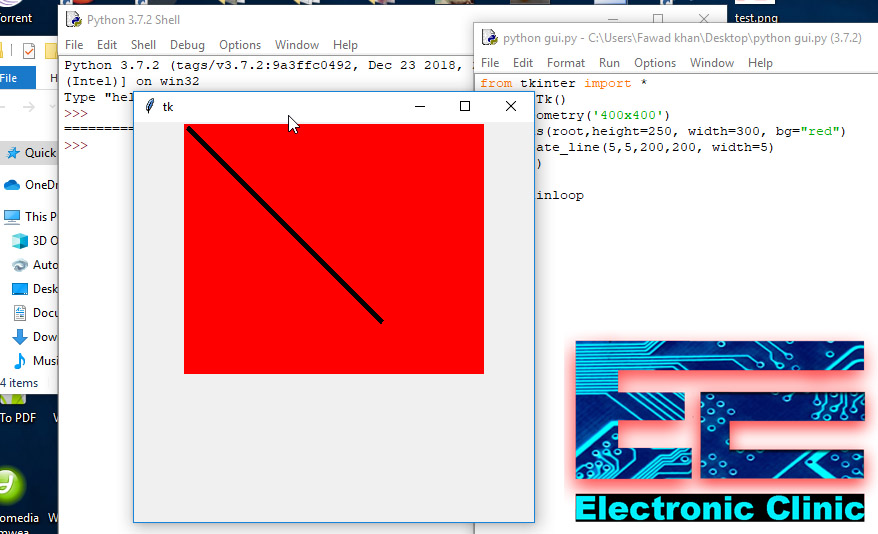
So, that is how you can create a line on your Python tkinter canvas.
Making Oval/Circle shape using Python GUI tkinter canvas:
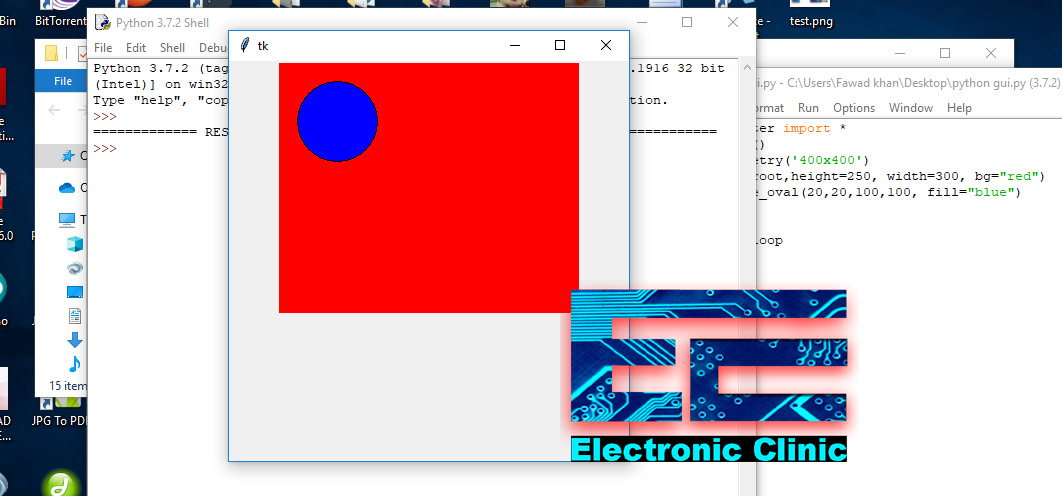
The second object I am going to draw is an oval. So, I started off by initializing a variable for oval which is O and is equal to c.create_oval and again if you want to make a circle with an oval it’s relatively straightforward you pass in your initial points as 20 comma 20 you pass in your ending points 100 comma 100 and then after that I specified a fill color let’s go ahead and fill our oval with the color blue. Copy and paste the below code.
|
1 2 3 4 5 6 7 8 |
from tkinter import * root = Tk() root.geometry('400x400') c=Canvas(root,height=250, width=300, bg="red") o=c.create_oval(20,20,100,100, fill="blue") c.pack() root.mainloop |
After running the above program you will be able to see a Blue color circle. You can create different shapes simply play with the values.
Making Rectangle shape using Python GUI tkinter canvas:
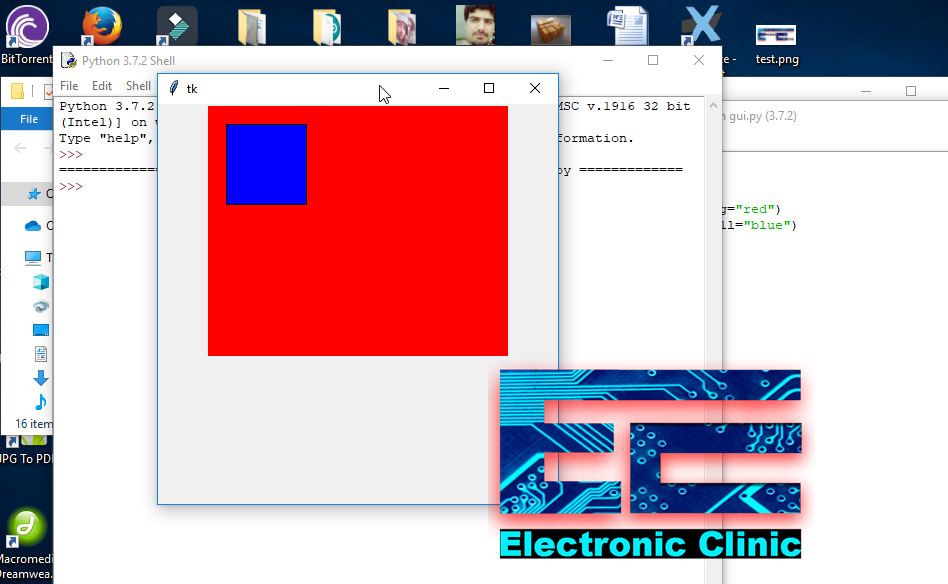
The third object that I am going to create is a rectangle. So, I started off by initializing a variable for rectangle r which is equal to c.create_rectangle and again if you want to make a rectangle you will pass in your initial points 20 comma 20 you pass in your ending points 100 comma 100 and then after that I specified a fill color.
|
1 2 3 4 5 6 7 |
from tkinter import * root = Tk() root.geometry('400x400') c=Canvas(root,height=250, width=300, bg="red") r=c.create_rectangle(20,20,100,100, fill="blue") c.pack() root.mainloop |
Copy and paste the above program. Save the program and then press F5 to run the code. After running the code you will be able to see a Blue color rectangle which you can see in the picture given below.
You can make this rectangle smaller or larger by simply changing the values. In this article I have shared enough information with you guys. Now you should be able to make amazing Python GUI applications for Raspberry Pi using the tkinter canvas. If you have any questions let me know in a comment. Check the related Raspberry Pi based projects in the related projects section.
Raspberry Pi related Projects:
Raspberry Pi Home Automation using RC522 RFID, Smart Home
https://www.electroniclinic.com/raspberry-pi-home-automation-using-rc522-rfid-smart-home/
Raspberry Pi RFID RC522 NFC Reader, Tags Scanner python code
https://www.electroniclinic.com/raspberry-pi-rfid-rc522-nfc-reader-tags-scanner-python-code/
Raspberry Pi Industrial Automation HMI/GUI designing using PYQT5
https://www.electroniclinic.com/raspberry-pi-industrial-automation-hmi-gui-designing-using-pyqt5/
Raspberry Pi DS18B20 Temperature Sensor & Text file
https://www.electroniclinic.com/raspberry-pi-ds18b20-temperature-sensor-text-file/