Read Raspberry Pi Pico onboard temperature sensor
Table of Contents
Raspberry Pi Pico OnBoard Temperature Sensor:
In this article, I am going to explain how to use the Raspberry Pi Pico Onboard temperature sensor and display its value on the SSD1306 Oled display module. I going to use this temperature sensor for monitoring the ambient temperature. I don’t know if this sensor is going to give me the exact value as its directly mounted on the Pico board as it may sense some heat from the board.
This onboard temperature sensor can be quite useful in situations when used in high-temperature areas, so this sensor can monitor the Pico board temperature and when the temperature exceeds a predefined value a Fan or other cooling system is automatically turned ON. So, let’s go ahead and take a look at the circuit diagram.
Previous Articles:
Raspberry Pi Pico Pinout & Specs
Raspberry Pi Pico MicroPython and Thonny IDE Installation.
Raspberry Pi Pico Led examples.
Raspberry Pi Pico Digital Input.
Raspberry Pi Pico Oled Display Module SSD1306
Raspberry Pi Pico ADC Analog Sensor
Raspberry Pi Pico Ultrasonic Sensor.
Raspberry Pi Pico PIR Motion Sensor.
Raspberry Pi Pico LDR Sensor, Day & Night Detection.
Amazon Links:
Other Tools and Components:
Super Starter kit for Beginners
PCB small portable drill machines
*Please Note: These are affiliate links. I may make a commission if you buy the components through these links. I would appreciate your support in this way!
Raspberry Pi Pico Temperature Sensor Circuit Diagram:
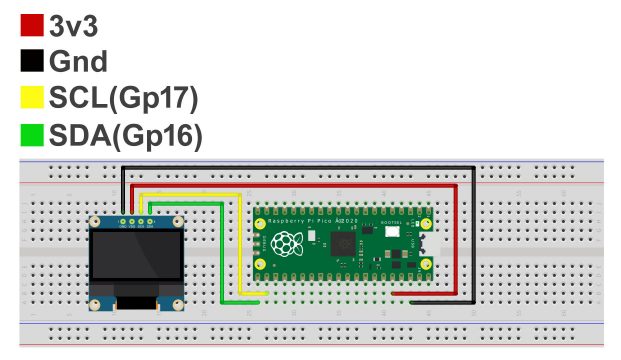
For this project, you only need to interface the Oled display module with the Raspberry Pi Pico. The connections I have already explained in example5.
Now, you might be thinking to which pin this onboard temperature sensor is connected? This onboard temperature sensor is connected to one of the ADCs or Analog-to-Digital Converters. The temperature sensor does not have a physical pin in the board but is accessed as ADC4. This onboard temperature sensor works by delivering a voltage to the ADC4 pin that is proportional to the temperature. If you check the Raspberry Pi Pico datasheet you will find that a temperature of 27 degrees Celsius delivers a voltage of 0.706 volts.
In the RP2040 Pico Board, the ADC pins support 12-bits, which means that the value can go from 0 to 4095. But the MicroPython code can scale the ADC values to a 16-bit range. So we effectively get the range from 0 to 65535. The microcontroller works at 3.3 V, which means that an ADC pin will return a value of 65535 when 3.3 V is applied to it or 0 when there is no voltage. We can obtain all the in-between values when the voltage applied to the pin is between 0 and 3.3 V. Let’s take a look at the code and you will get the idea.
Raspberry Pi Pico Temperature Sensor Programming:
|
1 2 3 4 5 6 7 8 9 10 11 12 13 14 15 16 17 18 19 20 21 22 23 24 25 26 27 28 29 30 31 32 33 34 35 36 37 38 39 40 41 42 |
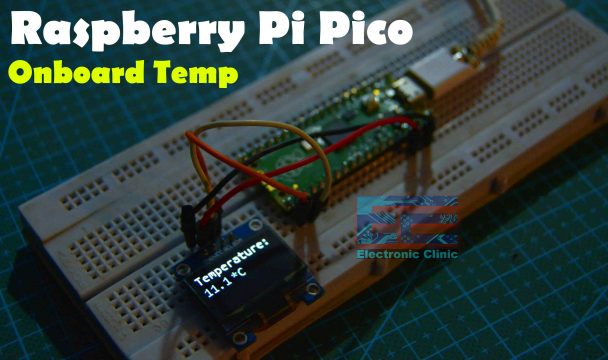
from machine import Pin, I2C from ssd1306 import SSD1306_I2C from oled import Write, GFX, SSD1306_I2C from oled.fonts import ubuntu_mono_15, ubuntu_mono_20 import utime TempSensor = machine.ADC(4) WIDTH = 128 HEIGHT = 64 i2c = I2C(0, scl=Pin(17), sda=Pin(16), freq=200000) conversion_factor = 3.3 / 65535 oled = SSD1306_I2C(WIDTH, HEIGHT, i2c) while True: data = TempSensor.read_u16() * conversion_factor temperature = 27-(data-0.706)/0.001721 oled.fill(0) write20 = Write(oled, ubuntu_mono_20) write20.text("Temperature: ", 0, 0) write20.text(str(round(temperature,1)),0,20) write20.text("*C",44,20) oled.show() |
Now, you should be able to understand why am I using ADC4 and why am I dividing 3.3 by 65535. As I explained earlier, if you check the Raspberry Pi Pico datasheet you will find that a temperature of 27 degrees Celsius delivers a voltage of 0.706 volts, so that’s why you can see these numbers and then this value is used to convert the temperature reading into Celsius. So, that’s all about the code and now let’s run this code.
Next article, Raspberry Pi Pico Ultrasonic Sensor
Hi ENGr Fahad; The program worked for 2 days then battery drained. I downloaded program to pico and got error. So while uploading there was a “rp2-pico-20220618-v1.19.1.uf2” update so I installed it. Now I get error for OLED )shown below. I deleted the OLED and SSD1306 in the Manage Package- reinstalled them again. I get the same errors. Not sure what is going on in the code.
Can you tell me if I ned to change something in the code to OLED and SSD1306?
Thanks; MC
Traceback (most recent call last):
File “”, line 13, in
File “/lib/oled/ssd1306.py”, line 127, in init
File “/lib/oled/ssd1306.py”, line 47, in init
File “/lib/oled/ssd1306.py”, line 72, in init_display
File “/lib/oled/ssd1306.py”, line 132, in write_cmd
OSError: [Errno 5] EIO
If you are using thonny go in options and choose MiroPython (RP2040) in Interpreter. Next open Manage packages and install micropython_oled and micropython_ssd1306