Wireless Temperature monitoring system using Bluetooth
Table of Contents
Wireless temperature Monitoring Project Description:
Wireless Temperature Monitoring- This tutorial is based on the wireless Temperature monitoring using Bluetooth module, Arduino Uno and Android cell phone application. In this project, the temperature request can be sent to the Arduino at any time. This project also has a feedback system. The command is sent wirelessly to the Arduino Uno, the Arduino once receive the command then replay back with the temperature and humidity values. In this project, the famous DHT11 temperature and humidity module are used for monitoring the temperature and humidity.
This project mainly focuses on how to request the Sensors data from the Arduino, this method is best as it never keeps the Arduino busy in sending the messages again and again. So whenever you need to check the temperature and humidity values, you simply send a request command to the Arduino Uno.
For the complete step by step explanation, you can watch a video Tutorial given at the end of this article.
Amazon Links:
Arduino Nano USB-C Type (Recommended)
DHT11 Temperature and Humidity Module:
Other Tools and Components:
ESP32 WiFi + Bluetooth Module (Recommended)
Super Starter kit for Beginners
PCB small portable drill machines
*Please Note: These are affiliate links. I may make a commission if you buy the components through these links. I would appreciate your support in this way!
DHT11 Temperature and Humidity sensor:
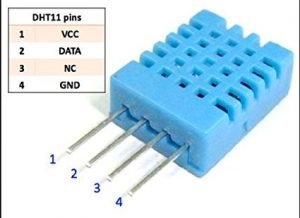
The DHT11 Temperature and Humidity Module is one of the most commonly used sensors. The DHT11 sensor most frequently is used in Weather Station projects. The DHT11 Temperature and Humidity Sensor has a total of 4 pins. Out of these 4 pins, we will use only three pins. Pin number 3 will not be used.
Wireless Temperature monitoring Circuit Diagram:
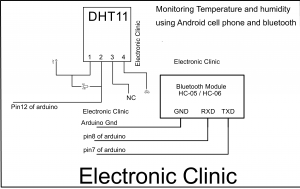
The data pin of the DHT11 sensor is connected with the Arduino’s digital pin 12. While the power supply pins are connected with the Arduino’s 5V and GND pins.
The Bluetooth module HC-05 or HC-06 is connected with the Arduino’s pins 7 and 8. The RX pin of the Bluetooth module is connected with the Arduino’s pin number 8. The TX pin of the Bluetooth module is connected with Pin 7 of the Arduino Board, while the Power supply pins are connected with the Arduino’s power supply.
Download:
Android cell phone Apk file: BlueserialApp
Wireless Temperature Monitoring Arduino Programming:
Before, you start the programming, first of all, make sure you download the DHT library. In this project, instead of using the Arduino’s default Serial Port, I will be defining another Serial Port using the SoftwareSerial library. This way I can use the Arduino’s default Serial Port only for debugging purposes.
|
1 2 3 4 5 6 7 8 9 10 11 12 13 14 15 16 17 18 19 20 21 22 23 24 25 26 27 28 29 30 31 32 33 34 35 36 37 38 39 40 41 42 43 44 45 46 47 48 49 50 51 52 53 54 55 56 57 58 59 60 61 62 63 64 65 66 67 68 69 70 71 72 73 74 75 76 77 78 79 80 81 82 83 84 85 86 87 88 89 90 91 92 93 94 95 96 97 98 99 100 101 102 103 104 105 106 107 108 |
/* commands v = feedback request */ #include <SoftwareSerial.h> #include "DHT.h" #define DHTPIN 12 // what pin we're connected to //Uncomment whatever the type of sensor we are using. #define DHTTYPE DHT11 // DHT 11 //#define DHTTYPE DHT22 // DHT 22 (AM2302) //#define DHTTYPE DHT21 // DHT 21 (AM2301) // Connect pin 1 (on the left) of the sensor to +5V // NOTE: If using a board with 3.3V logic like an Arduino Due connect pin 1 // to 3.3V instead of 5V! // Connect pin 2 of the sensor to whatever your DHTPIN is // pin3 of the sensor is not connected // Connect pin 4 (on the right) of the sensor to GROUND // Connect a 10K resistor from pin 2 (data) to pin 1 (power) of the sensor // Initialize DHT sensor for normal 16mhz Arduino DHT dht(DHTPIN, DHTTYPE); char inchar; // Will hold the incoming character from the GSM shield SoftwareSerial blue(7, 8); // bluetooth module will be connected here. String TextForSms ; String humidity = " Humidity: %"; String temperature = " Temperature"; String sign = " *C"; int powerb = 6; // to power up the dht11 sensor, dht11 5v wire is connected with pin6 of the arduino. void setup() { Serial.begin(9600); blue.begin(9600); // original 19200 pinMode(powerb, OUTPUT); digitalWrite(powerb, HIGH); dht.begin(); } void loop() { if(blue.available() == 0); if(blue.available() >0) { inchar=blue.read(); Serial.println(inchar); delay(20); if (inchar=='v') { delay(10); Serial.println(inchar); // Wait a few seconds between measurements. delay(2000); // Reading temperature or humidity takes about 250 milliseconds! // Sensor readings may also be up to 2 seconds 'old' (its a very slow sensor) int h = dht.readHumidity(); // Read temperature as Celsius int t = dht.readTemperature(); // Read temperature as Fahrenheit int f = dht.readTemperature(true); // Check if any reads failed and exit early (to try again). if (isnan(h) || isnan(t) || isnan(f)) { Serial.println("Failed to read from DHT sensor!"); return; } // Compute heat index // Must send in temp in Fahrenheit! int hi = dht.computeHeatIndex(f, h); // Serial.print("Humidity: "); // Serial.print(h); // Serial.print(" %\t"); // Serial.print("Temperature: "); // Serial.print(t); // Serial.print(" *C "); TextForSms = TextForSms + "HUMIDITY: "; TextForSms.concat(h); TextForSms = TextForSms + "% TEMPERATURE: "; TextForSms.concat(t); TextForSms = TextForSms + "*C"; blue.print(TextForSms); Serial.println(TextForSms); delay(2000); TextForSms = " "; } } } |
WOW just what I was looking for. Came here by searching for meta_keyword|
Simply desire to say your article is as astounding. The clarity for your post is simply nice and i could suppose you are knowledgeable in this subject. Well together with your permission let me to clutch your feed to stay up to date with drawing close post. Thank you a million and please carry on the rewarding work.|
Hurrah, that’s what I was looking for, what a stuff! present here at this weblog, thanks admin of this website.|
Hi there to all, how is the whole thing, I think every one is getting more from this website, and your views are nice in support of new users.|
It works