This ESP32 Voice Recorder Has No Buttons and No Touch – Here’s How It Works
Last Updated on May 19, 2026 by Engr. Shahzada Fahad
Table of Contents
Can an ESP32 really work as a voice recorder?
In this article, I turn an ESP32 into a real, gesture-controlled voice recorder and show how it records audio and saves proper WAV files to an SD card with no buttons and no touch controls at all. making it a complete DIY ESP32 voice recorder.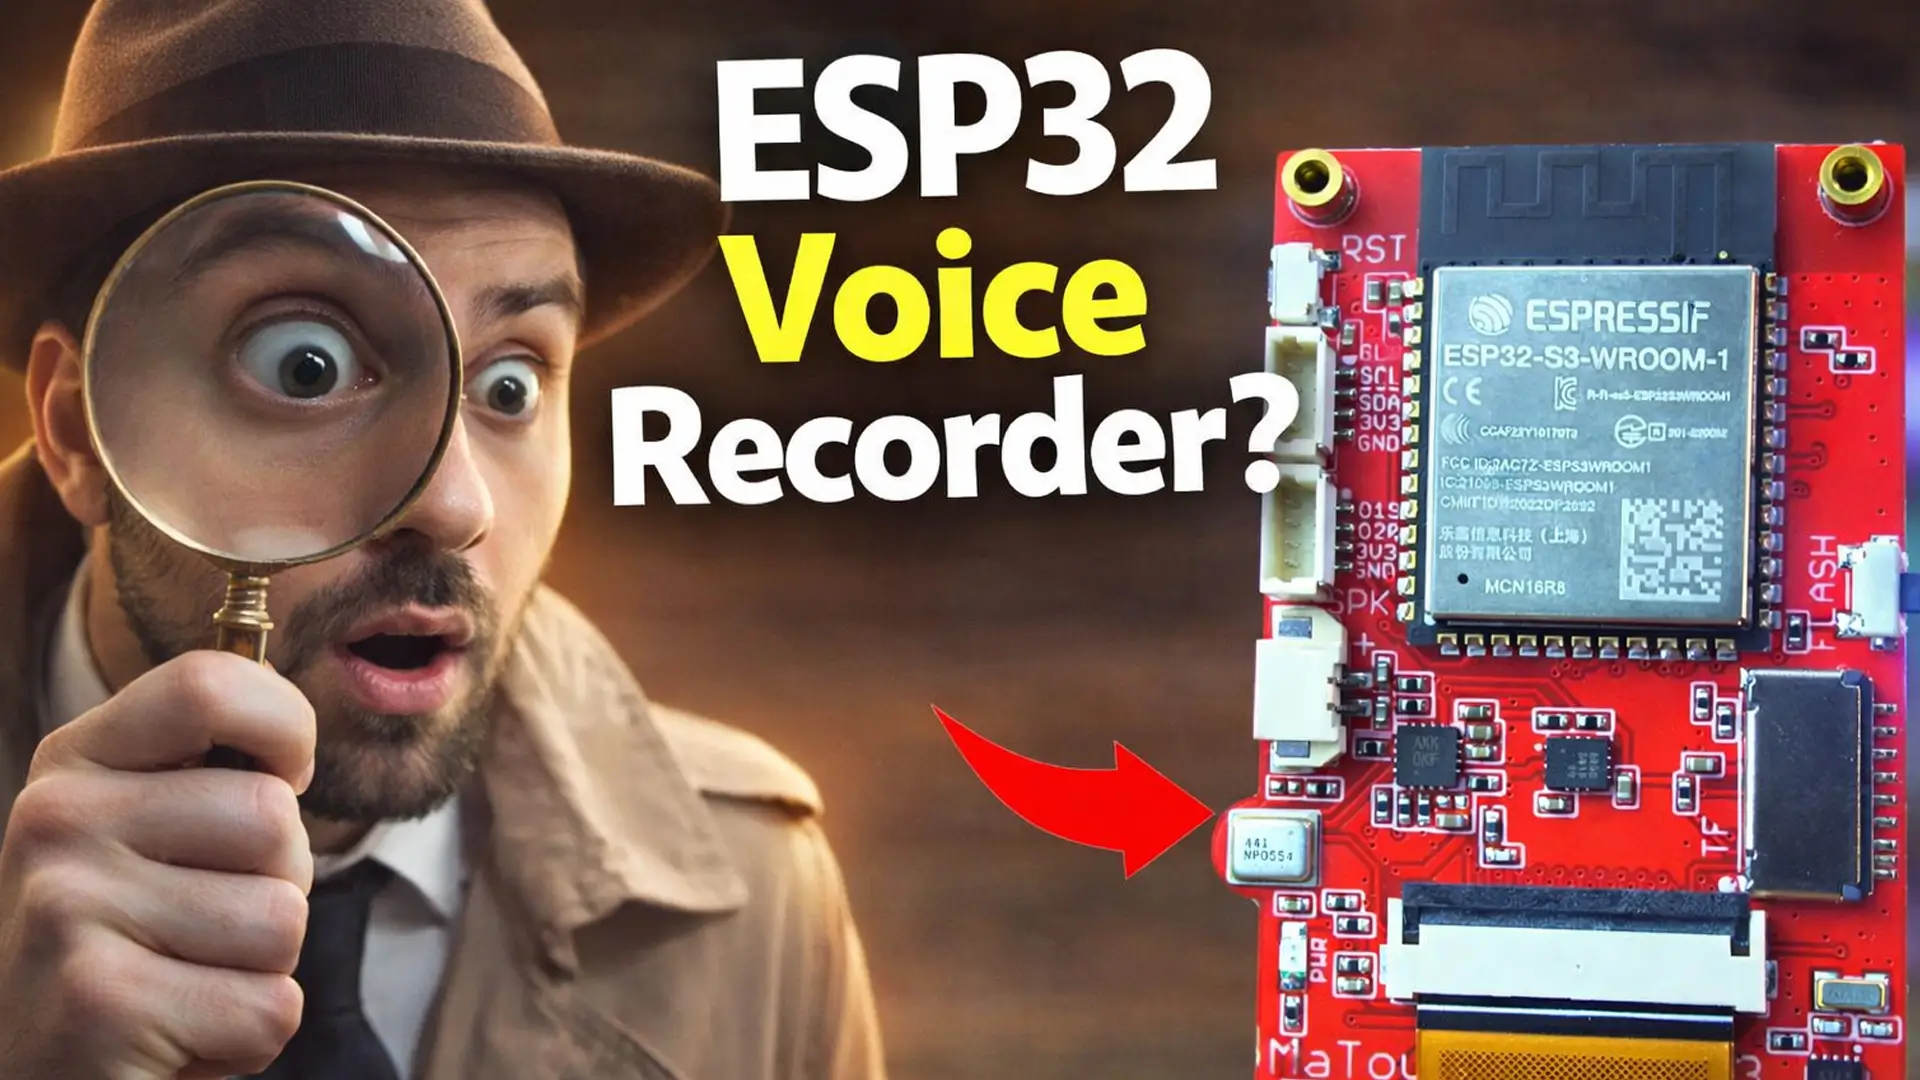
Normally, audio recording projects mean extra modules, complex wiring, and messy code. You need a separate microphone, an amplifier, power management, and even after all that, you still fight noise and stability issues.
But this board changes everything with gesture control, making it feel like a true no button voice recorder and a smooth gesture controlled ESP32 project, almost like a smart voice recorder ESP32 that responds naturally without any physical interaction.
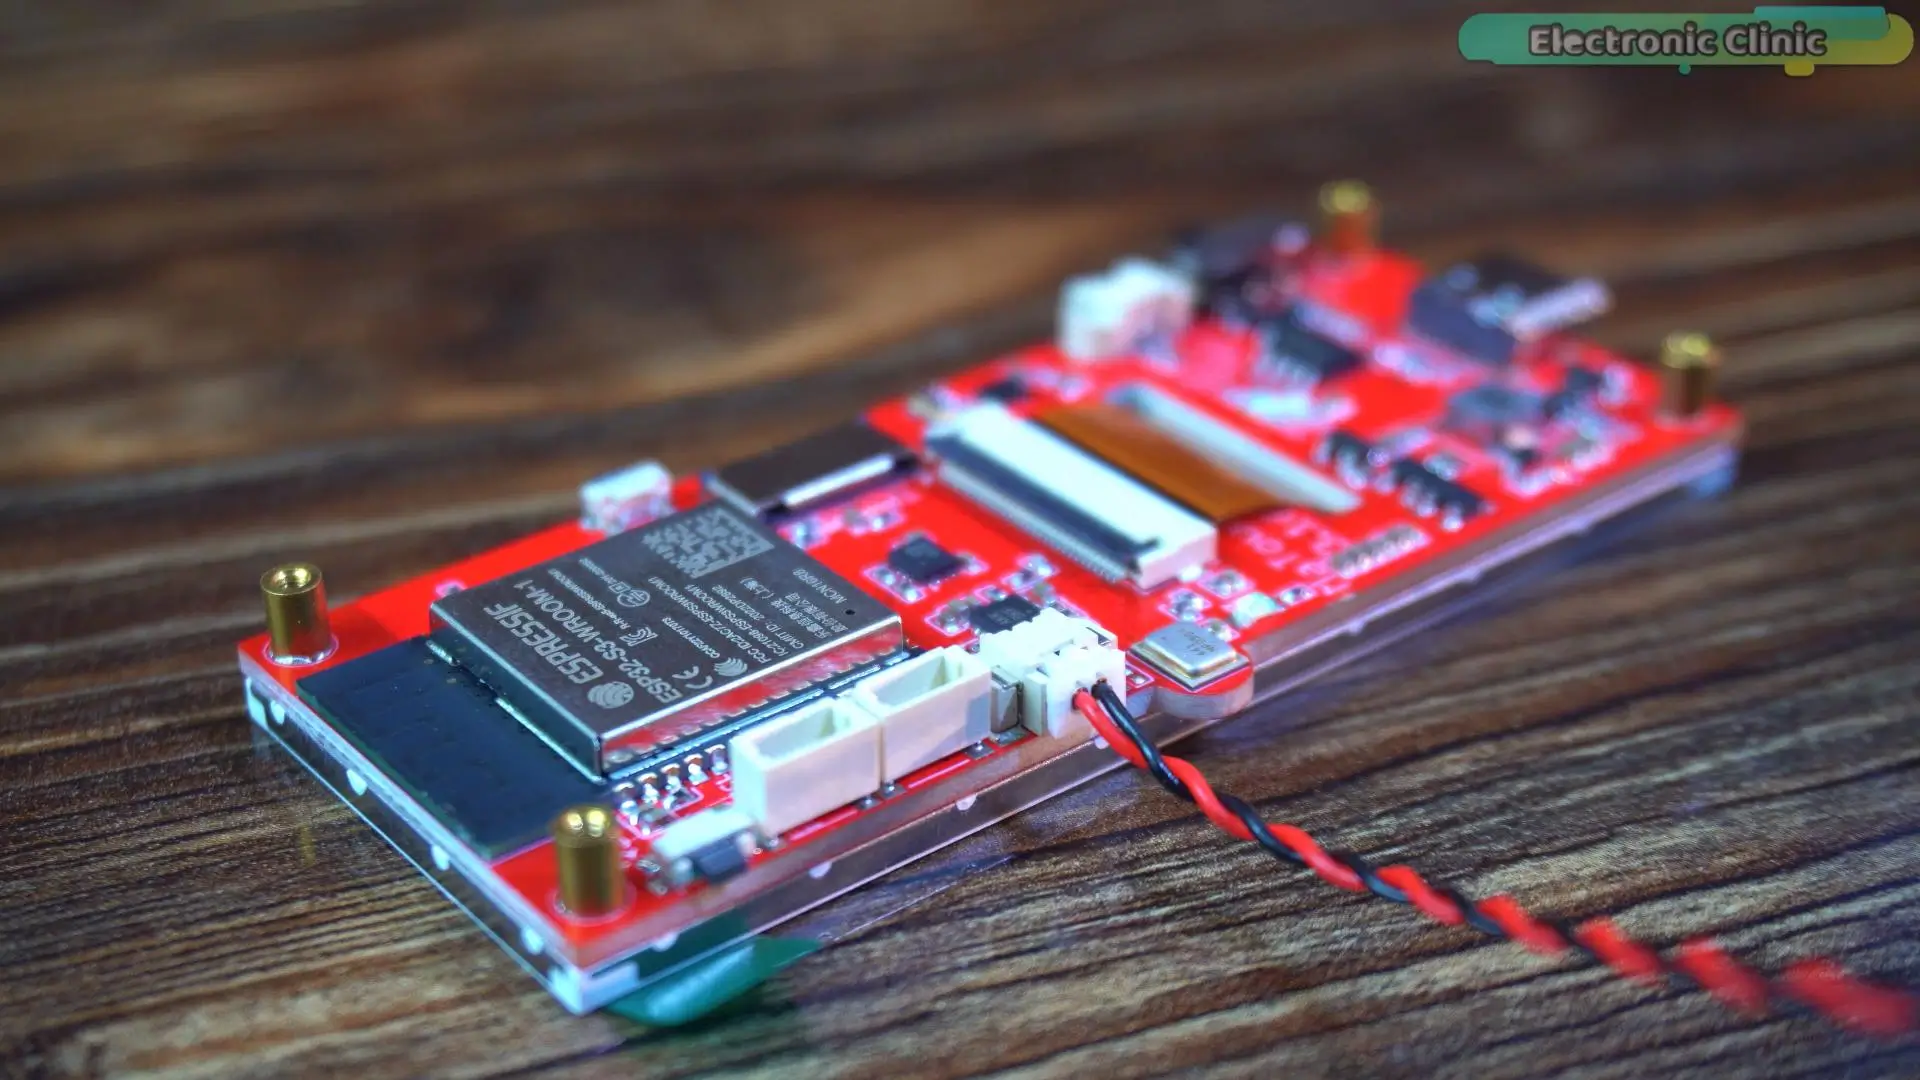
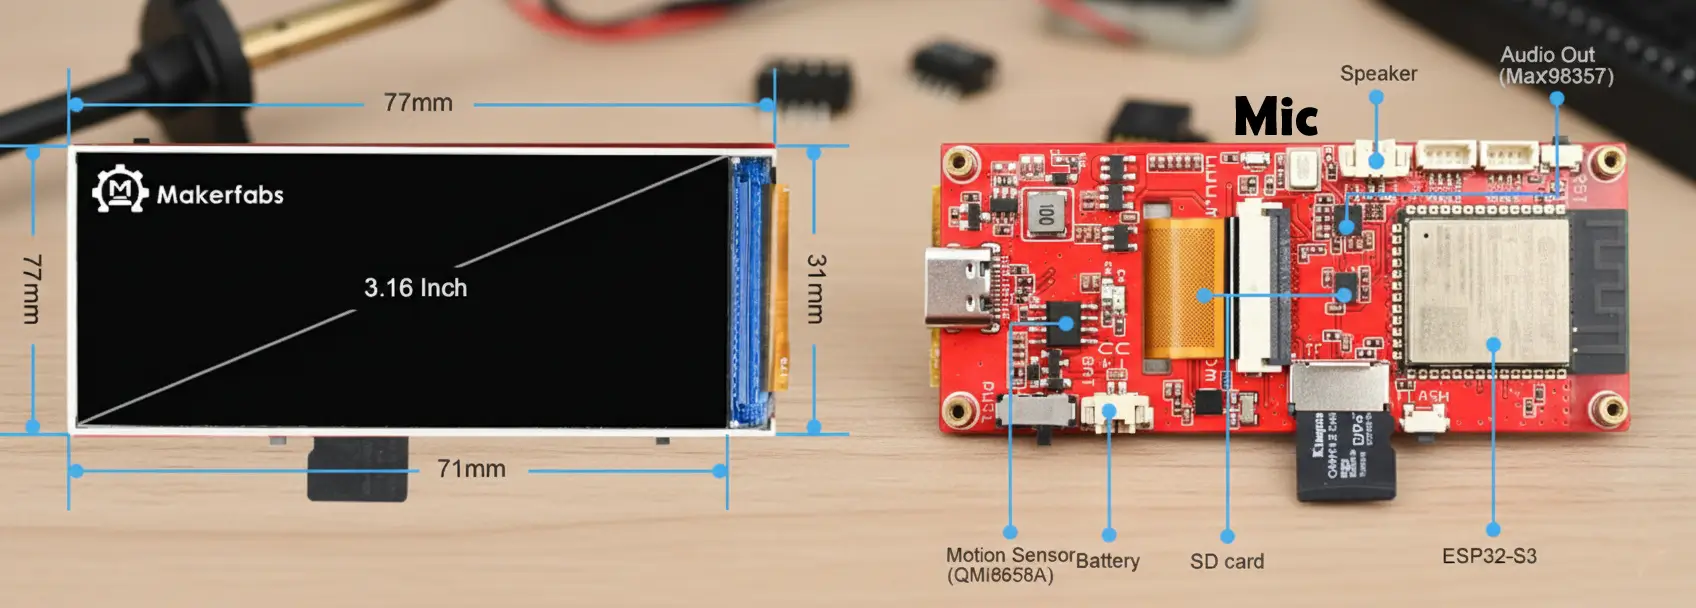
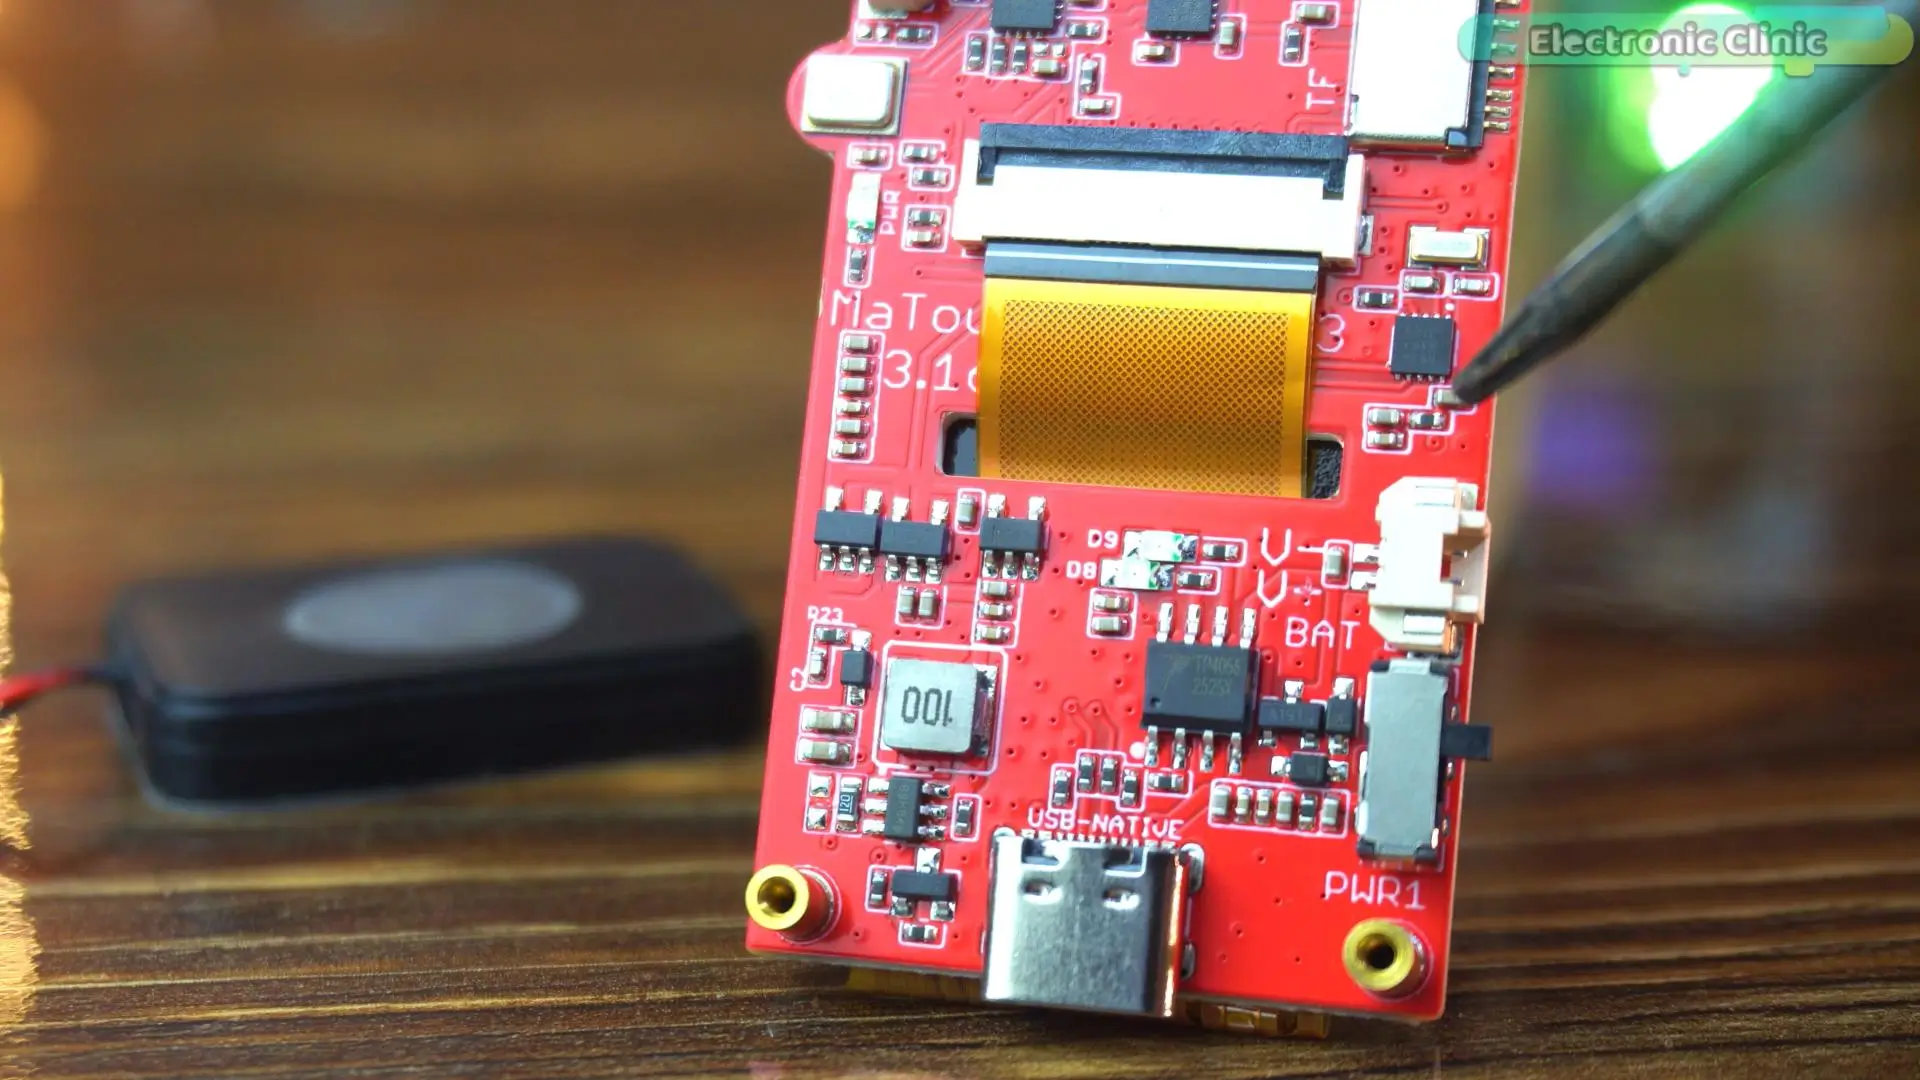
This is the Makerfabs MaTouch ESP32-S3 Parallel TFT 3.16-inch ST7701S development kit..It already includes a digital microphone, a powerful ESP32-S3, a large display, and proper power management — all in one clean design.
No extra modules. No wiring mess. That’s why it’s perfect for building a gesture-controlled ESP32 voice recorder.
One thing I really appreciate about Makerfabs is that they don’t hide the design.
All the important connections are exposed and clearly laid out.
You can actually see how the microphone, display, power circuit, and ESP32 are connected.
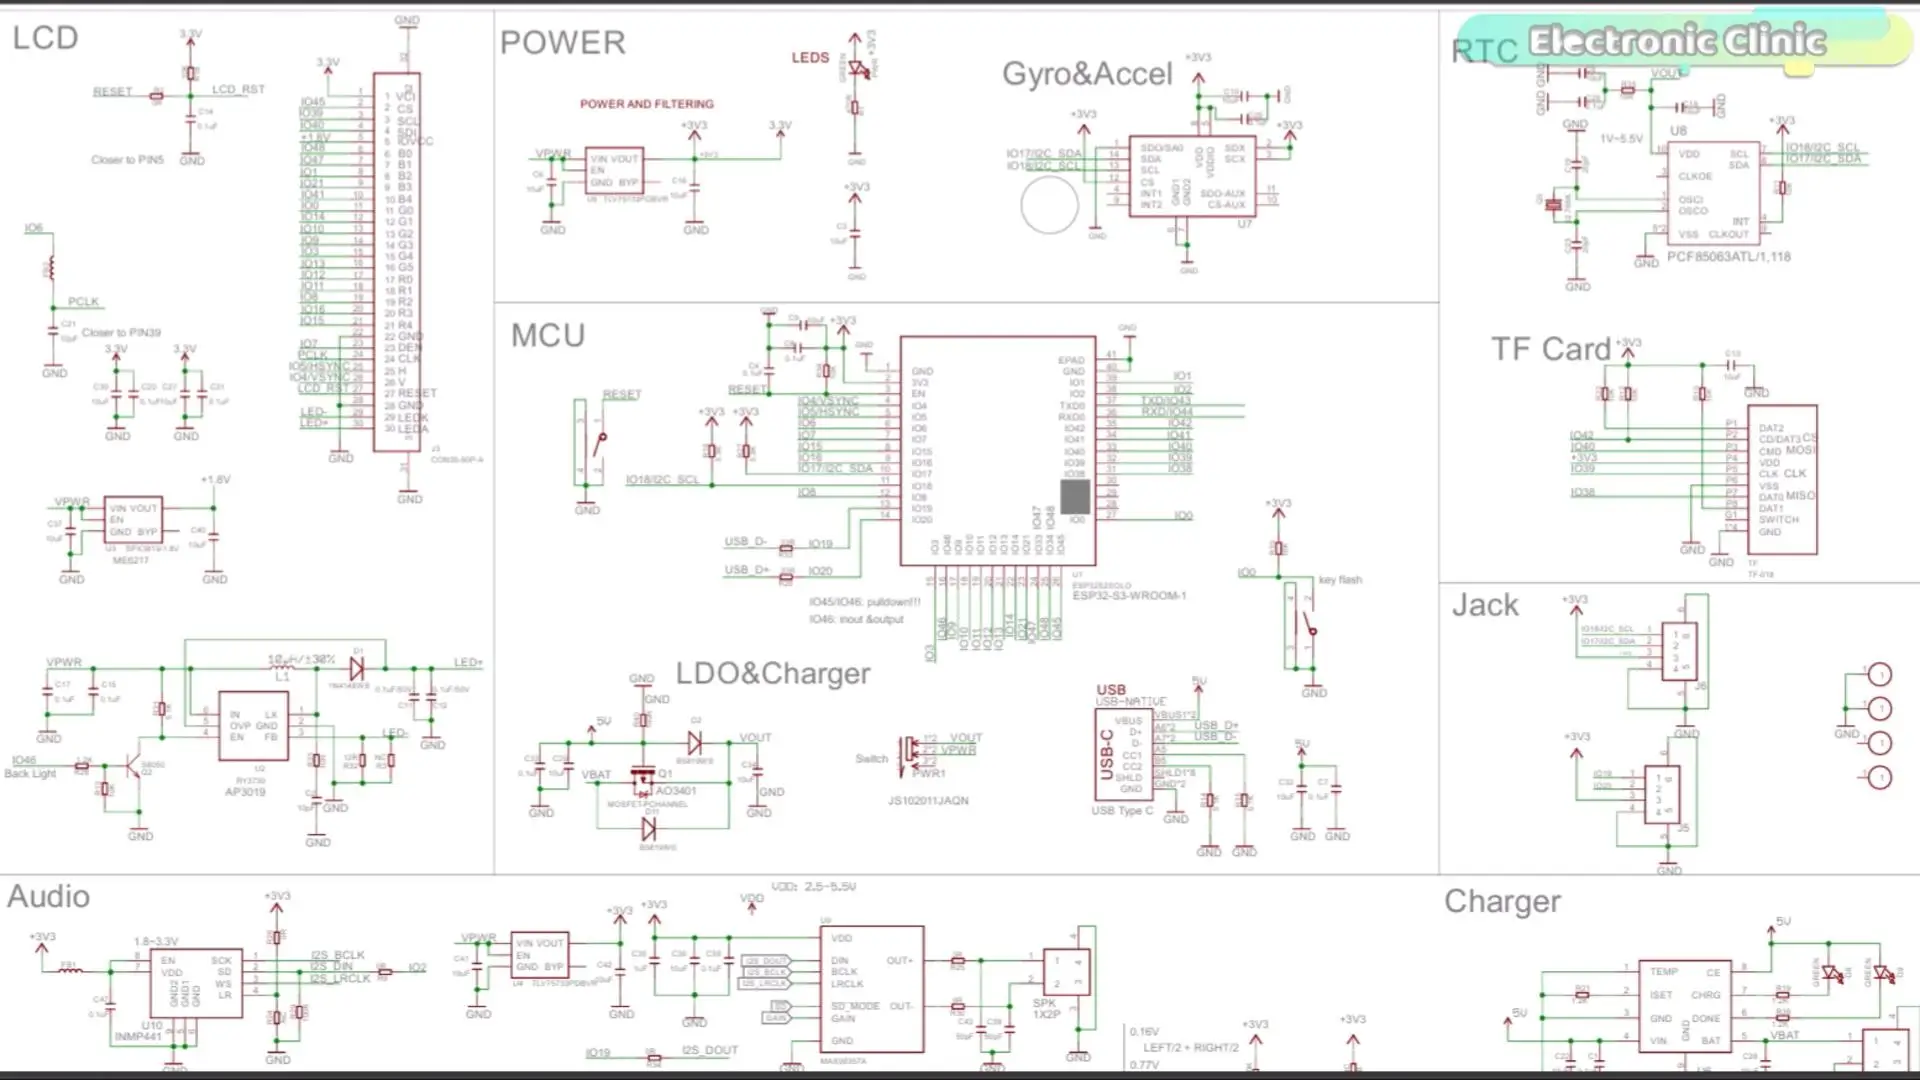
This makes it much easier to learn, understand the signal flow, and eventually build your own designs from scratch. Don’t worry, if you are not able to see the connections clearly, this circuit diagram is available in the folder.
Portability is another big deal for a real voice recorder.
This board supports a battery with built-in charging, so with a small Li-ion battery, the project becomes fully portable.
No power banks. No USB cables.
Just switch it on and record anywhere.
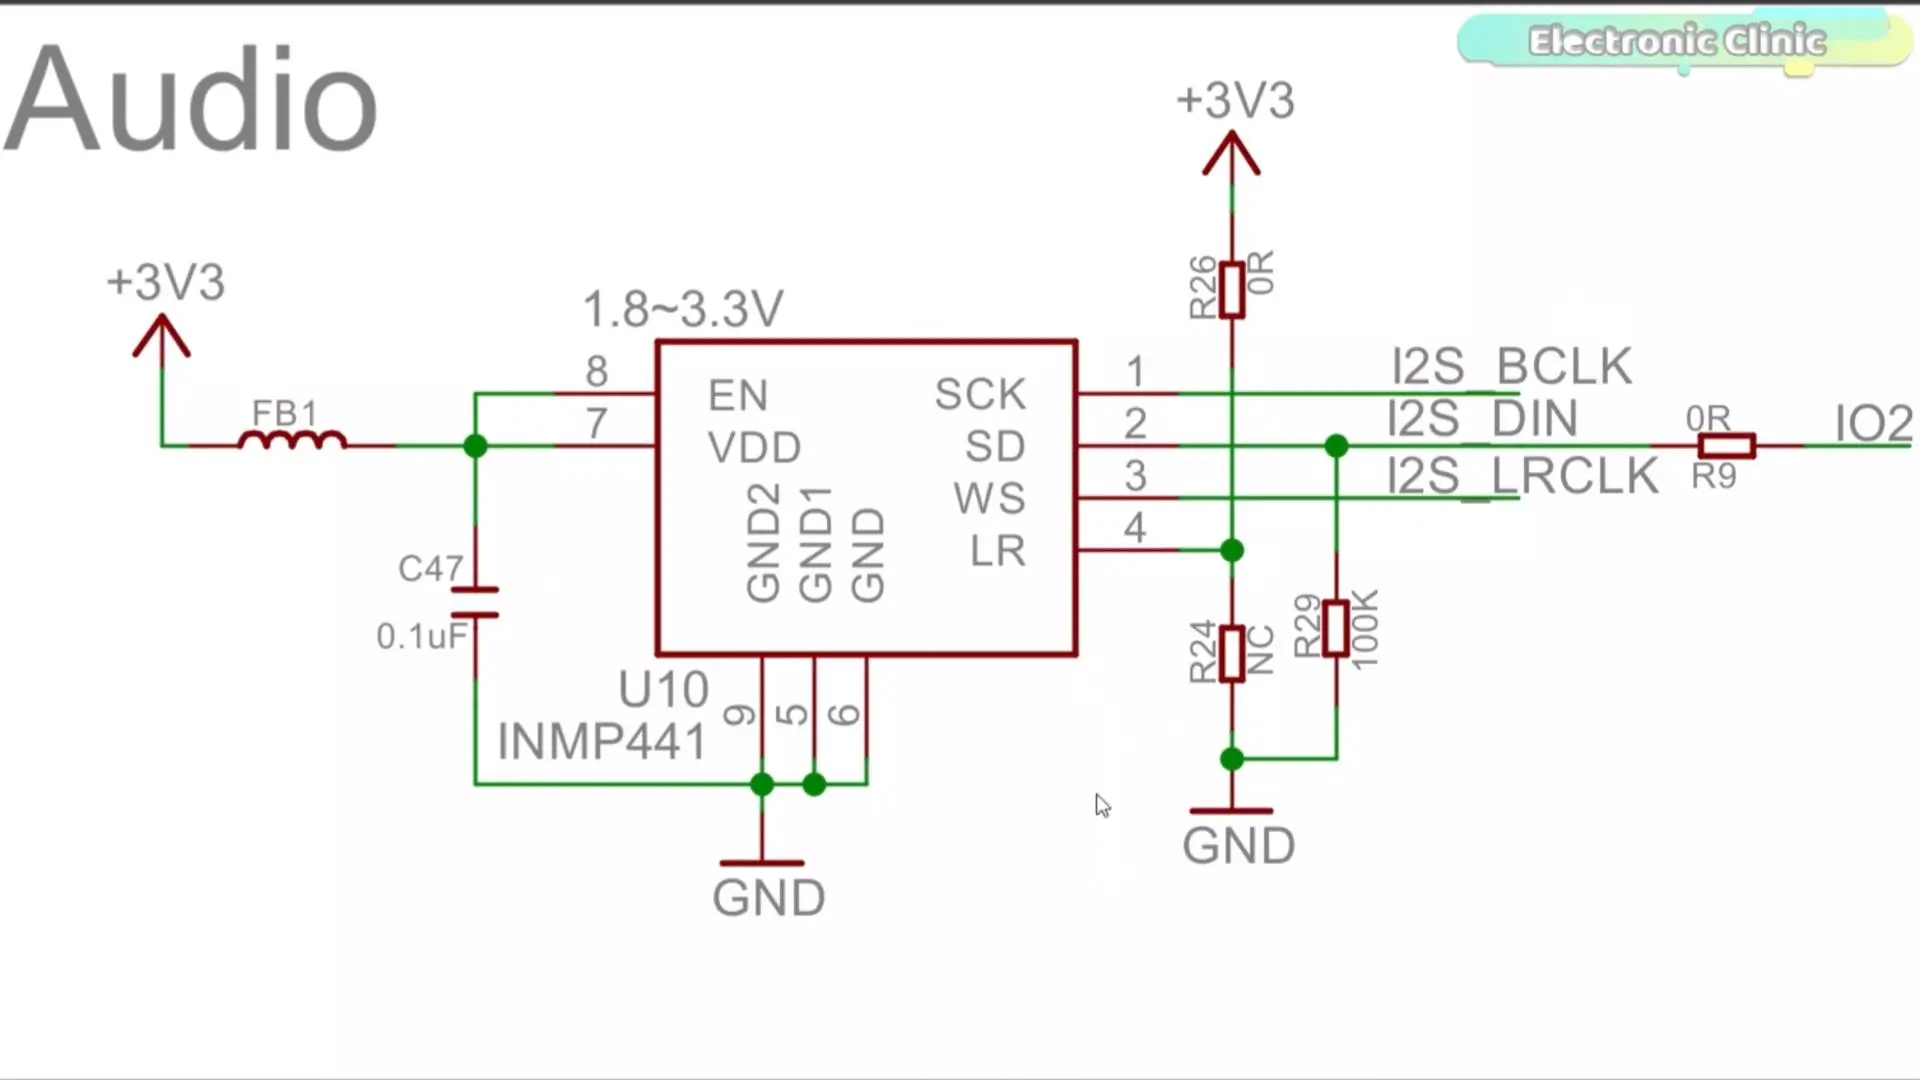
The microphone used here is the INMP441 digital I2S microphone.
It’s one of the best choices for ESP32 audio projects.
Because it’s digital, the audio goes straight to the ESP32 over I2S, avoiding analog noise, unstable ADC readings, and signal issues.
The INMP441 isn’t meant for studio music production, and its sensitivity is fixed; but for speech, learning, and embedded voice recorders, it’s an excellent choice.
And the best part?
Everything is already integrated properly.
Microphone, display, power system, and controls are all ready to go.
That means less time fighting hardware and more time understanding how audio recording actually works on the ESP32.
If you want ready-to-use project folders and extra resources, you can support my work on Patreon.
With just a $1 subscription, you get access to all my premium projects.
ESP32 Voice Recorder Software Setup – Arduino IDE, Boards & Libraries
Before we start writing any code, let me quickly share my software setup so you can follow along without any issues.
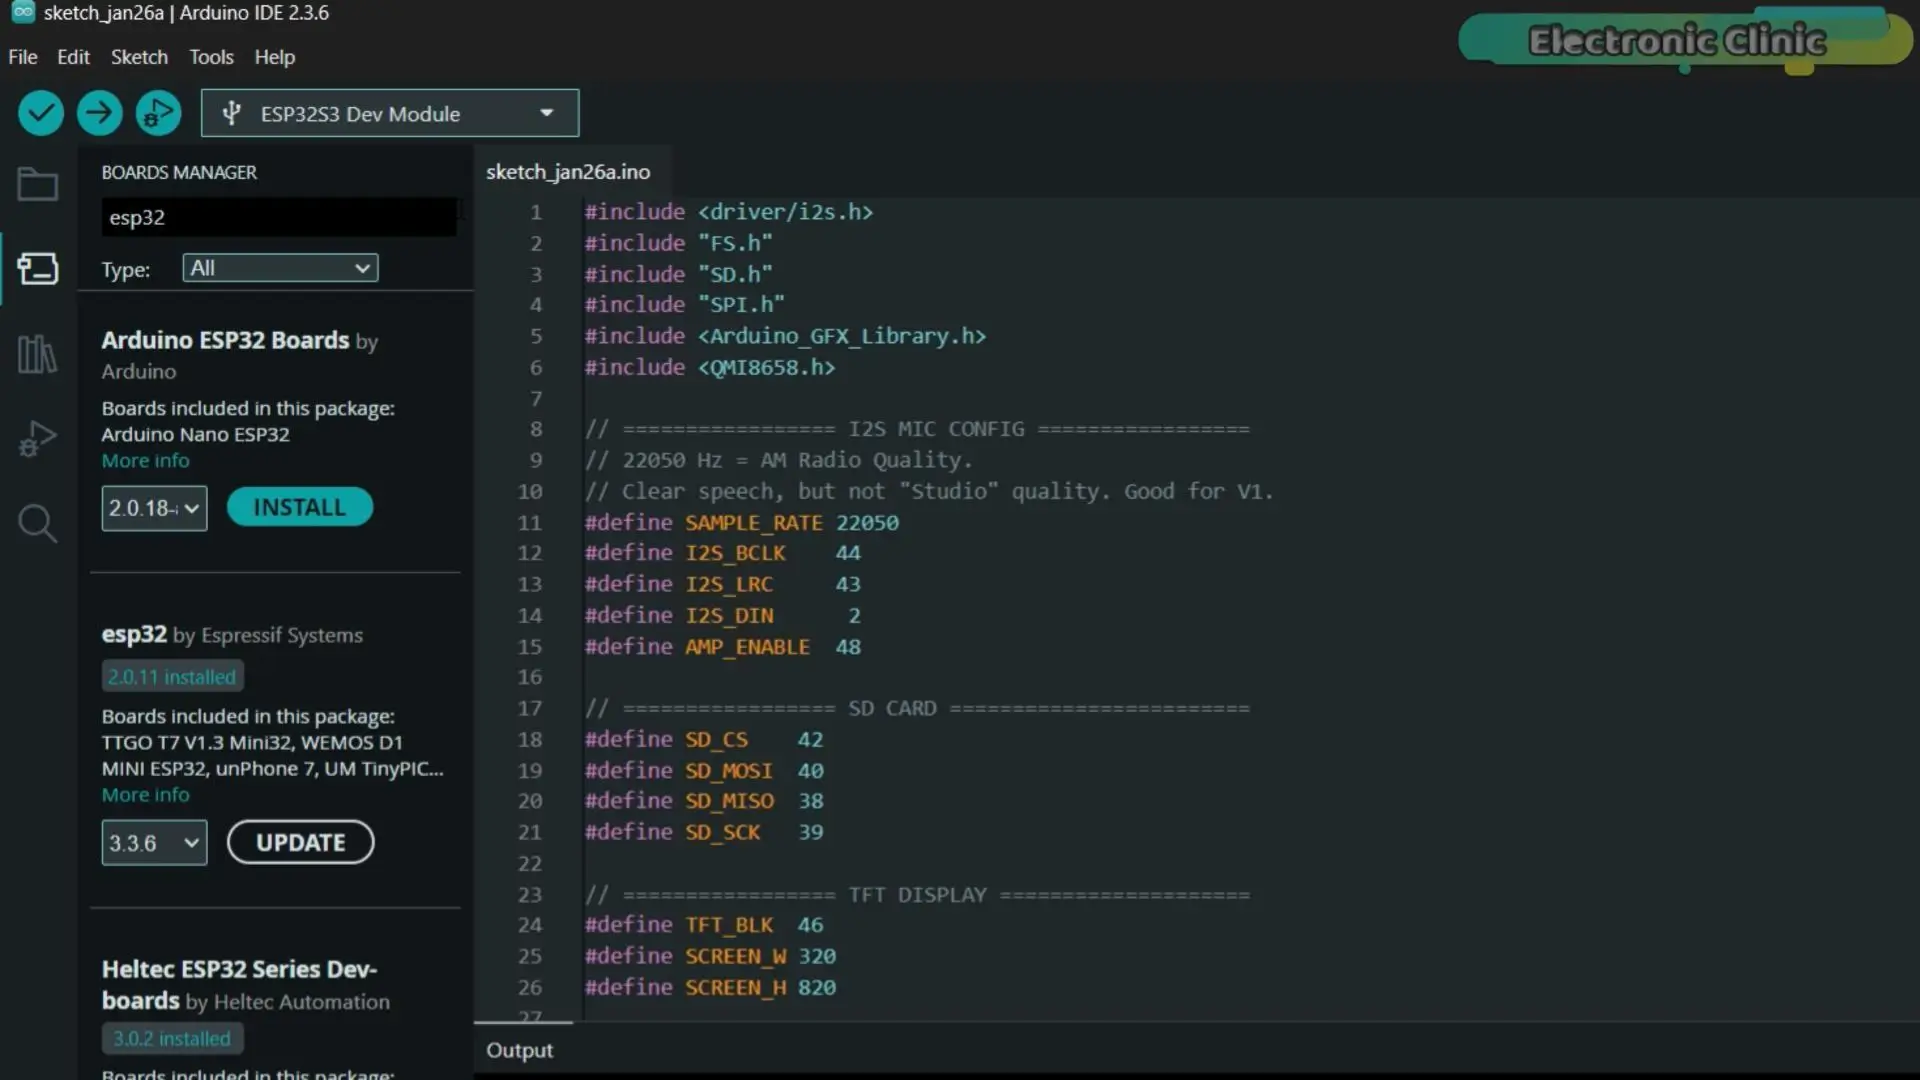
I am using Arduino IDE version 2.3.6, along with the ESP32 boards package version 2.0.11; if you want you can also try 2.0.16. This setup works reliably with the ESP32-S3 and avoids compatibility problems.
For libraries, you will need two important ones.
The first is the QMI8658 library version 1.0.1, which is used for gesture and motion input on this board.
And for Arduino_GFX_Library watch the video.
For the Arduino_GFX_Library
Go into the “lib” folder.
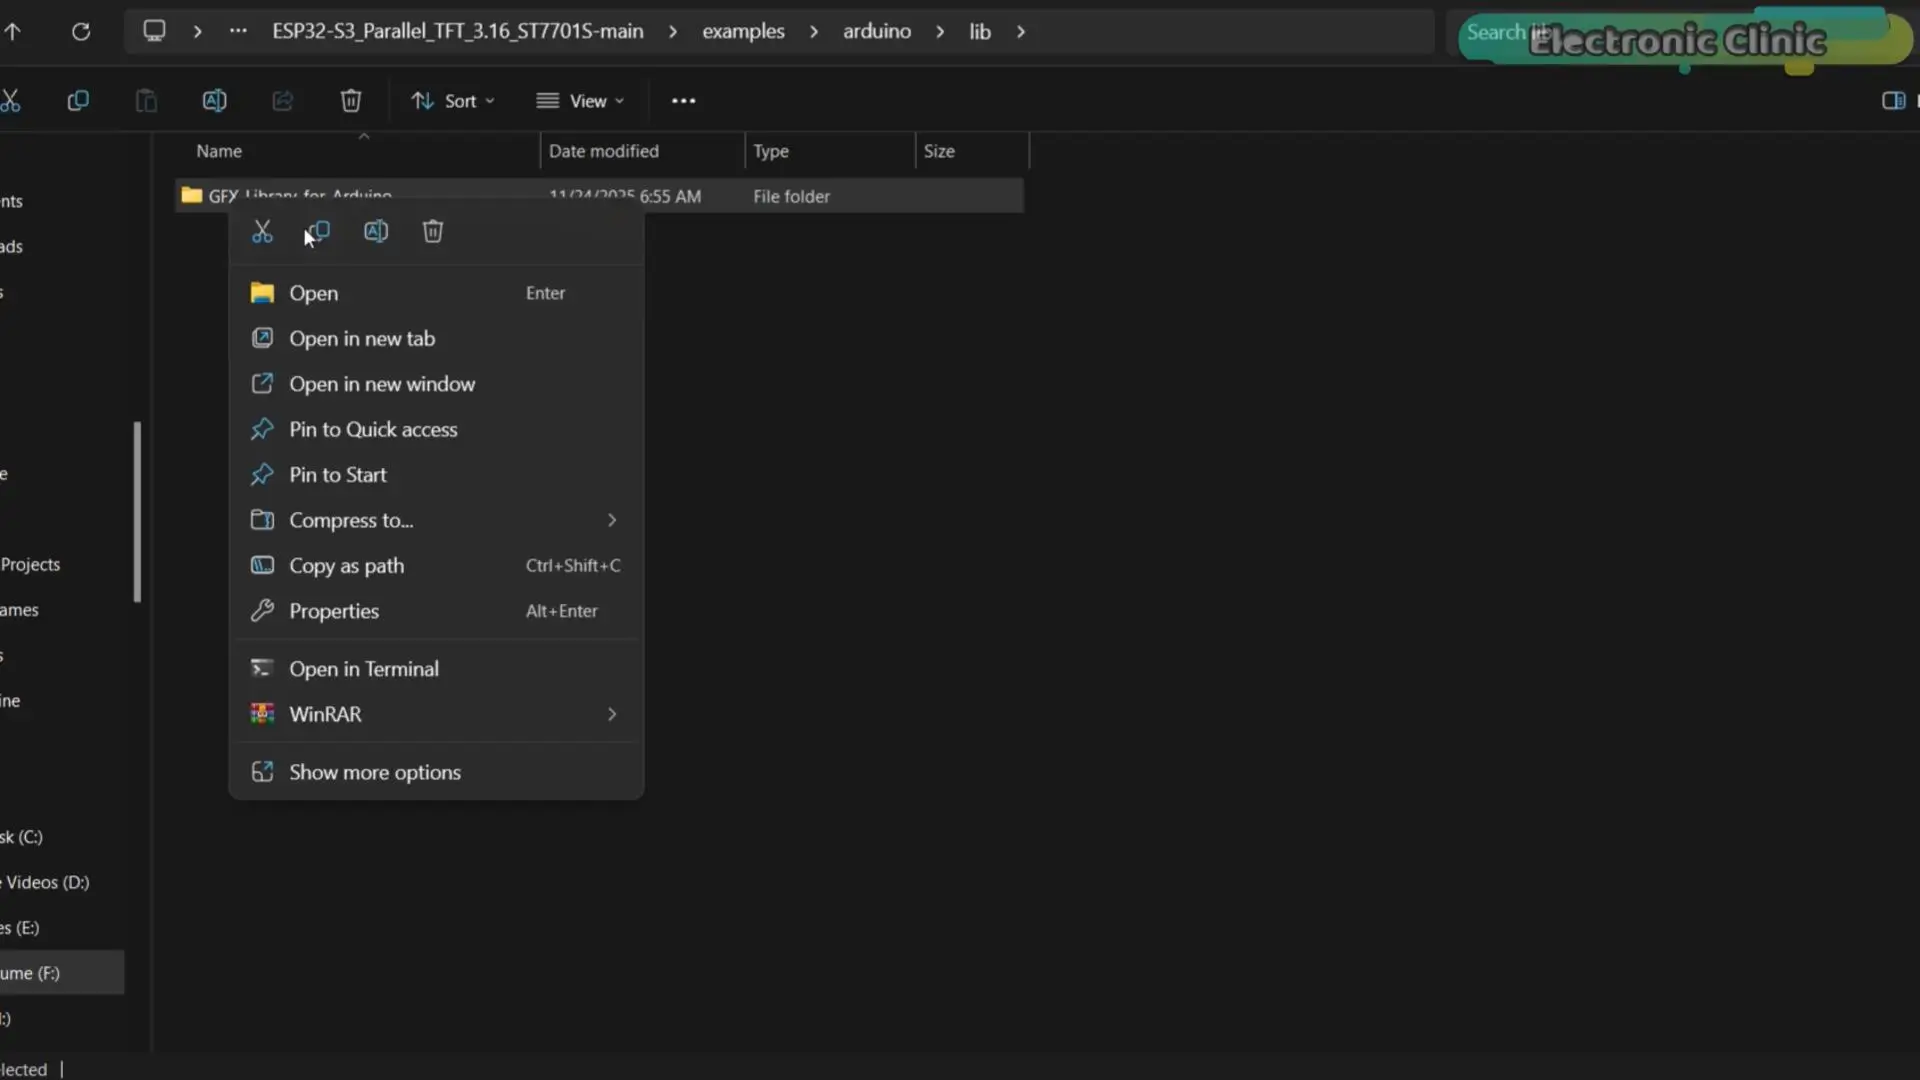
From here, copy “GFX_Library_for_Arduino”… and paste it into your Arduino libraries folder.
If you already have an older GFX library installed, make sure you delete it first.
Otherwise, you may run into multiple libraries found errors during compilation, and that can cause unnecessary confusion.
Once you have the Arduino IDE installed, the ESP32 board package set correctly, and both of these libraries added, the software side is fully ready. At this point, we are officially prepared to move forward and start building the voice recorder.
Arduino IDE:
Arduino IDE 2.3.6
ESP32 Boards package:
ESP32 V2.0.11 or ESP32 V2.0.16
Libraries:
QMI8658 v1.0.1 library
GFX_Library_for_Arduino
Install JPEGDecoder v2.0.0 library
ESP32 Voice Recorder Full Code
|
1 2 3 4 5 6 7 8 9 10 11 12 13 14 15 16 17 18 19 20 21 22 23 24 25 26 27 28 29 30 31 32 33 34 35 36 37 38 39 40 41 42 43 44 45 46 47 48 49 50 51 52 53 54 55 56 57 58 59 60 61 62 63 64 65 66 67 68 69 70 71 72 73 74 75 76 77 78 79 80 81 82 83 84 85 86 87 88 89 90 91 92 93 94 95 96 97 98 99 100 101 102 103 104 105 106 107 108 109 110 111 112 113 114 115 116 117 118 119 120 121 122 123 124 125 126 127 128 129 130 131 132 133 134 135 136 137 138 139 140 141 142 143 144 145 146 147 148 149 150 151 152 153 154 155 156 157 158 159 160 161 162 163 164 165 166 167 168 169 170 171 172 173 174 175 176 177 178 179 180 181 182 183 184 185 186 187 188 189 190 191 192 193 194 195 196 197 198 199 200 201 202 203 204 205 206 207 208 209 210 211 212 213 214 215 216 217 218 219 220 221 222 223 224 225 226 227 228 229 230 231 232 233 234 235 236 237 238 239 240 241 242 243 244 245 246 247 248 249 250 251 252 253 254 255 256 257 258 259 260 261 262 263 264 265 266 267 268 269 270 271 272 273 274 275 276 277 278 279 280 281 282 283 284 285 286 287 288 289 290 291 292 293 294 295 296 297 298 299 300 301 302 303 304 305 306 307 308 309 310 311 312 313 314 315 316 317 318 |
#include <driver/i2s.h> #include "FS.h" #include "SD.h" #include "SPI.h" #include <Arduino_GFX_Library.h> #include <QMI8658.h> // ================= I2S MIC CONFIG ================= // 22050 Hz = AM Radio Quality. // Clear speech, but not "Studio" quality. Good for V1. #define SAMPLE_RATE 22050 #define I2S_BCLK 44 #define I2S_LRC 43 #define I2S_DIN 2 // ================= SD CARD ======================== #define SD_CS 42 #define SD_MOSI 40 #define SD_MISO 38 #define SD_SCK 39 // ================= TFT DISPLAY ==================== #define TFT_BLK 46 #define SCREEN_W 320 #define SCREEN_H 820 // ================= IMU (ACCEL) ==================== #define SDA 17 #define SCL 18 // ================= AUDIO BUFFERING ================ #define BUFFER_SIZE 1024 // ================= SHAKE SETTINGS ================= // Asymmetric Thresholds: Easy to start, Harder to stop #define SHAKE_THRESHOLD_START 1200 #define SHAKE_THRESHOLD_STOP 1800 #define SHAKE_DEBOUNCE 1000 // ================= UI COLORS ====================== #define COLOR_BG 0x10A2 #define COLOR_CARD 0x2124 #define COLOR_ACCENT 0x035A #define COLOR_SUCCESS 0x0600 #define COLOR_DANGER 0xF800 #define COLOR_TEXT 0xFFFF #define COLOR_MUTED 0x8410 // ================= TFT INIT ======================= Arduino_DataBus *bus = new Arduino_SWSPI(GFX_NOT_DEFINED, 45, 39, 40, GFX_NOT_DEFINED); Arduino_ESP32RGBPanel *rgbpanel = new Arduino_ESP32RGBPanel( 7,4,5,6,12,11,8,16,15,0,14,10,9,3,13,48,47,1,21,41, 1,10,8,50,1,10,8,20 ); Arduino_RGB_Display *gfx = new Arduino_RGB_Display( SCREEN_W, SCREEN_H, rgbpanel, 0, true, bus, GFX_NOT_DEFINED, st7701_type9_init_operations, sizeof(st7701_type9_init_operations) ); // ================= GLOBALS ======================== QMI8658 imu; File recFile; bool isRecording = false; unsigned long lastShake = 0; float lastAccelX = 0; float lastAccelY = 0; float lastAccelZ = 0; uint32_t totalBytes = 0; int recordingNumber = 1; bool imuCalibrated = false; // ================= UI HELPERS ===================== void centerPrint(String text, int y, int size, uint16_t color) { gfx->setTextSize(size); gfx->setTextColor(color); int16_t textWidth = text.length() * 6 * size; int16_t x = (SCREEN_W - textWidth) / 2; if (x < 0) x = 0; gfx->setCursor(x, y); gfx->print(text); } void drawBaseUI() { gfx->fillScreen(COLOR_BG); gfx->fillRect(0, 0, SCREEN_W, 60, COLOR_ACCENT); centerPrint("VOICE RECORDER", 20, 3, COLOR_TEXT); } void drawStandbyUI() { drawBaseUI(); gfx->fillRoundRect(20, 100, SCREEN_W - 40, 300, 15, COLOR_CARD); // Blue Circle gfx->fillCircle(SCREEN_W / 2, 220, 60, COLOR_ACCENT); gfx->fillCircle(SCREEN_W / 2, 220, 50, COLOR_CARD); centerPrint("STANDBY", 320, 3, COLOR_TEXT); char nextFile[32]; sprintf(nextFile, "Next: rec_%03d.wav", recordingNumber); centerPrint(nextFile, 360, 2, COLOR_MUTED); centerPrint("Shake to Record", 430, 2, COLOR_MUTED); } void drawRecordingUI() { drawBaseUI(); gfx->fillRoundRect(20, 100, SCREEN_W - 40, 300, 15, COLOR_CARD); // Red Pulsing Circle gfx->fillCircle(SCREEN_W / 2, 220, 60, COLOR_DANGER); centerPrint("REC", 212, 2, COLOR_TEXT); centerPrint("RECORDING...", 320, 3, COLOR_TEXT); centerPrint("22kHz Quality", 360, 2, COLOR_MUTED); centerPrint("Shake to Stop", 430, 2, COLOR_MUTED); } void drawSavedUI(String filename) { drawBaseUI(); gfx->fillRoundRect(20, 100, SCREEN_W - 40, 300, 15, COLOR_CARD); // Green Circle gfx->fillCircle(SCREEN_W / 2, 220, 60, COLOR_SUCCESS); centerPrint("SAVED!", 320, 3, COLOR_TEXT); centerPrint(filename, 360, 2, COLOR_MUTED); centerPrint("Shake to record again", 430, 2, COLOR_MUTED); } // ================= WAV HEADER ===================== void writeWavHeader(File &file, uint32_t dataSize) { uint32_t chunkSize = 36 + dataSize; uint16_t audioFormat = 1; uint16_t numChannels = 1; uint32_t sampleRate = SAMPLE_RATE; uint16_t bitsPerSample = 16; uint32_t byteRate = sampleRate * numChannels * bitsPerSample / 8; uint16_t blockAlign = numChannels * bitsPerSample / 8; file.seek(0); file.write((const uint8_t*)"RIFF", 4); file.write((const uint8_t*)&chunkSize, 4); file.write((const uint8_t*)"WAVE", 4); file.write((const uint8_t*)"fmt ", 4); uint32_t subChunk1Size = 16; file.write((const uint8_t*)&subChunk1Size, 4); file.write((const uint8_t*)&audioFormat, 2); file.write((const uint8_t*)&numChannels, 2); file.write((const uint8_t*)&sampleRate, 4); file.write((const uint8_t*)&byteRate, 4); file.write((const uint8_t*)&blockAlign, 2); file.write((const uint8_t*)&bitsPerSample, 2); file.write((const uint8_t*)"data", 4); file.write((const uint8_t*)&dataSize, 4); } // ================= MIC INIT ======================= void MicInit() { i2s_config_t cfg = { .mode = (i2s_mode_t)(I2S_MODE_MASTER | I2S_MODE_RX), .sample_rate = SAMPLE_RATE, .bits_per_sample = I2S_BITS_PER_SAMPLE_16BIT, .channel_format = I2S_CHANNEL_FMT_ONLY_RIGHT, .communication_format = I2S_COMM_FORMAT_I2S, .intr_alloc_flags = ESP_INTR_FLAG_LEVEL1, .dma_buf_count = 8, .dma_buf_len = 512, .use_apll = true }; i2s_pin_config_t pin = { .bck_io_num = I2S_BCLK, .ws_io_num = I2S_LRC, .data_out_num = I2S_PIN_NO_CHANGE, .data_in_num = I2S_DIN }; i2s_driver_install(I2S_NUM_0, &cfg, 0, NULL); i2s_set_pin(I2S_NUM_0, &pin); } // ================= START RECORD =================== void startRecording() { char filename[32]; sprintf(filename, "/rec_%03d.wav", recordingNumber); // Smart Indexing Check while(SD.exists(filename)) { recordingNumber++; sprintf(filename, "/rec_%03d.wav", recordingNumber); } recFile = SD.open(filename, FILE_WRITE); if(!recFile){ drawBaseUI(); centerPrint("ERROR", 200, 4, COLOR_DANGER); centerPrint("SD Card Write Failed", 250, 2, COLOR_TEXT); return; } for (int i=0;i<44;i++) recFile.write((uint8_t)0); // reserve header totalBytes = 0; isRecording = true; lastShake = millis(); // Reset debounce MicInit(); drawRecordingUI(); } // ================= STOP RECORD ==================== void stopRecording() { isRecording = false; i2s_driver_uninstall(I2S_NUM_0); writeWavHeader(recFile, totalBytes); recFile.close(); char filename[32]; sprintf(filename, "rec_%03d.wav", recordingNumber); drawSavedUI(String(filename)); recordingNumber++; // Prepare for next lastShake = millis(); // Reset debounce } // ================= SETUP ========================== void setup() { Serial.begin(115200); pinMode(TFT_BLK, OUTPUT); digitalWrite(TFT_BLK, LOW); gfx->begin(); drawBaseUI(); centerPrint("BOOTING...", 200, 2, COLOR_MUTED); SPI.begin(SD_SCK, SD_MISO, SD_MOSI, SD_CS); if (!SD.begin(SD_CS)) { centerPrint("SD FAIL", 250, 3, COLOR_DANGER); while(1); } // === SMART INDEXING === drawBaseUI(); centerPrint("INDEXING...", 200, 2, COLOR_MUTED); while(true) { char testName[32]; sprintf(testName, "/rec_%03d.wav", recordingNumber); if (!SD.exists(testName)) { break; } recordingNumber++; } if (!imu.begin(SDA, SCL)) { centerPrint("IMU FAIL", 250, 3, COLOR_DANGER); while(1); } imu.setAccelRange(QMI8658_ACCEL_RANGE_2G); imu.setAccelODR(QMI8658_ACCEL_ODR_500HZ); imu.setAccelUnit_mg(true); imu.enableSensors(QMI8658_ENABLE_ACCEL); drawBaseUI(); centerPrint("Calibrating...", 200, 2, COLOR_MUTED); delay(1500); QMI8658_Data d; if (imu.readSensorData(d)) { lastAccelX = d.accelX; lastAccelY = d.accelY; lastAccelZ = d.accelZ; } imuCalibrated = true; drawStandbyUI(); } // ================= LOOP =========================== void loop() { uint8_t buffer[BUFFER_SIZE]; size_t bytesRead; // ---------- RECORD DATA ---------- if (isRecording) { // RAW Recording: No DSP, No Gain, No Loop Processing i2s_read(I2S_NUM_0, buffer, BUFFER_SIZE, &bytesRead, portMAX_DELAY); if (bytesRead > 0) { recFile.write(buffer, bytesRead); totalBytes += bytesRead; } } // ---------- SHAKE DETECT ---------- if (imuCalibrated) { QMI8658_Data d; if (imu.readSensorData(d)) { float delta = abs(d.accelX - lastAccelX) + abs(d.accelY - lastAccelY) + abs(d.accelZ - lastAccelZ); lastAccelX = d.accelX; lastAccelY = d.accelY; lastAccelZ = d.accelZ; // START: Standard Threshold // STOP: Higher Threshold (Prevents accidental stops) int currentThreshold = isRecording ? SHAKE_THRESHOLD_STOP : SHAKE_THRESHOLD_START; if (delta > currentThreshold && millis() - lastShake > SHAKE_DEBOUNCE) { lastShake = millis(); if (!isRecording) startRecording(); else stopRecording(); } } } } |
This code turns the ESP32-S3 into a complete, gesture-controlled voice recorder. Audio from the digital I2S microphone is captured cleanly and written directly to the SD card in standard WAV format, so every recording can be played instantly on any device. The ESP32 handles this in real time, making sure no audio data is lost.
The TFT display gives clear visual feedback at every stage. In standby, the system waits for input. When recording starts, the screen switches to a bold red “REC” indicator, and when recording stops, it turns green and confirms that the file has been saved. You always know exactly what the recorder is doing.
Instead of buttons, the QMI8658 motion sensor is used for control. After a short calibration at startup, a simple shake gesture starts or stops recording. This makes the whole system fast, intuitive, and completely touch-free.
How to Upload Code to ESP32-S3 Voice Recorder (Correct Settings)
To upload the program, here is what you need to do:
First, go to the Tools menu > Board > ESP32, and select ESP32S3 Dev Module.
Go back to the Tools Menu > Port, and choose the correct communication port.
Again to the tools menu > Flash Size, and select 16MB.
Again go to the Tools menu > Partition Scheme and select 16M Flash
And one last time, go to Tools Menu > PSRAM, and select OPI PSRAM.
Once these settings are done, you can simply click the Upload button.
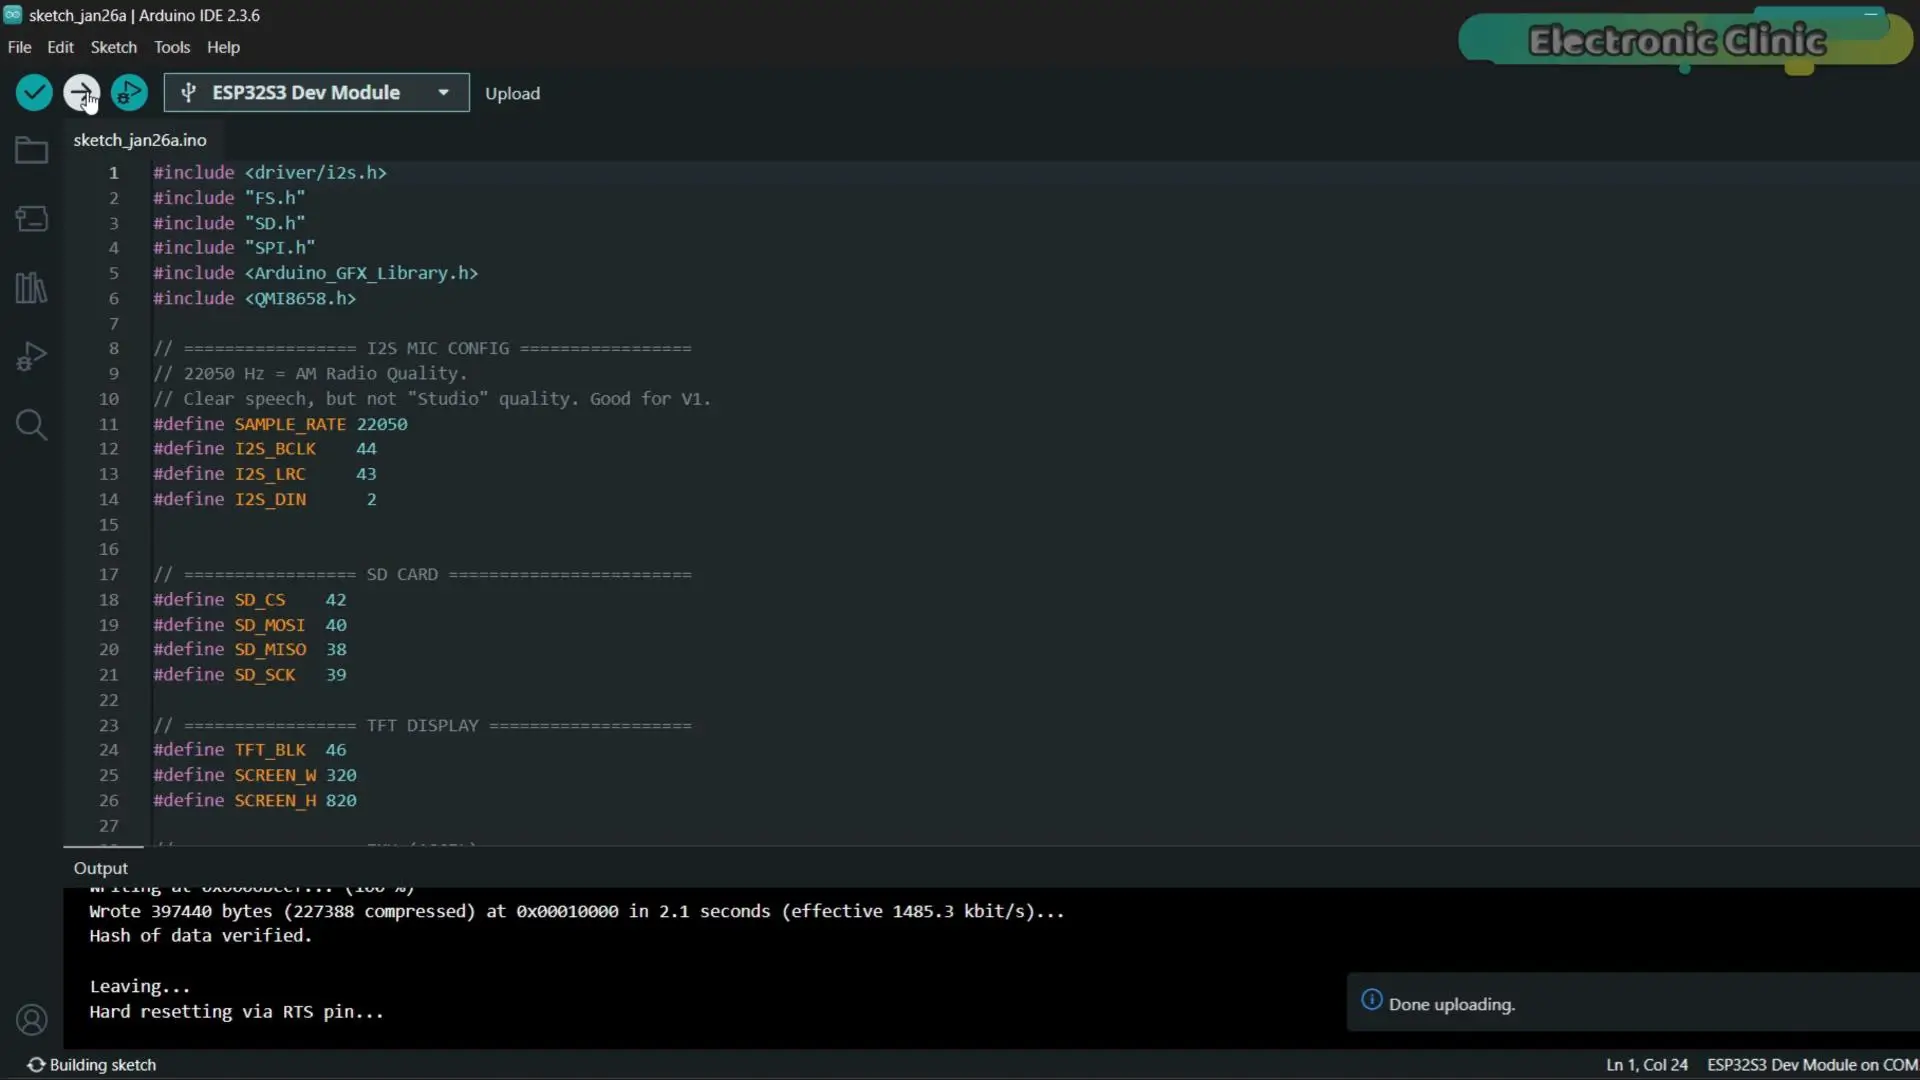
As you can see, the program has been successfully uploaded.
Real ESP32 Voice Recorder Demo – Shake to Record, Save & Play Audio
As soon as we flip the power switch, the system takes about two seconds to initialize.
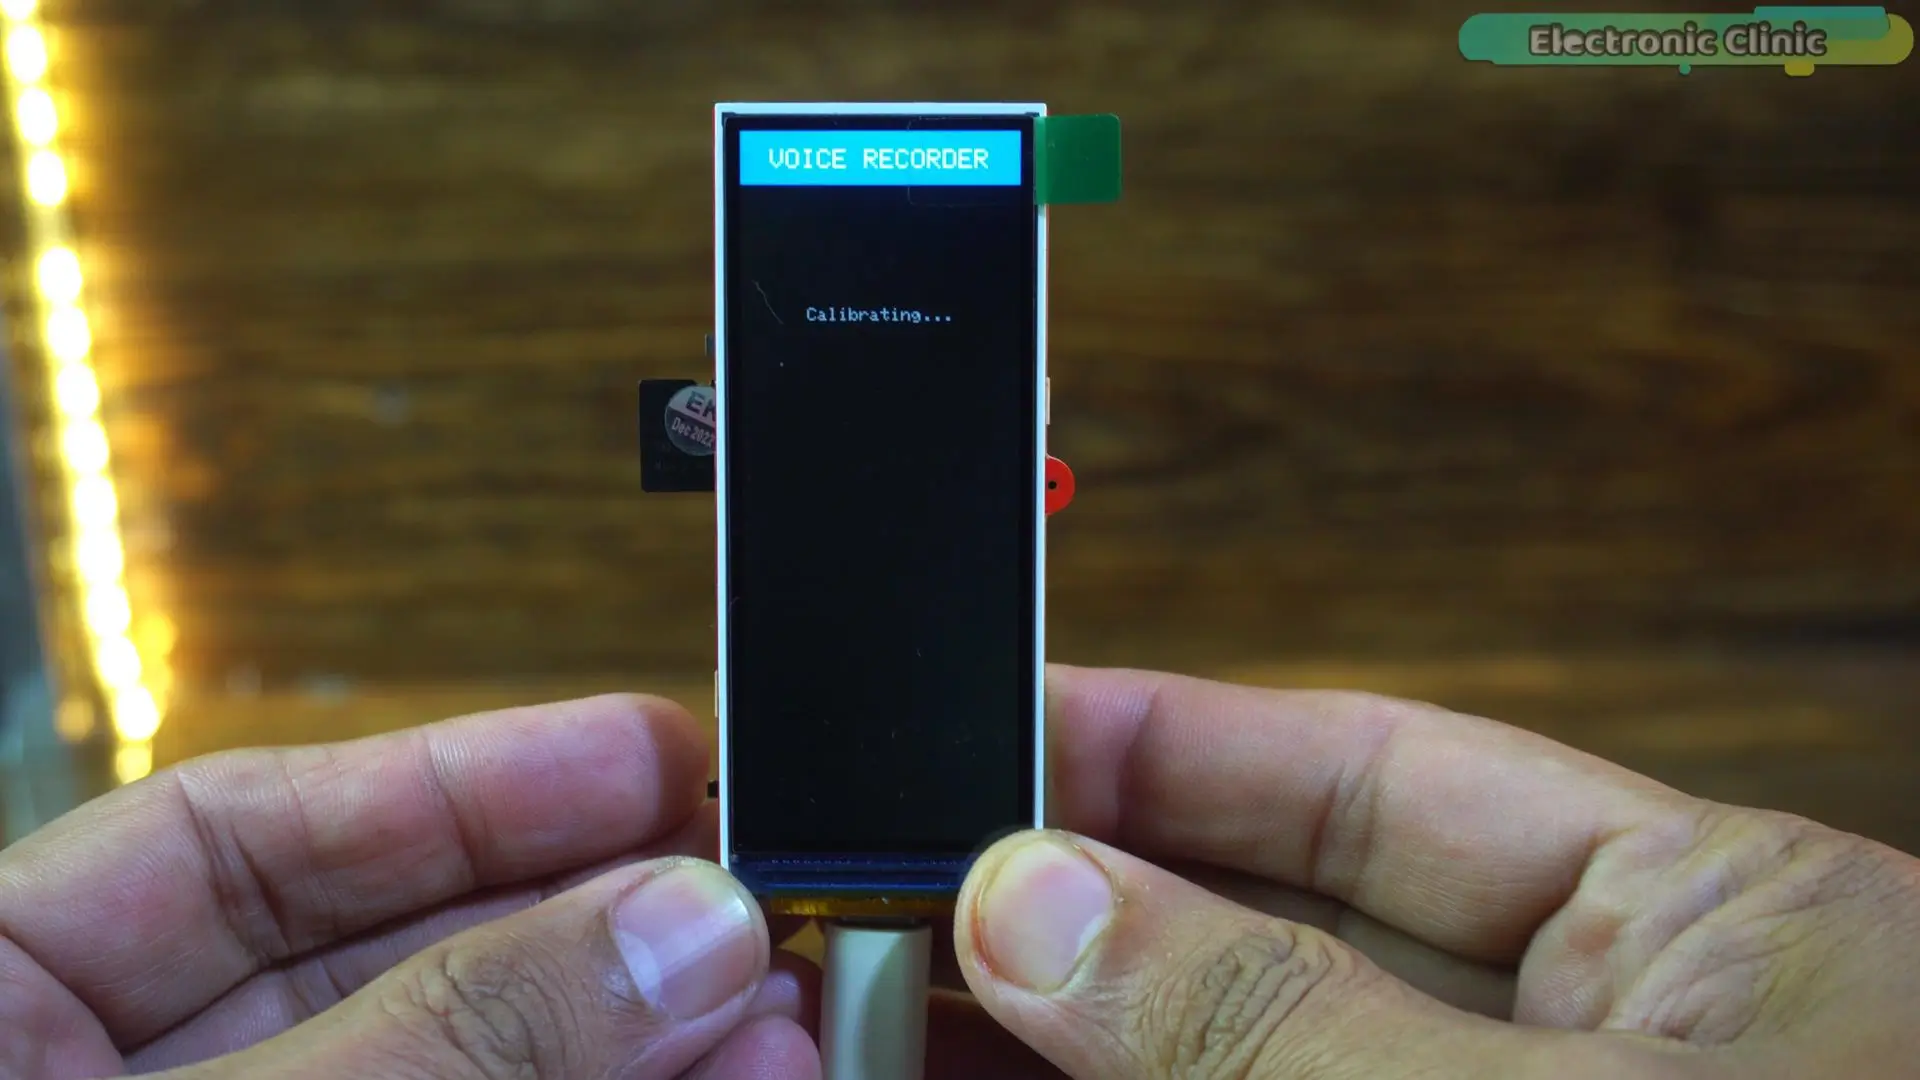
During this time, it’s zeroing out the accelerometer and calibrating itself. Pro tip here: keep the device completely still during this phase. If you move it too much, the shake detection can become a little too sensitive later.
Once the calibration is done, the system enters standby mode.
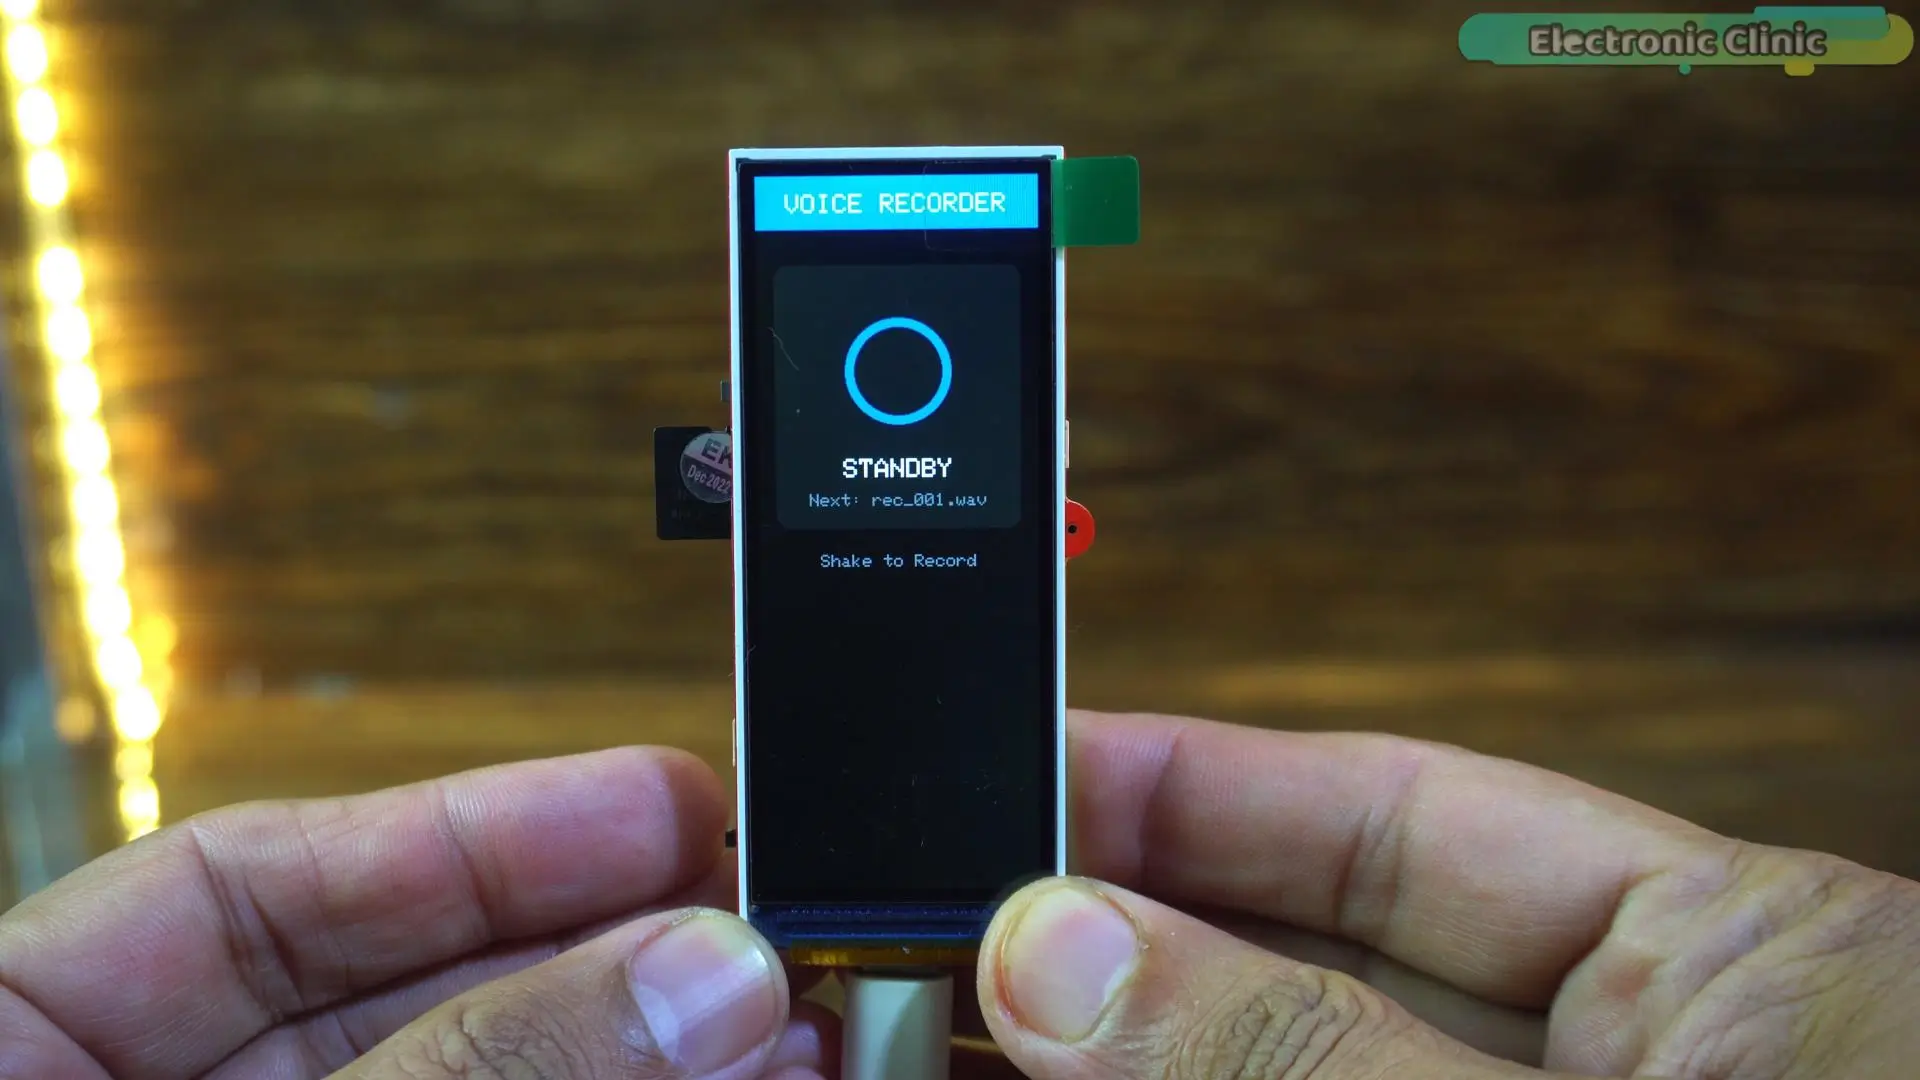
At this point, it’s fully armed and ready to go. Now, instead of fumbling around with tiny buttons, all you need to do is give the device a quick shake to start recording.
The moment recording starts, the interface changes instantly.
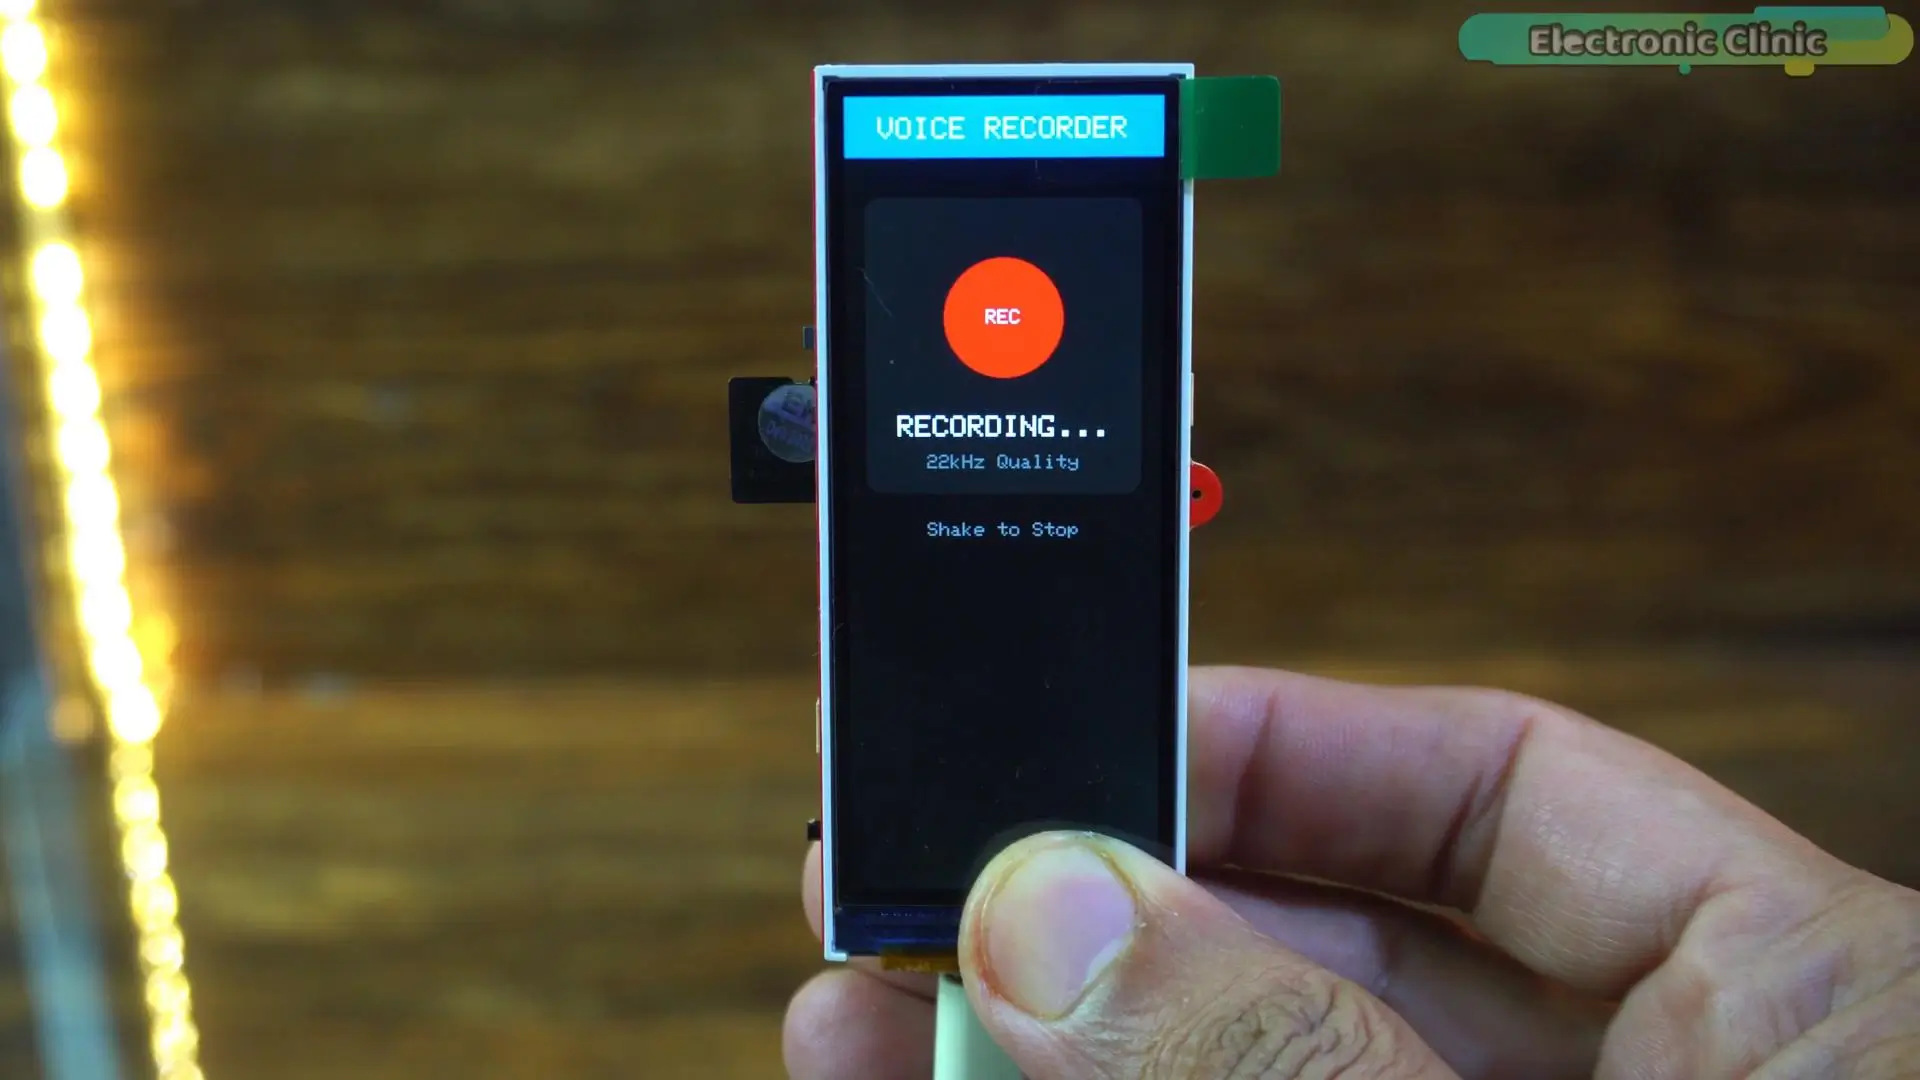
A big red circle appears on the screen with the word “REC” stamped right in the center. You simply cannot miss it. That large recording indicator makes it very clear that audio is being captured, even if the recorder is placed a few feet away from you.

When you are done recording, just shake the device again. The recording stops immediately, the screen turns green, and a clear “SAVED!” message appears.
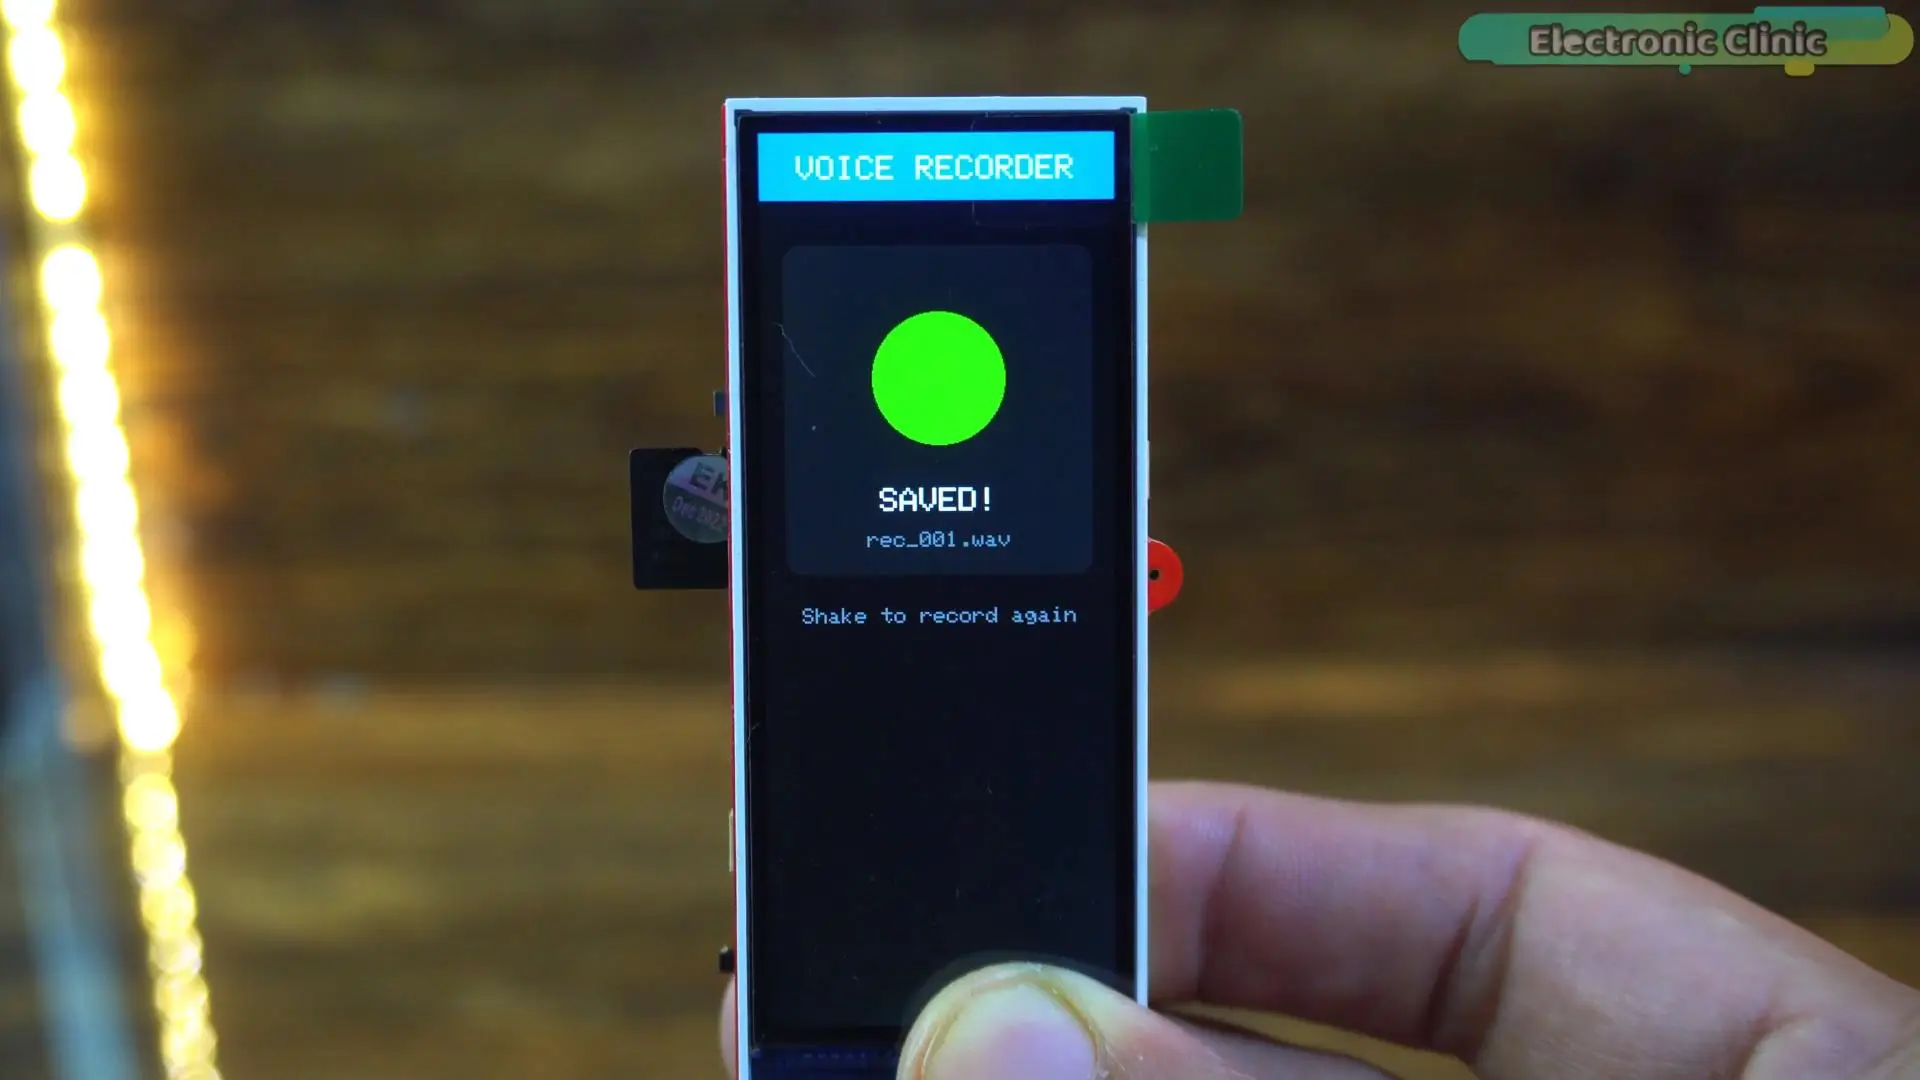
The file name is shown right there on the display, so there’s no guessing and no risk of losing your audio.
Before we play the recording, let me set the right expectations.
Right now, this project is using very basic audio settings. We are using a buffer size of 1024, 16-bit audio, and a 22.05 kHz sample rate. That puts us around AM-radio to podcast-draft quality; clear enough for speech, but definitely not studio grade. And that’s completely by design.
Right now, the goal is not to chase perfect sound. The goal is to build a reliable, gesture-controlled voice recorder and really understand the fundamentals: how the ESP32 captures digital audio, how that data is written cleanly to an SD card, and how motion control replaces physical buttons. This is version one, and it’s doing exactly what it’s meant to do.
Alright, with that out of the way… let’s play the recording. “For the practical Demonstration watch the video tutorial”.
Alright, so what you are hearing right now is coming directly from the ESP32 voice recorder. This is raw audio; 16-bit, 22 kilohertz, written straight to the SD card.
So yes, it sounds a bit thin, and it doesn’t have that studio warmth or punch.
And that’s completely expected.
This version is focused on functionality, not perfection.
It’s here to prove that the ESP32 can record audio reliably, save proper WAV files, and can be controlled entirely using gestures.
In the next video and article, we are taking a big step forward. I will be building a true studio-style voice recorder specifically for voiceovers.
That means proper DSP processing, digital gain control, limiters, noise handling, and all the techniques that actually shape and polish audio. If sound quality matters to you, that’s a video you absolutely don’t want to miss.
So, that’s all for now.
Watch Video Tutorial:
Frequently Asked Questions
Can an ESP32 really work as a voice recorder?
Yes, the ESP32-S3 can be used as a complete ESP32 voice recorder, capable of capturing audio and saving it as WAV files on an SD card.
How does this ESP32 voice recorder work without buttons or touch?
This project uses a gesture controlled ESP32 system, where a simple shake starts and stops recording instead of physical buttons.
What is the shake-to-record feature in this ESP32 project?
The shake feature uses motion detection to trigger recording, making it a true no button voice recorder experience.
Which ESP32 board is used in this voice recorder project?
The project uses the Makerfabs MaTouch ESP32-S3 TFT development board, which integrates display, power, and audio support.
What microphone is used in this ESP32 audio recording system?
The project uses the INMP441 ESP32 I2S microphone, which provides clean digital audio input.
Why is an I2S microphone used in ESP32 audio recording?
An ESP32 I2S microphone like INMP441 sends digital audio directly to ESP32, reducing noise and improving stability.
Does the ESP32 save WAV files directly?
Yes, this project uses ESP32 save WAV file functionality to store properly formatted audio files on SD card.
Where are audio files stored in this ESP32 voice recorder?
All recordings are saved on an SD card using the ESP32 SD card recording system.
What format is used for recorded audio files?
The system saves audio in standard WAV format, so files can be played on any device without conversion.
What sensor is used for gesture detection?
The QMI8658 accelerometer/IMU is used to detect shaking for controlling the ESP32 voice recorder without buttons.
What libraries are required for ESP32 audio recording?
This ESP32 audio recording project uses:
- QMI8658 library
- Arduino_GFX_Library
- JPEGDecoder
- SD and SPI libraries
What Arduino IDE version is used in this project?
The project uses Arduino IDE 2.3.6 for programming the ESP32.
Which ESP32 board package is required?
You need ESP32 board package v2.0.11 or v2.0.16 for stable compilation.
What sample rate is used in ESP32 audio recording?
The system uses 22.05 kHz sample rate, which gives clear speech quality suitable for voice recording.
What type of ESP32 project is this?
This is a gesture controlled ESP32 voice recorder project with SD card storage and I2S audio input.
Can ESP32 handle real-time audio recording?
Yes, ESP32 can handle real-time ESP32 audio recording by streaming I2S data into SD card storage.
Is this project suitable for beginners?
It is intermediate level because it combines ESP32 I2S microphone, SD card, IMU sensor, and display UI.
What makes this ESP32 voice recorder different?
It has:
- No buttons
- No touch input
- Shake control
- SD card WAV recording
- Integrated display UI
Discover more from Electronic Clinic
Subscribe to get the latest posts sent to your email.


