How to Use a pH Meter with Arduino and Calibrate the DIYMORE pH Sensor
Last Updated on May 11, 2026 by Engr. Shahzada Fahad
Table of Contents
pH Meter Arduino, Description:

pH Meter Arduino– This is the analog pH sensor kit from the DIY MORE which is a bit different from the one developed by the DFrobot which I have already used in some of my previous projects explaining what is a pH sensor, it’s working, Calibration, and how to use a pH sensor to find the pH value of different liquids. I also used the DFrobot pH sensor kit for measuring the water quality using the Arduino board and I also used the pH sensor kit from the DFrobot in an IoT based water quality monitoring system using the NodeMCU ESP8266 WiFi module. I have also used the same Diymore pH Sensor with the ESP32 and built an IoT pH Meter. So, if you want to learn how to use the pH sensor kit from the DFrobot then I highly recommend read my previous articles.
Before I am going to explain how to calibrate and use this pH Sensor kit from the DIY MORE, first a few words about the sponsor of this article for sending me high-quality PCBs.
Read our latest article on “ESP32 Hydroponic System using pH Sensor, EC Sensor, A02YYUW Waterproof Ultrasonic Sensor, DS18B20 waterproof one-wire digital temperature sensor, and Blynk application“.
About the Sponsor, ALLPCB:

ALLPCB is the World’s Fastest PCB Manufacturing Company. Feel free to visit their website allpcb.com to not only find out what awesome PCB and assembly services they offer but also to easily upload your Gerber files and thus order affordable and High-quality PCBs quickly. Besides this, you will also get a 30 Dollars Coupon balance, which you can use to get your first prototype order for free.
Xmas Surprise‘s Back
Random Secret Coupon for Any Order Over $500 Before 24th December 2020. $10, $20, $50 or $500 Coupon Immediate Use, for more information visit:

In this tutorial, you will learn how to calibrate and use this low-cost pH sensor kit from DIY MORE. I started off by calibrating the pH sensor using the Arduino board, once the pH sensor perfectly calibrated, then I started by measuring the pH value of the distilled water and displayed the values on the serial monitor.

I performed a series of tests using different liquids and once satisfied I further modified the code to display the pH value on the Oled display module. Again I started with the Distilled water and waited for around 30 minutes to check if there can be any fluctuations in the pH value. The pH value remained almost the same.
Next I added some lemon juice to the water and I was amazed with the result.

As you know the pH value of the lemon juice is 2, and the value on the display as you can see is almost 2. Next, I cleaned the pH sensor probe to measure the pH value of the Malik. For the milk too I got the correct pH value.

I also added lemon juice to the Milk to check if the value will drop. After adding the Lemon juice to the milk the value dropped. As this is a getting started tutorial; I will try to explain the maximum basic things.
In this tutorial we will cover,
- DIY MORE pH Sensor Kit Pinout and technical specifications
- pH Sensor Calibration
- Complete circuit diagram explanation
- pH Sensor Arduino Programming and finally
- Testing
Without any further delay let’s get started!!!
Amazon Purchase links:
Arduino Nano USB-C Type (Recommended)
Gravity: Analog pH Sensor / Meter Kit For Arduino by DFrobot:
SSD1306 128×64 Oled i2c display Module
*Disclosure: These are affiliate links. As an Amazon Associate I earn from qualifying purchases.
Analog pH sensor Pinout:
This is the analog pH sensor kit from the DIY MORE which is a bit different from the one developed by the DFrobot. This pH Sensor Kit can measure pH values of different liquids with a good precision. The board contains a pair of trimmers through which you can adjust the Analog reading offset which I will explain while calibrating the pH Sensor. I will show you the easiest way to calibrate the pH sensor without using any liquid or substance and then later we will measure the pH value of some known liquids. It has two LEDs which work as the Power Indicator, a pH sensor, a BNC connector. This board is also known as the sensor interface circuit.
This pH Sensor Kit has an on-board voltage regulator chip due to which it can be easily powered up using 3.3 to 5.5Vdc. Due to this wide range of input voltages it can be used with 5V and 3.3V compatible controller boards like Arduino, ESP32, and ESP8266 etc.

The pH Sensor interface circuit is also provided with 6 male headers which are clearly labeled as V+, this is where we connect the 3.3V or 5V from the Arduino, in my case I will connect 5 volts, but if you are planning to use this pH sensor Kit with ESP8266 or ESP32 then you will need to connect this pin with 3.3Volts.
The next two pins are the ground pins, you can connect any of these two pins with the Ground pin of the Arduino.
Po is the Analog output pin, which should be connected with the analog pin of the Arduino.
Do is the 3.3V DC output pin.
The last pin is the To which is the temperature output.
Out of these 6 pins we will only use 3 pins; V+, G, and Po.
pH Sensor Calibration:

To calibrate this sensor you will need a wire to short the external part and the center of the probe connector. This causes a 2.5 volts tension on the Po analog output pin. I started off by connecting the external part of the BNC connector with the center of the BNC probe connector.

Now connect the V+ pin with the Arduino’s 5v. Connect the ground pin of the interface circuit with the ground pin of the Arduino, and finally connect the analog output pin Po with the A0 pin of the Arduino.
Connect Arduino with the laptop to calibrate the pH sensor using the following Arduino code.
pH Sensor Calibration Arduino Code:
|
1 2 3 4 5 6 7 8 9 10 11 12 13 14 15 16 |
int pH_Value; float Voltage; void setup() { Serial.begin(9600); pinMode(pH_Value, INPUT); } void loop() { pH_Value = analogRead(A0); Voltage = pH_Value * (5.0 / 1023.0); Serial.println(Voltage); delay(500); } |
This is a very basic program that we are going to use for calibrating the pH sensor interface circuit. The purpose of this program is to the read the analog output pin Po and display the voltage on the serial monitor. Make sure the Arduino board is selected and also check if the right communication port is selected. Click on the Upload button and wait for a while. After the program has been uploaded. Now the next step is to open the serial monitor.
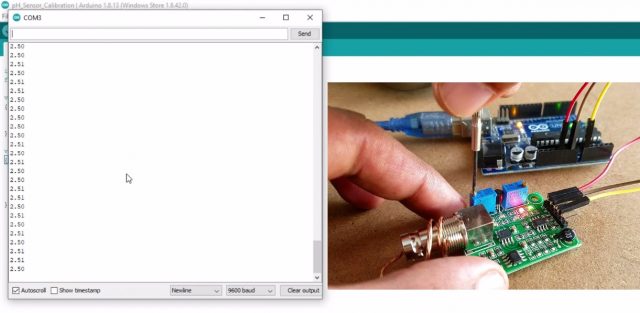
If you will see a value other than 2.50 then use the trimmer to adjust this value.You know the pH value is from 0 to 14. A pH of 7 means 2.5 Volts. So we are going to set it to 2.5 volts using the trimmer. Now, you can see the value is set to 2.5Volts. The pH Sensor is now calibrated.
Disconnect the Arduino board and also remove the wire. Now, it’s time to connect the pH sensor with the interface board.

The small container already has the distilled water, this is how it look after connecting the pH sensor with the Interface board, the wiring remains the same. Now, let’s check its pH value.
Arduino pH meter testing after calibration:

As you can see the Arduino is connected with the laptop, now we will need to upload the following code to find the pH value of the distilled water.
pH Meter Arduino Code:
|
1 2 3 4 5 6 7 8 9 10 11 12 13 14 15 16 17 18 19 20 21 22 23 24 25 26 27 28 29 30 31 32 33 34 35 36 37 38 39 40 41 42 43 44 45 46 47 48 49 50 51 52 53 54 55 56 57 58 59 60 61 62 63 64 65 66 67 68 69 70 71 72 73 74 75 76 77 78 79 80 81 82 83 84 85 86 87 88 89 |
#include <Wire.h> #include <Adafruit_GFX.h> #include <Adafruit_SSD1306.h> #include <SimpleTimer.h> SimpleTimer timer; float calibration_value = 21.34 - 0.7; int phval = 0; unsigned long int avgval; int buffer_arr[10],temp; float ph_act; // for the OLED display #define SCREEN_WIDTH 128 // OLED display width, in pixels #define SCREEN_HEIGHT 64 // OLED display height, in pixels // Declaration for an SSD1306 display connected to I2C (SDA, SCL pins) #define OLED_RESET -1 // Reset pin # (or -1 if sharing Arduino reset pin) Adafruit_SSD1306 display(SCREEN_WIDTH, SCREEN_HEIGHT, &Wire, OLED_RESET); void setup() { Wire.begin(); Serial.begin(9600); display.begin(SSD1306_SWITCHCAPVCC, 0x3C); display.clearDisplay(); display.setTextColor(WHITE); timer.setInterval(500L, display_pHValue); } void loop() { timer.run(); // Initiates SimpleTimer for(int i=0;i<10;i++) { buffer_arr[i]=analogRead(A0); delay(30); } for(int i=0;i<9;i++) { for(int j=i+1;j<10;j++) { if(buffer_arr[i]>buffer_arr[j]) { temp=buffer_arr[i]; buffer_arr[i]=buffer_arr[j]; buffer_arr[j]=temp; } } } avgval=0; for(int i=2;i<8;i++) avgval+=buffer_arr[i]; float volt=(float)avgval*5.0/1024/6; ph_act = -5.70 * volt + calibration_value; Serial.println("pH Val: "); Serial.print(ph_act); delay(1000); } void display_pHValue() { // display on Oled display // Oled display display.clearDisplay(); display.setTextSize(2); display.setCursor(0,0); // column row display.print("pH:"); display.setTextSize(2); display.setCursor(55, 0); display.print(ph_act); /* display.setTextSize(2); display.setCursor(0,30); display.print("EC:"); display.setTextSize(2); display.setCursor(60, 30); display.print(345); display.setCursor(95, 50); */ display.display(); } |
After you upload the program, then you can open the Serial monitor to check the pH value of some known liquid. I used the distilled water. Although I did the calibration, but still the value was little off which I then adjusted. The above code is already adjusted. I have explained this in the video tutorial given at the end of this article.
Very pure distilled water that has had little contact with air will have a pH value between 6.9 and 7. After adjusting the value, I was able to get the exact pH value for the distilled water. The pH value is between 6.9 and 7. The pH value can be further adjusted by changing the calibration value. We are done with the calibration and now it’s time to display the pH value on the Oled display module as it seems quite impractical to use the laptop or computer.
pH Sensor and Oled display with Arduino, Circuit Diagram:

The 5V regulated power supply based on the LM7805 linear voltage regulator is used to power up the Arduino Nano. J1 is the female DC power jack and this is where we connect the input power supply. You can connect any voltage source between 7 and 25 Volts. Two 470uF capacitors are connected at the input and output sides of the voltage regulator. These are the decoupling capacitors. The output voltage should be connected with the VIN pin of the Arduino Nano.
The 128×64 SSD1306 i2c supported Oled display module is connected with the Arduino Nano which is used to display the pH value. The SCL and SDA pins are connected with the A5 and A4 pins, while the VCC and GND pins of the Oled display module are connected with the Arduino’s 5V and ground.
The V+ pin of the pH Sensor is connected with the 5V. The ground of the pH sensor is connected with the ground of the Arduino Nano. The analog output pin Po is connected with the Arduino’s analog pin A0.
Arduino Nano development board PCB designing:
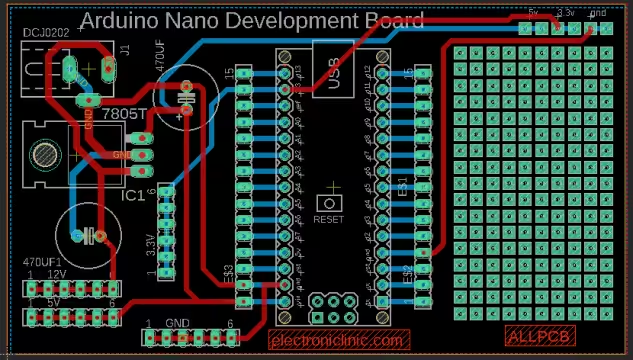
Next, I designed a PCB for the Arduino Nano, which I will use as the Development board. I added female headers for the 3.3V, 12V, 5V, and ground. The area on the right side can be used as the Vero Board for soldering other electronic components. I also added female headers on the left and right sides of the Arduino Nano for connecting the jumper wires.

These are the PCBs I received from the ALLPCB Company. As you can see the quality is really great, the silkscreen is quite clear, and the Blue color solder mask looks amazing. Finally, I started off by placing the components and completed the soldering Job.

This is how everything looks after soldering and interfacing. Again I started with the testing. If you remember I did all the testing with Arduino Uno, but this time I am using the Arduino Nano. This is why the value is little off, now you can again calibrate the sensor. I practically tested this if you do the calibration on the Arduino Nano and then use the pH sensor with the Arduino Uno the pH value can be little off. So make sure to calibrate the pH sensor whenever you switch between the different Arduino boards. Anyhow I calibrated the pH sensor one more time for the Arduino Nano and again I was able to get the exact pH values for different liquids. If you compare the pH sensor from the DIY MORE with the pH Sensor from the DFrobot you will find the pH sensor from the DIY MORE is cheap, but when it comes to the use and accuracy the pH sensor from the DFrobot is simply amazing. My recommendation is go for the DFrobot pH sensor.
pH meter Arduino code Explanation:
You will need the following libraries in order to print the pH values on the Oled display module.
#include <Wire.h>
#include <Adafruit_GFX.h>
#include <Adafruit_SSD1306.h>
#include <SimpleTimer.h>
SimpleTimer timer;
The following line of code is used to calibrate the value. My value was a little off that’s why I subtracted 0.7. If your value is different then you can adjust this value.
float calibration_value = 21.34 – 0.7; //21.34 – 0.7
Following are some variables.
int phval = 0;
unsigned long int avgval;
int buffer_arr[10],temp;
float ph_act;
// for the OLED display
#define SCREEN_WIDTH 128 // OLED display width, in pixels
#define SCREEN_HEIGHT 64 // OLED display height, in pixels
// Declaration for an SSD1306 display connected to I2C (SDA, SCL pins)
#define OLED_RESET -1 // Reset pin # (or -1 if sharing Arduino reset pin)
Adafruit_SSD1306 display(SCREEN_WIDTH, SCREEN_HEIGHT, &Wire, OLED_RESET);
void setup()
{
Wire.begin();
Serial.begin(9600);
display.begin(SSD1306_SWITCHCAPVCC, 0x3C);
display.clearDisplay();
display.setTextColor(WHITE);
timer.setInterval(500L, display_pHValue);
}
void loop() {
timer.run(); // Initiates SimpleTimer
using the for loop we take samples, then arrange the values, and then finally take the average.
for(int i=0;i<10;i++)
{
buffer_arr[i]=analogRead(A0);
delay(30);
}
for(int i=0;i<9;i++)
{
for(int j=i+1;j<10;j++)
{
if(buffer_arr[i]>buffer_arr[j])
{
temp=buffer_arr[i];
buffer_arr[i]=buffer_arr[j];
buffer_arr[j]=temp;
}
}
}
avgval=0;
for(int i=2;i<8;i++)
avgval+=buffer_arr[i];
float volt=(float)avgval*5.0/1024/6;
ph_act = -5.70 * volt + calibration_value;
Serial.println(“pH Val: “);
Serial.print(ph_act);
delay(1000);
}
display_pHValue() this is a user-defined function, it has no return type and doesn’t take any argument as the input. This function is controlled using the timer. The purpose of this function is to display the pH value on the Oled display module.
void display_pHValue()
{
// display on Oled display
// Oled display
display.clearDisplay();
display.setTextSize(2);
display.setCursor(0,0); // column row
display.print(“pH:”);
display.setTextSize(2);
display.setCursor(55, 0);
display.print(ph_act);
/*
display.setTextSize(2);
display.setCursor(0,30);
display.print(“EC:”);
display.setTextSize(2);
display.setCursor(60, 30);
display.print(345);
display.setCursor(95, 50);
*/
display.display();
}
For the step by step explanation watch video tutorial given below.
Watch Video Tutorial:

Discover more from Electronic Clinic
Subscribe to get the latest posts sent to your email.


timer.run()
i am getting for this line
error: class SimpleTimer’ has no member named ‘run’
Hi Shahzada,
i also getting multiple erros regarding simple timer library.
I added the library correctly bit there are some matching errors. Any ideas? :
In function ‘void setup()’:
sketch_apr19a:32:40: error: no matching function for call to ‘SimpleTimer::setInterval(long int, void (&)())’
timer.setInterval(500L, display_pHValue);
^
note: candidate: void SimpleTimer::setInterval(uint64_t)
void setInterval(uint64_t interval);
candidate expects 1 argument, 2 provided
In function ‘void loop()’:
sketch_apr19a:35:9: error: ‘class SimpleTimer’ has no member named ‘run’
timer.run(); // Initiates SimpleTimer
^~~
no matching function for call to ‘SimpleTimer::setInterval(long int, void (&)())’
Here is a link to download the simpletimer library
https://www.electroniclinic.com/wp-content/uploads/2019/08/SimpleTimer.zip
I downloaded the library simpletimer but i have the same problem.
In function ‘void setup()’:
sketch_may21b:32: error: no matching function for call to ‘SimpleTimer::setInterval(long int, void (&)())’
timer.setInterval(500L, display_pHValue);
…
void SimpleTimer::setInterval(uint64_t)
void setInterval(uint64_t interval);
…
In function ‘void loop()’:
sketch_may21b:35: error: ‘class SimpleTimer’ has no member named ‘run’
timer.run(); // Initiates SimpleTimer
Hi, im trying to calibrate my sensor but the lower number i can get is 4.03, can u help me, i need this for a project
Hi, had you found the solution to solve the issue? I am facing same problem with you. Thank you
what I just did is I replace the 10k with 20k ohm trimmer to adjust the voltage to zero because my previous encounter is that the minimum is 3v
Hello Engr. Fahad, how are you?
Thank you very much for the wonderful data and video about the pH sensor.
Is there available code or sketch of this type of project using a Raspberry Pi Pico?
I am currently doing a special project here in my place for measuring pH level of water with Raspberry Pi Pico and I cannot find any video or code in any website or organization.
Please help me. Thank you and best regards.
Hi, I am working on the same project as you. I am trying to measure pH levels with Raspberry Pi Pico. Have you succeeded? If yes, could you help me out?
Hey, did you succeeded to solve thsese issue?
I have the same error.
I’m getting the same error. Anyone have a solution?
I am trying to calibrate the sensor but the output is 5.0, adjusting the trimmers does not solve the problem (I am using ESP8266 would that make a difference?
I have the same problem like Fatma (I’m also using the ESP8266). Does anyone found a solution yet?
I am getting this error in code. can someone help
?
\.arduinoIDE-unsaved2023815-952-1lky3ul.7ptk\sketch_sep15a\sketch_sep15a.ino: In function ‘void setup()’:
Temp\.arduinoIDE-unsaved2023815-952-1lky3ul.7ptk\sketch_sep15a\sketch_sep15a.ino:32:40: error: no matching function for call to ‘SimpleTimer::setInterval(long int, void (&)())’
timer.setInterval(500L, display_pHValue);
^
In file included from .arduinoIDE-unsaved2023815-952-1lky3ul.7ptk\sketch_sep15a\sketch_sep15a.ino:4:0:
Arduino\libraries\SimpleTimer/SimpleTimer.h:23:10: note: candidate: void SimpleTimer::setInterval(uint64_t)
void setInterval(uint64_t interval);
^~~~~~~~~~~
c:\Users\User\Documents\Arduino\libraries\SimpleTimer/SimpleTimer.h:23:10: note: candidate expects 1 argument, 2 provided
.arduinoIDE-unsaved2023815-952-1lky3ul.7ptk\sketch_sep15a\sketch_sep15a.ino: In function ‘void loop()’:
.arduinoIDE-unsaved2023815-952-1lky3ul.7ptk\sketch_sep15a\sketch_sep15a.ino:35:9: error: ‘class SimpleTimer’ has no member named ‘run’
timer.run(); // Initiates SimpleTimer
^~~
exit status 1
Compilation error: no matching function for call to ‘SimpleTimer::setInterval(long int, void (&)())’
i ajusted the trimmer to 2.5, but then when i connect the ph monitor it is constantly 4.096v. the red indicator led is also not on, idk if tht matters
would realy like some help thx a lot
have same issue ..
i have connected the wire then connect the with laptop, i am getting 0.0 and 0.24 and values like that repeatedly after the gap with 0.00 so what would be the probable error, and one more thing by mistake i change the second screw then what i can do to correct it.