ph sensor Arduino, how do ph sensors work, application of ph meter, ph sensor calibration
Table of Contents
pH Sensor Arduino:
Arduino pH Sensor- In this Tutorial, you will learn how to use the pH sensor with Arduino and how to find the pH value of different liquids “Water, Milk and Cold rink”, and display the pH value on the serial monitor. As this is a getting started tutorial, so in this tutorial, we will only cover the extreme basics like for example
- How a pH sensor work
- Application of pH meter
- pH sensor Calibration
- pH sensor interfacing with Arduino
- Basic programming to find the pH value of different liquids and finally
- Testing
My other pH sensors related Projects:
Arduino based Hydroponics System
IoT Water Quality Monitoring System
DIYMORE pH Sensor with Arduino
DFrobot and Amazon Purchase links :
Gravity: Analog pH Sensor / Meter Kit For Arduino by DFrobot:
Amazon links:
Arduino Nano USB-C Type (Recommended)
Gravity: Analog pH Sensor / Meter Kit For Arduino by DFrobot:
Other Tools and Components:
ESP32 WiFi + Bluetooth Module (Recommended)
Super Starter kit for Beginners
PCB small portable drill machines
DISCLAIMER:
Please Note: these are affiliate links. I may make a commission if you buy the components through these links. I would appreciate your support in this way!
Let’s first start with the very basic questions
What is pH? And how a pH sensor actually works?
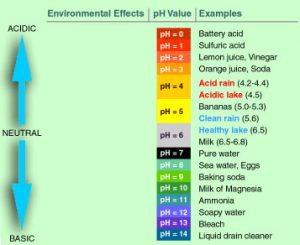
“pH stands for power of hydrogen, which is a measurement of the hydrogen ion concentration in the body. The total pH scale ranges from 1 to 14, with 7 considered to be neutral. A pH less than 7 is said to be acidic and solutions with a pH greater than 7 are basic or alkaline.”
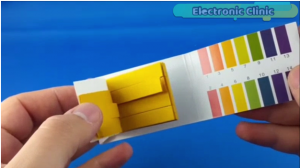
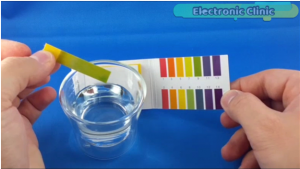
If you’re using litmus paper, and you are not interested in any automatic system, or any notification system then none of this matters. You can check manually the pH values of different liquids. The basic idea is that the paper turns a slightly different color in solutions between pH 1 and 14 and, by comparing your paper to a color chart, you can simply read off the acidity or alkalinity without worrying how many hydrogen ions there are.
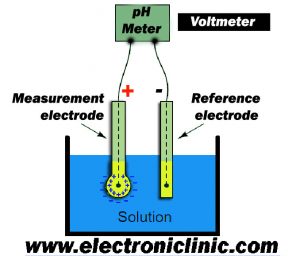
But a pH meter somehow has to measure the concentration of hydrogen ions. How does it do it?
An acidic solution has far more positively charged hydrogen ions in it than an alkaline one, so it has greater potential to produce an electric current in a certain situation.
in other words, it’s a bit like a battery that can produce a greater voltage. A pH meter takes advantage of this and works like a voltmeter: it measures the voltage (electrical potential) produced by the solution whose acidity we’re interested in, compares it with the voltage of a known solution, and uses the difference in voltage (the “potential difference”) between them to deduce the difference in pH….
About the DFrobot pH Sensor kit:
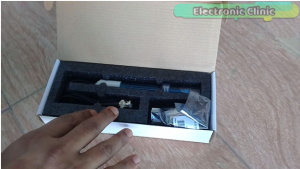
This is the analog pH sensor kit from the DFrobot, DFrobot is a leading robotics and open source hardware provider. They create innovative, user-friendly hardware & software products that become the building blocks in all kinds of electronic projects. I personally recommend you should definitely visit www.dfrobot.com .
This pH sensor kit can be used in water quality monitoring equipment, it can be used in the water tanks, Fish aquarium, this pH Sensor kit can be used with GSM, nodemcu esp8266 wifi module for remote notifications.
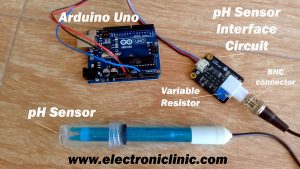
This pH sensor kit is best for measuring water quality and other parameters. It has an LED that works as the Power Indicator, a pH sensor, a BNC connector, a variable resistor which is used for the calibration which I will explain during the testing, and a PH2.0 sensor interface circuit.
pH Sensor Kit Interfacing with Arduino:
For the step by step interface connections watch the video Tutorial “Click Here”
Connect the red wire with the Arduino’s 5v…
Connect the black wire with the Arduino’s Ground…
Connect the blue wire with the Arduino’s Analog pin A0..
so that’s all about the interfacing, now let’s have a look at the pH sensor Arduino programming/code.
pH Sensor Arduino Programming:
Arduino pH sensor code / Programming:
This is a very simple and basic program to find the pH value of different liquids, I will be using some known liquids, whose pH values are already known. For demonstration purposes, I will be using Water, Milk, and a cold drink. In upcoming tutorials, I will modify this program and display the pH Values on the LCD. I will also make an IoT version of the same project.
|
1 2 3 4 5 6 7 8 9 10 11 12 13 14 15 16 17 18 19 20 21 22 23 24 25 26 27 28 29 30 31 32 33 34 35 36 37 38 39 40 41 42 43 |
#define SensorPin 0 // the pH meter Analog output is connected with the Arduino’s Analog unsigned long int avgValue; //Store the average value of the sensor feedback float b; int buf[10],temp; void setup() { pinMode(13,OUTPUT); Serial.begin(9600); Serial.println("Ready"); //Test the serial monitor } void loop() { for(int i=0;i<10;i++) //Get 10 sample value from the sensor for smooth the value { buf[i]=analogRead(SensorPin); delay(10); } for(int i=0;i<9;i++) //sort the analog from small to large { for(int j=i+1;j<10;j++) { if(buf[i]>buf[j]) { temp=buf[i]; buf[i]=buf[j]; buf[j]=temp; } } } avgValue=0; for(int i=2;i<8;i++) //take the average value of 6 center sample avgValue+=buf[i]; float phValue=(float)avgValue*5.0/1024/6; //convert the analog into millivolt phValue=3.5*phValue; //convert the millivolt into pH value Serial.print(" pH:"); Serial.print(phValue,2); Serial.println(" "); digitalWrite(13, HIGH); delay(800); digitalWrite(13, LOW); } |
We use a for loop to get 10 sample values from the pH sensor and store these values in an array. Then we use these two for loops to sort the values from small to larger in the ascending order…
This for loop is used to take the average value of 6 center samples and the value is stored in avgValue. Then we convert this value into millivolts and into the pH value. Then finally we display the ph value on the serial monitor.
pH Sensor Practical Testing:
For the Practical Demonstration watch video given at the end or “click Here”.
First of all, let’s find the pH value of the Water, the water under test is not pure water, so in this case, the ph value can be slightly greater than 7. After you are done with the program uploading,
connect Arduino with the laptop and open the Serial monitor.
The pH of pure water is 7. In general, water with a pH lower than 7 is considered acidic, and with a pH greater than 7 is considered basic. The normal range for pH in surface water systems is 6.5 to 8.5, and the pH range for groundwater systems is between 6 to 8.5. So the water under test is safe as you can see in the video and can be used for drinking without any problem….
Now let’s test the pH value of the Milk.
Fresh cow’s milk has a pH of between 6.7 and 6.5. Values higher than 6.7 denote mastitic milk and values below pH 6.5 denote the presence of bacterial deterioration. Now, let’s check the pH value of a Cold drink. Remove milk and clean this with water… If you search on Google you will find that the pH value for the cola drinks can be from 2 to 5. As you can see on the screen the pH value is between 2 and 5.
This pH sensor kit from the DFrobot is the most accurate pH sensor kit. We checked the pH values of three different liquids and got accurate values.
Arduino pH Sensor Calibration:
The calibration is really easy, all you need is to select a liquid with known pH values like for example cow milk and check it’s value, if the value is greater or lower than the exact pH value you can, of course, find in the chart, then all you need is to rotate this variable resistor which you can find near to the BNC connector clearly labeled in the picture above, and adjust the value.
Watch Video Tutorial:
Related Projects:
IOT Water Quality monitoring using Arduino,pH Sensor,Nodemcu ESP8266
TDS meter Arduino, water Quality Monitoring Project, TDS in Water
Turbidity Sensor with Arduino for Water quality monitoring, Turbidity Meter


Hi Engr,
This is awesome stuff! Thank you so much for sharing. I’m currently looking at making a monitoring system from an Arduino that measures things like temperature and pH, but am interested in running two temperature and two pH meters, all simultaneously. I’m curious to know how the code would change if I’m wanting to add another pH meter? What kinds of changes would you make? I’d love to hear your thoughts!
Hi Engr,
Very Good Tuto !!! Thank you. I’ve a question please : i don’t see when you use the following electronics parts :
lm7805 Voltage Regulator
330-ohm resistors pack
2n2222 NPN transistors
10k Resistor
lm7805 Voltage Regulator
330-ohm resistors pack
Is it use for calibration ?
Best regards,
Olivier
these components are not used, but if in case anyone needs to purchase.