Low Energy Bluetooth BLE for ESP32 Series and Bluetooth 5 & Onwards
Last Updated on October 3, 2024 by Engr. Shahzada Fahad
Table of Contents
Low Energy Bluetooth BLE:
Low Energy Bluetooth BLE for ESP32 Series and Bluetooth 5 & Onwards– I have designed my own Low Energy Bluetooth application for the ESP32 series of controllers. This application can be used with all Bluetooth modules and controller boards that support Bluetooth Low Energy (BLE) Technology.

Why did I make my Low Energy Bluetooth application? And why should you also make a BLE application? Which Bluetooth versions can you use with a BLE application? And what are the benefits of making a BLE application? You will get answers to all these questions, so without any further delay, let’s get started!!!
Note: Read my article on STM32 and Bluetooth application.
Amazon Links:
ESP32 WiFi + Bluetooth Module (Recommended)
*Disclosure: These are affiliate links. As an Amazon Associate I earn from qualifying purchases.
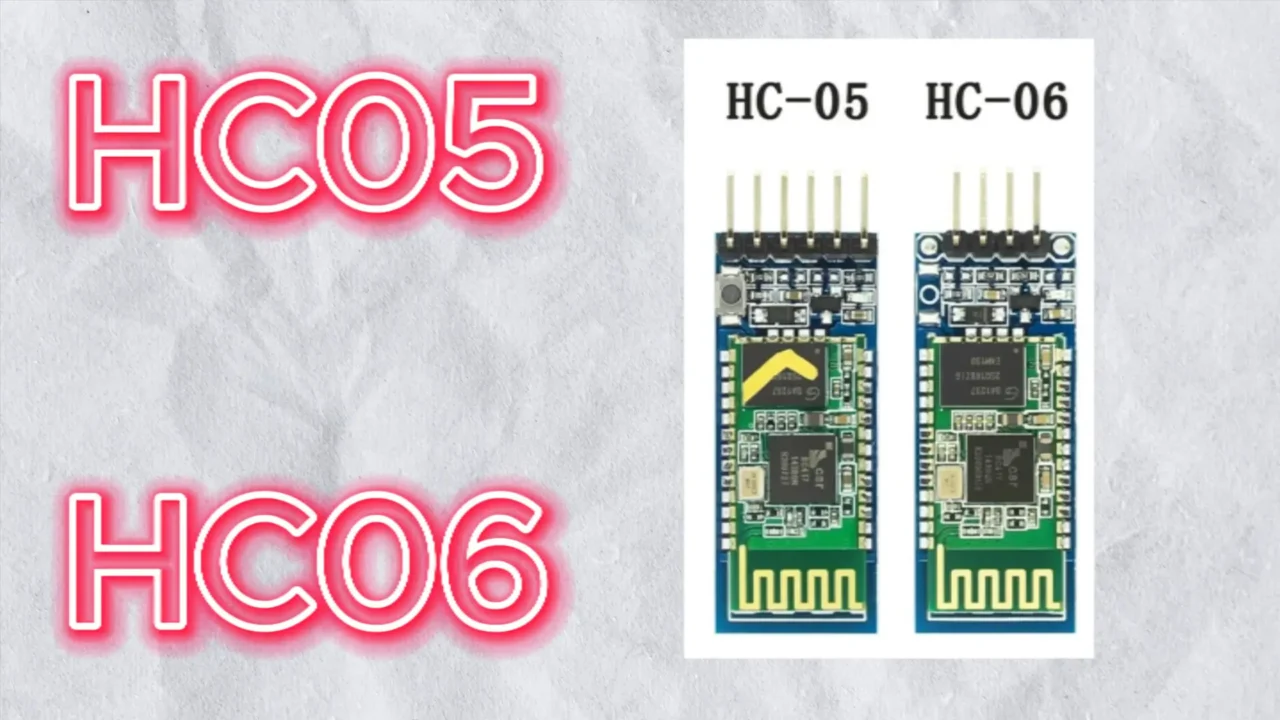
Starting with the most popular Bluetooth Modules HC05/HC06. I have used these Bluetooth modules in many projects to control loads and monitor sensors. I have also published an article on “Android App Development” where many people have read it and made their own applications.
HC05 and HC06 Bluetooth modules are based on the Bluetooth 2.0 + EDR “Enhanced Data Rate”. Let me also tell you EDR was first introduced in Bluetooth 2.0, offering faster data transfer rates compared to the original Bluetooth 1; which was the initial version of Bluetooth with limited data transfer rates and relatively short ranges.
Anyway, HC05 and HC06 Bluetooth Modules do not support Bluetooth Low Energy BLE Technology. Because, these are based on the Bluetooth Classic standards which is different from the Bluetooth Low Energy (BLE) Technology.
So, all those applications that I made for HC-05 and HC-06 Bluetooth Modules do not work with Low Energy Bluetooth Modules like Bluetooth 4.0, Bluetooth 5.0, and newer versions.
Let me also tell you; the Bluetooth Low Energy BLE technology was introduced in Bluetooth 4.0. The aim was to significantly reduce the power consumption and to enable new types of applications like trackers, smart watches, fitness, and IoT devices. And then
Bluetooth 5 brought several improvements including higher data transfer rates, longer range, and enhanced advertising capabilities for BLE.
So, the applications that you used with Bluetooth versions 1 and 2 will not work at all with Bluetooth 4 and Bluetooth 5. So, you will need to design completely separate applications for Low Energy Bluetooth Modules. But the question is, how do we make a BLE application?
So far, everyone I have seen on YouTube is using ready-made Low Energy Bluetooth applications. In fact, in the beginning, I also downloaded the nRF Connect Application from the Play Store to test the range of the XIAO ESP32C3 onboard Bluetooth.
Although I successfully controlled the loads, but what I really didn’t like was, every time I had to type the command to turn the load ON or OFF. And to be very honest, as an engineer, I didn’t feel good at all about using a ready-made application.
And furthermore, we just can’t use the same application everywhere. I want to create my own application for each device and add features according to my preference. So, I decided to design my own Low Energy Bluetooth (BLE) application. It took me almost 6 to 7 months to create a completely bug-free BLE application.
We can use this with all the ESP32 Variants. Because all the ESP32 boards support both Bluetooth Classic (BR/EDR) and Bluetooth Low Energy BLE protocols. So, to explain this point; I am going to test my designed BLE Application with these two boards.
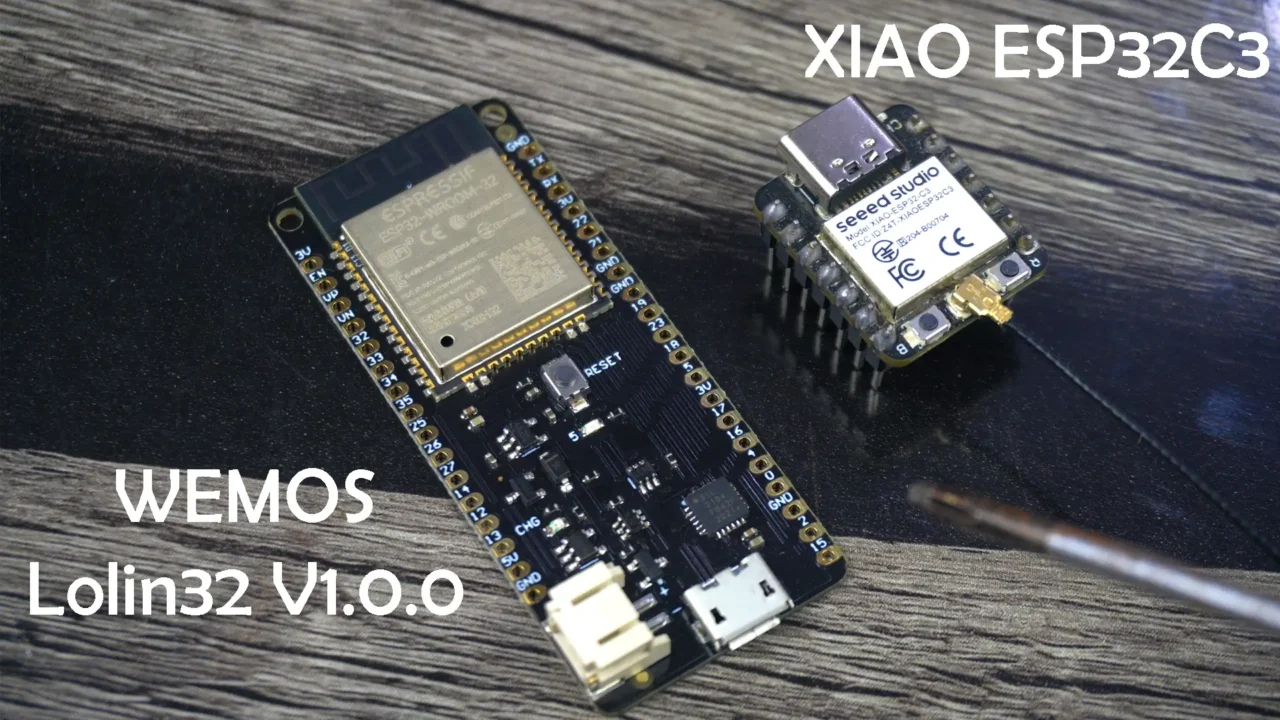
On the left side is the WEMOS Lolin32 V1.0.0 version of the ESP32 and let me tell you it doesn’t come with Bluetooth 4 or Bluetooth 5 but it still can be used with the BLE applications because it supports both Bluetooth Classic and Bluetooth Low Energy protocols.
And the one on the right side is the XIAO ESP32C3 and it comes with an onboard Low Energy Bluetooth 5.0.
First let’s start with the basic ESP32 WiFi + Bluetooth module.

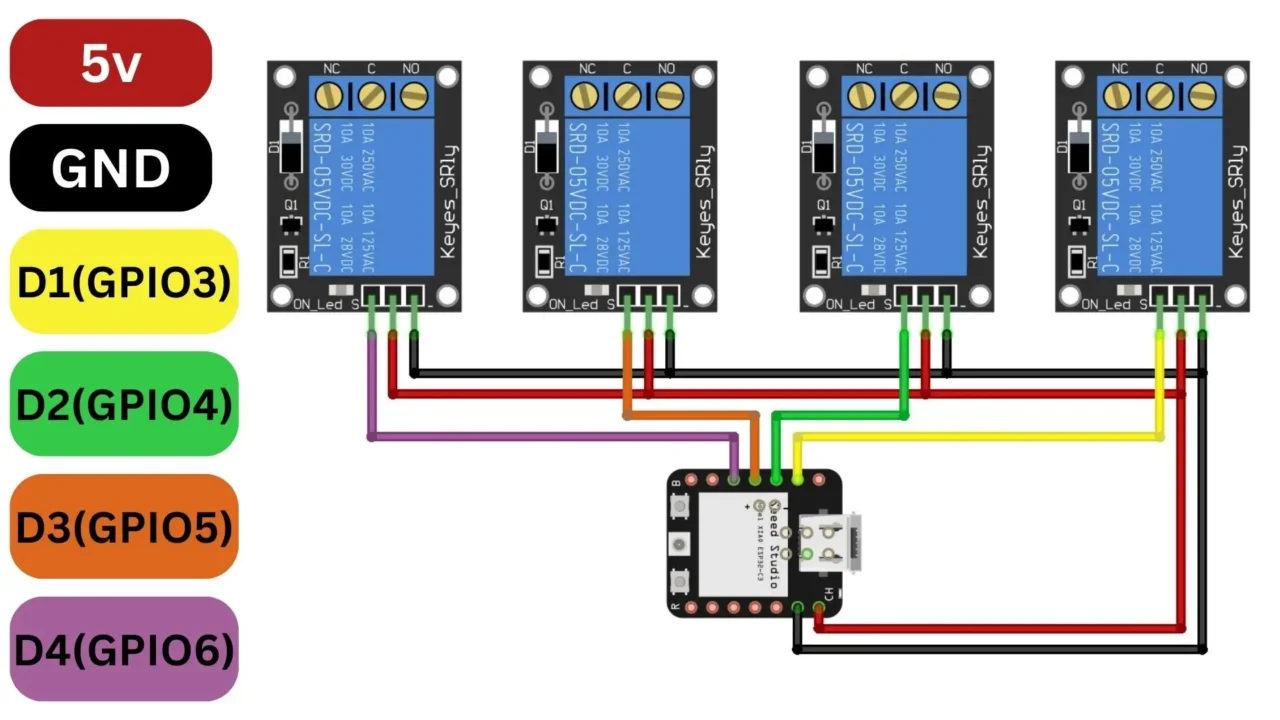
For the connections you can follow this circuit diagram; if you want to wire up all your components on a breadboard.
About the Hardware:

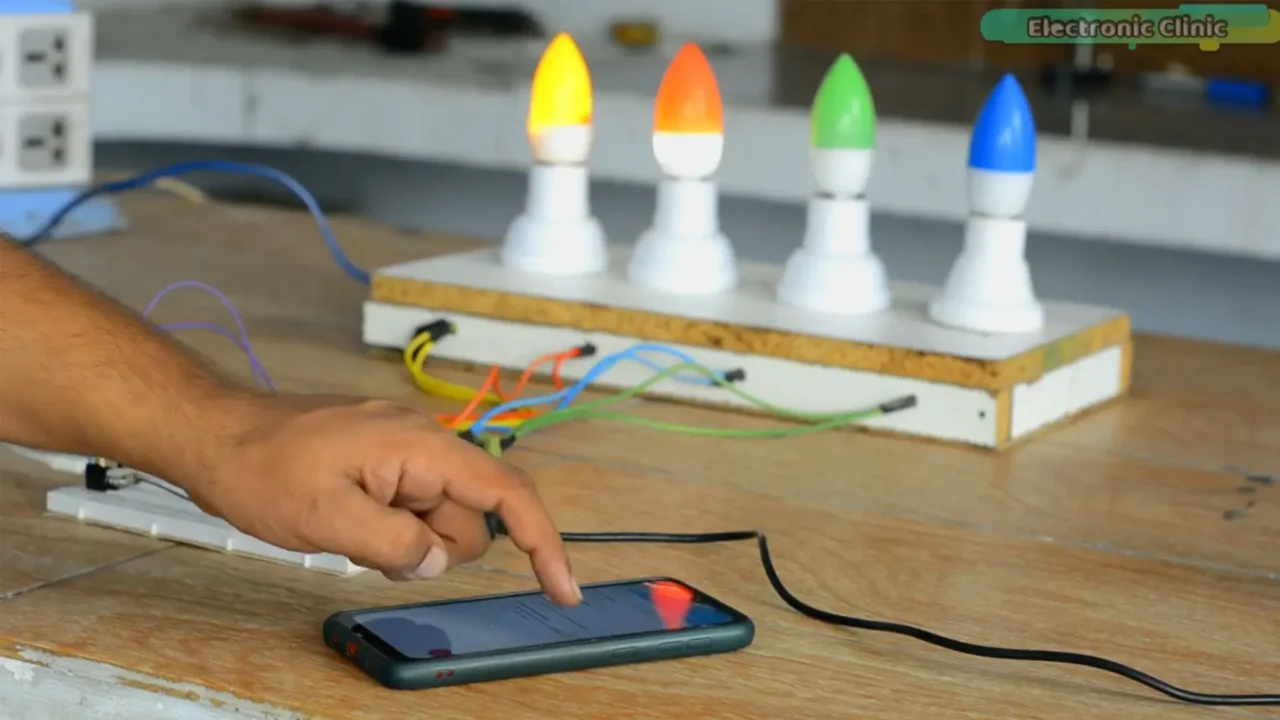
For demonstration purposes, I have connected 4 Blubs but you can connect any AC or DC loads.
If you are thinking about using 110/220Vac supply, you need to consider safety.
Safety:
When the 110/220Vac supply is connected, never touch the relay contacts as it can be extremely dangerous. It is important to note that when working with mains voltage, proper safety precautions should always be taken and it is advisable to consult relevant electrical codes and standards.
Don’t worry about the libraries; because all the libraries are automatically installed when you install the ESP32 board. For installing the ESP32 board, you can read my getting started article on the ESP32.
WEMOS Lolin32 ESP32 Code:
|
1 2 3 4 5 6 7 8 9 10 11 12 13 14 15 16 17 18 19 20 21 22 23 24 25 26 27 28 29 30 31 32 33 34 35 36 37 38 39 40 41 42 43 44 45 46 47 48 49 50 51 52 53 54 55 56 57 58 59 60 61 62 63 64 65 66 67 68 69 70 71 72 73 74 75 76 77 78 79 80 81 82 83 84 85 86 87 88 89 90 91 92 93 94 95 96 97 98 99 100 101 102 103 104 105 106 107 108 109 110 111 112 113 114 115 116 117 118 119 120 121 122 123 124 125 126 127 128 129 130 131 132 133 134 135 136 137 138 139 140 141 142 143 144 145 146 147 148 149 150 151 152 153 154 155 156 157 158 159 160 161 |
#include <BLEDevice.h> #include <BLEServer.h> #include <BLEUtils.h> #include <BLE2902.h> #include <BLEClient.h> #include <EEPROM.h> BLEClient* pClient; BLEServer* pServer; BLECharacteristic* pCharacteristic; BLECharacteristic* pReceiveCharacteristic; bool deviceConnected = false; bool oldDeviceConnected = false; const int ledPin1 = 27; const int ledPin2 = 14; const int ledPin3 = 12; const int ledPin4 = 13; bool led1State = false; // State of LED 1 bool led2State = false; // State of LED 2 bool led3State = false; // State of LED 2 bool led4State = false; // State of LED 2 class MyCallbacks: public BLECharacteristicCallbacks { void onWrite(BLECharacteristic *pCharacteristic) { std::string value = pCharacteristic->getValue(); if (value.length() > 0) { if (value == "199") { led1State = true; Serial.println("LED 1 is ON"); digitalWrite(ledPin1, HIGH); } else if (value == "222") { led1State = false; Serial.println("LED 1 is OFF"); digitalWrite(ledPin1, LOW); } else if (value == "333") { led2State = true; Serial.println("LED 2 is ON"); digitalWrite(ledPin2, HIGH); } else if (value == "444") { led2State = false; Serial.println("LED 2 is OFF"); digitalWrite(ledPin2, LOW); } else if (value == "555") { led3State = true; Serial.println("LED 3 is ON"); digitalWrite(ledPin3, HIGH); } else if (value == "666") { led3State = false; Serial.println("LED 3 is OFF"); digitalWrite(ledPin3, LOW); } else if (value == "777") { led4State = true; Serial.println("LED 4 is ON"); digitalWrite(ledPin4, HIGH); } else if (value == "888") { led4State = false; Serial.println("LED 4 is OFF"); digitalWrite(ledPin4, LOW); } // Save LED states to EEPROM EEPROM.write(0, led1State); EEPROM.write(1, led2State); EEPROM.write(2, led3State); EEPROM.write(3, led4State); EEPROM.commit(); } } }; class MyServerCallbacks: public BLEServerCallbacks { void onConnect(BLEServer* pServer) { deviceConnected = true; BLEDevice::startAdvertising(); }; void onDisconnect(BLEServer* pServer) { deviceConnected = false; } }; void setup() { Serial.begin(9600); Serial.println("Connect to MyESP32"); BLEDevice::init("ESP32C3Ble"); pServer = BLEDevice::createServer(); pServer->setCallbacks(new MyServerCallbacks()); pinMode(ledPin1, OUTPUT); pinMode(ledPin2, OUTPUT); pinMode(ledPin3, OUTPUT); pinMode(ledPin4, OUTPUT); // Initialize EEPROM EEPROM.begin(512); // Load LED states from EEPROM led1State = EEPROM.read(0); led2State = EEPROM.read(1); led3State = EEPROM.read(2); led4State = EEPROM.read(3); if (led1State) { digitalWrite(ledPin1, HIGH); } if (led2State) { digitalWrite(ledPin2, HIGH); } if (led3State) { digitalWrite(ledPin3, HIGH); } if (led4State) { digitalWrite(ledPin4, HIGH); } BLEService *pService = pServer->createService("0000180d-0000-1000-8000-00805f9b34fb"); pCharacteristic = pService->createCharacteristic( "00002a37-0000-1000-8000-00805f9b34fb", BLECharacteristic::PROPERTY_READ | BLECharacteristic::PROPERTY_WRITE // Added write property ); pCharacteristic->addDescriptor(new BLE2902()); pCharacteristic->setCallbacks(new MyCallbacks()); pService->start(); BLEAdvertising *pAdvertising = pServer->getAdvertising(); pAdvertising->start(); // Initialize BLE client for central role pClient = BLEDevice::createClient(); } void loop() { if (deviceConnected) { String ledStates = String(led1State) + "," + String(led2State) + "," + String(led3State) + "," + String(led4State); pCharacteristic->setValue(ledStates.c_str()); pCharacteristic->notify(); // Handle LED control commands from the central device delay(1000); // Adjust the update interval as needed } // Disconnecting if (!deviceConnected && oldDeviceConnected) { delay(500); // Give the Bluetooth stack the chance to get things ready pServer->startAdvertising(); // Restart advertising Serial.println("Start advertising"); oldDeviceConnected = deviceConnected; } // Connecting if (deviceConnected && !oldDeviceConnected) { // Do stuff here on connecting oldDeviceConnected = deviceConnected; } } |
About the BLE Application:
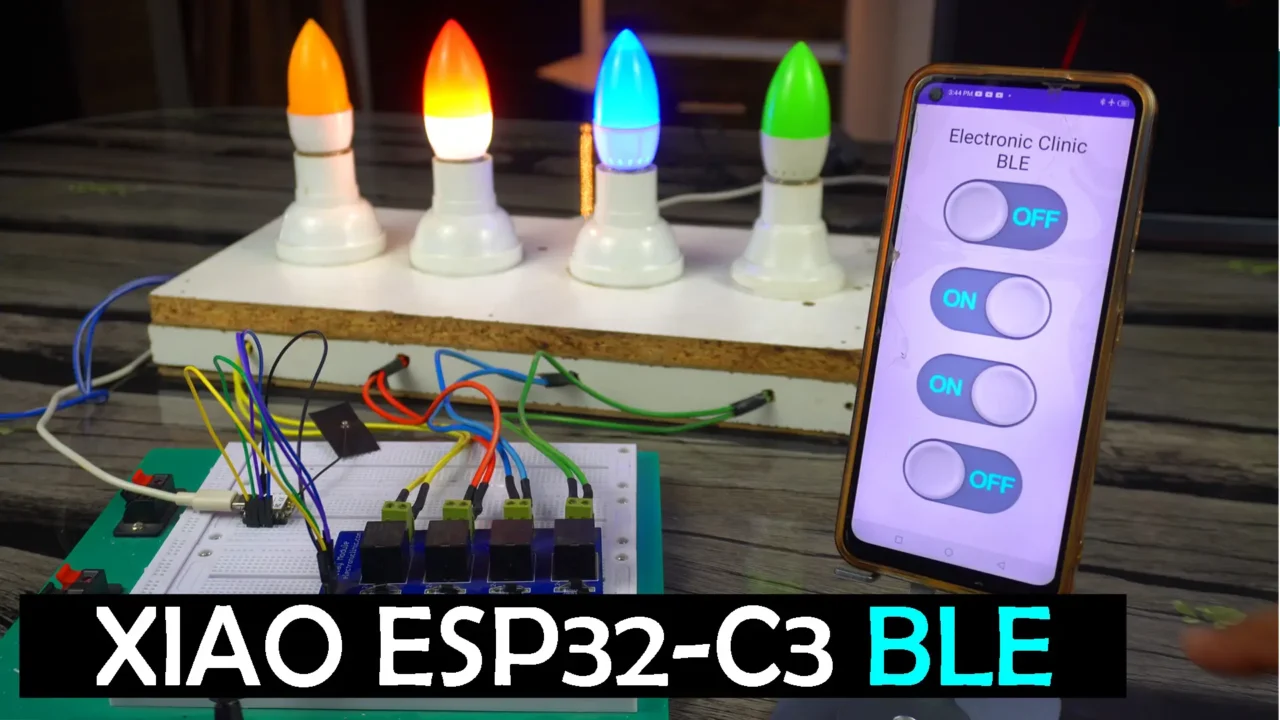
Before, when I used older applications, I had to manually select and connect the device after opening the application. But now, when I open this BLE application, it automatically connects to the device.

The communication is quite fast and responsive. I have also added a feedback feature in it, and it can also remember the status of the loads.
Let’s say I want to keep these 2 lights ON.
Now, if for some reason the power disconnects or there is a power outage, the controller will remember the previous state of the loads. So, as soon as the power connection is restored, these lights will automatically turn ON.
In the video, I also demonstrated its feedback functionality. For now, let’s imagine these loads are installed in another room. After a couple of hours, I want to switch one of these loads on or off, but I have forgotten which one I turned ON or turned OFF. To eliminate this kind of confusion, I have integrated a feedback feature in this application. As soon as I open the application on my cell phone, ESP32, through Bluetooth, provides me with feedback on which load is currently on and which one is off. This ensures seamless control and eliminates any confusion. For the practical demonstration, I highly recommend watch my video available on my YouTube Channel “Electronic Clinic”.
Now, let’s go ahead and start with the XIAO ESP32C3.
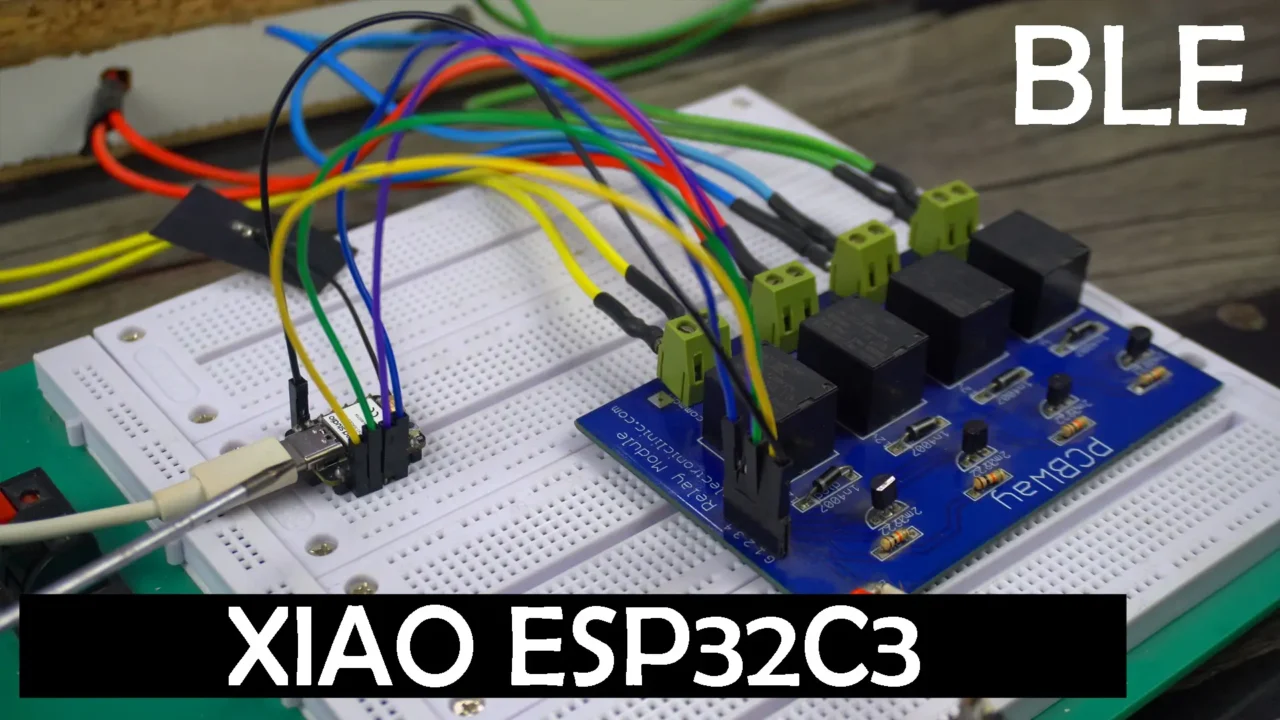
This is my Hardware setup for the XIAO ESP32C3, the connections are exactly the same except the pin numbers, and don’t forget to follow the safety protocols. For the connections you can follow this circuit diagram.
XIAO ESP32C3 BLE Code:
|
1 2 3 4 5 6 7 8 9 10 11 12 13 14 15 16 17 18 19 20 21 22 23 24 25 26 27 28 29 30 31 32 33 34 35 36 37 38 39 40 41 42 43 44 45 46 47 48 49 50 51 52 53 54 55 56 57 58 59 60 61 62 63 64 65 66 67 68 69 70 71 72 73 74 75 76 77 78 79 80 81 82 83 84 85 86 87 88 89 90 91 92 93 94 95 96 97 98 99 100 101 102 103 104 105 106 107 108 109 110 111 112 113 114 115 116 117 118 119 120 121 122 123 124 125 126 127 128 129 130 131 132 133 134 135 136 137 138 139 140 141 142 143 144 145 146 147 148 149 150 151 152 153 154 155 156 157 158 159 160 161 |
#include <BLEDevice.h> #include <BLEServer.h> #include <BLEUtils.h> #include <BLE2902.h> #include <BLEClient.h> #include <EEPROM.h> BLEClient* pClient; BLEServer* pServer; BLECharacteristic* pCharacteristic; BLECharacteristic* pReceiveCharacteristic; bool deviceConnected = false; bool oldDeviceConnected = false; const int ledPin1 = 3; const int ledPin2 = 4; const int ledPin3 = 5; const int ledPin4 = 6; bool led1State = false; // State of LED 1 bool led2State = false; // State of LED 2 bool led3State = false; // State of LED 2 bool led4State = false; // State of LED 2 class MyCallbacks: public BLECharacteristicCallbacks { void onWrite(BLECharacteristic *pCharacteristic) { std::string value = pCharacteristic->getValue(); if (value.length() > 0) { if (value == "199") { led1State = true; Serial.println("LED 1 is ON"); digitalWrite(ledPin1, HIGH); } else if (value == "222") { led1State = false; Serial.println("LED 1 is OFF"); digitalWrite(ledPin1, LOW); } else if (value == "333") { led2State = true; Serial.println("LED 2 is ON"); digitalWrite(ledPin2, HIGH); } else if (value == "444") { led2State = false; Serial.println("LED 2 is OFF"); digitalWrite(ledPin2, LOW); } else if (value == "555") { led3State = true; Serial.println("LED 3 is ON"); digitalWrite(ledPin3, HIGH); } else if (value == "666") { led3State = false; Serial.println("LED 3 is OFF"); digitalWrite(ledPin3, LOW); } else if (value == "777") { led4State = true; Serial.println("LED 4 is ON"); digitalWrite(ledPin4, HIGH); } else if (value == "888") { led4State = false; Serial.println("LED 4 is OFF"); digitalWrite(ledPin4, LOW); } // Save LED states to EEPROM EEPROM.write(0, led1State); EEPROM.write(1, led2State); EEPROM.write(2, led3State); EEPROM.write(3, led4State); EEPROM.commit(); } } }; class MyServerCallbacks: public BLEServerCallbacks { void onConnect(BLEServer* pServer) { deviceConnected = true; BLEDevice::startAdvertising(); }; void onDisconnect(BLEServer* pServer) { deviceConnected = false; } }; void setup() { Serial.begin(9600); Serial.println("Connect to MyESP32"); BLEDevice::init("ESP32 XAIO"); pServer = BLEDevice::createServer(); pServer->setCallbacks(new MyServerCallbacks()); pinMode(ledPin1, OUTPUT); pinMode(ledPin2, OUTPUT); pinMode(ledPin3, OUTPUT); pinMode(ledPin4, OUTPUT); // Initialize EEPROM EEPROM.begin(512); // Load LED states from EEPROM led1State = EEPROM.read(0); led2State = EEPROM.read(1); led3State = EEPROM.read(2); led4State = EEPROM.read(3); if (led1State) { digitalWrite(ledPin1, HIGH); } if (led2State) { digitalWrite(ledPin2, HIGH); } if (led3State) { digitalWrite(ledPin3, HIGH); } if (led4State) { digitalWrite(ledPin4, HIGH); } BLEService *pService = pServer->createService("0000180d-0000-1000-8000-00805f9b34fb"); pCharacteristic = pService->createCharacteristic( "00002a37-0000-1000-8000-00805f9b34fb", BLECharacteristic::PROPERTY_READ | BLECharacteristic::PROPERTY_WRITE // Added write property ); pCharacteristic->addDescriptor(new BLE2902()); pCharacteristic->setCallbacks(new MyCallbacks()); pService->start(); BLEAdvertising *pAdvertising = pServer->getAdvertising(); pAdvertising->start(); // Initialize BLE client for central role pClient = BLEDevice::createClient(); } void loop() { if (deviceConnected) { String ledStates = String(led1State) + "," + String(led2State) + "," + String(led3State) + "," + String(led4State); pCharacteristic->setValue(ledStates.c_str()); pCharacteristic->notify(); // Handle LED control commands from the central device delay(1000); // Adjust the update interval as needed } // Disconnecting if (!deviceConnected && oldDeviceConnected) { delay(500); // Give the Bluetooth stack the chance to get things ready pServer->startAdvertising(); // Restart advertising Serial.println("Start advertising"); oldDeviceConnected = deviceConnected; } // Connecting if (deviceConnected && !oldDeviceConnected) { // Do stuff here on connecting oldDeviceConnected = deviceConnected; } } |
The code is also exactly the same except the pin numbers. And the coolest thing is, for the XIAO ESP32C3 you don’t need to do anything. When you install the ESP32 board, all its variants are installed including the XIAO ESP32C3. You can check this in the boards list.

You can see the XIAO ESP32C3 is available in the boards list. If you are not able to find the XIAO ESP32C3 in the boards list then you will have to update your boards list through the board’s manager URL link. Anyway, then all you need is to select the XIAO ESP32C3, select the communication port, and click on the Upload button and that’s it. I have already uploaded this program; so, let’s go ahead and start practical demonstration.
BLE App for XIAO ESP32C3:
This is the same BLE application, but this time I have added the Bluetooth address of the XIAO ESP32C3 in the application code. All other features and functionality are exactly the same.
You can download the source code of this BLE application from my Patreon Shop at a very reasonable price. Then, you can modify this BLE application according to your preference. You just need to have a little knowledge of Android Studio.
Once you learn to make BLE applications, you can launch your own products. You can control and monitor things like bikes, cars, loads, sensors, and many other things. You can sell these products on platforms like Amazon just like me. You can create amazing projects for your international clients. So, what are you waiting for? Download the BLE application source code and get started!
Watch Video Tutorial:

Discover more from Electronic Clinic
Subscribe to get the latest posts sent to your email.


From where we can purchase your app source code?