XIAO ESP32C3 Getting started tutorial with Projects, ESP32 C3
Last Updated on September 21, 2024 by Engr. Shahzada Fahad
Table of Contents
XIAO ESP32C3:
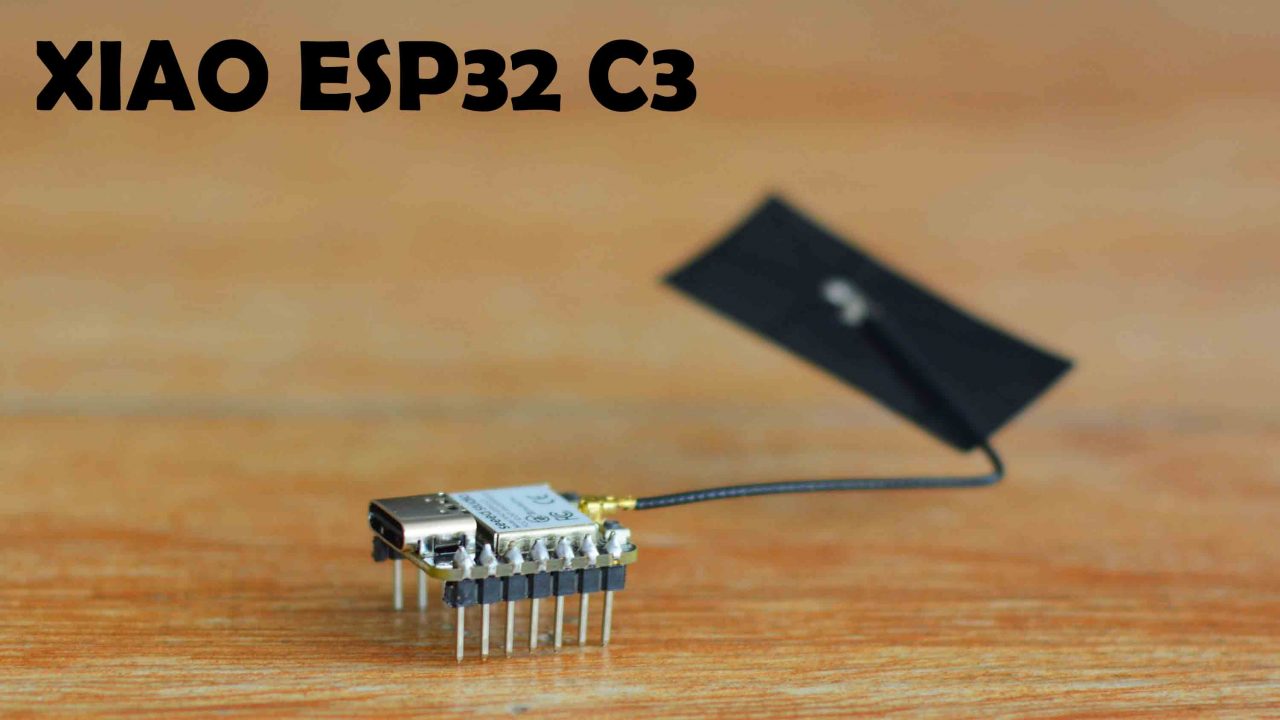
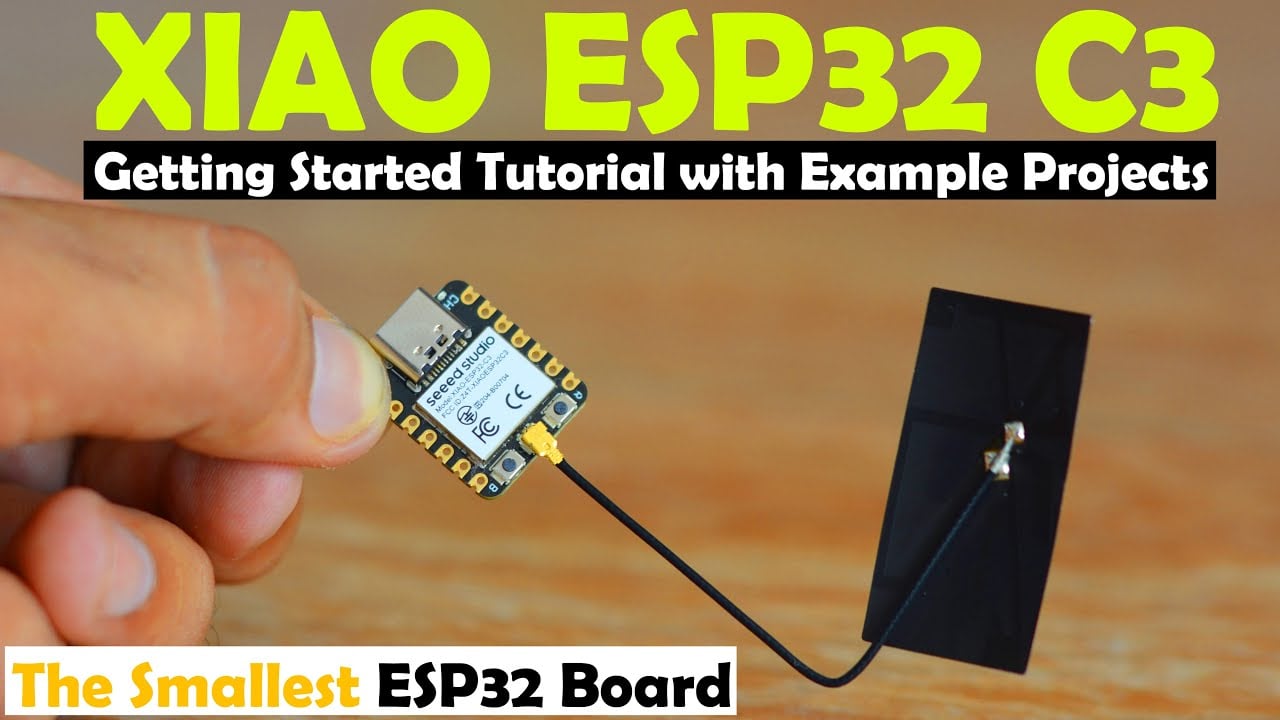
XIAO ESP32C3 Getting started tutorial with Projects- As usual Seeed Studios has surprised everyone by launching the smallest ESP32C3 WiFi + Bluetooth development board. XIAO means small in Chinese. Previously, they launched Seeeduino XIAO the smallest Arduino, and this time the XIAO ESP32C3.
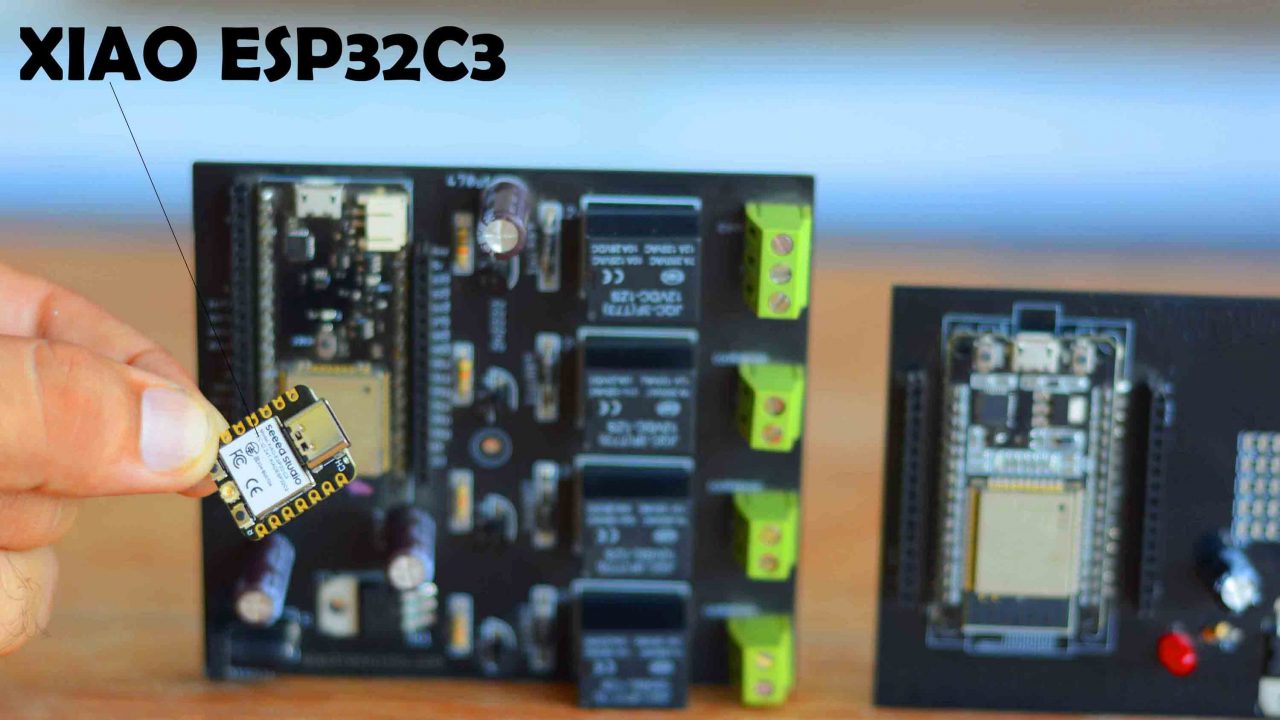
These are the ESP32 WiFi + Bluetooth modules I have been using for a long time and this is the XIAO ESP32C3 WiFi + Bluetooth module. Just look at the size difference. The SEEED Studio’s ESP32C3 is extremely small in size. Anyway, since this is a getting started tutorial, I will try my level best to explain each and every detail including,
- Technical specifications.
- Pinout
- ESP32C3 board installation using Arduino IDE.
- Writing our first program to control any LED.
- I will also use it with the Adafruit IO for monitoring the Temperature and Humidity.
So, without any further delay, let’s get started!!!
Amazon Links:
DHT11 Temperature and Humidity
*Disclosure: These are affiliate links. As an Amazon Associate I earn from qualifying purchases.
XIAO ESP32C3 Specifications:

Here is the Seeed Studio’s XIAO ESP32C3 which is an IoT “Internet of things” mini development board based on the Espressif ESP32-C3 WiFi and Bluetooth dual-mode chip. You might be wondering what is C3? Well, actually ESP32 has a number of variants; for example ESP32 S2, S3, C3, C5, C6, and H2.
The ESP32C3 type is a single-core 32-bit RISC-V CPU, up to 160 MHz. It has excellent radio frequency performance, supporting IEEE 802.11 b/g/n WiFi 2.4 GHz, and Bluetooth 5 (low energy) protocols. The board has this IPEX connector which is used to connect the WiFi/Bluetooth Antenna to increase the signal strength for your wireless applications. I have a detailed tutorial on the XIAO ESP32C3 onboard Bluetooth module; in which I performed the Bluetooth range test, and i also built a smart home automation project using XIAO ESP32C3 and an android application. This is an Ultra-Low power module that consumes only 43uA when in Deep Sleep mode. This board also has the battery charging chip that can be used to charge the lithium battery. It has 400KB of SRAM and 4MB of on-board Flash memory. Now, let’s take a look at the Pinout diagram.
XIAO ESP32C3 Pinout Diagram:
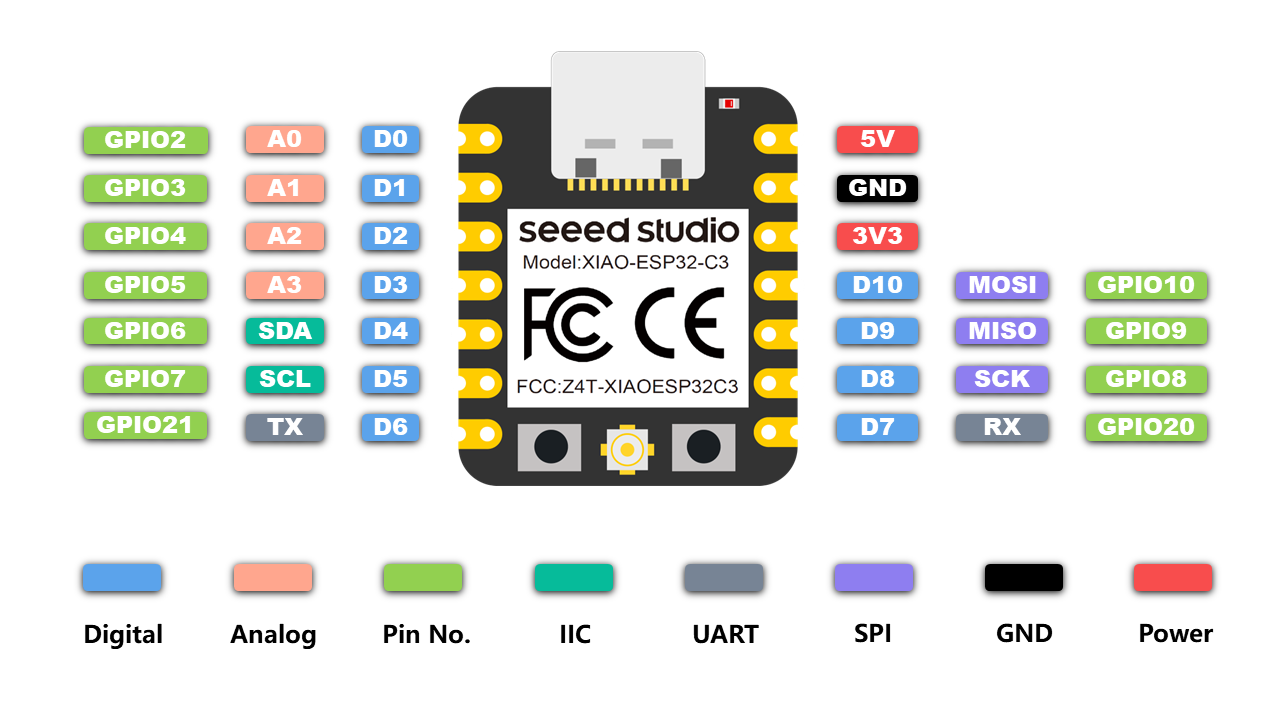
Apart from the 5V, GND, and 3.3V pins. It has got a total of 11 GPIO pins. These are multi-purpose pins. All these 11 GPIO pins can be used as digital pins.
GPIO’s 2, 3, 4, and 5 can also be used as analog pins for interfacing analog sensors.
GPIO’s 6 and 7 can be used as i2c pins for connecting i2c-supported sensors and display modules.
GPIO’s 21 and 20 can also be used as TX and RX. And finally,
GPIO’s 8, 9, and 10 can be used as the SPI pins.
Now, let’s take a look at the Onboard components.
ESP32C3 Components Overview:
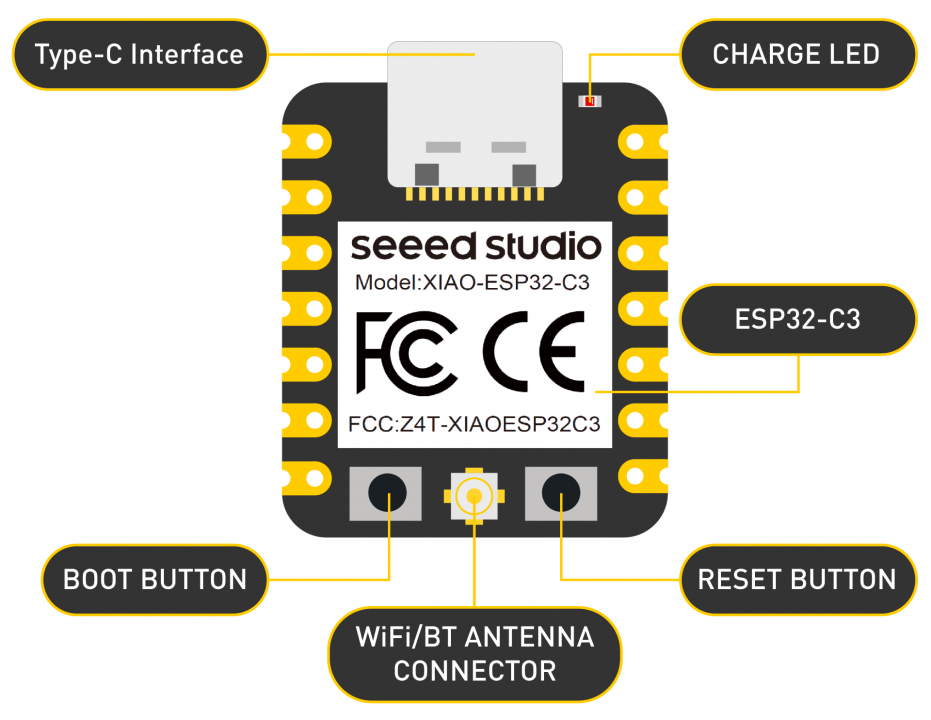
It has the USB type-C Interface, charge LED, the ESP32-C3 itself, a Reset button, WiFi/Bluetooth Antenna Connector, and a BOOT Button.
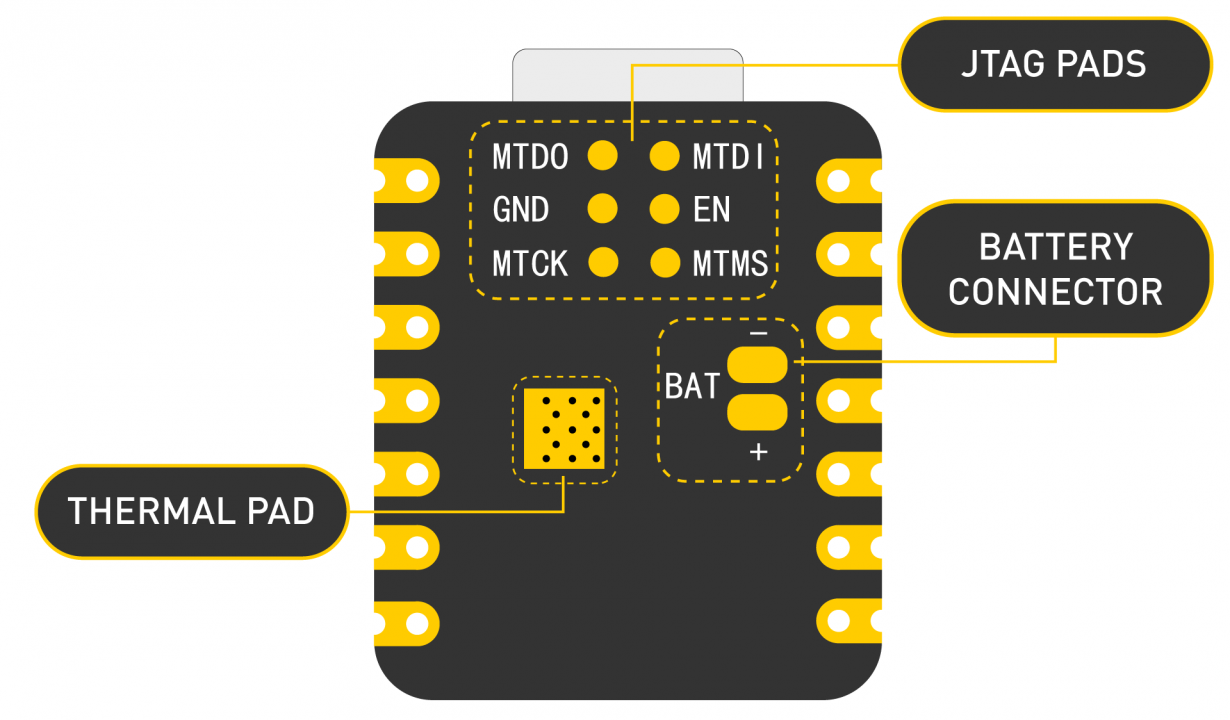
On the bottom side, we have got JTAG PADS, Battery Connector, and a Thermal PAD.
Power Pins:
- 5V – This is 5v out from the USB port. You can also use this as a voltage input but you must have some sort of diode (schottky, signal, power) between your external power source and this pin with anode to battery, cathode to 5V pin.
- 3V3 – This is the regulated output from the onboard regulator. You can draw 700mA
- GND – Power/data/signal ground
Now, I am going to solder male headers so that I can easily use it on a breadboard.
As you can see I have soldered the male headers.
Arduino IDE setup:
Now, to use the ESP32C3 with the Arduino IDE, you will need to install the latest ESP32 board manager URL link.
https://raw.githubusercontent.com/espressif/arduino-esp32/gh-pages/package_esp32_index.json
Copy the above link. Then open the Arduino IDE > Click on the File Menu > Click on the Preferences > And paste the link in the Additional Boards Manager URL’s.
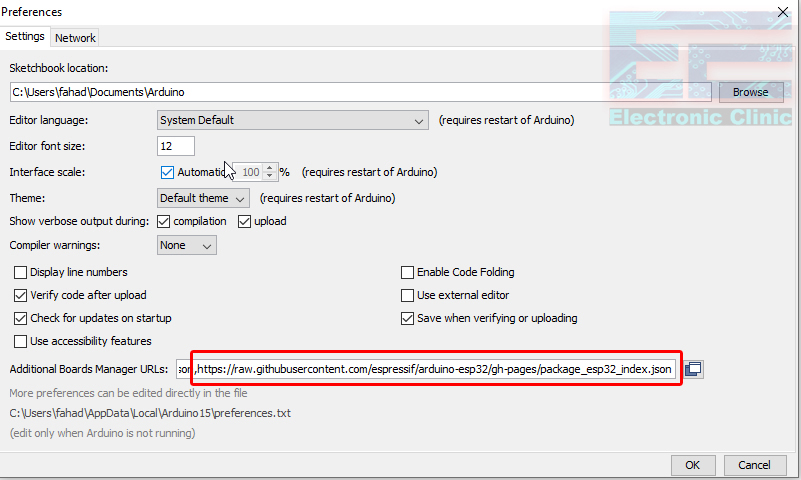
As you can see, I have already added the link. If you already have some URLs then simply put a comma and past the URL. Finally, click on the OK button.
This time click on the Tools Menu > Go to Board and click on the Boards Manager.
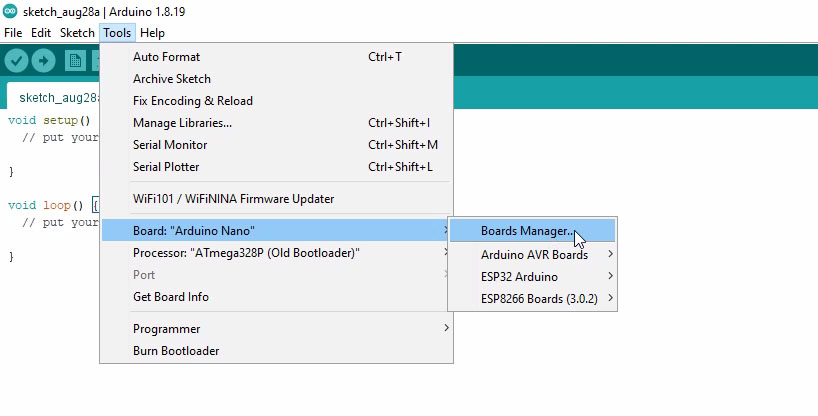
Search for the ESP32 and install the latest version.
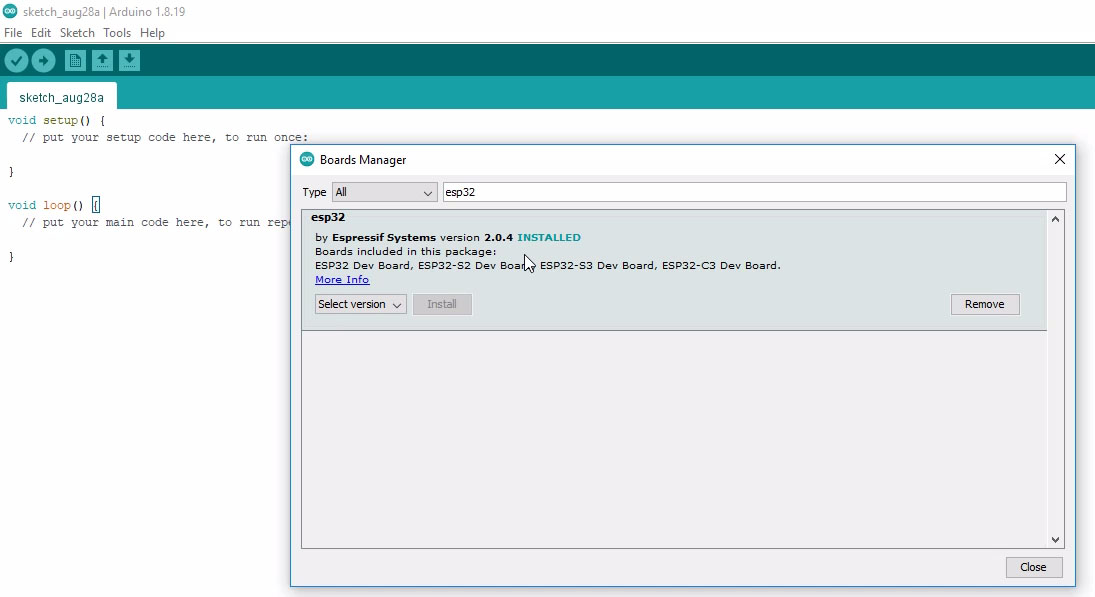
As you can see, I have already installed the latest version of the ESP32 board.
Now, Go to the boards and check if you can find the XIAO_ESP32C3.
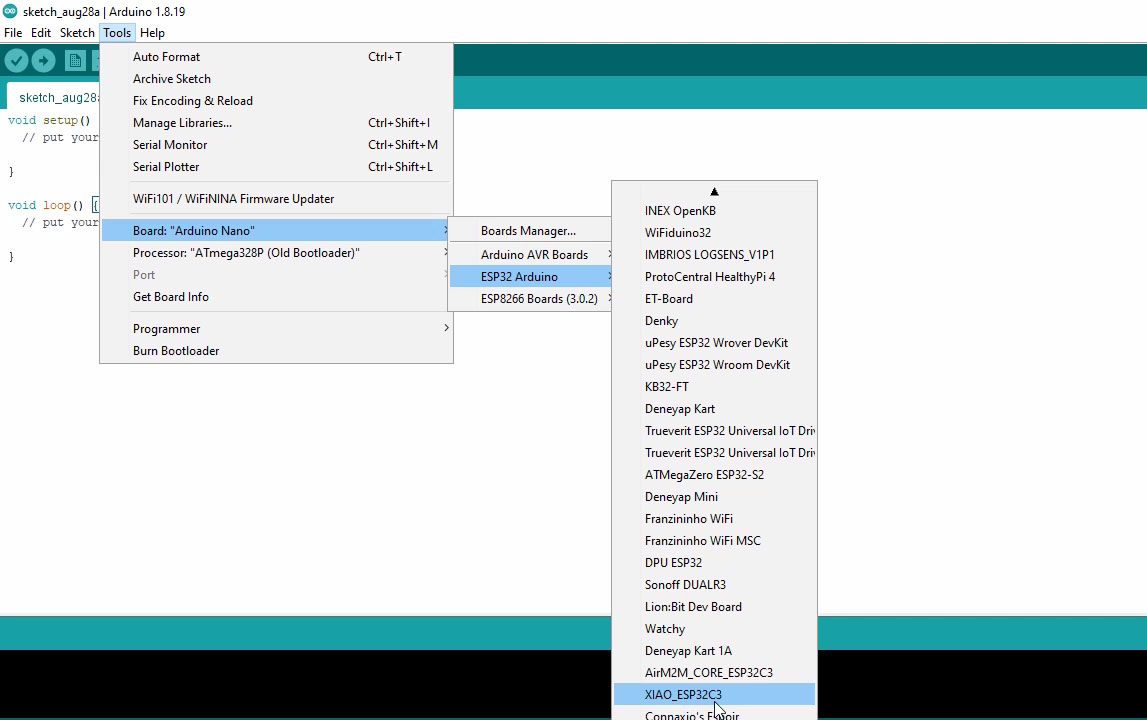
If it’s available in the list then congrats, you are done with the hard part. Now, I am going to start with a simple LED project.
LED with ESP32C3 Circuit:
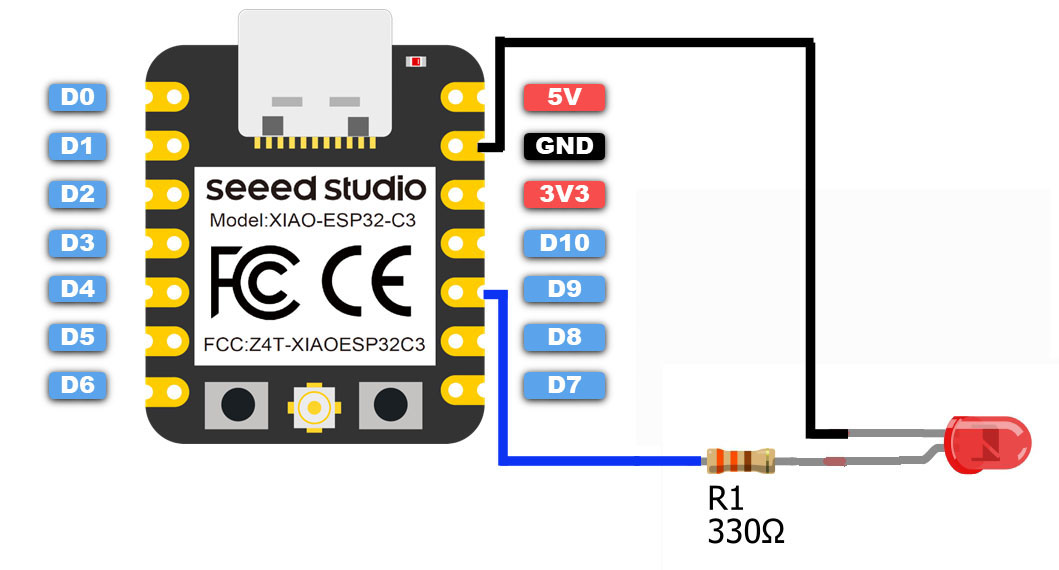
Connect the Cathode leg of the LED with the GND pin on the ESP32C3. Connect the Anode leg of the LED with the digital pin 9 through a current limiting resistor of 330 ohms. I connected the LED with the ESP32C3 as per the circuit diagram. And now let’s take a look at the programming.
ESP32C3 Led Code:
|
1 2 3 4 5 6 7 8 9 10 11 12 13 14 15 16 17 18 |
// define led according to pin diagram int led = D9; void setup() { // initialize digital pin led as an output Serial.begin(115200); pinMode(led, OUTPUT); } void loop() { digitalWrite(led, HIGH); // turn the LED on Serial.println("led on"); delay(1000); // wait for a second digitalWrite(led, LOW); // turn the LED off delay(1000); // wait for a second Serial.println("led off"); } |
Here, I have this very simple code. You can see LED is connected to D9. Inside the setup() function I set the LED as output. Inside the loop() function, I am simply turning ON and turning OFF the LED. I am using a delay of 1 second.
Now, to upload the code, select the XIAO_ESP32C3. Make sure the correct communication port is selected. Finally, click on the upload button and wait for a while.

The LED is blinking which means we have done everything correctly.
XIAO ESP32C3 with DHT11 Sensor:
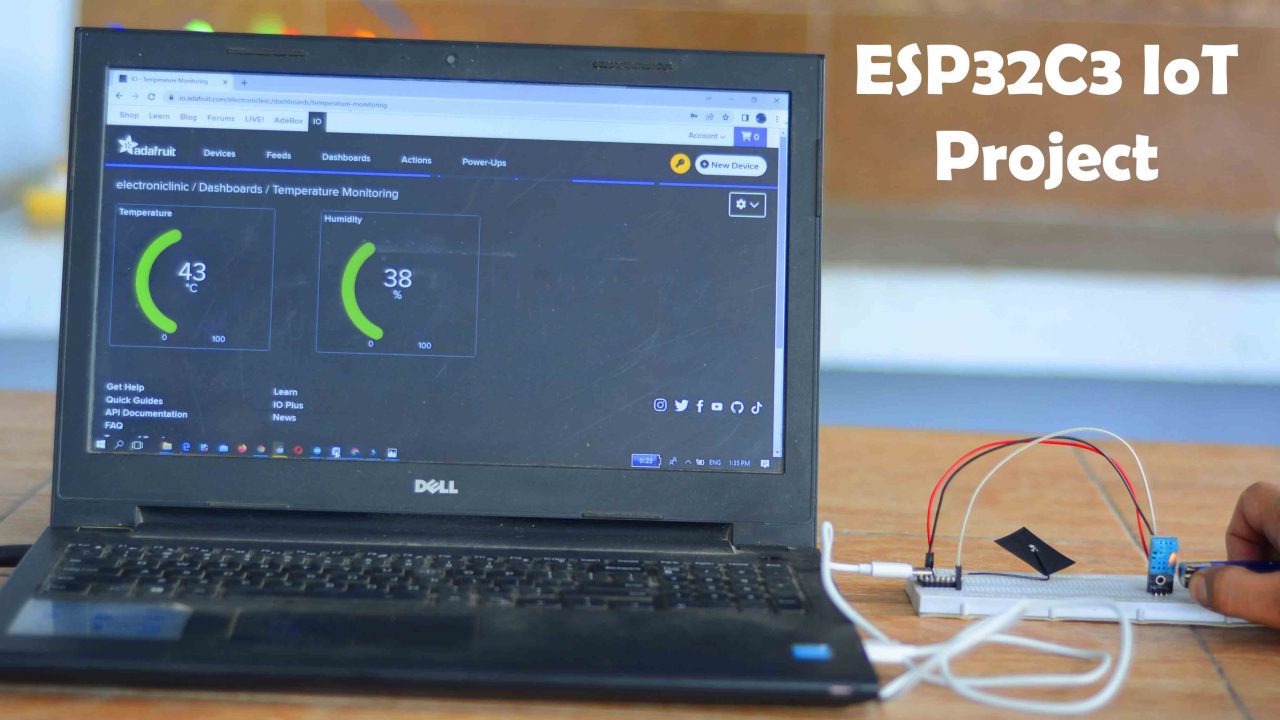
Now, in this next example, I am going to use ESP32C3 with Adafruit IO for monitoring Temperature and Humidity using DHT11 sensor. You can run your previously designed projects without changing the code. You will only need to change the pin numbers.
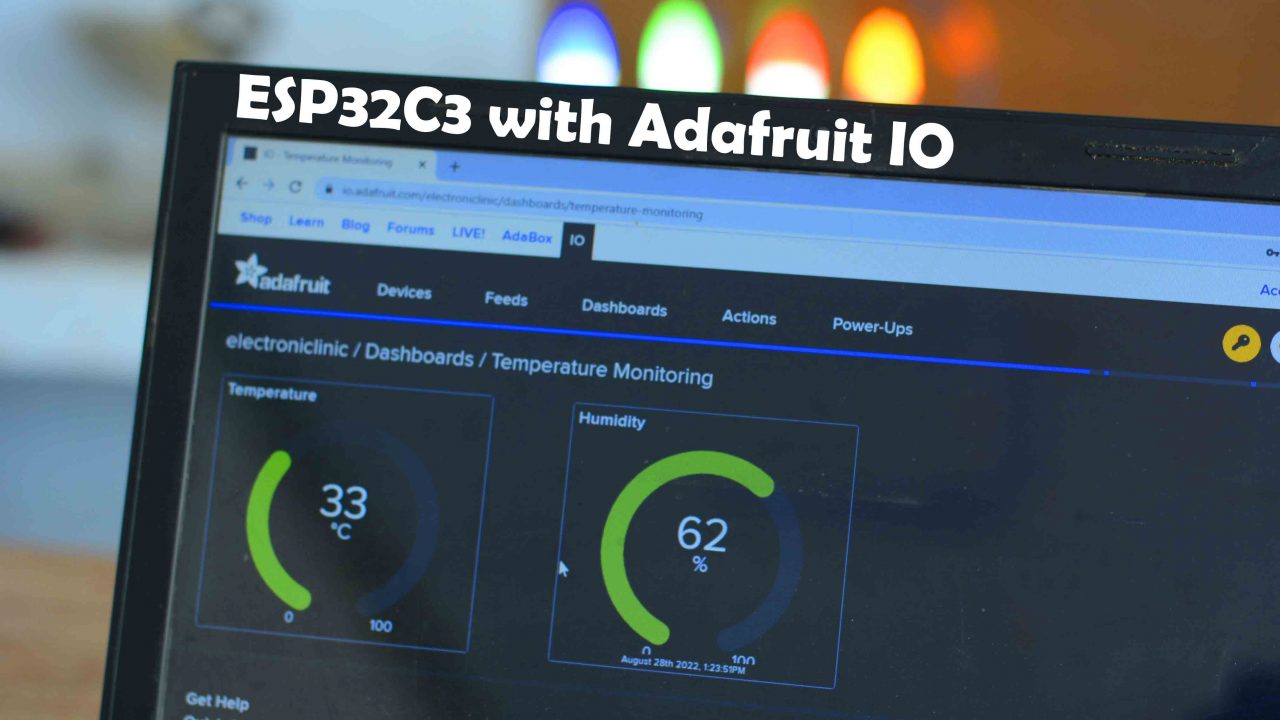
To practically explain this, I am going to use my previously designed Adafruit IO Dashboard. If you want to learn how to make the same IoT dashboard using Adafruit IO then I highly recommend read my article on Adafruit IO and ESP8266. Now, Let’s take a look at the circuit diagram.
DHT11 Sensor Interfacing with ESP32C3:
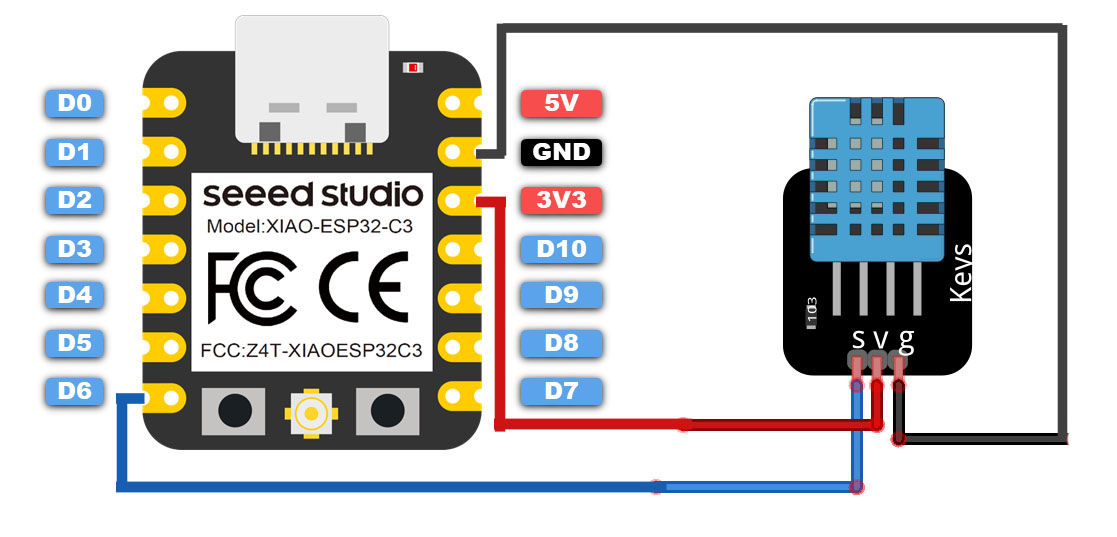
The Data pin or the S pin of the DHT11 sensor is connected with the D6 pin. While the voltage and ground pins of the DHT11 sensor are connected with the 3.3V and GND pins. I connected the DHT11 sensor as per the circuit diagram. Now, let’s take a look at the programming.
ESP32C3 DHT11 Code:
|
1 2 3 4 5 6 7 8 9 10 11 12 13 14 15 16 17 18 19 20 21 22 23 24 25 26 27 28 29 30 31 32 33 34 35 36 37 38 39 40 41 42 43 44 45 46 47 48 49 50 51 52 53 54 55 56 57 58 59 60 61 62 63 64 65 66 67 68 69 70 71 72 73 74 75 76 77 78 79 80 81 82 83 84 85 86 87 88 89 90 91 92 93 94 95 96 97 98 99 100 101 102 103 104 105 106 107 |
#include <WiFi.h> #include "DHT.h" #include "Adafruit_MQTT.h" #include "Adafruit_MQTT_Client.h" #define DHTPIN D6 #define DHTTYPE DHT11 DHT dht(DHTPIN, DHTTYPE); // WiFi parameters #define WLAN_SSID "AndroidAP3DEC" #define WLAN_PASS "electroniclinic" // Adafruit IO #define AIO_SERVER "io.adafruit.com" #define AIO_SERVERPORT 1883 //Enter the username and key from the Adafruit IO #define AIO_USERNAME "electroniclinic" #define AIO_KEY "aio_KrWj56Oiufjv84CQca5HfWD8ewWT" WiFiClient client; // Setup the MQTT client class by passing in the WiFi client and MQTT server and login details. Adafruit_MQTT_Client mqtt(&client, AIO_SERVER, AIO_SERVERPORT, AIO_USERNAME, AIO_KEY); Adafruit_MQTT_Publish Temperature = Adafruit_MQTT_Publish(&mqtt, AIO_USERNAME "/feeds/Temperature"); Adafruit_MQTT_Publish Humidity = Adafruit_MQTT_Publish(&mqtt, AIO_USERNAME "/feeds/Humidity"); float temp; //to store the temperature value float hum; // to store the humidity value void setup() { Serial.begin(115200); dht.begin(); //Begins to receive Temperature and humidity values. Serial.println(F("Adafruit IO Example")); // Connect to WiFi access point. Serial.print(F("Connecting to ")); Serial.println(WLAN_SSID); WiFi.begin(WLAN_SSID, WLAN_PASS); while (WiFi.status() != WL_CONNECTED) { delay(500); Serial.print(F(".")); } Serial.println(); Serial.println(F("WiFi connected")); Serial.println(F("IP address: ")); Serial.println(WiFi.localIP()); // connect to adafruit io connect(); } // connect to adafruit io via MQTT void connect() { Serial.print(F("Connecting to Adafruit IO... ")); int8_t ret; while ((ret = mqtt.connect()) != 0) { switch (ret) { case 1: Serial.println(F("Wrong protocol")); break; case 2: Serial.println(F("ID rejected")); break; case 3: Serial.println(F("Server unavail")); break; case 4: Serial.println(F("Bad user/pass")); break; case 5: Serial.println(F("Not authed")); break; case 6: Serial.println(F("Failed to subscribe")); break; default: Serial.println(F("Connection failed")); break; } if(ret >= 0) mqtt.disconnect(); Serial.println(F("Retrying connection...")); delay(10000); } Serial.println(F("Adafruit IO Connected!")); } void loop() { // ping adafruit io a few times to make sure we remain connected if(! mqtt.ping(3)) { // reconnect to adafruit io if(! mqtt.connected()) connect(); } temp = dht.readTemperature(); hum = dht.readHumidity(); Serial.print("temperature = "); Serial.println(temp); Serial.print("humidity = "); Serial.println(hum); delay(5000); if (! Temperature.publish(temp)) { //Publish to Adafruit Serial.println(F("Failed")); } if (! Humidity.publish(hum)) { //Publish to Adafruit Serial.println(F("Failed")); } else { Serial.println(F("Sent!")); } } |
I have already explained this code in my previous video on the Adafruit IO and ESP8266. As this time I am using ESP32C3 so I changed the ESP8266WiFi to WiFi. And I only changed the DHT11 pin. This time I am using digital pin D6. There was some code for the buzzer and Oled, which I removed. While everything else remains exactly the same. You can copy this modified code from my article. I will provide a link in the description. Upload this code the same way as we did in the LED example.
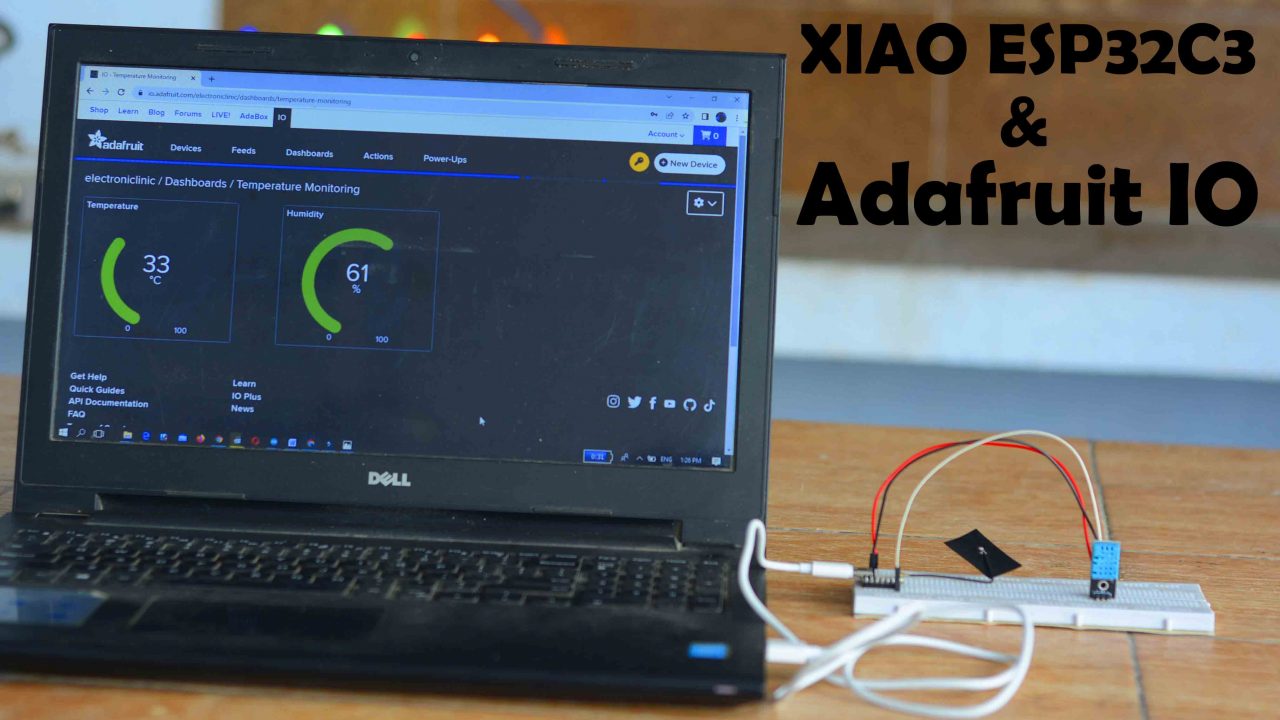
Right now the XIAO ESP32C3 and Laptop both are connected to the WiFi. You can use the same WiFi network or different WiFi networks. Anyway, you can see the Temperature and Humidity values on the Gauges. Let me apply some heat and you will see an increase in the temperature.
Check the Seeed Studio Xiao ESP32C6.
Watch Video Tutorial
Discover more from Electronic Clinic
Subscribe to get the latest posts sent to your email.


Thanks for all the very useful info.
Can you tell me how to awake Xiao ESP32C3 from deep sleep with gpio?
For the ESP32, there is no need to use the F macro in lines like
Serial.println(F(“Failed”));
String constants are always stored in flash by the IDE.
Thanks, this is great. Any idea how to manipulate the Flash on this?
Does this ESP32C3 have DAC PINS and did not dsee them/
Sir, Can please provide code for read GPIO (INPUT PINS D0 to D10) and Send to Android phone using BLE…