How to Log Data to Google Spreadsheet Using ESP8266 NodeMCU
ESP8266 and Google Spreadsheet
Last Updated on May 11, 2026 by Engr. Shahzada Fahad
Table of Contents
Google Spread Sheet with ESP8266, Description:
Google Spreadsheet or Google Sheets with ESP8266 Nodemcu for Data Logging, Temp & Hum DHT11- So far I have covered majority of the IoT platforms for monitoring different types of sensors and for controlling different types of electrical devices. Usually for the real-time sensors monitoring I display the sensors values on the Gauges and for this I mostly use Blynk IoT platform, Ubidots, and Thingspeak etc. In majority of the cases only displaying the sensor values is not enough. There are guys who are interested in the data logging for the post analysis. The sensors data logging service offered by majority of the IoT platforms isn’t as impressive as offered by the Google which is absolutely free, highly secured, fast, and reliable. In this article, I will be using Nodemcu ESP8266 WiFi module with Google Sheets for the sensor data logging. Google Sheets is a spreadsheet program included as part of the free, web-based Google Docs Editors suite offered by Google.
Read my latest Article on How to send data from Google Spreadsheet to ESP8266 or ESP32.
Since this is my first time using the Google sheets for the Sensors data logging; so, I will try my level best to explain each and every detail. I will be using DHT11 Temperature and Humidity sensor as this is the most basic and easily available sensor. Once you learn how to send the temperature and humidity values to the Google Spreadsheet then you can replace this sensor with any other sensor of your choice. So, before, I am going to explain the circuit diagram, programming, and how to get started with the Google sheets, first let me explain; how this projects works.

I am using my homemade 4S lithium Ion battery pack for powering up my Nodemcu ESP8266 Development board. Read my article on how to make 3S and 4S lithium Ion batteries pack, if you want to make the same battery pack. As soon as I powered my Nodemcu ESP8266 module, after a few seconds I started to receive the data. The temperature and humidity values are stored along with the date and time information. For the demonstration purposes I am using a short delay in the programming, if you want you can increase the delay time. It’s totally up to you whether you want to send data after every 1 minute or 10 minutes, or 1 hour.

Anyways, you can also open the Google spreadsheet using your laptop or computer; again it’s up to you whether you want to use your computer or your cell phone for the monitoring and post analysis. Since this is an IoT based project so, you can monitor the temperature and humidity values from anywhere in the world. One thing that I really liked about the Google sheets is that; if you share the same Google account with multiple users then all the users can monitor the same sensor from anywhere in the world.
As this is a getting started tutorial, that’s why I only started with the DHT11 temperature and Humidity sensor, if you want you can use multiple sensors, just go ahead and give it a try and if you face any issues then let me know in a comment. Anyways, now you have got the idea of what exactly you are going to learn after reading this article. Without any further delay, let’s get started!!!
Amazon Links:
DHT11 Temperature and Humidity Module:
*Please Note: These are affiliate links. I may make a commission if you buy the components through these links. I would appreciate your support in this way!
ESP8266 NodeMCU:
ESP8266 is a highly integrated chip designed for the needs of a new connected world. It offers a complete and self-contained Wi-Fi networking solution, allowing it to either host the application or to offload all Wi-Fi networking functions from another application processor.
ESP8266 has powerful on-board processing and storage capabilities that allow it to be integrated with the sensors and other application specific devices through its GPIOs with minimal development up-front and minimal loading during runtime. Its high degree of on-chip integration allows for minimal external circuitry, and the entire solution, including front-end module, is designed to occupy minimal PCB area.

Specifications:
Serial/UART baud rate: 115200 bps
Input power: 3.3V
I/O voltage tolerance: 3.6V Max
Flash Memory Size: 1MB (8Mbit)
WiFi security modes: WPA, WPA2
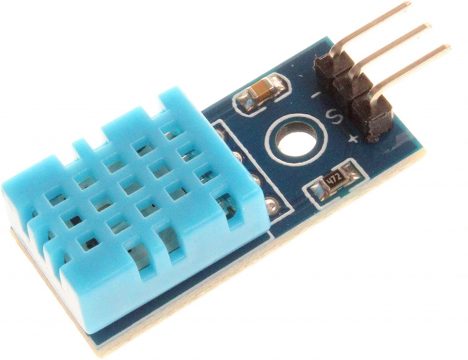
DHT11 Sensor:
- DHT11 digital temperature and humidity sensor is a digital signal output with a calibrated temperature and humidity combined sensor.
- It uses a dedicated digital modules and acquisition of temperature and humidity sensor technology to ensure that products with high reliability and excellent long term stability.
- Sensor consists of a resistive element and a sense of wet NTC temperature measurement devices, and with a high-performance 8-bit microcontroller connected.
- The product has excellent quality, fast response, anti-interference ability, high cost and other advantages.
The single-wire wiring scheme makes it easy to be integrated to other applications and the simple communication protocol greatly reduces the programming effort required.
Nodemcu ESP8266 and DHT11 Circuit Diagram:

If you are just getting started with the Nodemcu ESP8266 and DHT11 Temperature and Humidity sensor then these are the minimal connections which you will need for this project. You can power up your Nodemcu module using your laptop. Connect the VCC and GND pins of the DHT11 sensor with the 3.3V and GND pins of the Nodemcu Module; and connect the Data pin of the dht11 sensor with the digital pin D1 of the Nodemcu module. Don’t forget to add a 10k ohm resistor between the VCC and Data pins of the DHT11 sensor. Now, let’s take a look at the other circuit diagram.
Nodemcu esp8266 power supply Circuit Diagram:

This circuit diagram is for those guys who want to power up the Nodemcu module using an external power supply. As you can see the DHT11 sensor connections with the Nodemcu ESP8266 WiFi module remains exactly the same. On the left side is the regulated 5v power supply which is based on the 7805 voltage regulator. J1 is the DC female power jack and this is where we connect a 12v adaptor, battery, or a solar panel. Don’t forget to add these 470uF decoupling capacitors.

Here is my Nodemcu ESP8266 WiFi module based development board which I use for testing my IoT based projects. If you want to make the same development board then you can read my ESP8266 NodeMCU getting started guide. Anyways, I interfaced my DHT11 sensor with the Nodemcu module as per the circuit diagram. My connections are completed and now let’s start with the Google sheets, there is nothing complicated just follow the same exact steps.
Creating Google Spreadsheet:
First of all we will create the Google Spreadsheet for which we will click on the Google apps and in which we will click on the Sheets.

After that we will click on the blank in order to create a new spreadsheet.

After that we will give the title name of the project and then in columns we will write the date, time, temperature, and humidity.
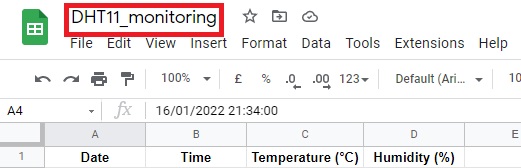
In the date column which is “A” we will receive the date, in column “B” we will receive the time, in column “C” we will receive the temperature, and in the column “D” we will receive the humidity. After that we will open the script editor in the previous versions of spread sheet it was found in the tools but in the new versions of the spread sheet it is in the extensions with the name Apps Script click on it.

After that we will click on the untitled project and give the name to the project which is DHT_monitoring and click on the ok.

After that paste the following code in it.
|
1 2 3 4 5 6 7 8 9 10 11 12 13 14 15 16 17 18 19 20 21 22 23 24 25 26 27 28 29 30 31 32 33 34 35 36 37 38 39 40 41 |
function doGet(e) { Logger.log( JSON.stringify(e) ); var result = 'Ok'; if (e.parameter == 'undefined') { result = 'No Parameters'; } else { var sheet_id = ''; // Spreadsheet ID var sheet = SpreadsheetApp.openById(sheet_id).getActiveSheet(); var newRow = sheet.getLastRow() + 1; var rowData = []; var Curr_Date = new Date(); rowData[0] = Curr_Date; // Date in column A var Curr_Time = Utilities.formatDate(Curr_Date, "Asia/", 'HH:mm:ss'); rowData[1] = Curr_Time; // Time in column B for (var param in e.parameter) { Logger.log('In for loop, param=' + param); var value = stripQuotes(e.parameter[param]); Logger.log(param + ':' + e.parameter[param]); switch (param) { case 'temperature': rowData[2] = value; // Temperature in column C result = 'Temperature Written on column C'; break; case 'humidity': rowData[3] = value; // Humidity in column D result += ' ,Humidity Written on column D'; break; default: result = "unsupported parameter"; } } Logger.log(JSON.stringify(rowData)); var newRange = sheet.getRange(newRow, 1, 1, rowData.length); newRange.setValues([rowData]); } return ContentService.createTextOutput(result); } function stripQuotes( value ) { return value.replace(/^["']|['"]$/g, ""); } |
In the above code we will make several changes in the var_sheet id we will paste the code copied from the spread sheet main page which is shown below in the diagram.

We can change the time by changing the command
|
1 |
varCurr_Time = Utilities.formatDate(Curr_Date, "Asia/Karachi", 'HH:mm:ss'); |
As the Pakistan time is based on the Karachi so we will write Asia/Karachi. If you are living in India then you will write Asia/New Dehli. You can search the time zone of your country and replace it. After that we will click on the publish and then click on the deploy as web.

Then we will select the “anyone even anonymous” and click on the Deploy.

Then click on the review permission

Then choose the account the g-mail account with which you have created the spread sheet. After that we will click on the advance.

Then click on the go to dht_monitoring

After that we will click on the allow button.

After that we will copy the script url and click on the ok.

Now the process of the Google spreadsheet is completed and we will open the Arduino IDE. If this is your first time using the Nodemcu ESP8266 WiFi module then you will need to install the Nodemcu board. I have a very detailed article on how to install the Nodemcu board. You will also need to install the DHT11 library for this click on the Sketch Menu then go to the Include Library and then click on the Manage Libraries. Type dht in the search box and then install the dht sensor library.
Google Spreadsheet Nodemcu ESP8266 Code:
|
1 2 3 4 5 6 7 8 9 10 11 12 13 14 15 16 17 18 19 20 21 22 23 24 25 26 27 28 29 30 31 32 33 34 35 36 37 38 39 40 41 42 43 44 45 46 47 48 49 50 51 52 53 54 55 56 57 58 59 60 61 62 63 64 65 66 67 68 69 70 71 72 73 74 75 76 77 78 79 80 81 82 83 84 85 86 87 88 89 90 91 92 93 94 95 96 97 98 99 100 101 102 103 104 105 106 107 108 109 110 111 112 113 114 115 116 117 118 119 120 121 122 123 124 125 126 127 128 129 130 131 132 |
#include <ESP8266WiFi.h> #include <WiFiClientSecure.h> #include "DHT.h" #define DHTTYPE DHT11 // type of the temperature sensor const int DHTPin = 5; //--> The pin used for the DHT11 sensor is Pin D1 = GPIO5 DHT dht(DHTPin, DHTTYPE); //--> Initialize DHT sensor, DHT dht(Pin_used, Type_of_DHT_Sensor); #define ON_Board_LED 2 //--> Defining an On Board LED, used for indicators when the process of connecting to a wifi router const char* ssid = "AndroidAP3DEC"; //--> Your wifi name or SSID. const char* password = "123456"; //--> Your wifi password. //----------------------------------------Host & httpsPort const char* host = "script.google.com"; const int httpsPort = 443; //---------------------------------------- WiFiClientSecure client; //--> Create a WiFiClientSecure object. String GAS_ID = "AKfycby8Lfzwu-5SBj9tHxbw3_j8ZPZy6P6_3e_BBISC0Jg7SstXLUed"; //--> spreadsheet script ID void setup() { // put your setup code here, to run once: Serial.begin(115200); delay(500); dht.begin(); //--> Start reading DHT11 sensors delay(500); WiFi.begin(ssid, password); //--> Connect to your WiFi router Serial.println(""); pinMode(ON_Board_LED,OUTPUT); //--> On Board LED port Direction output digitalWrite(ON_Board_LED, HIGH); //--> Turn off Led On Board //----------------------------------------Wait for connection Serial.print("Connecting"); while (WiFi.status() != WL_CONNECTED) { Serial.print("."); //----------------------------------------Make the On Board Flashing LED on the process of connecting to the wifi router. digitalWrite(ON_Board_LED, LOW); delay(250); digitalWrite(ON_Board_LED, HIGH); delay(250); //---------------------------------------- } //---------------------------------------- digitalWrite(ON_Board_LED, HIGH); //--> Turn off the On Board LED when it is connected to the wifi router. Serial.println(""); Serial.print("Successfully connected to : "); Serial.println(ssid); Serial.print("IP address: "); Serial.println(WiFi.localIP()); Serial.println(); //---------------------------------------- client.setInsecure(); } void loop() { // Reading temperature or humidity takes about 250 milliseconds! // Sensor readings may also be up to 2 seconds 'old' (its a very slow sensor) int h = dht.readHumidity(); // Read temperature as Celsius (the default) float t = dht.readTemperature(); // Check if any reads failed and exit early (to try again). if (isnan(h) || isnan(t)) { Serial.println("Failed to read from DHT sensor !"); delay(500); return; } String Temp = "Temperature : " + String(t) + " °C"; String Humi = "Humidity : " + String(h) + " %"; Serial.println(Temp); Serial.println(Humi); sendData(t, h); //--> Calls the sendData Subroutine } // Subroutine for sending data to Google Sheets void sendData(float tem, int hum) { Serial.println("=========="); Serial.print("connecting to "); Serial.println(host); //----------------------------------------Connect to Google host if (!client.connect(host, httpsPort)) { Serial.println("connection failed"); return; } //---------------------------------------- //----------------------------------------Processing data and sending data String string_temperature = String(tem); // String string_temperature = String(tem, DEC); String string_humidity = String(hum, DEC); String url = "/macros/s/" + GAS_ID + "/exec?temperature=" + string_temperature + "&humidity=" + string_humidity; Serial.print("requesting URL: "); Serial.println(url); client.print(String("GET ") + url + " HTTP/1.1\r\n" + "Host: " + host + "\r\n" + "User-Agent: BuildFailureDetectorESP8266\r\n" + "Connection: close\r\n\r\n"); Serial.println("request sent"); //---------------------------------------- //----------------------------------------Checking whether the data was sent successfully or not while (client.connected()) { String line = client.readStringUntil('\n'); if (line == "\r") { Serial.println("headers received"); break; } } String line = client.readStringUntil('\n'); if (line.startsWith("{\"state\":\"success\"")) { Serial.println("esp8266/Arduino CI successfull!"); } else { Serial.println("esp8266/Arduino CI has failed"); } Serial.print("reply was : "); Serial.println(line); Serial.println("closing connection"); Serial.println("=========="); Serial.println(); //---------------------------------------- } //============================================================================== |
Upload the above. Power up your Nodemcu ESP8266 module, next open your spreadsheet App on your cell phone or computer and you should be able to receive the temperature and humidity values along with the date and time information.

For detailed explanation and practical demonstration watch video given below.
Watch Video Tutorial:
Troubleshooting — Common Problems When Logging Data to Google Sheets
Problem 1: The ESP8266 connects to WiFi but data never appears in the spreadsheet
This is the most common issue people face with this project and it almost always comes down to one of three things — the Google Apps Script is not deployed correctly, the GScript ID in the code is wrong, or the HTTPSRedirect library files are not all in the same folder.
Start with the Script ID. In your Arduino code, the GScriptId variable holds the long string that identifies your Google Apps Script deployment. This string comes from the URL of your deployed Web App — specifically the part between /macros/s/ and /exec. It is very long and easy to accidentally copy with a missing character or extra space. Go back to your Google Apps Script, click Deploy, then Manage Deployments, copy the URL fresh, and extract the ID carefully.
Next, check your deployment access. Open Google Apps Script, go to Manage Deployments, and confirm the access is set to “Anyone, even anonymous.” If it says “Only myself” or any restricted setting, the ESP8266 request will be rejected silently every time.
Finally, open the Serial Monitor at 115200 baud while the project is running and look at the output from HTTPSRedirect. It prints the HTTP response code after every data send attempt. A 200 means the data reached Google successfully. A 302 means a redirect is happening which usually means the script URL has a small error. Anything else means a connection problem — check your WiFi credentials and internet connection.
Problem 2: Data is being received in Google Sheets but the date and time columns show wrong values or are completely empty
The timestamp in this project comes from the Google Apps Script side, not from the ESP8266 itself. The script uses JavaScript’s new Date() function to capture the current time when data arrives. If the timestamps are wrong, the most likely cause is that your Google account’s timezone is not set correctly.
Go to your Google Sheet, click File, then Settings, and check the Timezone setting. Make sure it is set to your correct timezone — for Pakistan this should be Asia/Karachi which is UTC+5. After changing this, new entries will show the correct local time. Existing entries with wrong timestamps cannot be fixed retroactively but all new data will be correct going forward.
If the date and time columns are completely empty, look at your Apps Script code and check whether the date variable is being passed as a parameter in the doGet function. If the ESP8266 is not including the date and time in the URL parameters it sends, the script receives nothing to write in those columns. In that case, add JavaScript timestamp generation directly inside the script so it adds the time automatically regardless of what the ESP8266 sends.
Problem 3: Data logging works for a few hours then suddenly stops — no new rows added after that
When data logging stops on its own after a few hours without any error or reset, there are two very common causes — Google Apps Script execution quota being reached, or the HTTPSRedirect connection going stale.
Google Apps Script on a free Google account has a daily execution quota of 6 minutes of total script runtime. If your ESP8266 is sending data every 5 seconds continuously, and each script execution takes even half a second, you can burn through this quota in a few hours. The fix is to increase the data logging interval in your code. For most monitoring projects, logging once per minute or once every 5 minutes is completely sufficient and keeps you well within Google’s free quota limits.
For the stale connection issue, the HTTPSRedirect library sometimes holds a persistent connection to Google’s servers. Over time this connection can time out on Google’s side while the ESP8266 still thinks it is connected. Add a periodic reconnection in your code — disconnect and reconnect HTTPSRedirect every 20 to 30 data points. This refreshes the connection and prevents stale sessions from causing silent failures.
Problem 4: The code compiles fine but I get an error about HTTPSRedirect or DebugMacros not found
This error means the required helper files for HTTPSRedirect are not where the Arduino IDE can find them.
The HTTPSRedirect library does not work as a standard installed library. It requires the main sketch file, DebugMacros.h, HTTPSRedirect.cpp, and HTTPSRedirect.h to all be together in the same folder as your .ino sketch file. This is different from most libraries that you install once and use anywhere. Open your sketch folder in Windows Explorer or Finder and confirm all four files are there. If any are missing, download the HTTPSRedirect files fresh from GitHub and place them in the same folder as your sketch.
After placing all files together, close and reopen the Arduino IDE completely. The IDE sometimes does not detect newly added files in an already-open sketch. After reopening, all four files should appear as separate tabs in the Arduino IDE editor.
Problem 5: ESP8266 keeps crashing and restarting every few minutes during data logging
A restarting ESP8266 during WiFi operation is almost always a power supply problem or a watchdog timer reset caused by blocking code.
The ESP8266 draws up to 300mA in short bursts when actively transmitting data over WiFi. If your USB cable is thin or low quality, or if you are powering from a laptop USB port that is already supplying other devices, the voltage can dip below 3V during these bursts and trigger a brownout reset. Try a different USB cable — specifically one rated for charging rather than data-only cables which often have thin internal wires. Or use a dedicated 5V phone charger adapter with at least 1A capacity.
For watchdog resets, make sure your data logging code does not block for more than a few seconds at a time. Long blocking delays like delay(30000) prevent the ESP8266’s background WiFi processes from running, which eventually triggers the watchdog timer. Replace all long delays with the millis() based non-blocking approach where you check if enough time has passed since the last log rather than pausing the entire program.
Problem 6: I can log temperature fine but when I add a second sensor the data in Google Sheets gets mixed up in the wrong columns
When you add a second sensor and the column data gets shuffled or mixed up, the issue is in how the URL parameters are being constructed and how the Apps Script is parsing them.
Every column in your Google Sheet corresponds to a named parameter in the URL that the ESP8266 sends. For example, the URL might include ?temp=28.5&humidity=65.2. On the Apps Script side, the doGet function reads e.parameter.temp and e.parameter.humidity and writes them to the correct columns. If you added a second sensor but only updated the ESP8266 code without also updating the Apps Script to handle the new parameter, the new data either goes to the wrong column or gets ignored entirely. Open your Apps Script and add the new parameter name in the same way as the existing ones — both sides must match exactly.
Frequently Asked Questions
Is Google Sheets really free for IoT data logging or are there hidden costs?
Google Sheets is completely free for this kind of project with no hidden charges. The free Google account gives you 15GB of storage shared across Drive, Gmail, and Sheets, which is enormous for text-based sensor data. A row of temperature and humidity data with a timestamp takes maybe 100 bytes. Even logging every minute for a year generates only about 50MB of data — a tiny fraction of your free 15GB. The only limit that matters in practice is the Apps Script execution quota of 6 minutes per day on free accounts, which you can stay well within by not logging too frequently.
Can I log data from multiple ESP8266 boards to the same Google Sheet?
Yes and this is a genuinely useful setup for multi-room or multi-location monitoring. Each ESP8266 sends data to the same Google Apps Script URL but includes a different device ID as an additional URL parameter. The Apps Script reads this device ID and writes the data to a different tab or a different set of columns depending on which device sent it. You could have one tab for the living room sensor, another for the kitchen, and another for outdoors — all from separate ESP8266 boards all logging to one Google Sheet simultaneously.
How long does it take for data to appear in the spreadsheet after the ESP8266 sends it?
Under normal internet conditions, data appears in the spreadsheet almost instantly — usually within 1 to 3 seconds of the ESP8266 sending it. Google Apps Script processes the incoming request and writes to the sheet in real time. There is no meaningful delay for practical purposes. If you notice a consistent delay of 10 seconds or more, it usually means Google’s servers are under heavy load, your internet connection is slow, or the HTTPS handshake is taking longer than usual due to a stale connection.
Can I read data back from Google Sheets and send it to the ESP8266?
Yes — Engr. Shahzada Fahad has covered exactly this in a separate article on this site titled “Send data from Google Spreadsheet to ESP8266 or ESP32.” The approach uses the same HTTPSRedirect library but reads values from the sheet instead of writing to it. This is useful for sending control commands or threshold values to the ESP8266 remotely by simply editing a cell in the Google Sheet from your phone anywhere in the world.
Can I replace DHT11 with any other sensor for logging different data?
Absolutely. DHT11 is used in this tutorial purely as an easy starting point. Once you understand how the Google Sheets logging works, replacing DHT11 with any other sensor is straightforward. Just change the part of the code that reads the sensor and update the variable names and column headers accordingly. The HTTPSRedirect and Google Apps Script parts stay essentially the same. People have used this same approach with soil moisture sensors, water level sensors, gas sensors, pH sensors, power meters, and many other types of sensors on this site.
Does this project still work after Google changed its Apps Script policies?
Google has made several changes to Apps Script deployment and access settings over the years. The most significant change was requiring explicit permission during deployment to allow anonymous access — the option you must select when deploying your Web App. As long as you set “Anyone, even anonymous” during deployment and authorize the script when prompted, the project works correctly. If your script stopped working after a Google update, simply create a new deployment from scratch in Apps Script — older deployments sometimes lose their authorization after major Google account security updates. Creating a fresh deployment with a new URL and updating the GScript ID in your ESP8266 code almost always resolves this.
If you are still having trouble getting data into your spreadsheet after going through all these steps, leave a comment below with the exact HTTP response code you see in your Serial Monitor and I will help you identify exactly what is going wrong.
Discover more from Electronic Clinic
Subscribe to get the latest posts sent to your email.


In the code for google script,there are many misleadingly concatenated words like dofunctionget, varsheet etc. Would be nice if the script worked out of box. Otherwise, great article.
sorry, that was the admin mistake. I reuploaded the code.
Great work Engr… all the best!!
Thank you.
hello there,
how to add moisture and ultrasonic sensor along with this code..
thanks in advance.
do you know how to read data from gg_sheets. thanhs you!
hello. do you know how to read data from google sheets. thanks!
I have done it. Very soon i will publish the article and Video.
I get this error when I tried to run the script
“TypeError: Cannot read property ‘parameter’ of undefined
doGet @ Code.gs:4”
please help
Not able to save Humidity value in column D. How to do that ?
Great tutorial! Thank you for putting it together! I have modified parts of it to send RFID data from an RC522 to google sheets, but I keep getting the “esp8266/Arduino CI has failed” error. Any insight as to what usually causes that?
I am getting same thing. Can you please help me in this
same issue here, i am using a esp32
@Sohail or @Suvam, did you find a solution? @Engr Fahad, any help?
Thanks for the nice and great tutorials.
great article.
I am from INDIA, i have tried this tutorial, working fine.
Thank you
I’m having a problem in the code. Ca you please help me out. I am from India too
I am having a problem that the code is not being able to fetch the headers but it is reding the data sucessfully but data is not going to sheet
Excellent tutorial, I followed each step and received all values, but when i added more variables upto seven, google sheet only displayed five of them, can you please tell me about this problem?
Initially got a “Cache-Control: private, max-age=0” error and then a “esp8266/Arduino CI has failed” error. never uploaded any data
“TypeError: Cannot read property ‘parameter’ of undefined
doGet @ Code.gs:4”
how to solve it ?
hello i am using the Arduino uno and sim800l GSM module to send data on google sheet using the GPRS how to send can anyone help me thank you ?