How to use A02YYUW Waterproof Ultrasonic Sensor with Arduino, ESP32, & ESP8266
Last Updated on May 10, 2026 by Engr. Shahzada Fahad
Table of Contents
A02YYUW Waterproof Ultrasonic Sensor:
A02YYUW Waterproof Ultrasonic Sensor with Arduino, ESP32, & ESP8266- today we are going to use A02YYUW Waterproof Ultrasonic Sensor with Arduino, ESP32 WiFi + Bluetooth Module, and the Nodemcu ESP8266 WiFi module.
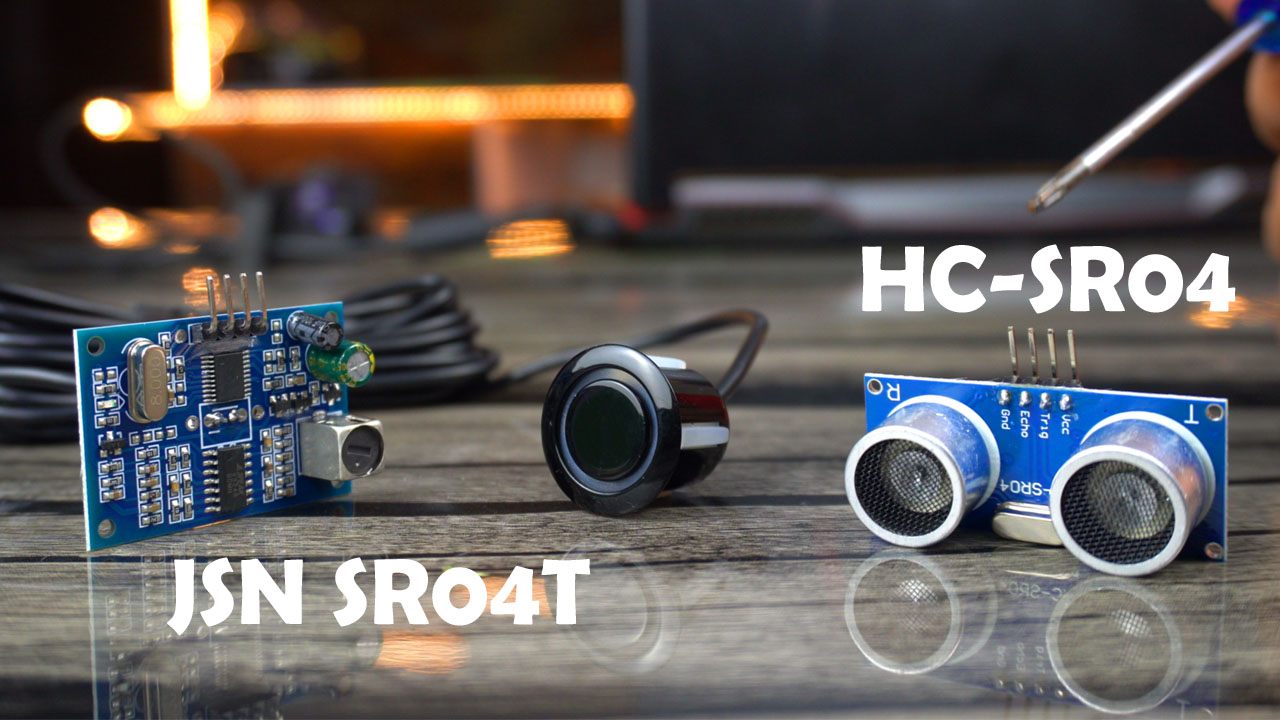
I’ve already written quite detailed articles on the HC-SR04 and JSN SR04T Waterproof Ultrasonic sensors. I have used both of these sensors in projects ranging from beginners to intermediate and advanced levels. So, in this article, I won’t go into much detail about these sensors; I will just do a brief comparison. But if you want to know more about these sensors in detail, you can check out my previous videos and articles.
Anyway, let’s do a side by side comparison of the A02YYUM Waterproof Ultrasonic Sensor with its ultrasonic siblings.
| A02YYUW | HC-SR04 | JSN SR04T |
| Waterproof: Yes
Operating Voltage: 3.3~5V standby Current: ≤5mA Working Current: ≤8mA Blind Zone Distance: 3cm Ranging Distance: 3-450cm Output: UART Response Time: 100ms Frequency: 40kHz Operating Temperature: -15~60℃ Sensing Angle: 60° Protection Rate: IP67 |
Waterproof: No
Operating Voltage: 5V standby Current: ≤2mA Working Current: ≤15mA Blind Zone Distance: 2cm Ranging Distance: 2-400cm Output: TTL Response Time: 20ms Frequency: 40kHz Operating Temperature: -15~70℃ Sensing Angle: 15° Cone Protection Rate: No |
Waterproof: Yes Operating Voltage: 5V standby Current: ≤5mA Working Current: ≤30mA Blind Zone Distance: 25cm Ranging Distance: 25-450cm Output: TTL and UART Response Time: 65ms Frequency: 40kHz Operating Temperature: -10~70℃ Sensing Angle: <50° Protection Rate: only the sensor |
Waterproof Ultrasonic Sensor:
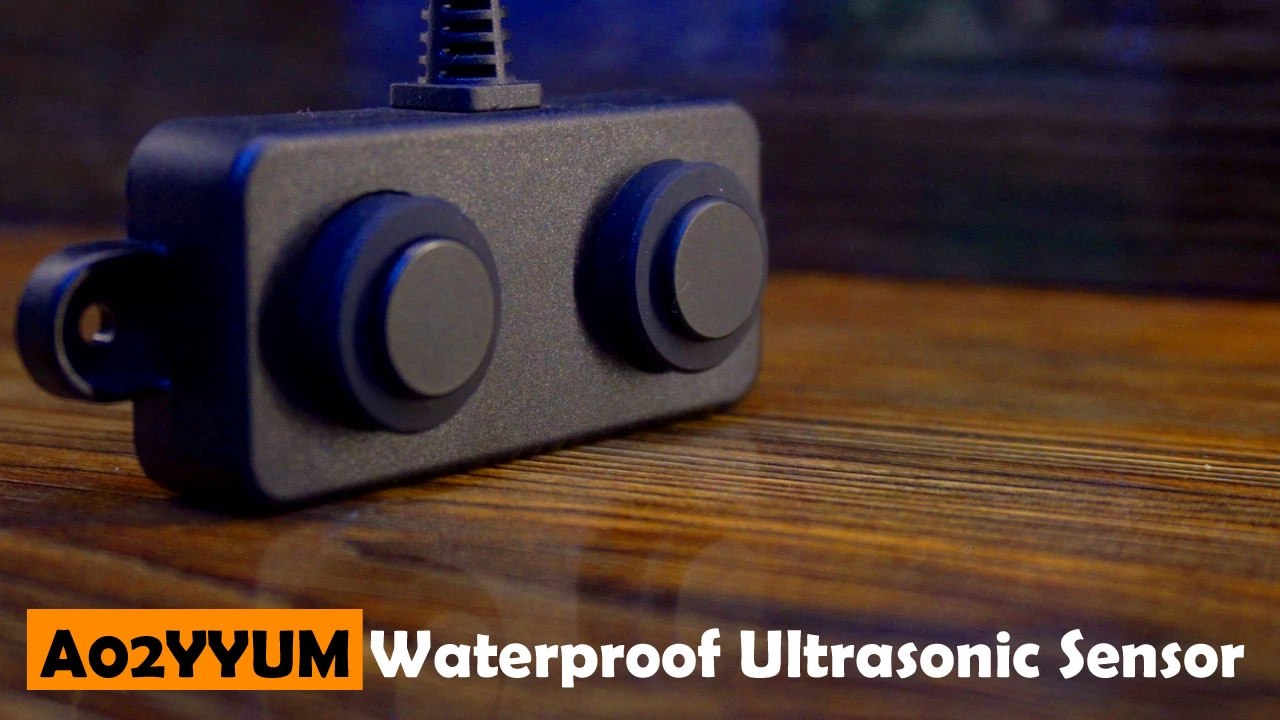
The A02YYUW Ultrasonic Sensor is waterproofed and its protection rate is IP67; the entire sensor is protected against dust and water.
Whereas the HC-SR04 is not designed to be waterproof or weather-resistant. It does not have a specific protection rate against dust or water. It is recommend to use the HC-SR04 ultrasonic sensor in environment where it won’t be exposed to moisture or harsh weather conditions.
While the JSN SR04T is designed to be waterproof and has a protection rate against dust and water. This makes the JSN SR04T suitable for applications where water resistance is necessary, such as outdoor projects or environments where the sensor might be exposed to rain or moisture. It should be noted, only the sensor part is waterproofed and not the interface board. So, make sure you keep the circuit part in a waterproof enclosure.
Operating Voltage:
The Operating voltage of the A02YYUW waterproof Ultrasonic Sensor is from 3.3V to 5V DC. So, its compatible with ESP32, ESP8266, STM32, Raspberry Pi Pico etc which are 3.3V compatible controller boards and also with Arduino, Raspberry Pi etc which are 5V compatible controller boards.
Whereas the HC-SR04 and JSN SR04T ultrasonic sensors are 5V compatible controller boards. You can safely use it with Arduino and Raspberry Pi but if you are planning on using these sensors with 3.3V compatible controller boards then you will have to use voltage converters.
Working Current:
The working current of A02YYUW Waterproof Ultrasonic sensor is 8mA.
The working current of HC-SR04 Ultrasonic sensor is 15mA. And
The Working current of JSN SR04T Waterproof Ultrasonic Sensor is 30mA.
The exact working current of the Ultrasonic Sensor can vary slightly based on factors like operating conditions and specifications of the particular model.
Blind Zone Distance:
The Blind Zone Distance of the A02YYUW Waterproof Ultrasonic sensor is 3cm; it means that the sensor may not reliably detect objects that are closer than 3cm. The blind zone distance of an ultrasonic sensor refers to the minimum distance within which the sensor is unable to provide accurate distance measurements.
The Blind zone distance of the HC-SR04 is 2cm. Whereas the Blind zone distance of the JSN SR04T is 25cm.
A02YYUW falls in between HC-SR04 and JSN SR04T in terms of blind zone distance. It offers a compromise between close-range precision and longer-range performance.
Ranging Distance:
The A02YYUW Waterproof Ultrasonic sensor has a ranging distance of 3-450cm.
The HC-SR04 Ultrasonic Sensor has a ranging distance of 2-400cm. And
The JSN SR04T Waterproof Ultrasonic Sensor has a ranging distance of 25-450cm.
Output:
The output of the A02YYUW Waterproof Ultrasonic sensor is UART.
The output of the HC-SR04 is TTL. And
The output of the JSN SR04T is TTL and UART.
Response Time:
Response time of the A02YYUW is 100ms.
Response time of the HC-SR04 is 20ms. And
Response time of the JSN SR04T is 65ms.
The exact response time may vary slightly depending on factors such as the specific model, environmental conditions, and the microcontroller or system it is connected to.
Frequency:
All the three Ultrasonic sensors are 40kHz.
Operating Temperature:
The operating temperature of the A02YYUW is between -15~60℃.
The Operating temperature of the HC-SR04 Ultrasonic Sensor is between -15~70℃. And
The operating temperature of the JSN SR04T Ultrasonic Sensor is between -10~70℃.
Keep in mind that these are general specifications, and the actual performance in extreme temperatures may vary. If you have specific temperature requirements for your application, it’s advisable to refer to the datasheet or technical specifications provided by the manufacturer for the precise details related to the model you are using.
Sensing Angle:
The sensing angle of A02YYUM Waterproof Ultrasonic sensor is 60°.
The Sensing angle of the HC-SR04 Ultrasonic Sensor is 15° Cone shaped. And
The Sensing angle of the JSN SR04T Waterproof Ultrasonic sensor is less then 50°.
The sensing angle is a crucial factor to consider when positioning the sensor in a project, as it determines the coverage area and influences the sensor’s effectiveness in detecting objects within its field of view. A wider sensing angle might be beneficial in applications where a larger detection area is required.
After this detailed comparison, now you have an idea that the A02YYUW Waterproof Ultrasonic Sensor is better in every aspect, especially its voltage range, maximum distance range, sensing angle, accuracy, and protection rating.
Now, we are going to use this Ultrasonic Sensor with Arduino, Nodemcu ESP8266 WiFi module, and ESP32 WiFi + Bluetooth Module. So, without any further delay, let’s get started!!!
Amazon Links:
Arduino Nano USB-C Type (Recommended)
A02YYUW Waterproof Ultrasonic sensor
ESP32 WiFi + Bluetooth Module (Recommended)
*Disclosure: These are affiliate links. As an Amazon Associate I earn from qualifying purchases.
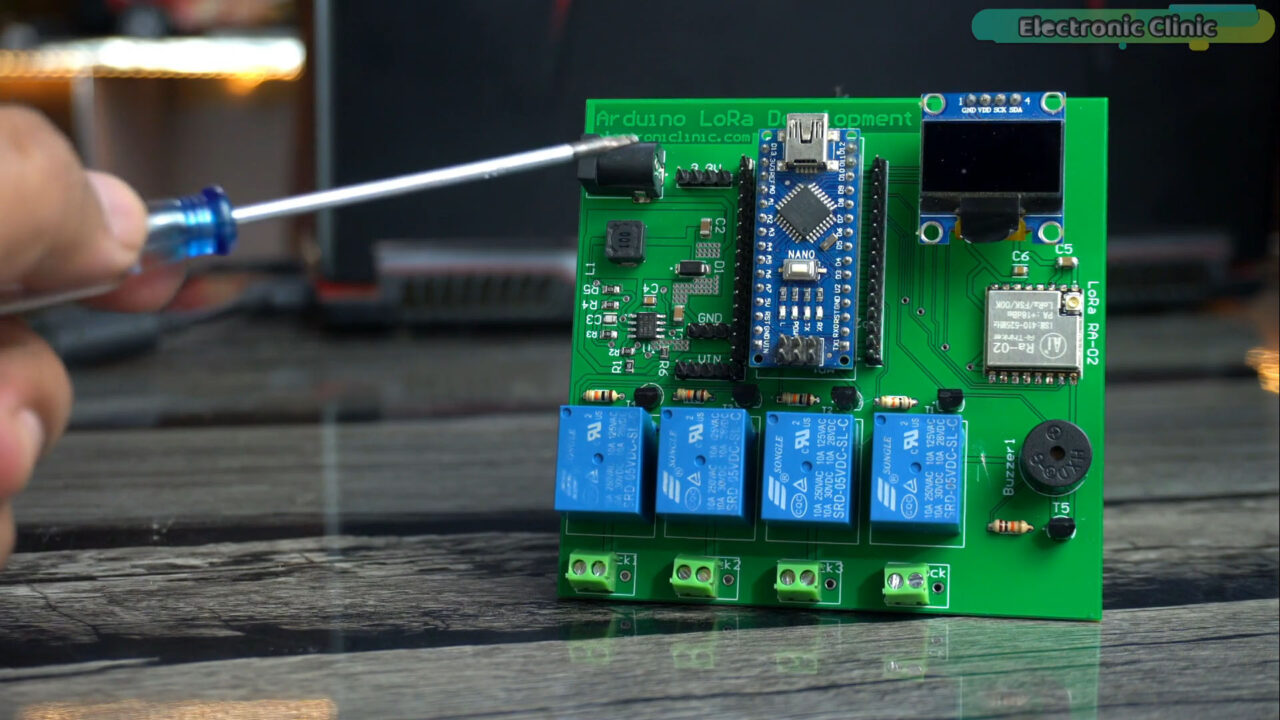
As usual, I am using my designed Arduino Nano development board, but you can also use Arduino Uno.
Required Libraries:
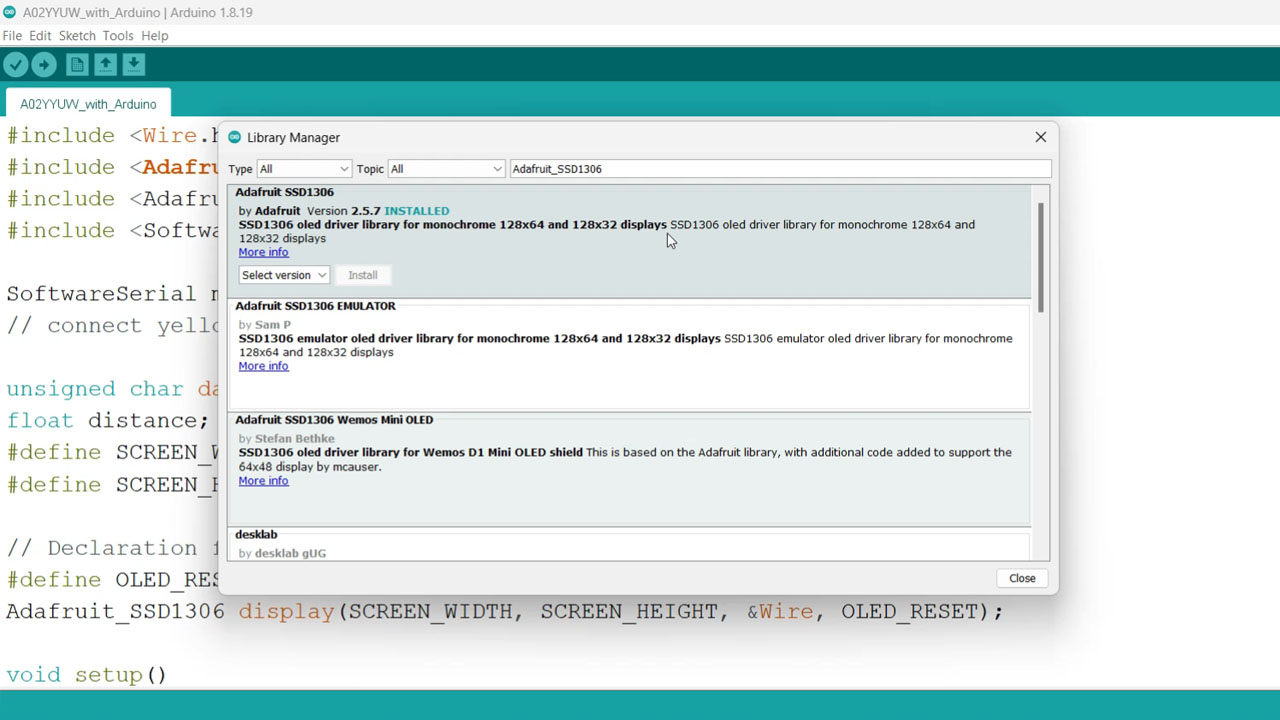
Before, you start the programming; first of all, make sure you install these libraries.
Adafruit_SSD1306
Adafruit_GFX
Simply, copy the library name, then go to the Sketch Menu, then to Include Library, and Click on the manage libraries.
Paste the library name in the search box and install the library. As you can see I have already installed this library.

Now, follow the same exact steps for the other library.
A02YYUW Waterproof Ultrasonic Sensor with Arduino:
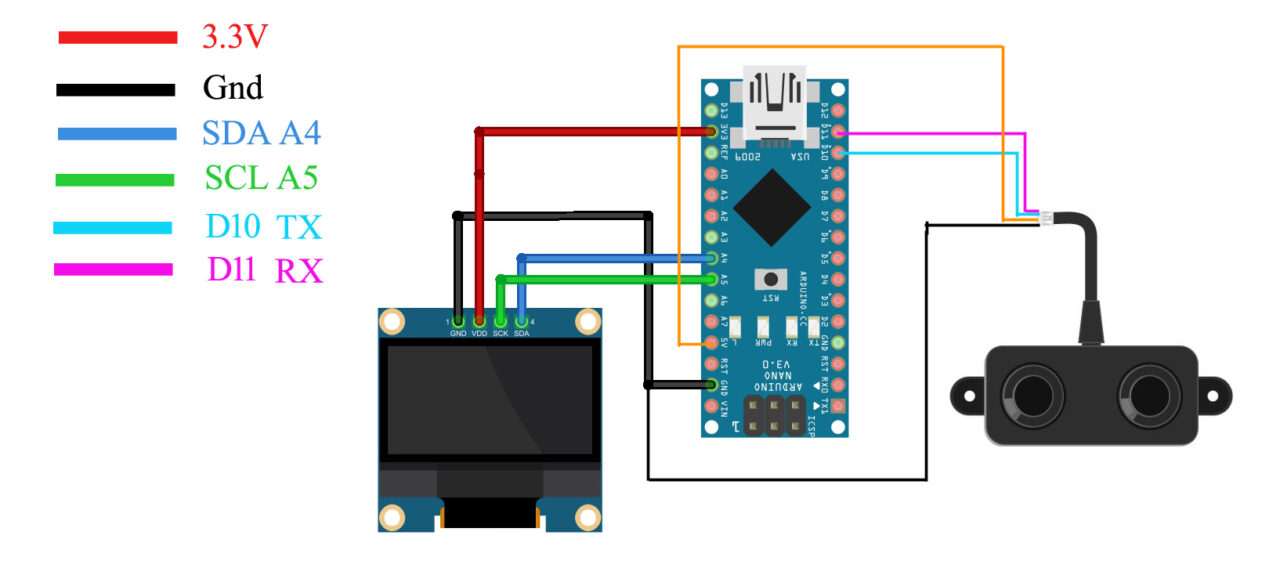
Connect the VCC and GND wires of the A02YYUW Waterproof Ultrasonic Sensor to the Arduino 5V and GND pins. Connect the Tx and Rx pins of the Ultrasonic Sensor to the Arduino D10 and D11 pins.
Connect the VCC and GND pins of the SSD1306 Oled display module to the Arduino 3.3V and GND pins. Connect the SDA and SCL pins of the Oled display module to the Arduino A4 and A5 pins. A4 is the SDA and A5 is the SCL. And now let’s go ahead and take at the programming.
A02YYUW Waterproof Ultrasonic Sensor with Arduino Programming:
|
1 2 3 4 5 6 7 8 9 10 11 12 13 14 15 16 17 18 19 20 21 22 23 24 25 26 27 28 29 30 31 32 33 34 35 36 37 38 39 40 41 42 43 44 45 46 47 48 49 50 51 52 53 54 55 56 57 58 59 60 61 |
#include <Wire.h> #include <Adafruit_GFX.h> #include <Adafruit_SSD1306.h> #include <SoftwareSerial.h> SoftwareSerial mySerial(11,10); // RX, TX // connect yellow wire to D10 and White wire to D11 unsigned char data[4]={}; float distance; #define SCREEN_WIDTH 128 // OLED display width, in pixels #define SCREEN_HEIGHT 64 // OLED display height, in pixels // Declaration for an SSD1306 display connected to I2C (SDA, SCL pins) #define OLED_RESET -1 // Reset pin # (or -1 if sharing Arduino reset pin) Adafruit_SSD1306 display(SCREEN_WIDTH, SCREEN_HEIGHT, &Wire, OLED_RESET); void setup() { Serial.begin(115200); mySerial.begin(9600); display.begin(SSD1306_SWITCHCAPVCC, 0x3C); delay(2000); display.clearDisplay(); display.setTextColor(WHITE); delay(1000); } void loop() { do{ for(int i=0;i<4;i++) { data[i]=mySerial.read(); } }while(mySerial.read()==0xff); mySerial.flush(); if(data[0]==0xff) { int sum; sum=(data[0]+data[1]+data[2])&0x00FF; if(sum==data[3]) { distance=(data[1]<<8)+data[2]; distance=distance / 10; Serial.println(distance); display.clearDisplay(); display.setCursor(10,0); display.setTextSize(2); display.setTextColor(WHITE); display.print("Distance"); display.setCursor(10,30); display.setTextSize(2); display.print(String(distance)+" cm"); display.display(); } } delay(100); } |
The advantage of using softwareSerial library is that I can define multiple serial ports, this way, I can use the Arduino default serial port of the debugging purposes. So, you can see, I have defined another serial port with the name mySerial. So, through this serial port I am going to communicate with the Ultrasonic Sensor.
This code is needed for the SSD1306 Oled display module, I have already explained it in my Arduino full course video. Anyway, the code is pretty straightforward, we simply read the A02YYUW waterproof ultrasonic sensor and then print the value on the Oled display module.
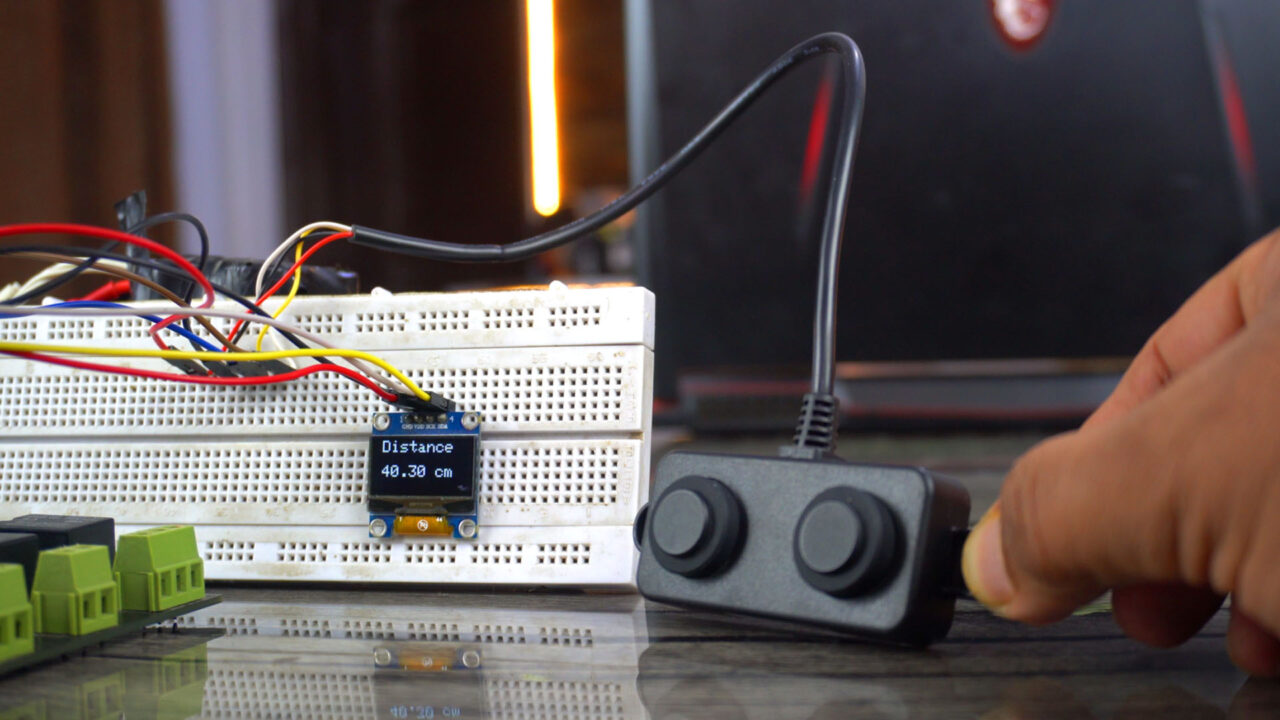
I have already uploaded this program and now let’s watch the Arduino and A02YYUW Waterproof Ultrasonic Sensor in Action.
Practical Demonstration:
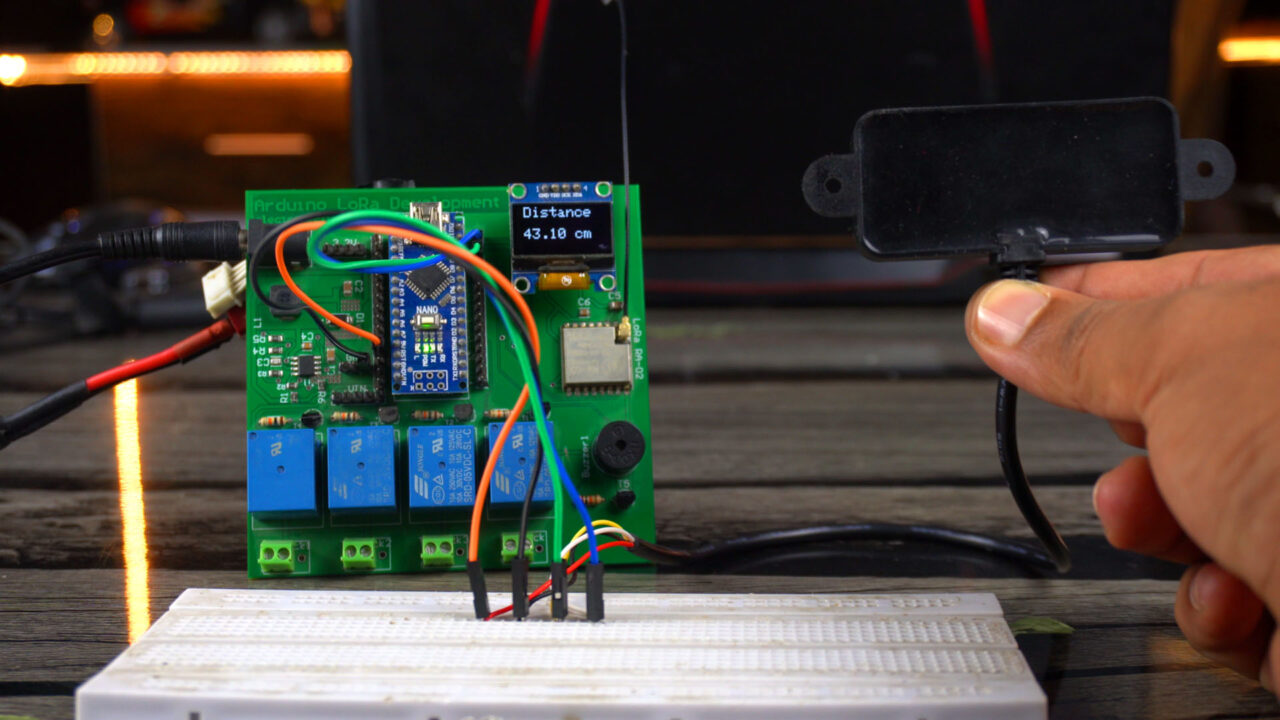
We just built a simple yet highly accurate distance meter. You can modify this project and covert it into a security system by adding some if conditions; so when an object or a human or anything else is detected by this sensor a buzzer will be turned ON. Or you can use this as an obstacle detector in a robot and this way you can control the motors. You can also use this as a water level sensor. There are countless ways you can use this sensor. It totally depends on your idea, how you decide to use it.
Next, we are going to use this Waterproof Ultrasonic Sensor with the Nodemcu ESP8266 WiFi Module.
A02YYUW Waterproof Ultrasonic Sensor with ESP8266:
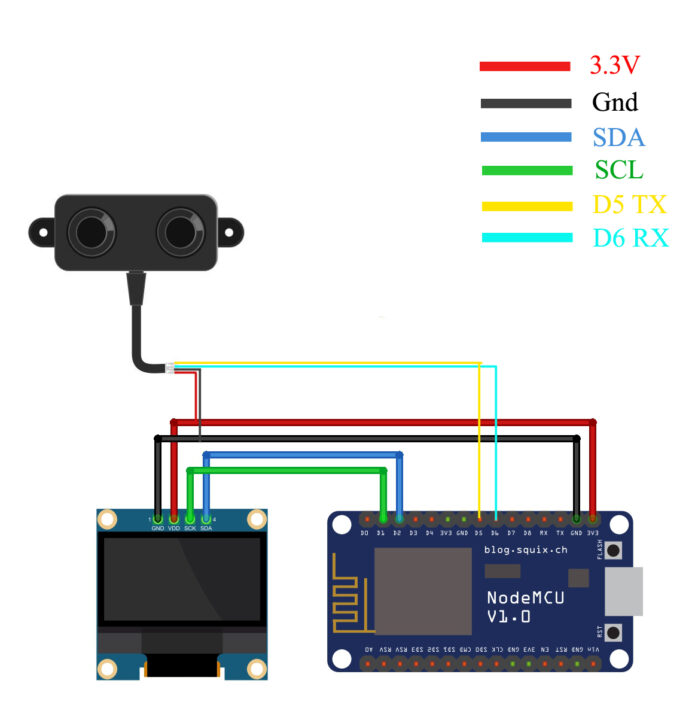
Connect the VCC and GND wires of the A02YYUW Waterproof Ultrasonic Sensor to the Nodemcu ESP8266 WiFi Module 3.3V and GND pins. Connect the Tx and Rx pins of the Ultrasonic Sensor to the ESP8266 D5 and D6 pins.
Connect the VCC and GND pins of the SSD1306 Oled display module to the Nodemcu ESP8266 WiFi Module 3.3V and GND pins. Connect the SDA and SCL pins of the Oled display module to the Nodemcu D2 and D1 pins. And now let’s go ahead and take at the programming.
A02YYUW Waterproof Ultrasonic Sensor with ESP8266 Programming:
|
1 2 3 4 5 6 7 8 9 10 11 12 13 14 15 16 17 18 19 20 21 22 23 24 25 26 27 28 29 30 31 32 33 34 35 36 37 38 39 40 41 42 43 44 45 46 47 48 49 50 51 52 53 54 55 56 57 58 59 60 61 |
#include <Wire.h> #include <Adafruit_GFX.h> #include <Adafruit_SSD1306.h> #include <SoftwareSerial.h> SoftwareSerial mySerial(D6,D5); // RX, TX // connect yellow wire to D5 and White wire to D6 unsigned char data[4]={}; float distance; #define SCREEN_WIDTH 128 // OLED display width, in pixels #define SCREEN_HEIGHT 64 // OLED display height, in pixels // Declaration for an SSD1306 display connected to I2C (SDA, SCL pins) #define OLED_RESET -1 // Reset pin # (or -1 if sharing Arduino reset pin) Adafruit_SSD1306 display(SCREEN_WIDTH, SCREEN_HEIGHT, &Wire, OLED_RESET); void setup() { Serial.begin(115200); mySerial.begin(9600); display.begin(SSD1306_SWITCHCAPVCC, 0x3C); delay(2000); display.clearDisplay(); display.setTextColor(WHITE); delay(1000); } void loop() { do{ for(int i=0;i<4;i++) { data[i]=mySerial.read(); } }while(mySerial.read()==0xff); mySerial.flush(); if(data[0]==0xff) { int sum; sum=(data[0]+data[1]+data[2])&0x00FF; if(sum==data[3]) { distance=(data[1]<<8)+data[2]; distance=distance / 10; Serial.println(distance); display.clearDisplay(); display.setCursor(10,0); display.setTextSize(2); display.setTextColor(WHITE); display.print("Distance"); display.setCursor(10,30); display.setTextSize(2); display.print(String(distance)+" cm"); display.display(); } } delay(100); } |
This is the same exact program, this time I only changed the pins my ultrasonic sensor is connected to. While everything else remains exactly the same. And one more thing that I would like to talk about is, if this is your first time using the nodemcu ESP8266 WiFi module then you will need to install the ESP8266 Board in the Arduino IDE and for this you can read my getting started article on the Nodemcu ESP8266 WiFi module. In this article, I have explained how to add the board manager url link in the Arduino IDE and how to install different variants of the ESP8266.
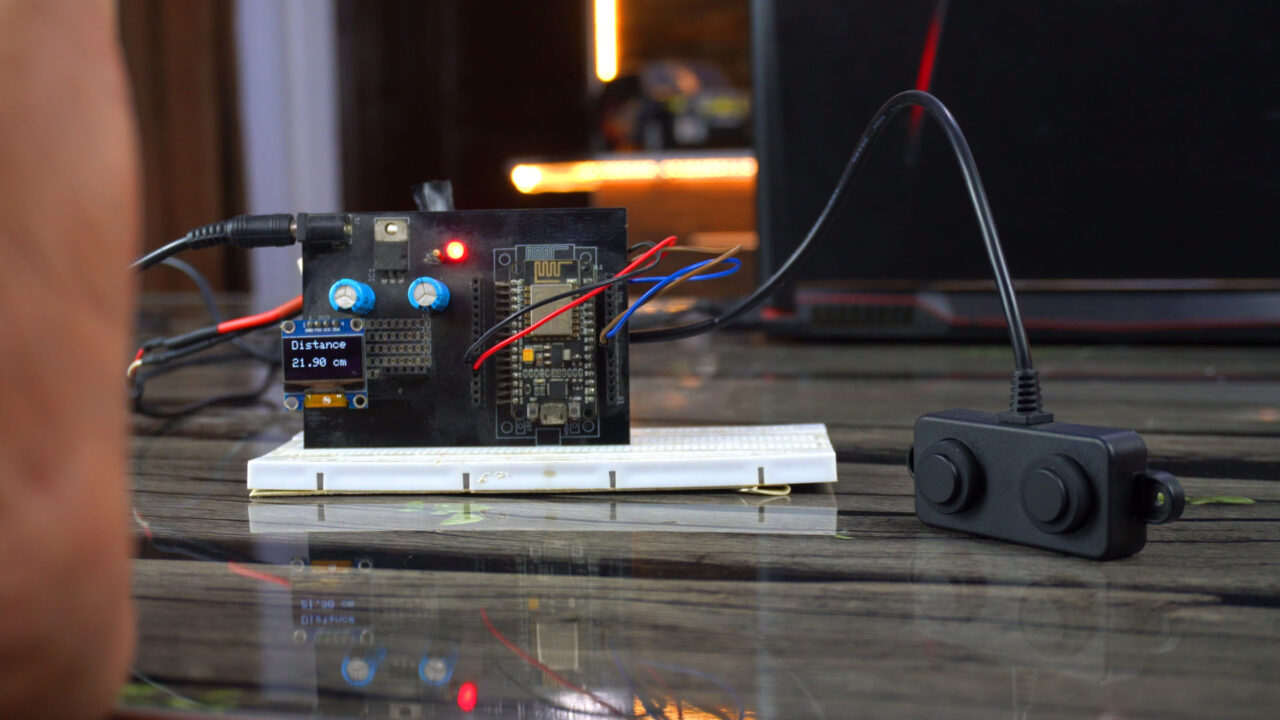
Anyway, I have already uploaded this program, and now let’s watch the A02YYUW waterproof ultrasonic sensor and Nodemcu ESP8266 WiFi module in action.
Next time, I will use this with Blynk application, so consider subscribing if you don’t want to miss any of my upcoming videos and articles.
Next, we are going to use this Ultrasonic Sensor with the ESP32 WiFi + Bluetooth module.
A02YYUW Waterproof Ultrasonic Sensor with ESP32:
Next, we are going to use the A02YYUW Waterproof Ultrasonic Sensor with the ESP32 WiFi + Bluetooth and the SSD1306 Oled display module. I have also used the A02YYUW Ultrasonic Sensor with the ESP32 and LoRa for monitoring the Water Level over a long distance.
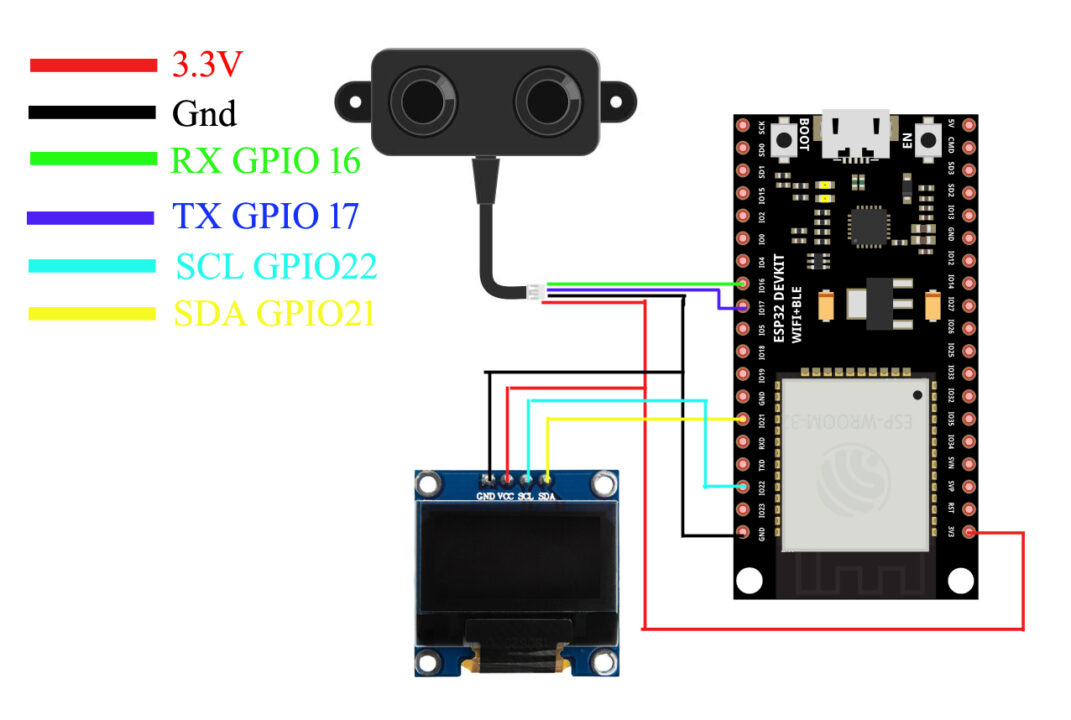
Connect the VCC and GND wires of the A02YYUW Waterproof Ultrasonic Sensor to the ESP32 3.3V and GND pins. Connect the Tx and Rx pins of the Ultrasonic Sensor to the ESP32 GPIO16 and GPIO17.
Connect the VCC and GND pins of the SSD1306 Oled display module to the ESP32 3.3V and GND pins. Connect the SDA and SCL pins of the Oled display module to the ESP32 GPIO pins 21 and 22. And now let’s go ahead and take a look at the programming.
A02YYUW Waterproof Ultrasonic Sensor with ESP32 Programming:
|
1 2 3 4 5 6 7 8 9 10 11 12 13 14 15 16 17 18 19 20 21 22 23 24 25 26 27 28 29 30 31 32 33 34 35 36 37 38 39 40 41 42 43 44 45 46 47 48 49 50 51 52 53 54 55 56 57 58 59 60 61 62 63 |
#include <Wire.h> #include <Adafruit_GFX.h> #include <Adafruit_SSD1306.h> #include <HardwareSerial.h> HardwareSerial Ultrasonic_Sensor(2); // TX2 (pin 17), RX2 (pin 16) unsigned char data[4] = {}; float distance; #define SCREEN_WIDTH 128 // OLED display width, in pixels #define SCREEN_HEIGHT 64 // OLED display height, in pixels // Declaration for an SSD1306 display connected to I2C (SDA, SCL pins) #define OLED_RESET -1 // Reset pin # (or -1 if sharing Arduino reset pin) Adafruit_SSD1306 display(SCREEN_WIDTH, SCREEN_HEIGHT, &Wire, OLED_RESET); void setup() { Serial.begin(115200); // Initialize the serial monitor Ultrasonic_Sensor.begin(9600); // Initialize the hardware serial display.begin(SSD1306_SWITCHCAPVCC, 0x3C); delay(2000); display.clearDisplay(); display.setTextColor(WHITE); delay(1000); } void loop() { do { for (int i = 0; i < 4; i++) { data[i] = Ultrasonic_Sensor.read(); } } while (Ultrasonic_Sensor.read() == 0xff); Ultrasonic_Sensor.flush(); if (data[0] == 0xff) { int sum; sum = (data[0] + data[1] + data[2]) & 0x00FF; if (sum == data[3]) { distance = (data[1] << 8) + data[2]; Serial.print("distance="); distance=distance / 10; Serial.println(distance); display.clearDisplay(); display.setCursor(10,0); display.setTextSize(2); display.setTextColor(WHITE); display.print("Distance"); display.setCursor(10,30); display.setTextSize(2); display.print(String(distance)+" cm"); display.display(); } } delay(100); } |
Again I am using the same exact libraries and code, but this time instead of using the softwareSerial library, I am using the HardwareSerial library. As ESP32 has got multiple serial ports. So, you can see, my waterproof ultrasonic sensor is connected to the Serial Port 2, and everything else remains exactly the same.
And let me also tell you, if this is your first time using the ESP32 WiFi + Bluetooth module then first of all, you will need to install the ESP32 board in the Arduino IDE and for this you can read my getting started article on the ESP32 WiFi + Bluetooth module.
Anyway, I have already, uploaded this program and now let’s watch the A02YYUW Waterproof Ultrasonic Sensor and ESP32 WiFi + Bluetooth module in action.
Watch Video Tutorial:
Troubleshooting — When the A02YYUW Is Not Behaving the Way You Expect
Problem 1: The sensor is connected and powered but gives zero output or no readings at all
This is the first problem almost everyone runs into, and it almost always comes down to one of two things — either the UART wires are swapped, or the wrong code is being used for the version of the sensor you have.
Here is what I want you to check first. The A02YYUW comes in two versions — UART and PWM. They look completely identical from the outside. The wires are the same color. Even the packaging looks the same. But they use completely different communication methods and completely different code. If you loaded UART code onto a PWM sensor or the other way around, you will get nothing. Go back to where you bought it and confirm which version you ordered.
If you are sure about the version, then check the TX and RX connections. People swap these all the time. The TX pin of the sensor must go to the RX pin of your Arduino or ESP32 — and the RX pin of the sensor goes to the TX of your board. Not TX to TX. Cross them over. If you currently have them straight, swap them and try again.
Problem 2: Getting readings but the values are completely wrong — way too high or jumping around randomly
Wrong readings with this sensor usually come from one of three sources — electrical noise, an obstacle that is too close, or a surface that is not reflecting sound properly.
The A02YYUW has a minimum detection range of about 25 centimeters. If you place your hand or an object closer than that, the sensor cannot resolve the reflection properly and will output garbage values. Always keep your target at least 25cm away during testing.
For jumping or noisy readings, the fix that works almost every time is to take multiple readings and average them. Instead of using a single reading, take 5 readings in a row, throw out the highest and lowest, and average the remaining three. This alone cleans up most noise issues dramatically. Also make sure the sensor cable is not running alongside a power wire or motor cable — interference from those will absolutely corrupt the signal.
Problem 3: Sensor works fine with Arduino but gives no output when connected to ESP32 or ESP8266
This catches a lot of people off guard. The reason is almost always a logic level issue combined with a UART conflict.
The ESP32 and ESP8266 operate on 3.3V logic, and the good news is the A02YYUW is compatible with 3.3V — so that part is fine. The problem is usually that you are using the hardware Serial pins (GPIO1 and GPIO3 on ESP8266, or the default Serial on ESP32) which are shared with the USB programmer. When your code is running, any Serial.print() statement you have for debugging is fighting with the sensor data on the same pins.
The solution is to use SoftwareSerial on a different pair of GPIO pins for the sensor. On ESP8266, use something like GPIO12 and GPIO14. On ESP32, you can use Serial2 which is mapped to GPIO16 (RX2) and GPIO17 (TX2) by default — these are completely separate from the programming port and work perfectly with this sensor.
Problem 4: Readings are stable indoors but go completely unreliable outdoors
If you take this sensor outside and suddenly the readings become erratic, the environment is working against you in a couple of ways.
Wind is the biggest enemy of ultrasonic sensors outdoors. Even a light breeze changes the path of the sound wave slightly, causing reflections to arrive at unexpected times. Mount the sensor in a position where it is shielded from direct wind exposure — inside a pipe or behind a baffle works well.
Temperature also affects the speed of sound, which the sensor uses to calculate distance. On a cold morning versus a hot afternoon, readings can shift by a centimeter or two over longer distances. For most practical projects this is not a problem, but if you need high accuracy over distances greater than 2 meters outdoors, factor in a temperature correction in your code.
Direct sunlight on the sensor face can also cause problems over time. The A02YYUW is IP67 rated so it handles water fine, but intense heat can affect the piezo element. Mount it in shade where possible.
Problem 5: The sensor reading freezes at one value and never updates
When readings freeze completely and stop updating, the serial communication between the sensor and your board has gotten stuck. This usually happens when the buffer fills up with incomplete data packets and the code is waiting for a byte that never arrives.
The fix is to add a flush and timeout to your serial reading code. Before reading, clear the buffer with Serial.flush() or by reading and discarding all available bytes. Also add a timeout — if no valid packet is received within 100 milliseconds, skip that reading and try again on the next loop cycle. This prevents the code from hanging indefinitely waiting for a complete packet.
Another cause is a power supply that dips below 3.3V under load. If your breadboard power supply or voltage regulator is weak, the sensor may partially crash and freeze its output. Test with a different power source to rule this out.
Problem 6: The waterproof cable is too short for my installation
This is a practical problem a lot of people face when installing the sensor at the top of a water tank or pipe. The stock cable on the A02YYUW is typically around 50 to 70cm long which is fine for a bench test but rarely enough for a real installation.
You can extend the cable but you need to do it carefully. Use shielded cable for the TX and RX signal wires — regular dupont wire acts like an antenna over longer runs and picks up all kinds of noise. Keep extension lengths below 3 meters for reliable UART communication. Twist the TX and RX wires together along their length to reduce interference. Solder the joints and cover them with heat shrink tubing rather than using breadboard connectors which can corrode outdoors over time.
Frequently Asked Questions
What is the real-world maximum range I can expect from this sensor?
The datasheet says 4.5 meters and in clean, controlled conditions with a flat perpendicular surface that is accurate. In real-world installations — water tanks, bins, walls — you will typically get reliable readings up to about 3.5 to 4 meters. Beyond that, the reflected signal gets weak and readings become inconsistent. For water level monitoring in a standard household tank, 4 meters is more than enough. If you need longer range, the TOF10120 laser sensor works well up to 6 meters but only in clean, dry environments.
What is the difference between the UART and PWM versions of this sensor?
Both sensors measure the same distances and have the same IP67 waterproof rating. The difference is only in how they communicate results. The UART version sends distance data as a serial data packet — three bytes in a specific format — which your Arduino or ESP32 reads and interprets. The PWM version outputs a pulse whose width represents the measured distance, similar to how a servo receives its position signal. The UART version is generally more reliable over longer cable runs and is less susceptible to electrical noise. That is why Engr. Shahzada Fahad uses and recommends the UART version in all his projects. If you are buying one for the first time, get the UART version.
Can I use this sensor to measure liquid level inside a tank?
Yes — and this is actually one of its most popular uses on this site. Mount the sensor at the top of the tank facing downward. The distance it measures is from the sensor face to the water surface. Subtract that from the total tank height to get the water level. The IP67 rating means splashes and high humidity inside the tank will not damage the sensor. Just make sure the sensor face is not submerged — this sensor is designed to work above the liquid surface, not inside it. For true underwater measurement you need a different type of sensor entirely.
Is it safe to connect this sensor directly to a 5V Arduino without any converter?
Yes, completely safe. The A02YYUW operates from 3.3V to 5V which means it works directly with both 5V Arduino boards and 3.3V ESP32 and ESP8266 boards without needing any logic level converter. This wide voltage range is one of the reasons it is superior to the older HC-SR04 and JSN-SR04T sensors which are 5V only. Just make sure you connect VCC to the correct voltage for your board — 5V for Arduino, 3.3V for ESP32 and ESP8266.
Why does this sensor work better than HC-SR04 for my project?
A few reasons. First, the HC-SR04 is not waterproof at all — one splash and it is done. The A02YYUW is IP67 rated and can handle rain, splashes, condensation and dusty environments without any problem. Second, the HC-SR04 needs two GPIO pins for trigger and echo and has more code complexity around timing those pulses. The A02YYUW uses UART which is cleaner and more reliable. Third, the sensing angle of the A02YYUW is narrower — around 45 to 75 degrees — which reduces false reflections from nearby walls when measuring inside a tank or pipe. For indoor hobby experiments the HC-SR04 is fine. For anything that needs to work reliably outdoors or in a wet environment, the A02YYUW is the better choice every single time.
My sensor worked for weeks and then suddenly stopped giving correct readings. What happened?
A few things can cause this after extended use. First, check the sensor face for dirt, dust or mineral deposits — hard water can leave calcium buildup on the piezo element which dampens the ultrasonic pulse. Gently wipe the sensor face with a damp cloth. Do not use solvents. Second, check your wiring connections especially if the sensor is installed outdoors. Corrosion on dupont connector pins is surprisingly common after a few weeks of outdoor exposure. Third, check whether anything changed in the installation — a new object placed inside the detection cone, a change in tank shape or mounting angle. Sometimes the environment changes and the sensor is measuring the right thing, just not what you expect.
If you are stuck on a specific problem with this sensor that I have not covered here, describe your setup and wiring in the comments below and I will personally help you figure it out.
Discover more from Electronic Clinic
Subscribe to get the latest posts sent to your email.


Iam trying to program this sensor with my esp32 with no luck i do not the liquid crystal display but would like to see the results on my serial output from my computer could you help me