Decoder, 3 to 8 Decoder Block Diagram, Truth Table, and Logic Diagram
Table of Contents
Description:
Decoder- In this tutorial, you learn about the Decoder which is one of the most important topics in digital electronics. In this article we will talk about the Decoder itself, we will have a look at the 3 to 8 decoder, 3 to 8 line decoder designing steps, a technique to simplify the Boolean function, and in the end, we will draw a logic diagram of the 3 to 8 decoder.
A digital decoder converts a set of digital signals into corresponding decimal code. A decoder is also the most commonly used circuit prior to the use of an encoder. The encoded data is decoded for the user interface in most of the output devices like monitors, calculator displays, printers, etc.
Difference Between Encoder and Decoder. On the contrary, a decoder accepts binary code as its input. An encoder is a device that converts the active data signal into a coded message format. However, a decoder performs the inverse operation of the encoder and thus converts the coded input into original data input.
Without any further delay let’s get started!!!
Amazon Purchase Links.
Other Tools and Components:
Super Starter kit for Beginners
PCB small portable drill machines
*Please Note: These are affiliate links. I may make a commission if you buy the components through these links. I would appreciate your support in this way!
Decoder:
A device used for the conversion of binary into decimal. It is a combinational logic circuit that receives the n input lines and generates a maximum of 2n unique output lines. The output might be less than 2n lines. This condition will occur when we are not using it up to its maximum capacity.
There are several types of binary decoders, but in all cases, a decoder is an electronic circuit with multiple inputs and multiple output signals, which converts every unique combination of input states to a specific combination of output states. In addition to integer data inputs, some decoders also have one or more “enable” inputs. When the enable input is negated (disabled), all decoder outputs are forced to their inactive states.
Depending on its function, a binary decoder will convert binary information from n input signals to as many as 2n unique output signals. Some decoders have less than 2n output lines; in such cases, at least one output pattern may be repeated for different input values.
Why do we need a Decoder?
A decoder is a circuit that changes a code into a set of signals. It is called a decoder because it does the reverse of encoding, but we will begin our study of encoders and decoders with decoders because they are simpler to design.
One of the most frequently asked questions, what is the main difference between demultiplexer and decoder is that a demultiplexer is a combinational circuit that accepts only one input and directs it into one of the several outputs. On the contrary, the decoder is a combinational circuit that can accept many inputs and generate the decoded output.
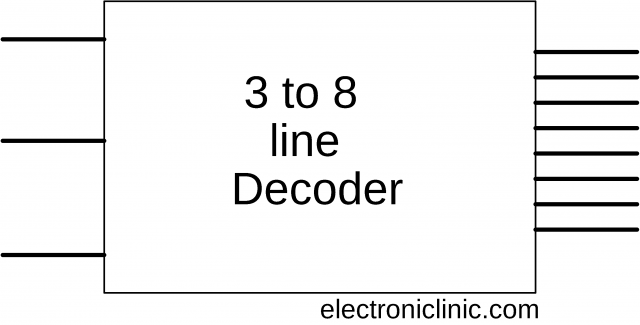
The Block diagram of 3 to 8 Decoder:
3 to 8 Decoder designing steps
- Problem: 3 to 8 line decoder.
- The number of available inputs are 3 and outputs are 8.
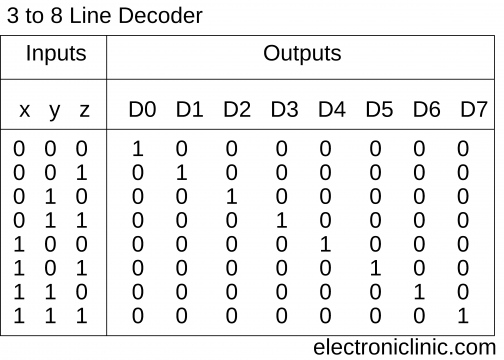
- Let us represent the inputs and outputs by symbol letters. Let us represent the inputs by x, y, and z; and the outputs by D0, D1, D2, … D7.
- 3 to 8 Decoder Truth Table:
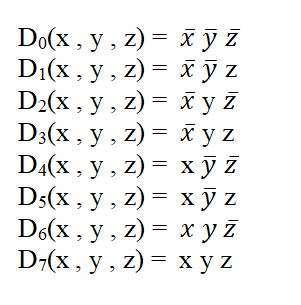
Now functions.
- Simplified Boolean function.
The above function cannot be further simplified, I tried using the Karnaugh Map.
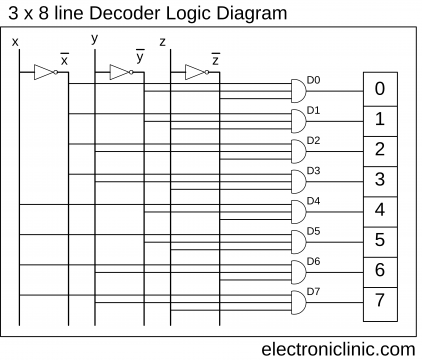
- 3 to 8 Decoder Logic Diagram
The logical diagram of the 3×8 line decoder is given below.
3 to 8 line Decoder has a memory of 8 stages. It is convenient to use an AND gate as the basic decoding element for the output because it produces a “HIGH” or logic “1” output only when all of its inputs are logic “1”. You can clearly see the logic diagram is developed using the AND gates and the NOT gates. The Inputs are represented by x, y, and z while the compliments are represented with the bars over the letters. The AND gates are represented by D0, D1, D2, D3, D4, D5, D6, and D7. The corresponding inputs are connected with the AND gates as per the boolean functions given above.
I hope you have learned a lot from this article. Read my other articles on Logic gates, Karnaugh Map, Half Adder and Full Adder, Subtractor, Codes in digital electronics, etc. Don’t forget to subscribe to my website and YouTube channel “Electronic Clinic”. If you have any question regarding this article or any other project based on Arduino uno, Arduino Nano, Nodemcu ESP8266, ESP32, Image Processing, Robotics, Wireless communication, Radio Frequency, Blynk application designing, IoT projects, PLC and SCADA, etc. then let me know in a comment.
