Android app development to control Arduino over Bluetooth using Android Studio
Last Updated on May 11, 2026 by Engr. Shahzada Fahad
Table of Contents
Android App Development:
Android app development– So far I have been using Android applications to control Arduino over Bluetooth. I will share the links of all the projects in which I have used the android applications. Due to a lot of requests from my subscribers and followers on my YouTube channel “Electronic Clinic” to explain how to create your own android application. Finally, I decided to share with you the knowledge, how to develop your own Android app to control Arduino.
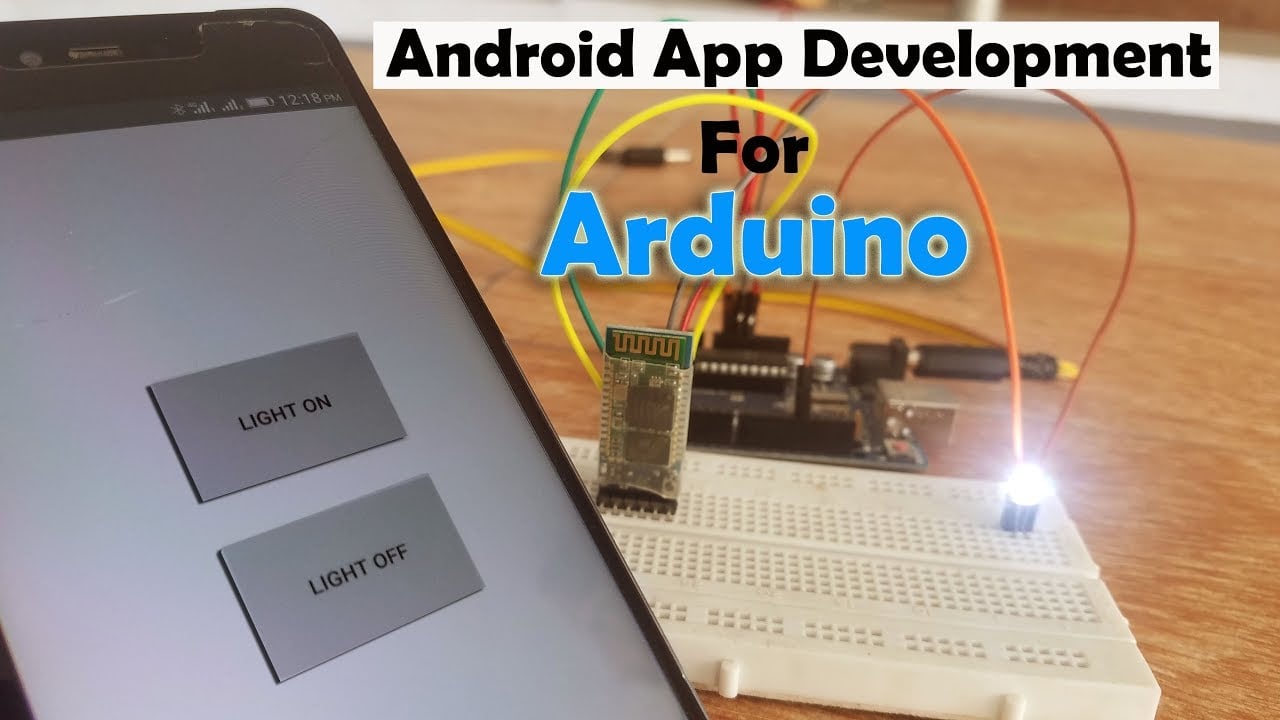
For the best understanding and easy follow-up, I am going to control an LED from the android cell phone app. In this tutorial I will add two buttons in the app, one button will be used to turn on the LED and the other button will be used to turn off the LED. Later after understanding the basics then you can add multiple buttons and you can simply copy and paste the code the only difference will be in the ID, which you will see in the programming.
In this tutorial I am going to use a lot of pictures and I will try to explain everything, so this Tutorial can be a bit longer, but trust me if you follow all the steps and read this article, at the end you will be able to make your own Android app to control anything you want. Enough with the introduction, without any further delay, let’s get started!!!
The software’s used:
- The Software used for the Android app development
- Android Studio
- Arduino IDE
About the Android Studio:
Android studio is one of the most commonly used software used for android app development which includes designing and programming. Before you follow this tutorial you should have some basic knowledge of how to use the Android studio. Otherwise, It can be really confusing for you. My recommendation is first you should follow some basic tutorials and then you can resume from here.
Before we start the android app development, first of all, I would like to explain the circuit diagram and Arduino programming. Because we can only design a good android application if we know exactly for what purpose we are making this application.
Circuit Diagram:
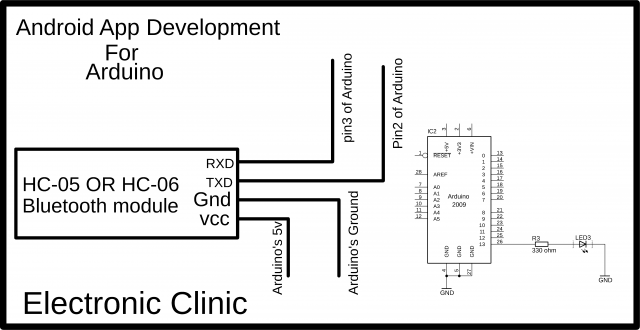
This is a very basic circuit diagram designed in CadeSoft Eagle 9.1.0 version. If you want to learn how to make a schematic and PCB then watch my tutorial given in the related projects section at the end.
An LED is connected with Pin number 13 of the Arduino through 330-ohm resistor. This is a 2.5v LED and that’s why I connected this current limiting resistor. If you have a 5v LED then there is no need to connect this resistor. In Video you will see I am not using this resistor as the led I am using is 5v. The main reason I added 2.5v LED in the circuit diagram is that this led is very commonly available. It really doesn’t matter if you use a 2.5v LED or a 5v led or even if you add a relay to control a 220 Vac bulb, it will have no effect on the programming.
On the left side, you can see a Bluetooth module, you can use HC-05 or HC-06 Bluetooth Module. If you are using a Bluetooth for the first time then you can watch my getting started tutorial on the Bluetooth module available in the related projects section. The Bluetooth module Tx and Rx pins are connected with the Arduino’s pin number 2 and pin number 3. Pin number and pin number 3 will be used as the Serial Port, which will be defined in the programming. While the VCC and GND are connected with the Arduino’s 5v and GND.
Arduino Bluetooth Programming:
|
1 2 3 4 5 6 7 8 9 10 11 12 13 14 15 16 17 18 19 20 21 22 23 24 25 26 27 28 29 30 31 32 33 34 35 36 37 38 39 40 41 42 43 44 45 46 47 48 49 50 |
<span style="font-family: georgia, palatino, serif;">#include <SoftwareSerial.h> SoftwareSerial Blue(2, 3); long int data; int LED = 13; // Led connected long int password1 = 92;// light on long int password2 = 79; // light off char state = 0; void setup() { pinMode(LED, OUTPUT); digitalWrite(LED, LOW); Serial.begin(9600); Blue.begin(9600); } void loop() { while(Blue.available()==0) ; if(Blue.available()>0) { data = Blue.parseInt(); } delay(400); //Serial.print(data); if (data == password1) { digitalWrite(LED,HIGH); Serial.println("LED ON "); } if( data == password2) { digitalWrite(LED,LOW); Serial.println("LED OFF"); } } </span> |
Arduino Program Explanation:
As you know my friends in Arduino Uno we have only one Serial port which is available on pin number 0 and pin number 1. As I always say never use these pins with any Serial communication supported devices. The Arduino’s default Serial Port should only be used for debugging purposes. You can always define other Serial Ports using the SoftwareSerial library. So that’s the reason I added the SoftwareSerial.h header file.
I defined a Serial Port with the name Blue on pin number 2 and pin number 3 of the Arduino. The pin number is the Rx while Pin number 3 is the Tx.
On the third line, I defined a variable data of the type long int. This variable will be used to store the number which is sent from the Android cell phone.
LED is connected with pin number 13 of the Arduino.
Then I defined two variables password1 and password2 of the type long integer. The number 92 is used to turn on the led while 79 is used to turn off the led. This led can be replaced with a relay, this way you will be able to control anything you want.
Then in the void setup function, I set the LED as output and set it to off state using the digitalwrite function. low means off and High means ON.
To activate the serial communication I used the Serial.begin() function while 9600 is the baud rate and similarly for the Bluetooth module. then starts the void loop function.
while(Blue.available()==0) ;
this line means that if the Bluetooth module has not received any data from the android cell phone then simply wait here.
if(Blue.available()>0)
this condition means if the Bluetooth module has received data from the android cell phone then store the received number in variable data and then using the if conditions the number stored in variable data is compared with the password1 and password2. If the number is equal to the password1 then the LED is turned ON and if the number stored in data is equal to password2 then the led is turned OFF. So that’s all about the Arduino’s programming.
Android app development:
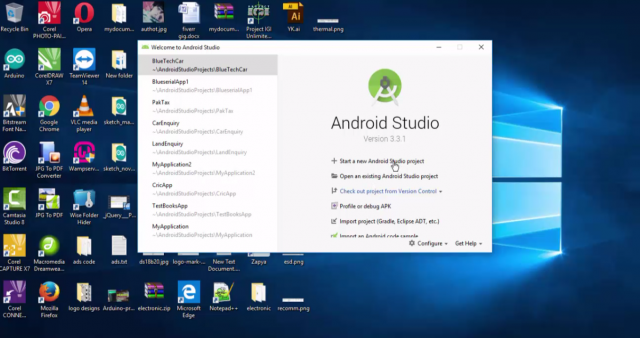
First off all, open the Android Studio.

Click on Start a new Android Studio project
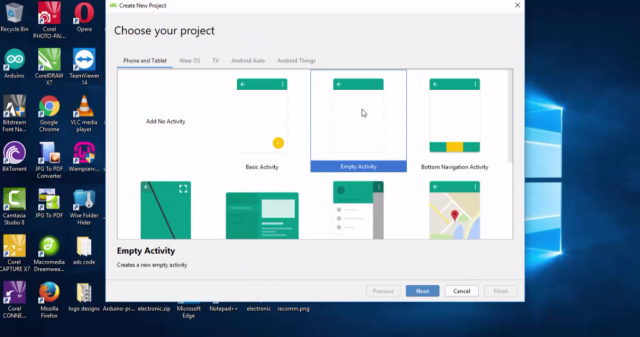
While the Choose your project form is open.
Select empty activity and click on the next button
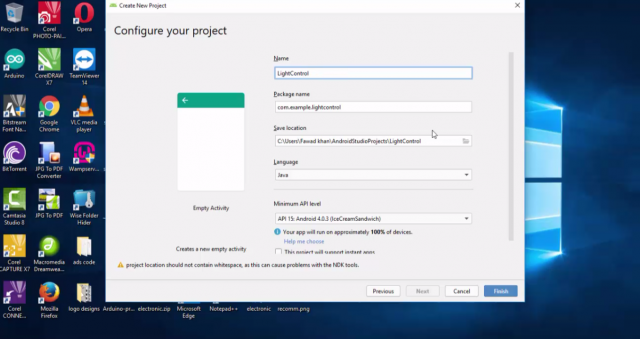
After you click on the Next button, the configure your project form is opened, over here you set the project name, package name and you can select a directory where you want to store the application. Make sure the language is set to Java. So after you are done then you can click on the Finish button.
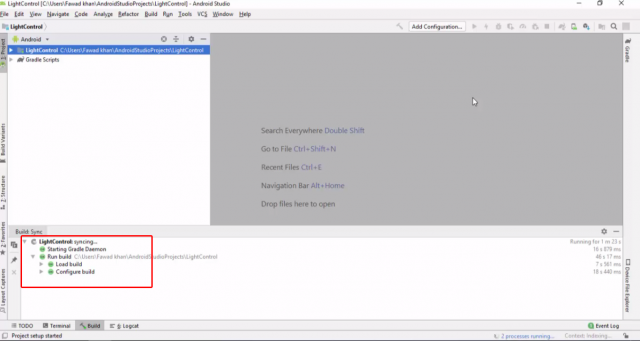
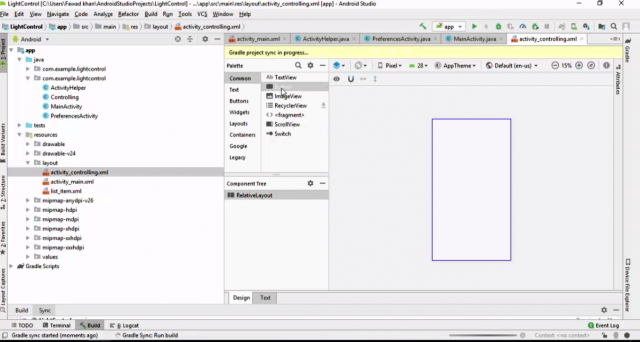
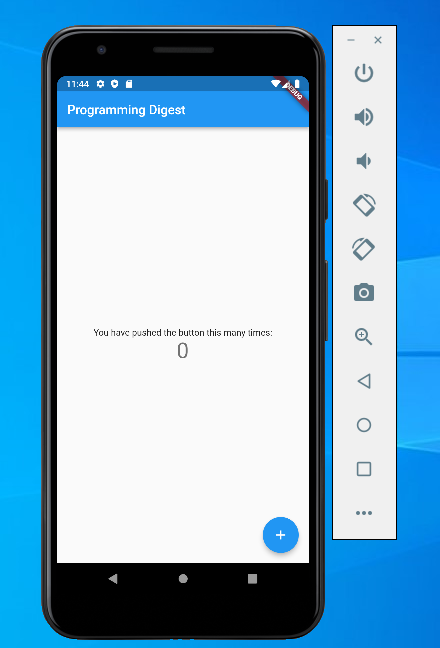
Wait for app synchronization

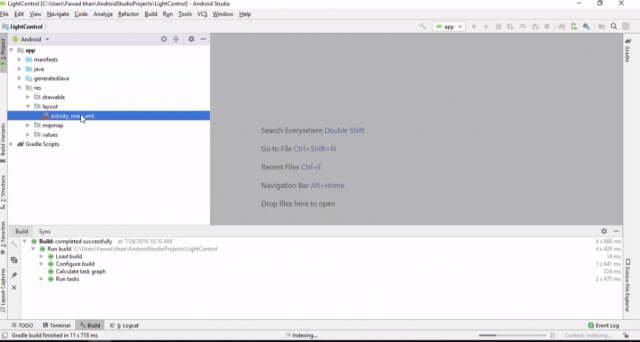
When your project is fully synchronized, as you can see the green dots in the following picture which is an indication that the synchronization is completed and we are ready for the next step.
Now we will make a layout for the Search and connect buttons. The search button will be used for searching the Bluetooth module and the connect button will be used to connect with the paired Bluetooth module.
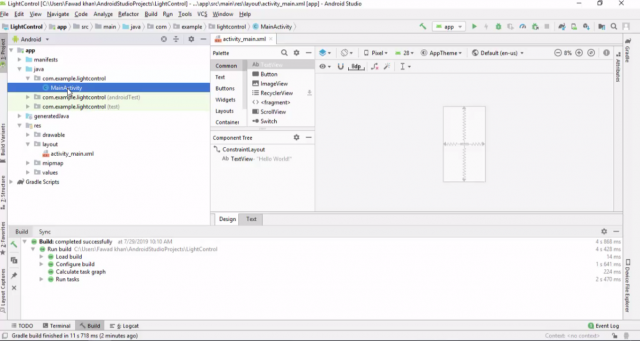
For this click on the small arrow symbol given with the lightcontrol and find the Res and click on the small arrow to expand it, under the res then click on the layout to expand it and click on the activity_main.xml this will open the design screen.
The design screen is opened. Click on the small arrow in front of the java to expand it and then click on the MainActivity.
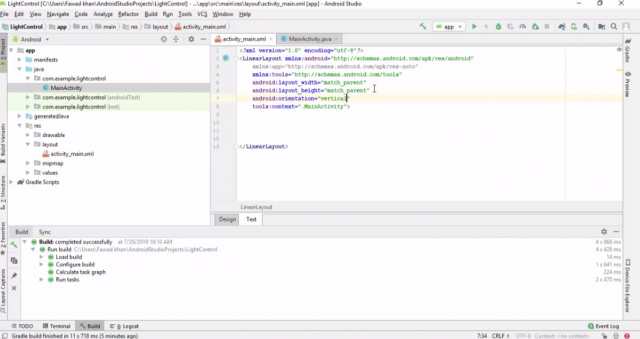
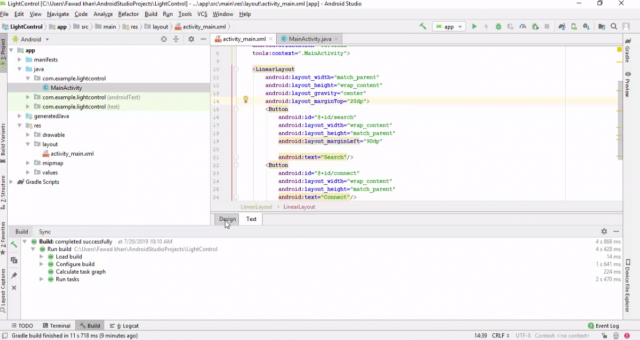
Now change the layout form constraint layout to linearlayout
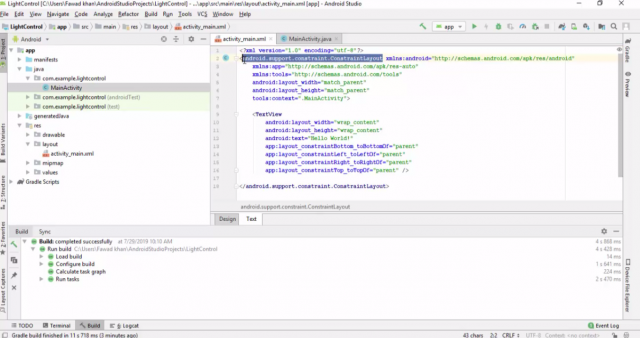
As you can see in the picture below.
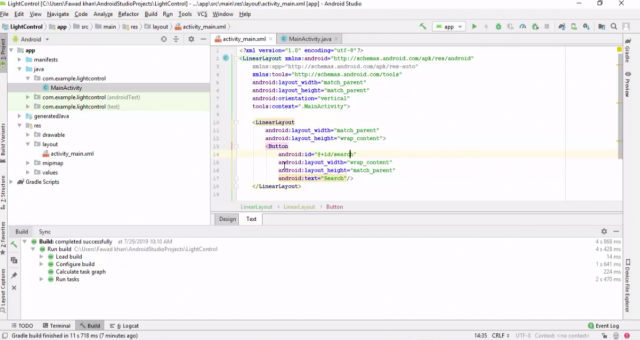
Now we make another linear layout within the main linearlayout
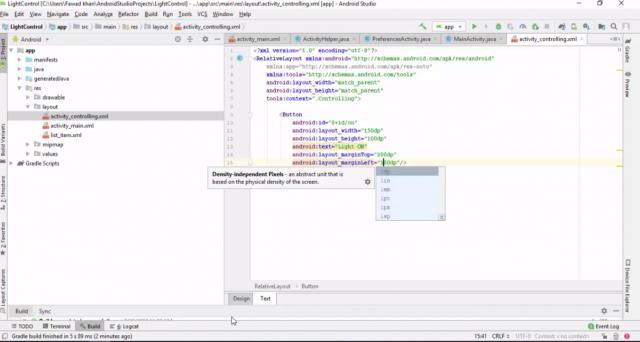
To create a button in xml we use the button attribute having some property which you can adjust as per your requirements.
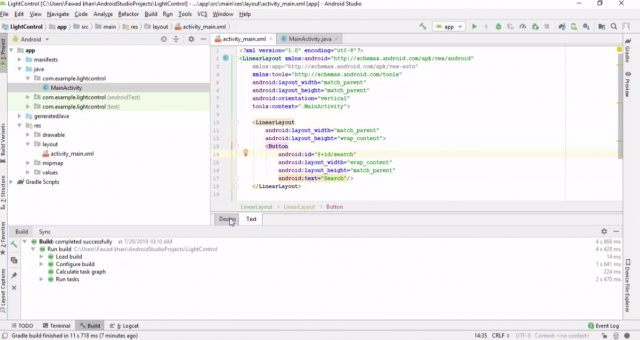
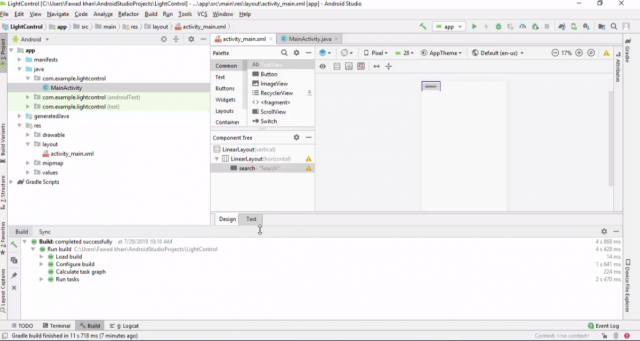
To check the design layout for this change from text mode to the design. As you can see at the end of the coding there are two buttons with captions Design and Text. You can click on the Design button. As you can see the mouse cursor.
Now again click on the text button to open the coding. As in this App I am going to use only two buttons. So I can simply copy and paste the code and will change the caption of the button from search to connect.
Now if again you click on the design button you will see now two buttons are added.
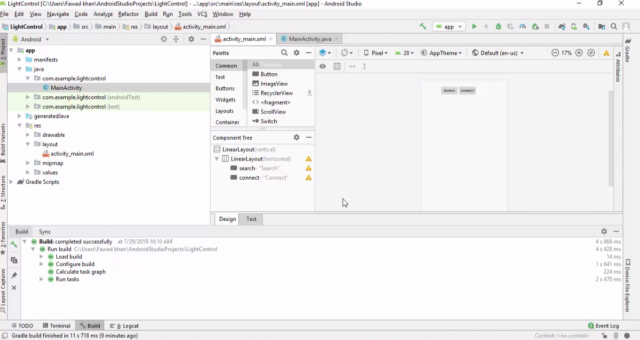
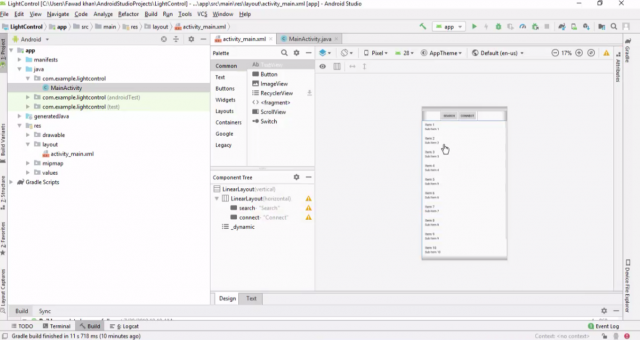
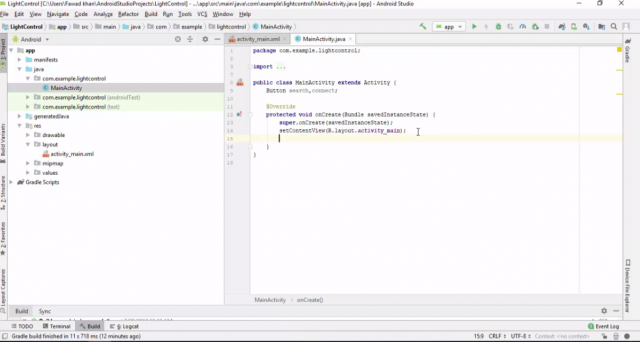
It’s a good programming practice to keep checking your design layout as you continue to program. So now we are done with two buttons with captions search and connect. Now we will add the code for the paired device, for this, we use the listview attribute.
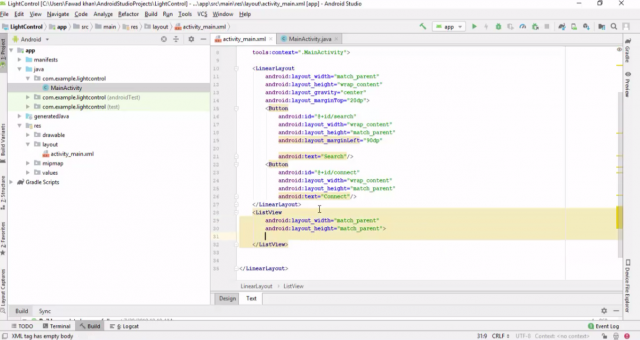
Click on the Design button to check.
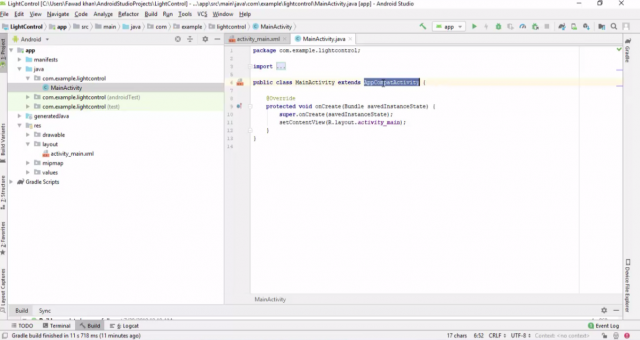
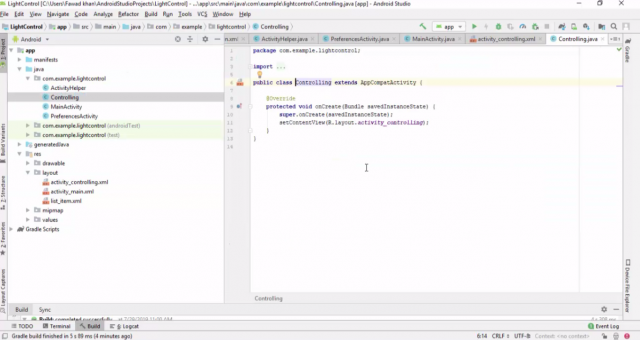
Now open the mainActivity.java class

Change the appcompatActivity to Activity
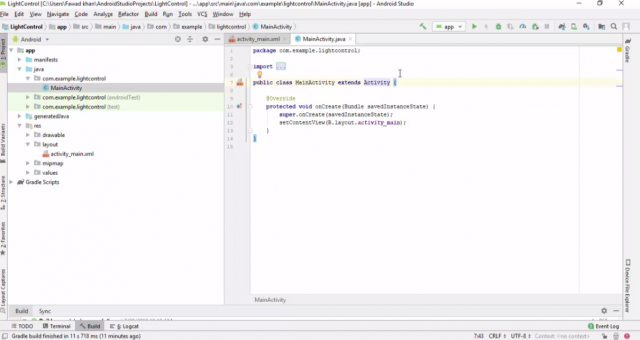
Now you can follow the following pictures
Now create a java class
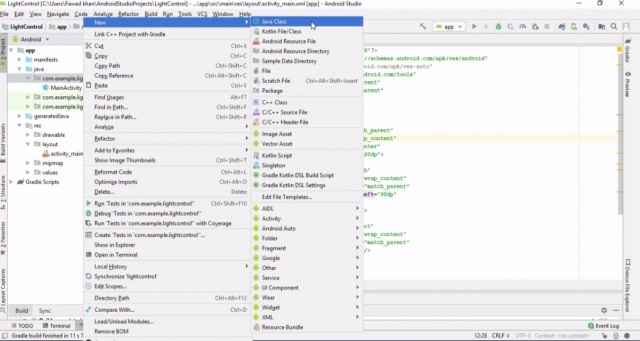
Enter the name as the ActivityHelper and click ok

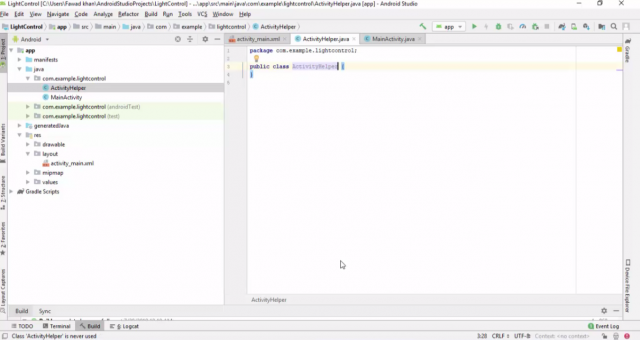
ActivityHelper.java Code:
|
1 2 3 4 5 6 7 8 9 10 11 12 13 14 15 16 17 18 19 20 21 22 |
<span style="font-family: georgia, palatino, serif;">package com.example.lightcontrol; import android.app.Activity; import android.content.SharedPreferences; import android.content.pm.ActivityInfo; import android.preference.PreferenceManager; public class ActivityHelper { public static void initialize(Activity activity) { SharedPreferences prefs = PreferenceManager.getDefaultSharedPreferences(activity); String orientation = prefs.getString("prefOrientation", "Null"); if ("Landscape".equals(orientation)) { activity.setRequestedOrientation(ActivityInfo.SCREEN_ORIENTATION_LANDSCAPE); } else if ("Portrait".equals(orientation)) { activity.setRequestedOrientation(ActivityInfo.SCREEN_ORIENTATION_PORTRAIT); } else { activity.setRequestedOrientation(ActivityInfo.SCREEN_ORIENTATION_FULL_SENSOR); } } } </span> |

Now create the second java class

Enter class name as the preferrencesActivity and click ok

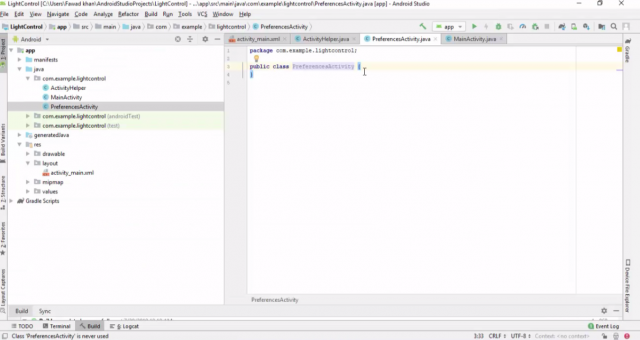
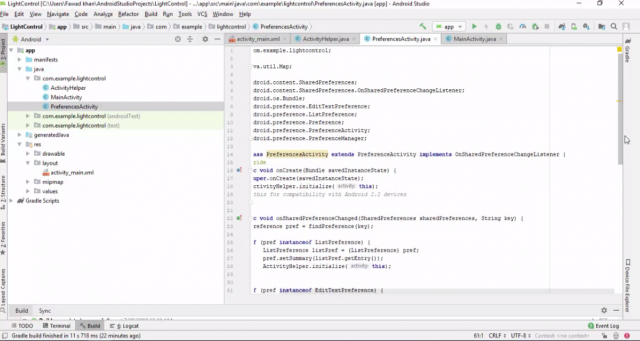
PreferrencesActivity.java Code
|
1 2 3 4 5 6 7 8 9 10 11 12 13 14 15 16 17 18 19 20 21 22 23 24 25 26 27 28 29 30 31 32 33 34 35 36 37 38 39 40 41 42 43 44 45 46 47 48 49 50 51 52 53 54 55 56 57 58 59 60 61 |
<span style="font-family: georgia, palatino, serif;">package com.example.lightcontrol; import java.util.Map; import android.content.SharedPreferences; import android.content.SharedPreferences.OnSharedPreferenceChangeListener; import android.os.Bundle; import android.preference.EditTextPreference; import android.preference.ListPreference; import android.preference.Preference; import android.preference.PreferenceActivity; import android.preference.PreferenceManager; public class PreferencesActivity extends PreferenceActivity implements OnSharedPreferenceChangeListener { @Override public void onCreate(Bundle savedInstanceState) { super.onCreate(savedInstanceState); ActivityHelper.initialize(this); // Using this for compatibility with Android 2.2 devices } public void onSharedPreferenceChanged(SharedPreferences sharedPreferences, String key) { Preference pref = findPreference(key); if (pref instanceof ListPreference) { ListPreference listPref = (ListPreference) pref; pref.setSummary(listPref.getEntry()); ActivityHelper.initialize(this); } if (pref instanceof EditTextPreference) { EditTextPreference editPref = (EditTextPreference) pref; pref.setSummary(editPref.getText()); } } @Override protected void onPause() { PreferenceManager.getDefaultSharedPreferences(this).unregisterOnSharedPreferenceChangeListener(this); super.onPause(); } @Override protected void onResume() { PreferenceManager.getDefaultSharedPreferences(this).registerOnSharedPreferenceChangeListener(this); Map<String, ?> keys = PreferenceManager.getDefaultSharedPreferences(this).getAll(); for (Map.Entry<String, ?> entry : keys.entrySet()) { // Log.d("map values", entry.getKey() + ": " + entry.getValue().toString()); Preference pref = findPreference(entry.getKey()); if (pref != null) { pref.setSummary(entry.getValue().toString()); } } super.onResume(); } } </span> |
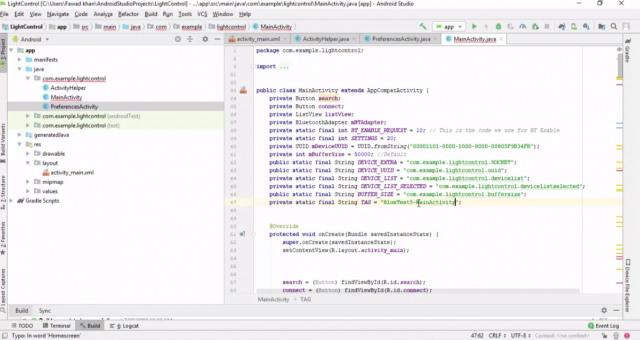
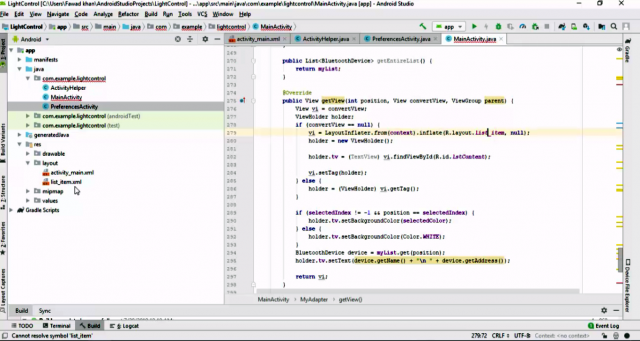
Now open again MainActivity.java
PCBWay:
PCBWay is a trusted leader in the PCB industry, offering custom-designed boards at competitive prices to suit projects of all sizes—from basic to highly specialized.
Whether you’re working with standard FR-4 or need advanced solutions like Rogers, HDI, or Flexible and Rigid-Flex boards, PCBWay provides high-quality options without the high cost. Get an instant quote at pcbway.com/orderonline.
Curious about what others are creating? Explore innovative projects and ideas from the PCB community on PCBWay’s open-source platform at pcbway.com/project/.
MainActivity.java Code
|
1 2 3 4 5 6 7 8 9 10 11 12 13 14 15 16 17 18 19 20 21 22 23 24 25 26 27 28 29 30 31 32 33 34 35 36 37 38 39 40 41 42 43 44 45 46 47 48 49 50 51 52 53 54 55 56 57 58 59 60 61 62 63 64 65 66 67 68 69 70 71 72 73 74 75 76 77 78 79 80 81 82 83 84 85 86 87 88 89 90 91 92 93 94 95 96 97 98 99 100 101 102 103 104 105 106 107 108 109 110 111 112 113 114 115 116 117 118 119 120 121 122 123 124 125 126 127 128 129 130 131 132 133 134 135 136 137 138 139 140 141 142 143 144 145 146 147 148 149 150 151 152 153 154 155 156 157 158 159 160 161 162 163 164 165 166 167 168 169 170 171 172 173 174 175 176 177 178 179 180 181 182 183 184 185 186 187 188 189 190 191 192 193 194 195 196 197 198 199 200 201 202 203 204 205 206 207 208 209 210 211 212 213 214 215 216 217 218 219 220 221 222 223 224 225 226 227 228 229 230 231 232 233 234 235 236 237 238 239 240 241 242 243 244 245 246 247 248 249 250 251 252 253 254 255 256 257 258 259 260 261 262 263 264 265 266 267 268 269 270 271 272 273 274 275 276 277 278 279 280 281 282 283 284 285 286 287 288 289 290 291 292 293 294 295 296 297 298 299 300 301 302 303 304 305 306 307 308 309 310 311 312 313 314 315 316 317 318 319 320 |
<span style="font-family: georgia, palatino, serif;">package com.example.lightcontrol; import android.bluetooth.BluetoothAdapter; import android.bluetooth.BluetoothDevice; import android.content.Context; import android.content.Intent; import android.content.SharedPreferences; import android.content.pm.ActivityInfo; import android.graphics.Color; import android.os.AsyncTask; import android.preference.PreferenceManager; import android.support.v7.app.AppCompatActivity; import android.os.Bundle; import android.util.Log; import android.view.LayoutInflater; import android.view.Menu; import android.view.MenuItem; import android.view.View; import android.view.ViewGroup; import android.widget.AdapterView; import android.widget.ArrayAdapter; import android.widget.Button; import android.widget.ListView; import android.widget.TextView; import android.widget.Toast; import java.util.ArrayList; import java.util.List; import java.util.Set; import java.util.UUID; public class MainActivity extends AppCompatActivity { private Button search; private Button connect; private ListView listView; private BluetoothAdapter mBTAdapter; private static final int BT_ENABLE_REQUEST = 10; // This is the code we use for BT Enable private static final int SETTINGS = 20; private UUID mDeviceUUID = UUID.fromString("00001101-0000-1000-8000-00805F9B34FB"); private int mBufferSize = 50000; //Default public static final String DEVICE_EXTRA = "com.example.lightcontrol.SOCKET"; public static final String DEVICE_UUID = "com.example.lightcontrol.uuid"; private static final String DEVICE_LIST = "com.example.lightcontrol.devicelist"; private static final String DEVICE_LIST_SELECTED = "com.example.lightcontrol.devicelistselected"; public static final String BUFFER_SIZE = "com.example.lightcontrol.buffersize"; private static final String TAG = "BlueTest5-MainActivity"; @Override protected void onCreate(Bundle savedInstanceState) { super.onCreate(savedInstanceState); setContentView(R.layout.activity_main); search = (Button) findViewById(R.id.search); connect = (Button) findViewById(R.id.connect); listView = (ListView) findViewById(R.id.listview); if (savedInstanceState != null) { ArrayList<BluetoothDevice> list = savedInstanceState.getParcelableArrayList(DEVICE_LIST); if (list != null) { initList(list); MyAdapter adapter = (MyAdapter) listView.getAdapter(); int selectedIndex = savedInstanceState.getInt(DEVICE_LIST_SELECTED); if (selectedIndex != -1) { adapter.setSelectedIndex(selectedIndex); connect.setEnabled(true); } } else { initList(new ArrayList<BluetoothDevice>()); } } else { initList(new ArrayList<BluetoothDevice>()); } search.setOnClickListener(new View.OnClickListener() { @Override public void onClick(View arg0) { mBTAdapter = BluetoothAdapter.getDefaultAdapter(); if (mBTAdapter == null) { Toast.makeText(getApplicationContext(), "Bluetooth not found", Toast.LENGTH_SHORT).show(); } else if (!mBTAdapter.isEnabled()) { Intent enableBT = new Intent(BluetoothAdapter.ACTION_REQUEST_ENABLE); startActivityForResult(enableBT, BT_ENABLE_REQUEST); } else { new SearchDevices().execute(); } } }); connect.setOnClickListener(new View.OnClickListener() { @Override public void onClick(View arg0) { BluetoothDevice device = ((MyAdapter) (listView.getAdapter())).getSelectedItem(); Intent intent = new Intent(getApplicationContext(), Controlling.class); intent.putExtra(DEVICE_EXTRA, device); intent.putExtra(DEVICE_UUID, mDeviceUUID.toString()); intent.putExtra(BUFFER_SIZE, mBufferSize); startActivity(intent); } }); } protected void onPause() { // TODO Auto-generated method stub super.onPause(); } @Override protected void onStop() { // TODO Auto-generated method stub super.onStop(); } @Override protected void onActivityResult(int requestCode, int resultCode, Intent data) { switch (requestCode) { case BT_ENABLE_REQUEST: if (resultCode == RESULT_OK) { msg("Bluetooth Enabled successfully"); new SearchDevices().execute(); } else { msg("Bluetooth couldn't be enabled"); } break; case SETTINGS: //If the settings have been updated SharedPreferences prefs = PreferenceManager.getDefaultSharedPreferences(this); String uuid = prefs.getString("prefUuid", "Null"); mDeviceUUID = UUID.fromString(uuid); Log.d(TAG, "UUID: " + uuid); String bufSize = prefs.getString("prefTextBuffer", "Null"); mBufferSize = Integer.parseInt(bufSize); String orientation = prefs.getString("prefOrientation", "Null"); Log.d(TAG, "Orientation: " + orientation); if (orientation.equals("Landscape")) { setRequestedOrientation(ActivityInfo.SCREEN_ORIENTATION_LANDSCAPE); } else if (orientation.equals("Portrait")) { setRequestedOrientation(ActivityInfo.SCREEN_ORIENTATION_PORTRAIT); } else if (orientation.equals("Auto")) { setRequestedOrientation(ActivityInfo.SCREEN_ORIENTATION_FULL_SENSOR); } break; default: break; } super.onActivityResult(requestCode, resultCode, data); } /** * Quick way to call the Toast * @param str */ private void msg(String str) { Toast.makeText(getApplicationContext(), str, Toast.LENGTH_SHORT).show(); } /** * Initialize the List adapter * @param objects */ private void initList(List<BluetoothDevice> objects) { final MyAdapter adapter = new MyAdapter(getApplicationContext(), R.layout.list_item, R.id.lstContent, objects); listView.setAdapter(adapter); listView.setOnItemClickListener(new AdapterView.OnItemClickListener() { @Override public void onItemClick(AdapterView<?> parent, View view, int position, long id) { adapter.setSelectedIndex(position); connect.setEnabled(true); } }); } /** * Searches for paired devices. Doesn't do a scan! Only devices which are paired through Settings->Bluetooth * will show up with this. I didn't see any need to re-build the wheel over here * @author ryder * */ private class SearchDevices extends AsyncTask<Void, Void, List<BluetoothDevice>> { @Override protected List<BluetoothDevice> doInBackground(Void... params) { Set<BluetoothDevice> pairedDevices = mBTAdapter.getBondedDevices(); List<BluetoothDevice> listDevices = new ArrayList<BluetoothDevice>(); for (BluetoothDevice device : pairedDevices) { listDevices.add(device); } return listDevices; } @Override protected void onPostExecute(List<BluetoothDevice> listDevices) { super.onPostExecute(listDevices); if (listDevices.size() > 0) { MyAdapter adapter = (MyAdapter) listView.getAdapter(); adapter.replaceItems(listDevices); } else { msg("No paired devices found, please pair your serial BT device and try again"); } } } /** * Custom adapter to show the current devices in the list. This is a bit of an overkill for this * project, but I figured it would be good learning * Most of the code is lifted from somewhere but I can't find the link anymore * @author ryder * */ private class MyAdapter extends ArrayAdapter<BluetoothDevice> { private int selectedIndex; private Context context; private int selectedColor = Color.parseColor("#abcdef"); private List<BluetoothDevice> myList; public MyAdapter(Context ctx, int resource, int textViewResourceId, List<BluetoothDevice> objects) { super(ctx, resource, textViewResourceId, objects); context = ctx; myList = objects; selectedIndex = -1; } public void setSelectedIndex(int position) { selectedIndex = position; notifyDataSetChanged(); } public BluetoothDevice getSelectedItem() { return myList.get(selectedIndex); } @Override public int getCount() { return myList.size(); } @Override public BluetoothDevice getItem(int position) { return myList.get(position); } @Override public long getItemId(int position) { return position; } private class ViewHolder { TextView tv; } public void replaceItems(List<BluetoothDevice> list) { myList = list; notifyDataSetChanged(); } public List<BluetoothDevice> getEntireList() { return myList; } @Override public View getView(int position, View convertView, ViewGroup parent) { View vi = convertView; ViewHolder holder; if (convertView == null) { vi = LayoutInflater.from(context).inflate(R.layout.list_item, null); holder = new ViewHolder(); holder.tv = (TextView) vi.findViewById(R.id.lstContent); vi.setTag(holder); } else { holder = (ViewHolder) vi.getTag(); } if (selectedIndex != -1 && position == selectedIndex) { holder.tv.setBackgroundColor(selectedColor); } else { holder.tv.setBackgroundColor(Color.WHITE); } BluetoothDevice device = myList.get(position); holder.tv.setText(device.getName() + "\n " + device.getAddress()); return vi; } } @Override public boolean onCreateOptionsMenu(Menu menu) { // Inflate the menu; this adds items to the action bar if it is present. //getMenuInflater().inflate(R.menu.homescreen, menu); return true; } @Override public boolean onOptionsItemSelected(MenuItem item) { switch (item.getItemId()) { case R.id.action_settings: Intent intent = new Intent(MainActivity.this, PreferencesActivity.class); startActivityForResult(intent, SETTINGS); break; } return super.onOptionsItemSelected(item); } } </span> |
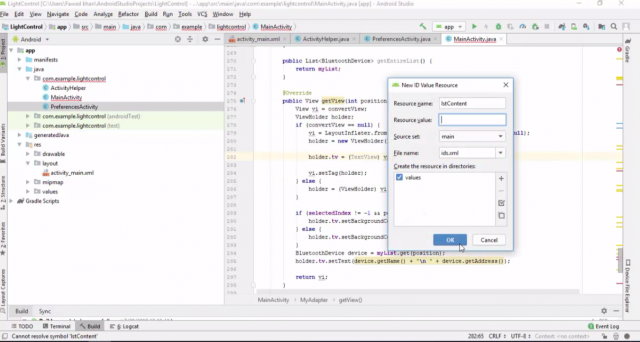
To remove this error just click on the red bulb and select create id value resource

And then click ok
Now remove this error click on red bulb and click on create layout resource file
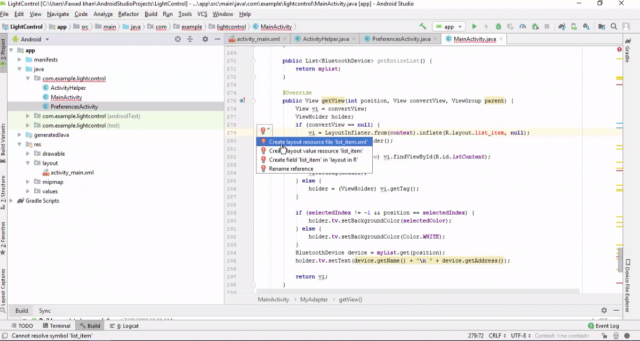
And the click ok
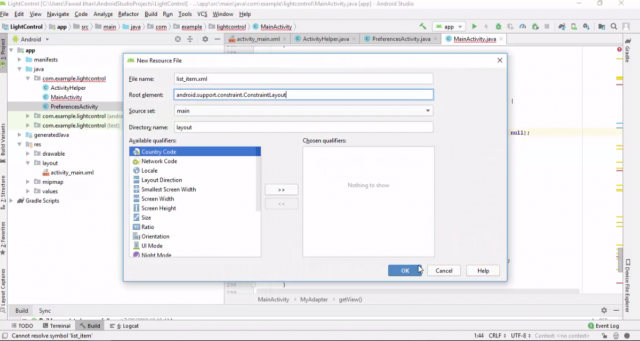
So now you can see the list_item.xml is created
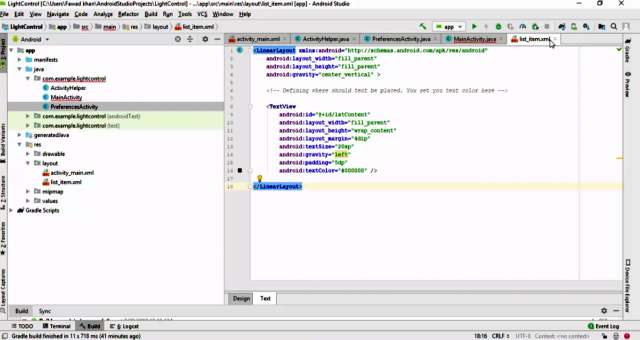
Open list_item.xml file and paste this code
|
1 2 3 4 5 6 7 8 9 10 11 12 13 14 15 16 17 18 19 20 |
<span style="font-family: georgia, palatino, serif;"><LinearLayout xmlns:android="http://schemas.android.com/apk/res/android" android:layout_width="fill_parent" android:layout_height="fill_parent" android:gravity="center_vertical" > <!-- Defining where should text be placed. You set you text color here --> <TextView android:id="@+id/lstContent" android:layout_width="fill_parent" android:layout_height="wrap_content" android:layout_margin="4dip" android:textSize="20sp" android:gravity="left" android:padding="5dp" android:textColor="#000000" /> </LinearLayout> </span> |
Now you see all red error are removed.
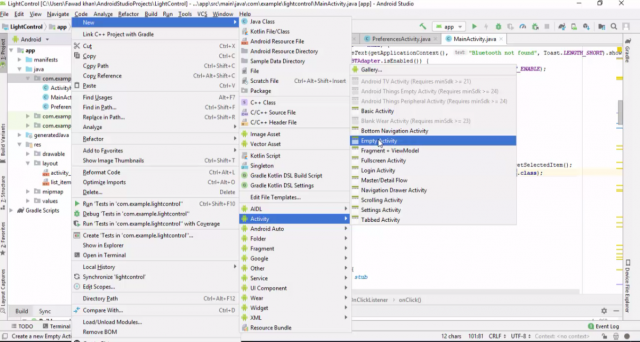
Now we create the main controlling screen, for this right click on package folder
Then New
Then Activity
And click on the Empty Activity
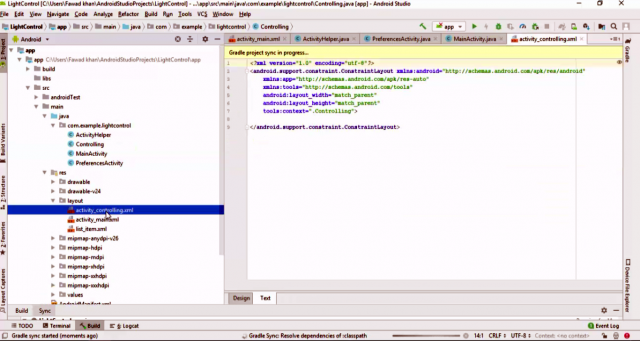
Open activity_controlling.xml
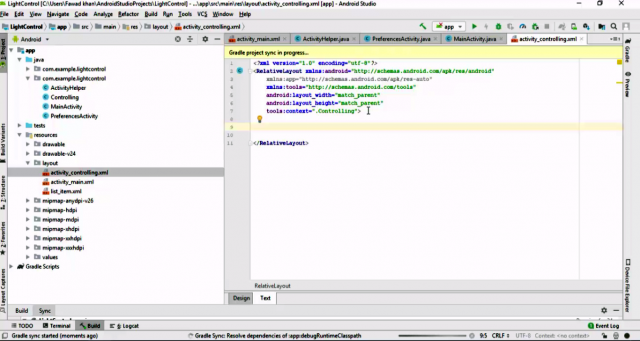
Now change the layout form constraint layout to RelativeLayout

Open activity_controlling.xml and switch form text to design mode
Create button id on

Copy the same code and paste and change the id and name

Now open the Controlling.java class

Controlling.java code
|
1 2 3 4 5 6 7 8 9 10 11 12 13 14 15 16 17 18 19 20 21 22 23 24 25 26 27 28 29 30 31 32 33 34 35 36 37 38 39 40 41 42 43 44 45 46 47 48 49 50 51 52 53 54 55 56 57 58 59 60 61 62 63 64 65 66 67 68 69 70 71 72 73 74 75 76 77 78 79 80 81 82 83 84 85 86 87 88 89 90 91 92 93 94 95 96 97 98 99 100 101 102 103 104 105 106 107 108 109 110 111 112 113 114 115 116 117 118 119 120 121 122 123 124 125 126 127 128 129 130 131 132 133 134 135 136 137 138 139 140 141 142 143 144 145 146 147 148 149 150 151 152 153 154 155 156 157 158 159 160 161 162 163 164 165 166 167 168 169 170 171 172 173 174 175 176 177 178 179 180 181 182 183 184 185 186 187 188 189 190 191 192 193 194 195 196 197 198 199 200 201 202 203 204 205 206 207 208 209 210 211 212 213 214 215 216 217 218 219 220 221 222 223 224 225 226 227 228 229 230 231 232 233 234 235 236 237 238 239 240 241 242 243 244 245 246 247 248 249 250 251 252 253 254 255 256 257 258 259 260 261 262 263 264 265 266 267 268 269 270 271 272 273 274 275 276 277 278 279 280 281 282 283 284 285 286 287 288 289 290 291 292 293 294 295 296 |
<span style="font-family: georgia, palatino, serif;">package com.example.lightcontrol; import android.app.Activity; import android.app.ProgressDialog; import android.bluetooth.BluetoothAdapter; import android.bluetooth.BluetoothDevice; import android.bluetooth.BluetoothSocket; import android.content.Intent; import android.os.AsyncTask; import android.support.v7.app.AppCompatActivity; import android.os.Bundle; import android.util.Log; import android.view.MotionEvent; import android.view.View; import android.widget.ArrayAdapter; import android.widget.Button; import android.widget.ImageButton; import android.widget.ListView; import android.widget.Toast; import java.io.IOException; import java.io.InputStream; import java.util.Set; import java.util.UUID; public class Controlling extends Activity { private static final String TAG = "BlueTest5-Controlling"; private int mMaxChars = 50000;//Default//change this to string.......... private UUID mDeviceUUID; private BluetoothSocket mBTSocket; private ReadInput mReadThread = null; private boolean mIsUserInitiatedDisconnect = false; private boolean mIsBluetoothConnected = false; private Button mBtnDisconnect; private BluetoothDevice mDevice; final static String on="92";//on final static String off="79";//off private ProgressDialog progressDialog; Button btnOn,btnOff; @Override protected void onCreate(Bundle savedInstanceState) { super.onCreate(savedInstanceState); setContentView(R.layout.activity_controlling); ActivityHelper.initialize(this); // mBtnDisconnect = (Button) findViewById(R.id.btnDisconnect); btnOn=(Button)findViewById(R.id.on); btnOff=(Button)findViewById(R.id.off); Intent intent = getIntent(); Bundle b = intent.getExtras(); mDevice = b.getParcelable(MainActivity.DEVICE_EXTRA); mDeviceUUID = UUID.fromString(b.getString(MainActivity.DEVICE_UUID)); mMaxChars = b.getInt(MainActivity.BUFFER_SIZE); Log.d(TAG, "Ready"); btnOn.setOnClickListener(new View.OnClickListener() { @Override public void onClick(View v) { // TODO Auto-generated method stub try { mBTSocket.getOutputStream().write(on.getBytes()); } catch (IOException e) { // TODO Auto-generated catch block e.printStackTrace(); } }}); btnOff.setOnClickListener(new View.OnClickListener() { @Override public void onClick(View v) { // TODO Auto-generated method stub try { mBTSocket.getOutputStream().write(off.getBytes()); } catch (IOException e) { // TODO Auto-generated catch block e.printStackTrace(); } }}); } private class ReadInput implements Runnable { private boolean bStop = false; private Thread t; public ReadInput() { t = new Thread(this, "Input Thread"); t.start(); } public boolean isRunning() { return t.isAlive(); } @Override public void run() { InputStream inputStream; try { inputStream = mBTSocket.getInputStream(); while (!bStop) { byte[] buffer = new byte[256]; if (inputStream.available() > 0) { inputStream.read(buffer); int i = 0; /* * This is needed because new String(buffer) is taking the entire buffer i.e. 256 chars on Android 2.3.4 http://stackoverflow.com/a/8843462/1287554 */ for (i = 0; i < buffer.length && buffer[i] != 0; i++) { } final String strInput = new String(buffer, 0, i); /* * If checked then receive text, better design would probably be to stop thread if unchecked and free resources, but this is a quick fix */ } Thread.sleep(500); } } catch (IOException e) { // TODO Auto-generated catch block e.printStackTrace(); } catch (InterruptedException e) { // TODO Auto-generated catch block e.printStackTrace(); } } public void stop() { bStop = true; } } private class DisConnectBT extends AsyncTask<Void, Void, Void> { @Override protected void onPreExecute() { } @Override protected Void doInBackground(Void... params) {//cant inderstand these dotss if (mReadThread != null) { mReadThread.stop(); while (mReadThread.isRunning()) ; // Wait until it stops mReadThread = null; } try { mBTSocket.close(); } catch (IOException e) { // TODO Auto-generated catch block e.printStackTrace(); } return null; } @Override protected void onPostExecute(Void result) { super.onPostExecute(result); mIsBluetoothConnected = false; if (mIsUserInitiatedDisconnect) { finish(); } } } private void msg(String s) { Toast.makeText(getApplicationContext(), s, Toast.LENGTH_SHORT).show(); } @Override protected void onPause() { if (mBTSocket != null && mIsBluetoothConnected) { new DisConnectBT().execute(); } Log.d(TAG, "Paused"); super.onPause(); } @Override protected void onResume() { if (mBTSocket == null || !mIsBluetoothConnected) { new ConnectBT().execute(); } Log.d(TAG, "Resumed"); super.onResume(); } @Override protected void onStop() { Log.d(TAG, "Stopped"); super.onStop(); } @Override protected void onSaveInstanceState(Bundle outState) { // TODO Auto-generated method stub super.onSaveInstanceState(outState); } private class ConnectBT extends AsyncTask<Void, Void, Void> { private boolean mConnectSuccessful = true; @Override protected void onPreExecute() { progressDialog = ProgressDialog.show(Controlling.this, "Hold on", "Connecting");// http://stackoverflow.com/a/11130220/1287554 } @Override protected Void doInBackground(Void... devices) { try { if (mBTSocket == null || !mIsBluetoothConnected) { mBTSocket = mDevice.createInsecureRfcommSocketToServiceRecord(mDeviceUUID); BluetoothAdapter.getDefaultAdapter().cancelDiscovery(); mBTSocket.connect(); } } catch (IOException e) { // Unable to connect to device` // e.printStackTrace(); mConnectSuccessful = false; } return null; } @Override protected void onPostExecute(Void result) { super.onPostExecute(result); if (!mConnectSuccessful) { Toast.makeText(getApplicationContext(), "Could not connect to device.Please turn on your Hardware", Toast.LENGTH_LONG).show(); finish(); } else { msg("Connected to device"); mIsBluetoothConnected = true; mReadThread = new ReadInput(); // Kick off input reader } progressDialog.dismiss(); } } @Override protected void onDestroy() { // TODO Auto-generated method stub super.onDestroy(); } } </span> |
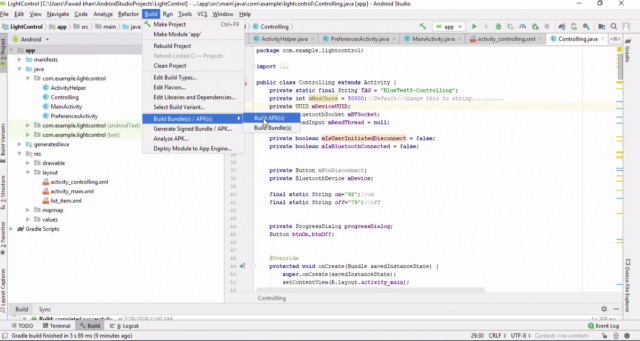
Don’t forget to add the bluetooth permission in manifest.xml before you creat the APK file.

We are done with the designing and coding. Now the next step is to create the APK file.
Create .apk file:
Click on the build menu then hover the mouse on build bundle/(apk) and click on the build apk
And then wait for around one minute depending on your laptop or computer processing speed.
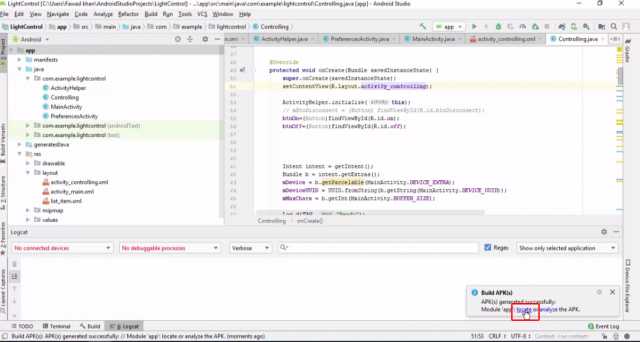
After generating the apk file then click on locate and transfer the app-debug.apk to phone and install

Download:
Download apk file: light controlling apk
For the android app testing watch video given below.
Watch Video on YouTube:
Android app Bluetooth related Projects:
- Arduino Buetooth Pin Code and Name changing using AT Commands
- Control HMI Screen using Bluetooth
- Battery Efficiency Monitoring using Bluetooth and Android App with Database
- Bluetooth controlled Robot Car using Android App
- Heartbeats monitoring App using Arduino and Bluetooth
- Android and Arduino based Smart Lock
- Android App, Bluetooth, and GSM based Arduino Project
- Wireless 12V Battery Voltage Monitoring using Android App and Bluetooth
- Android App for Temperature Monitoring using Arduino
- Control 8×8 LED Matrix using Arduino, Bluetooth, and Android App
Troubleshooting — Common Problems When Building This Project
Problem 1: The Android app is installed on the phone but it cannot find or connect to the HC-05 Bluetooth module
This is the single most reported problem with any Bluetooth Arduino project and almost every time it comes down to pairing and permissions rather than any fault in the code.
Before your app can connect to the HC-05, the module must first be paired with your phone through the Android Bluetooth settings — not through the app. Go to Settings, then Bluetooth, and scan for devices. You should see HC-05 appear. Tap it and enter the pairing code which is 1234 by default. Some modules use 0000. Once paired, close the settings and open your app. Now it should find and connect to the HC-05 successfully.
If you are running Android 12 or Android 13 on your phone, there is an additional issue. Google added new Bluetooth permissions in these versions — BLUETOOTH_CONNECT and BLUETOOTH_SCAN — which older tutorials do not mention because they were written before these versions existed. If your app targets API level 31 or higher and you did not declare these permissions in your AndroidManifest.xml file, the app will crash or silently fail to connect. Add these permissions and also request them at runtime using ActivityCompat.requestPermissions before trying to connect.
Problem 2: The HC-05 is paired and the app connects but the Arduino is not responding to button presses
The connection is established — you can see the HC-05 LED blinking at a slower rate which confirms it is connected — but pressing the ON or OFF button does nothing on the Arduino side.
First thing to check is the baud rate. In the Arduino code, the SoftwareSerial is initialized at 9600 baud rate. The HC-05 module must also be set to 9600. By default the HC-05 comes set to 9600 so this usually matches, but if someone previously changed it using AT commands it might be different. To confirm, put the HC-05 into AT command mode by holding the button on the module while powering it up. Open the Serial Monitor at 38400 baud and type AT. If you get OK back, then type AT+UART? to see the current baud rate setting.
Second thing to check is whether the TX and RX pins are correctly connected. The TX pin of the HC-05 goes to the RX pin defined in SoftwareSerial in your code and the RX pin of HC-05 goes to the TX. Getting these crossed is extremely common and results in the Arduino never receiving any data.
Third, make sure the passwords in the Android app code match exactly what is in the Arduino code. In the tutorial the value 92 turns the LED on and 79 turns it off. If you changed these values on the Arduino side but forgot to update them in the Android app, or vice versa, nothing will happen.
Problem 3: Android Studio is showing Gradle build errors and the project will not compile
Opening someone else’s Android Studio project or following along with an older tutorial often produces Gradle errors because Android Studio updates frequently and older project configurations become incompatible.
The most common errors are related to the Gradle version, the compileSdkVersion, and the targetSdkVersion being outdated. When you open the project, Android Studio will usually show a yellow bar at the top offering to upgrade the Gradle version automatically. Click that and let it upgrade. In most cases this alone fixes the build errors.
If errors persist, go to File then Project Structure then check that the Compile SDK Version matches the latest Android SDK you have installed. Also check that the Build Tools version is up to date. Go to Tools then SDK Manager and make sure the latest SDK build tools are installed.
For beginners, the cleanest approach is to create a brand new Android Studio project using the latest Empty Activity template, then copy only the Java code and the button layout from the tutorial into your new project rather than trying to fix an old one. Starting fresh with a current template avoids almost all Gradle compatibility headaches.
Problem 4: The app works fine in the emulator but crashes on a real phone
The Android emulator does not have real Bluetooth hardware. If your app appears to work in the emulator that is actually suspicious — Bluetooth functions in the emulator are simulated and do not reflect real behavior. Always test Bluetooth apps on a real physical Android device.
When the app crashes on a real phone, enable USB debugging on your phone, connect it to your computer, and in Android Studio go to Logcat. Run the app and watch the red error messages when it crashes. The error message will tell you exactly which line of code caused the crash and why. NullPointerException on a Bluetooth socket usually means the device was not found before trying to connect. SecurityException means a Bluetooth permission was not granted. These specific messages tell you exactly what to fix.
Problem 5: The Bluetooth connection keeps dropping after 30 seconds or a few minutes
An unstable connection that drops regularly is almost always caused by one of two things — the HC-05 module not getting enough power, or Android’s battery optimization killing the Bluetooth connection in the background.
For the power issue, check that your HC-05 is powered from the Arduino’s 5V pin with a good quality connection. The HC-05 draws up to 40mA during transmission which is fine for the Arduino’s 5V output, but a loose breadboard connection causes intermittent voltage dips that reset the module. Solder the connections or use a dedicated 3.3V regulator for the HC-05 for a more stable supply.
For the Android battery optimization issue, go to your phone’s Settings then Battery then Battery Optimization. Find your app in the list and set it to Not Optimized or Unrestricted. Android aggressively kills background connections to save battery and this directly affects Bluetooth apps that need to stay connected.
Problem 6: I want to add more buttons to control more things but do not know how to scale the code
This is actually the most common question after getting the basic project working. The good news is the code structure is designed to scale easily.
On the Arduino side, each command is just a number. You already have 92 for ON and 79 for OFF. To add a third device, pick any other number — say 85 for relay 2 ON and 66 for relay 2 OFF. Add those if conditions to the Arduino code just like the existing ones. On the Android side, add a new button to your layout in the XML designer, give it a new ID, and in Java copy the existing button click listener code and change the value being sent to your new number. The pattern repeats for every new button you add. There is no limit to how many commands you can add this way.
Frequently Asked Questions
Do I need to know Java to follow this tutorial?
You need a very basic understanding — enough to know what a variable is, how an if statement works, and how to call a function. You do not need to be a professional Java developer. The tutorial in this article walks through every line of the code with a full explanation. If you have never programmed before, spend one afternoon watching a 30-minute Java basics tutorial on YouTube first and everything in this article will make much more sense. Most of the Android app code follows a repetitive pattern — once you understand one button, adding ten more is just copy and paste with small changes.
Can I use HC-06 instead of HC-05 with this project?
Yes, completely interchangeable for this project. The HC-06 and HC-05 use the same AT command set and the same baud rate. The only practical difference is that the HC-06 can only work as a Bluetooth slave — meaning it can only receive connections, it cannot initiate them. The HC-05 can work as both master and slave. For this project where the phone is always the initiating device and the Arduino is always receiving, the HC-06 works perfectly and is sometimes slightly cheaper.
Can I use this same Android app to control an ESP32 or ESP8266 instead of Arduino?
Yes but with a small change. The ESP32 has built-in Bluetooth so you do not need an HC-05 module at all. You use the ESP32’s built-in BluetoothSerial library in your Arduino IDE code and the Android app code stays exactly the same — it still connects to a Bluetooth device and sends numbers. The ESP8266 does not have Bluetooth so you would still need an external HC-05 or HC-06 module with it, wired the same way as the Arduino version.
My phone is an iPhone. Can I use this app on iOS?
Unfortunately no. This tutorial uses Android Studio and the app runs only on Android. iPhone uses a completely different Bluetooth protocol called BLE (Bluetooth Low Energy) and iOS apps are built using Swift or Objective-C in Xcode which is a completely different development environment. The HC-05 and HC-06 modules use classic Bluetooth and are not compatible with iPhone at all. If you specifically need iOS control, you would need to switch to a BLE-compatible module like the HM-10 and build an iOS app separately. For Android users this project works exactly as described.
Is it possible to control the Arduino from a greater distance than the HC-05 allows?
The HC-05 has a typical range of about 10 meters in open space. Walls, furniture, and interference reduce this significantly. If you need longer range, Bluetooth is simply not the right technology for that. For control over hundreds of meters, use LoRa modules as covered in other articles on this site. For control over WiFi within your home from any room, replace the HC-05 with an ESP8266 or ESP32 and build a simple web server — the phone connects through WiFi and the range becomes limited only by your router coverage. For truly remote control over the internet from anywhere in the world, use the Blynk platform with an ESP32 which I have covered in several other projects.
Why are numbers used as commands instead of text like ON and OFF?
This is purely about efficiency and reliability. Sending the text string “ON” over Bluetooth sends two bytes — the letters O and N. Sending the number 92 sends only one byte. On a slow 9600 baud serial connection, fewer bytes means faster response. More importantly, single byte commands are less likely to be corrupted during transmission. Text strings can also cause confusion with newline characters or spaces that get accidentally added. Numbers are clean, simple, and unambiguous. This is the same approach used in professional serial communication protocols — keep the command set as small and simple as possible.
If you run into a specific error in Android Studio or a connection issue that is not listed here, paste the exact error message in the comments below and I will help you figure out what is going wrong.
Discover more from Electronic Clinic
Subscribe to get the latest posts sent to your email.
thank you very much
but i have an error at the main activity at line 315:
Error:(315, 22) error: cannot find symbol variable action_settings
hi you forgot to add:
to the manifest,
And for the action_settings problem I recommend checking this tutorial that also helped me → https://stackoverflow.com/questions/35727429/cannot-resolve-symbol-action-settings/40341572
Except this, BIG thanks for this tutorial !
I think there are problems on pasting source code so I wanted to said to reference the Controller activity on the manifest
(….)
Thank you for this nice tutorial.
But still have problem with line “case R.id.action_settings:” which I don’t know how to solve.
@SAVOIU Ioan : Tried to understand your link but didn’t know what to do as they mentionned to create a menu to insert action.settings, but we don’t need a menu so it’s a big mystery for me, also that I’m a newbie on Android Studio. So if someone can help
I have also try to make a new folder named “menu_game” in layout folder and declared inside action_settings. There is no more error in the code but the app still crashes. the debugger gives : “Caused by: java.lang.NullPointerException: Attempt to invoke virtual method ‘void android.widget.ListView.setAdapter(android.widget.ListAdapter)” , the two lines concerned 🙁 initList(new ArrayList()); ) and ( listView.setAdapter(adapter); ). What’s wrong, if someone can answer, I can post codes but waiting for somebody…Please.
Hi, @Mastaf, You did not need Setting. comment or remove that function
( @Override
public boolean onOptionsItemSelected(MenuItem item) {
switch (item.getItemId()) {
case R.id.action_settings:
Intent intent = new Intent(MainActivity.this, PreferencesActivity.class);
startActivityForResult(intent, SETTINGS);
break;
}
return super.onOptionsItemSelected(item);
} )
Great tutorial. Good luck!
Hello, did you solve the problem ? I have this problem too and I cant figure it out :/
Thanks for your answer Yamee Roar, I do understand know that is was for the ActionBar with the icon “settings” 😉 If you don’t setup the ActionBar with this variable, it’s unused…
Is it possible you can leave us a copy of the entire project? For some reason the The project does not seem to work when I try and build it.
This project is successfully built by so many guys.
So ive spent like multiple hours trying to figure what I am doing wrong. I can get the app to start but whenever I try to connect through Bluetooth the app crashes. The main issue I had with the code is the action_settings variable which I would comment out because I would get the error stating it was never declared. Would you by any chance know what the issue is?
Seriously, I have no idea what are you missing? I have shared the complete code. I tested it. you can watch the video. People are making this.
I am really not sure. The app keeps crashing. If you are able to leave a copy of the project it would be greatly appreciated.
Dear Sir;
thank you so much for your grear tutorial. I run correctly the code in my phone, but when i execute the app and touch search button, it doesn’t recognize and device, can you please help?
the same thing Hina was facing too. Check your wiring, double check your code.
Now app knows my other phone but it can not recognize my HC05 bluetooth device.
Hallo thanks for this tutorial. I have Problem with “android.support.v7.app.AppCompatActivity; does not exist” i’m using sdkversion 29.
replace this : import android.support.v7.app.AppCompatActivity;
by this : import androidx.appcompat.app.AppCompatActivity;
I have Problem with:
java.lang.NullPointerException: Attempt to invoke virtual method ‘android.widget.ListAdapter android.widget.ListView.getAdapter()’ on a null object reference
I can’t solve it. can you help me
Hi, I have a problem when I tried to turn the light on with the app. I’ve double checked the wiring already so i thought it was my coding. therefore, i downloaded the apk with the link provided. It is still not working. Everything was fine like i can connect the bluetooth but when i touch the light on button, the led light was not responding. Also, i tried to use 330 ohm resistor as well.
This is a fully tested project. IF for you even the APK file is not working, Then there must be some other problem with your hardware. Are you sure your Bluetooth module is ok? the wires are connected in the proper way?
Hi Can you send me APK file by change the button name as LOCK OPEN and LOCK CLOSE
Can you please share the project …. I am having problems in MainAcitivity.java
Just solved the problem with MainActivity errors (listview and action_settings)
listview ERROR:
Add into activity_main -> “android:id=”@+id/listview”
action_settings ERROR:
As the link that SAVOIU Ioan post, create the menu with the code:
It should be already fixed
Pls share the project with me…i am not able to do so
pls helpppp
@Carlos is the android studio project working in your case…pls reply asap
Very Good??? Do you with this project send data from arduino to mobile ?? how?
Nice tutorial. Had to do some modifications to get it working, but I got it. Didn`t try to connect to bluetooth adapter as I must get it first tho.
1.) Follow link posted by SAVOIU Ioan to solve action_settings problem.
2.) replace this : import android.support.v7.app.AppCompatActivity;
by this : import androidx.appcompat.app.AppCompatActivity;
(Do this, posted by Tuday to solve “android.support.v7.app.AppCompatActivity; does not exist” problem).
After that app should work, but one problem remains.
If you press connect button with nothing selected from bluetooth device list app will crash. I`m picky so I worked on solution:
In MainActivity.java add this line:
connect.setEnabled(false);
right after:
search = (Button) findViewById(R.id.search);
connect = (Button) findViewById(R.id.connect);
so you get:
search = (Button) findViewById(R.id.search);
connect = (Button) findViewById(R.id.connect);
connect.setEnabled(false);
This will disable connect button if no device is selected from the list and prevent app from crashing.
Thank you
Hi can you provide me the source code
@Override
public boolean onOptionsItemSelected(MenuItem item) {
switch (item.getItemId()) {
case R.id.action_settings:
Intent intent = new Intent(MainActivity.this, PreferencesActivity.class);
startActivityForResult(intent, SETTINGS);
break;
}
return super.onOptionsItemSelected(item);
}
}
I’m having an issue with this: “Cannot find symbol variable action_settings
Can you please help?
@Override
public boolean onOptionsItemSelected(MenuItem item) {
switch (item.getItemId()) {
case R.id.action_settings:
Intent intent = new Intent(MainActivity.this, PreferencesActivity.class);
startActivityForResult(intent, SETTINGS);
break;
}
Error: cannot find symbol variable action_settings
Please help
@Override
public boolean onOptionsItemSelected(MenuItem item) {
switch (item.getItemId()) {
case R.id.action_settings:
Intent intent = new Intent(MainActivity.this, PreferencesActivity.class);
startActivityForResult(intent, SETTINGS);
break;
}
return super.onOptionsItemSelected(item);
}
error: cannot find symbol variable action_settings
How to control led brightness with it? Any suggestion. Please help me.
I have problem with the code it says I cannot resolve symbol R, I don’t know what this R do and what is it so I cant find the solution anyone might help?:(
same problem here also if you resolved it tell me please
What number of main activities should I add to?
Which line of main activity should I add to?
Can you tell me where to add the main activity?
Which line of main activity should I add?
connect.setEnabled(false);
right after:
search = (Button) findViewById(R.id.search);
connect = (Button) findViewById(R.id.connect);
so you get:
search = (Button) findViewById(R.id.search);
connect = (Button) findViewById(R.id.connect);
connect.setEnabled(false);
Im having an error, for some reason the app crashes when i touch the “search” button, it dosent say anything about any error on android studio, does anybody know how to fix this?
Hi after creating the list_item.xml file you said all errors has been gone, but i still have 5 errors in the code, can you please help me out.
3 of them required bluetooth permission when i click on the red bulb and then click again and gave the premission the error has gone,
but 1 error remains and it is on line 101 about controlling.class,
it say ” cannot resolve ‘controlling'”.
and when i clicked on the red bulb it shows me the 4 ways which are
create class
create enum
create inner class
create interface
what should i do now??
where to add this line can you please tell us in detail
Thank you
same problem bro. Did you find any solution??
Did you figure this out?
are you sure that is it corrrect??
please tell me, thanks
ok,it is good , i like it, it can help me
Im having an error, for some reason the app crashes when i touch the “search” button, it dosent say anything about any error on android studio, does anybody know how to fix this
Hello hope you are doing well. Can you please explain you have specifically taken password1 as 92 and password2 as 79? is there a reason or I can change the numbers according to my choice
try changing both the arduino and android to your liking
if you want to change passwords , you have to change it also in data read Arduino
How did you get around the bluetooth connection issue. startActivity has been deprecated… Whats the fix to the code??? Thanks.
Hello, I was able to follow your code and installed it to my android. but when I click/touch the search button it crashes and exit? I tried to other phones and its the same. does anyone here encountered it?