ThingSpeak Nodemcu ESP8266, Send Sensors Data to ThingSpeak
Last Updated on September 19, 2024 by Engr. Shahzada Fahad
Table of Contents
ThingSpeak Nodemcu ESP8266 Introduction:
ThingSpeak Nodemcu ESP8266, Send Sensors Data to ThingSpeak– This is a getting started tutorial in which you will learn how to start with the ThingSpeak IoT platform, explaining how to create different ThingSpeak channels. We will go through some basic examples; we will be using Nodemcu ESP8266 with ThingSpeak IoT platform.
We will send the sensors data to the ThingSpeak channel fields and finally, we will display the sensors data through Gauges and Charts. If you really want to learn the basics then read this article from start to the very end. Because in this tutorial, I am going to explain the extreme basics, which will help you in advanced level projects.
Without any further delay, let’s get started!!!
Amazon Product links:
DHT11 Temperature and Humidity Module:
*Please Note: These are affiliate links. I may make a commission if you buy the components through these links. I would appreciate your support in this way!
Nodemcu ESP8266 WiFi Module:

As this tutorial is based on the Nodemcu Module, so, first let’s start with the NodeMCU Module. NodeMCU ESP8266 Wifi Module is an open-source Lua based firmware and development board specially targeted for IoT based Applications. It includes firmware that runs on the ESP8266 Wi-Fi SoC from Espressif Systems, and hardware which is based on the ESP-12 module.
Nodemcu ESP8266 Specifications & Features
Microcontroller: Tensilica 32-bit RISC CPU Xtensa LX106
Operating Voltage: 3.3V
Input Voltage: 7-12V
Digital I/O Pins (DIO): 16
Analog Input Pins (ADC): 1
UARTs: 1
SPIs: 1
I2Cs: 1
Flash Memory: 4 MB
SRAM: 64 KB
Clock Speed: 80 MHz
USB-TTL based on CP2102 is included onboard, Enabling Plug n Play
PCB Antenna
Small Sized module to fit smartly inside your IoT projects
Nodemcu ESP8266 Pinout:
For practical purposes ESP8266 NodeMCU V2 and V3 boards present identical pinouts. While working on the NodeMCU based projects we are interested in the following pins.
Power pins (3.3 V).
Ground pins (GND).
Analog pins (A0).
Digital pins (D0 – D8, SD2, SD3, RX and TX – GPIO XX)
Most ESP8266 NodeMCU boards have one input voltage pin (Vin), three power pins (3.3v), four ground pins (GND), one analog pin (A0) and several digital pins (GPIO XX).
Pin Code Arduino alias
A0 A0 A0
D0 GPIO 16 16
D1 GPIO 5 5
D2 GPIO 4 4
D3 GPIO 0 0
D4 GPIO 2 2
D5 GPIO 14 14
D6 GPIO 12 12
D7 GPIO 13 13
D8 GPIO 15 15
SD2 GPIO 9 9
SD3 GPIO 10 10
RX GPIO 3 3
TX GPIO 1 1
Applications of Nodemcu
Prototyping of IoT devices
Low power battery operated applications
Network projects
Projects requiring multiple I/O interfaces with Wi-Fi and Bluetooth functionalities
Want to know more about the Nodemcu Module?
Setting ThingSpeak & Getting API Key:
- Go to https://thingspeak.com/ and create an account if you do not have one. The registration process on the ThingSpeak IoT platform is very simple. After your account is ready.
- Login to your account.

Click on the Channels menu and then click on the New Channel. This will open a new page as you can see in the picture below.

I selected the name as ThingSpeak Nodemcu and followed by the description. To activate a field, simply click on the check box, and you can assign different names to the fields, I selected Value1 to Value5.
Scroll down, check the show status check box, and click on the Save Channel Button. For now you can forget about other fields. So, after you click on the Save button, a new page will open as you can see in the picture below.
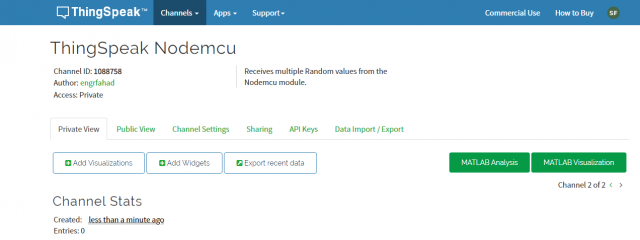
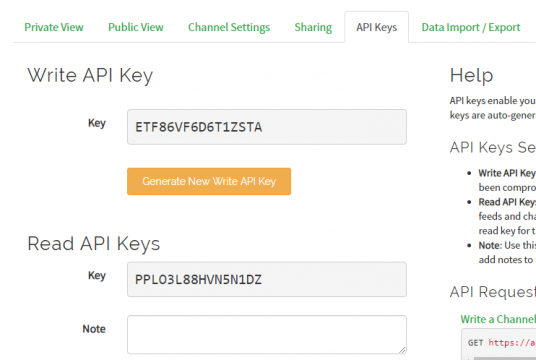
As you can see the channel name at the top “ThingSpeak Nodemcu”. The Channel ID:1088758, and other things. All the selected fields are automatically added, if you scroll down the page. To Copy the API Keys, click on the API Keys,
|
1 2 |
For my channel the Write API Key is ETF86VF6D6T1ZSTA And the Read API Key is PPLO3L88HVN5N1DZ |
You can always generate new keys. For now we will only be using the Channel ID and the Write API key, as we will only be sending data from the Nodemcu ESP8266 to the ThingSpeak IoT Platform.
ThingSpeak Nodemcu ESP8266, Example 1:
In example number1 we don’t need to connect any sensors with the Nodemcu Module. All you need is to connect the Nodemcu module with the Laptop USB port. The next most important thing is to download the ThingSpeak Library. Download other libraries.
The purpose of this example is to send some random multiple values to the ThingSpeak, to check if our programming is working. Later we can modify the same program for other Sensors.
Send Multiple Values to ThingSpeak, Nodemcu Programming:
Open the Arduino IDE and copy and paste the following code.
|
1 2 3 4 5 6 7 8 |
// Use this file to store all of the private credentials // and connection details #define SECRET_SSID "AndroidAP7DF8" // replace MySSID with your WiFi network name #define SECRET_PASS "jamshaidkhan78" // replace MyPassword with your WiFi password #define SECRET_CH_ID 1088758 // replace 0000000 with your channel number #define SECRET_WRITE_APIKEY "ETF86VF6D6T1ZSTA" // replace XYZ with your channel write API Key |
Save the program as the secrets.h. The secrets.h file consists of the WiFi credentials, the channel ID, and the Write API key. Each time you create a channel you get a unique channel ID and a unique Write API key.
Now open a new window, and copy and paste the code given below.
|
1 2 3 4 5 6 7 8 9 10 11 12 13 14 15 16 17 18 19 20 21 22 23 24 25 26 27 28 29 30 31 32 33 34 35 36 37 38 39 40 41 42 43 44 45 46 47 48 49 50 51 52 53 54 55 56 57 58 59 60 61 62 63 64 65 66 67 68 69 70 71 72 73 74 75 76 77 78 79 80 81 82 83 |
//https://www.electroniclinic.com/ // Download Libraries: https://www.electroniclinic.com/arduino-libraries-download-and-projects-they-are-used-in-project-codes/ #include "ThingSpeak.h" #include "secrets.h" #include <ESP8266WiFi.h> char ssid[] = SECRET_SSID; // your network SSID (name) char pass[] = SECRET_PASS; // your network password int keyIndex = 0; // your network key Index number (needed only for WEP) WiFiClient client; unsigned long myChannelNumber = SECRET_CH_ID; const char * myWriteAPIKey = SECRET_WRITE_APIKEY; // Initialize our values int number1 = 0; int number2 = random(0,100); int number3 = random(0,100); int number4 = random(0,100); String myStatus = ""; void setup() { Serial.begin(115200); // Initialize serial WiFi.mode(WIFI_STA); ThingSpeak.begin(client); // Initialize ThingSpeak } void loop() { // Connect or reconnect to WiFi if(WiFi.status() != WL_CONNECTED){ Serial.print("Attempting to connect to SSID: "); Serial.println(SECRET_SSID); while(WiFi.status() != WL_CONNECTED){ WiFi.begin(ssid, pass); // Connect to WPA/WPA2 network. Change this line if using open or WEP network Serial.print("."); delay(5000); } Serial.println("\nConnected."); } // set the fields with the values ThingSpeak.setField(1, number1); ThingSpeak.setField(2, number2); ThingSpeak.setField(3, number3); ThingSpeak.setField(4, number4); // figure out the status message if(number1 > number2){ myStatus = String("field1 is greater than field2"); } else if(number1 < number2){ myStatus = String("field1 is less than field2"); } else{ myStatus = String("field1 equals field2"); } // set the status ThingSpeak.setStatus(myStatus); // write to the ThingSpeak channel int x = ThingSpeak.writeFields(myChannelNumber, myWriteAPIKey); if(x == 200){ Serial.println("Channel update successful."); } else{ Serial.println("Problem updating channel. HTTP error code " + String(x)); } // change the values number1++; if(number1 > 99){ number1 = 0; } number2 = random(0,100); number3 = random(0,100); number4 = random(0,100); delay(20000); // Wait 20 seconds to update the channel again } |
Make sure you save the above to programs in the same folder. If you have installed the correct libraries at this point your program should compile and upload without any problem. I uploaded the above program and I was able to send some random values from the Nodemcu ESP8266 to the ThingSpeak IoT platform.

I successfully received the data. Now, I am 100% sure, my Nodemcu code is working, my ThingSpeak channel settings are ok. Now this time I can go ahead and connect a sensor with the Nodemcu Module.
ThingSpeak Nodemcu ESP8266, Example 2:
In example number2, we will connect a Potentiometer with the Analog pin A0 of the Nodemcu Module. This time we will be using only one field, for this example, I will deactivate the remaining field, while the secrets.h file will remain the same on the programming side.
|
1 2 3 4 5 6 7 8 9 10 11 12 13 14 15 16 17 18 19 20 21 22 23 24 25 26 27 28 29 30 31 32 33 34 35 36 37 38 39 40 41 42 43 44 45 46 47 48 49 50 51 52 53 54 55 56 57 58 59 60 61 62 63 64 65 66 67 68 69 70 71 72 73 74 75 76 77 78 79 80 81 82 83 84 85 |
//https://www.electroniclinic.com/ // Download Libraries: https://www.electroniclinic.com/arduino-libraries-download-and-projects-they-are-used-in-project-codes/ #include "ThingSpeak.h" #include "secrets.h" // secrets.h code is already given above in the first example #include <ESP8266WiFi.h> char ssid[] = SECRET_SSID; // your network SSID (name) char pass[] = SECRET_PASS; // your network password int keyIndex = 0; // your network key Index number (needed only for WEP) WiFiClient client; unsigned long myChannelNumber = SECRET_CH_ID; const char * myWriteAPIKey = SECRET_WRITE_APIKEY; // Initialize our values int number1 = 0; int number2 = random(0,100); int number3 = random(0,100); int number4 = random(0,100); String myStatus = ""; // sensor int Pot = A0; void setup() { Serial.begin(115200); // Initialize serial pinMode(Pot,INPUT); WiFi.mode(WIFI_STA); ThingSpeak.begin(client); // Initialize ThingSpeak } void loop() { // Connect or reconnect to WiFi if(WiFi.status() != WL_CONNECTED){ Serial.print("Attempting to connect to SSID: "); Serial.println(SECRET_SSID); while(WiFi.status() != WL_CONNECTED){ WiFi.begin(ssid, pass); // Connect to WPA/WPA2 network. Change this line if using open or WEP network Serial.print("."); delay(5000); } Serial.println("\nConnected."); } int data = map(analogRead(Pot),0,1023,0,255); // set the fields with the values ThingSpeak.setField(1, data); // ThingSpeak.setField(2, number2); // ThingSpeak.setField(3, number3); // ThingSpeak.setField(4, number4); // figure out the status message if(number1 > number2){ myStatus = String("field1 is greater than field2"); } else if(number1 < number2){ myStatus = String("field1 is less than field2"); } else{ myStatus = String("field1 equals field2"); } // set the status ThingSpeak.setStatus(myStatus); // write to the ThingSpeak channel int x = ThingSpeak.writeFields(myChannelNumber, myWriteAPIKey); if(x == 200){ Serial.println("Channel update successful."); } else{ Serial.println("Problem updating channel. HTTP error code " + String(x)); } // change the values number1++; if(number1 > 99){ number1 = 0; } number2 = random(0,100); number3 = random(0,100); number4 = random(0,100); delay(20000); // Wait 20 seconds to update the channel again } |
I simply uploaded this code. Opened my channel settings and deactivated the other fields and also change the name of the field1 to the Potentiometer.

You can see a change in the graph, this is because I rotated the knob of the Potentiometer. As there are delays, so it takes time to display the value.
ThingSpeak Nodemcu ESP8266, Example 3:
In example number 3, we will make a weather station using DHT11, ThingSpeak, and Nodemcu ESP8266. The Humidity and Temperature values will be displayed on the Charts.
DHT11 with Nodemcu ESP8266 Circuit Diagram:
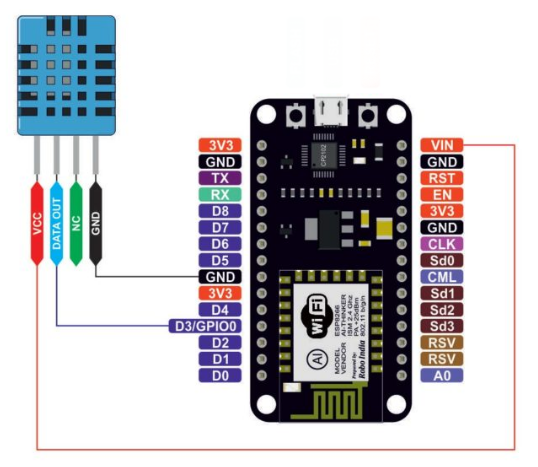
If you have never used the DHT11 Temperature and Humidity Sensor then read my article. The circuit diagram is very simple. You only need to connect the VCC, DATA OUT, and GND pins of the DHT11 Temperature and Humidity sensors with the Nodemcu Module.
ThingSpeak Nodemcu Weather Station Programming:
The purpose of the following program is to send the Humidity and Temperature values to the ThingSpeak IoT platform where these values are displayed on the charts. This time I added another library for the DHT11 Sensor.
|
1 2 3 4 5 6 7 8 9 10 11 12 13 14 15 16 17 18 19 20 21 22 23 24 25 26 27 28 29 30 31 32 33 34 35 36 37 38 39 40 41 42 43 44 45 46 47 48 49 50 51 52 53 54 55 56 57 58 59 60 61 |
//https://www.electroniclinic.com/ // Download Libraries: https://www.electroniclinic.com/arduino-libraries-download-and-projects-they-are-used-in-project-codes/ #include "ThingSpeak.h" #include "secrets.h" #include <ESP8266WiFi.h> #include <DHT.h> // Including library for dht char ssid[] = SECRET_SSID; // your network SSID (name) char pass[] = SECRET_PASS; // your network password int keyIndex = 0; // your network key Index number (needed only for WEP) WiFiClient client; unsigned long myChannelNumber = SECRET_CH_ID; const char * myWriteAPIKey = SECRET_WRITE_APIKEY; #define DHTPIN 0 //pin where the dht11 is connected DHT dht(DHTPIN, DHT11); void setup() { Serial.begin(115200); // Initialize serial WiFi.mode(WIFI_STA); ThingSpeak.begin(client); // Initialize ThingSpeak } void loop() { // Connect or reconnect to WiFi if(WiFi.status() != WL_CONNECTED){ Serial.print("Attempting to connect to SSID: "); Serial.println(SECRET_SSID); while(WiFi.status() != WL_CONNECTED){ WiFi.begin(ssid, pass); // Connect to WPA/WPA2 network. Change this line if using open or WEP network Serial.print("."); delay(5000); } Serial.println("\nConnected."); } float h = dht.readHumidity(); float t = dht.readTemperature(); if (isnan(h) || isnan(t)) { Serial.println("Failed to read from DHT sensor!"); return; } // set the fields with the values ThingSpeak.setField(1, h); ThingSpeak.setField(2, t); // write to the ThingSpeak channel int x = ThingSpeak.writeFields(myChannelNumber, myWriteAPIKey); if(x == 200){ Serial.println("Channel update successful."); } else{ Serial.println("Problem updating channel. HTTP error code " + String(x)); } delay(20000); // Wait 20 seconds to update the channel again } |
If you have any questions regarding this article, let me know in a comment.
Discover more from Electronic Clinic
Subscribe to get the latest posts sent to your email.


Hello Sir, how I can I get these library secrets.h I search for it in manage library but could not find it
Hello, please how can I modify your sketch to be able to monitor and send multiple analogue values to thingspeak on nodemcu?
That is not a library.. it’s a text file where you should place your credentials (so you don’t have to show them on the program code). That information is above, but you can find it copied below)
Open any text editor, copy the following lines and save file as “secrets.h” to the same directory where you have the sketch (.ino) file.
// Use this file to store all of the private credentials
// and connection details
#define SECRET_SSID “MySSID” // replace MySSID with your WiFi network name
#define SECRET_PASS “MyPassword” // replace MyPassword with your WiFi password
#define SECRET_CH_ID 00000000 // replace 0000000 with your channel number
#define SECRET_WRITE_APIKEY “XYZ” // replace XYZ with your thingspeak’s channel write API Key
I am getting error message:
Problem updating channel. HTTP error code -304
What may be the potential reason for this.