How to Build a Google Sheet Attendance Tracker with ESP8266 and R557 Biometric Sensor
Google Sheet for Employee time tracker or Student Time Tracker
Last Updated on May 11, 2026 by Engr. Shahzada Fahad
Table of Contents
Google Sheet Attendance Tracker:
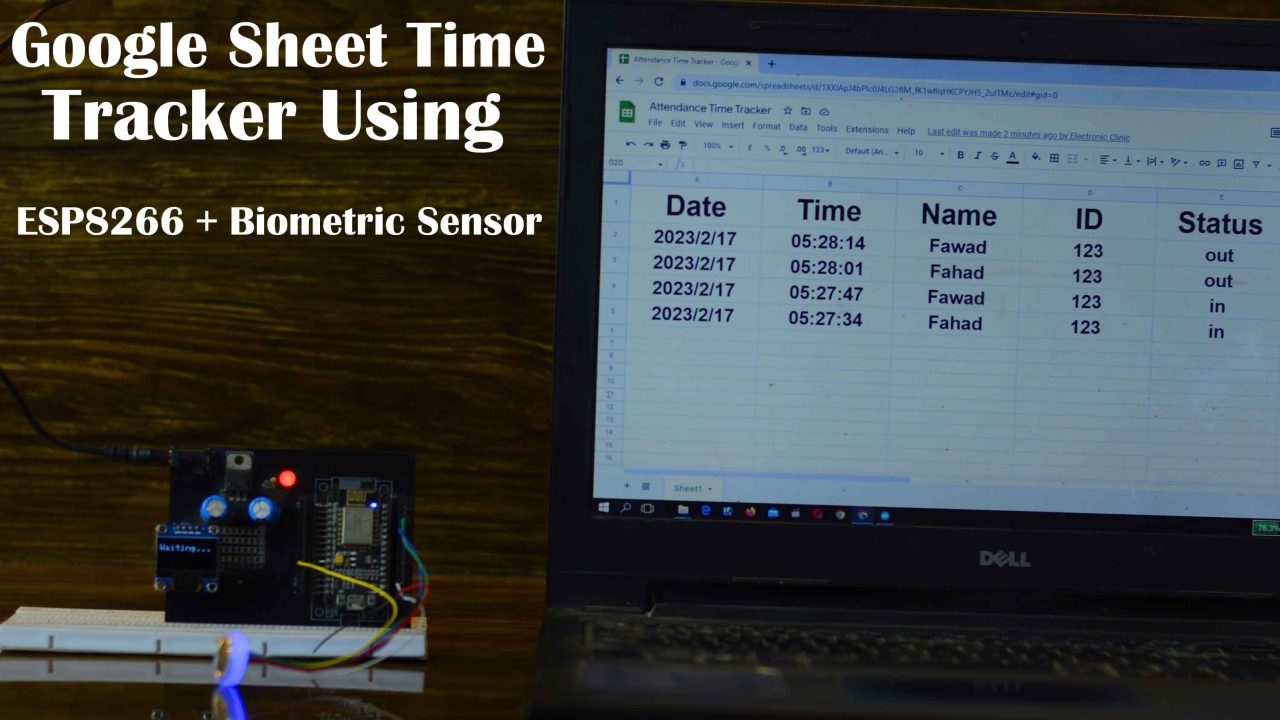
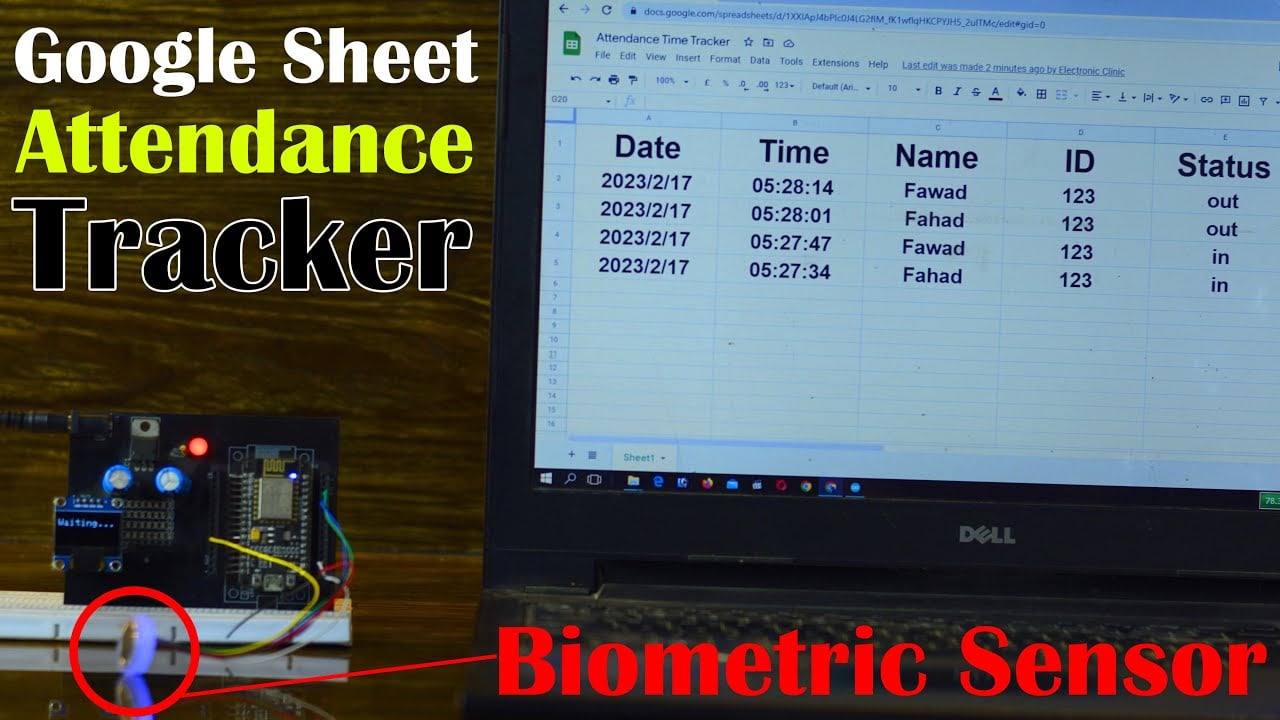
Google Sheet Attendance Tracker using ESP8266 & Biometric Sensor R557- In today’s article, you will learn how to make an IoT based In/Out Student Time Tracker or Employee Time Tracker System using the Nodemcu ESP8266 WiFi Module, the R557 Biometric Sensor, an I2C-supported SSD1306 Oled Display Module, and Google Spreadsheet or Google Sheet. So, without any further delay let’s get started!!!
Related article:
Arduino and R557 Fingerprint-based Door Lock Control System
Amazon Links:
R557 Biometric Sensor or Fingerprint Sensor
Disclosure: These are affiliate links. As an Amazon Associate I earn from qualifying purchases.
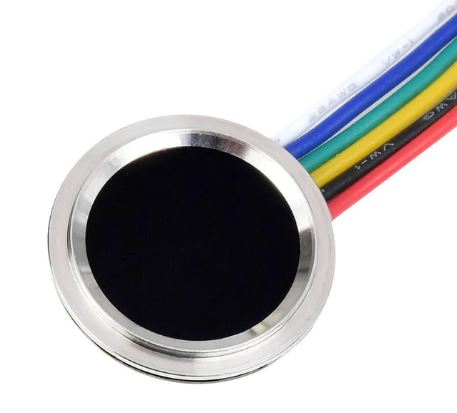
R557 Capacitive Biometric Sensor:
The reason behind selecting this particular Biometric Sensor or Fingerprint module is that it’s low-cost, smaller in size, and it’s insanely fast. It operates on a low voltage of 3.3V, making it ideal for battery-powered systems. It can be used with 5v and 3.3V compatible controller boards like Arduino, ESP32, STM32, ESP8266, Raspberry Pi Pico, and so on. With this Capacitive Fingerprint sensor, you can easily integrate biometric authentication into your projects.
Technical specifications:
Technical parameter:
Supply voltage: DC 3.3V
Supply current:
Working current: 30mA (typ.)
Peak current: 40mA
Fingerprint image entry time: <0.3 seconds
Collection window area: 12.8mm in diameter
Image pixel: 160*160 pixel
Image Resolution: 508dpi
Match method:
Comparison method (1:1)
Search method (1:N)
Storage capacity: 120 pieces
Security level: five (from low to high: 1, 2, 3, 4, 5)
False Recognition Rate (FAR): <0.0001%
Authentic rejection rate (FRR): <1.0%
Search time: <0.3 seconds (1:1000, average)
Host computer interface: RS232 (TTL logic level, 3.3V)
Communication baud rate: (9600?N)bps where N=1~12 (default value N=6, ie 57600bps)
Working environment:
Temperature: -20 to +45?
Relative humidity: 10%RH-85%RH (non-condensing)
There is an RGB Led inside this module. So, when the fingerprint sensor is ON it shows Blue light. When the Fingerprint scanning operation is successful it shows Green Light, and when the operation is failed, it shows Red light.
It includes a storage capacity of up to 120 fingerprints, a fast recognition speed of under 1 second, and a high resolution image sensor that captures clear and accurate fingerprints.
R557 Capacitive Fingerprint Sensor Pinout:
Wiring
1 VT Finger detection
2 Out IRQ
3 VCC 3.3
4 TX 3.3 Logic level
5 RX 3.3 Logic level
6 GND
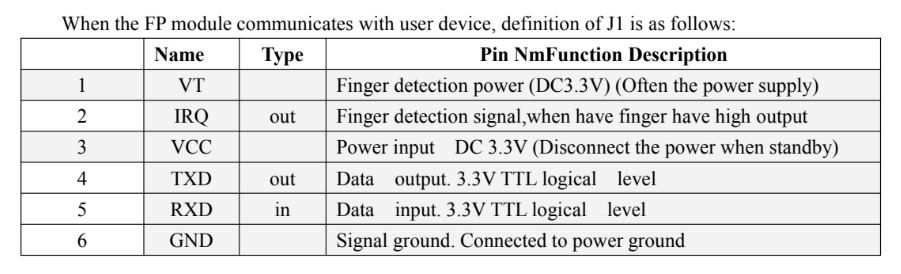
1st wire is the VT. This is the Finger Detection power and this wire is connected with the 3.3V.
2nd wire is the IRQ. This is the Finger detection signal wire. When there is a finger, it outputs a high signal.
3rd wire is the VCC and it should be connected with 3.3V.
4th and 5th wires are TXD and RXD, both are 3.3V TTL logical level. And
6th wire is the GND and it should be connected with the ground.
Now, let’s go ahead and take a look at the circuit diagram.
R557 Capacitive Biometric Sensor with ESP8266:

The VT and VCC wires of the R557 Capacitive Fingerprint sensor are connected with the Nodemcu ESP8266 3.3V Pin. The IRQ wire is left unconnected. The TXD and RXD wires are connected with pins D3 and D4. And the ground wire is connected with the ground pin of the Nodemcu ESP8266 WiFi module.
The GND and VDD pins of the SSD1306 Oled display module are connected with the 3.3V and GND pins of the Nodemcu ESP8266 WiFi module. Whereas the SCK or SCL and SDA pins of the Oled display module are connected with the D1 and D2 pins of the Nodemcu Module. D1 is the SCL and D2 is the SDA.
On the Left side is the regulated 5V power supply based on the 7805 voltage regulator. This is optional. If you want to power up your project using your laptop or PC then there is no need for this 5V regulated power supply. But if you want to externally power up your project using a 12v battery or Adaptor then you will need this regulated 5 volts power supply.
![]()
As usual, I am using the same ESP8266 development board. It doesn’t matter if you don’t have this development board you can do all the connections on a breadboard. Anyway, I have connected everything as per the circuit diagram.
Fingerprint Library Installation:
Now, the next step is to install the Arduino Library for the R557 Capacitive Fingerprint Sensor.
For this, open the Arduino IDE. Click on the sketch Menu, go to Include Library, and then click on manage libraries.
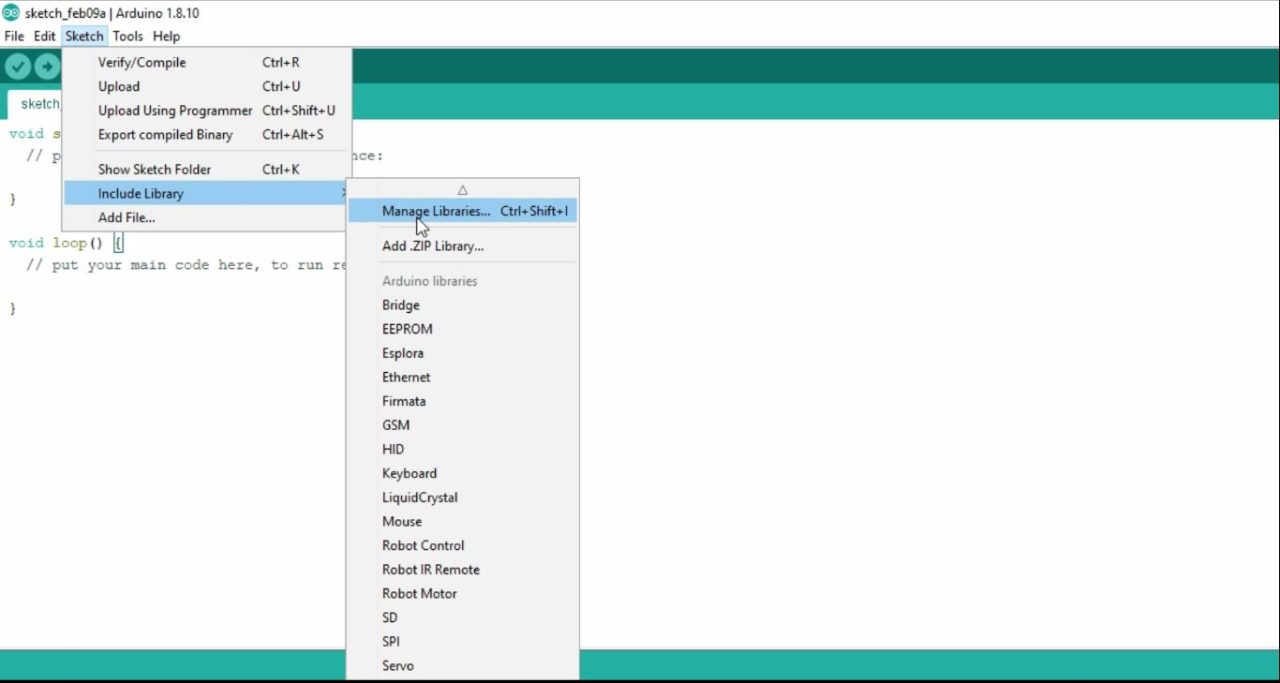
Search for the Adafruit Fingerprint.
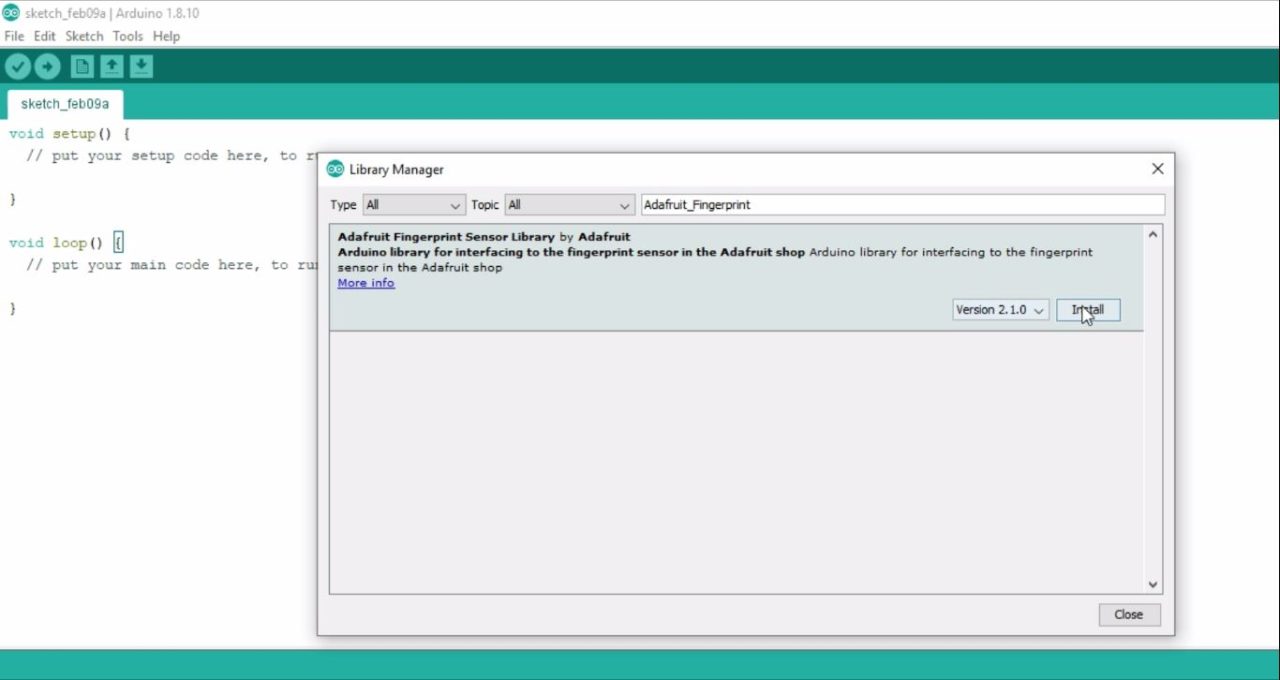
Click on the install button.
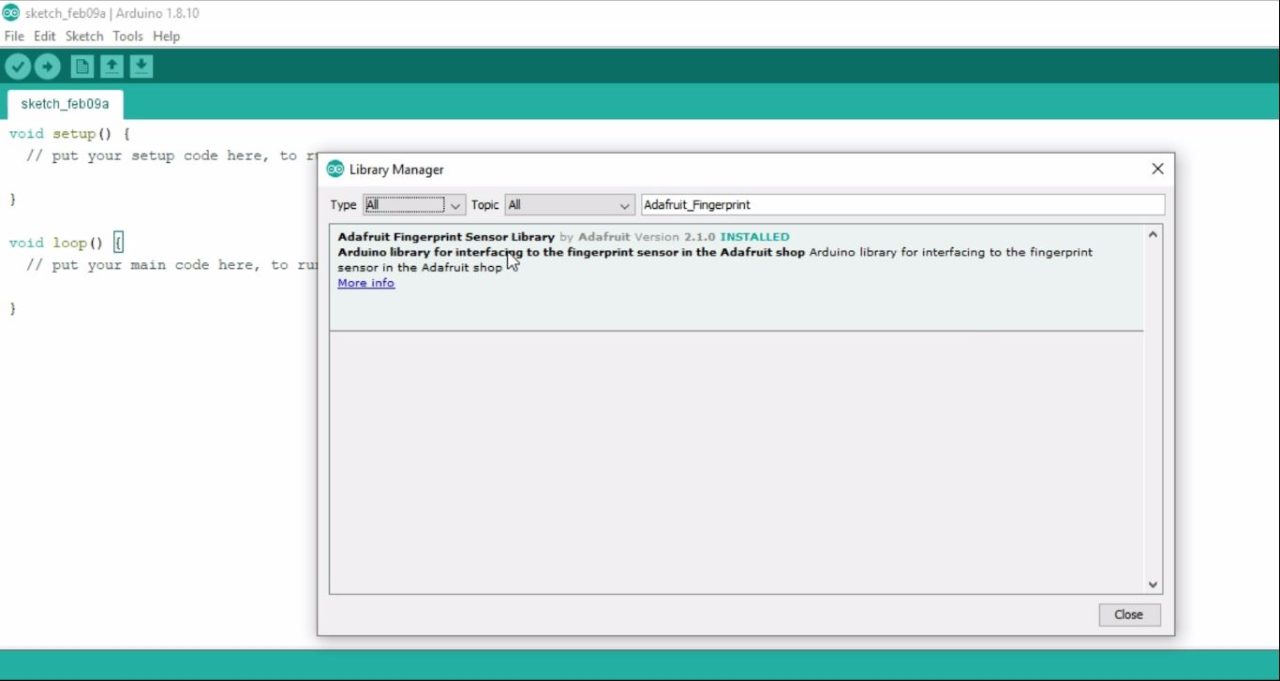
You can see my Adafruit Fingerprint Sensor Library is now installed.
Next, for the Fingerprint enrollment connect your Nodemcu ESP8266 WiFi module with the Laptop/PC and Upload the following sketch.
Fingerprint Enrollment Code:
|
1 2 3 4 5 6 7 8 9 10 11 12 13 14 15 16 17 18 19 20 21 22 23 24 25 26 27 28 29 30 31 32 33 34 35 36 37 38 39 40 41 42 43 44 45 46 47 48 49 50 51 52 53 54 55 56 57 58 59 60 61 62 63 64 65 66 67 68 69 70 71 72 73 74 75 76 77 78 79 80 81 82 83 84 85 86 87 88 89 90 91 92 93 94 95 96 97 98 99 100 101 102 103 104 105 106 107 108 109 110 111 112 113 114 115 116 117 118 119 120 121 122 123 124 125 126 127 128 129 130 131 132 133 134 135 136 137 138 139 140 141 142 143 144 145 146 147 148 149 150 151 152 153 154 155 156 157 158 159 160 161 162 163 164 165 166 167 168 169 170 171 172 173 174 175 176 177 178 179 180 181 182 183 184 185 186 187 188 189 190 191 192 193 194 195 196 197 198 199 200 201 202 203 204 205 206 207 208 209 210 |
#include <Adafruit_Fingerprint.h> #if (defined(__AVR__) || defined(ESP8266)) && !defined(__AVR_ATmega2560__) SoftwareSerial mySerial(D3, D4); #else // On Leonardo/M0/etc, others with hardware serial, use hardware serial! // #0 is green wire, #1 is white #define mySerial Serial1 #endif Adafruit_Fingerprint finger = Adafruit_Fingerprint(&mySerial); uint8_t id; void setup() { Serial.begin(9600); while (!Serial); // For Yun/Leo/Micro/Zero/... delay(100); Serial.println("\n\nAdafruit Fingerprint sensor enrollment"); // set the data rate for the sensor serial port finger.begin(57600); if (finger.verifyPassword()) { Serial.println("Found fingerprint sensor!"); } else { Serial.println("Did not find fingerprint sensor :("); while (1) { delay(1); } } Serial.println(F("Reading sensor parameters")); finger.getParameters(); Serial.print(F("Status: 0x")); Serial.println(finger.status_reg, HEX); Serial.print(F("Sys ID: 0x")); Serial.println(finger.system_id, HEX); Serial.print(F("Capacity: ")); Serial.println(finger.capacity); Serial.print(F("Security level: ")); Serial.println(finger.security_level); Serial.print(F("Device address: ")); Serial.println(finger.device_addr, HEX); Serial.print(F("Packet len: ")); Serial.println(finger.packet_len); Serial.print(F("Baud rate: ")); Serial.println(finger.baud_rate); } uint8_t readnumber(void) { uint8_t num = 0; while (num == 0) { while (! Serial.available()); num = Serial.parseInt(); } return num; } void loop() // run over and over again { Serial.println("Ready to enroll a fingerprint!"); Serial.println("Please type in the ID # (from 1 to 127) you want to save this finger as..."); id = readnumber(); if (id == 0) {// ID #0 not allowed, try again! return; } Serial.print("Enrolling ID #"); Serial.println(id); while (! getFingerprintEnroll() ); } uint8_t getFingerprintEnroll() { int p = -1; Serial.print("Waiting for valid finger to enroll as #"); Serial.println(id); while (p != FINGERPRINT_OK) { p = finger.getImage(); switch (p) { case FINGERPRINT_OK: Serial.println("Image taken"); break; case FINGERPRINT_NOFINGER: Serial.println("."); break; case FINGERPRINT_PACKETRECIEVEERR: Serial.println("Communication error"); break; case FINGERPRINT_IMAGEFAIL: Serial.println("Imaging error"); break; default: Serial.println("Unknown error"); break; } } // OK success! p = finger.image2Tz(1); switch (p) { case FINGERPRINT_OK: Serial.println("Image converted"); break; case FINGERPRINT_IMAGEMESS: Serial.println("Image too messy"); return p; case FINGERPRINT_PACKETRECIEVEERR: Serial.println("Communication error"); return p; case FINGERPRINT_FEATUREFAIL: Serial.println("Could not find fingerprint features"); return p; case FINGERPRINT_INVALIDIMAGE: Serial.println("Could not find fingerprint features"); return p; default: Serial.println("Unknown error"); return p; } Serial.println("Remove finger"); delay(2000); p = 0; while (p != FINGERPRINT_NOFINGER) { p = finger.getImage(); } Serial.print("ID "); Serial.println(id); p = -1; Serial.println("Place same finger again"); while (p != FINGERPRINT_OK) { p = finger.getImage(); switch (p) { case FINGERPRINT_OK: Serial.println("Image taken"); break; case FINGERPRINT_NOFINGER: Serial.print("."); break; case FINGERPRINT_PACKETRECIEVEERR: Serial.println("Communication error"); break; case FINGERPRINT_IMAGEFAIL: Serial.println("Imaging error"); break; default: Serial.println("Unknown error"); break; } } // OK success! p = finger.image2Tz(2); switch (p) { case FINGERPRINT_OK: Serial.println("Image converted"); break; case FINGERPRINT_IMAGEMESS: Serial.println("Image too messy"); return p; case FINGERPRINT_PACKETRECIEVEERR: Serial.println("Communication error"); return p; case FINGERPRINT_FEATUREFAIL: Serial.println("Could not find fingerprint features"); return p; case FINGERPRINT_INVALIDIMAGE: Serial.println("Could not find fingerprint features"); return p; default: Serial.println("Unknown error"); return p; } // OK converted! Serial.print("Creating model for #"); Serial.println(id); p = finger.createModel(); if (p == FINGERPRINT_OK) { Serial.println("Prints matched!"); } else if (p == FINGERPRINT_PACKETRECIEVEERR) { Serial.println("Communication error"); return p; } else if (p == FINGERPRINT_ENROLLMISMATCH) { Serial.println("Fingerprints did not match"); return p; } else { Serial.println("Unknown error"); return p; } Serial.print("ID "); Serial.println(id); p = finger.storeModel(id); if (p == FINGERPRINT_OK) { Serial.println("Stored!"); } else if (p == FINGERPRINT_PACKETRECIEVEERR) { Serial.println("Communication error"); return p; } else if (p == FINGERPRINT_BADLOCATION) { Serial.println("Could not store in that location"); return p; } else if (p == FINGERPRINT_FLASHERR) { Serial.println("Error writing to flash"); return p; } else { Serial.println("Unknown error"); return p; } return true; } |
After uploading this code; next open the serial monitor and follow the instructions. If you find it difficult to enroll your fingers then you can follow my video tutorial given at the end of this article. Anyway, I enrolled two fingers “the forefinger and the middle finger” I assigned 3 as an ID to the forefinger and 4 as an ID to my Middle finger. One finger is going to represent Fahad and another finger is going to represent Fawad. Now, let’s go ahead and start with Google Sheet for time tracking.
Google Sheet Setup:
![]()
You will need to carefully setup your Google Spreadsheet or Google sheet for logging the required data. If you miss anything, you won’t be able to get it connected to your Nodemcu ESP8266 WiFi Module. This is the same Google sheet I setup for my ESP8266 and PN532 NFC RFID module-based student or employee time tracking. I only changed the name of the Google Sheet while everything else remains exactly the same. So, for the step-by-step explanation read my article on Google spreadsheet and PN532 RFID module. The only difference is that that time I was using an RFID module while this time I am using a Biometric sensor or Fingerprint sensor.
Google Sheet Attendance Tracker Code:
|
1 2 3 4 5 6 7 8 9 10 11 12 13 14 15 16 17 18 19 20 21 22 23 24 25 26 27 28 29 30 31 32 33 34 35 36 37 38 39 40 41 42 43 44 45 46 47 48 49 50 51 52 53 54 55 56 57 58 59 60 61 62 63 64 65 66 67 68 69 70 71 72 73 74 75 76 77 78 79 80 81 82 83 84 85 86 87 88 89 90 91 92 93 94 95 96 97 98 99 100 101 102 103 104 105 106 107 108 109 110 111 112 113 114 115 116 117 118 119 120 121 122 123 124 125 126 127 128 129 130 131 132 133 134 135 136 137 138 139 140 141 142 143 144 145 146 147 148 149 150 151 152 153 154 155 156 157 158 159 160 161 162 163 164 165 166 167 168 169 170 171 172 173 174 175 176 177 178 179 180 181 182 183 184 185 186 187 188 189 190 191 192 193 194 195 196 197 198 199 200 201 202 203 204 205 206 207 208 209 210 211 212 213 214 215 216 217 218 219 220 221 222 223 224 225 226 227 228 229 230 231 232 233 234 235 236 237 238 239 240 241 242 243 244 245 246 247 248 249 250 251 252 253 254 255 256 257 258 259 260 261 262 263 264 265 266 267 268 269 270 271 272 273 274 275 276 277 278 279 280 281 282 283 284 285 286 287 288 289 290 291 292 293 294 295 296 297 298 299 300 301 302 303 304 305 306 307 308 309 310 311 312 313 314 315 316 317 318 319 320 321 322 323 324 325 326 327 328 329 330 331 332 333 334 335 336 337 338 339 340 341 342 343 344 345 346 347 348 349 350 351 352 353 354 |
#include <Adafruit_GFX.h> #include <Adafruit_SSD1306.h> #include <Adafruit_Fingerprint.h> #include <Arduino.h> #include <ESP8266WiFi.h> #include "HTTPSRedirect.h" #include <Wire.h> int u=0; int v=0; #if (defined(__AVR__) || defined(ESP8266)) && !defined(__AVR_ATmega2560__) SoftwareSerial mySerial(D3, D4); #else // On Leonardo/M0/etc, others with hardware serial, use hardware serial! // #0 is green wire, #1 is white #define mySerial Serial1 #endif Adafruit_Fingerprint finger = Adafruit_Fingerprint(&mySerial); // Enter network credentials: const char* ssid = "AndroidAP3DEC"; const char* password = "electroniclinic"; // Enter Google Script Deployment ID: const char *GScriptId = "AKfycbwmOKtVpFvW84U-A_-TeNyA3a-eyfXbO6kNg-WuErOYuNA0WW9XKKXlAddlF6iDnjmWQQ"; // Enter command (insert_row or append_row) and your Google Sheets sheet name (default is Sheet1): String payload_base = "{\"command\": \"insert_row\", \"sheet_name\": \"Sheet1\", \"values\": "; String payload = ""; // Google Sheets setup (do not edit) const char* host = "script.google.com"; const int httpsPort = 443; const char* fingerprint = ""; String url = String("/macros/s/") + GScriptId + "/exec"; HTTPSRedirect* client = nullptr; // Declare variables that will be published to Google Sheets String user = ""; String id = ""; String enter =""; #define SCREEN_WIDTH 128 // OLED display width, in pixels #define SCREEN_HEIGHT 64 // OLED display height, in pixels // Declaration for an SSD1306 display connected to I2C (SDA, SCL pins) #define OLED_RESET -1 // Reset pin # (or -1 if sharing Arduino reset pin) Adafruit_SSD1306 display(SCREEN_WIDTH, SCREEN_HEIGHT, &Wire, OLED_RESET); void setup() { Serial.begin(9600); Serial.println('\n'); Serial.println("System initialized"); // Connect to WiFi WiFi.begin(ssid, password); Serial.print("Connecting to "); Serial.print(ssid); Serial.println(" ..."); while (WiFi.status() != WL_CONNECTED) { delay(1000); Serial.print("."); } Serial.println('\n'); Serial.println("Connection established!"); Serial.print("IP address:\t"); Serial.println(WiFi.localIP()); // Use HTTPSRedirect class to create a new TLS connection client = new HTTPSRedirect(httpsPort); client->setInsecure(); client->setPrintResponseBody(true); client->setContentTypeHeader("application/json"); Serial.print("Connecting to "); Serial.println(host); // Try to connect for a maximum of 5 times bool flag = false; for (int i=0; i<5; i++){ int retval = client->connect(host, httpsPort); if (retval == 1){ flag = true; Serial.println("Connected"); break; } else Serial.println("Connection failed. Retrying..."); } if (!flag){ Serial.print("Could not connect to server: "); Serial.println(host); return; } delete client; // delete HTTPSRedirect object client = nullptr; // delete HTTPSRedirect object display.begin(SSD1306_SWITCHCAPVCC, 0x3C); delay(2000); display.clearDisplay(); display.setTextColor(WHITE); delay(10); while (!Serial); // For Yun/Leo/Micro/Zero/... delay(100); Serial.println("\n\nAdafruit finger detect test"); // set the data rate for the sensor serial port finger.begin(57600); delay(5); if (finger.verifyPassword()) { Serial.println("Found fingerprint sensor!"); } else { Serial.println("Did not find fingerprint sensor :("); while (1) { delay(1); } } Serial.println(F("Reading sensor parameters")); finger.getParameters(); Serial.print(F("Status: 0x")); Serial.println(finger.status_reg, HEX); Serial.print(F("Sys ID: 0x")); Serial.println(finger.system_id, HEX); Serial.print(F("Capacity: ")); Serial.println(finger.capacity); Serial.print(F("Security level: ")); Serial.println(finger.security_level); Serial.print(F("Device address: ")); Serial.println(finger.device_addr, HEX); Serial.print(F("Packet len: ")); Serial.println(finger.packet_len); Serial.print(F("Baud rate: ")); Serial.println(finger.baud_rate); finger.getTemplateCount(); if (finger.templateCount == 0) { Serial.print("Sensor doesn't contain any fingerprint data. Please run the 'enroll' example."); } else { Serial.println("Waiting for valid finger..."); Serial.print("Sensor contains "); Serial.print(finger.templateCount); Serial.println(" templates"); } } void loop() { // create some fake data to publish display.clearDisplay(); display.setTextSize(2); display.setCursor(0, 10); display.print("Waiting..."); display.display(); getFingerprintID(); } void updatesheet(String user, String id, String enter) { static bool flag = false; if (!flag){ client = new HTTPSRedirect(httpsPort); client->setInsecure(); flag = true; client->setPrintResponseBody(true); client->setContentTypeHeader("application/json"); } if (client != nullptr){ if (!client->connected()){ client->connect(host, httpsPort); } } else{ Serial.println("Error creating client object!"); } // Create json object string to send to Google Sheets payload = payload_base + "\"" + user + "," + id + "," + enter + "\"}"; // Publish data to Google Sheets Serial.println("Publishing data..."); Serial.println(payload); if(client->POST(url, host, payload)){ // do stuff here if publish was successful } else{ // do stuff here if publish was not successful Serial.println("Error while connecting"); } // a delay of several seconds is required before publishing again delay(5000); } uint8_t getFingerprintID() { uint8_t p = finger.getImage(); switch (p) { case FINGERPRINT_OK: Serial.println("Image taken"); break; case FINGERPRINT_NOFINGER: Serial.println("No finger detected"); finger.LEDcontrol(FINGERPRINT_LED_OFF, 0, FINGERPRINT_LED_BLUE); finger.LEDcontrol(FINGERPRINT_LED_OFF, 0, FINGERPRINT_LED_RED); return p; case FINGERPRINT_PACKETRECIEVEERR: Serial.println("Communication error"); return p; case FINGERPRINT_IMAGEFAIL: Serial.println("Imaging error"); return p; default: Serial.println("Unknown error"); return p; } // OK success! p = finger.image2Tz(); switch (p) { case FINGERPRINT_OK: Serial.println("Image converted"); break; case FINGERPRINT_IMAGEMESS: Serial.println("Image too messy"); return p; case FINGERPRINT_PACKETRECIEVEERR: Serial.println("Communication error"); return p; case FINGERPRINT_FEATUREFAIL: Serial.println("Could not find fingerprint features"); return p; case FINGERPRINT_INVALIDIMAGE: Serial.println("Could not find fingerprint features"); return p; default: Serial.println("Unknown error"); return p; } // OK converted! p = finger.fingerSearch(); Serial.println("finger print id"); Serial.println(p); if (p == FINGERPRINT_OK) { Serial.println("Found a print match!"); finger.LEDcontrol(FINGERPRINT_LED_FLASHING, 25, FINGERPRINT_LED_PURPLE, 10); delay(1000); if(finger.fingerID==3) { if(u==0) { display.clearDisplay(); display.setTextSize(2); display.setCursor(0, 10); display.print("Success"); display.display(); user="Fahad"; id="123"; enter="in"; updatesheet(user,id, enter); u=1; } else if(u==1) { display.clearDisplay(); display.setTextSize(2); display.setCursor(0, 10); display.print("Success"); display.display(); enter=""; user="Fahad"; id="123"; enter="out"; updatesheet(user,id, enter); u=0; } } if(finger.fingerID==4) { if(v==0) { display.clearDisplay(); display.setTextSize(2); display.setCursor(0, 10); display.print("Success"); display.display(); enter=""; user="Fawad"; id="123"; enter="in"; updatesheet(user,id, enter); v=1; } else if(v==1) { display.clearDisplay(); display.setTextSize(2); display.setCursor(0, 10); display.print("Success"); display.display(); enter=""; user="Fawad"; id="123"; enter="out"; updatesheet(user,id, enter); v=0; } } } else if (p == FINGERPRINT_PACKETRECIEVEERR) { Serial.println("Communication error"); return p; } else if (p == FINGERPRINT_NOTFOUND) { finger.LEDcontrol(FINGERPRINT_LED_FLASHING, 25, FINGERPRINT_LED_RED, 10); delay(1000); Serial.println("Did not find a match"); return p; } else { Serial.println("Unknown error"); return p; } // found a match! Serial.print("Found ID #"); Serial.print(finger.fingerID); Serial.print(" with confidence of "); Serial.println(finger.confidence); return finger.fingerID; } // returns -1 if failed, otherwise returns ID # int getFingerprintIDez() { uint8_t p = finger.getImage(); if (p != FINGERPRINT_OK) return -1; p = finger.image2Tz(); if (p != FINGERPRINT_OK) return -1; p = finger.fingerFastSearch(); if (p != FINGERPRINT_OK) return -1; // found a match! Serial.print("Found ID #"); Serial.print(finger.fingerID); Serial.print(" with confidence of "); Serial.println(finger.confidence); return finger.fingerID; } |
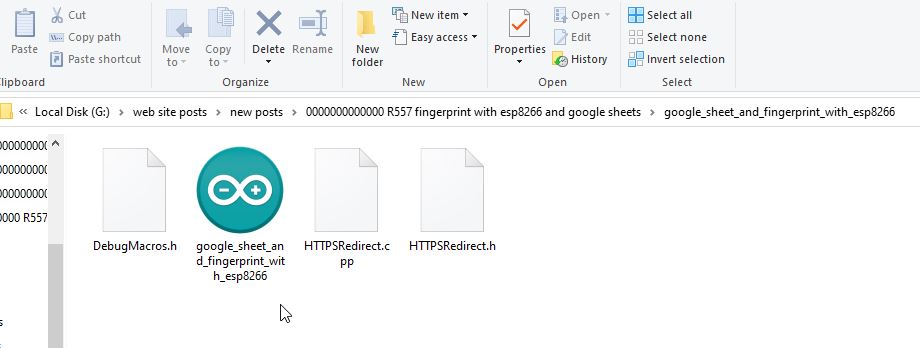
This is the final code and these are the same libraries I previously used. If you compare this code with the RFID and Google spreadsheet based project code; then you will better understand how and why I made certain changes. And one more thing, keep the main code file, DebugMaros.h, HTTPSRedirect.cpp, and HTTPSRedirect.h files all in the same folder.
Anyway, let me show you how I used the Finger IDs and what values I am sending to Google Sheet.
|
1 2 3 4 5 6 7 8 9 10 11 12 13 14 15 16 17 18 19 20 21 |
if(finger.fingerID==3) { if(u==0) { user="Fahad"; id="123"; enter="in"; updatesheet(user,id, enter); u=1; } else if(u==1) { enter=""; user="Fahad"; id="123"; enter="out"; updatesheet(user,id, enter); u=0; } } |
If the finger ID == 3 and if u == 0 means if the person is scanning his finger for the first time then send these values to the Google sheet.
|
1 2 3 4 |
user="Fahad"; id="123"; enter="in"; updatesheet(user,id, enter); |
So, using the same technique we can do it for other students or employees.
I have already uploaded this program and now let’s watch the Google Sheet Attendance Tracker in action.
Note:
If you are doing all this for the first time and you don’t know how to use SSD1306 Oled display module. How to install the Nodemcu ESP8266 WiFi board in the Arduino IDE. Then I highly recommend read my articles on
Practical Demonstration:
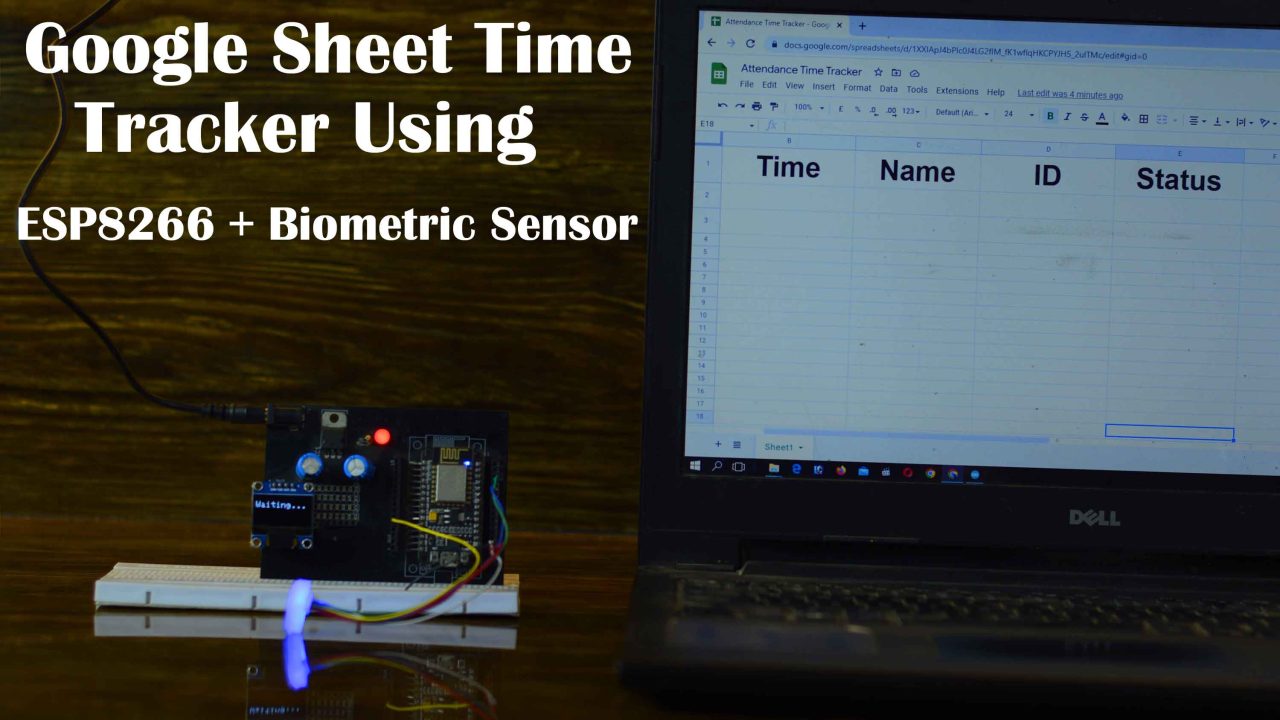
Right now, my Nodemcu ESP8266 WiFi Module and Laptop are connected to the WiFi. Let me also tell you, it’s not necessary to use the same WiFi network, you can use different WiFi networks. It’s an IoT project, you can monitor the employees or students in/out time from any part of the world. You can see there is no physical connection between the Nodemcu ESP8266 and my Laptop.
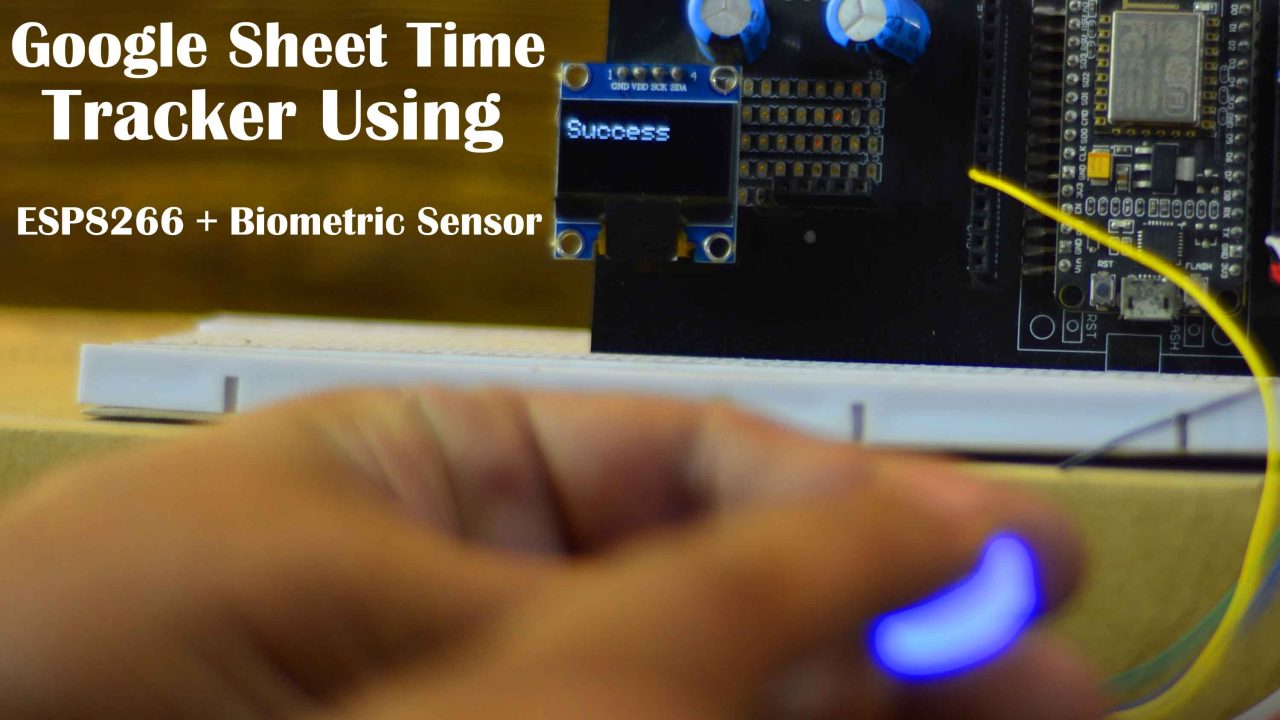
The Oled display module is optional, if you remove this it won’t have any effect on the project. But it’s good to use a display, because without the display you will be confused and you won’t be sure if the finger is successfully scanned. Right now, on the Oled display module, you can see the message waiting… this means you can scan your finger. When it successfully scan a finger, the message Success is printed on the display.
Anyway, on the Google spreadsheet I can monitor the Date, Time, Name of the employee or a student, the ID, and the in/out status.
For the practical demonstration, watch the video tutorial given below.
Watch Video Tutorial:
Troubleshooting — Problems You Might Face With This Attendance System
Problem 1: The R557 fingerprint sensor is not being detected — the code uploads fine but the Serial Monitor shows sensor initialization failed
This is almost always a wiring issue or a baud rate mismatch between the ESP8266 and the R557 sensor.
The R557 communicates over UART and its default baud rate is 57600. In the code, the SoftwareSerial is initialized at this same rate. If you accidentally changed it or copied code from a different fingerprint library that uses 9600, the sensor will never respond and initialization will fail every time. Double check that the baud rate in the code matches 57600.
Next, check the TX and RX connections. On the ESP8266 side, the R557 TXD wire connects to the ESP8266 RX pin (D4 in this project) and the R557 RXD wire connects to the ESP8266 TX pin (D3). These are crossed over intentionally — if you connected them straight instead of crossed, the sensor and ESP8266 cannot hear each other. Swap them and try again.
Also confirm that both the VT and VCC wires of the R557 are connected to 3.3V — not 5V. The R557 is a 3.3V sensor. Powering it from 5V will not immediately destroy it but it causes unreliable behavior and can shorten the sensor’s lifespan significantly.
Problem 2: Fingerprint enrollment works but the sensor keeps returning “finger not found” for enrolled fingers
You enrolled your fingers successfully, the sensor confirmed each enrollment, but now when you scan the same finger it consistently returns not found or shows the wrong ID. This is one of the more frustrating problems with capacitive fingerprint sensors and it usually comes down to enrollment quality.
Capacitive fingerprint sensors like the R557 capture a mathematical template of the ridges in your finger. If during enrollment you placed your finger at a slightly different angle each time, the two templates that get merged may not represent your finger accurately. The fix is to delete all enrolled fingers and re-enroll them carefully. During each enrollment, place your finger flat and centered on the sensor window, apply consistent pressure, and make sure the green light confirms each scan before removing. Re-enroll the same finger three or four times if the library allows multiple templates per ID to improve matching reliability.
Dry skin is another common cause of missed reads. Capacitive sensors need a small amount of moisture on the fingertip to read the ridge pattern. If someone consistently fails recognition, ask them to slightly breathe on their fingertip before scanning. If this fixes it, consider switching to an optical fingerprint module for people who regularly have dry or worn fingertips.
Problem 3: Data is not being written to Google Sheets — the spreadsheet stays empty
The ESP8266 connects to WiFi and the fingerprint scan works correctly, but nothing appears in the Google Sheet. This is almost always a problem with the HTTPSRedirect library setup or the Google Apps Script deployment.
First, make sure all four project files are in the same folder — the main sketch file, DebugMacros.h, HTTPSRedirect.cpp, and HTTPSRedirect.h. If any of these files are missing or in a different location, the code will not compile correctly or will fail silently at runtime.
Second, go back to your Google Apps Script and check the deployment. After writing the script, you must deploy it as a Web App with access set to “Anyone, even anonymous.” If you deployed it with restricted access, the ESP8266 HTTP request gets rejected. Create a new deployment with the correct access setting and copy the fresh script ID into your code — it is the long string in the script URL after /macros/s/ and before /exec.
Third, open the Serial Monitor and watch the output when a finger is scanned. The HTTPSRedirect library prints the HTTP response to Serial. A response of 200 means success. A response of 302 means a redirect issue. Any connection error means the ESP8266 is not reaching Google’s servers — check your WiFi credentials and confirm the GScriptId in the code is correct.
Problem 4: The OLED display shows garbage characters or nothing at all after connecting the fingerprint sensor
Before connecting the fingerprint sensor, the OLED worked perfectly. After adding the R557, the display shows random pixels or goes blank. This is an I2C address conflict or power issue.
The OLED display uses I2C on pins D1 (SCL) and D2 (SDA). The R557 fingerprint sensor uses SoftwareSerial on D3 and D4. These are completely separate communication buses and should not interfere with each other. However, if the power supply cannot handle both devices simultaneously, the voltage can dip when the fingerprint sensor activates and briefly corrupt the OLED display.
Add a 470 microfarad capacitor across the 3.3V and GND rails on your breadboard close to the OLED module. This acts as a local reservoir that supplies a brief burst of current when the fingerprint sensor wakes up, preventing the voltage dip that causes the OLED to glitch.
Also confirm that D1 and D2 are not being accidentally used by any other part of your code. On the ESP8266, D1 and D2 are the default I2C pins and they must remain exclusively for I2C devices.
Problem 5: The system correctly identifies finger ID 3 but writes the wrong student name to Google Sheets
The finger ID number and the student name mapping exists only in your Arduino code, not in the Google Sheet itself. When finger ID 3 is detected, the code looks up a name in a variable or if-else block and sends that name as a string to the Sheet. If the name in the Sheet is wrong, there is a mismatch between the finger ID number you enrolled and the ID number in your if-else conditions.
Open your Arduino code and find the section that checks finger IDs. You will see conditions like if (fingerID == 3). Check what name is being sent for each ID and confirm it matches the finger you actually enrolled at that ID number. If you re-enrolled fingers and the IDs changed during the process, the mapping in your code will be wrong. Either re-enroll with the same IDs or update the name mapping in the code to reflect the new ID assignments.
Problem 6: Attendance data is being written to Google Sheets but the timestamp shows the wrong time or year 1970
The timestamp in Google Sheets for this project comes from either the ESP8266 or the Google Apps Script, depending on how the script is written. If you see 1970 as the year, the ESP8266 is generating the timestamp locally and it has not synchronized with an NTP time server — 1970 is the Unix epoch start time, which is what you get when time has never been set.
The fix is to add NTP time synchronization to your code. Include the ESP8266WiFi and time.h libraries and call configTime() in your setup function with the correct timezone offset for Pakistan, which is UTC+5. Something like configTime(5 * 3600, 0, “pool.ntp.org”, “time.nist.gov”). After this, the ESP8266 fetches the current time from the internet on startup and the timestamp written to Google Sheets will be accurate. Make sure this NTP sync call happens after the WiFi connection is established.
Frequently Asked Questions
Can I use this same system for employee attendance in a small office or factory?
Absolutely — this is one of the most practical real-world uses of this project. The R557 sensor stores up to 120 fingerprints which is more than enough for a small to medium office. Each employee gets enrolled with a unique finger ID and their name is added to the mapping in the Arduino code. The Google Sheet records every clock-in and clock-out event with a timestamp automatically. The sheet can be shared with management so they can monitor attendance from any device with internet access. For a larger organization with more than 120 employees, you would need to chain multiple R557 sensors or switch to a higher-capacity fingerprint module.
What happens if the internet connection goes down? Is attendance data lost?
In the current design, if the ESP8266 cannot reach Google Sheets when a finger is scanned, that particular attendance record is lost because there is no local storage in the design. For a production system where no records can be missed, add an SD card module to the ESP8266 and write every scan to the SD card first. Then, when internet connectivity is restored, read the buffered records from the SD card and upload them to Google Sheets. This gives you a fail-safe local backup of every scan regardless of internet availability.
Can I add more than 120 students or employees to this system?
The R557 sensor has a hardware limit of 120 stored fingerprint templates. You cannot store more than 120 fingerprints in a single R557 module. If you need to handle more people, you have a few options. You can use multiple R557 sensors on the same system — the library supports addressing individual sensors. You can also switch to a higher-capacity fingerprint module such as the AS608 which supports up to 1000 templates, or industrial fingerprint modules that support several thousand. The ESP8266 and Google Sheets side of the project does not limit the number of users at all — only the fingerprint module hardware creates this ceiling.
Can I replace Google Sheets with a local database if I do not want data stored online?
Yes. Instead of using the HTTPSRedirect library to send data to Google, you can set up a simple web server on a Raspberry Pi or a local PC using Python Flask or Node.js. The ESP8266 sends the attendance data as an HTTP POST request to your local server instead of to Google. The server writes the data to a local SQLite or MySQL database. You can then build a simple web dashboard to view the attendance records. This approach keeps all data on your own hardware with no cloud dependency, which some organizations prefer for privacy and security reasons.
How do I delete a specific fingerprint without erasing all enrolled fingers?
In the R557 library, there is a function called finger.deleteModel(id) where id is the specific finger ID number you want to remove. Upload a small test sketch that calls this function with the ID you want to delete, run it once, and that specific fingerprint template is removed from the sensor’s memory while all other enrolled fingers remain untouched. If you want to clear all fingerprints at once, use finger.emptyDatabase() which wipes all stored templates in one command. After deleting templates, the storage slots become available for new enrollments.
Can the R557 sensor be used outdoors or in a dusty factory environment?
The R557 is a capacitive fingerprint sensor, which means it reads the electrical difference between the ridges and valleys of your fingerprint through direct contact with the sensing surface. Capacitive sensors are generally less affected by surface contamination than optical sensors, but they are not rated for outdoor or harsh industrial environments. Dust, grease, and moisture on the sensor window will reduce recognition accuracy over time. For outdoor or factory floor use, cover the sensor with a protective enclosure that has an opening just large enough for finger placement, and clean the sensor surface regularly with a dry lint-free cloth. For genuinely harsh environments, look for industrial-grade fingerprint modules with IP65 or higher ratings.
If this attendance system is not working correctly at any step, describe the exact problem in the comments below along with what your Serial Monitor is showing and I will help you get it working.
Discover more from Electronic Clinic
Subscribe to get the latest posts sent to your email.


I am trying to compile the code but it is bringing D3 was not declared
can i use Nodemcu ESP8266 with built in oled?, also can i use AS608 fingerprint?