How to Use ESP32 CAM and ESP8266 with Google Sheets, Google Drive, MLX90614, and Ultrasonic Sensor
Last Updated on May 11, 2026 by Engr. Shahzada Fahad
Table of Contents
ESP32 CAM and ESP8266:
ESP32 CAM and ESP8266 with Google sheets, Google Drive, MLX90614,& Ultrasonic Sensor- By the way, I should have made this project during the time of COVID, but well, even now you can use this project. Or you can modify it into a completely different project.

Anyway, as you can see this project is based on the ESP32 Cam and ESP8266 WiFi module. MLX90614 non-contact infrared temperature sensor and the HC-SR04 Ultrasonic sensor are connected to the ESP8266 WiFi Module. Ultrasonic Sensor measures the distance of the person standing in front of the MLX90614 Temperature sensor. The MLX90614 is used to measure the person’s temperature. If the person distance is within the defined range then the ESP8266 WiFi Module sends the person’s measured temperature and distance to the Google sheets or Google spreadsheet. And at the same time it also triggers the ESP32 Cam to capture the image and send it to the Google Drive. This is a completely contactless iot based temperature monitoring system.
You may find this project a little difficult, but it’s not like that. This project is actually very easy if you follow my instructions.
Look, ESP32 Cam has its code and the ESP8266 has its own code. The only link between these two is that when a person comes in front of the Ultrasonic Sensor and the person distance is within the defined range, the ESP8266 WiFi Module triggers the I/O pin of the ESP32 Cam Module.
For the ESP32 CAM, it’s just like if you have connected a button or a digital sensor to its I/O pin. Anyway, as soon as the I/O pin on the ESP32 Cam module is triggered, it captures an image and sends it to the Google Drive.
If you want to completely understand and quickly build this project then for this you will have to watch my previous getting started videos on the ESP32 Cam Module and the Google Spreadsheet.
- I used ESP32 CAM to send images to the Google Drive whenever the Infrared Sensor would detect the presence of a human or any other object. In this project, the infrared sensor has the same job, it triggers the ESP23 Cam i/o pin. Now, instead of using the IR sensor I am using the ESP8266 Wifi module to trigger the I/O pin. So, if you watch this video then your ESP32 Cam and Google drive part will be covered.
- And to completely understand how to setup your Google Spreadsheet for the data logging then you will have to read my ESP8266 Google Spreadsheet data logging tutorial. In this project, I have used the DHT11 temperature and humidity sensor. Just forget about the sensor and concentrate on the Google spreadsheet part only. Once you learn how to setup your Google spreadsheet account for the data logging then you can monitor almost anything. In my case, I simply replaced the Temperature and humidity values with the Temperature and distance values.
So, without any further delay, let’s get started!!!
Amazon Links:
MLX90614 non-contact infrared temperature sensor
Arduino Nano USB C type (Recommended)
Disclosure: These are affiliate links. As an Amazon Associate I earn from qualifying purchases.
The DFrobot MLX90614:
Temperature measurement can be divided into two types: contact and non-contact. Contact measurement requires the testing object and the sensor to reach thermal equilibrium in order to accurately measure temperature. This means that the sensor must physically touch the object being measured. However, this approach has some limitations. The process of reaching thermal equilibrium can take time, resulting in longer response times for temperature readings. Moreover, factors such as ambient temperature can introduce inaccuracies in the measurements.
In contrast, non-contact temperature measurement techniques utilize infrared radiation to determine the temperature of an object without requiring direct physical contact. The sensor detects the infrared radiation emitted by the object and translates it into temperature readings. This method offers several advantages. Firstly, it eliminates the need for physical touch, which is particularly useful when measuring the temperature of delicate or sensitive objects. It also allows for measurements to be taken at a safe distance, which is beneficial in situations where contact with the object may not be possible or desirable.
One of the key advantages of non-contact measurement is its speed and accuracy. The readings can be obtained quickly, allowing for real-time monitoring and analysis. Additionally, this method reduces the influence of ambient temperature on the measurements, leading to more precise results.
The applications of non-contact temperature measurement have expanded significantly in recent years. In the medical field, it is used for non-invasive temperature monitoring, particularly in situations where direct contact may be impractical or uncomfortable for the patient. Environmental monitoring systems employ non-contact measurement techniques to assess temperature variations in ecosystems, industrial settings, and weather forecasting. In home automation, non-contact temperature sensors are integrated into smart devices to enable temperature control and energy efficiency. Automotive electronics rely on non-contact temperature measurement for monitoring engine temperature, exhaust systems, and various vehicle components. Aerospace and military applications leverage this technology for temperature monitoring in aircraft, missiles, and other critical equipment.
The adoption of non-contact measurement methods has revolutionized temperature sensing, offering flexibility, accuracy, and safety across a wide range of industries and applications.

Model: MLX90614-DCC
Operating Voltage: 3.3V – 5V
Interface Type: I2C
Interface Line Sequence: VCC, GND, SCL, SDA
FOV: 35°
Weight: 15g
Temperature Range: -70.01℃ to +380℃, with a resolution of 0.01℃
Measurement Accuracy: ±0.2℃ (body temperature range)/±0.5℃
Dimensions: 31.5*18 mm/1.24 x 0.7 inches
Here is another model:
SEN0263 (MLX90614-DCI)
Operating Voltage: 3.3V-5V
Operating Current: 1.2mA
Temperature: -70.01℃ to +270℃,(0.01 ℃ resolution)
Interface Type: IIC
Interface Line Sequence: VCC,GND,SCL,SDA
FOV: 35°
Dimensions: 31.5*18mm/1.24 x 0.7 inches
HC-SR04 Ultrasonic Sensor:

The HC-SR04 Ultrasonic Range Finder is an immensely popular sensor used in various applications that require distance measurement and object detection. Taking inspiration from the echolocation abilities of bats and dolphins, this ultrasonic sensor utilizes sonar technology to determine the distance to objects.
This Ultrasonic Sensor module incorporates a transmitter, a receiver, and a control circuit, all conveniently packed into a single unit. With its compact and user-friendly design, it offers exceptional range accuracy and stable readings. Unlike Sharp rangefinders, this sensor is not affected by sunlight or black materials, although it may face challenges in detecting acoustically soft materials like cloth.
The Trigger and Echo pins of this module serve as input/output pins and can be easily connected to microcontrollers or Arduino boards. When the receiver detects the return wave, the Echo pin goes high for a specific duration, equivalent to the time taken for the wave to travel back to the sensor.
The Ultrasonic Ranging Module HC-SR04 provides non-contact distance sensing capabilities in the range of 2cm to 400cm. It boasts impressive ranging accuracy, with measurements accurate up to 3mm.
The versatility of the HC-SR04 makes it an indispensable component in various applications, including robotics, security systems, automated navigation, obstacle avoidance, and much more. Its reliable performance, easy integration, and precise distance measurements make it a popular choice among electronics enthusiasts and professionals alike.
Wiring:
- +5V(positive)
- Trig(control)
- Echo(receive)
- GND(negative)
Features:
- Measures the distance within a wide range of 2cm to 400cm
- Stable performance
- Accurate distance measurement
- High-density
- Small blind distance
ESP32 CAM and ESP8266 interfacing:

Connect the 5V and GND pins of the ESP32 Camera module to the 5V and GND pins of the regulated 5V power supply. This 5V regulated power supply is based on the 7805 Voltage regulator which is ok for the basic testing but if you are planning on using this project for hours then I would recommend you should build my designed 5V and 3A power supply. As you might know, ESP32 Camera module draws more current and if along with the ESP32 Camera module you also power up the ESP8266 and all the other sensors then the 7805 voltage regulator will really get hot and the ESP32 Camera module will keep disconnecting. So, my recommendation is build yourself this 5V and 3A power supply. Which is more than enough for powering all these electronics.
Anyway, connect D6 of the ESP8266 to the IO13 on the ESP32 Cam module. The IO13 pin look at the D6 pin as the push button or a digital sensor. I have already explained this in detail.
The VCC and GND pins of the MLX90614 non-contact infrared temperature sensor are connected to 3.3V and GND pins on the ESP8266. Whereas the SCL and SDA pins of the MLX90614 are connected to the ESP8266 D1 and D2 pins. D1 is the SCL and D2 is the SDA.
Connect the VCC and GND pins of the Ultrasonic Sensor to the 5V and GND. Connect the Trigger and Echo Pins to D4 and D5 respectively.
So, that’s all about the connections and now, let’s go ahead and start with the Google Drive Setup for the ESP32 Cam Module.
What is Google Drive?
Google Drive is a cloud-based storage and file synchronization service provided by Google. It allows users to store their files, including documents, photos, videos, and more, securely in the cloud and access them from any device with an internet connection.
The primary purpose of Google Drive is to provide users with a convenient and reliable platform for storing and managing their digital files. It offers several features and benefits that enhance productivity and collaboration:
File Storage and Organization: Google Drive provides a generous amount of free storage space (15GB at the time of writing) and options to upgrade for additional storage. Users can upload files of various formats, create folders to organize their files, and easily search for specific documents using keywords.
Accessibility and Cross-Device Syncing: Files stored in Google Drive can be accessed from any device with an internet connection, including computers, smartphones, and tablets. Google Drive offers seamless syncing across devices, ensuring that the latest version of a file is always available.
Collaboration and File Sharing: Google Drive allows users to share files and folders with others, enabling seamless collaboration. Multiple users can work on the same document simultaneously, making real-time edits and comments. Permissions can be set to control who can view, edit, or comment on the shared files.
Document Creation and Editing: Within Google Drive, users have access to a suite of productivity tools, including Google Docs, Sheets, Slides, and Forms. These web-based applications enable users to create, edit, and collaborate on documents, spreadsheets, presentations, and forms directly within the Drive environment.
Integration with Other Google Services: Google Drive integrates seamlessly with other Google services such as Gmail, Google Photos, and Google Calendar. This integration allows for easy attachment of files in emails, automatic backup of photos and videos, and scheduling events directly from Drive.
Data Backup and Recovery: Google Drive serves as a reliable backup solution for important files, protecting them from data loss due to hardware failures, accidental deletions, or device theft. Deleted files can often be restored from the Trash folder, offering a safety net for unintentional deletions.
In summary, Google Drive is a cloud storage service that offers users a secure and accessible platform for storing, organizing, and collaborating on files. Its features and seamless integration with other Google services make it a popular choice for individuals, businesses, and teams seeking an efficient and collaborative file management solution. In this project I, am going to send my images from the ESP32 Cam module to the Google Drive. So, let’s go ahead and setup our Google Drive.
ESP32 Cam and Google Drive Setup:
Make sure you are on the google.com/script/start/. On the right side you can see Start Scripting, just click it.

While you are signed in with your registered Gmail ID. Open the Apps Script Page and click on the New project.

Enter project name.

After writing the project name. You can see function myFuntion() { }
Just delete it paste the following Google Script Code.
Google Script code:
|
1 2 3 4 5 6 7 8 9 10 11 12 13 14 15 16 17 18 19 20 21 22 23 24 25 26 27 28 29 30 31 32 33 34 35 36 37 38 39 40 41 42 43 44 45 |
functiondoPost(e) { varmyFoldername = e.parameter.myFoldername; varmyFile = e.parameter.myFile; varmyFilename = e.parameter.myFilename; //varmyFilename = Utilities.formatDate(new Date(), "GMT", "yyyyMMddHHmmss")+"-"+e.parameter.myFilename; varmyToken = e.parameter.myToken; varcontentType = myFile.substring(myFile.indexOf(":")+1, myFile.indexOf(";")); var data = myFile.substring(myFile.indexOf(",")+1); data = Utilities.base64Decode(data); var blob = Utilities.newBlob(data, contentType, myFilename); // Save a captured image to Google Drive. var folder, folders = DriveApp.getFoldersByName(myFoldername); if (folders.hasNext()) { folder = folders.next(); } else { folder = DriveApp.createFolder(myFoldername); } var file = folder.createFile(blob); file.setDescription("Uploaded by " + myFilename); varimageID = file.getUrl().substring(file.getUrl().indexOf("/d/")+3,file.getUrl().indexOf("view")-1); varimageUrl = "https://drive.google.com/uc?authuser=0&id="+imageID; // Send a link message to Line Notify. var res = "Line Notify: "; try { varurl = 'https://notify-api.line.me/api/notify'; var response = UrlFetchApp.fetch(url, { 'headers': { 'Authorization': 'Bearer ' + myToken, }, 'method': 'post', 'payload': { 'message': imageUrl } }); res += response.getContentText(); } catch(error) { res += error; } return ContentService.createTextOutput(myFoldername+"/"+myFilename+"\n"+imageUrl+"\n"+res); } |
Save this code.
Next, Go to the Publish Menu and click Deploy as web app.

Under who has access to the app, select Anyone, even anonymous and click the Deploy button.

Click on Review Permissions.

Select the email id.

Click on the Advanced and then click on your project. In my case “ESP32_CAM.

On the next page, scroll down and click Allow.

You will get this Current web app URL.

Copy this link and paste it in a new web browser.

Copy this part of the URL as you can see in the image above. Open the ESP32 cam programming, which is given below. And replace this part with the new one that we just copied.

Make sure you also download the Base64.cpp and Base64.h files.
After you download the Base64.cpp and Base64.h files; make sure you keep these files with the main programming .ino file in the same folder.
ESP32 Cam Google Drive Code:
|
1 2 3 4 5 6 7 8 9 10 11 12 13 14 15 16 17 18 19 20 21 22 23 24 25 26 27 28 29 30 31 32 33 34 35 36 37 38 39 40 41 42 43 44 45 46 47 48 49 50 51 52 53 54 55 56 57 58 59 60 61 62 63 64 65 66 67 68 69 70 71 72 73 74 75 76 77 78 79 80 81 82 83 84 85 86 87 88 89 90 91 92 93 94 95 96 97 98 99 100 101 102 103 104 105 106 107 108 109 110 111 112 113 114 115 116 117 118 119 120 121 122 123 124 125 126 127 128 129 130 131 132 133 134 135 136 137 138 139 140 141 142 143 144 145 146 147 148 149 150 151 152 153 154 155 156 157 158 159 160 161 162 163 164 165 166 167 168 169 170 171 172 173 174 175 176 177 178 179 180 181 182 183 184 185 186 187 188 189 190 191 192 193 194 195 196 197 198 199 200 201 202 203 204 205 206 207 208 209 210 211 212 213 214 215 216 217 218 219 220 221 222 223 224 225 226 227 228 229 230 231 232 233 234 235 236 237 238 239 240 241 242 243 244 245 246 247 248 249 250 251 252 253 254 255 256 257 258 259 |
// Enter your WiFi ssid and password const char* ssid = "AndroidAP3DEC"; //your network SSID const char* password = "electroniclinic"; //your network password int IRpin = 13; int state = LOW; String myScript = "/macros/s/AKfycbxcnqrIeZjKohDYYwADWckLugt1Mr_sh-lAEcWw7TScxDNLexU/exec"; //Create your Google Apps Script and replace the "myScript" path. String myLineNotifyToken = "myToken=**********"; //Line Notify Token. You can set the value of xxxxxxxxxx empty if you don't want to send picture to Linenotify. String myFoldername = "&myFoldername=ESP32-CAM"; String myFilename = "&myFilename=ESP32-CAM.jpg"; String myImage = "&myFile="; #include <WiFi.h> #include <WiFiClientSecure.h> #include "soc/soc.h" #include "soc/rtc_cntl_reg.h" #include "Base64.h" #include "esp_camera.h" // WARNING!!! Make sure that you have either selected ESP32 Wrover Module, // or another board which has PSRAM enabled //CAMERA_MODEL_AI_THINKER #define PWDN_GPIO_NUM 32 #define RESET_GPIO_NUM -1 #define XCLK_GPIO_NUM 0 #define SIOD_GPIO_NUM 26 #define SIOC_GPIO_NUM 27 #define Y9_GPIO_NUM 35 #define Y8_GPIO_NUM 34 #define Y7_GPIO_NUM 39 #define Y6_GPIO_NUM 36 #define Y5_GPIO_NUM 21 #define Y4_GPIO_NUM 19 #define Y3_GPIO_NUM 18 #define Y2_GPIO_NUM 5 #define VSYNC_GPIO_NUM 25 #define HREF_GPIO_NUM 23 #define PCLK_GPIO_NUM 22 void setup() { pinMode(IRpin,INPUT); WRITE_PERI_REG(RTC_CNTL_BROWN_OUT_REG, 0); Serial.begin(115200); delay(10); WiFi.mode(WIFI_STA); Serial.println(""); Serial.print("Connecting to "); Serial.println(ssid); WiFi.begin(ssid, password); long int StartTime=millis(); while (WiFi.status() != WL_CONNECTED) { delay(500); if ((StartTime+10000) < millis()) break; } Serial.println(""); Serial.println("STAIP address: "); Serial.println(WiFi.localIP()); Serial.println(""); if (WiFi.status() != WL_CONNECTED) { Serial.println("Reset"); ledcAttachPin(4, 3); ledcSetup(3, 5000, 8); ledcWrite(3,10); delay(200); ledcWrite(3,0); delay(200); ledcDetachPin(3); delay(1000); ESP.restart(); } else { ledcAttachPin(4, 3); ledcSetup(3, 5000, 8); for (int i=0;i<5;i++) { ledcWrite(3,10); delay(200); ledcWrite(3,0); delay(200); } ledcDetachPin(3); } camera_config_t config; config.ledc_channel = LEDC_CHANNEL_0; config.ledc_timer = LEDC_TIMER_0; config.pin_d0 = Y2_GPIO_NUM; config.pin_d1 = Y3_GPIO_NUM; config.pin_d2 = Y4_GPIO_NUM; config.pin_d3 = Y5_GPIO_NUM; config.pin_d4 = Y6_GPIO_NUM; config.pin_d5 = Y7_GPIO_NUM; config.pin_d6 = Y8_GPIO_NUM; config.pin_d7 = Y9_GPIO_NUM; config.pin_xclk = XCLK_GPIO_NUM; config.pin_pclk = PCLK_GPIO_NUM; config.pin_vsync = VSYNC_GPIO_NUM; config.pin_href = HREF_GPIO_NUM; config.pin_sscb_sda = SIOD_GPIO_NUM; config.pin_sscb_scl = SIOC_GPIO_NUM; config.pin_pwdn = PWDN_GPIO_NUM; config.pin_reset = RESET_GPIO_NUM; config.xclk_freq_hz = 20000000; config.pixel_format = PIXFORMAT_JPEG; //init with high specs to pre-allocate larger buffers if(psramFound()){ config.frame_size = FRAMESIZE_UXGA; config.jpeg_quality = 10; //0-63 lower number means higher quality config.fb_count = 2; } else { config.frame_size = FRAMESIZE_SVGA; config.jpeg_quality = 12; //0-63 lower number means higher quality config.fb_count = 1; } // camera init esp_err_t err = esp_camera_init(&config); if (err != ESP_OK) { Serial.printf("Camera init failed with error 0x%x", err); delay(1000); ESP.restart(); } //drop down frame size for higher initial frame rate sensor_t * s = esp_camera_sensor_get(); s->set_framesize(s, FRAMESIZE_VGA); } void loop() {state = digitalRead(IRpin); if (state ==HIGH){ SendCapturedImage(); delay(1000); } } String SendCapturedImage() { const char* myDomain = "script.google.com"; String getAll="", getBody = ""; camera_fb_t * fb = NULL; fb = esp_camera_fb_get(); if(!fb) { Serial.println("Camera capture failed"); delay(1000); ESP.restart(); return "Camera capture failed"; } Serial.println("Connect to " + String(myDomain)); WiFiClientSecure client_tcp; client_tcp.setInsecure(); //run version 1.0.5 or above if (client_tcp.connect(myDomain, 443)) { Serial.println("Connection successful"); char *input = (char *)fb->buf; char output[base64_enc_len(3)]; String imageFile = "data:image/jpeg;base64,"; for (int i=0;i<fb->len;i++) { base64_encode(output, (input++), 3); if (i%3==0) imageFile += urlencode(String(output)); } String Data = myLineNotifyToken+myFoldername+myFilename+myImage; client_tcp.println("POST " + myScript + " HTTP/1.1"); client_tcp.println("Host: " + String(myDomain)); client_tcp.println("Content-Length: " + String(Data.length()+imageFile.length())); client_tcp.println("Content-Type: application/x-www-form-urlencoded"); client_tcp.println("Connection: keep-alive"); client_tcp.println(); client_tcp.print(Data); int Index; for (Index = 0; Index < imageFile.length(); Index = Index+1000) { client_tcp.print(imageFile.substring(Index, Index+1000)); } esp_camera_fb_return(fb); int waitTime = 10000; // timeout 10 seconds long startTime = millis(); boolean state = false; while ((startTime + waitTime) > millis()) { Serial.print("."); delay(100); while (client_tcp.available()) { char c = client_tcp.read(); if (state==true) getBody += String(c); if (c == '\n') { if (getAll.length()==0) state=true; getAll = ""; } else if (c != '\r') getAll += String(c); startTime = millis(); } if (getBody.length()>0) break; } client_tcp.stop(); Serial.println(getBody); } else { getBody="Connected to " + String(myDomain) + " failed."; Serial.println("Connected to " + String(myDomain) + " failed."); } return getBody; } String urlencode(String str) { String encodedString=""; char c; char code0; char code1; char code2; for (int i =0; i < str.length(); i++){ c=str.charAt(i); if (c == ' '){ encodedString+= '+'; } else if (isalnum(c)){ encodedString+=c; } else{ code1=(c & 0xf)+'0'; if ((c & 0xf) >9){ code1=(c & 0xf) - 10 + 'A'; } c=(c>>4)&0xf; code0=c+'0'; if (c > 9){ code0=c - 10 + 'A'; } code2='\0'; encodedString+='%'; encodedString+=code0; encodedString+=code1; //encodedString+=code2; } yield(); } return encodedString; } |
Our Google drive and ESP32 Cam setup is completed and now we can upload the program.
Upload Code to ESP32 Cam:
You can upload the code to the ESP32 Cam using two methods.
1st Method:
The first method is using the Arduino Uno or Arduino Nano. Connect your ESP32 Cam module to the Arduino Uno or Arduino Nano by following this circuit diagram.
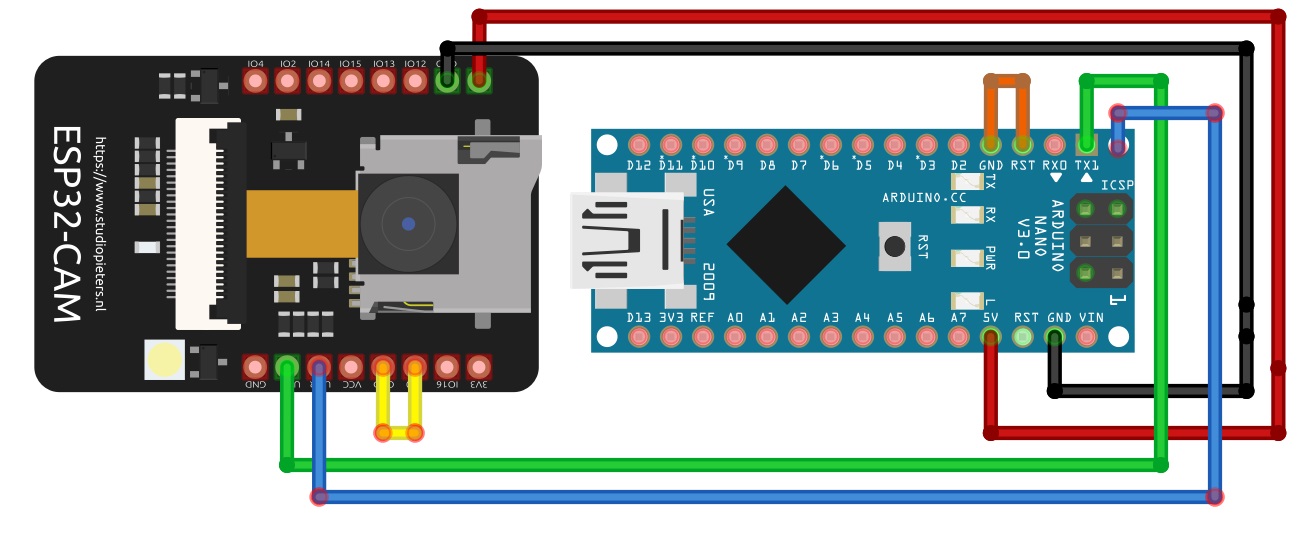
- Connect the 5V of the Arduino Nano with the 5V of the ESP32 CAM
- Connect the ground of the Arduino Nano with the ground of the ESP32 CAM
- Connect the TX pin of the Arduino Nano with the VOT of the ESP32 CAM
- Connect the RX pin of the Arduino Nano with the VOR of the ESP32 CAM
- Connect the reset pin with the ground in the Arduino Nano.
- Connect IOO of the ESP32 CAM with the Ground
Now, before you click on the upload button, make sure you do the following settings in the Arduino IDE.
- Board: ”ESP32 Wrover Module”
- Upload Speed: “115200”
- Flash Frequency: “40MHz”
- Flash Mode: “Q10” >
- Partition Scheme: “Huge APP (3MB No OTA/1 MB SPIFFS)” >
- Core Debug Level: “None” >
- Port: “COM port’ > According to your port connection

Finally, you can click on the upload button.
2nd Method:

The 2nd method is using this Development board. All you need is to simply plug in the ESP32 Cam, connect it to your laptop, and upload the program.

If you want to save time and to avoid any risk of damaging your ESP32 Cam module then I highly recommend, get yourself this development board. Anyway, after uploading the program; now we can start with the Google spreadsheet.
What is Google Sheets or Google Spreadsheet:
Google Sheets, also known as Google Spreadsheets, is a powerful web-based application provided by Google that allows users to create, edit, and collaborate on spreadsheets in a cloud environment. With its user-friendly interface and robust functionality, Google Sheets has become a go-to tool for individuals, businesses, and teams needing efficient data management and analysis.
In this introduction, we highlight the key features and benefits of Google Sheets:
Boost Your Productivity with Google Sheets: Google Sheets offers a wide range of tools and functions that streamline data organization and manipulation. Whether you’re crunching numbers, analyzing data trends, or creating dynamic charts, Google Sheets provides a user-friendly platform that enhances your productivity.
Collaborate Seamlessly: Google Sheets enables real-time collaboration, allowing multiple users to work simultaneously on the same spreadsheet. With just a few clicks, you can invite team members, clients, or partners to collaborate, making it easy to gather input, track changes, and maintain version control.
Data Access Anywhere, Anytime: As a cloud-based application, Google Sheets provides the convenience of accessing your spreadsheets from any device with an internet connection. Whether you’re at the office, on the go, or working remotely, you can securely access and edit your spreadsheets, ensuring data consistency and real-time updates.
Intuitive and Versatile Functions: From basic calculations to complex data analysis, Google Sheets offers a wide array of formulas, functions, and formatting options. With its intuitive interface, even users with limited spreadsheet experience can leverage its capabilities to perform calculations, manipulate data, and generate meaningful insights.
Seamless Integration with Google Services: Google Sheets seamlessly integrates with other Google services, such as Google Drive, Gmail, and Google Calendar. You can easily import data from various sources, attach spreadsheets to emails, and schedule automatic data updates, saving you time and effort.
Data Security and Backup: Google Sheets ensures data security by providing robust encryption and access control features. Additionally, your data is automatically saved as you work, reducing the risk of data loss due to hardware failures or accidental deletions.
This is the main reason, I am using Google sheets for the temperature and distance data logging. If anything happens on the hardware side, the data is still going to be available on Google sheets.
Google Sheets or Google spreadsheet setup:
While you are logged in into your registered Gmail id, click on sheets.

Click on Start a new spreadsheet then enter your project name, and set the column names.

Go to the Extensions menu and click on the Apps Script.

Enter the project name. R

Remember it has nothing to do with the ESP32 Cam module, this time we are doing it for the ESP8266 WiFi module. Copy the following script. And paste in the Code.gs.
Script Code:
|
1 2 3 4 5 6 7 8 9 10 11 12 13 14 15 16 17 18 19 20 21 22 23 24 25 26 27 28 29 30 31 32 33 34 35 36 37 38 39 40 41 |
functiondoGet(e) { Logger.log(JSON.stringify(e) ); var result = 'Ok'; if (e.parameter == 'undefined') { result = 'No Parameters'; } else { varsheet_id = '1wsk5D9Bd6OLds5ifmiSAsC_Vf9zeI4TlL6peFbEeZxk'; // Spreadsheet ID var sheet = SpreadsheetApp.openById(sheet_id).getActiveSheet(); varnewRow = sheet.getLastRow() + 1; varrowData = []; varCurr_Date = new Date(); rowData[0] = Curr_Date; // Date in column A varCurr_Time = Utilities.formatDate(Curr_Date, "Asia/Karachi", 'HH:mm:ss'); rowData[1] = Curr_Time; // Time in column B for (varparam in e.parameter) { Logger.log('In for loop, param=' + param); var value = stripQuotes(e.parameter[param]); Logger.log(param + ':' + e.parameter[param]); switch (param) { case 'temperature': rowData[2] = value; // Temperature in column C result = 'Temperature Written on column C'; break; case 'distance': rowData[3] = value; // Distance in column D result += ' ,Distance Written on column D'; break; default: result = "unsupported parameter"; } } Logger.log(JSON.stringify(rowData)); varnewRange = sheet.getRange(newRow, 1, 1, rowData.length); newRange.setValues([rowData]); } returnContentService.createTextOutput(result); } functionstripQuotes( value ) { returnvalue.replace(/^["']|['"]$/g, ""); } |
Go to your Google Spreadsheet and copy this part of the URL as you can see in the image below.


Then go to the Publish Menu and click on Deploy as web app…

Under the Who has access to the app: select Anyone even anonymous and click the Deploy button.

Then on the Authorization, click Review Permissions.

Now click on the advance option

Then click on Go to mlx and Ultrasonic sensor monitoring.

And finally, click on the Allow.

Now, go back to Google script and copy this part of the URL as you can see in the image given below.

And paste it next to the GAS_ID in the programming given below.
Google Spreadsheet ESP8266 Programming:
|
1 2 3 4 5 6 7 8 9 10 11 12 13 14 15 16 17 18 19 20 21 22 23 24 25 26 27 28 29 30 31 32 33 34 35 36 37 38 39 40 41 42 43 44 45 46 47 48 49 50 51 52 53 54 55 56 57 58 59 60 61 62 63 64 65 66 67 68 69 70 71 72 73 74 75 76 77 78 79 80 81 82 83 84 85 86 87 88 89 90 91 92 93 94 95 96 97 98 99 100 101 102 103 104 105 106 107 108 109 110 111 112 113 114 115 116 117 118 119 120 121 122 123 124 125 126 127 128 129 130 131 132 133 134 135 136 137 138 139 140 141 142 143 144 145 146 147 148 149 150 151 152 153 154 155 156 157 158 159 160 161 162 163 164 165 166 167 168 169 170 171 172 173 174 175 176 177 178 179 180 181 182 183 184 185 186 187 188 189 190 |
#include <ESP8266WiFi.h> #include <WiFiClientSecure.h> #include <DFRobot_MLX90614.h> DFRobot_MLX90614_I2C sensor; // instantiate an object to drive our sensor #define ON_Board_LED 2 //--> Defining an On Board LED, used for indicators when the process of connecting to a wifi router const int trigPin = D4; const int echoPin = D5; int sp=D6; //define sound velocity in cm/uS #define SOUND_VELOCITY 0.034 bool stat; long duration; float distanceCm; const char* ssid = "AndroidAP3DEC"; //--> Your wifi name or SSID. const char* password = "electroniclinic"; //--> Your wifi password. //----------------------------------------Host & httpsPort const char* host = "script.google.com"; const int httpsPort = 443; //---------------------------------------- WiFiClientSecure client; //--> Create a WiFiClientSecure object. String GAS_ID = "AKfycby2ZD9NqSVAGSv_zFjOcMJxwLSE4gEFEy4NQktolHN_mZfl1JOBgKw_keIOZrAaw6kl8g"; //--> spreadsheet script ID void setup() { // put your setup code here, to run once: Serial.begin(115200); pinMode(trigPin, OUTPUT); // Sets the trigPin as an Output pinMode(echoPin, INPUT); // Sets the echoPin as an Input pinMode(sp,OUTPUT); delay(500); WiFi.begin(ssid, password); //--> Connect to your WiFi router Serial.println(""); pinMode(ON_Board_LED,OUTPUT); //--> On Board LED port Direction output digitalWrite(ON_Board_LED, HIGH); //--> Turn off Led On Board //----------------------------------------Wait for connection Serial.print("Connecting"); while (WiFi.status() != WL_CONNECTED) { Serial.print("."); //----------------------------------------Make the On Board Flashing LED on the process of connecting to the wifi router. digitalWrite(ON_Board_LED, LOW); delay(250); digitalWrite(ON_Board_LED, HIGH); delay(250); //---------------------------------------- } //---------------------------------------- digitalWrite(ON_Board_LED, HIGH); //--> Turn off the On Board LED when it is connected to the wifi router. Serial.println(""); Serial.print("Successfully connected to : "); Serial.println(ssid); Serial.print("IP address: "); Serial.println(WiFi.localIP()); Serial.println(); //---------------------------------------- client.setInsecure(); while( NO_ERR != sensor.begin() ){ Serial.println("Communication with device failed, please check connection"); delay(3000); } Serial.println("Begin ok!"); /** * adjust sensor sleep mode * mode select to enter or exit sleep mode, it's enter sleep mode by default * true is to enter sleep mode * false is to exit sleep mode (automatically exit sleep mode after power down and restart) */ sensor.enterSleepMode(); delay(50); sensor.enterSleepMode(false); delay(200); sensor.setEmissivityCorrectionCoefficient(.98); // for human skin } void loop() { digitalWrite(trigPin, LOW); delayMicroseconds(2); // Sets the trigPin on HIGH state for 10 micro seconds digitalWrite(trigPin, HIGH); delayMicroseconds(10); digitalWrite(trigPin, LOW); // Reads the echoPin, returns the sound wave travel time in microseconds duration = pulseIn(echoPin, HIGH); // Calculate the distance distanceCm = duration * SOUND_VELOCITY/2; //Serial.print("Distance (cm): "); //Serial.println(distanceCm); // Reading temperature or humidity takes about 250 milliseconds! // Sensor readings may also be up to 2 seconds 'old' (its a very slow sensor) float ambientTemp = sensor.getAmbientTempCelsius(); /** * get temperature of object 1, unit is Celsius * return value range: -40 C ~ 85 C */ float objectTemp = sensor.getObjectTempCelsius(); // print measured data in Celsius // Serial.print("Ambient celsius : "); Serial.print(ambientTemp); Serial.println(" C"); //Serial.print("Object celsius : "); Serial.print(objectTemp); Serial.println(" C"); // print measured data in Fahrenheit // Serial.print("Ambient fahrenheit : "); Serial.print(ambientTemp*9/5 + 32); Serial.println(" F"); float ftemp=objectTemp*9/5 + 32; //Serial.print("Object fahrenheit : "); Serial.print(ftemp); Serial.println(" F"); String Temp = "Temperature : " + String(objectTemp) + " °C"; String Dist = "Distance : " + String(distanceCm) + " cm"; //Serial.println(Temp); Serial.println(Dist); if(distanceCm<10) { sendData(objectTemp, distanceCm); //--> Calls the sendData Subroutine digitalWrite(sp,HIGH); Serial.print(sp); // Serial.print("data send"); delay(1000); } else { digitalWrite(sp,LOW); } } // Subroutine for sending data to Google Sheets void sendData(float tem, int dist) { Serial.println("=========="); Serial.print("connecting to "); Serial.println(host); //----------------------------------------Connect to Google host if (!client.connect(host, httpsPort)) { Serial.println("connection failed"); return; } //---------------------------------------- //----------------------------------------Processing data and sending data String string_temperature = String(tem); // String string_temperature = String(tem, DEC); String string_distance = String(dist, DEC); String url = "/macros/s/" + GAS_ID + "/exec?temperature=" + string_temperature + "&distance=" + string_distance; Serial.print("requesting URL: "); Serial.println(url); client.print(String("GET ") + url + " HTTP/1.1\r\n" + "Host: " + host + "\r\n" + "User-Agent: BuildFailureDetectorESP8266\r\n" + "Connection: close\r\n\r\n"); Serial.println("request sent"); //---------------------------------------- //----------------------------------------Checking whether the data was sent successfully or not while (client.connected()) { String line = client.readStringUntil('\n'); if (line == "\r") { Serial.println("headers received"); break; } } String line = client.readStringUntil('\n'); if (line.startsWith("{\"state\":\"success\"")) { Serial.println("esp8266/Arduino CI successfull!"); } else { Serial.println("esp8266/Arduino CI has failed"); } Serial.print("reply was : "); Serial.println(line); Serial.println("closing connection"); Serial.println("=========="); Serial.println(); //---------------------------------------- } //============================================================================== |
Required Library:
First of all, we will install the MLX90614 library for this open your Arduino IDE, then go to the Sketch Menu, then to Include Library, and click on Manage Libraries. Wait for a few seconds and when the loading is done; then in the search box type MLX90614 as you can see in the image below.

The whole process is completed. And don’t forget to change your SSID and password. Finally, you can upload the program.
Practical Demonstration:
I Powered up the ESP8266, ESP32 CAM, and all the other sensors. I asked my cousin to come in front of the sensor.

The ESP8266 WiFi module successfully sent the temperature and distance values to the Google sheet or Google spreadsheet. And at the same time, the ESP32 CAM captured the image and sent it to the Google Drive.

For the better understanding and practical demonstration watch video tutorial on my YouTube channel Electronic Clinic. The link is given below.
Watch Video Tutorial:

Troubleshooting — Common Problems and How to Fix Them
Problem 1: ESP8266 is not sending data to Google Sheets — the spreadsheet stays empty
You uploaded the code, the ESP8266 connected to WiFi, but when you look at your Google Spreadsheet nothing is being written to it. This is one of the most frustrating moments in this project and there are a few specific things to check.
The most common cause is the Google Apps Script deployment. After writing your script in Google Apps Script, you must deploy it as a Web App and set access to “Anyone, even anonymous.” If you deployed it with restricted access, the ESP8266 HTTP request gets rejected silently and nothing appears in the sheet. Go back to your script, click Deploy, then Manage Deployments, and check the access setting. If it is restricted, create a new deployment with the correct access setting and copy the new URL into your ESP8266 code.
The second thing to check is the GAS_ID in your code. This is the long string you copy from the Google Apps Script URL after deploying. It must be copied exactly — no extra spaces, no missing characters. Even one wrong character means the ESP8266 is sending data to a URL that does not exist.
Third, open the Serial Monitor at 115200 baud rate while the project is running and watch the output. The code should print the HTTP response code. A 302 response means a redirect is happening which usually means the script URL is slightly wrong. A 200 response means success. If you see connection errors or timeouts, your ESP8266 is not reaching Google’s servers — check your WiFi credentials and make sure your router allows outgoing HTTPS connections.
Problem 2: MLX90614 is reading the wrong temperature — values are way off from actual body temperature
The MLX90614 is a non-contact infrared temperature sensor and it measures the infrared radiation emitted by a surface. The problem is that different materials emit infrared radiation differently — this is called emissivity. When you aim the sensor at human skin, if the emissivity is set to the default value of 1 in the library, you will get readings that are sometimes 2 to 4 degrees off from the real temperature.
To get accurate human body temperature readings, you need to calibrate the emissivity value for human skin which is approximately 0.98. In the Adafruit MLX90614 library, you can set this using the setEmissivity() function. After calibrating, compare the sensor reading against a reliable medical thermometer. For accurate forehead measurements, hold the sensor approximately 5 to 8 centimeters away from the skin — not touching, but not too far either. Distance matters significantly with this sensor.
Also make sure the sensor has warmed up for at least 30 seconds after powering on before taking any readings. Like most precision sensors, the MLX90614 needs a short stabilization period after startup.
Problem 3: ESP32-CAM is not capturing and sending images to Google Drive
The ESP32-CAM part of this project has its own separate Google Apps Script setup from the ESP8266 spreadsheet part. If images are not appearing in your Google Drive folder, these are the things to check first.
Make sure the ESP32-CAM script is deployed separately with its own unique Web App URL. The two scripts — one for the spreadsheet and one for Drive — are completely independent. Mixing up their URLs in the code is a very common mistake.
The ESP32-CAM needs its own stable power supply. This module is notorious for failing to capture images when powered from a weak USB port or from shared power with other modules. Use a dedicated 5V supply capable of at least 2A for the ESP32-CAM. A good sign that the power is insufficient is when the red LED on the ESP32-CAM flickers or the module resets randomly.
Also confirm that the trigger signal between the ESP8266 D6 pin and the ESP32-CAM IO13 pin is working. When the ESP8266 detects a person within range, it pulls IO13 high which triggers the camera. Use a multimeter or scope to verify this pin actually goes high during a detection event.
Problem 4: The ultrasonic sensor is triggering randomly even when nobody is standing in front of it
False triggers from the HC-SR04 are a real problem in production setups and happen for a few reasons.
The most common cause is reflections from nearby walls, furniture, or even the sensor cable itself. The HC-SR04 sends out a wide ultrasonic cone of about 15 degrees. If there is a wall or object within that cone at the detection distance, it will trigger constantly. Point the sensor in a clear direction with nothing within the detection range except the intended target zone.
Electrical noise is another cause. The HC-SR04 shares the power rail with the ESP8266 and MLX90614 in this setup. When the ESP8266 connects to WiFi or transmits data, it draws bursts of current that cause small voltage dips. These can create spurious signals on the sensor echo pin. Adding a 100 microfarad capacitor across the 5V and GND of the ultrasonic sensor smooths this out.
In the code, add a simple filter — only act on a reading if you get the same result three times in a row within a short window. One random spike will not pass this check and false triggers will disappear.
Problem 5: Google Apps Script authorization keeps expiring and data stops logging after a few days
This is a known quirk of Google Apps Script. The authorization tokens that allow the script to write to your Google Sheet expire periodically and need to be renewed. When they expire, the script stops accepting data without giving you any obvious error.
The fix is simple but easy to miss. Go to your Google Apps Script, click Run on the doGet or doPost function manually, and re-authorize when prompted. This resets the token. For a more permanent solution, set up a time-based trigger inside Apps Script that runs the script automatically every day — this keeps the authorization alive so it never expires during your project.
Also make sure you are not hitting Google’s free tier quotas. Google Apps Script allows 20,000 URL fetch calls per day on a free Google account. If this project is running 24 hours logging data every few seconds, you will hit that limit. Increase the logging interval in your code to once every 30 seconds or once per minute to stay well within the quota.
Problem 6: Both modules work individually but the system behaves erratically when everything is connected together
When multiple modules share the same power supply and ground on a breadboard, they interfere with each other through the power rail. The ESP8266 WiFi module is the biggest offender — it draws up to 300mA in bursts when transmitting, which causes the supply voltage to dip momentarily. That dip can cause the MLX90614 to give a bad reading or the ultrasonic sensor to misfire at that exact moment.
The solution is to add decoupling capacitors — place a 470 microfarad capacitor across the main 3.3V and GND lines close to the ESP8266, and a separate 100 microfarad capacitor near the MLX90614. These act as local energy reservoirs that smooth out the current spikes. Also make sure all GND connections are tied to a single common ground point rather than daisy-chained from module to module through long breadboard connections.
Frequently Asked Questions
Can I replace the MLX90614 with a DHT11 or DHT22 temperature sensor?
You can, but the purpose of the project changes significantly. The MLX90614 is a non-contact infrared sensor that measures the temperature of a person without any physical contact — perfect for a screening system. The DHT11 and DHT22 measure ambient air temperature, not the temperature of a specific object or person. Replacing the MLX90614 with DHT11 would turn this into a regular room temperature logger rather than a body temperature screening system. For that use case, the swap makes sense. But for detecting human body temperature without contact, the MLX90614 is the right sensor for this job.
Why does the project use both ESP32-CAM and ESP8266 instead of just one board?
This is a practical design decision. The ESP32-CAM is excellent at capturing images and sending them over WiFi but it has very limited GPIO pins available once the camera is active — most pins are used internally by the camera module. Connecting both the MLX90614 I2C sensor and the HC-SR04 ultrasonic sensor to the ESP32-CAM would be extremely difficult due to pin conflicts. The ESP8266 handles all the sensor reading and data logging work and simply sends a trigger signal to the ESP32-CAM when a person is detected. This two-module approach keeps the wiring clean and each board doing what it does best.
Can I use Google Firebase instead of Google Sheets for data storage?
Absolutely, and for some use cases Firebase is actually better. Google Sheets is excellent if you want your data in a spreadsheet format that you can share, graph, and analyze easily using built-in Sheets tools. Firebase is better if you need real-time data updates, if you want to read the data back from the cloud into another device, or if you need to store large amounts of data quickly. The ESP8266 and ESP32-CAM can work with Firebase but they need a different library setup — I have covered ESP32 with Firebase in a separate article on this site which you can refer to for that approach.
How do I make the system store images in a specific folder in Google Drive?
By default the Google Apps Script creates files in your Drive root. To save images in a specific folder, you need to modify the script slightly. Instead of using DriveApp.createFile(), first get the folder reference using DriveApp.getFolderById(‘your-folder-id’) and then call createFile() on that folder object. Get the folder ID from the URL when you open the folder in Google Drive — it is the long string after /folders/ in the URL. This one change organizes all captured images into a dedicated folder automatically.
What is the maximum number of images the ESP32-CAM can send before Google Drive runs out of space?
A single image from the ESP32-CAM in JPEG format at medium resolution is typically between 20KB and 100KB depending on the resolution and scene complexity. Google Drive gives you 15GB of free storage. At 50KB per image that works out to roughly 300,000 images before you run out of space which is more than most projects will ever generate. If you are running this continuously as a security camera, add a cleanup script in Google Apps Script that automatically deletes images older than 7 or 30 days to keep storage usage manageable.
Can this project work without an internet connection — for example on a local network only?
The Google Sheets and Google Drive parts of this project specifically require internet access because they communicate with Google’s servers. However, you can modify the project to work on a local network only by replacing Google Sheets with a local database like SQLite running on a Raspberry Pi, and replacing Google Drive with a local FTP server or a simple file share on a NAS device. The ESP8266 and ESP32-CAM would then send data to your local server instead of to Google. This approach is more complex to set up initially but gives you complete control over your data and works even when your internet connection is down.
If you run into any issues with the Google Apps Script setup or the sensor readings in this project, describe the problem in the comments below and I will help you troubleshoot it step by step.
Discover more from Electronic Clinic
Subscribe to get the latest posts sent to your email.


Hello Shahzada Fahad! I hope you are in good health, I have read your whole project and it is very nice how you integrated several sensors and the ESP32 CAM module. I would like to use this same module for a personal project but I would like to implement it in a different way, I want the picture taken to be sent to a specific column of a google sheet and the next pictures to be grouped in the rows along with the sensed data.
And I would like to ask you more questions since you have knowledge in these topics: what happens when using the maximum number of rows in Google Sheets? Can I make that every (example: 1500) rows are automatically deleted to continue writing on the same Google Sheet?