Arduino Weather Station using dht11 and Display Data on Gauges
Last Updated on August 18, 2024 by Engr. Shahzada Fahad
Table of Contents
Description:
Arduino Weather Station– This project is based on the Real-Time weather station monitoring system using Arduino, DHT11” temperature and humidity sensor” and Visual Basic 2010 Express edition. The main purpose of this project is to share with you the idea of how you can make a real-time weather station and display the Temperature and Humidity values on the Gauges. In this project, you will also learn how to install and use the Dev Components.
The DHT11 sensor will be interfaced with the Arduino Uno or Mega. The temperature and humidity values will be calculated by the Arduino or Mega, and then these values will be sent Serially to the Computer designed application. This project also focuses on the concept of how multiple sensors values can be sent in a single string message separated with comma, and then how each sensor value can be accessed individually and display them in there own boxes or Gauges. So this project will also help you learn, how to split the string message. This technique can be used in Advanced level projects, where you need to monitor multiple sensors connected with Arduino or Mega or any other controller.
For the step by step designing and explanation watch video available at the end of this Article.
Amazon Links:
Arduino Nano USB-C Type (Recommended)
DHT11 Temperature and Humidity Module:
*Disclosure: These are affiliate links. As an Amazon Associate I earn from qualifying purchases.
Softwares used in this project:
- Visual Basic 2010 Express Edition “Vb.net”
- Arduino IDE
The weather station application forms will be designed and programmed in the Visual Basic.Net, while the Arduino programming will be done in the Arduino IDE. Both the Softwares are freely available and can be downloaded without any problems. The desktop application programming and Arduino programming both are available at the end of this Article.
DHT11 sensor Pinout:

This is the DHT11 temperature and humidity sensor which is used in this project for building the Real-Time weather station. DHT11 Sensor has a total of 4 pins. Pin number 1 is the VCC, pin number 2 is the data, pin number 3 is not connected while pin number 4 is the Ground.
The other useful information about the DHT11 sensor can be found in its datasheet. For example its applications, Features, Dimensions, Product parameter, Electrical characteristics, Pin description, and data format, etc. It’s a good designing practice to study the datasheet of the electrical component before you start using it any circuit.
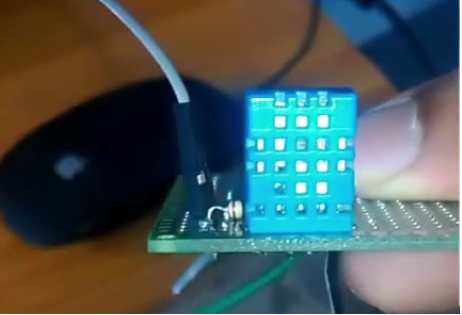
For the easy connections, I highly recommend firs you need to fix this sensor on the Vero Board, Solder its legs and the 10-kilo resistor. Then solder jumper wires. This way you can easy interface the DHT11 temperature and humidity sensor with the Arduino Uno or Mega.
Circuit Diagram of the Arduino Weather Station:

The connection of the DHT11 temperature and humidity sensor with the Arduino Uno or Mega is really simple. As you can see in the circuit diagram above, a 10 kilo Ohm resistor is connected between pin number 1 and pin number 2. As I said earlier the pin number 3 of the dht11 sensor is not used. Pin number 4 of the DHT11 temperature and humidity sensor is connected with the Arduino’s Ground, while pin number 2 is connected with the Arduino’s pin number 12.
Weather Station Programming:
This project is basically based on two programs, one program is written for the Arduino, while the other program is for the computer software designed in visual basic 2010 express edition.
Before you start the programming first of all, make sure you download all the necessary libraries.
Arduino Weather Station Programming:
|
1 2 3 4 5 6 7 8 9 10 11 12 13 14 15 16 17 18 19 20 21 22 23 24 25 26 27 28 29 30 31 32 33 34 35 36 37 38 39 40 41 42 43 44 45 46 47 48 49 50 51 52 53 54 55 56 57 58 59 60 61 62 63 64 65 66 67 68 69 70 71 72 73 74 75 76 77 78 79 80 81 82 83 84 85 86 87 88 89 90 91 |
#include "DHT.h" #define DHTPIN 12 // what pin we're connected to //Uncomment whatever the type of sensor we are using. #define DHTTYPE DHT11 // DHT 11 //#define DHTTYPE DHT22 // DHT 22 (AM2302) //#define DHTTYPE DHT21 // DHT 21 (AM2301) // Connect pin 1 (on the left) of the sensor to +5V // NOTE: If using a board with 3.3V logic like an Arduino Due connect pin 1 // to 3.3V instead of 5V! // Connect pin 2 of the sensor to whatever your DHTPIN is // pin3 of the sensor is not connected // Connect pin 4 (on the right) of the sensor to GROUND // Connect a 10K resistor from pin 2 (data) to pin 1 (power) of the sensor // Initialize DHT sensor for normal 16mhz Arduino DHT dht(DHTPIN, DHTTYPE); // NOTE: For working with a faster chip, like an Arduino Due or Teensy, you // might need to increase the threshold for cycle counts considered a 1 or 0. // You can do this by passing a 3rd parameter for this threshold. It's a bit // of fiddling to find the right value, but in general the faster the CPU the // higher the value. The default for a 16mhz AVR is a value of 6. For an // Arduino Due that runs at 84mhz a value of 30 works. // Example to initialize DHT sensor for Arduino Due: //DHT dht(DHTPIN, DHTTYPE, 30); String TextForSms ; String humidity = " Humidity: %"; String temperature = " Temperature"; String sign = " *C"; char fromc; // character from computer void setup() { Serial.begin(9600); // Serial.println("DHT11 test!"); dht.begin(); } void loop() { // Wait a few seconds between measurements. delay(2000); // Reading temperature or humidity takes about 250 milliseconds! // Sensor readings may also be up to 2 seconds 'old' (its a very slow sensor) int h = dht.readHumidity(); // Read temperature as Celsius int t = dht.readTemperature(); // Read temperature as Fahrenheit int f = dht.readTemperature(true); // Check if any reads failed and exit early (to try again). if (isnan(h) || isnan(t) || isnan(f)) { Serial.println("Failed to read from DHT sensor!"); return; } // Compute heat index // Must send in temp in Fahrenheit! int hi = dht.computeHeatIndex(f, h); // Serial.print("Humidity: "); // Serial.print(h); // Serial.print(" %\t"); // Serial.print("Temperature: "); // Serial.print(t); // Serial.print(" *C "); TextForSms = TextForSms + t + "," + h + ","; Serial.println(TextForSms); TextForSms = ""; delay(1000); // TextForSms.concat(humidity); // TextForSms.concat(h); // TextForSms.concat(temperature); // TextForSms.concat(t); // TextForSms.concat(sign); // Serial.println(TextForSms); // Serial.print(f); // Serial.print(" *F\t"); // Serial.print("Heat index: "); // Serial.print(hi); // Serial.println(" *F"); } |
Computer application Programming of Weather Station:
|
1 2 3 4 5 6 7 8 9 10 11 12 13 14 15 16 17 18 19 20 21 22 23 24 25 26 27 28 29 30 31 32 33 34 35 36 37 38 39 40 41 42 43 44 45 46 47 48 49 50 51 52 53 54 55 56 57 58 59 60 61 62 63 64 65 66 67 68 69 70 71 72 73 74 75 |
Imports System.IO Imports System.IO.Ports Public Class Form1 Dim value1 As Decimal Dim value2 As Decimal Private Sub Form1_Load(ByVal sender As System.Object, ByVal e As System.EventArgs) Handles MyBase.Load SerialPort1.Close() SerialPort1.PortName = "com5" SerialPort1.BaudRate = "9600" SerialPort1.DataBits = 8 SerialPort1.Parity = Parity.None SerialPort1.StopBits = StopBits.One SerialPort1.Handshake = Handshake.None SerialPort1.Encoding = System.Text.Encoding.Default SerialPort1.Open() End Sub Private Sub Timer1_Tick(ByVal sender As System.Object, ByVal e As System.EventArgs) Handles Timer1.Tick Dim s As String s = TextBox1.Text + "," + "," + "," + "," Dim somestring() As String ' Split string based on comma somestring = s.Split(New Char() {","c}) TextBox2.Text = somestring(0) Try value1 = Convert.ToDecimal(TextBox2.Text) Catch ex As Exception TextBox1.Text = "" End Try TextBox3.Text = somestring(1) Try value2 = Convert.ToDecimal(TextBox3.Text) Catch ex As Exception TextBox1.Text = "" End Try TextBox4.Text = somestring(2) gc1.SetPointerValue("Scale1", "Pointer1", value1) gc2.SetPointerValue("Scale1", "Pointer1", value2) TextBox1.Text = "" End Sub Private Sub DataReceived(ByVal sender As Object, ByVal e As SerialDataReceivedEventArgs) Handles SerialPort1.DataReceived Try Dim mydata As String = "" mydata = SerialPort1.ReadExisting() If TextBox1.InvokeRequired Then TextBox1.Invoke(DirectCast(Sub() TextBox1.Text &= mydata, MethodInvoker)) Else TextBox1.Text &= mydata End If Catch ex As Exception MessageBox.Show(ex.Message) End Try End Sub End Class |
Watch Video Tutorial:
Discover more from Electronic Clinic
Subscribe to get the latest posts sent to your email.


i need help in visual basic code
gc1.SetPointerValue(“Scale1”, “Pointer1”, value1)
gc2.SetPointerValue(“Scale1”, “Pointer1”, value2)
in these line it is saying gc1 is not decleard
same for gc2
any help??
Where do I get the DHT library (so many on internet, not sure which one is the correct one)?
on my website, there is an article about the Arduino libraries. Download this library from there.
from where you get gaugecontrol .dll or .cs please share file