Power supply for Nodemcu esp8266 wifi module
Last Updated on August 16, 2024 by Engr. Shahzada Fahad
Table of Contents
Power Supply for Nodemcu Description:
In this tutorial, you will learn how to make your own 5V regulated power supply for Nodemcu esp8266 wifi module so that it can be easily powered up using a 12v adaptor or a solar panel or aaa or 12v battery, or any other dc voltage source.
The input source voltage should be greater than 5 volts as we are using a 7805 voltage regulator and less than 35 volts. In this tutorial, you will also learn how to add female headers so that it can be easily interfaced with Arduino Uno or other electronic circuits.
A very common mistake that people often make is that they power the Nodemcu esp8266 wifi module using the Arduino’s 5v. As Arduino’s cannot provide enough current due to which the Nodemcu module keeps resetting. For a Detailed explanation watch video tutorial.
Amazon Links:
*Disclosure: These are affiliate links. As an Amazon Associate I earn from qualifying purchases
Nodemcu Power Supply Circuit Diagram:
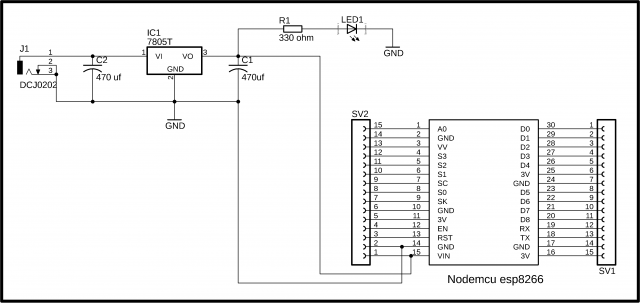
The circuit Diagram is really simple as you can see. J1 is the female dc socket where you can connect a 12v adaptor or a 12v battery or a 9v battery. The power supply as you can see is based on the LM7805 voltage regulator. Two 470uf capacitors are connected at the input and output of the voltage regulator. A 330-ohm resistor is connected in series with the 2.5v led. This is a current limiting resistor. to power, up the Nodemcu module, we simply connect the output of the voltage regulator with the Vin pin of the Nodemcu module and connect the ground with the ground pin of the Nodemcu module. You might be wondering what are these SV1 and SV2? these are female headers that can be used for interfacing with other electronic circuits. For a more detailed explanation watch video Tutorial.
Watch Video Tutorial:
Updated Tutorial:
Discover more from Electronic Clinic
Subscribe to get the latest posts sent to your email.