XIAO ESP32C6 Getting Started Tutorial, Seeed Studio
Last Updated on August 24, 2024 by Engr. Shahzada Fahad
Table of Contents
Xiao ESP32C6 Introduction:
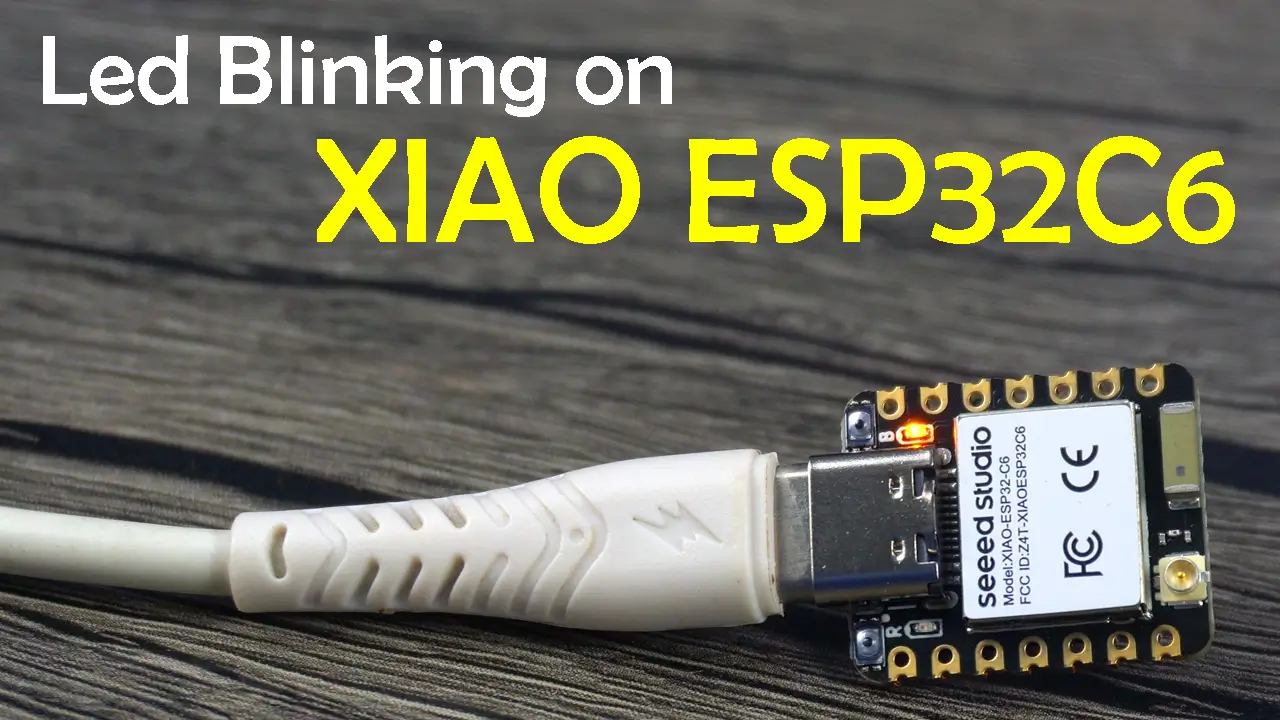
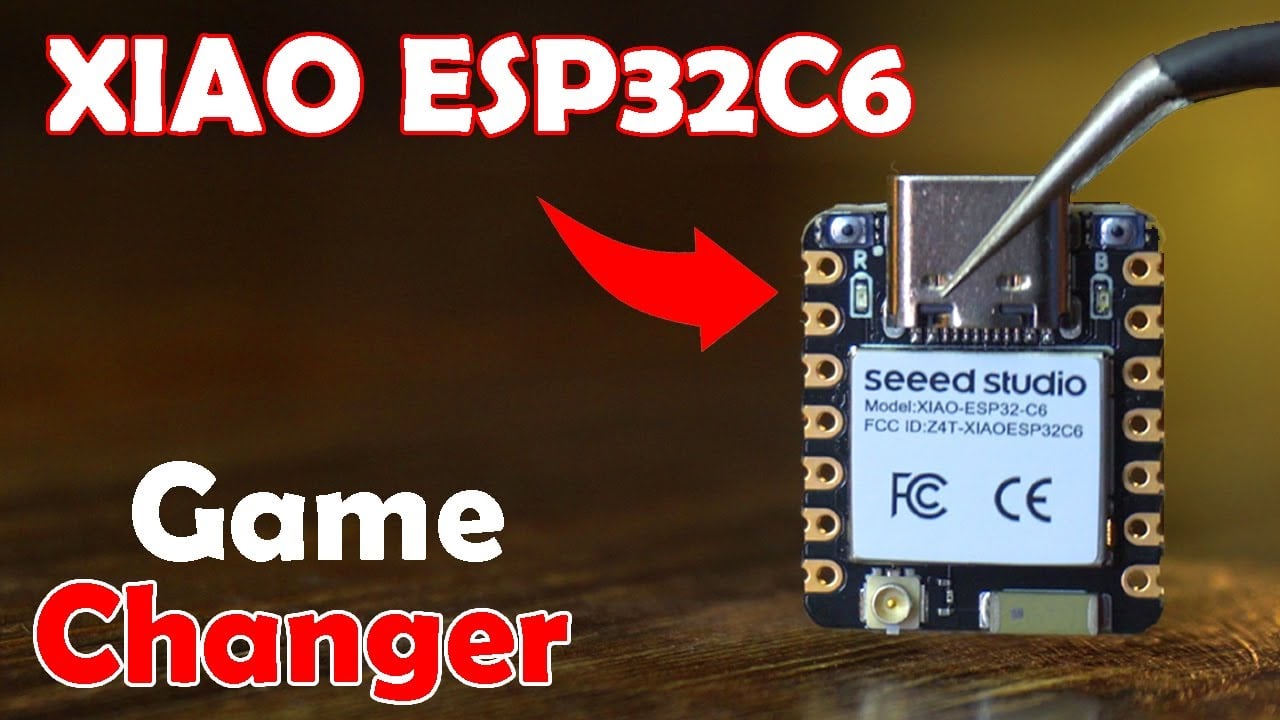
XIAO ESP32C6 Getting Started Tutorial- Seeed Studio has just dropped the latest addition to their tiny but strong XIAO series – the XIAO ESP32C6, and it’s a game-changer!
This tiny powerhouse is not only cost-effective but comes with the mighty ESP32-C6 chip from Espressif Systems. We are talking about strong wireless connections made specifically for smart home devices that follow the Matter standard. This microcontroller unit has everything you need, like WiFi 6, Bluetooth 5, and Thread/Zigbee. And true to the XIAO legacy, it’s tiny enough to fit into small spaces in your projects. And it keeps your data safe with built-in encryption as secure as Fort Knox.
Its built on two 32-bit RISC-V processors, with a high-performance (HP) processor with running up to 160 MHz, and a low-power (LP) 32-bit RISC-V processor, which can be clocked up to 20 MHz. There are 512KB SRAM and 4 MB Flash on the chip, allowing for more programming space, and bringing more possibilities to the IoT control scenarios.
XIAO ESP32C6 is Matter native thanks to its enhanced wireless connectivity. The wireless stack supports 2.4 GHz WiFi 6, Bluetooth® 5.3, Zigbee, and Thread (802.15.4). As the first XIAO member compatible with Thread, it’s a perfect fit for building Matter-compliant projects, thus achieving interoperability in smart-home.
To better support your IoT projects, XIAO ESP32C6 not only provides seamless integration with mainstream cloud platforms like ESP Rain Maker, AWS IoT, Microsoft Azure, and Google Cloud, but also leverages security for your IoT applications. With its on-chip secure boot, flash encryption, identity protection, and Trusted Execution Environment (TEE), this tiny board ensures the desired level of security for developers looking to build smart, secure, and connected solutions.
Amazon Links:
*Disclosure: These are affiliate links. As an Amazon Associate I earn from qualifying purchases.
Xiao ESP32C6:
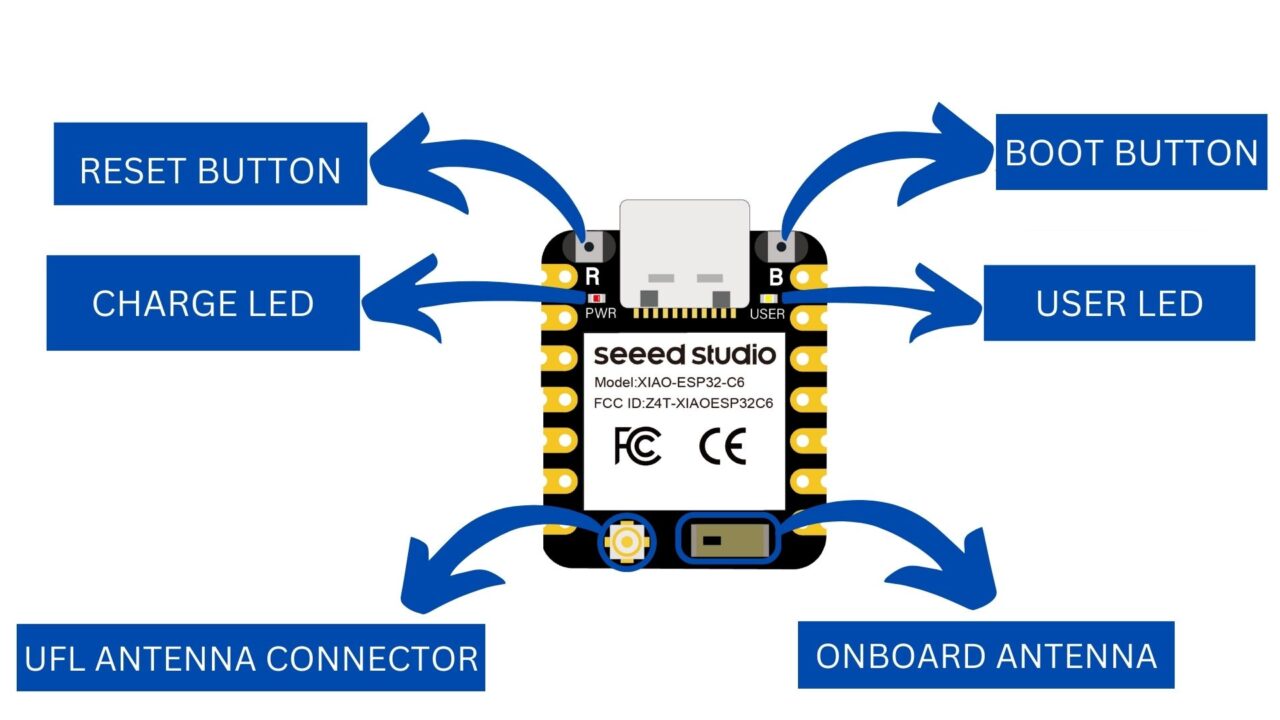
The new XIAO ESP32C6 has a strong built-in high performance ceramic antenna that can connect to Bluetooth and WiFi devices up to 80 meters away. You can also connect an external UFL antenna with the onboard UFL Antenna Connector. It also comes with an optimized power consumption management, with four different power modes and an onboard lithium battery charging management circuit. When it’s in deep sleep mode, it uses a tiny bit of power with a current as low as 15uA, making it an excellent fit for remote battery powered applications.
On the right side of the USB-C type port is the Bult-in Led and Boot Button labeled as B. while on the Left side you can find the charging Led and the Reset Button labeled as R.
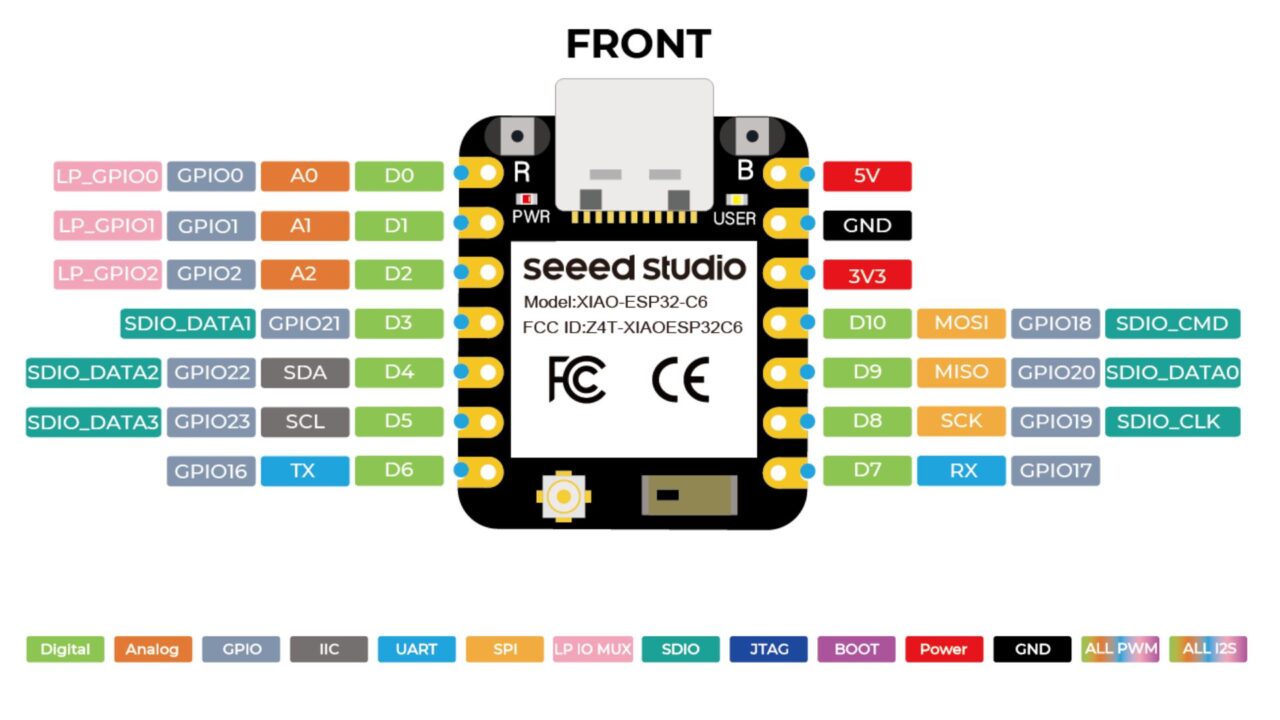
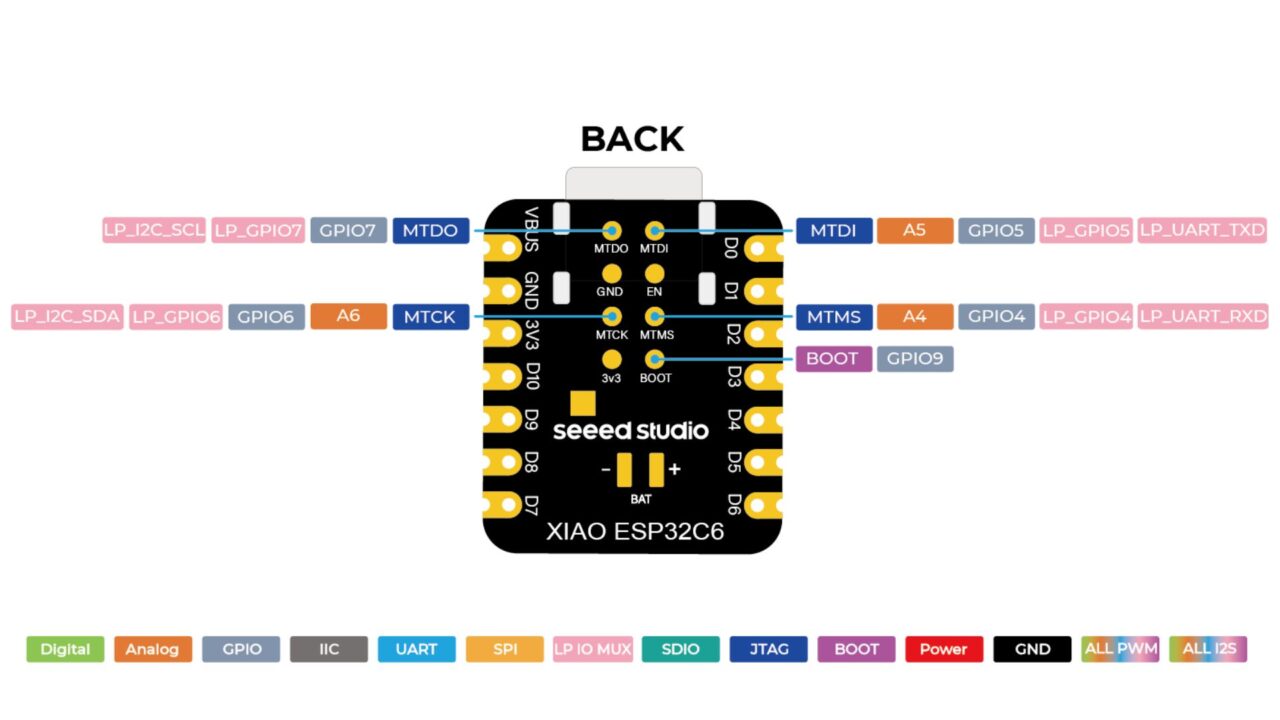
As the newest and being the 8th member of the Seeed Studio XIAO family, XIAO ESP32C6 keeps the same small design as the Classic XIAO design. It’s made to fit in a small space, just 21×17.5 millimeters, and it still only has components on one side. Despite its tiny size, it amazingly breaks out 15 total GPIO pins, including 11 digital I/Os for PWM pins and 4 Analog I/Os for ADC pins. It supports UART, IIC, and SPI Serial communication ports. All these features make it a perfect fit for either space-limited projects such as wearable devices or for making your own circuit boards.
Specification and Comparison:
Here are technical specifications of the XIAO ESP32C6 and its comparison with XIAO ESP32C3 and XIAO ESP32S3.
| Product | XIAO ESP32C6 | XIAO ESP32C3 | XIAO ESP32S3 |
| Processor | Espressif ESP32-C6
SoC |
Espressif ESP32-C3
SoC |
Espressif ESP32-S3R8 |
| two 32-bit RISC-V
processors, with the high-performance one running up to 160 MHz, and the low-power one clocking up to 20 MHz |
RISC-V single-core
32-bit chip processor with a four-stage pipeline that operates at up to 160 MHz |
Xtensa LX7
dual-core, 32-bit processor running up to 240 MHz
|
|
| Wireless | Complete 2.4GHz
Wi-Fi 6 subsystem |
Complete 2.4GHz
Wi-Fi subsystem |
Complete 2.4GHz
Wi-Fi subsystem |
| Bluetooth 5.0/
Bluetooth mesh |
BLE: Bluetooth 5.0,
Bluetooth mesh |
BLE: Bluetooth 5.0,
Bluetooth mesh |
|
| Zigbee,
Thread, IEEE 802.15.4 |
/ | / | |
| On-chip
Memory |
512KB SRAM &
4MB Flash |
400KB SRAM &
4MB Flash |
8M PSRAM &
8MB Flash |
| Interface | 1x UART,
1x LP_UART, 1x IIC, 1x LP_IIC, 1x SPI, 11x GPIO(PWM), 7x ADC, 1xSDIO |
1x UART,
1x IIC, 1x SPI, 11x GPIO(PWM), 4x ADC |
1x UART,
1x IIC, 1x IIS, 1x SPI, 11x GPIO(PWM), 9x ADC, 1x User LED, 1x Charge LED |
| 1x Reset button,
1x Boot button |
1x Reset button,
1x Boot button |
1x Reset button,
1x Boot button |
|
| Dimensions | 21 x 17.5mm | 21 x 17.5mm | 21 x 17.5mm |
| Power | Input voltage (Type-C):
5V Input voltage (BAT): 4.2V |
Input voltage (Type-C):
5V Input voltage (BAT): 4.2V |
Input voltage
(Type-C):5V Input voltage (BAT): 4.2V |
| Circuit operating
Voltage: – USB:5V@9mA – BAT:3.8V@9mA |
Circuit operating Voltage:
– USB:5V@9mA – BAT:3.8V@9mA |
Circuit operating Voltage:
– Type-C: 5V@19mA – BAT: 3.8V@22mA |
|
| Charging battery
current:350mA |
Charging battery current:
350mA |
Charging battery
current: 100mA |
|
| Power Consumption
Model (Supply Power: 3.8V) |
Modem-sleep Model:
~ 30 mA Light-sleep Model: ~ 2.5 mA Deep Sleep Model: ~ 15 μA |
Modem-sleep Model:
~ 24 mA Light-sleep Model: ~ 3 mA Deep Sleep Model: ~ 44 μA |
Modem-sleep
Model:~ 25 mA Light-sleep Model:~ 2mA Deep Sleep Model: ~ 14 μA |
| Working
Temperature |
-40°C ~ 85°C | -40°C ~ 85°C | -40°C ~ 65°C |
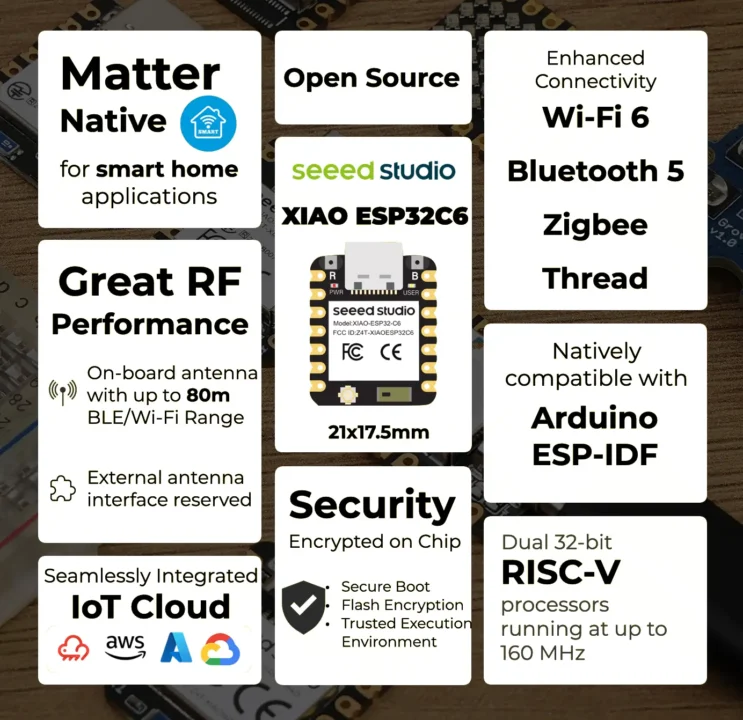
Enhanced Connectivity: Integrates 2.4 GHz Wi-Fi 6 (802.11ax), Bluetooth 5(LE), and IEEE 802.15.4 radio connectivity, allowing for the application of Thread and Zigbee protocols.
Matter Native: Supports the building of Matter-compliant smart home projects, ensuring interoperability among different smart devices.
Security Encrypted on Chip: Utilizes the ESP32-C6 to provide secure boot, encryption, and Trusted Execution Environment (TEE) features, enhancing the security of smart home projects.
Outstanding RF Performance: Features an on-board antenna with up to 80m BLE/Wi-Fi range and offers an interface for connecting an external UFL antenna, ensuring reliable connectivity.
Leveraging Power Consumption: Offers four working modes, including a deep sleep mode with consumption as low as 15 μA, along with support for lithium battery charge management.
Dual RISC-V Processors: Incorporates two 32-bit RISC-V processors, with the high-performance processor capable of running up to 160 MHz and the low-power processor up to 20 MHz.
Classic XIAO Designs: Maintains the thumb-size form factor of 21 x 17.5mm and single-sided mount design, ideal for space-limited projects like wearable devices.
It’s compatible with both Arduino IDE and ESP-IDF. But for now, I am going to start with the Arduino IDE as it’s the recommended programming tool for the XIAO ESP32C6, so you need to complete the Arduino installation as part of the software preparation. XIAO ESP32C6 requires at least , while on my laptop I have the Arduino 1.8.19 version installed. So, first I am going to download the latest version of the Arduino IDE. For this, you will need to go to the Arduino.cc official website. The Arduino IDE version 2.3.2 is available for the download. On the right side you will see the download options; select the one as per your operating system.
After Downloading the Arduino IDE, then the next step is to install it. It’s simple. I am sure you won’t face any difficulty, but still if you face any issues then you can watch my Video tutorial, the link is given at the end of this article. Anyway, if during the installation, it asks for any permissions, allow it. And I highly recommend, you guys should also update all your libraries and boards.
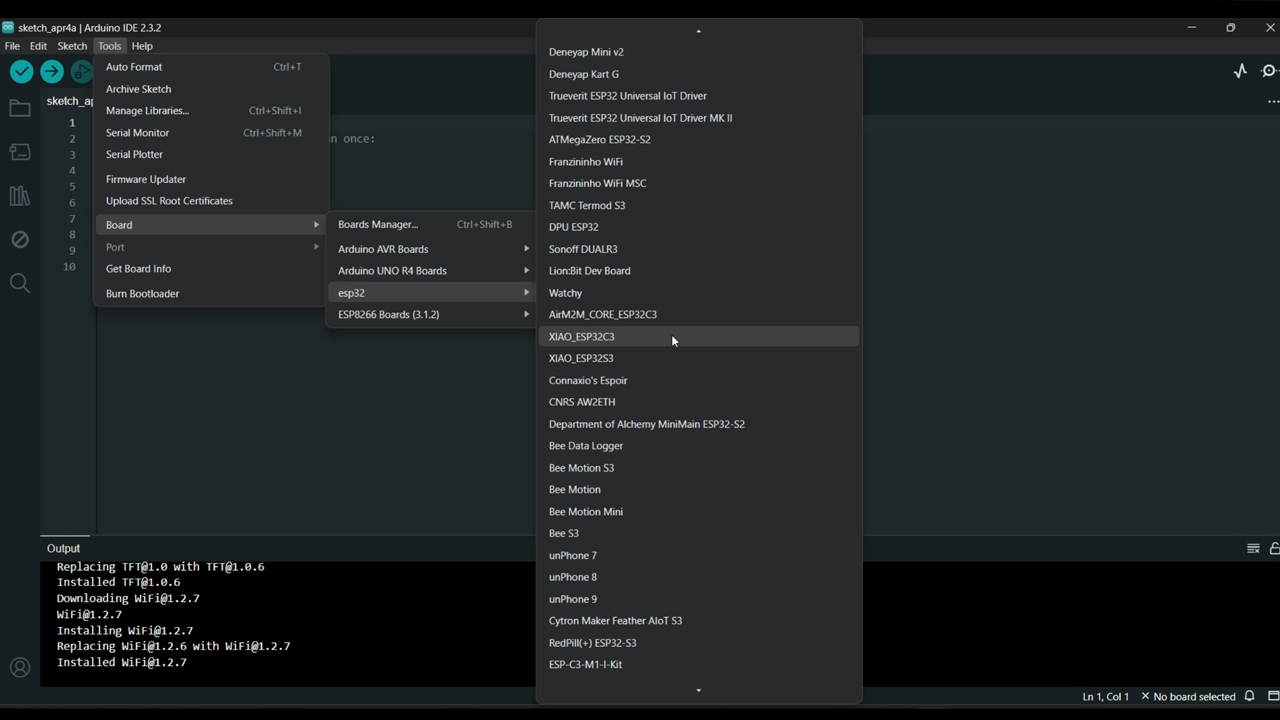
Let’s go ahead and check if the XIAO ESP32C6 is available in the boards list. It’s such a long list of boards; seems like all the ESP32 variants have been added in the list.
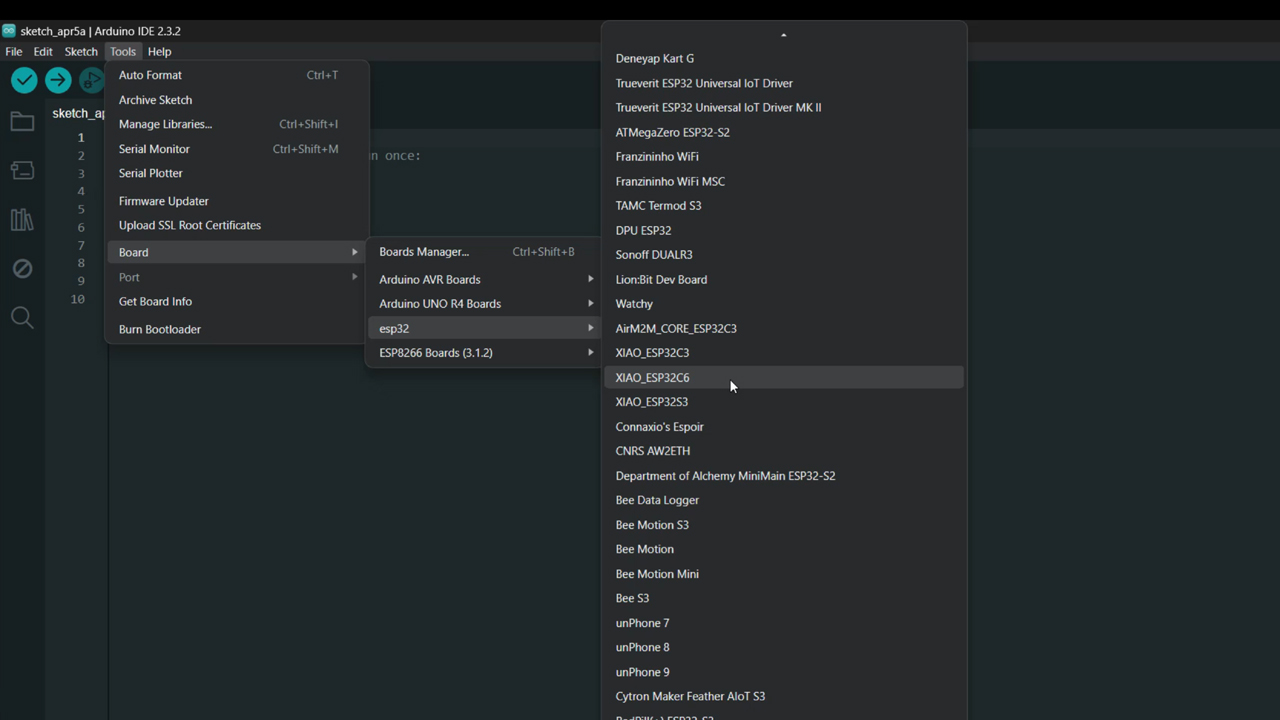
Right now I can only see XIAO_ESP32C3 and XIAO_ESP32S3 in the list.
As of April 2, 2024, the most current stable release of Arduino-ESP32 is version 2.0.14. Unfortunately, this version does not support the ESP32-C6 chipset, which means it also does not support the XIAO ESP32-C6 board. To work with XIAO-C6, you’ll need to utilize the development release of the board manager URL. Copy the following link.
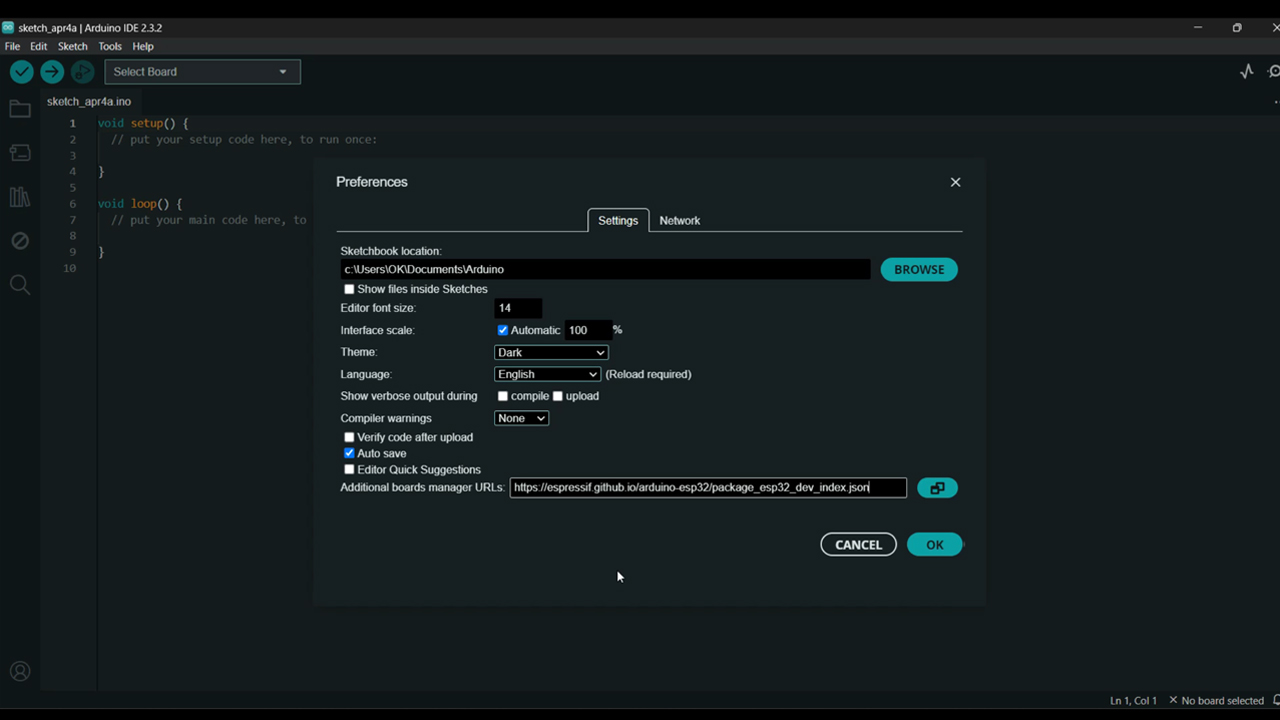
Board Manager URL:
https://espressif.github.io/arduino-esp32/package_esp32_dev_index.json
Next, go to the file menu, then to preferences and paste the link in the Additional boards manager URLs and then click on the Ok button.
Close the Arduino IDE and open it again.
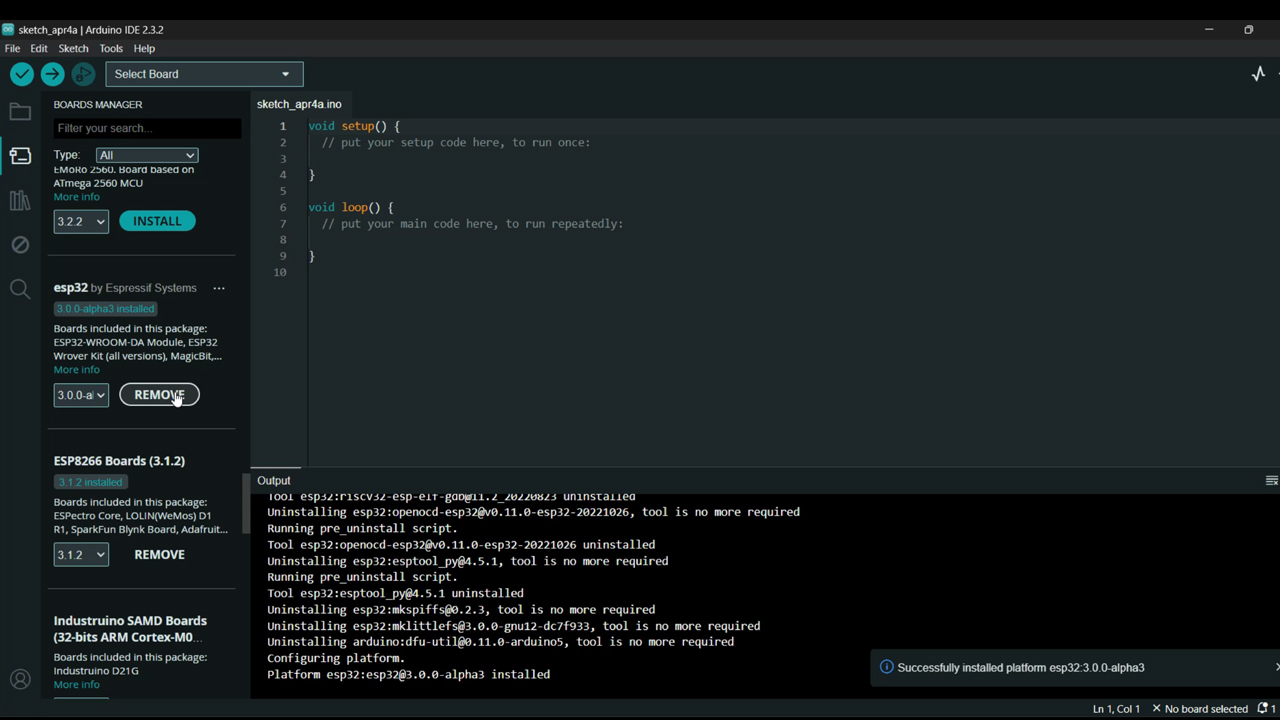
Go to the Boards Manager and search for the ESP32 board by the Espressif systems.
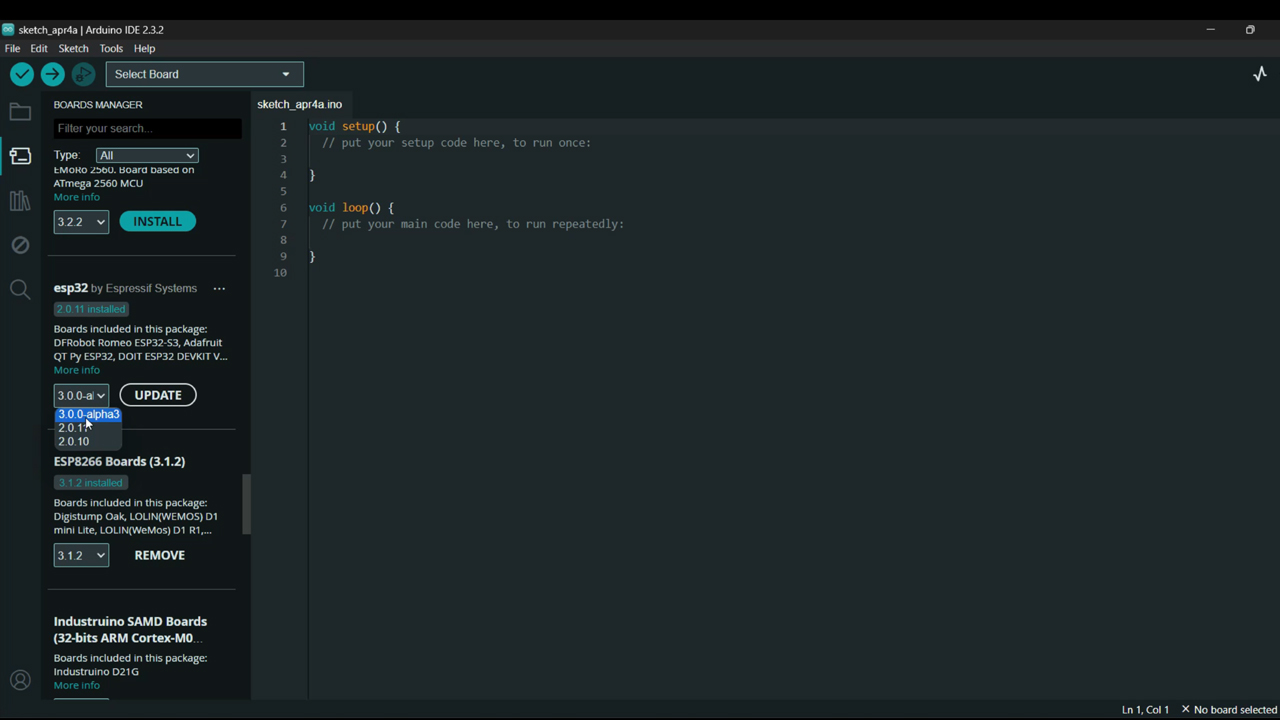
Here it is, select the latest version that is 3.0.0-alpha3 select it and then click on the UPDATE button. It’s going to take around 35 minutes depending on the speed of your internet connection. Anyway, when the board is installed and all the libraries are updated then you will see a message “It’s successfully installed”.
Additionally, the latest development release version (3.0.0-Alpha 3) was released on December 5, 2023. However, it does not contain support for XIAO ESP32C6. So, you will need to manually set it up and for this first you will need to download the boards.txt file and the XIAO_ESP32C6 folder I have added links in the description.
After downloading the boards.txt file and the XIAO_ESP32C6 folder next go to the C Drive and then to Users.
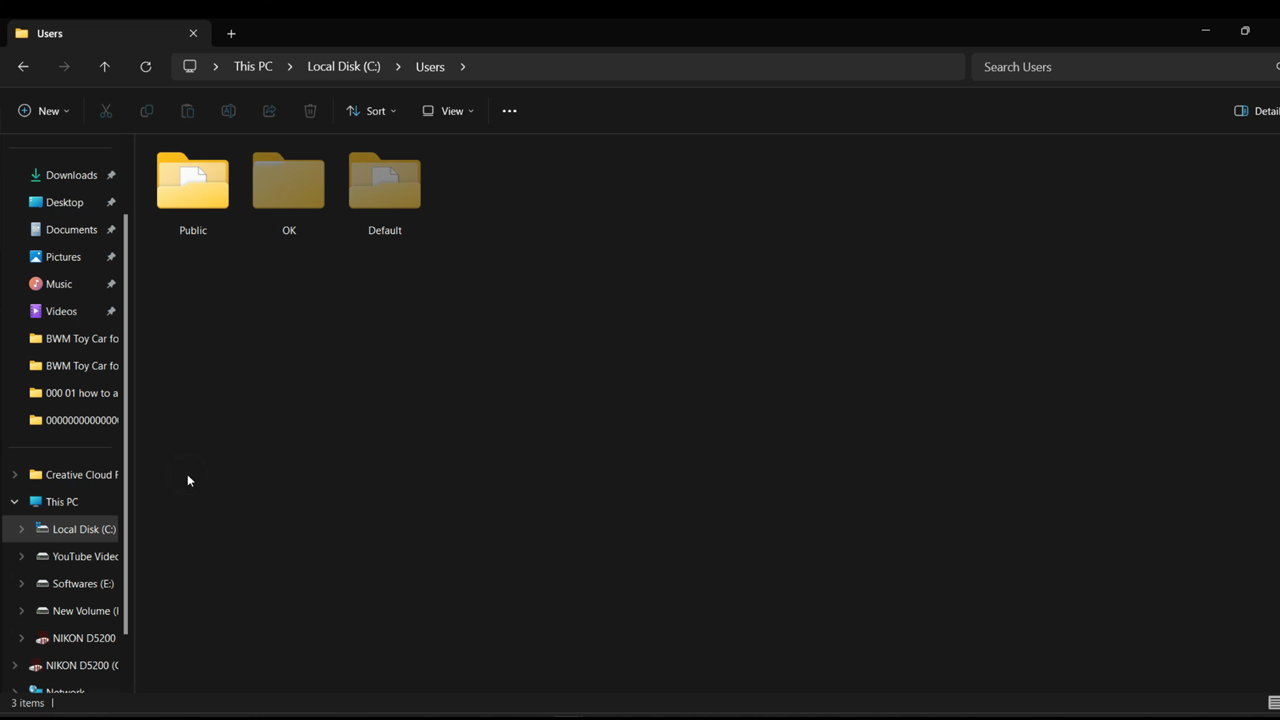
If inside the Users folder you can’t see the OK folder; it means it’s hidden, so first you will need to unhide it. Anyway, open the OK folder then go to the AppData then to Local then to Arduino15 then to packages then ESP32 then to Hardware again ESP32, Finally, you will see the folder 3.0.0-alphas, so go ahead and open this folder.
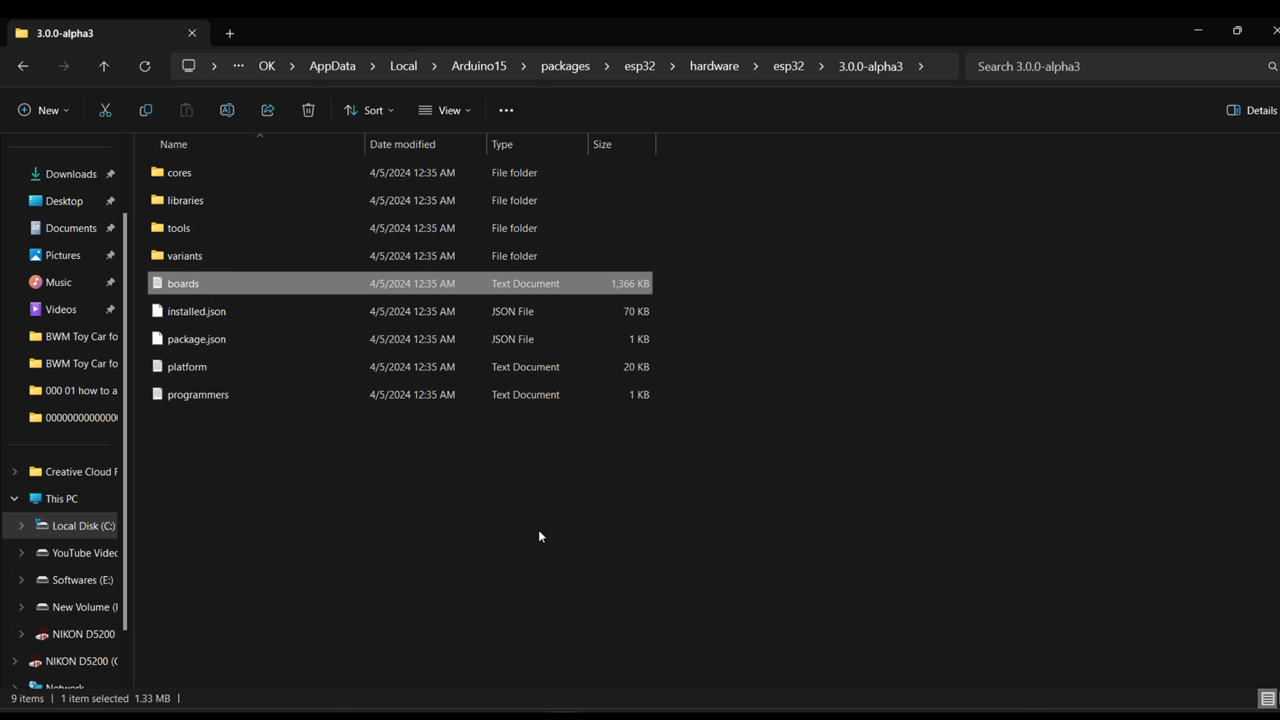
First we have to replace this boards file with the one that we downloaded, make sure you delete the existing boards file.
Next, go to the Variants folder, Copy the XIAO_ESP32C6 folder that you downloaded and then paste it in the Variants folder and that’s it.
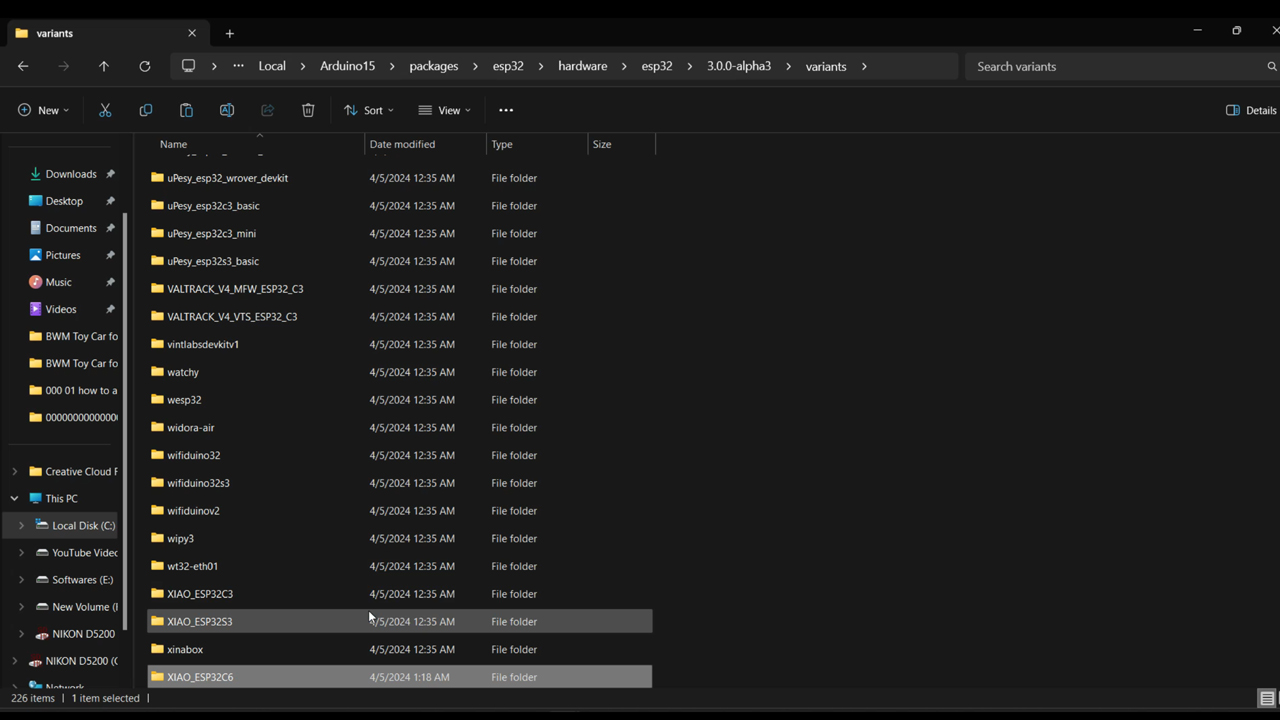
You can see in the Variants folder we already have the XIAO_ESP32C3 and the XIAO_ESP32S3, and now the XIAO_ESP32C6 is also added in the Variants folder. We are done with the hard part, now let’s go ahead and check if we can find the XIAO_ESP32C6 in the boards list.
Here it is, if you can also see the XIAO_ESP32C6 then congrats. Next, we are going to blink the onboard LED.
Connect your ESP32C6 board to the laptop using a USB-C type cable.
XIAO ESP32C6 Led Blinking Code:
|
1 2 3 4 5 6 7 8 9 10 11 12 13 |
// the setup function runs once when you press reset or power the board void setup() { // initialize digital pin LED_BUILTIN as an output. pinMode(LED_BUILTIN, OUTPUT); } // the loop function runs over and over again forever void loop() { digitalWrite(LED_BUILTIN, HIGH); // turn the LED on (HIGH is the voltage level) delay(1000); // wait for a second digitalWrite(LED_BUILTIN, LOW); // turn the LED off by making the voltage LOW delay(1000); // wait for a second } |
Upload this simple LED blinking sketch for this, first select the XIAO_ESP32C6 board from the boards list. Next, select the communication port and then finally, upload the program.
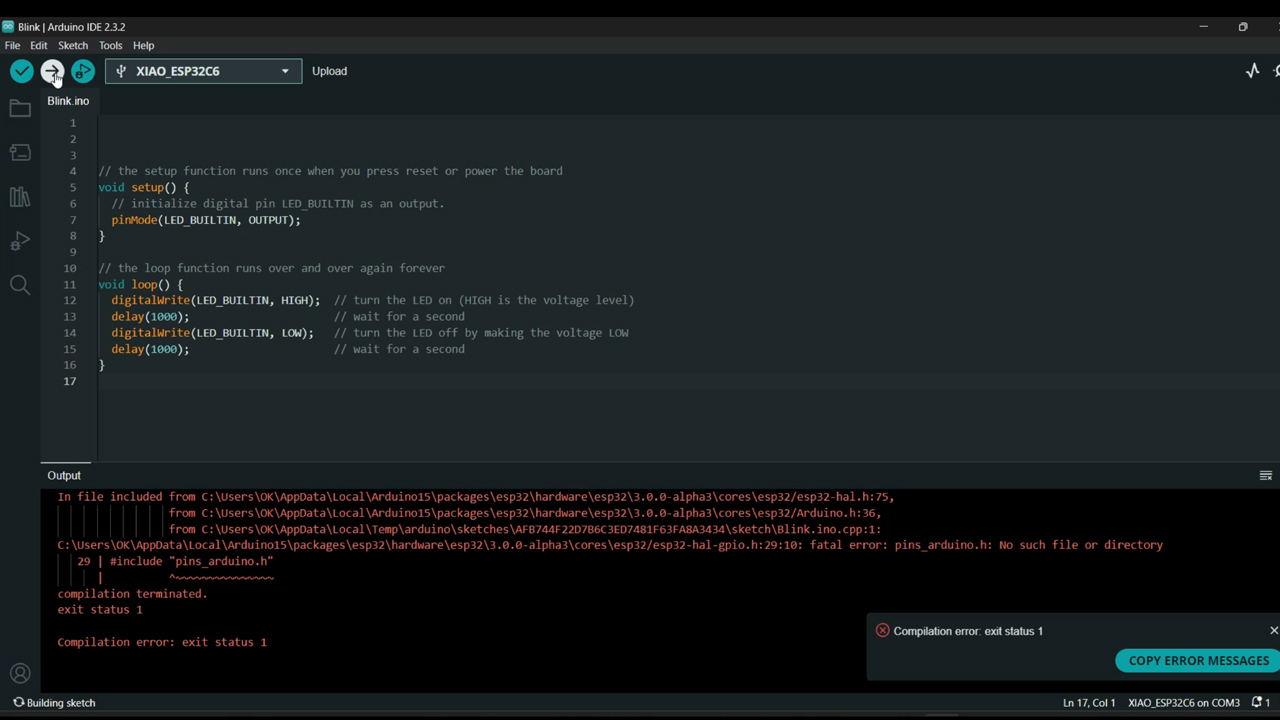
If you get an error like this which is due to the pins_arduino.h, to fix this error you will need to go to the variants folder and then to the XIAO_ESP32C6 folder.
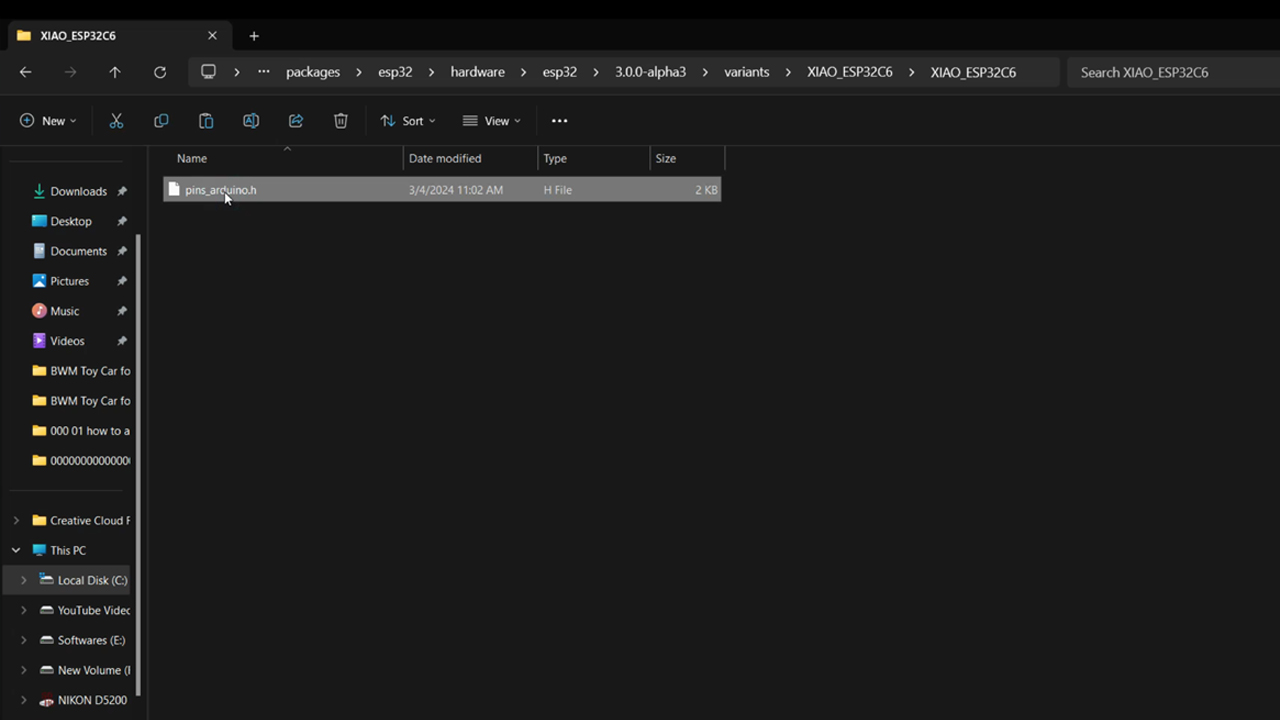
Copy the pins_arduino.h file, then go to the cores folder, open the ESP32 folder and paste the file.
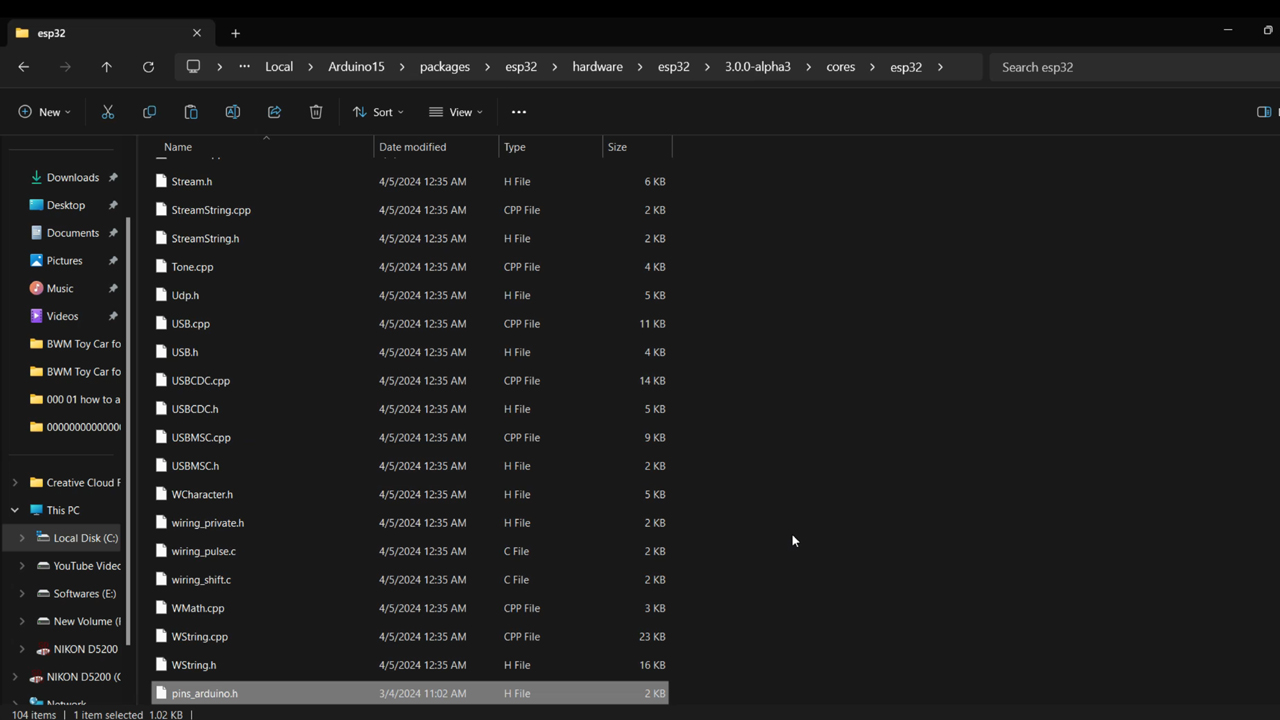
This will fix the issue. Let’s again upload the program.
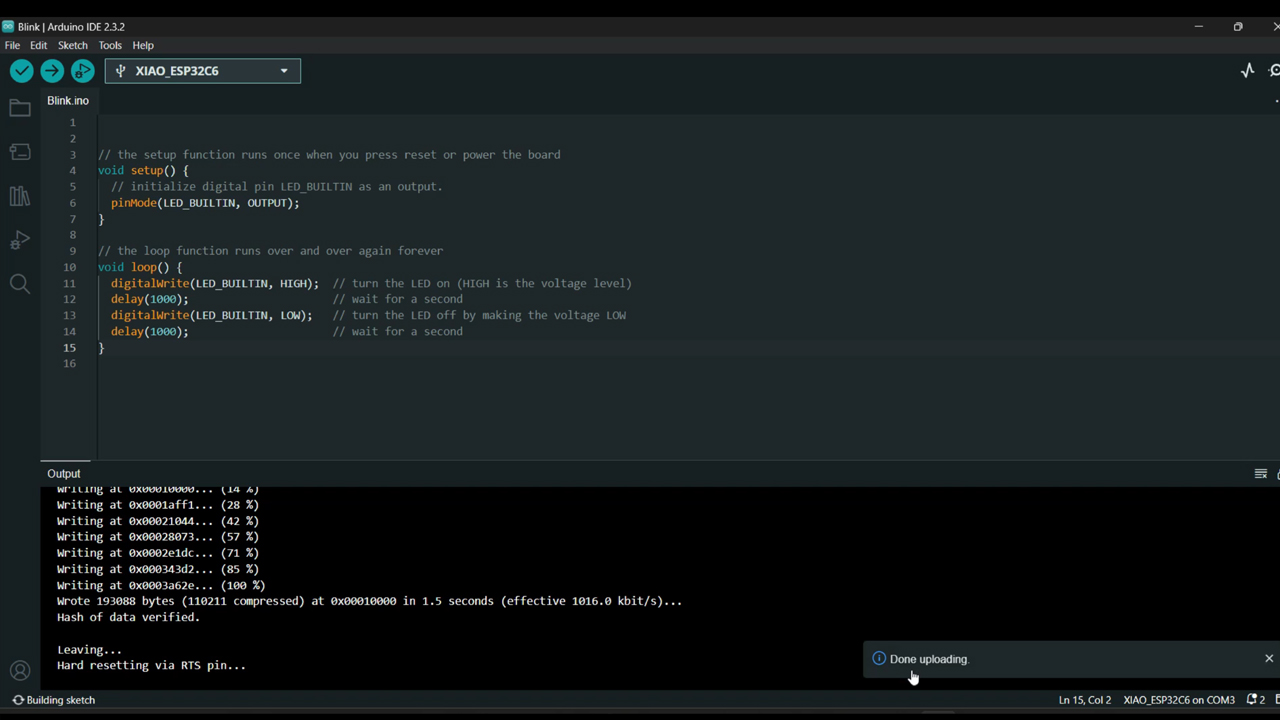
This time you can see the program successfully uploaded. And also the onboard LED has started to blink. Let me show it to you.
So, that’s all about how to get started with the XIAO ESP32C6. In upcoming tutorial I will test its Bluetooth communication range and I will also build different iOT based projects. So, consider subscribing if you don’t want to miss any of my upcoming tutorials.
Watch Video Tutorial:
Discover more from Electronic Clinic
Subscribe to get the latest posts sent to your email.


