ESP32 Bluetooth Relay Control with Android App
Last Updated on October 24, 2025 by Engr. Shahzada Fahad
Table of Contents
Description:
Imagine controlling all your home appliances with just your Smartphone; even when WiFi is down.
Today, I will show you how I built a Bluetooth-based relay control system using the ESP32-S3 and my own custom Android application designed and programmed in Android Studio.

And trust me, it’s faster and more reliable than you think!
This is my 3rd article on the MaTouch 1.28” Toolset Timer Switch Relay from Makerfabs.
In my last article, I showed you how to turn the MaTouch 1.28” Toolset Timer Switch Relay into a smart home controller using the ESP32S3 and Blynk IoT app.

The best part was the real-time synchronization; whether you switched a load ON or OFF from the display or from the Blynk app, both interfaces updated instantly. Plus, I made the system reliable enough to work online and offline, so even if WiFi dropped, the touchscreen UI still worked smoothly. This project gave us complete remote appliance control, smart automation, and a polished user interface; perfect for anyone interested in home automation, IoT projects, and ESP32 smart switches.
And for the hardware overview and software setups; read the first article.

Anyway, I liked this kit so much that I decided to make my own custom Android application for it. I kept the app very simple; no fancy images on the buttons; so even beginners can easily make changes and customize it in their own way.

And yes, I built this application in Android Studio.
The full project folder is available on my Patreon.
Before starting the practical demo, there are a few important things I want to share with you.

As you can see right now, the kit is powered ON, but the display is completely blank. That’s because this time, I did not use the display at all; I also ignored the encoder and the button.
I am pretending as if this board doesn’t even have a display, encoder, or button.
I am only using the ESP32-S3 and the relay board. The benefit of this is simple; the code I share with you will work on any ESP32 board without changes. And later, if you want more features, you can easily add them according to your needs.
So, you can think of today’s project as a template project for building Bluetooth-based projects.
It’s not that we won’t use the display, encoder, or button; we definitely will.
In my next video, I will use this same kit to build a Smartphone-based complete control system for a bike. In that project, we will use the display, encoder, and button to accept or reject calls, and even control the bike’s engine. So, make sure to subscribe if you don’t want to miss that video and article.
Anyway, let’s begin with the practical demonstration.
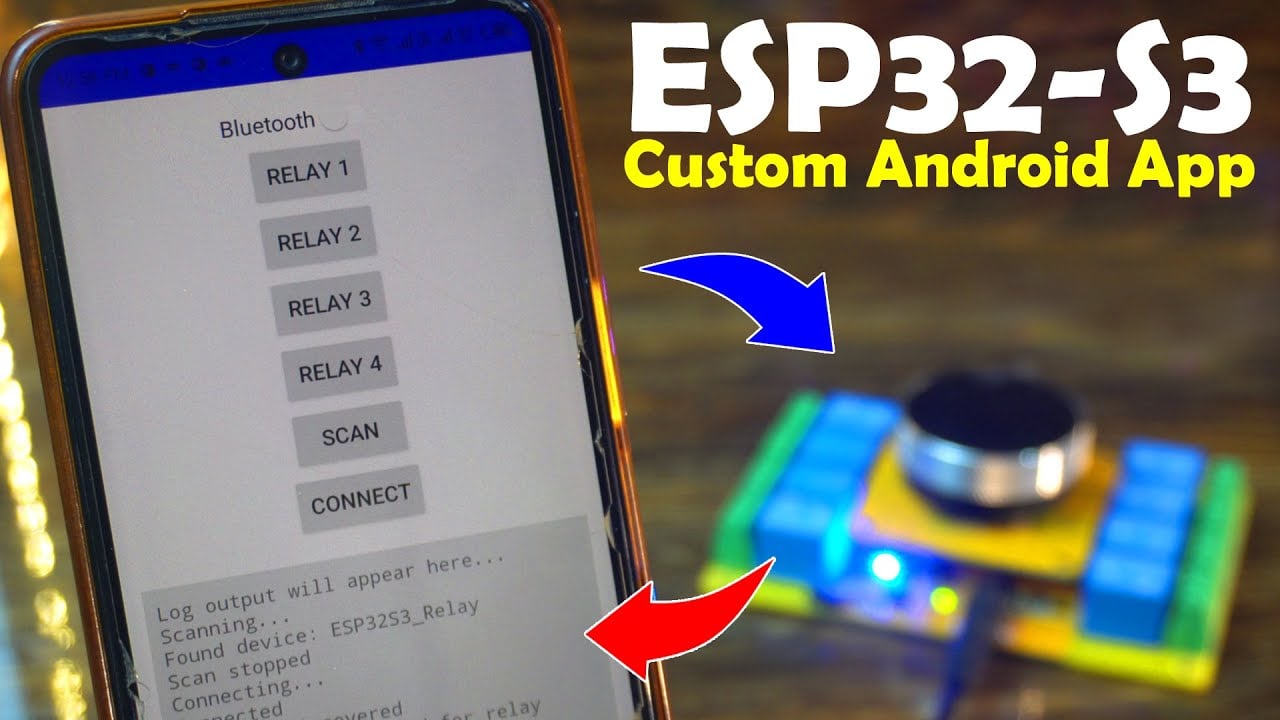
I have already paired the mobile application, just like we normally pair apps with any Bluetooth-supported device.

At the top, you can see this Bluetooth switch. I added it just as an example; you can rename it later and use it for any other purpose, or you can keep it as a connect and disconnect switch for Bluetooth.
To control the 4 relays, I have added 4 buttons. Of course, you can increase or decrease the number of buttons according to your own needs.
And finally, the SCAN and Connect buttons are very simple; their function is clear from their names.
And in that area where you can see “Log output will appear here…” , acknowledgment messages will be displayed; like when a relay turns ON or OFF.
This way, we know for sure whether the command we sent was successfully executed or not.
This feature is very useful in situations where the device is not in front of us; for example, if we are in the bathroom and want to turn the water pump ON or OFF.
Here, if you want, you can also display sensor values.
Now, let’s control all four relays.

As you can see, the moment I pressed the Relay 1 button, the relay turned ON, and at the same time I received the feedback message “Relay 1 ON.”
Let me turn it OFF; and this time, I instantly received the feedback message “Relay 1 OFF.”

In the Video tutorial, I have also practically demonstrated that how fast this entire system is.
So, I highly recommend watching the Video tutorial given at the end of this article.
So now, let’s move on and take a look at the programming.
ESP32 BLE Programming:

Don’t get scared by looking at the code. All of the files you see here are not even used in this project. As I already mentioned, we are only using the Bluetooth and a few GPIO pins.
These extra files were generated from SquareLine Studio in my previous project. If you want, you can delete all of them except the main .ino file.
I am not deleting them because later, if you want to use this project with a UI, these files will already be there to make things easier for you.
In fact, I will be modifying this same project in my next video, where I will build a bike control system with full smartphone integration.
I already explained the uploading method in Part 1, so I won’t repeat it here.
The complete source code of this project is available on my Patreon Shop.
So that’s all for now.
Watch Video Tutorial:
Discover more from Electronic Clinic
Subscribe to get the latest posts sent to your email.


