ESP32 Bluetooth Relay UI App – Version 4 Upgrade
Last Updated on October 25, 2025 by Engr. Shahzada Fahad
Table of Contents
Introduction:
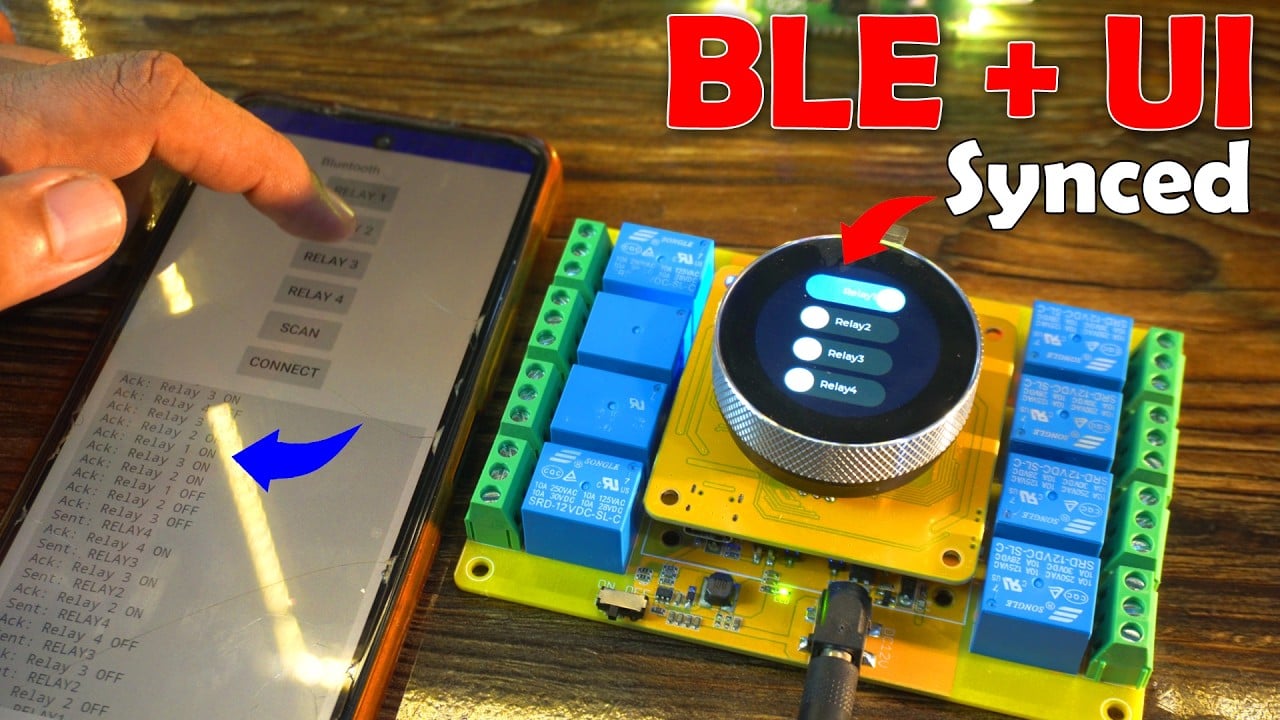
ESP32 Bluetooth Relay UI App – Version 4 Upgrade– With Version 4, the ESP32 Bluetooth Relay App and the UI display are now fully synchronized.

In the previous article, we built a custom Android application in Android Studio to control the MaTouch 1.28” Timer Switch Relay using Bluetooth. We kept it very simple; just relay control buttons and feedback messages; so that even beginners could customize it easily.
In that project, I completely ignored the display, encoder, and button. The idea was to treat the kit as just an ESP32-S3 with a relay board, so the same code could run on any ESP32 board without modification. That project will now serve as a template for all Bluetooth-based control systems.
What’s New in Version 4
Now, in this Version 4 update, I used the exact same Android app; without changing even a single line of code. I only made a few small modifications to my existing project in SquareLine Studio.

In Version 2, if you remember, we built a home automation system using the UI and the Blynk application. This time, I simply modified that same UI to create this project. Anyway, I will explain more about this later in the video.
I also made some modifications on the controller side program. What changes I made will become clear to you in just a moment, when I demonstrate everything practically.
Why Version 4?
See, in Version 4, I was going to make a control system for a bike, but some people sent me emails, one of my supporters on Patreon also said, in fact he even shared the idea that he wants to use it as a two-way system, and on TikTok also my followers requested that I use the same Android application with the UI. So, my YouTube and TikTok family, here it is.
First, I will share with you its practical demo and then after that we will talk more about it.
Practical demonstration:
In the previous project, the display was completely blank.

But this time, as you can see on Screen1, I added 4 switches with the same labels to avoid any confusion.

On Screen2, I used the same background image where I show the date and time. Anyway, let’s go back to Screen1.
Two-Way Synchronization
In Version 2, we had fully synchronized the UI with the Blynk application, and I have added the same feature in this project as well. This was the only part that took more time, because I had to make a lot of changes in the code to do it.
Anyway, now the UI and the Bluetooth app are completely synchronized. So, when I turn ON any switch in the mobile app, the same switch also turns ON in the UI.
And not only that; the controller also sends feedback to the Bluetooth app, which lets the user know that the command was successfully executed.
Without this feedback feature, the user would be confused about whether the load actually turned ON or OFF. This is very useful in situations where the loads are not physically visible.
Complete Two-Way Communication
This is now a complete two-way communication system. For example, I can turn ON Relay1 from the Bluetooth app, but I can also turn OFF the same relay from the UI.

And the best part is, when someone uses the UI to turn relays ON or OFF, the updated relay status is also sent back to the Bluetooth app.

For this, it’s not necessary for the Bluetooth application to stay active. Even if it is running in the background, it will still receive the relay status; even if I turn the phone screen off.
Now, let me randomly turn some relays ON and OFF, and then we will open the application to check.

Amazing! All the relay statuses we changed are received perfectly.

Speed Test
Now let’s quickly test how fast this system works.
For this test, I highly recommend watching my video tutorial given at the end of this article. Anyways, it was insanely fast!
This setup is completely ready for installation. You just need to add some fancy buttons in the Android app, and it’s all set.
Source Code
The complete project code, along with the original Android application source code, is available on my Patreon page.
About the UI in SquareLine Studio:

I have already made detailed videos and have written quite detailed articles on SquareLine Studio and LVGL, which you can find in my ESP32 Projects Category.
For projects like this, you should have at least some background in SquareLine Studio. Even if not too much, you should at least know how to start a new project, how to import an existing one, and how to use basic widgets. All the widgets you see here, I have already explained and used in my previous videos and articles. So, for the basics, make sure you read those articles.
Now, on Screen1 you can see I have just used 4 switches. I have also given them proper names so that when I am working in Arduino IDE, I don’t face any issues while tracing these buttons.
I have also assigned events to these buttons. For example, when I turn Relay1 switch ON or OFF, the function relay1fun is called. Similarly, for Relay2 it’s relay2fun, for Relay3 it’s relay3fun, and for Relay4 it’s relay4fun. You’ll find all these functions inside the ui_events.h file.
And then, you will use these same functions in your main .ino file to control the relays, update their status, and so on.
So, that’s all for now.
Watch Video Tutorial:
Discover more from Electronic Clinic
Subscribe to get the latest posts sent to your email.


