Html tags, Html tags Attributes, Html Lists ordered, unordered and definition list
Last Updated on April 2, 2021 by Engr. Shahzada Fahad
Table of Contents
Html:
HTML tags- Html stands for hyper text markup language. Html is a fundamental computer language which is used to develop web pages. It Is a language interpreted by a browser. It is a very simple language with only limited commands. These commands are called the html tags. These html tags can be embedded (inserted) in a document for formatting text and linking information.
Html document is an ordinary ASCII text file. It consists of text to be displayed and the tags that tell the browser how to display the text. It contains no images, no sounds, no videos, and no animation. However, a document can include links (or pointers) to0 image files, videos files, and animation files etc.
Limitations of HTML:
Although html is a fundamental web development language. It has some limitations such as:
- It can only used for creating static web pages I.e. web pages that cannot be changed by dynamically.
- It only provides commands in the form of html tags and does not provide the programming features such as loop structures and selection structures etc.
Amazon Purchase Links:
*Please Note: These are affiliate links. I may make a commission if you buy the components through these links. I would appreciate your support in this way!
Html tags:
Html commands are known as tags. The tags are the instructions used in a web page document that instruct a web browser to perform certain actions. For example, tags are used to format html document and to change other characteristics of the document. Similarly, tags are used to define the sections of document etc.
A tag always begins with a left angle bracket (<) and ends with a right angle bracket (>) the name of the tag is placed between these two symbols. These symbols are called angle bracket. The angle bracket simply tell the browser that it is an HTML tag command. The browser must do something. The use of html tags to define the elements of a web page/document is referred to as markup. The tags can be used for the following main purposes:
- To specify the heading/title of the document.
- To specify paragraphs.
- To format the text and other objects of HTML document.
- To specify the hyperlinks.
- To insert forms.
- To insert images and other multimedia objects etc.
For example;
- <b> tag is used to bold the text of document and <u> tag is used to underline the text.
- <body> tag is used to define the main body of the html document.
- <title> tag is used to specify the title of the document and so on.
Html tags are not case sensitive. It means that you can write tags. In uppercase and lowercase. However, if you want to follow the latest web standard, you should write Html tags in lowercase letters. The xhtml (the new generation of html) demands tags in lowercase.
Types of Html Tags:
Usually Html tags are divided into two types:
Paired Html tags
Singular Html tags
Paired Html tags:
Paired Html tags come in pairs link <html> and </html>. paired tags are also known as surrounding tags. The first tag in a pair is called opening tag or start tag, while the second tag is called closing tag or end tag. Both tags look alike except the closing tag Includes a forward slash ( / ) also. The opening tag activates the effect and the closing tag turns the effect off.
To apply tags to text / information in the document, place the opening tag before the text/information, and then place the closing tag after the information. The text/information between the start tag and end tag is called contents.
For example, to bold the text “Programming digest Web Programming “ in a document, the tags are written as;
<b> Programming digest Web Programming </b>
The opening tag and closing tag can be written on separate lines. For example, above tags can be applied as;
<b>
Programming digest Web Programming
</b>
Nested html tags:
Paired tags can be applied in nested form. Nesting means placing one set of html tags inside another set. For example, to apply bold and italic to Programming digest and only bold to Web Programming, the tags in nested form are written as follows:
<b> <i> Programming digest <i> Web Programming </b>
Singular Html tags:
Singular Html tags is also known as stand-alone tag or separation tag. Singular tag has no closing tag. The singular Html tags are used to insert line breaks, horizontal lines images etc. in the document. For example, <br> tag is used to insert a line break. Similarly, <hr> tag is use to insert a horizontal line.
Html tags Elements:
Html document is a text file made up of html elements. Html elements are defined using html tags. For example, an html element is given below
<b> programming </b>
In the above html element, note the following points:
- The html element starts with a start tag such as <b>
- The content of the html element is “programming”.
- Html element ends with an end tag </b>
- Another example of html element is given below;
<body >
I love <b> programming </b>
</body>
In this example, html element starts with the start tag <body>, and ends with tag </body>. The purpose of the <body> tag is to define the html element that contains the body of the html document.
Html tags attributes:
An attribute indicates the characteristics of an object. For example, size and color of a line or text represent the attributes. Attributes are specified with opening tag to provide additional information about an element or object of the document. For example, to display the heading In the center of a browser window, the alignment attribute along with its values is specified as below:
<h1 align =”center”> Web tutorial </h1>
In the above code, <h1> is the opening tag. It is used to display “Web tutorial” as heading 1. The attribute ‘align’ and its value ‘center’ are specified inside the opening tag.
A tag may multiple attributes. So multiple attributes can be associated with a tag. They are written separated by space. For example, to draw a horizontal line with width size of 50 pixels and with red color, the <hr> tag is written as;
<hr size = 50 color = red>
The value of an attribute may consist of two or more words such as “times new roaman”. In this case, it is written within single or double quotation marks such as;
<font face = “times new roman ”> Programming digest </font>
Creating, Saving, and Viewing Html document :
Html document can be created in any text editor. Usually, in the Windows operating system, the Notepad editor program is used to this purpose. In addition, you can create html document in Microsoft FrontPage, macromedia dream weaver and many other tools.
To create and save a html document In NotePad, follow these steps:-
- OpenNotepad program.
- Select new command for creating new document.
- Type the html code and text you want to include.
- Save you document by selection the save or save as command. The file extension must be ‘htm’ or ‘html’. please give the name of file with extension “htm” in double quotes in save as dialog box such as “test.htm”.
Viewing Html Document :
Html document can be tested in any web browser program. For example, internet explorer and netscape navigator can be use for this purpose.
To view the Html document in the browser, follow these steps:-
- Open the drive or folder that contains the html document.
- Double click the file name. the document will be opened in the internet explorer or netscape navigator, which is installed in your computer. Please note that internet explorer is provided in windows operation systems. It is automatically installed during installation process of windows operating system.
Structure of Html document:
Every computer language provides its own program structure for writing program source code. The programmer/developer must follow the program structure of that language for writing source code.
Html also provides structure for creating html document. The basic structure of html document Is as follows:-
|
1 2 3 4 5 6 7 8 9 10 11 12 |
<html> <head> <title> Your Page Title</title> </head> <body> Programming statements . . . </body> </html> |
The detail of the above mentioned standard tags is given below:
Html Tags used in a written document:
<html> Tag:
The <html > tag indicates the beginning of html document. This tag tell the browser that the document is an html document. Similarly, </html> indicates the end of html document. The entire html document (or html code) is enclosed within <html> and </html> tags.
The html document is divided into two sections:
- Header section which is defined by <head> and </head> tags.
- Body section which is defined by <body> and </body> tags.
<head> html tag:
Some information is provided between <head> and </head> tags that is required for the working of html document. The <head> and </head> tags contain the following information:
- Title of the document.
- Scripts definitions.
- Styles definitions.
- Document descriptions etc.
The browser does not display the contents of this section. However, the information given in this section is used in the body section of the document for different purposes.
The <head> tag may also contain other tags that have information for search engines and for index programs.
<Title>html tag:
This html tag is used to give the title of the web page (html document ). The text given as title appears in the title bar of the browser window. The title describes what is the page about. The text for title is given between <title> and </title> tags. Both of these html tags are enclosed between <head> and </head> tags.
For example, to give the title “Web Tutorial” of a document, the html tags are written as:
<head>
<title> Web Tutorial </title>
</head>
There are other html tags that can be used between <head> and </head> tags will be discussed later.
<body> html tag:
The main body of the html document is defined between the <body> and </body> tags. This section of the html document contains the information that the browser must display. Several other html tags are used between <body> and </body> tags for formatting the information to be displayed and for other purposes.
Attributes of the body:
The <body> tag has some attributes that can be used to customize the look of the page. The most commonly used attributes of <body> tag are follows:
BGColor:
It is used to specify the background color of the page. You can specify a color by name (such as ‘red’, ‘green’, ‘blue’) or its equivalent hexadecimal number.
Background:
It is used to specify the image file as the background of the page.
Text:
It is used to specify the color for document text to be displayed in the browser window.
Link:
It is used to specify the color for links.
Vlink:
Vlink stands for Visited link. This attribute is used to specify the color for links that have been clicked (or visited).
Alink:
Alink stands for activated link. This attribute is used to specify the color for an activated link. The specified color of the link appears when link is clicked.
For example, to specify the background color of the page as ‘green’ and text color as ‘red’, the <body> tag is written as:
<body BGcolor = green text = red>
Similarly, to specify the image file “map.gif” as background of the page, the <body> tag is written as;
<body background = map.gif>
Note that the file “map.gif” should be in the same directory/folder in which the html document is stored. If the image file is stored at some other location, then complete path of the image file must be given as attribute value.
Example write html code for the following purpose:
- To give title of the page as “Programming digest”
- To display message “Web Tutorial” in red color.
- To set background color of the page as yellow.
|
1 2 3 4 5 6 |
<html> <head> <title> Programming digest</title></head> <body BGcolor = yellow text = red> Web Tutorial </body> </html> |

Heading html Tags:
Html provides tags for displaying heading of different topics. Html supports six different levels of headings. Each level of heading has its own tag pair. <h1> is the highest level of heading and <h6> is the lowest level. All headings appear bold. The size of the heading depends on the level chosen I.e. <h1> to <h6>.
The headings tags are used inside the <body> tag. The text for heading is written between the heading tag e.g.
<h2> Programming Digest</h2>
Attributes of the heading html tags:
The heading tags support the ‘align’ attribute. The value for ‘align’ attribute are as follows:
Left:
It is used to align the heading on the left of the browser window. It is default setting.
Center:
It is used to align the heading in the center of browser window.
Right:
It is used to align the heading on the right of the browser window.
Example write HTML code to demonstrate the heading tags:
|
1 2 3 4 5 6 7 8 9 10 11 12 13 14 15 16 17 18 19 20 21 22 23 24 |
<html> <head> <title> Heading Tags</title></head> <body> <h1> Web Tutorial </h1> <h2> Web Tutorial </h2> <h3> Web Tutorial </h3> <h4> Web Tutorial </h4> <h5> Web Tutorial </h5> <h6> Web Tutorial </h6> </body> </html> |

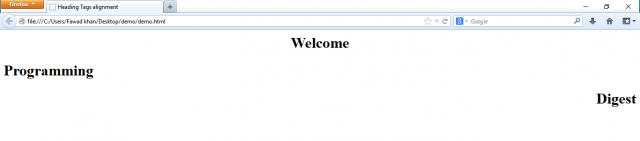
Example write html code for displaying headings as follows:
- “Welcome” at the center of browser window.
- “programming” at the left of browser window.
- “Digest” at right of browser window.
|
1 2 3 4 5 6 7 8 9 10 11 12 13 14 15 16 |
<html> <head> <title> Heading Tags alignment</title></head> <body> <h1 align = center> Welcome </h1> <h1 align = left > Programming </h1> <h1 align = right> Digest </h1> </body> </html> |
<p> html tags:
The <p> tag is used to insert a new paragraph in the document. It is used inside the <body> tag. The <p> tag is also in paired form. You can use the <p> tag alone. The use if closing tag i.e. </p> is optional. However, <p> tags should be used as paired to identify where a particular paragraph starts and ends. Mostly the <p> tag is used to add a break between paragraphs. For example
<body>
First paragraph
<p>
Second paragraph
<p>
Third paragraph
</body>
Attributes of P html tags:
Like heading tags, alignment attribute values can be applied with <p> tag for paragraph alignment such as:
Align = left :
it is used for left alignment of paragraph.
Align = right :
it is used for alignment of paragraph.
Align = center:
it is used for center alignment of paragraph.
Example write Html code for demonstrating the ‘Align’ attribute with all attribute values:
|
1 2 3 4 5 6 7 8 9 10 11 12 13 14 15 |
<html> <head> <title>Test Paragraph Alignment</title></head> <body> <p align =center> this align attribute value is use to display text in Center. </p> <p align =left> this align attribute value is use to display text in Left. </p> <p align =right> this align attribute value is use to display text in Right. </p> </body> </html> |

<BR> html tags (line Break):
The <br> tag is used for line break. The <br> tag moves the printing control to the start of the next line. This tag performs action in the same way as you press the Enter key (to insert new paragraph in editor window) during document entering / editing process. The <br> does not insert extra space between the lines. The <br> tag has no closing tag.
For example, the following text will be displayed on a single line:
Pakistan
Australia
Germany
Turkey
United state
To display the above text on different lines, the <br> tag used as;
Pakistan <br>
Australia <br>
Germany <br>
Turkey <br>
United state <br>
The following html code will display “ Web Tutorial Programming Digest” In three lines:
<body>
Web Tutorial <br> Programming <br> Digest
</br>
<HR> Html Tags (Drawing Horizontal line):
The <hr> tag is used to draw horizontal line in the document. The horizontal lines are draw to separate different sections of the document. <hr> is a singular tag. It means that it has no closing tag.
Attributes of <hr> html tags:
The most important and commonly used attributes of <hr> are as follows:
Align:
It is used to specify the alignment of the horizontal line. The possible value of this attribute are:
Left :
It is used to align the line at the left side of the page.
Right:
It is used to align the line at the right side of the page.
Center:
It is used to align the line at the center of the page.
Size:
It is used to specify the thickness of the line. It is measured in pixels. The default size is 2 pixels.
Width:
It is used to specify the length ( or width ) of the line. The value for this attribute is specify in pixels or percentage.
Color:
It is used to specify the color of the line. The default color is dark gray.
Noshade:
It is used to remove the shadow that normally appears below the line.
Example write Html code to demonstrate the use of <hr> html tag and its commonly used attributes:
|
1 2 3 4 5 6 7 8 9 |
<html> <head> <title>drawing Horizontal lines testing code</title></head> <body> <hr align = right size = 20 color =red width= "150"> <hr align = center size = 15 color =green width= "50%"> <hr align = left size = 10 color =orange width= "25%"> </body> </html> |

Html Tags for Text Formatting:
There are several Html tags that can be used for text formatting of the html document. You can apply formatting to individual text. For example, you can display a text as bold, italic, underline, subscript, and superscript etc. the most commonly used text formatting tags are described below:
<B> html Tags (bold):
The <b> tag is used to display text in boldface style. For example, to display “welcome “ in boldface style, the <b> tag is written as;
<b> welcome </b>
<i> tag (Italic):
The <i> tag is used to display text in italic style. For example, to display “welcome” in italic style, the <i> tag is written as;
<i> Welcome </i>
<u> tag (underline)
The <u> tag is used to display text as underlined. For example, to display “welcome” as underlined, the <u> tag is written as;
<u> Welcome</u>
<S> or <Strike> tag (Strike through):
the <s> or <strike> tag is used to display text in strike through style. For example, to display “welcome” in strike through, the <s> tag is written as;
<s> welcome</s>
Or
<strike> welcome< /strike>
<Sup> tag (superscript X2):
The <sup> tag is used to display specified text in superscript format. For example, to display “MC2” the <sup> tag is written as follows:
MC <sup>2 </sup>
<SUB> tag (subscript X2):
The <sub> tag is used to display specified text in subscript format. For example, to display “(1001001)2” the <sub> tag is written as follow:
(1001001) <sub>2 </sub>
Example write html code to display the text as follows:
“Programming digest web tutorial” as
- “Programming “ in bold style
- “Digest “ in italic
- “Web tutorial” in underline
- (X2Y2)2
|
1 2 3 4 5 6 7 8 9 10 11 |
<html> <head> <title>Text formatting testing code</title></head> <body> <p> <b>programming </b><i> digest</i><u> web tutorial</u> </p> <p> (X<sub>2</sub>Y<sup>2</sup>)<sup>2 </body> </html> |

<Font> Html tag:
The <font> tag is used to specify the font characteristics of the text. The font characteristics include typeface, size and color. The attributes are used along with <font> tag to specify the font characteristics.
The attributes used in <font> html tag:
The most important and commonly used attributes of <font> tag are listed below.
Face:
It is used to specify the font name. For example, to specify the font name as ‘Arial’ for the text welcome, <font> tag is written as;
<font face = Arial> welcome </font>
You can specify multiple font name separated by commas such as;
<font face = arial, helvetica, courier>
In the above case, if the ‘arial’ font is not available, the browser looks for ‘Helvetica’. If ‘Helvetic’ is not available, it looks for ‘courier’ and so on. If all specified font names are missing, then the default font name of the browser is used
Size:
It is used to specify the font size of the text. The font size is not specified in pixels or point. It is specified as relative value. you can specify values using two methods
- you can specify absolute value from 1 to 7. The default size is 3.
<font face = Arial size=5>
Note: the value 1 for size will display text in 8pt size value 2 will display text in 10pt size and so on.
- You can specify a change in font size using + or – such as -4, -3, -2, -1, +1, +2, and +3. For example, size = +2 will set a size of 5 (add 2 in default size of 3).
Color:
It is used to specify the color of the specified text. It means that the color is applied only to the text surrounded by the <font> and </font> tags. The value of this attribute can be given as color name (such as red, green, yellow etc.) or hexadecimal value of the color (such as #1F0000).
| Color | Hexadecimal Value |
| Black | #000000 |
| White | #FFFFFF |
| Red | #FF0000 |
| Green | #00FF00 |
| Blue | #0000FF |
| Yellow | #FFFF00 |
| Gray | #808080 |
| Dark Red | #800000 |
| Dark Green | #008000 |
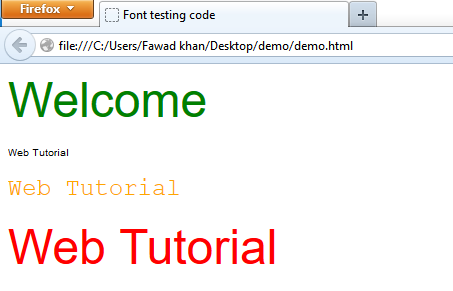
Example write html code to display information as follows:
- “Welcome” with font name Arial, font size 7 and with green color.
- “Web Tutorial” with different font name, colors and font sizes such as -3, -2, -1, +1, +2, +3, and +4.
|
1 2 3 4 5 6 7 8 9 10 11 12 13 14 15 16 17 18 19 20 21 22 23 24 25 26 |
<html> <head> <title>Font testing code</title></head> <body> <font face= arial size = 7 color= green> Welcome </font> <p> <font face= arial size = -2 color= black> Web Tutorial </font> </p> <p> <font face= courier size = +2 color= orange> Web Tutorial </font> </p> <p> <font face= helvetica size = +4 color= red> Web Tutorial </font> </p> </body> </html> |
Comments in Html:
You can write comments (or remarks) in html source code. The comment tag is used for this purpose. The comment tag starts with ‘<!’ and ends with ‘–>’. For example, to write comment “this is comment line” in html document, the comment tag is written as;
<!—this is comment line –>
The comments are written in html document to explain the html source code, which can help you when you edit the source code. You can write comments in any section of the document. The comment lines are ignored by the browser. It means that text for comments are not displayed in the browser window.
<PRE> html tag:
<pre> is short for preformatted. The <pre> tag is used to display preformatted text. The text is displayed in the browser window as you have typed in the html document. This tag is useful for displaying the addresses, source code of program or outputs of the program within your document.
In the following html code, address of a student is typed without using <pre> tag.
<body>
John smith
USA
Ph:123455
</body>
The output of the above html code will appear in browser as shown below.
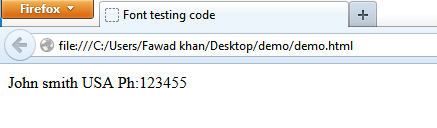
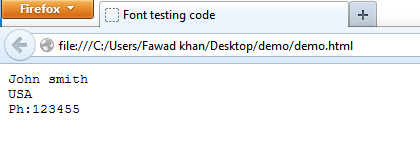
Note that multiple lines are typed within <body> tags but these lines of text are automatically wrapped in the browser window. To display the above text (address) exactly as it is typed; the text in multiple lines are written between <pre> and </pre> tags as follows:
<body>
<pre>
John smith
USA
Ph:123455
</pre>
</body>
<DIV> html tag:
Div is short for division. This dag is used to define logical divisions or section in an html document. Browser. Browsers usually place a line break before and after the div element.
Typically, the div tag to group block-element to format them with styles. You can apply alignment and other formatting to individual section/divisions of a web page. Particularly, style sheet attributes are applied to a specific section of the document.
Attributes of div HTML tags:
The most important and commonly used attributes of <div> tag are as follows:
Align:
It is used to specify the alignment to contents of the section of document. The possible values of this attribute are ‘left’, ‘right’, and ‘center’. The default value is ‘left’.
Nowrap:
It is used to disable the line wrapping for the section. The contents of the section will not automatically wrap as the user resizes the browser window.
Style:
It is used to provide the CSS inline styles to the html div tag.
Id:
It is used to access the div element in scripting languages like javascript, to modify the style or content dynamically.
Example write html code to display header element and two paragraphs with right alignment using <div> tag:
|
1 2 3 4 5 6 7 8 9 10 |
<html> <head> <title>Div tag testing code</title></head> <body> <div align = "right" > <h2> welcome</h2> <p>First paragraph placed inside the html div tag </p> <p>second paragraph placed inside the html div tag </p> </div> </body> </html> |

Example write html code to divide the page into two logical sections. Also, use CSS style to format these sections:
|
1 2 3 4 5 6 7 8 9 10 |
<html> <body> <div style=”background-color:orange; text-align:center”> <p>Navigation Section</p> </div> <div style=”border:1px solid black”> <p>Content Section</p> </div> </body> </html> |

<Marquee> html tag:
The <marquee> is a non-standard html tag. It is used to display a scrolling text message or an image within a document. This tag was first introduced in early version of microsoft’s internet explorer. Mostly the internet explorer recognizes this tag.
Attributes of <Marquee> html tags:
The most important and commonly used attributes of <marquee> tag are as follows:
Align:
It is used to specify the alignment of text outside the marquee. The possible values of this attribute are: ‘left’, ‘right’, ‘bottom’, and ‘center’.
Behavior:
It indicates the type of scrolling. The user can set the behavior of the marquee to one of three types:
- Scroll: it is default setting. It is used to scroll the text from one side of the marquee, across, and off the opposite side.
- Slide: Same as scroll except that the text stops when it reaches the opposite side.
- Alternate- text ‘moves’ alternatively from one side to the other.
ScrollDelay:
It is used to set the amount of time in milliseconds to control the scrolling speed. Increase this value to slow the scrolling action; decrease it to speed the scrolling action.
ScrollAmount:
It is used to control the amount of movement (in pixels) that gives the impression of animation.
Loop:
it is used to set how many times the marquee should ‘Loop’ its text/image. If you want to scroll the text/image only once, set its value 1; to scroll twice, set its value 2 and so on. If you want to scroll the text/image infinite number of times, set its value “infinite”. Default value is infinite.
Direction:
It is used to set the direction in which the text/image should scroll. Its possible values are:
- Left: it is used to scroll the text/image from right to left.
- Right: it is used to scroll the text/image from left to right.
- Up: it is used to scroll the text/image from down to up.
- Down: it is used to scroll the text/image from up to down.
- Bgcolor: it is used to set the background color of the marquee.
- Width: it is used to set the width of the marquee (in pixels or in %).
- Height: it is used to set the height of the marquee (in pixels or in %).
- Hspace: it is used to set the horizontal space around the marquee (in pixels)
- Vspace: it is used to set the vertical space around the marquee (in pixels).
Example write html code to scroll text using important attributes of <marquee> tag:
|
1 2 3 4 5 6 7 8 9 10 11 12 13 14 15 16 17 |
<html> <head> <title>Marquee tag testing code</title></head> <body> <div> <marquee direction=up behavior = slide loop=5> <b>important programming lanuages</b><br> Python<br> Java<br> C#<br> C++<br> PHP<br> </marquee> <div> <marquee direction= left behavior=alternate bgcolor=orange> This is alternate scrolling text</marquee> </div> </body> </html> |
Html Tags for Character Entities And Spaces:
In html, some characters have special meaning. For example, less than sign (<) define the start of an html tag. If you want to display these characters, then you must insert character entities in the html source code.
A character entitiy has three parts an ampersand (&), an entity name or # sign and an entity number, and finally an semicolon (;)for example, to display a less than sign, the character entity is written as follows:
<
Or
<
Where ‘lt’ specifies the entity name and ‘60’ specifies the entity number. Note that entity name is easier to remember than the entity number. However, some browser do not support the newest entity names, but almost all browsers support the entity number. Place note that the entities are case sensitive.
| Entity name | Entity number | Description |
| nbsp | 160 | It is used for non-breaking space, for example, to insert blank space between two word, character entity is written as; or   |
| Lt | 60 | It is used to insert (of display )less than sign (<) for example, to insert less than sign in the text of html document, character entity is written as; < or < |
| Gt | 62 | It is used to insert (or display) greater than sign (>) |
| Amp | 38 | It is used to insert (or display) ampersand sign (&) |
| Quot | 34 | It is used to insert (or display) quotation marks(“) |
| Apos | 39 | It is used to insert (or display) apostrophe(‘) |
| Pound | 163 | It is used to insert (or display) pound sign (£) |
| Yen | 165 | It is used to insert (or display) yen sign (¥) |
| Cent | 162 | It is used to insert (or display) cent sign (¢) |
| Sect | 167 | It is used to insert (or display) section sign (§) |
| Copy | 169 | It is used to insert (or display) copyright sign (©) |
| Reg | 174 | It is used to insert (or display) tragemark sign (®) |
| Time | 215 | It is used to insert (or display) multiplication sign (*) |
| Divide | 247 | It is used to insert (or display) division sign (÷) |
| Euro | 8364 | It is used to insert (or display) euro sign (€) |
Inserting Spaces:
If you insert many spaces between the text of html document, then html automatically will remove the extra spaces in your document, for example, if you insert 10 space between “programming “ and “digest”, then html will remove 9 of them.
To add spaces in the text character entity ‘ ’ is used. For example, to insert 3 spaces between “programming” and “Digest”, the html code is written as
<body>
Programming Digest
</body>
Lists Html tags:
Html provides tags for creating lists. In this way, you can present information in a structured and easy to read format. They draw attention of visitors to important points.
Types of lists:
In html, you can create three types of lists. Each of the list has a slightly different format and can be used for different purposes. The types of list are as follows:
- Order list
- Unordered lis
- Definitions list
Order List:
A list of items in which each item is marked with a unique number or letter (before item of the list) is called ordered list. Ordered list is also known as numbered list.
The following tags are used for ordered list:
- The <ol> tag is used for creating ordered list. Ol stands for ordered list.
- The <li> tag is used to specify the list item. li stants for list item. the <li> tag is used with each item in the list. The <li> tag has no closing tag.
The ordered list ends with </ol> tag.
Attributes of the ordered list HTML tags:
The most important and commonly used attributes of <ol> tag are as follows:
Type:
It is used to specify the numbering style for the ordered list. The possible values for this attribute are as follows:
1 :
It is used for Arabic number such as 1, 2, 3, 4…… it is the default numbering style.
i:
it is used for lowercase Roman number such as i, ii, iii……
l:
It is used for uppercase Roman number such as l, ll, lll…….,
a:
it is used for lowercase letters such as a, b, c …….
A:
It is used for uppercase letters such as A, B, C….
Start:
It is used to specify the value at which the ordered list should start. By default, it is ‘1’ for Arabic numbers, ‘i’ for roman numbers and so on.
Compact:
It indicates that the ordered list appears in a compact format.
<LI> html tags attributes for ordered list:
The most important and commonly used attributes of <li> tag for ordered list are as follows:
Type:
It is same as type attribute of <ol> tag. However, this attribute is used with <li> tag to change the numbering style in the middle of an ordered list. The values for this attribute are also same as mentioned in type attribute of <ol> tag.
Value:
It is used only with the <li> tag to change the numbering sequence in the middle of an ordered list.
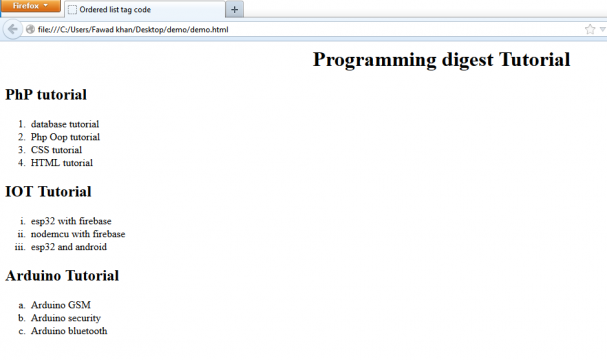
Example write HTML code to demonstrate the ordered List:
|
1 2 3 4 5 6 7 8 9 10 11 12 13 14 15 16 17 18 19 20 21 22 23 24 |
<html> <head> <title>Ordered list tag code</title></head> <body> <h1 align=center> Programming digest Tutorial</h1> <h2>PhP tutorial</h2> <ol> <li>database tutorial <li>Php Oop tutorial <li>CSS tutorial <li>HTML tutorial </ol> <h2> IOT Tutorial</h2> <ol type=i> <li> esp32 with firebase <li>nodemcu with firebase <li>esp32 and android </ol> <h2> Arduino Tutorial</h2> <ol type = a> <li> Arduino GSM <li> Arduino security <li> Arduino bluetooth </body> </html> |
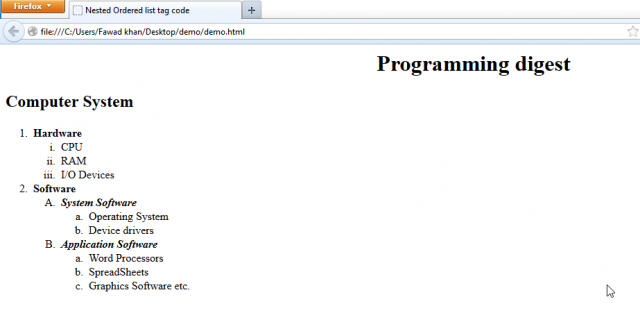
Example write html code to demonstrate the nested ordered list:
|
1 2 3 4 5 6 7 8 9 10 11 12 13 14 15 16 17 18 19 20 21 22 23 24 25 26 27 28 29 |
<html> <head> <title>Nested Ordered list tag code</title></head> <body> <h1 align=center> Programming digest</h1> <h2>Computer System</h2> <ol> <li><b>Hardware</b> <ol type =i> <li> CPU <li> RAM <li> I/O Devices </ol> <li><b> Software</b> <ol type = A> <li> <b> <i>System Software</b></i> <ol type = a> <li> Operating System <li> Device drivers </ol> <li> <b><i> Application Software </b> </i> <ol type =a> <li> Word Processors <li> SpreadSheets <li> Graphics Software etc. </ol> </ol> </ol> </body> </html> |
Unordered List html tag:
A list of items in which each item of the list is marked with a symbol or bullet (before item of the list), is called unordered list. It is also known unnumbered list. You can also specify any image as bullet to be displayed before list item. unordered list is also known as bulleted list.
The following tags are used for unordered list:
- The <ul> tag is used for creating unordered list. Ul stands for unordered list.
- Like ordered list, <li> tag is also used to add bulleted item of unordered list.
The unordered list ends with </ul> tag.
Attributes used in unordered list html tags:
The most important and commonly used attributes of <ul> tag are as follows:
Type:
It is used to specify the bullet type to be appeared with each item of the unordered list. The possible values for this attribute are as follows:
- Circle: small circle (o) will appear as bullet with each item of the list. It is the default
- Disc: small solid circle () will appear as bullet with each item of the list.
- Square: small solid square will appear as bullet with each item to the list.
SRC=”URL”:
It is used to specify the location of an image file (URL address) to use for the bullet in the unordered list. For example, to use the image for the bullet stored in the file “test.png”, the html code is written as
<ul src = “test.png”>
—————-
———–
</ul>
Note that the URL address may be relative or absolute.
Compact:
It indicates that the ordered list appears in a compact format.
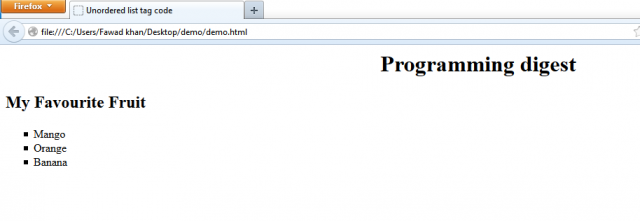
Example write html code to demonstrate the unordered list:
|
1 2 3 4 5 6 7 8 9 10 11 12 13 |
<html> <head> <title>Unordered list tag code</title></head> <body> <h1 align=center> Programming digest</h1> <h2> My Favourite Fruit </h2> <ul type = square> <li> Mango <li> Orange <li> Banana </ul> </body> </html> |
|
1 2 3 4 5 6 7 8 9 10 11 12 13 14 15 16 17 18 19 20 21 22 23 24 25 26 27 28 29 30 31 |
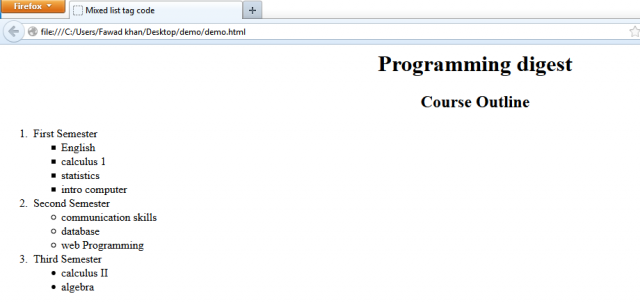
<html> <head> <title>Mixed list tag code</title></head> <body> <h1 align=center> Programming digest</h1> <h2 align = center> Course Outline </h2> <ol> <li> First Semester <ul type = square> <li> English <li> calculus 1 <li> statistics <li> intro computer </ul> <li> Second Semester <ul type = circle> <li> communication skills <li>database <li> web Programming </ul> <li> Third Semester <ul type = disc> <li> calculus II <li>algebra </ul> </ol> </body> </html> |
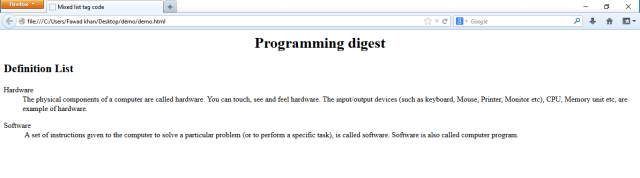
Definition List:
Definition list is slightly different from other list types. A definition list is not a list of item. it is a list of terms and explanation of the items. Each item of the definition list consists of two parts, the term and its description.
The following html tags are used for definition list:
- The <DL> tag is used to create a definition list. Dl stands for definition list.
- The <dt> tag is used to specify the term of definition. DT stands for definition term.
- The <DD> tag is used for the description of the term being defined. DD stands for Definition description.
The general form to define the definition list is as follows:
<dl>
<dt> term1</dt>
<DD> Description for term 1</DD>
<Dt> term2 </dt>
<dd> description for term2 </dd>
————-
————-
</dl>
Note that you can place paragraph, line breaks, images, links and other list etc. between the <dd> and </dd>
Example write the html code that displays the following information using the definition list:
Hardware
The physical components of a computer are called hardware. You can touch, see and feel hardware. The input/output devices (such as keyboard, Mouse, Printer, Monitor etc), CPU, Memory unit etc, are example of hardware.
Software
A set of instructions given to the computer to solve a particular problem (or to perform a specific task), is called software. Software is also called computer program.
|
1 2 3 4 5 6 7 8 9 10 11 12 13 14 15 16 17 18 19 20 21 |
<html> <head> <title>Mixed list tag code</title></head> <body> <h1 align=center> Programming digest</h1> <h2> Definition List </h2> <dl> <dt>Hardware</dt> <dd> The physical components of a computer are called hardware. You can touch, see and feel hardware. The input/output devices (such as keyboard, Mouse, Printer, Monitor etc), CPU, Memory unit etc, are example of hardware. </dd> </dl> <dt>Software</dt> <dd> A set of instructions given to the computer to solve a particular problem (or to perform a specific task), is called software. Software is also called computer program. </dd> </dl> </body> </html> |
Discover more from Electronic Clinic
Subscribe to get the latest posts sent to your email.