ESP32-S3 Bike Smart Control: Accept Calls & Start Engine with Touch & Encoder
Last Updated on October 31, 2025 by Engr. Shahzada Fahad
Table of Contents
Description:
ESP32-S3 Bike Smart Control: Accept Calls & Start Engine with Touch & Encoder- Imagine you are riding your bike; a call comes in; and instead of fumbling for your phone, the caller’s name pops up on your ESP32-S3 smart bike display. With just a tap, or even with gloves on by turning a simple rotary encoder, you can accept or reject the call instantly.

Not only that, you can start your engine, turn your headlights ON or OFF, and add unlimited custom controls for your vehicle.
Sounds futuristic, right?
Well, today we are making it real with the ESP32-S3 and the MaTouch 1.28” Toolset Timer Switch Relay kit.
But before we dive into this new project, let me take you back to where it all started.
Evolution: From Simple Relay Switch to Smart Vehicle Control
In Version 1, we explored the MaTouch 1.28” Toolset Timer Switch Relay for the first time; just a simple timer-based relay control system with the company’s own firmware.
In Version 2, we made it smarter with Blynk IoT, allowing us to control appliances from anywhere with real-time synchronization between the app and touchscreen.
In Version 3, I asked; what if WiFi isn’t available? So we built a custom Bluetooth app in Android Studio. It was fast, reliable, and worked even offline; perfect for any ESP32-based control project.
Then in Version 4, thanks to your feedback from YouTube, TikTok, and Patreon, we upgraded to a fully synchronized system. The UI and Bluetooth app worked in perfect harmony; complete two-way communication. Whether you toggled a relay from the app or the display, everything stayed in sync with instant feedback.
So you see, step by step, we have been evolving this system from a simple relay switch to a polished smart controller.
And here’s the best part; if you have watched my previous videos, you already have all the building blocks. By following this series, you can create your own custom automation systems; for home, office, or now even your bike.
Hands-Free Call Management Using BLE
Version 5 Smartphone + Vehicle Control System I modified the previous Android application and created this new one.

This application is now connected with this kit, and it will run in the background.
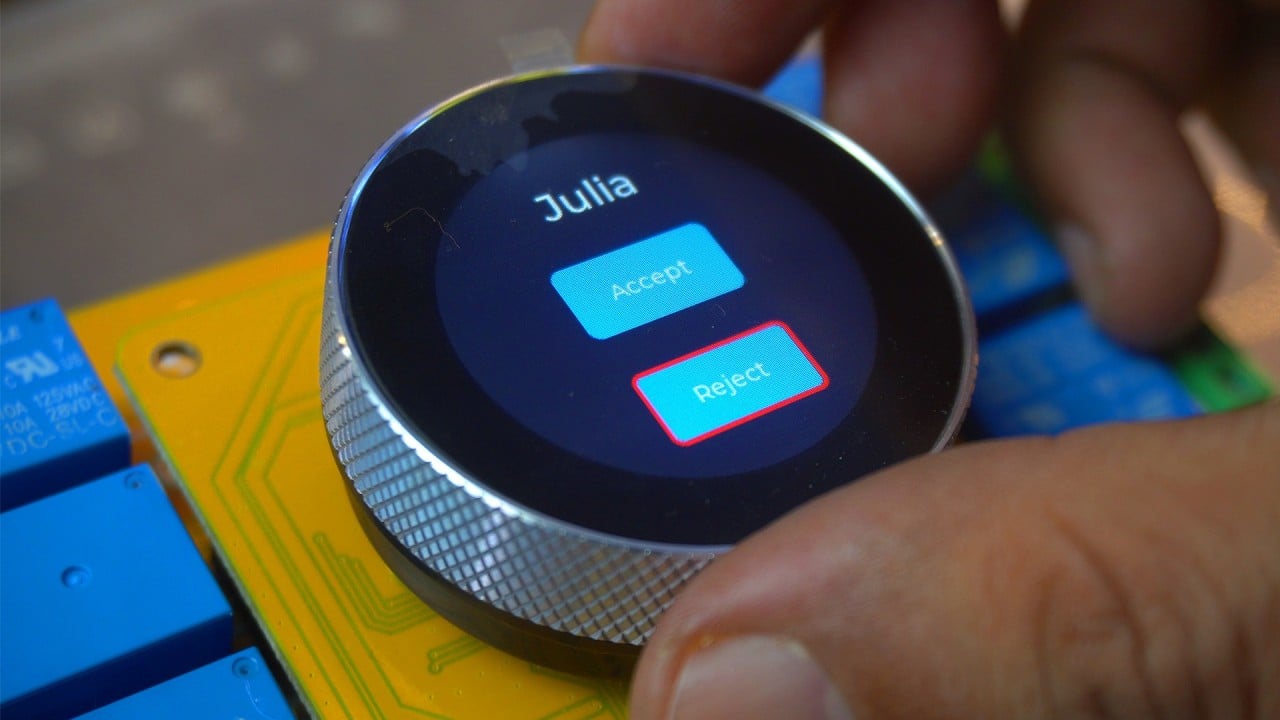
Now, whenever a call comes to this phone, the application will fetch the caller’s name and send it to the ESP32-S3 controller via Bluetooth. Then, the controller will display the caller’s name on the screen.

To accept or reject the call, I have also added two buttons on the screen named Accept and Reject. So, using these buttons, the person can either accept or reject the call.
First, let’s go with option one. I am going to ask my brother to call me, so I can practically demonstrate.

As you can see, as soon as I received the call on my cell phone, his name also appeared on the screen.
If I have the phone in my hand, I will attend the call through the phone. Otherwise, I can press the Accept button on the display to attend the call.
Implementing Automated Call Reject Messages
Now let’s move on to the second option; rejecting a call. What’s cool is that it not only rejects the call but also automatically sends a reply message saying “I’m busy! Call me later.”
And the best part?

This message is fully customizable, so you can set any text you like.
So once again, I will ask my brother to call me…
This time I am going to reject the call…

As you can see, right on his phone, he instantly received the message “I’m busy! Call me later”.
Solving the Glove Problem: Integrating the Rotary Encoder
So far, you have seen me using the on-screen Accept and Reject buttons. But here’s a real problem; what if I am wearing gloves? In that case, pressing those small buttons on the screen would be very difficult.
To solve this, I decided to integrate the encoder along with a push button. If you have been following my previous videos and articles, you already know I have covered the encoder and the built-in pushbutton in detail.
Now, let’s test it out. I will ask my brother to call me again…

This time, instead of touching the screen, I will simply rotate the encoder to choose between Accept or Reject, and then press the button to confirm my choice. Now, this is much easier.

Engine Start and Headlight Control Interface
On Screen 2, I am displaying the date and time. This is just to show you that you’re not limited to a single screen; you can easily create and switch between multiple screens without any issues.
Now, let’s move on to Screen 3.

Here, I have added two switches. The first switch is used to turn the engine ON and OFF. And this can be the engine of a bike, a car, or really any kind of vehicle.
As you can see, when I turn this switch ON or OFF, the relay on the board also switches ON or OFF. You might even hear the clicking sound of the relay; and if not, there’s also an LED for visual indication. “watch video tutorial for the practical demo”.
So imagine this on a bike or a car; you can use this button to start or stop the engine. And if you prefer wireless control, you can use the Bluetooth app.
I have already added an engine control switch inside the app, so with just one tap, I can wirelessly control the engine.
Now, the second switch on the display is for controlling the headlights. Just like the engine, I can easily turn the lights ON or OFF.
In the same way, if you want to control or monitor more things, you can do that very easily. This board actually has 8 relays, and you can use all of them for different functions.
I have also paid attention to the small details. For example, if I am on Screen 3, and if a call comes in, the display will automatically switch back to Screen 1 so you don’t miss it. That’s a pretty cool feature. I have shown this in the video.

And it doesn’t stop there; using this app, I can even send messages to the screen, or send hidden commands to the controller, like activating or deactivating the entire control system.
The possibilities are endless, and you can always add more features to make it fit your needs. If you would like to try this project yourself, you can download the complete source code for both the controller and the Bluetooth application along with the SqureLine Studio Project files from my Patreon shop.
Designing the Custom Bike UI with SquareLine Studio and LVGL
Now, let me give you a quick overview of what I have built in SquareLine Studio.

I created three different screens, each with its own function. And to make navigation smooth, I added gesture events; so you can easily swipe between screens without needing any extra buttons.
Screen 1 is dedicated to phone calls. This is where the caller’s name appears, along with the Accept and Reject buttons, and of course, it also works with the encoder.
Screen 2 shows the date and time; just to demonstrate that you are not limited to a single screen; you can display extra information too.
And Screen 3 is all about vehicle control. Here, I have added switches to control the engine and headlights, and you can expand this to manage even more features.
I have also given proper names to these buttons; for example, the Accept button is named btnaccept and the Reject button is named btnreject. I did the same with the labels as well, so that when I am working in the Arduino IDE, I can easily trace them without any confusion.
Using clear and meaningful names is really important. If you just leave the default names like Button1 or Switch2, it quickly becomes messy as your project grows. But with proper names, your code stays organized, easier to understand, and much simpler to debug later on.
Anyway, I didn’t just add the buttons; I also assigned them proper events. For example, whenever I press the Accept button, it automatically calls the acceptcallfun function, and when I press the Reject button, it calls the rejectcallfun function.
The same logic applies to the switches I added on Screen3. Each switch has its own event assigned, so whenever I interact with them, the corresponding function is triggered in the background. This makes the whole system very structured, because every button or switch you see on the UI is directly linked to a function in the code.
All the functions that we create inside SquareLine Studio can be found in the ui_events.h file. From there, you can call them inside your main .ino file to control the desired loads or execute any specific actions.
Now, I am not going into too much detail here because I already have a complete series on smartwatch programming where I explained SquareLine Studio and LVGL in depth. If you have seen that series, you will already be very comfortable with these concepts.
And for those who are new, don’t worry; things like how to upload the code and which parameters to use, I have already explained clearly in Version 1 of this project. So, if you need that foundational knowledge, make sure you go back and watch Version 1 first you can also read the article.
Setting Up the Custom Bluetooth App in Android Studio
First, you will need to download and install Android Studio. Once that’s done, head over to my Patreon page and download the source code.
After downloading, extract the zip file, and then open the extracted folder. Inside, you will find the project folder; copy this entire folder.

Now, go to your C drive → Users → and then open the AndroidStudioProjects folder. Paste the project folder here…

Once done, close the window and launch Android Studio.
In Android Studio, click on the Open button; browse to the project folder you just pasted, and hit OK.

If you are opening Android Studio for the very first time, it may ask to install some required packages. This can take a little time. But in my case, since I already built this application myself, all the packages are already installed.

Anyway, once the application is open, you can go ahead and make any necessary changes. By the way, I have also written a very detailed article on Android Studio and Bluetooth application. It’s the most complete guide available, and with the help of that article, many people have successfully built their own Android apps.
So, that’s all for now.
Watch Video Tutorial:
Discover more from Electronic Clinic
Subscribe to get the latest posts sent to your email.


