RDK X5: High-Performance YOLO Model Deployment on a Budget
Unlocking Real-Time YOLO AI Capabilities with the Budget-Friendly RDK X5
Last Updated on December 5, 2025 by Engr. Shahzada Fahad
Table of Contents
D-Robotics RDK X5:
RDK X5: High-Performance YOLO Model Deployment on a Budget- Today, we are unboxing the RDK X5 development board from D-Robotics. I know it’s made for AI projects, and it’s said to run models like YOLO smoothly; but I am not sure what accessories or parts are included. Let’s open the box and take a look.
Here we go…

The RDK X5 Development Board itself.
The RDK X5 case. And
The RDK Stereo Camera Module.
The packaging looks awesome! It’s organized, and I love how everything is boxed individually.
So first, let’s go through each component in detail, and then we will start the assembling!
YOLO V3 AI Projects
ESP32 CAM with Python OpenCV Yolo V3 for object detection and Identification
ESP32 Cam, Python OpenCV, Yolov3, & Arduino based Car Parking Barrier/Gate Control
Python OpenCV & ESP32 Cam based DIY Security Surveillance Camera
Purchase Links:
India: https://robu.in/product/d-robotics-rdk-x5-development-board-with-8gb-ram/
Europe: https://www.robot-maker.com/shop/kits-robots/167-rdk-x5-167.html
Other Tools and Components:
ESP32 WiFi + Bluetooth Module (Recommended)
Arduino Nano USB C type (Recommended)
*Please Note: These are affiliate links. I may make a commission if you buy the components through these links. I would appreciate your support in this way!
RDK X5 Development Board:
Let’s first start with the D-Robotics RDK X5 Development Board.

The RDK X5 is a powerful upgrade over the RDK X3, designed for high-performance AI and robotics tasks.
While the X3 features a quad-core Cortex-A53 CPU and 5 TOPS AI performance, the RDK X5 doubles both with an 8-core Cortex-A55 and 10 TOPS.
The RDK X5 also adds a GPU with 32GFlops, offers more memory (up to 8GB), and significantly improves USB connectivity with four USB 3.0 ports.
It supports Bluetooth 5.4, PoE-enabled Gigabit Ethernet, and includes advanced I/O like CAN FD and a 3.5mm audio jack.
For developers, the RDK X5 excels in running large language models with up to 14B parameters and achieves 220 FPS with YOLOv8n models—far beyond the X3’s 34 FPS. These enhancements make the RDK X5 ideal for demanding AI vision, robotics, and edge computing applications.
| Product | RDK X3 | RDK X5 | |
| Hardware | AI Performance | 5 TOPS | 10 TOPS |
| CPU | 4x Arm Cortex-A53@1.5G | 8x Arm Cortex-A55@1.5GHz | |
| BPU | Dual-core Bernoulli Arch, 5 TOPS | Bayes Arch, 10 TOPS | |
| GPU | – | 32Gflops | |
| Memory | 2GB/4GB | 4GB/8GB | |
| Storage | Micro SD | Micro SD | |
| Video Encode | 1x 4K60 (H.265\H.264) | 1x 4K60 (H.265\H.264) | |
| Video Decode | 1x 4K60 (H.265\H.264) | 1x 4K60 (H.265\H.264) | |
| Camera | 2 x 2-lane MIPI CSI | 2 x 4-lane MIPI CSI | |
| USB | 1 x USB 3.0 HOST interfaces(TYPE A)
2 x USB 2.0 HOST interfaces(TYPE A) 1 x USB 2.0 Device interface(TYPE C) |
4 x USB 3.0 HOST interfaces(TYPE A)
1 x USB 2.0 Device interface(TYPE C)1 x Debug serial port(Micro USB) |
|
| PCIe | – | – | |
| Networking | Wi-Fi/Bluetooth 2.4/5 GHz Bluetooth 4.21 x Gigabit Ethernet RJ45 port | Wi-Fi/Bluetooth 2.4/5 GHz Bluetooth 5.41 x Gigabit Ethernet RJ45 port with PoE | |
| Display | 1 x HDMI supporting up to 1080p60 | 1 x HDMI supporting up to 1080p60 1 x MIPI CSI 4 Lane | |
| Audio | – | 1x 3.5mm headphone jack audio input/output | |
| CAN FD | – | 1x CAN FD | |
| Other I/O | 40-pin GPIO header (28 GPIOs) | 40-pin GPIO header (28 GPIOs, reusable support 5 x UART, 8 x PWM, 3 x I2C, 2 x SPI, 1 x I2S) | |
| Power input | 5V 3A via Type-C (15W) | 5V/5A via Type-C (25W) | |
| Mechanical | 85mm x 49mm | 85mm x 49mm | |
| Software | Operation System | Ubuntu 20.04/22.04TogetherOS (D-robotic customized on ROS V2)Linaro & Linux | Ubuntu 22.04TogetheROS.Bot (D-robotic customized on ROS V2)Linaro & Linux |
| Robotics Middleware | TogetheROS.Bot (D-Robotic Customized on ROS2)ROS2/ROS1 | ||
| Development Tools | RDK Studio,NodeHub | ||
| AI Algorithms | LLM: (int8, context size: 2048)Integrate with the mainstream large language model inference framework, llama.cpp, to support running all Hugging Face language models in GGUF format that are smaller than 2 GB. It also supports direct conversion of over a hundred Hugging Face format language models on the board.Qwen2.5-0.5B: 5 token/sQwen2.5-1.5B: 2.5 token/sComputer Vision:Supports quantization conversion and BPU acceleration for all conventional vision models, including YOLOv5 to YOLOv12, Vision Transformer, etc.YOLOv5s(int8): 38 FPSYOLOv8n(int8): 34 FPSYOLO11n(int8+FP32): 5 FPS | LLM: (int8, context size: 2048)Integrate with the mainstream large language model inference framework, llama.cpp, to support running all Hugging Face language models in GGUF format that are smaller than 3.5GB. It also supports direct conversion of over a hundred Hugging Face format language models on the board.Qwen2.5-0.5B: 13 token/sQwen2.5-1.5B: 5 token/sQwen2.5-7B: 1.32 token/s (int4)Llama-3.1-8B: 1.38 token/s (int2)Qwen2.5-14B: 0.31 token/s (int2)Computer Vision:Supports quantization conversion and BPU acceleration for all conventional vision models, including YOLOv5 to YOLOv12, Vision Transformer, etc.YOLOv8n(int8): 220 FPSYOLO11n(int8): 200 FPSStereo Depth 4K @25FPS |
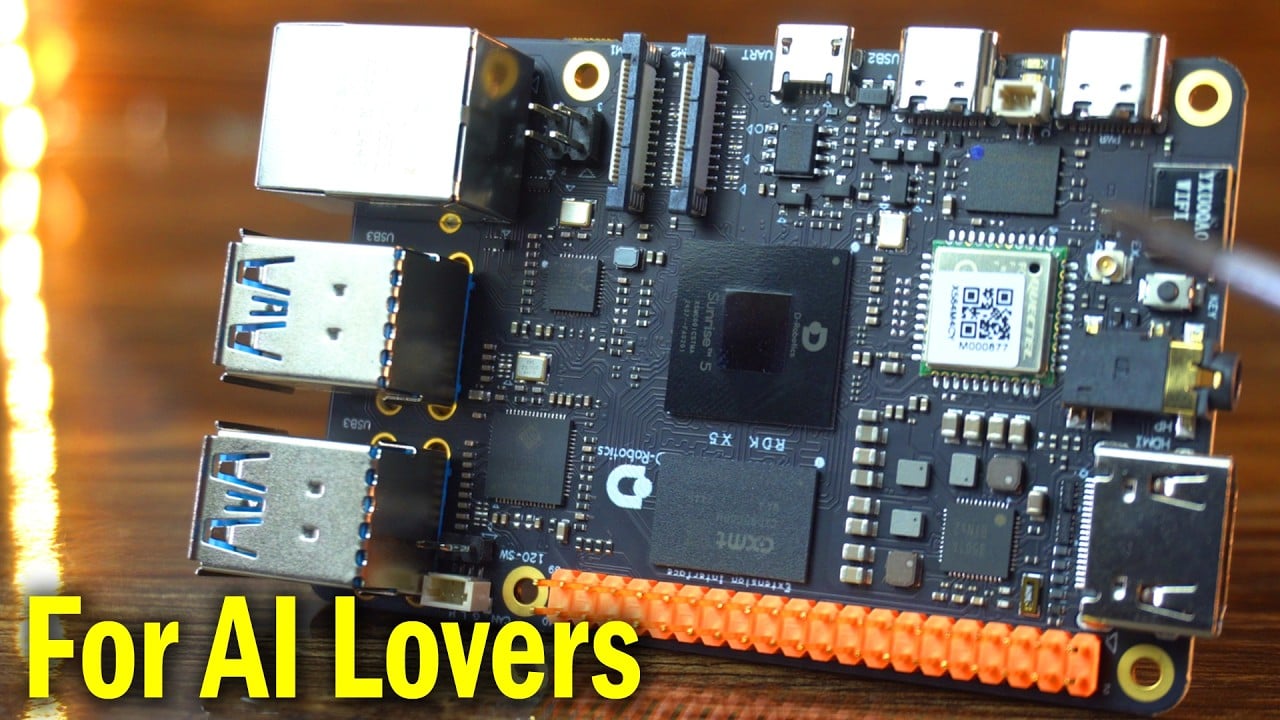
The board has a strong build, and I like how neat the layout is. Feels premium for sure.
This board is loaded. So many components in such a small space. It’s pretty packed! So many chips, ports, and connectors tightly fitted on this small board.
Let’s go through all its interfaces one by one.
RDK X5 Board Ports and Interfaces

- USB Type-C for powering the board. It requires a 5V/5A power adapter for supplying power to the board. Once the adapter is connected, the green power indicator and the orange indicator will light up, indicating normal power supply.
- RTC Battery Interface
- Easy Connect Port – Another USB Type-C port for extra connection
- (Micro USB) Debug Serial Port
- Dual MIPI Camera Ports
- Gigabit Ethernet Port with PoE
- 4 USB 3.0 Type A Ports
- High-speed CAN FD interface for communication with automotive or industrial devices
- 40-pin GPIO Interface
- HDMI Display InterfaceIt supports a maximum resolution of 1080p. It also supports real-time display of camera and network stream images.
- Headphone Jack, it works with multiple audio standards
- Onboard Wi-Fi Antenna
- microSD TF Card Slot It is recommended to use a card with at least 16GB of storage to meet the installation requirements of Ubuntu and related packages.
- LCD Display Interface (MIPI DSI)
RDK Stereo Camera Module:
Next up, the RDK Stereo Camera Module.

D-Robotics RDK Stereo Camera is a binocular depth camera designed for RDK X5.
It uses two 2-megapixel color cameras and is equipped with dual 22-pin MIPI interface outputs.
It’s built for AI vision tasks like depth and stereo vision.
Using SC230AI chip and SmartSens SmartClarity-2 technology, it provides excellent day + night imaging effects (night imaging requires additional purchase of fill light).
The sensor size is 1/2.8 inches, and the lens has an aperture of F2.2.
Resolution is 1920x1080p.
The camera has a base focal length (BFL) of 2.28mm and a wide field of view—178 degrees.
It keeps distortion low, less than -30%, which means a cleaner image.
It supports hardware synchronization and communicates over I2C with addresses 0x30 and 0x32.
RESETB control is low-active. This is perfect for AI vision applications such as depth vision and stereo vision.

Stereo vision works by taking two images at the same time and using the difference between them to see depth—just like how our eyes do.
Depth vision is the result of stereo vision. It gives a 3D map of the scene, showing how far each object is.
RDK X5 Case:
Next up, the RDK X5 Case.

The RDK X5 Case is a sturdy, full-metal black enclosure designed for the D-Robotics RDK X5 development board. Its durable construction provides excellent heat dissipation, helping to keep the board cool and extend its lifespan. The case has precisely placed openings for easy access to ports.

The RDK X5 Development Board is now completely ready!
Next, we need to flash the operating system onto the SD card. So, let’s do it!
OS Installation:
First, you need to visit this page.
https://developer.d-robotics.cc/rdk_doc/en/Quick_start/install_os/rdk_x5
Anyway, scroll down until you find the image download section and click on the Download Image.

Go to the system download page for version 3.0.0.
Download the rdk-x5-ubuntu22-preinstalled-desktop-3.0.0.

After downloading, extract the Ubuntu system image file.
Next, download and install the BalenaEtcher software. We will use this software to flash the image file onto the MicroSD card.
So, let’s go ahead and open the software.

Flashing the OS Image:
- Click on “Flash from file”.
- Browse to the location where you extracted the operating system image file, select it, and click Open.

- Next, click on “Select target”.
- I have already inserted the MicroSD card into my laptop, so I will select it.

- Finally, click the “Flash!” button.

As you can see, the operating system has been successfully flashed onto the Micro SD Card.
Insert the microSD card into the microSD card slot on the RDK X5 Development Board.
After the first power-up, don’t panic if you see a black screen for about a minute; this is completely normal as;
The system is initializing in the background, setting up all necessary processes, and getting everything ready for use. You don’t have to do anything—it handles everything automatically.

Also, I didn’t have to do anything, and I am already on the desktop! Seriously, I wasn’t expecting this at all. I thought I would have to go through multiple steps, but it booted directly to the desktop. Amazing!
Let’s connect the RDK X5 Development Board to WiFi.

I tried some browsing and played a few YouTube videos; everything ran super smooth.
Its interface is quite similar to the RDK X3 board, so I won’t repeat the explanation here. This was just a quick guide to get your RDK X5 up and running.
Personally, I really liked the D-Robotics RDK X5 Development Board because, first, it is compact in size, completely portable, and quite affordable as well.
So, that’s all for now.
Watch Video Tutorial:
Discover more from Electronic Clinic
Subscribe to get the latest posts sent to your email.