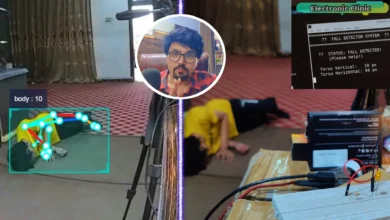
AI Squats Counter Using RDK X5 D-Robotics
Last Updated on September 15, 2026 by Engr. Shahzada Fahad
Description:
Today I am going to turn this small AI computer into a personal gym trainer “Squats Counter”.
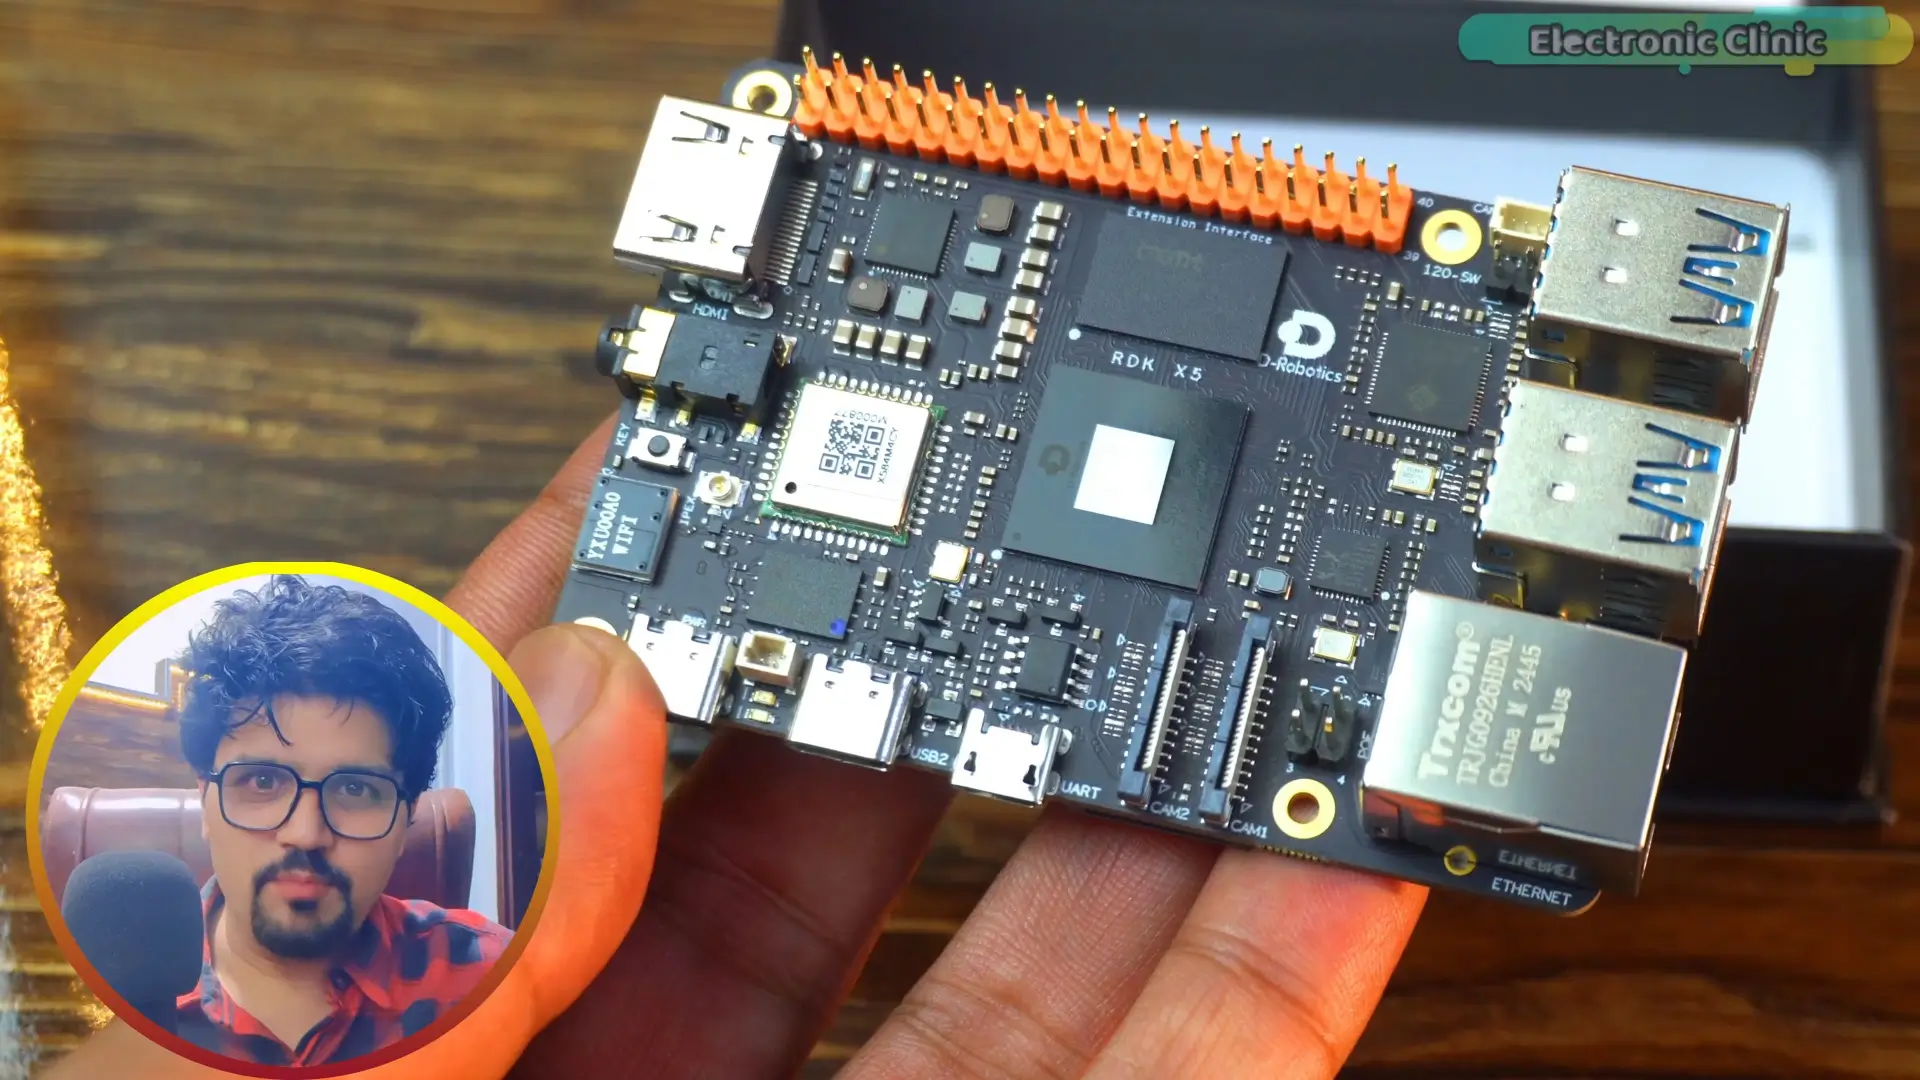
It will watch my body…
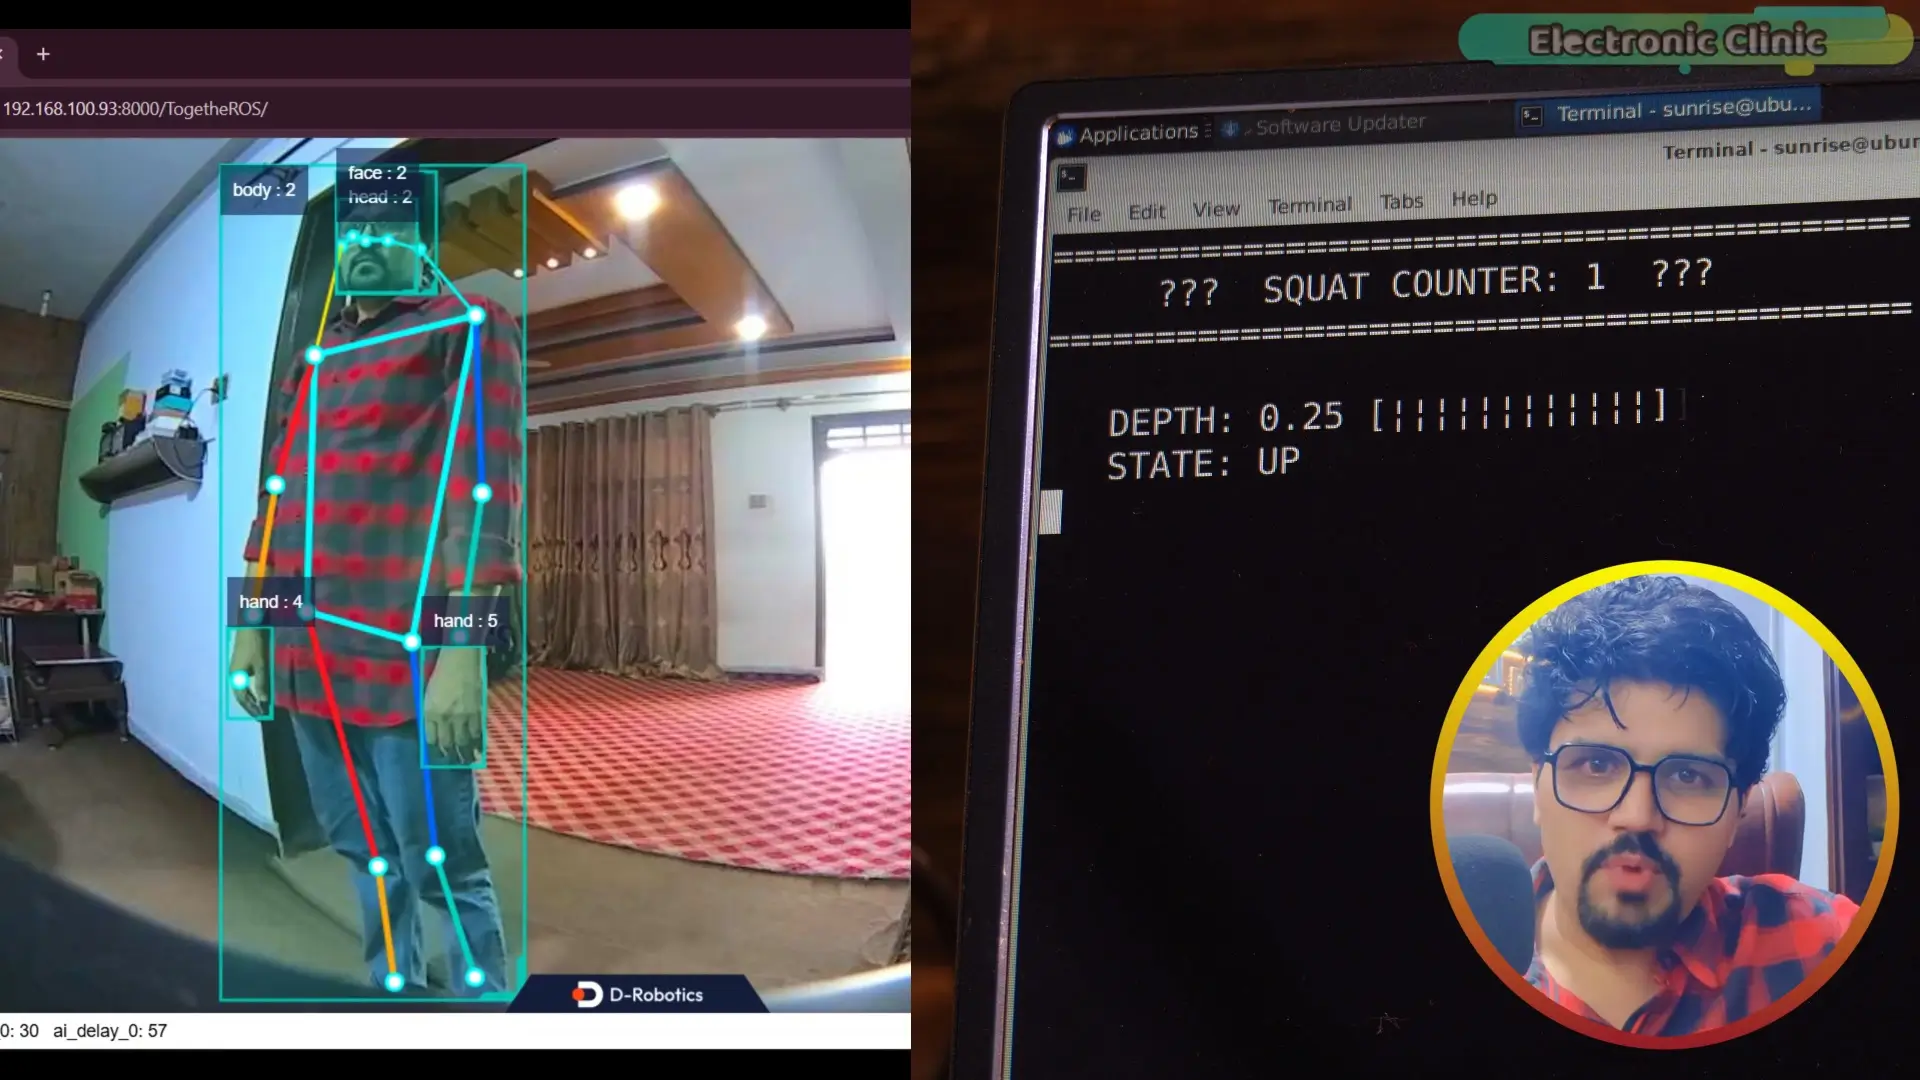
detect my movement…
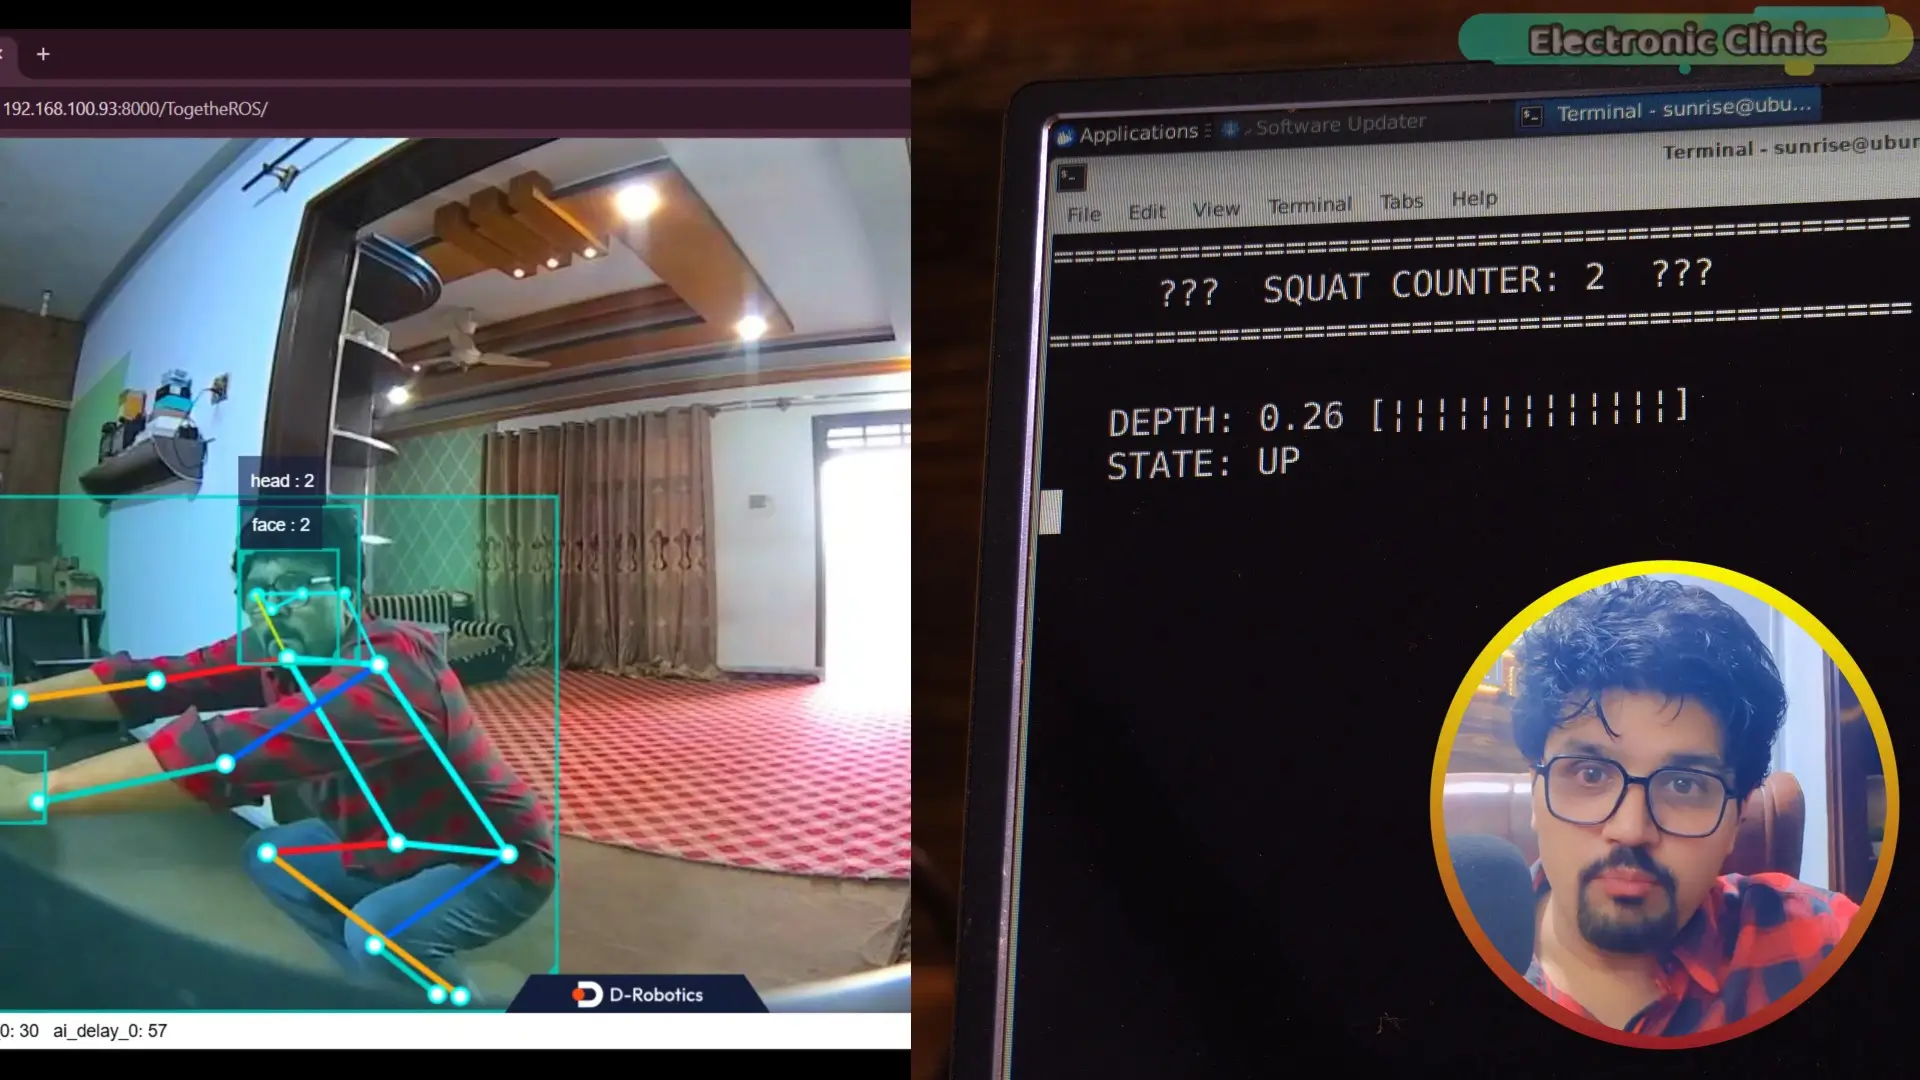
and count my squats automatically.
No smart watch.
No phone.
Just pure computer vision.
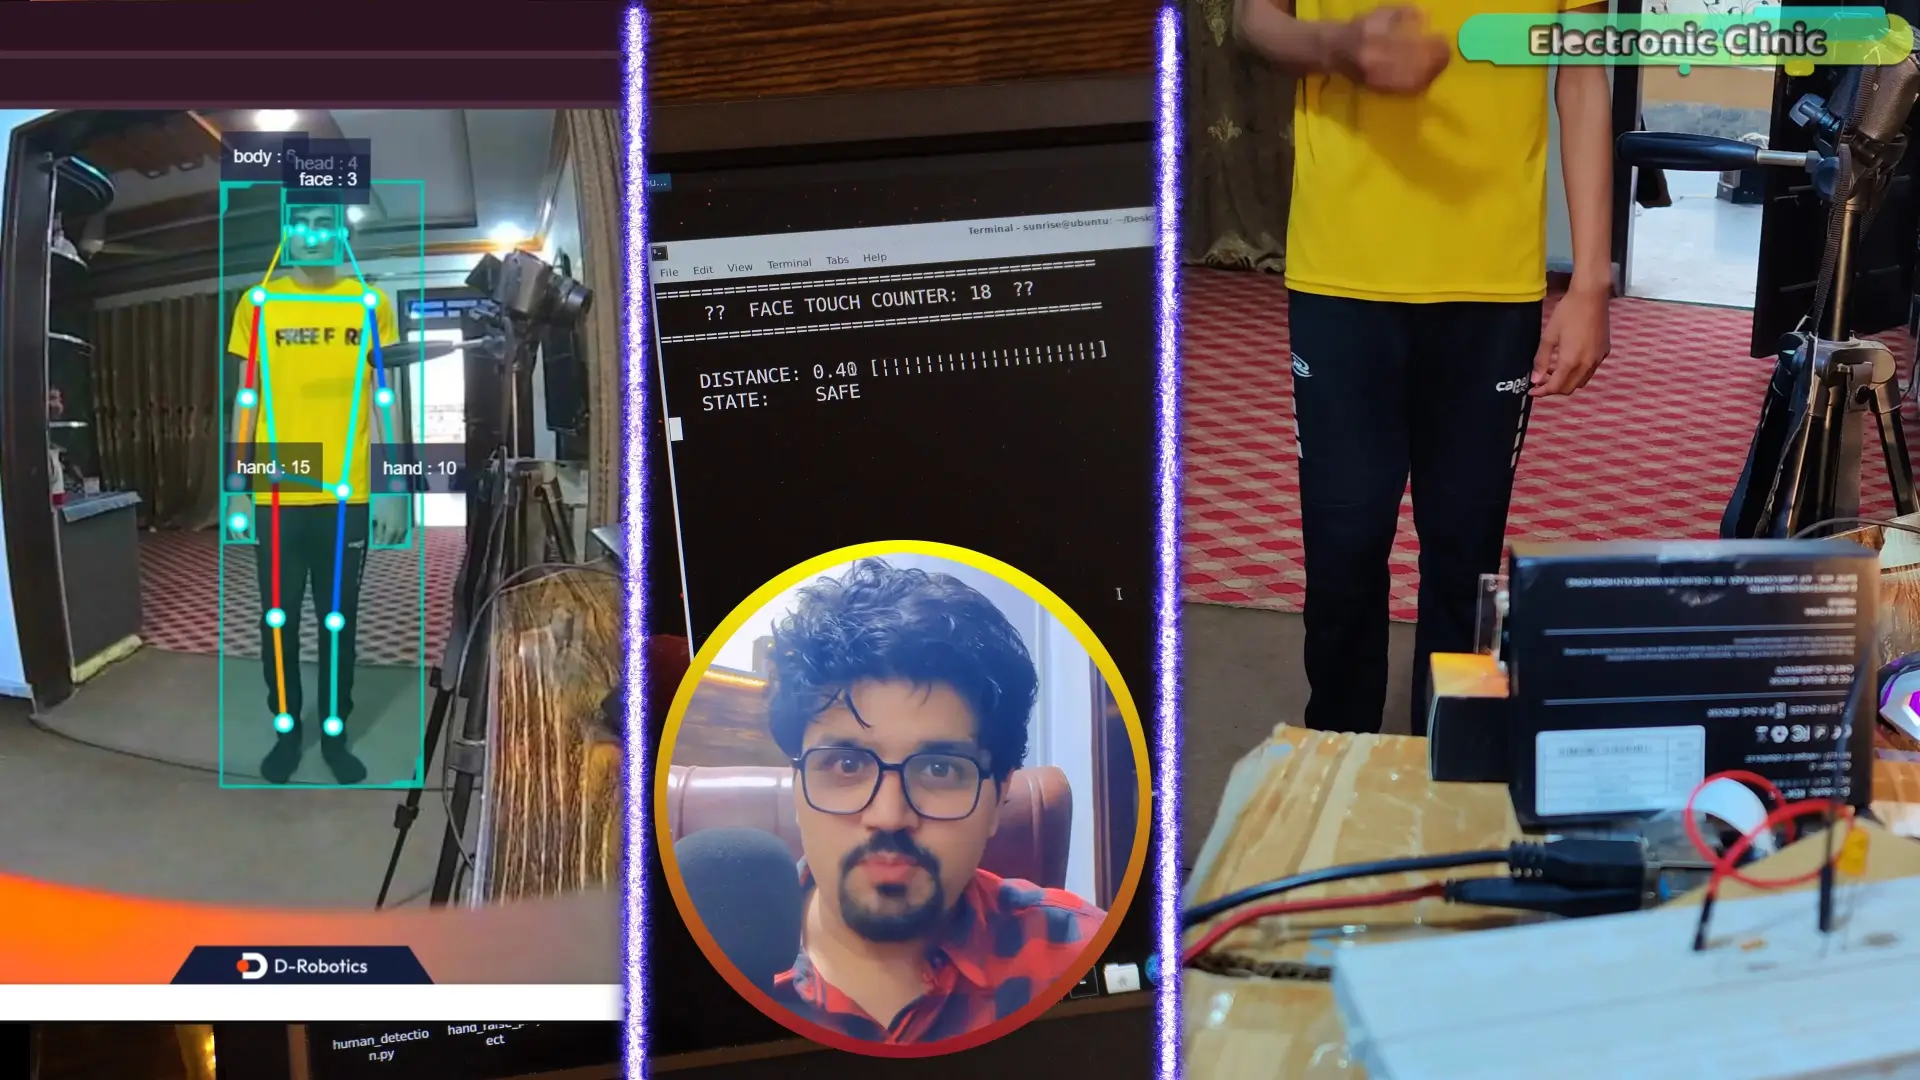
But here is the interesting part…
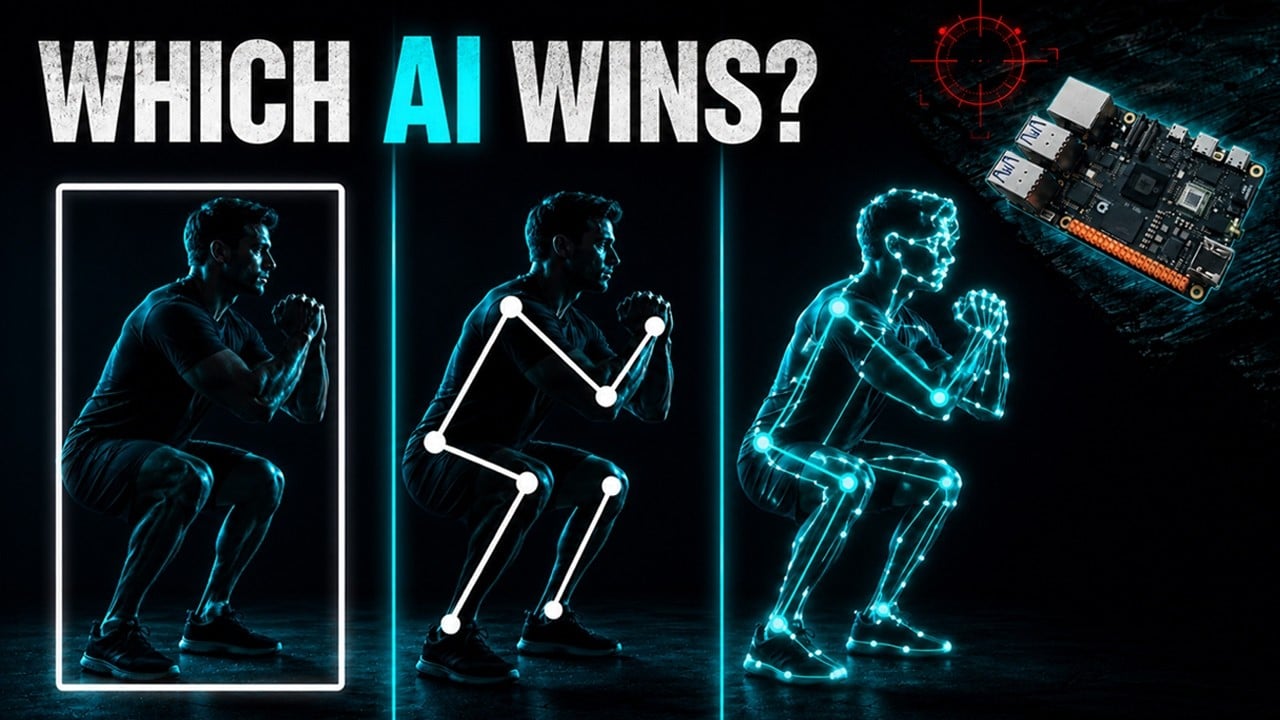
I will test three different AI methods.
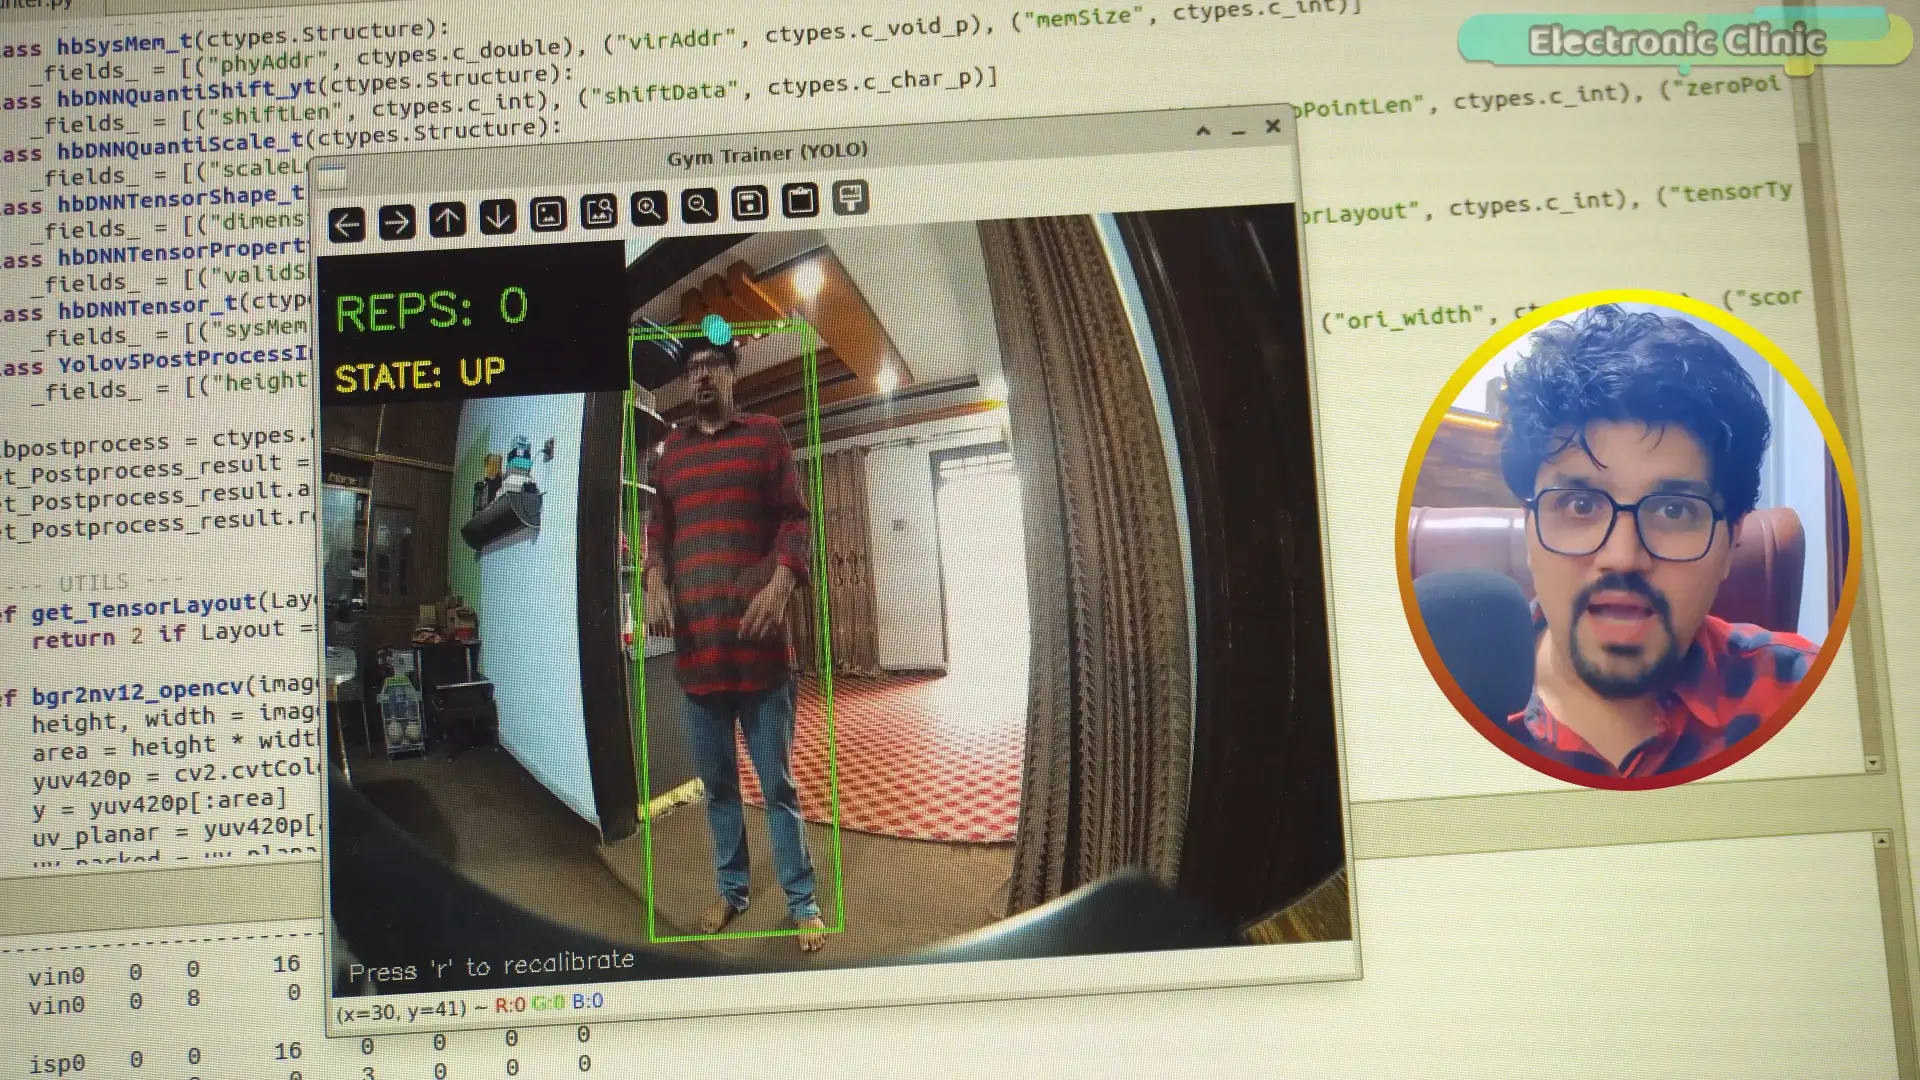
Method 1: A simple bounding box trick.
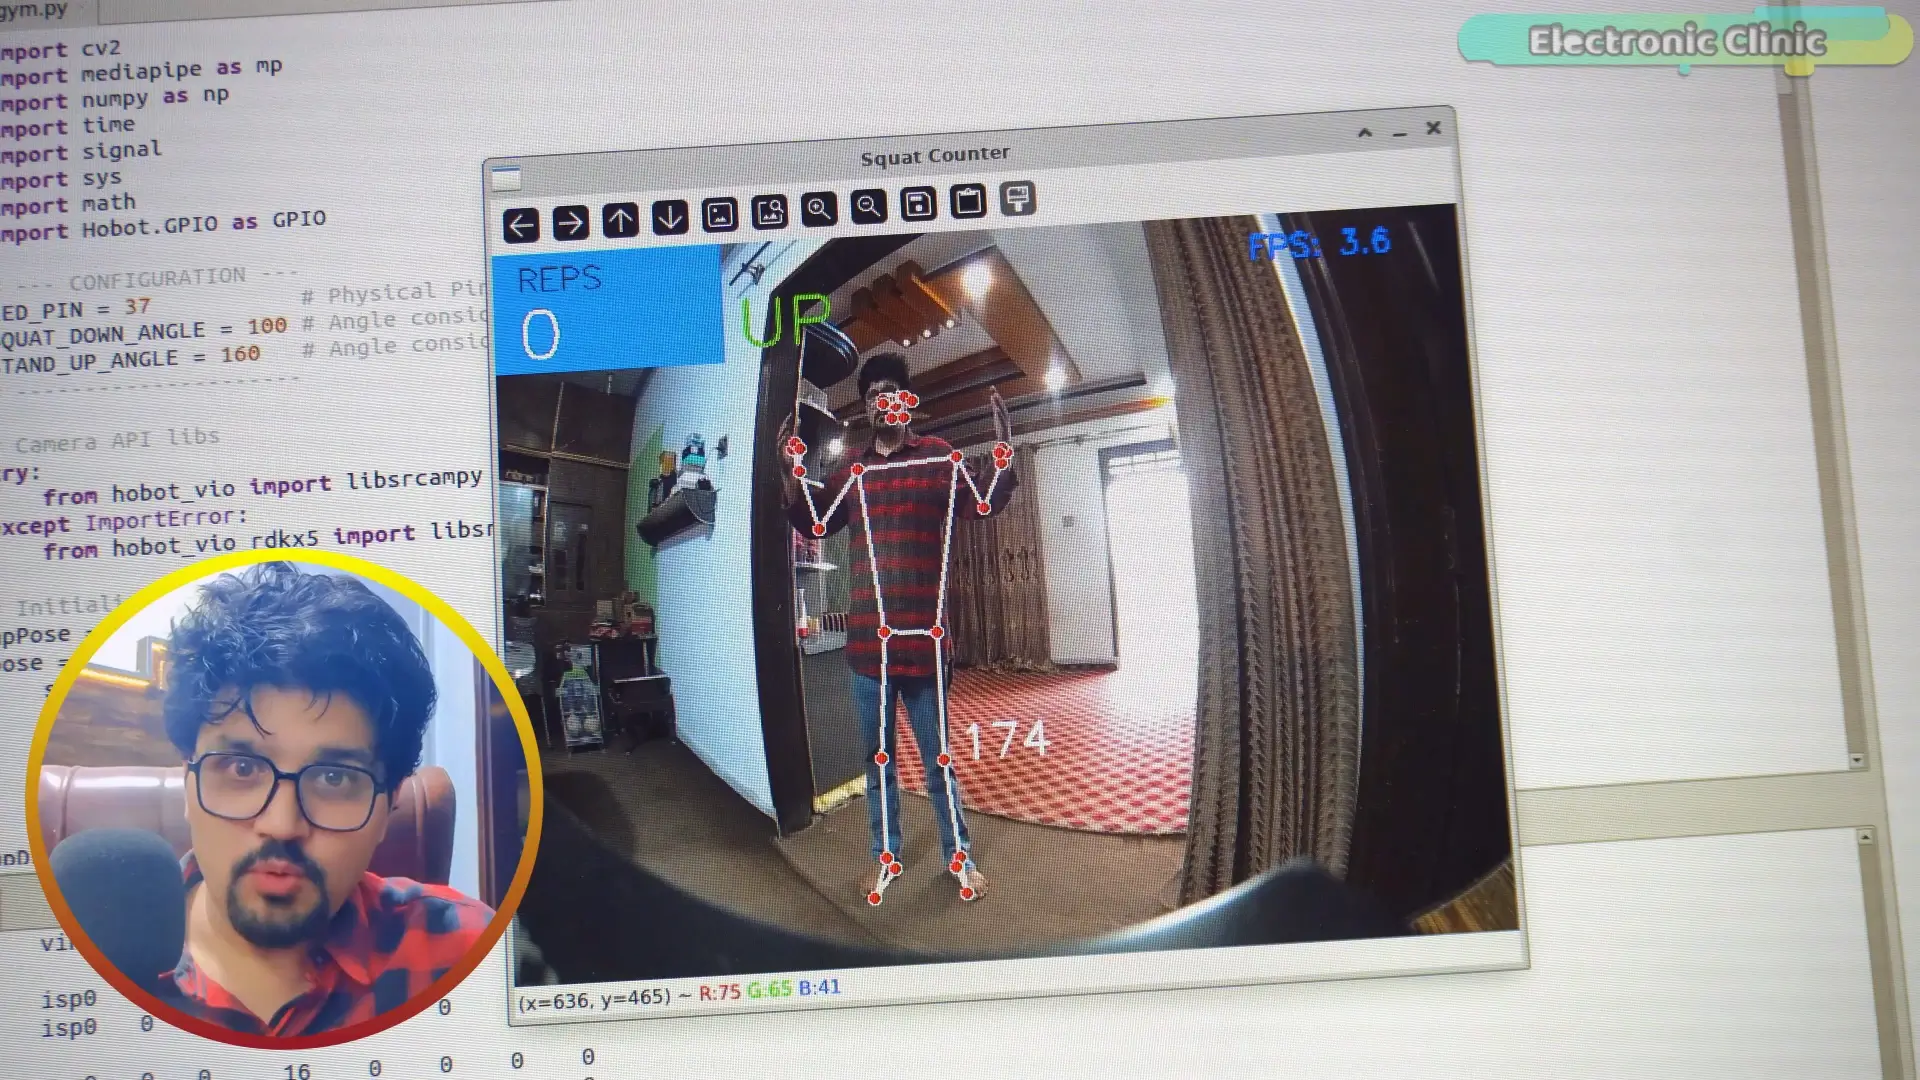
Method 2: A body skeleton system.
Method 3: A high-performance BPU powered AI model.
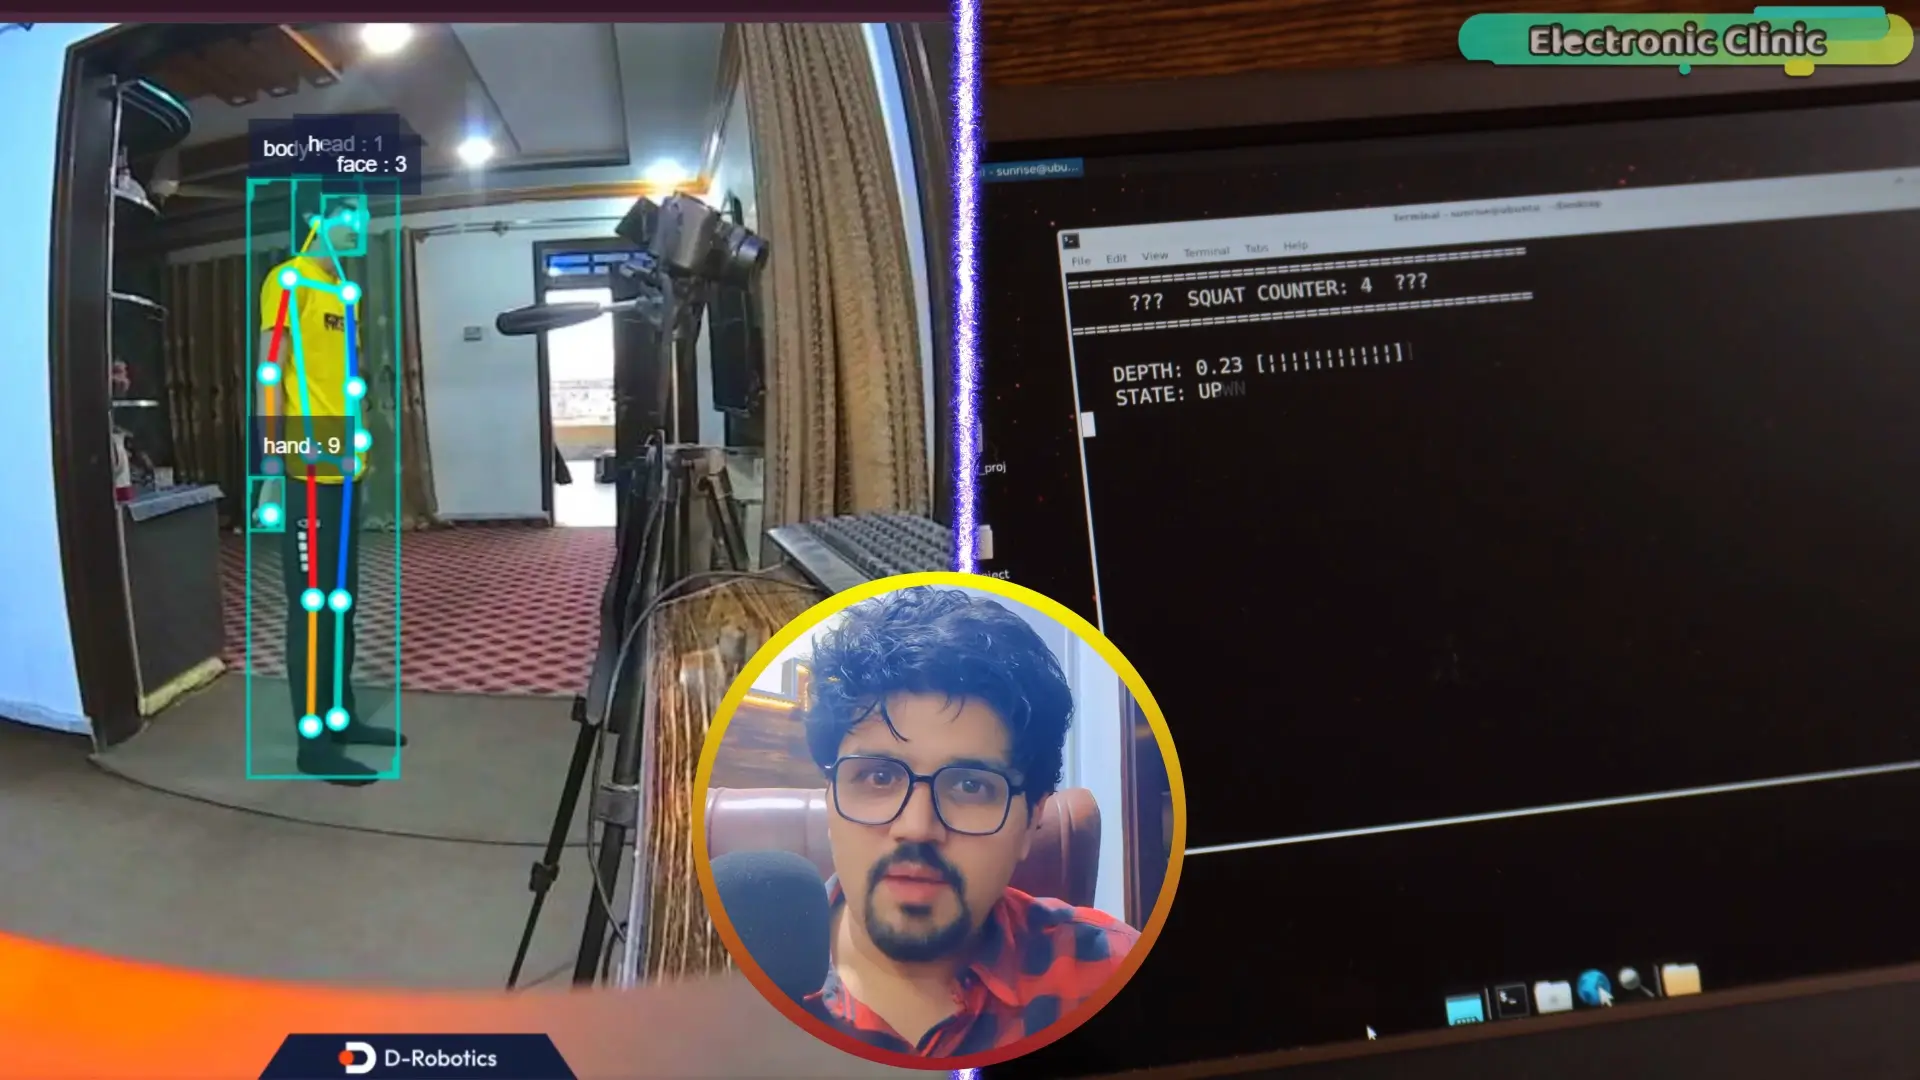
And the results are honestly surprising.
So, without any further delay let’s get started!!!
Table of Contents
Amazon Links:
*Please Note: These are affiliate links. I may make a commission if you buy the components through these links. I would appreciate your support in this way!
Project Introduction
The brain of this project is the RDK X5 AI development board from D-Robotics.
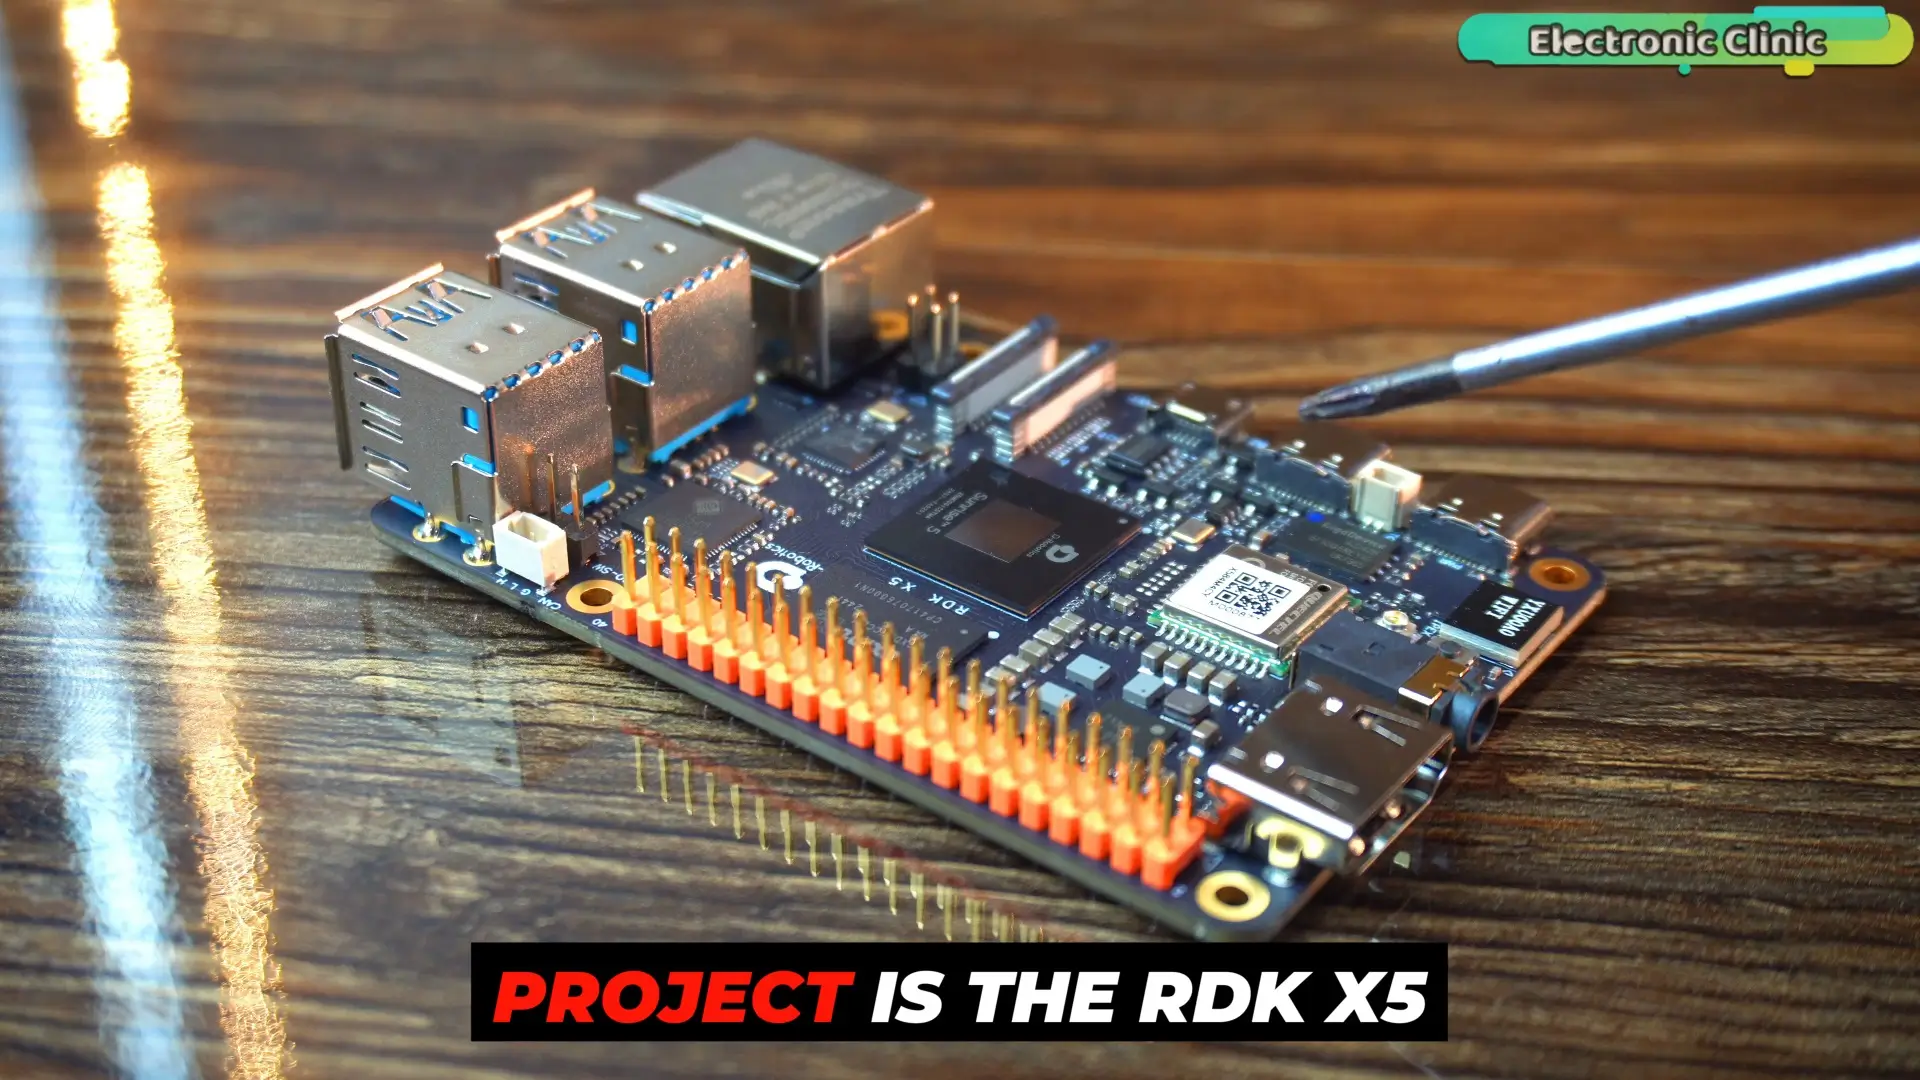
This board is designed for real-time AI applications.
It has:
CPU
GPU and a powerful
BPU (Brain Processing Unit) for AI acceleration.
To make this possible, we will be using a MIPI camera to capture everything in real time,
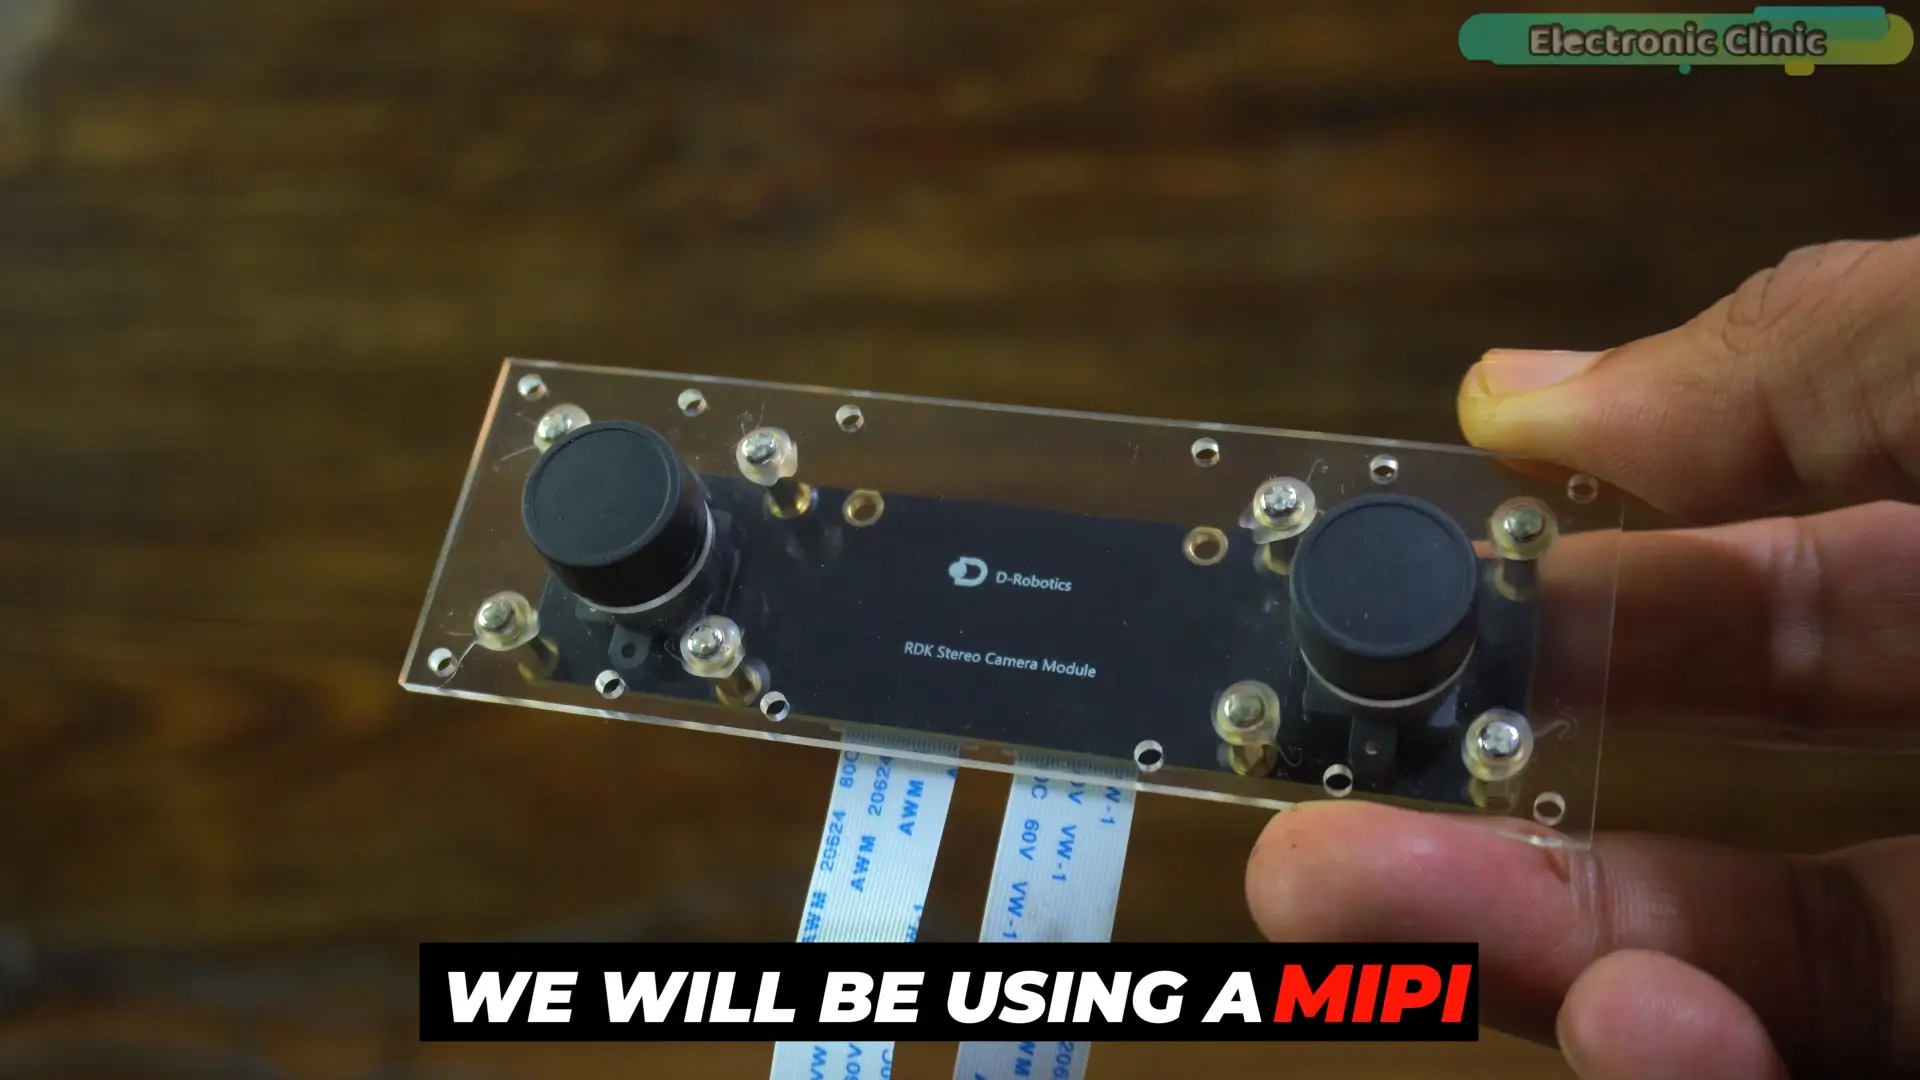
Because it gives us lower latency and much better performance compared to a USB camera.
The AI will detect a person…
Track body movement…
And count how many squats we do.
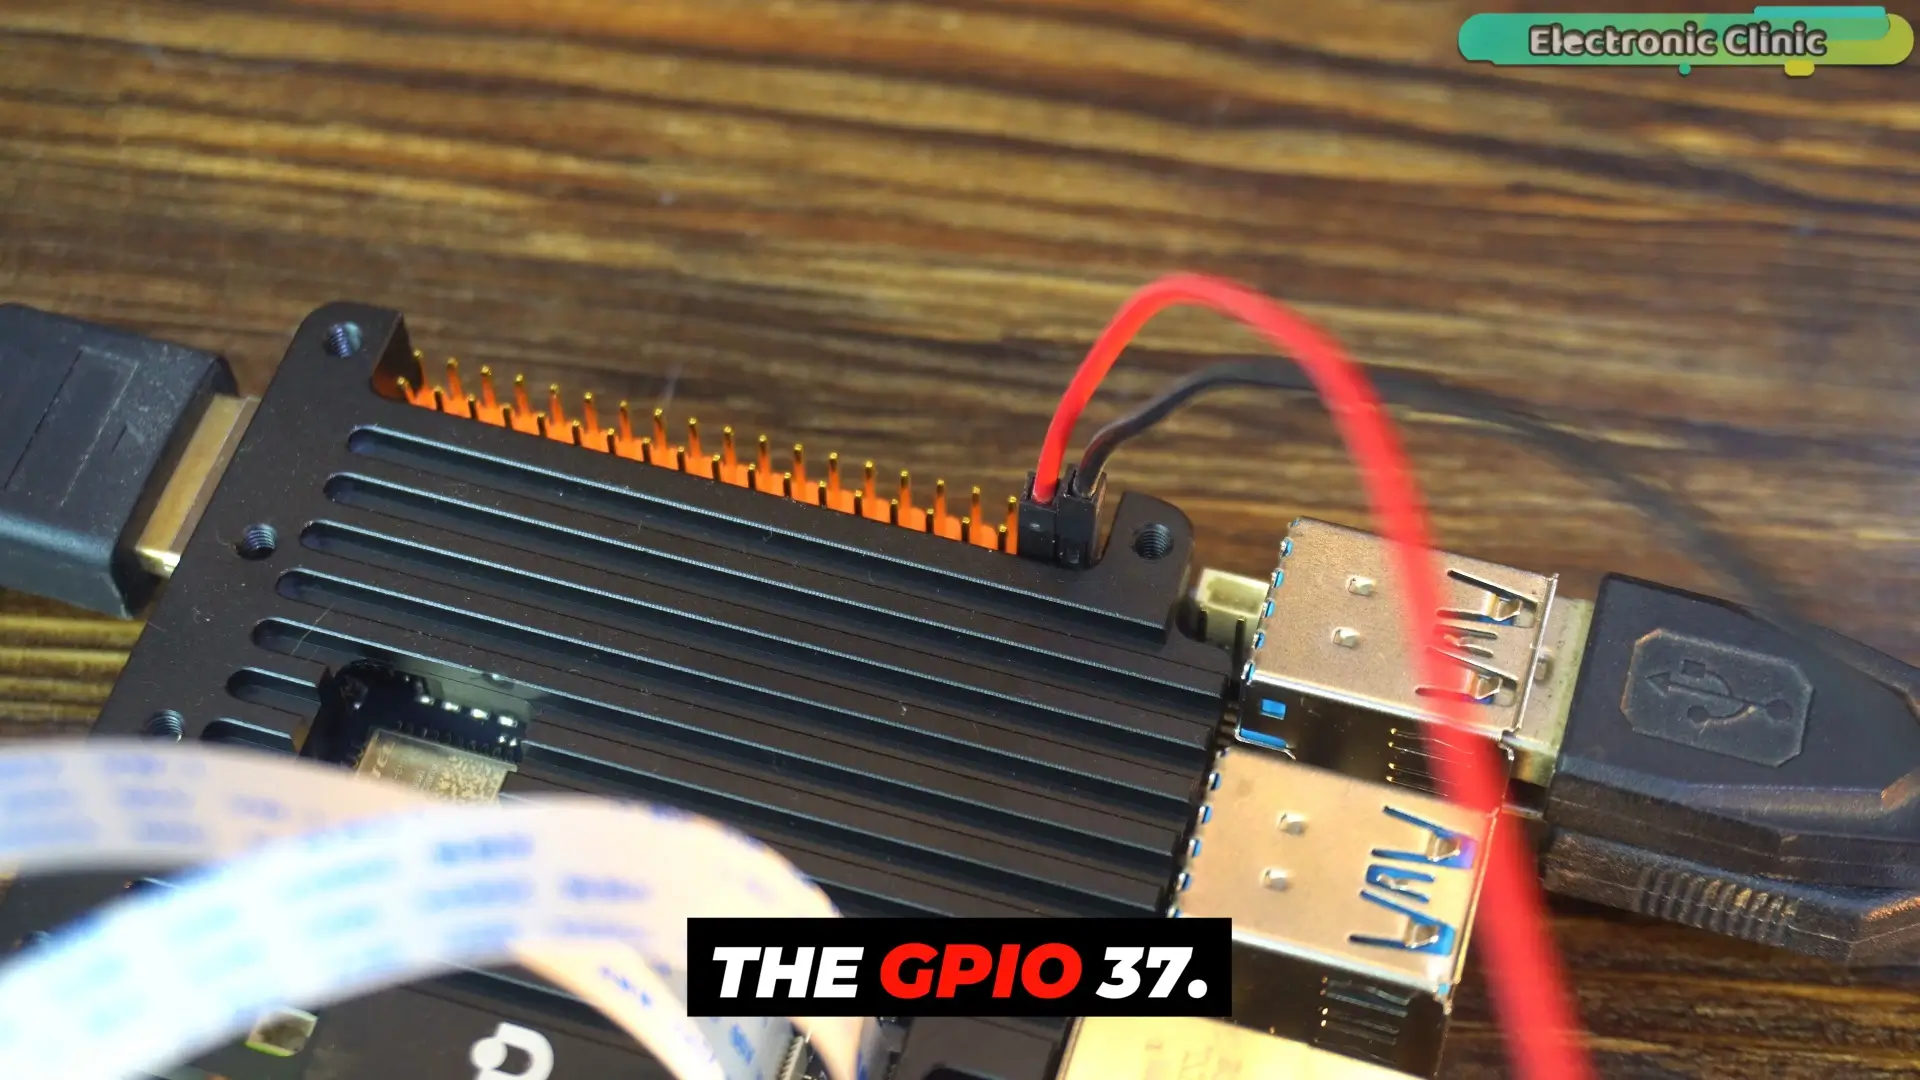
We will also use an LED so the system can give feedback during exercise.
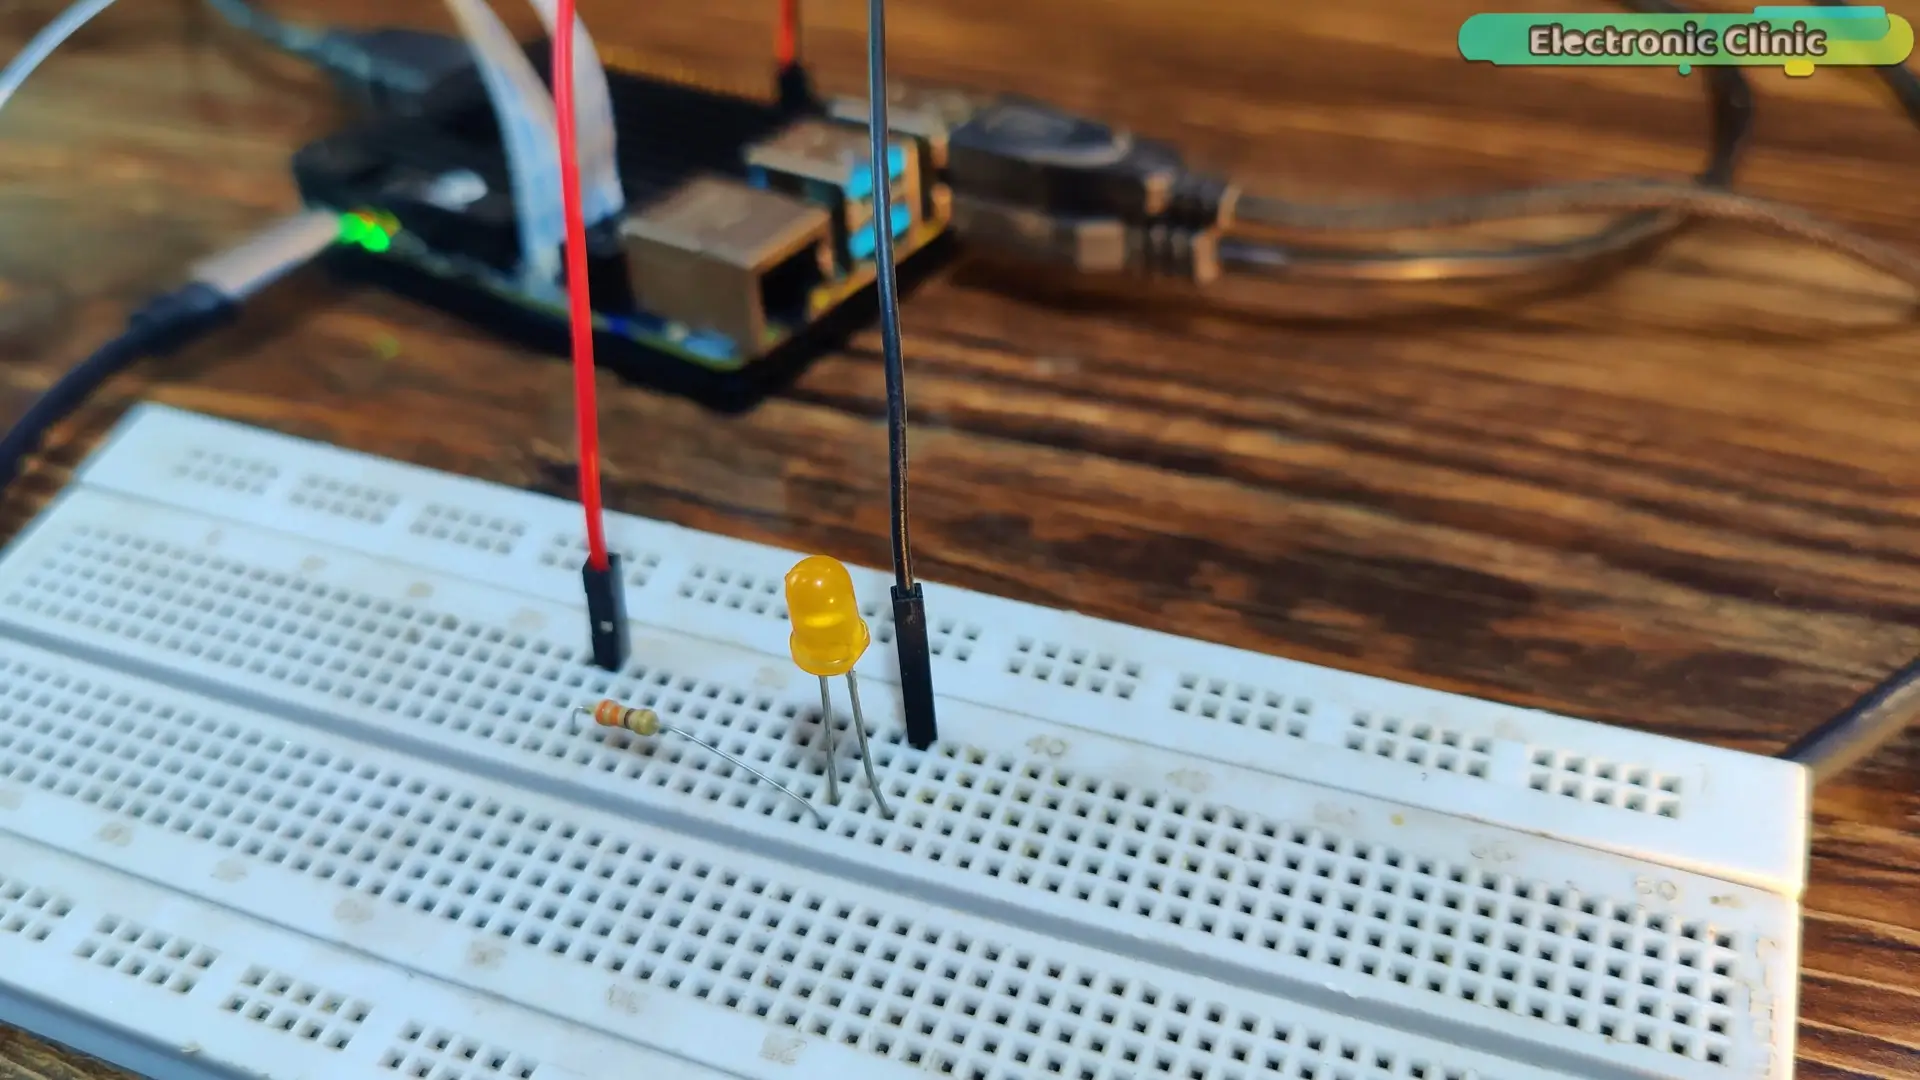
Led is optional, it’s just to show, you can also control hardware.
Led is connected to the GPIO37.
But before jumping to the advanced AI method…
Let’s start with the simplest idea possible.
Method 1
Bounding Box Squat Counter (YOLO)
Our first method uses YOLO object detection.
YOLO stands for You Only Look Once.
It is one of the most popular real-time object detection models.
This model detects objects like:
- Person
- Car
- Chair
- Phone
- And many others.
In our case, we only care about one object: the person.
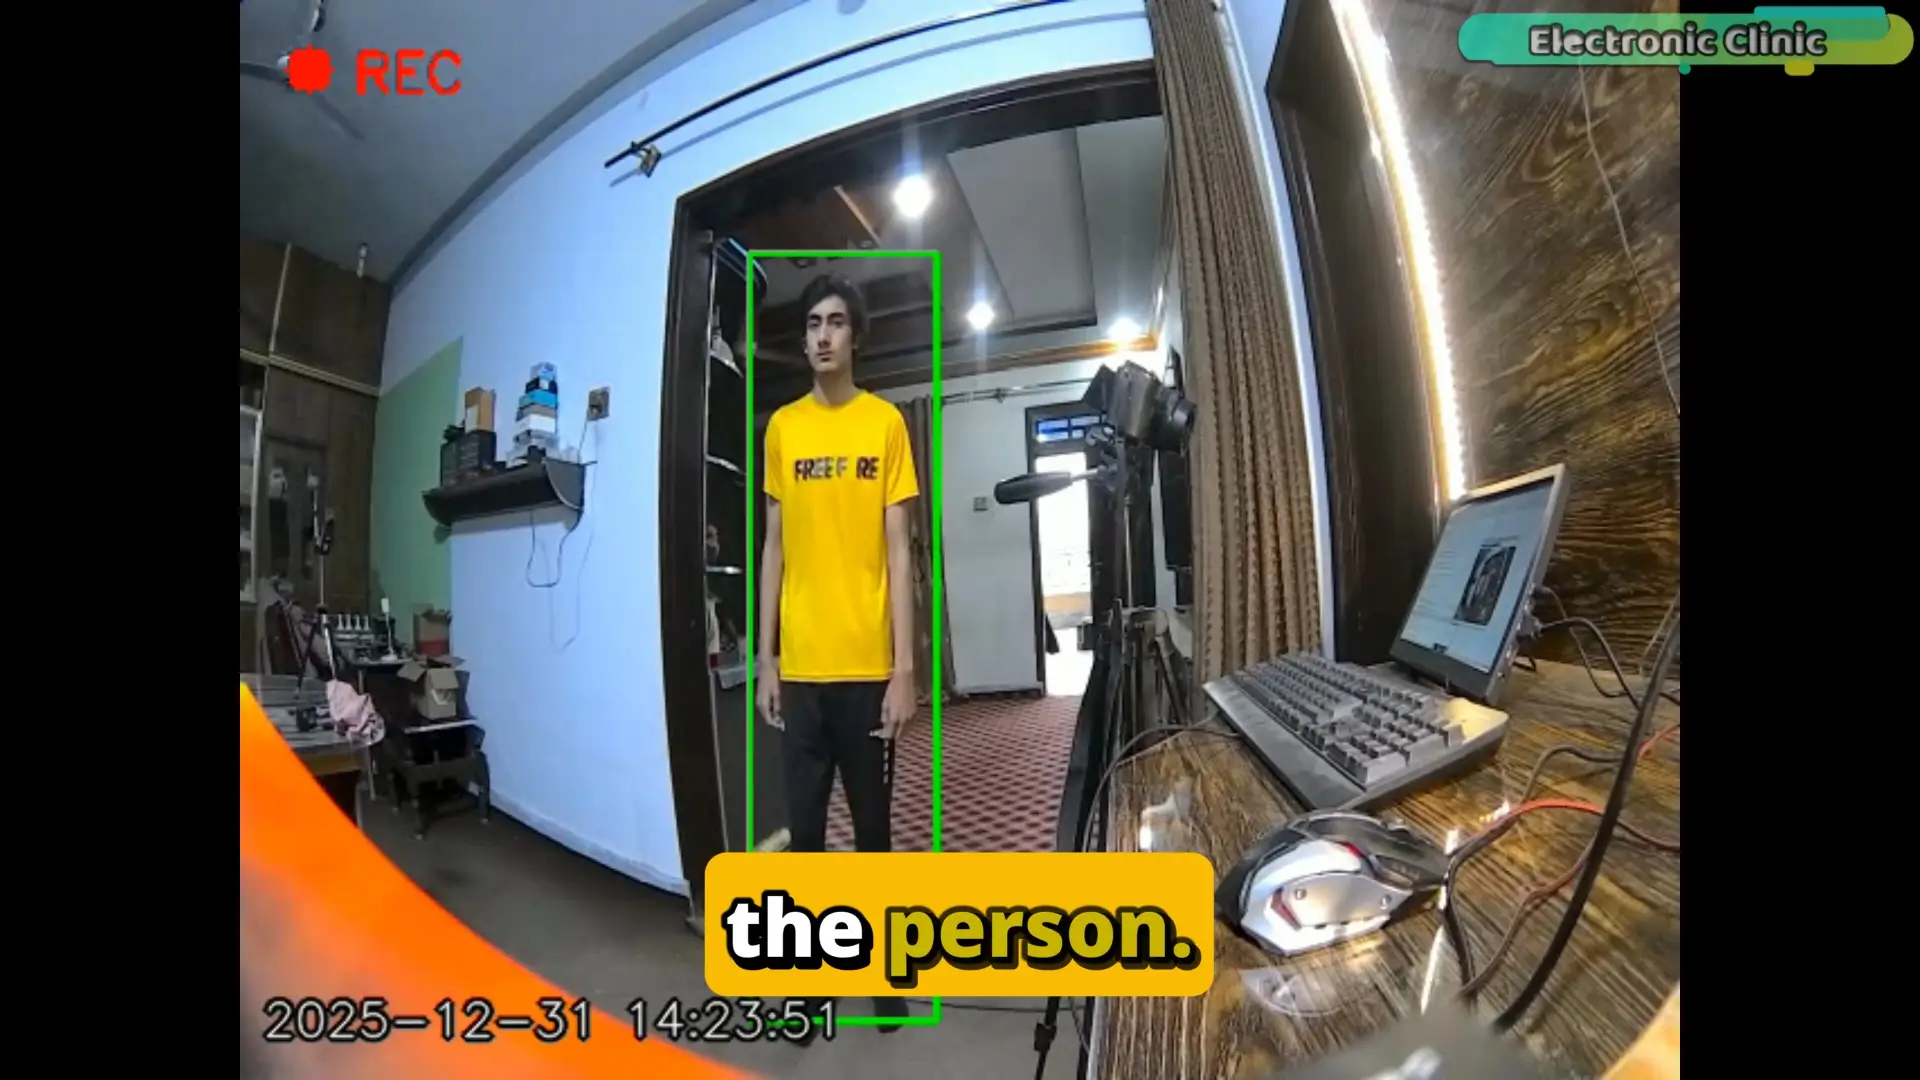
When YOLO detects a person, it draws a bounding box around the body.
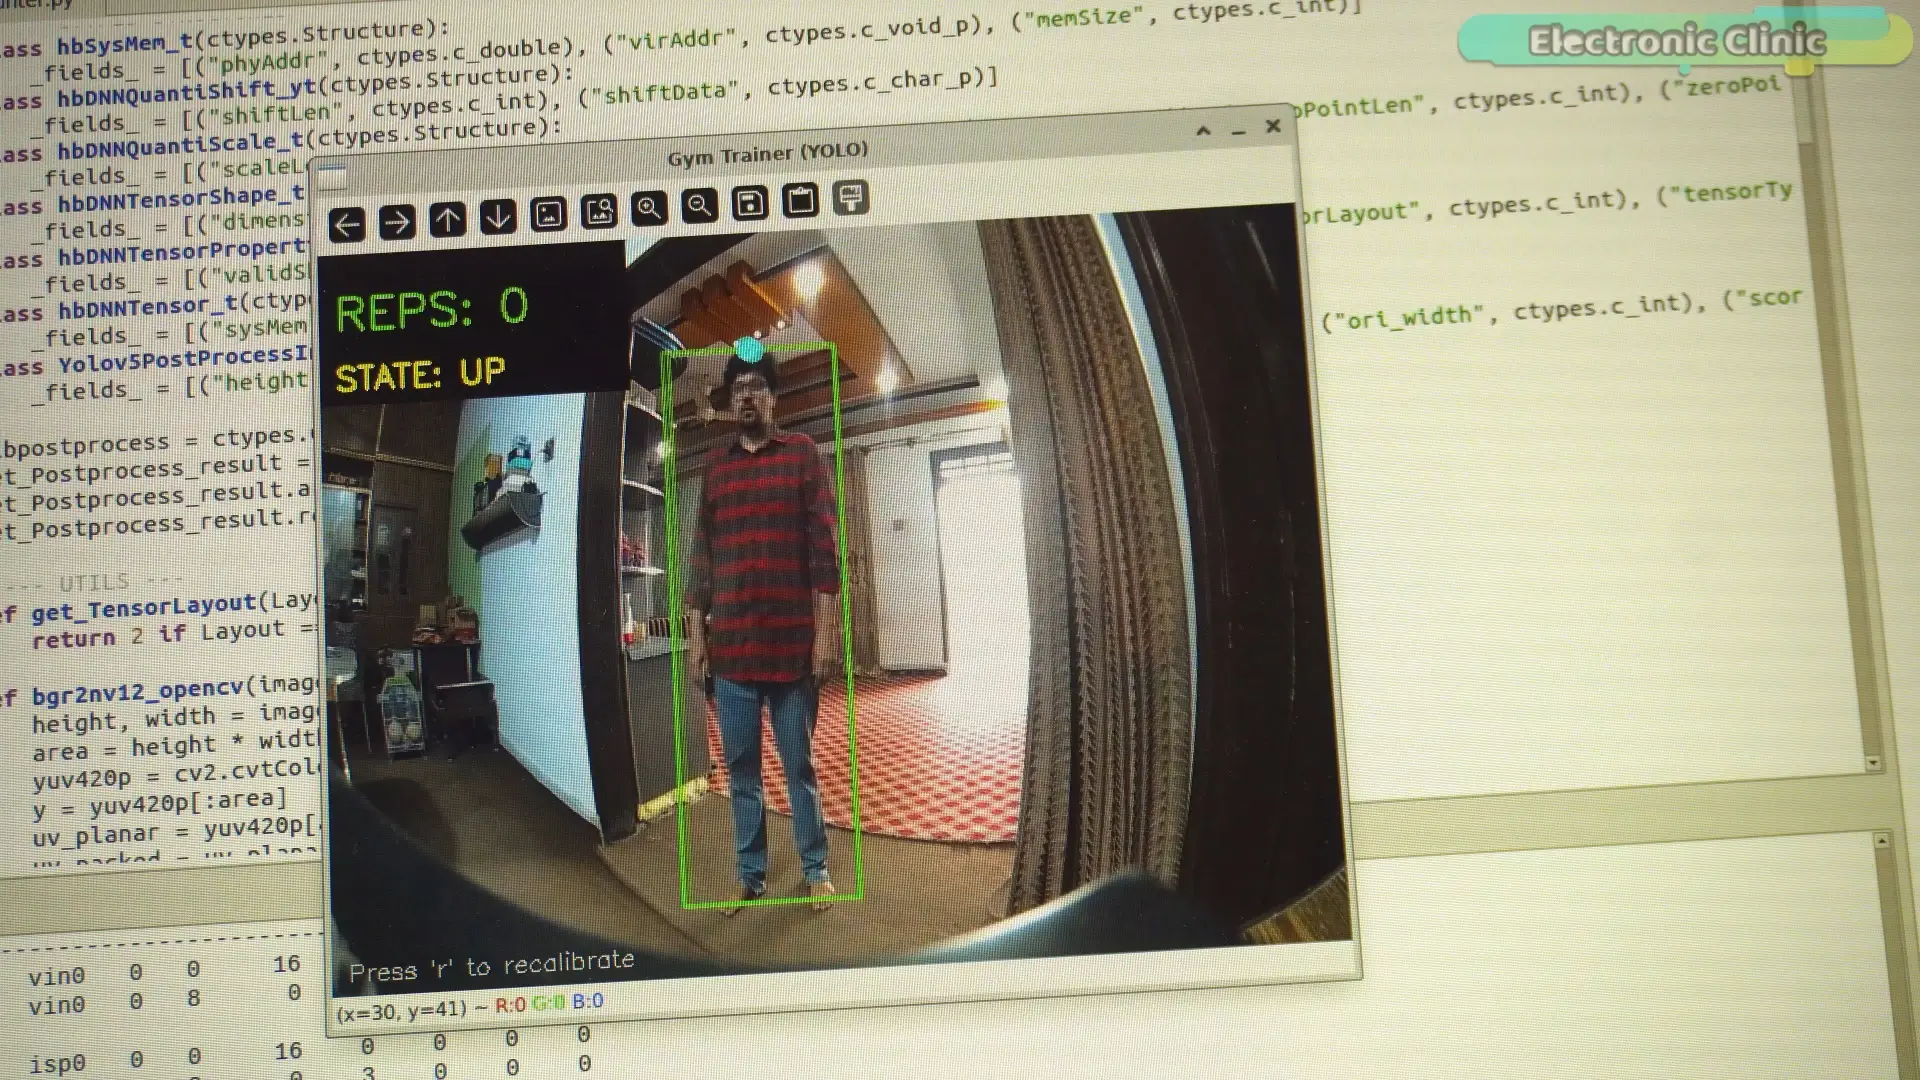
From this box we can get the top coordinate of the head.
And here is the simple idea.
When a person stands up, the head is higher.
When a person squats down, the head moves lower.
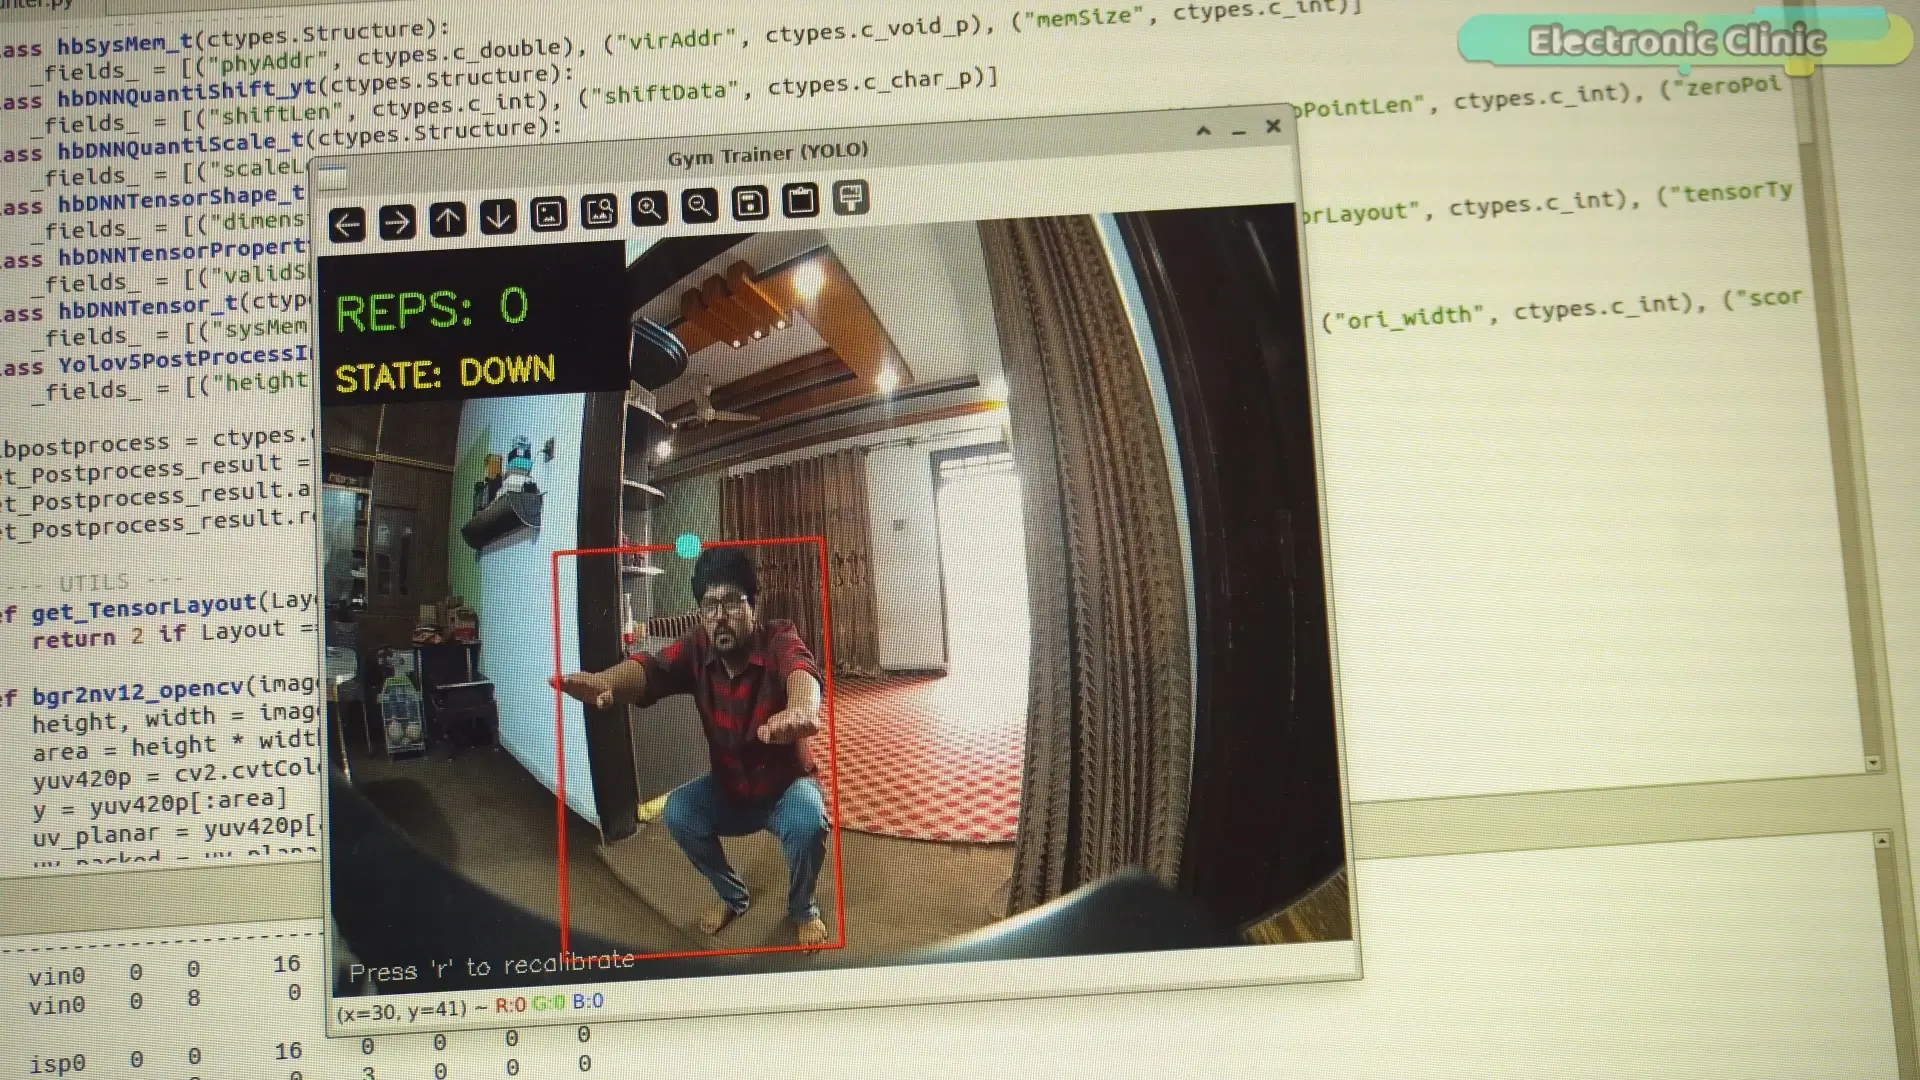
So we can measure this vertical movement.
The program first calibrates the standing height.
Then it checks how much the head moves downward.
If the head drops more than a certain number of pixels, we say the person is in the squat position.
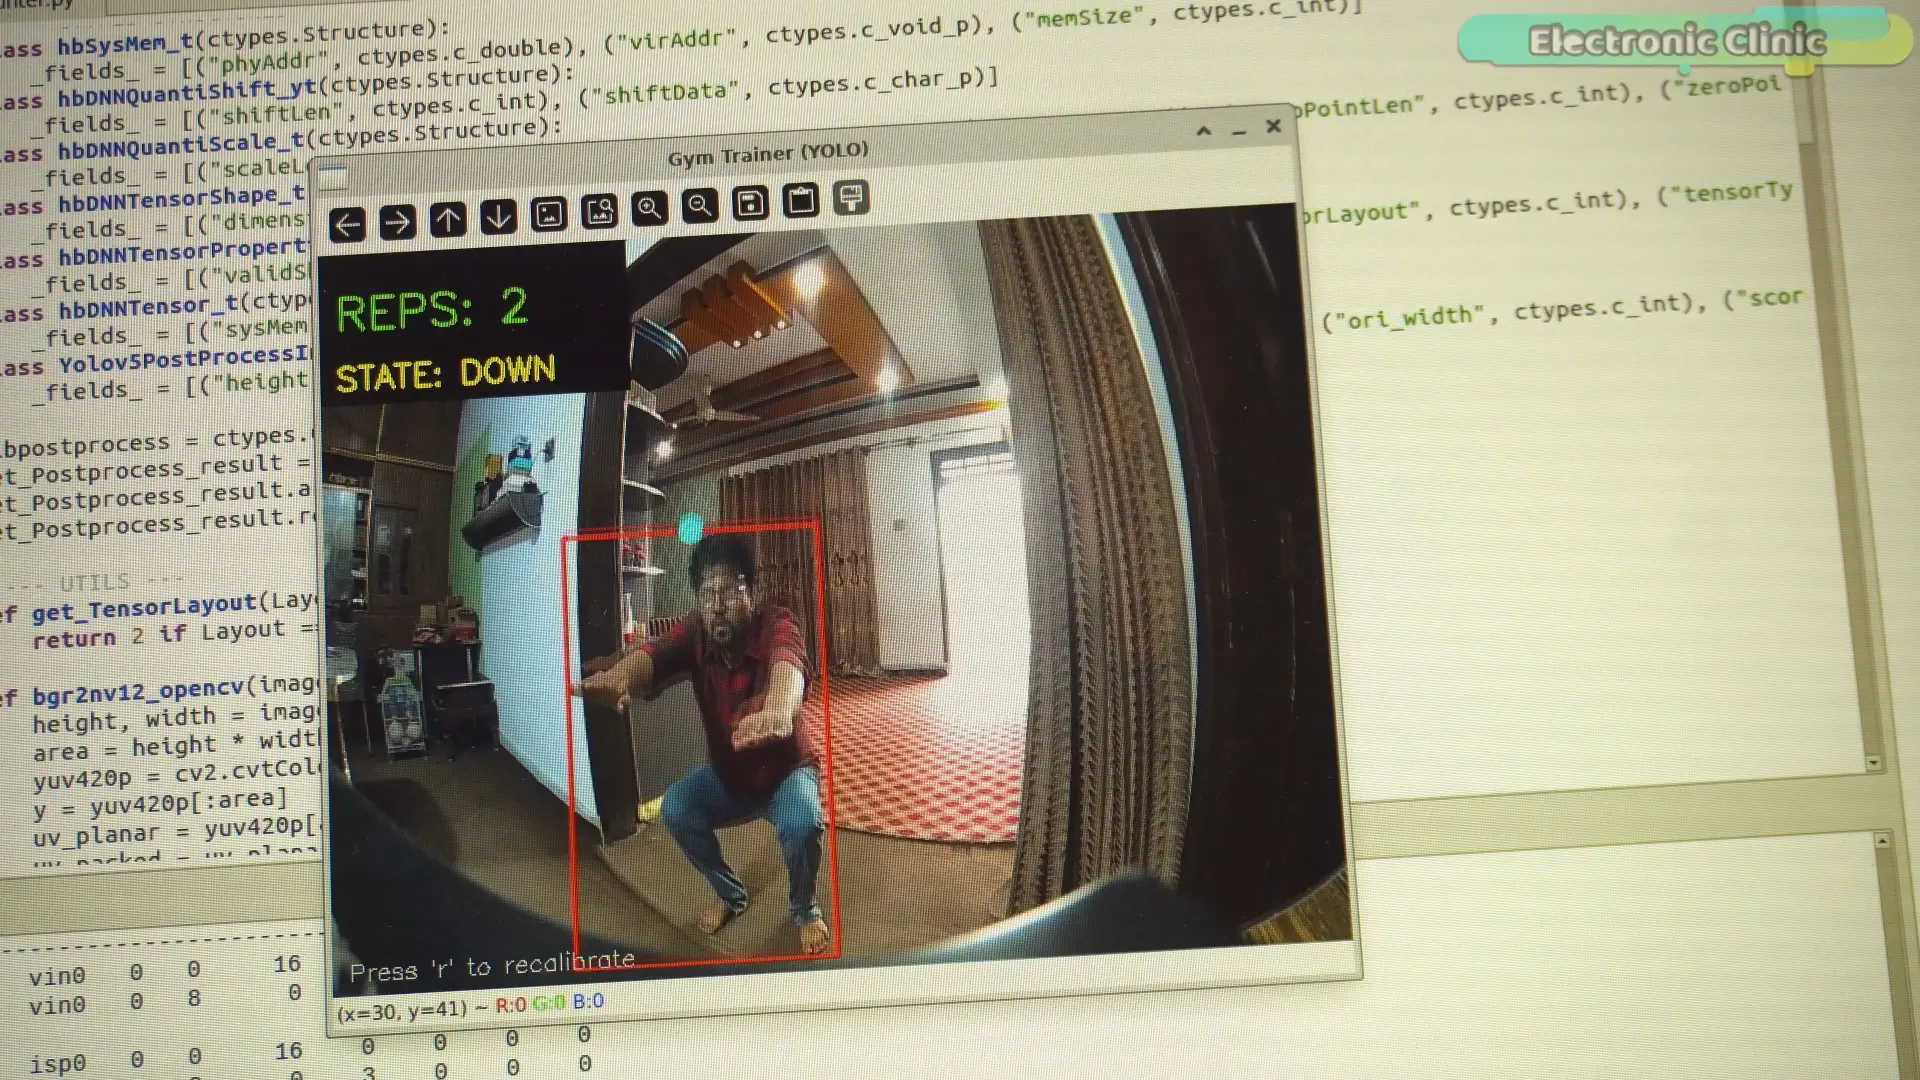
When the person stands back up, we count one repetition.
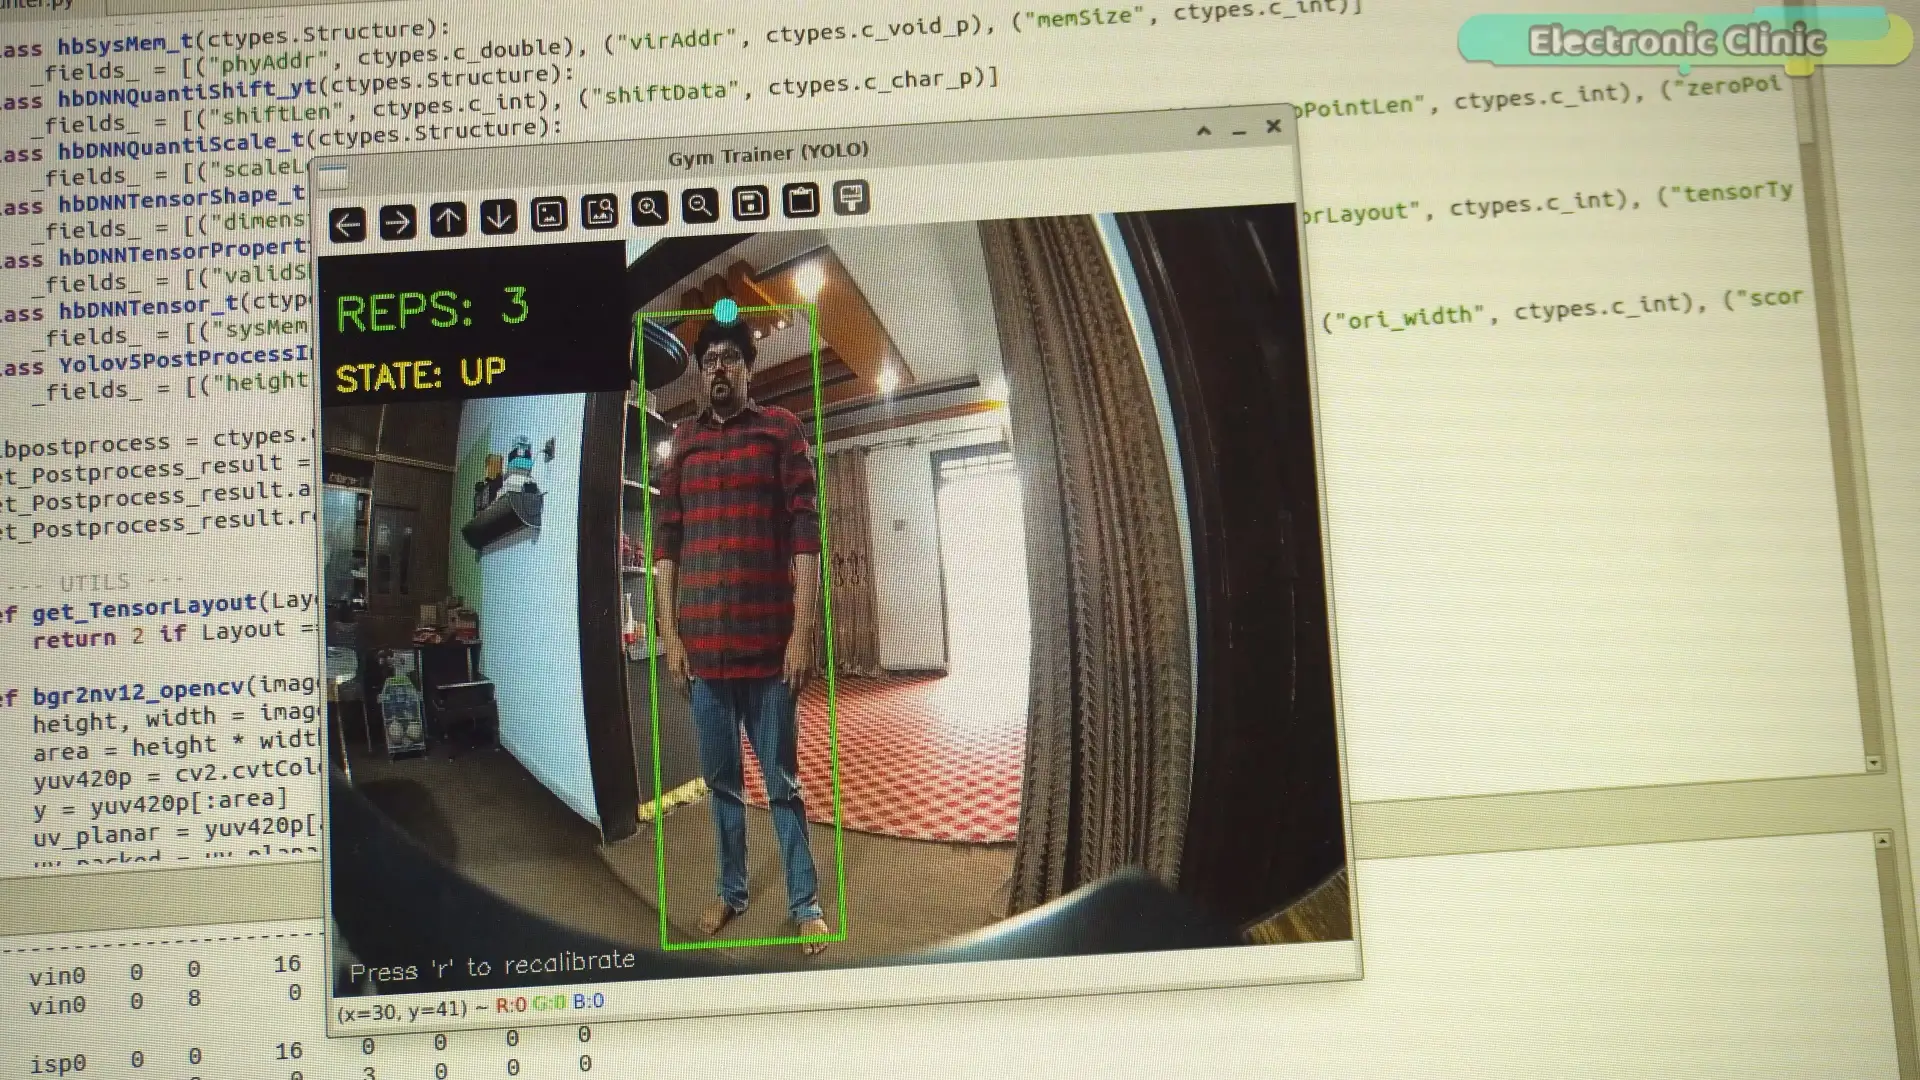
And that’s it.
A very simple logic.
Code:
|
1 2 3 4 5 6 7 8 9 10 11 12 13 14 15 16 17 18 19 20 21 22 23 24 25 26 27 28 29 30 31 32 33 34 35 36 37 38 39 40 41 42 43 44 45 46 47 48 49 50 51 52 53 54 55 56 57 58 59 60 61 62 63 64 65 66 67 68 69 70 71 72 73 74 75 76 77 78 79 80 81 82 83 84 85 86 87 88 89 90 91 92 93 94 95 96 97 98 99 100 101 102 103 104 105 106 107 108 109 110 111 112 113 114 115 116 117 118 119 120 121 122 123 124 125 126 127 128 129 130 131 132 133 134 135 136 137 138 139 140 141 142 143 144 145 146 147 148 149 150 151 152 153 154 155 156 157 158 159 160 161 162 163 164 165 166 167 168 169 170 171 172 173 174 175 176 177 178 179 180 181 182 183 184 185 186 187 188 189 190 191 192 193 194 195 196 197 198 199 200 201 202 203 204 205 206 207 208 209 210 211 212 213 214 215 216 217 218 219 220 221 222 223 224 225 226 227 228 229 230 231 232 233 234 235 236 237 238 239 |
#!/usr/bin/env python3 import cv2 import numpy as np import time import signal import sys import ctypes import json import Hobot.GPIO as GPIO # --- IMPORTS --- try: from hobot_vio import libsrcampy as srcampy except ImportError: from hobot_vio_rdkx5 import libsrcampy as srcampy try: from hobot_dnn import pyeasy_dnn as dnn except ImportError: from hobot_dnn_rdkx5 import pyeasy_dnn as dnn # --- CONFIGURATION --- BUZZER_PIN = 37 # WE USE THE WORKING MODEL FROM PROJECT A/C MODEL_PATH = '/opt/hobot/model/x5/basic/yolov5s_v7_640x640_nv12.bin' SCORE_THRESHOLD = 0.50 # --- CTYPES STRUCTURES --- class hbSysMem_t(ctypes.Structure): _fields_ = [("phyAddr", ctypes.c_double), ("virAddr", ctypes.c_void_p), ("memSize", ctypes.c_int)] class hbDNNQuantiShift_yt(ctypes.Structure): _fields_ = [("shiftLen", ctypes.c_int), ("shiftData", ctypes.c_char_p)] class hbDNNQuantiScale_t(ctypes.Structure): _fields_ = [("scaleLen", ctypes.c_int), ("scaleData", ctypes.POINTER(ctypes.c_float)), ("zeroPointLen", ctypes.c_int), ("zeroPointData", ctypes.c_char_p)] class hbDNNTensorShape_t(ctypes.Structure): _fields_ = [("dimensionSize", ctypes.c_int * 8), ("numDimensions", ctypes.c_int)] class hbDNNTensorProperties_t(ctypes.Structure): _fields_ = [("validShape", hbDNNTensorShape_t), ("alignedShape", hbDNNTensorShape_t), ("tensorLayout", ctypes.c_int), ("tensorType", ctypes.c_int), ("shift", hbDNNQuantiShift_yt), ("scale", hbDNNQuantiScale_t), ("quantiType", ctypes.c_int), ("quantizeAxis", ctypes.c_int), ("alignedByteSize", ctypes.c_int), ("stride", ctypes.c_int * 8)] class hbDNNTensor_t(ctypes.Structure): _fields_ = [("sysMem", hbSysMem_t * 4), ("properties", hbDNNTensorProperties_t)] class Yolov5PostProcessInfo_t(ctypes.Structure): _fields_ = [("height", ctypes.c_int), ("width", ctypes.c_int), ("ori_height", ctypes.c_int), ("ori_width", ctypes.c_int), ("score_threshold", ctypes.c_float), ("nms_threshold", ctypes.c_float), ("nms_top_k", ctypes.c_int), ("is_pad_resize", ctypes.c_int)] libpostprocess = ctypes.CDLL('/usr/lib/libpostprocess.so') get_Postprocess_result = libpostprocess.Yolov5PostProcess get_Postprocess_result.argtypes = [ctypes.POINTER(Yolov5PostProcessInfo_t)] get_Postprocess_result.restype = ctypes.c_char_p # --- UTILS --- def get_TensorLayout(Layout): return 2 if Layout == "NCHW" else 0 def bgr2nv12_opencv(image): height, width = image.shape[0], image.shape[1] area = height * width yuv420p = cv2.cvtColor(image, cv2.COLOR_BGR2YUV_I420).reshape((area * 3 // 2,)) y = yuv420p[:area] uv_planar = yuv420p[area:].reshape((2, area // 4)) uv_packed = uv_planar.transpose((1, 0)).reshape((area // 2,)) nv12 = np.zeros_like(yuv420p) nv12[:height * width] = y nv12[height * width:] = uv_packed return nv12 def get_hw(pro): if pro.layout == "NCHW": return pro.shape[2], pro.shape[3] else: return pro.shape[1], pro.shape[2] # --- MAIN --- is_stop = False def signal_handler(signal, frame): global is_stop is_stop = True def main(): signal.signal(signal.SIGINT, signal_handler) # 1. Setup Hardware GPIO.setwarnings(False) GPIO.setmode(GPIO.BOARD) GPIO.setup(BUZZER_PIN, GPIO.OUT) GPIO.output(BUZZER_PIN, GPIO.LOW) buzzer_active = False # 2. Load Reliable Model print(f"Loading Model: {MODEL_PATH}") try: models = dnn.load(MODEL_PATH) except Exception as e: print(f"Error: {e}") return model_h, model_w = get_hw(models[0].inputs[0].properties) cam_w, cam_h = 640, 480 cam = srcampy.Camera() cam.open_cam(0, -1, -1, [cam_w, 1920], [cam_h, 1080], 1080, 1920) # 3. Gym Variables rep_count = 0 state = "UP" calibration_y = 0 # Records your standing height is_calibrated = False # Thresholds SQUAT_DEPTH = 80 # Pixels to drop to count as a squat print("Gym Trainer (YOLO) Ready. Stand in frame!") try: while not is_stop: t_start = time.time() # Capture img_data = cam.get_img(2, cam_w, cam_h) img_np = np.frombuffer(img_data, dtype=np.uint8) img_nv12 = img_np.reshape((int(cam_h * 1.5), cam_w)) img_bgr = cv2.cvtColor(img_nv12, cv2.COLOR_YUV2BGR_NV12) # Inference resized_data = cv2.resize(img_bgr, (model_w, model_h), interpolation=cv2.INTER_AREA) nv12_input = bgr2nv12_opencv(resized_data) outputs = models[0].forward(nv12_input) # Post-Process post_info = Yolov5PostProcessInfo_t() post_info.height = model_h post_info.width = model_w post_info.ori_height = cam_h post_info.ori_width = cam_w post_info.score_threshold = SCORE_THRESHOLD post_info.nms_threshold = 0.45 post_info.nms_top_k = 20 post_info.is_pad_resize = 0 output_tensors = (hbDNNTensor_t * len(models[0].outputs))() for i in range(len(models[0].outputs)): output_tensors[i].properties.tensorLayout = get_TensorLayout(outputs[i].properties.layout) if len(outputs[i].properties.scale_data) == 0: output_tensors[i].properties.quantiType = 0 output_tensors[i].sysMem[0].virAddr = ctypes.cast(outputs[i].buffer.ctypes.data_as(ctypes.POINTER(ctypes.c_float)), ctypes.c_void_p) else: output_tensors[i].properties.quantiType = 2 output_tensors[i].properties.scale.scaleData = outputs[i].properties.scale_data.ctypes.data_as(ctypes.POINTER(ctypes.c_float)) output_tensors[i].sysMem[0].virAddr = ctypes.cast(outputs[i].buffer.ctypes.data_as(ctypes.POINTER(ctypes.c_int32)), ctypes.c_void_p) for j in range(len(outputs[i].properties.shape)): output_tensors[i].properties.validShape.dimensionSize[j] = outputs[i].properties.shape[j] libpostprocess.Yolov5doProcess(output_tensors[i], ctypes.pointer(post_info), i) result_str = get_Postprocess_result(ctypes.pointer(post_info)).decode('utf-8') try: detections = json.loads(result_str[16:]) except: detections = [] person_found = False head_y = 0 # --- SQUAT LOGIC --- for result in detections: if result['name'] == "person": person_found = True bbox = result['bbox'] x1, y1, x2, y2 = int(bbox[0]), int(bbox[1]), int(bbox[2]), int(bbox[3]) # Track Top of Head (y1) head_y = y1 # Draw Box color = (0, 255, 0) if state == "UP" else (0, 0, 255) cv2.rectangle(img_bgr, (x1, y1), (x2, y2), color, 2) cv2.circle(img_bgr, (int((x1+x2)/2), y1), 8, (255, 255, 0), -1) # Calibration (First Frame) if not is_calibrated: calibration_y = head_y is_calibrated = True print(f"Calibrated Height: {calibration_y}") # State Machine # Compare current head_y with standing head_y displacement = head_y - calibration_y if state == "UP": if displacement > SQUAT_DEPTH: # Head went down state = "DOWN" if not buzzer_active: GPIO.output(BUZZER_PIN, GPIO.HIGH) buzzer_active = True elif state == "DOWN": if displacement < (SQUAT_DEPTH / 2): # Head went back up state = "UP" rep_count += 1 if buzzer_active: GPIO.output(BUZZER_PIN, GPIO.LOW) buzzer_active = False # Reset buzzer if stuck if state == "UP" and buzzer_active: GPIO.output(BUZZER_PIN, GPIO.LOW) buzzer_active = False break # Only track one person # HUD if not person_found: # Reset if person leaves is_calibrated = False cv2.putText(img_bgr, "No Person Detected", (200, 240), cv2.FONT_HERSHEY_SIMPLEX, 1, (0, 0, 255), 2) else: # Stats cv2.rectangle(img_bgr, (0, 0), (200, 100), (0, 0, 0), -1) cv2.putText(img_bgr, f"REPS: {rep_count}", (10, 50), cv2.FONT_HERSHEY_SIMPLEX, 1, (0, 255, 0), 2) cv2.putText(img_bgr, f"STATE: {state}", (10, 90), cv2.FONT_HERSHEY_SIMPLEX, 0.7, (0, 255, 255), 2) # Calibration Reset Helper cv2.putText(img_bgr, "Press 'r' to recalibrate", (10, 470), cv2.FONT_HERSHEY_SIMPLEX, 0.5, (200, 200, 200), 1) cv2.imshow("Gym Trainer (YOLO)", img_bgr) key = cv2.waitKey(1) & 0xFF if key == ord('q'): break elif key == ord('r'): is_calibrated = False print("Recalibrating...") except Exception as e: print(f"Error: {e}") finally: GPIO.cleanup() cam.close_cam() cv2.destroyAllWindows() if __name__ == "__main__": main() |
Code Explanation
The system loads the YOLOv5 model.
Then the camera captures frames.
Each frame is sent to the AI model.
The model detects a person and returns the bounding box.
From the bounding box we track the top point of the head.
Then we calculate the displacement.
If the head moves down enough → state becomes DOWN.
If the head moves back up → we count one squat.
We also turn ON the LED when the person goes down.
This gives real-time feedback during exercise.
Pros and Cons — Method 1
Advantages
This method is very beginner friendly.
It is easy to understand.
It only requires object detection.
No complicated math.
So beginners learning computer vision can build this quickly.
Disadvantages
But there are also problems.
The system only tracks the head position.
So if the person:
Bends forward
Moves sideways
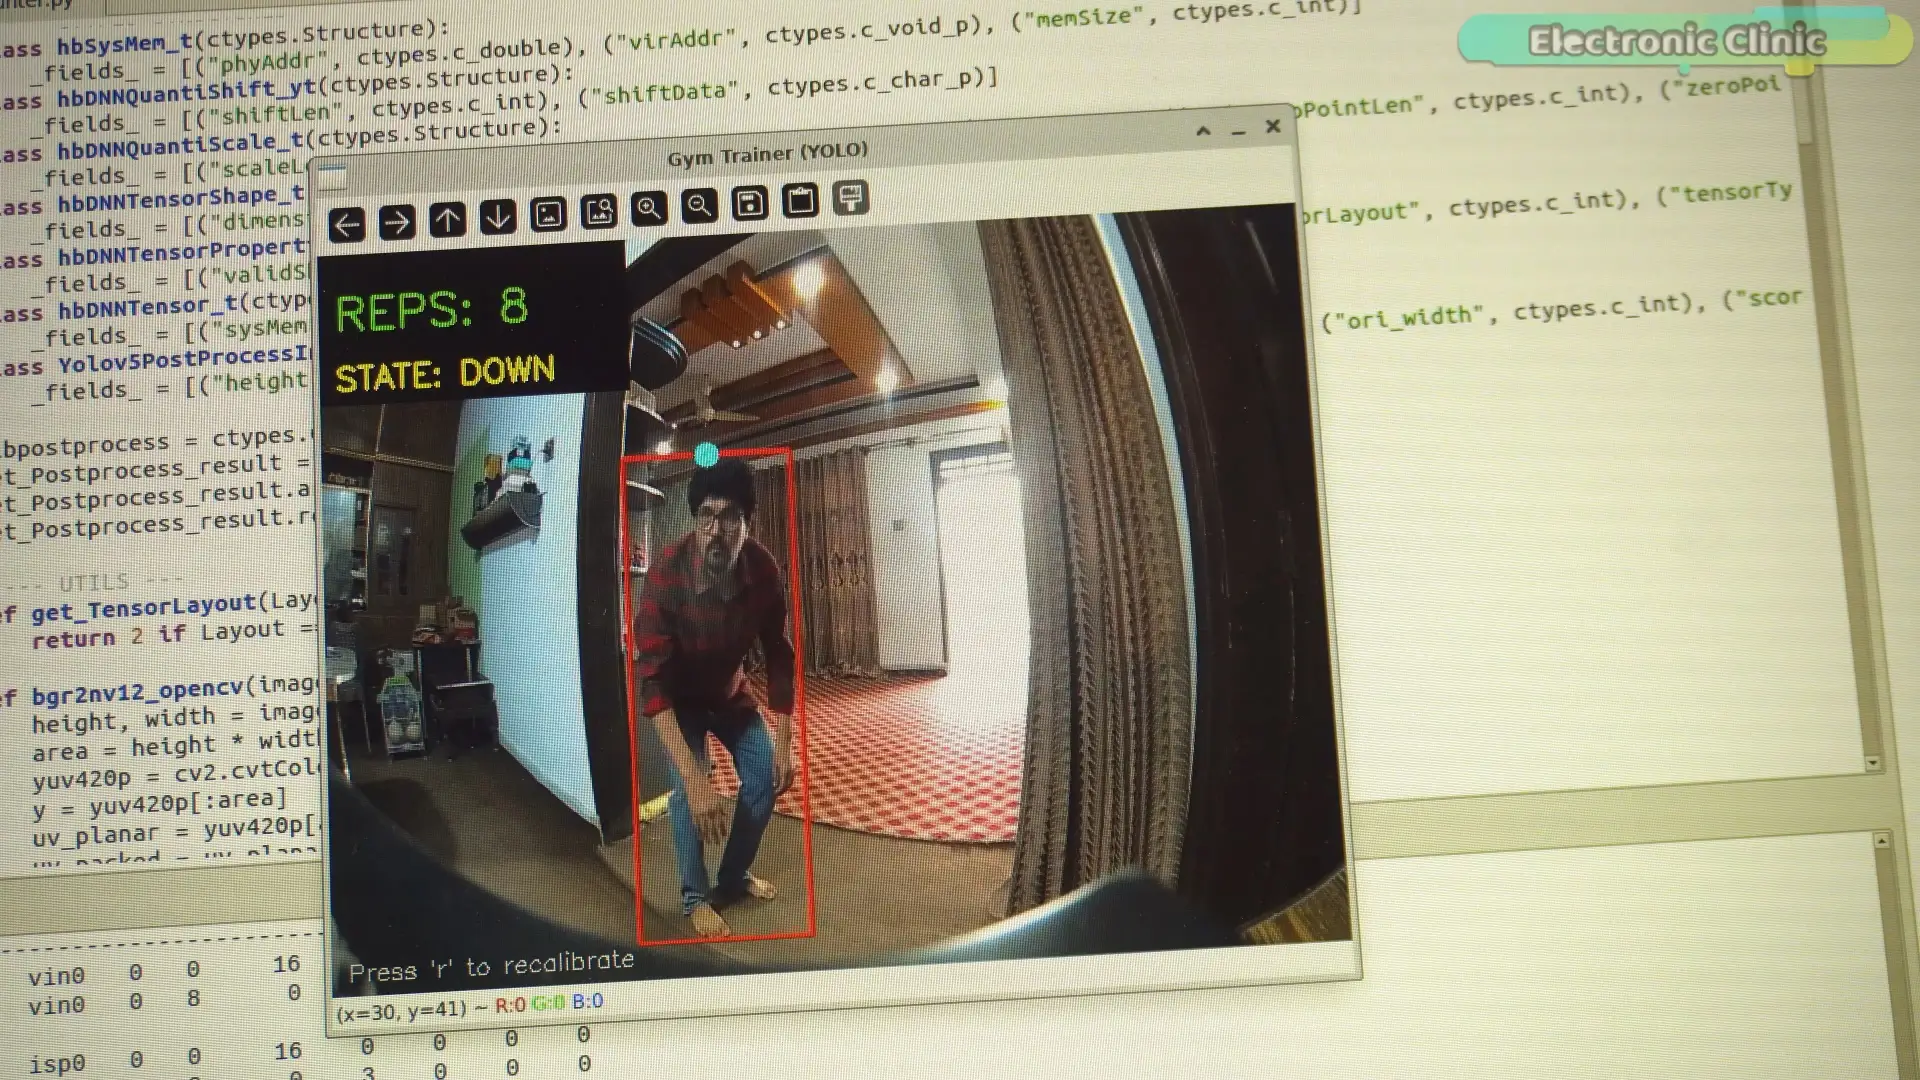
Or the camera angle changes
The squat detection becomes inaccurate.
Method 2
Body Landmark Detection (MediaPipe)
Instead of detecting just the person…
What if we detect the entire body skeleton?
That is exactly what MediaPipe Pose does.
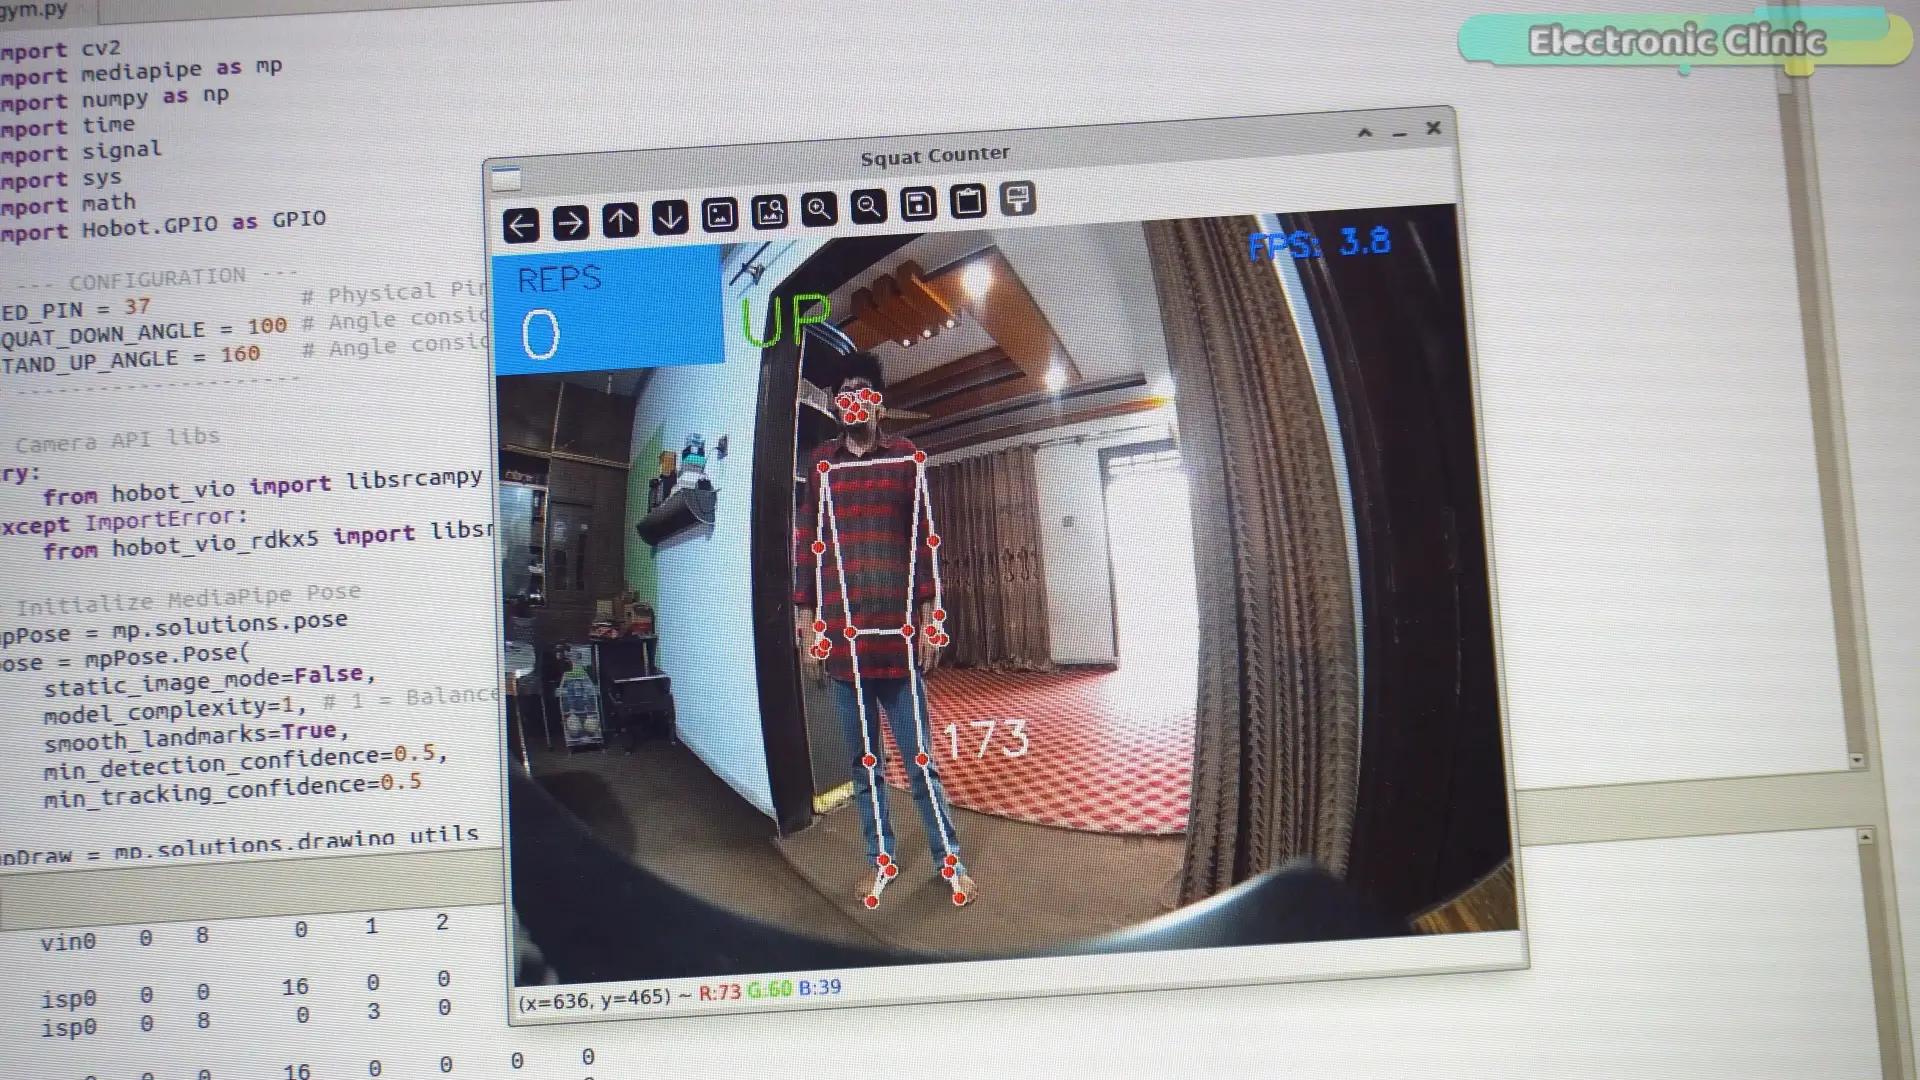
This system detects 33 body landmarks.
For example:
Shoulders
Hips
Knees
Ankles
Wrists
And many more.
This means we can track actual body joints.
So instead of guessing the squat using head movement…
We can calculate the knee angle.
How the Squat Detection Works
Let me explain; how it works.
When a person stands up…
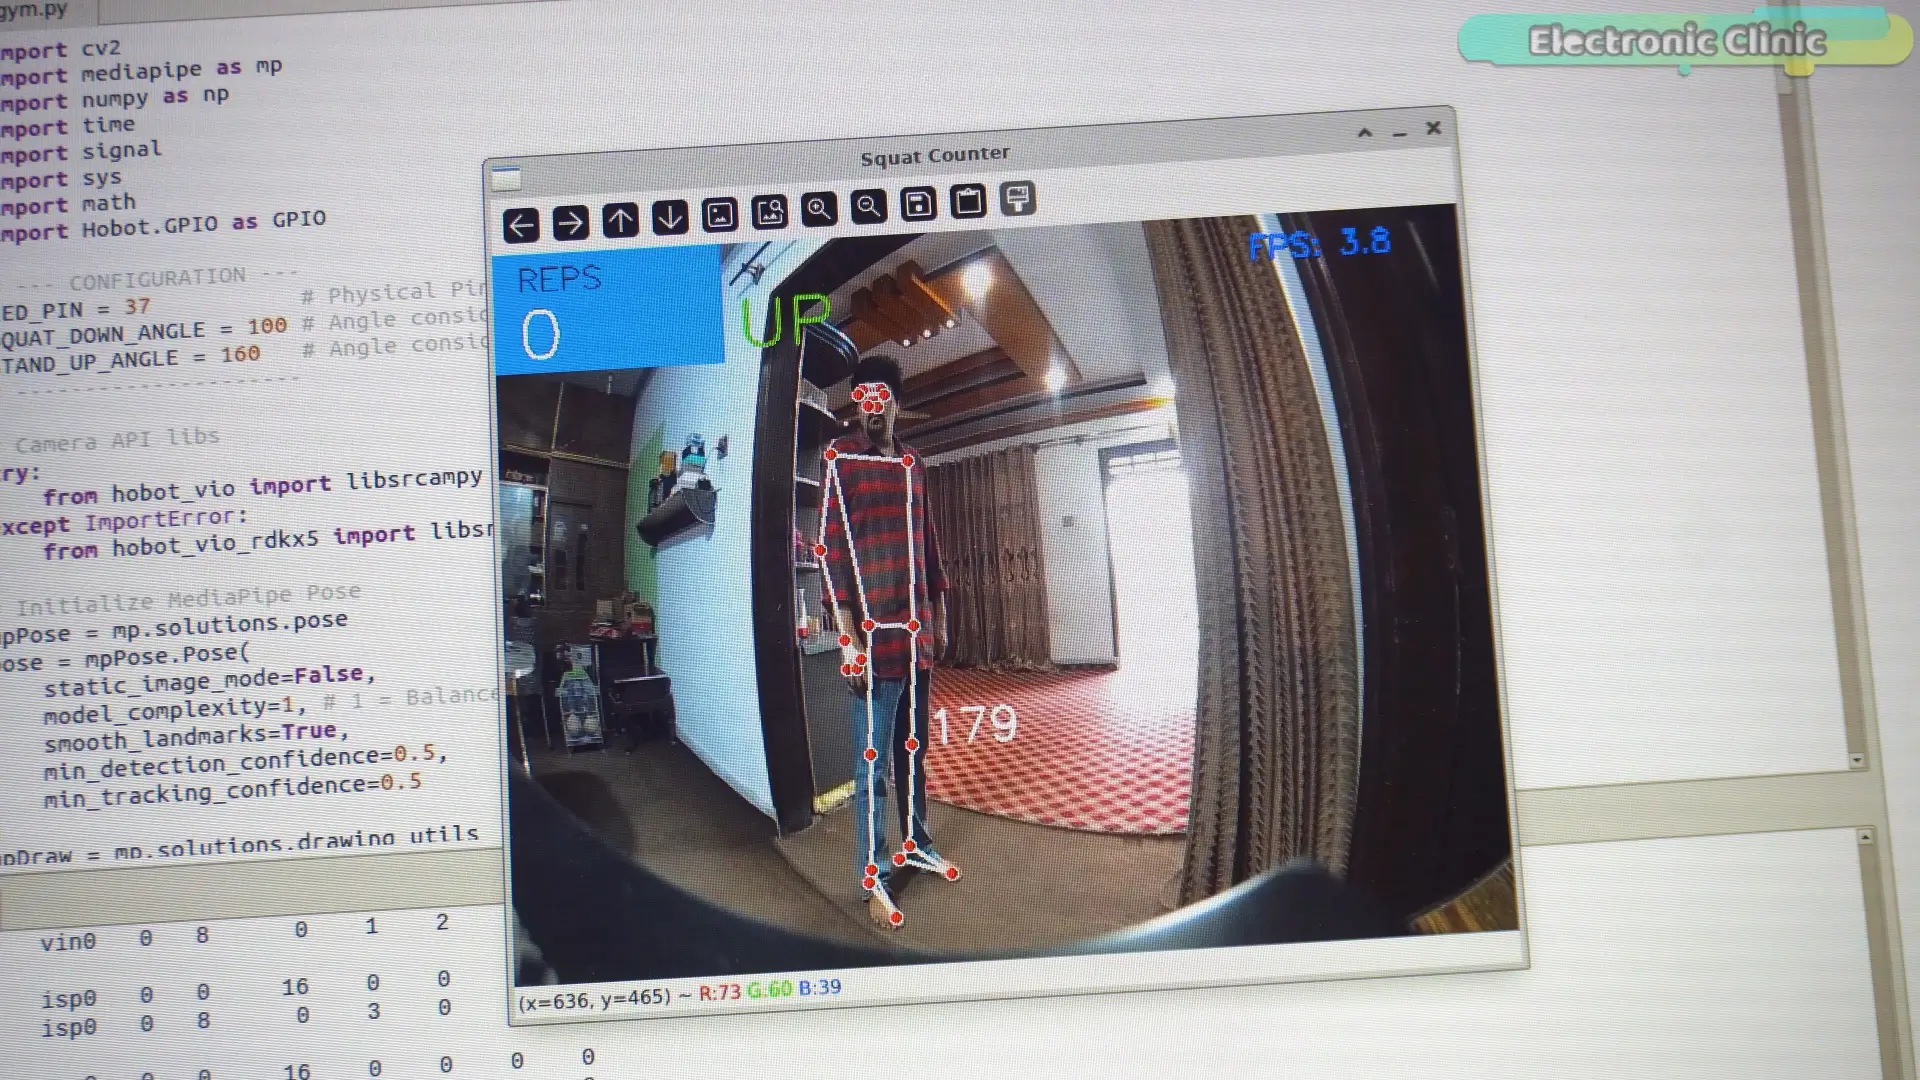
The knee angle is close to 180 degrees.
When the person squats…
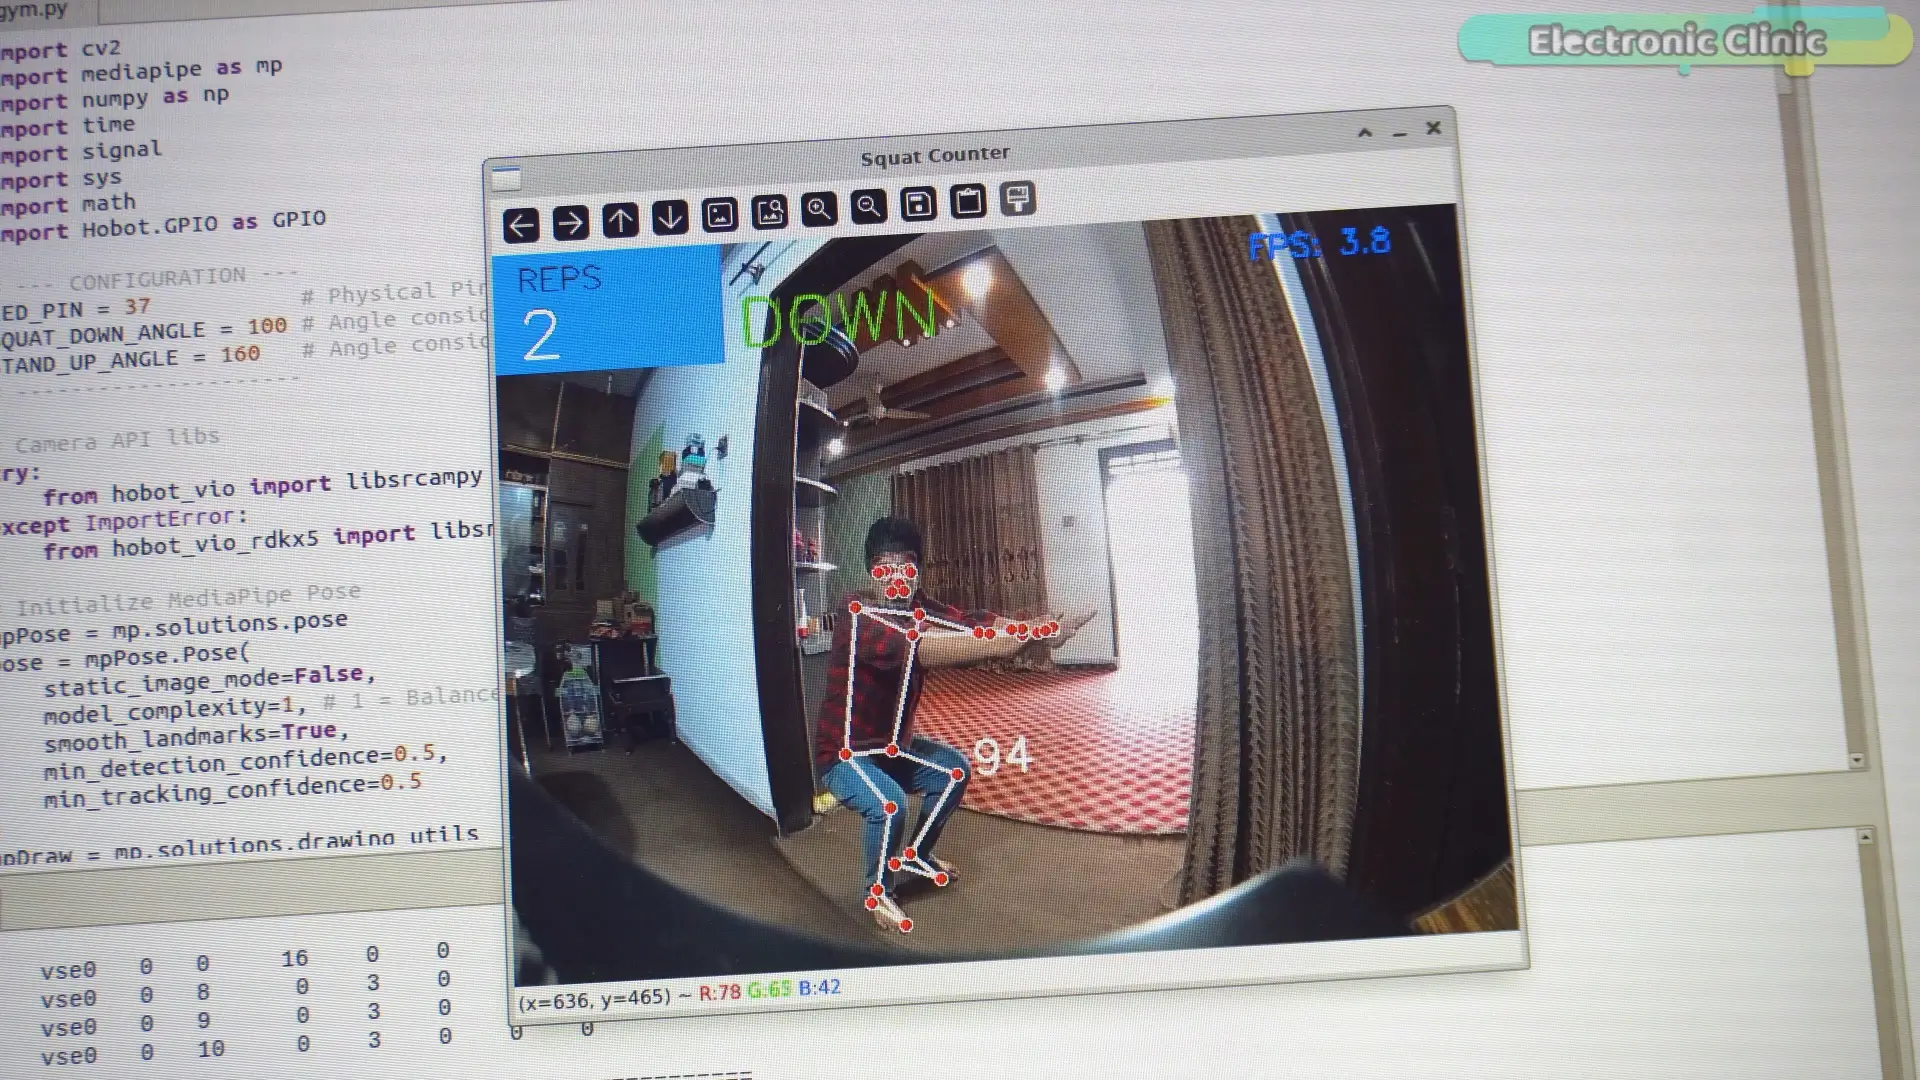
The knee angle becomes smaller.
Usually around 90 to 100 degrees.
So we track three points:
- Hip
- Knee
- Ankle
Then we calculate the angle at the knee joint.
If the angle goes below a threshold, we say the person is squatting.
When the angle goes back above another threshold, we count one rep.
Code:
|
1 2 3 4 5 6 7 8 9 10 11 12 13 14 15 16 17 18 19 20 21 22 23 24 25 26 27 28 29 30 31 32 33 34 35 36 37 38 39 40 41 42 43 44 45 46 47 48 49 50 51 52 53 54 55 56 57 58 59 60 61 62 63 64 65 66 67 68 69 70 71 72 73 74 75 76 77 78 79 80 81 82 83 84 85 86 87 88 89 90 91 92 93 94 95 96 97 98 99 100 101 102 103 104 105 106 107 108 109 110 111 112 113 114 115 116 117 118 119 120 121 122 123 124 125 126 127 128 129 130 131 132 133 134 135 136 137 138 139 140 141 142 143 144 145 146 147 148 149 150 151 152 153 154 155 156 157 158 159 160 161 162 163 164 165 166 167 168 169 170 171 172 173 174 175 176 177 178 179 |
import cv2 import mediapipe as mp import numpy as np import time import signal import sys import math import Hobot.GPIO as GPIO # --- CONFIGURATION --- LED_PIN = 37 # Physical Pin 37 SQUAT_DOWN_ANGLE = 100 # Angle considered as "Squatting" (LED ON) STAND_UP_ANGLE = 160 # Angle considered as "Standing" (LED OFF) # --------------------- # Camera API libs try: from hobot_vio import libsrcampy as srcampy except ImportError: from hobot_vio_rdkx5 import libsrcampy as srcampy # Initialize MediaPipe Pose mpPose = mp.solutions.pose pose = mpPose.Pose( static_image_mode=False, model_complexity=1, # 1 = Balanced smooth_landmarks=True, min_detection_confidence=0.5, min_tracking_confidence=0.5 ) mpDraw = mp.solutions.drawing_utils # Global cleanup handler is_stop = False def signal_handler(signal, frame): global is_stop print("\nStopping...") is_stop = True GPIO.cleanup() sys.exit(0) def calculate_angle(a, b, c): """ Calculates angle between three points (a, b, c). b is the vertex (the knee). """ a = np.array(a) # Hip b = np.array(b) # Knee c = np.array(c) # Ankle radians = np.arctan2(c[1]-b[1], c[0]-b[0]) - np.arctan2(a[1]-b[1], a[0]-b[0]) angle = np.abs(radians*180.0/np.pi) if angle > 180.0: angle = 360-angle return angle def main(): signal.signal(signal.SIGINT, signal_handler) # 1. Setup GPIO (LED) GPIO.setwarnings(False) GPIO.setmode(GPIO.BOARD) GPIO.setup(LED_PIN, GPIO.OUT) GPIO.output(LED_PIN, GPIO.LOW) # Start Off # 2. Setup Camera width = 640 height = 480 cam = srcampy.Camera() cam.open_cam(0, -1, -1, [width, 1920], [height, 1080], 1080, 1920) print("Squat Counter Started.") print("Stand back so the camera sees your LEGS.") # Variables for logic squat_count = 0 current_state = "UP" # UP or DOWN try: while not is_stop: t_start = time.time() # 3. Get Image (Hardware) img_data = cam.get_img(2, width, height) img_np = np.frombuffer(img_data, dtype=np.uint8) img_nv12 = img_np.reshape((int(height * 1.5), width)) img = cv2.cvtColor(img_nv12, cv2.COLOR_YUV2BGR_NV12) # 4. MediaPipe Processing imgRGB = cv2.cvtColor(img, cv2.COLOR_BGR2RGB) results = pose.process(imgRGB) # 5. Logic if results.pose_landmarks: landmarks = results.pose_landmarks.landmark # Draw Skeleton mpDraw.draw_landmarks(img, results.pose_landmarks, mpPose.POSE_CONNECTIONS) # Get Coordinates for LEFT LEG (Hip=23, Knee=25, Ankle=27) # MediaPipe uses normalized coordinates (0.0 to 1.0) try: # Check visibility to ensure legs are on screen if landmarks[25].visibility > 0.5 and landmarks[27].visibility > 0.5: hip = [landmarks[23].x, landmarks[23].y] knee = [landmarks[25].x, landmarks[25].y] ankle = [landmarks[27].x, landmarks[27].y] # Calculate Angle angle = calculate_angle(hip, knee, ankle) # Get pixel coordinates for drawing text near knee knee_x, knee_y = int(knee[0] * width), int(knee[1] * height) # Display Angle cv2.putText(img, str(int(angle)), (knee_x + 10, knee_y), cv2.FONT_HERSHEY_SIMPLEX, 1, (255, 255, 255), 2) # --- SQUAT LOGIC & LED CONTROL --- # Check for DOWN (Squatting) if angle < SQUAT_DOWN_ANGLE: if current_state == "UP": current_state = "DOWN" GPIO.output(LED_PIN, GPIO.HIGH) # LED ON print(f"DOWN! Angle: {int(angle)}") # Check for UP (Standing) if angle > STAND_UP_ANGLE: if current_state == "DOWN": current_state = "UP" squat_count += 1 GPIO.output(LED_PIN, GPIO.LOW) # LED OFF print(f"UP! Count: {squat_count}") # Ensure LED is off if we just started and are standing if current_state == "UP": GPIO.output(LED_PIN, GPIO.LOW) else: # If legs not visible cv2.putText(img, "LEGS NOT VISIBLE", (50, 200), cv2.FONT_HERSHEY_SIMPLEX, 1, (0, 0, 255), 2) except IndexError: pass # Draw UI # Box for Count cv2.rectangle(img, (0,0), (150, 80), (245, 117, 16), -1) cv2.putText(img, 'REPS', (15, 25), cv2.FONT_HERSHEY_SIMPLEX, 0.7, (0,0,0), 1) cv2.putText(img, str(squat_count), (15, 70), cv2.FONT_HERSHEY_SIMPLEX, 1.5, (255,255,255), 2) # Show State cv2.putText(img, current_state, (160, 70), cv2.FONT_HERSHEY_SIMPLEX, 1.5, (0, 255, 0), 2) # Show FPS fps = 1 / (time.time() - t_start) cv2.putText(img, f"FPS: {fps:.1f}", (500, 30), cv2.FONT_HERSHEY_SIMPLEX, 0.7, (255, 0, 0), 2) # Show Image cv2.imshow("Squat Counter", img) if cv2.waitKey(1) & 0xFF == ord('q'): break except Exception as e: print(f"Error: {e}") finally: cam.close_cam() cv2.destroyAllWindows() GPIO.output(LED_PIN, GPIO.LOW) GPIO.cleanup() if __name__ == "__main__": main() |
Code Concept
The program captures the image from the camera.
Then MediaPipe detects the body landmarks.
We extract the coordinates of:
- Hip
- Knee
- Ankle
Then we calculate the joint angle using trigonometry.
If the angle drops below the squat angle, we mark the DOWN state.
When the angle increases again, we count the squat.
We also turn an LED ON when squatting.
And turn it OFF when standing.
Pros and Cons — Method 2
Advantages
This method is much more accurate.
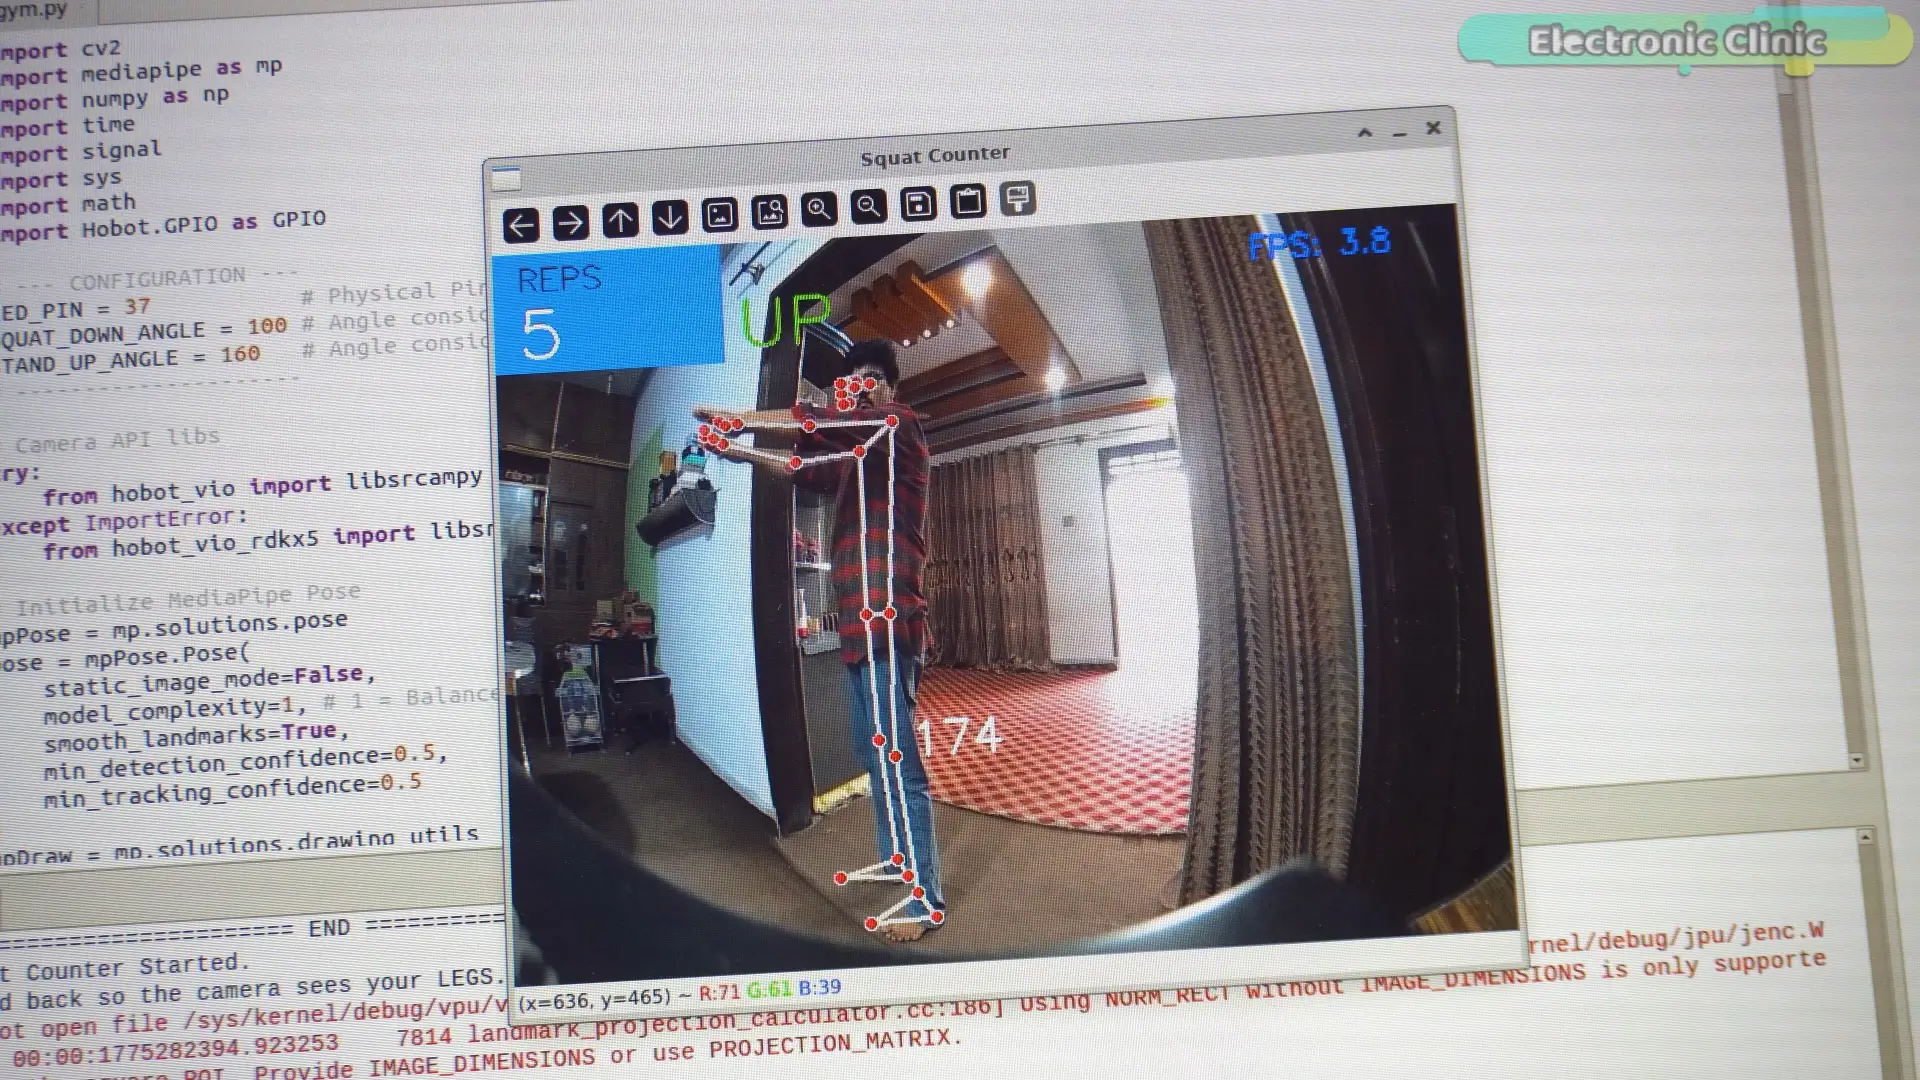
Because it tracks real body joints.
It works even if:
The person bends forward
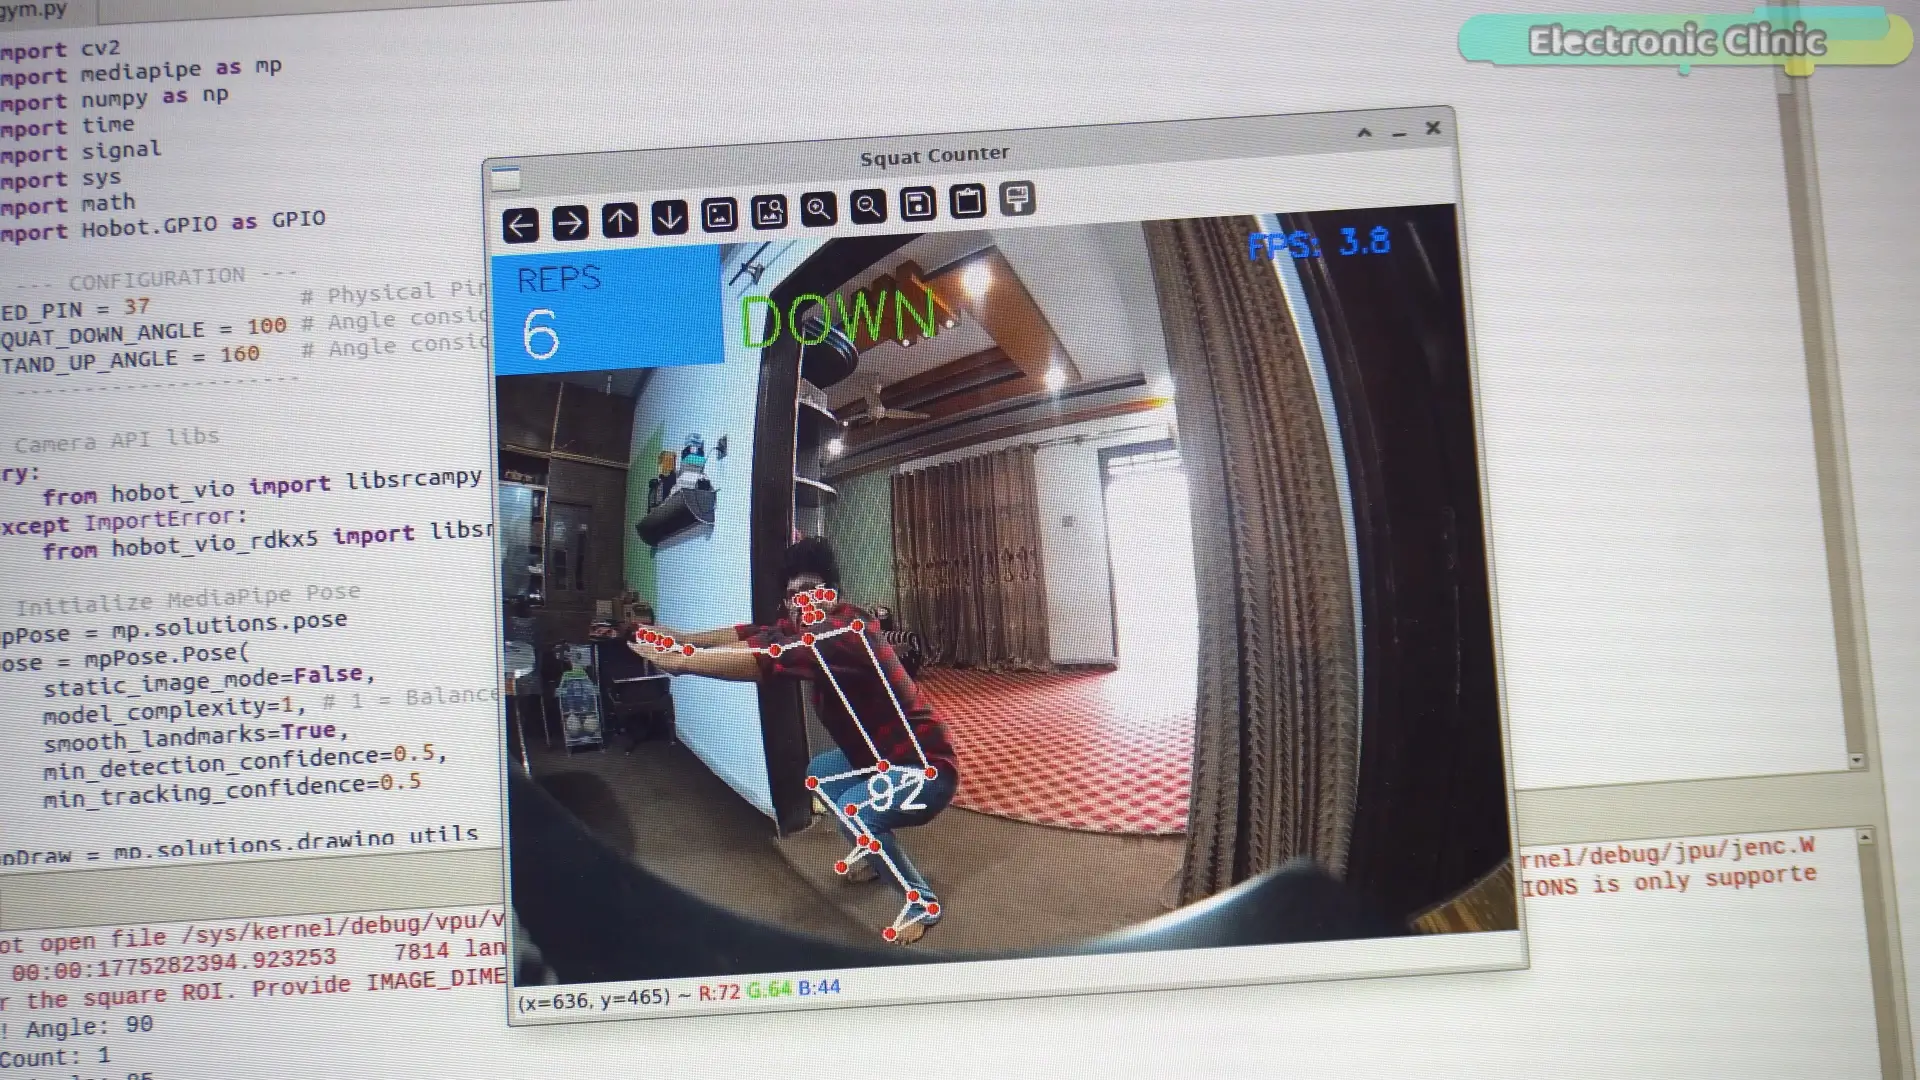
The head moves
The body shifts slightly
It is also great for beginners learning pose estimation.
Disadvantages
However…
MediaPipe runs mostly on the CPU.
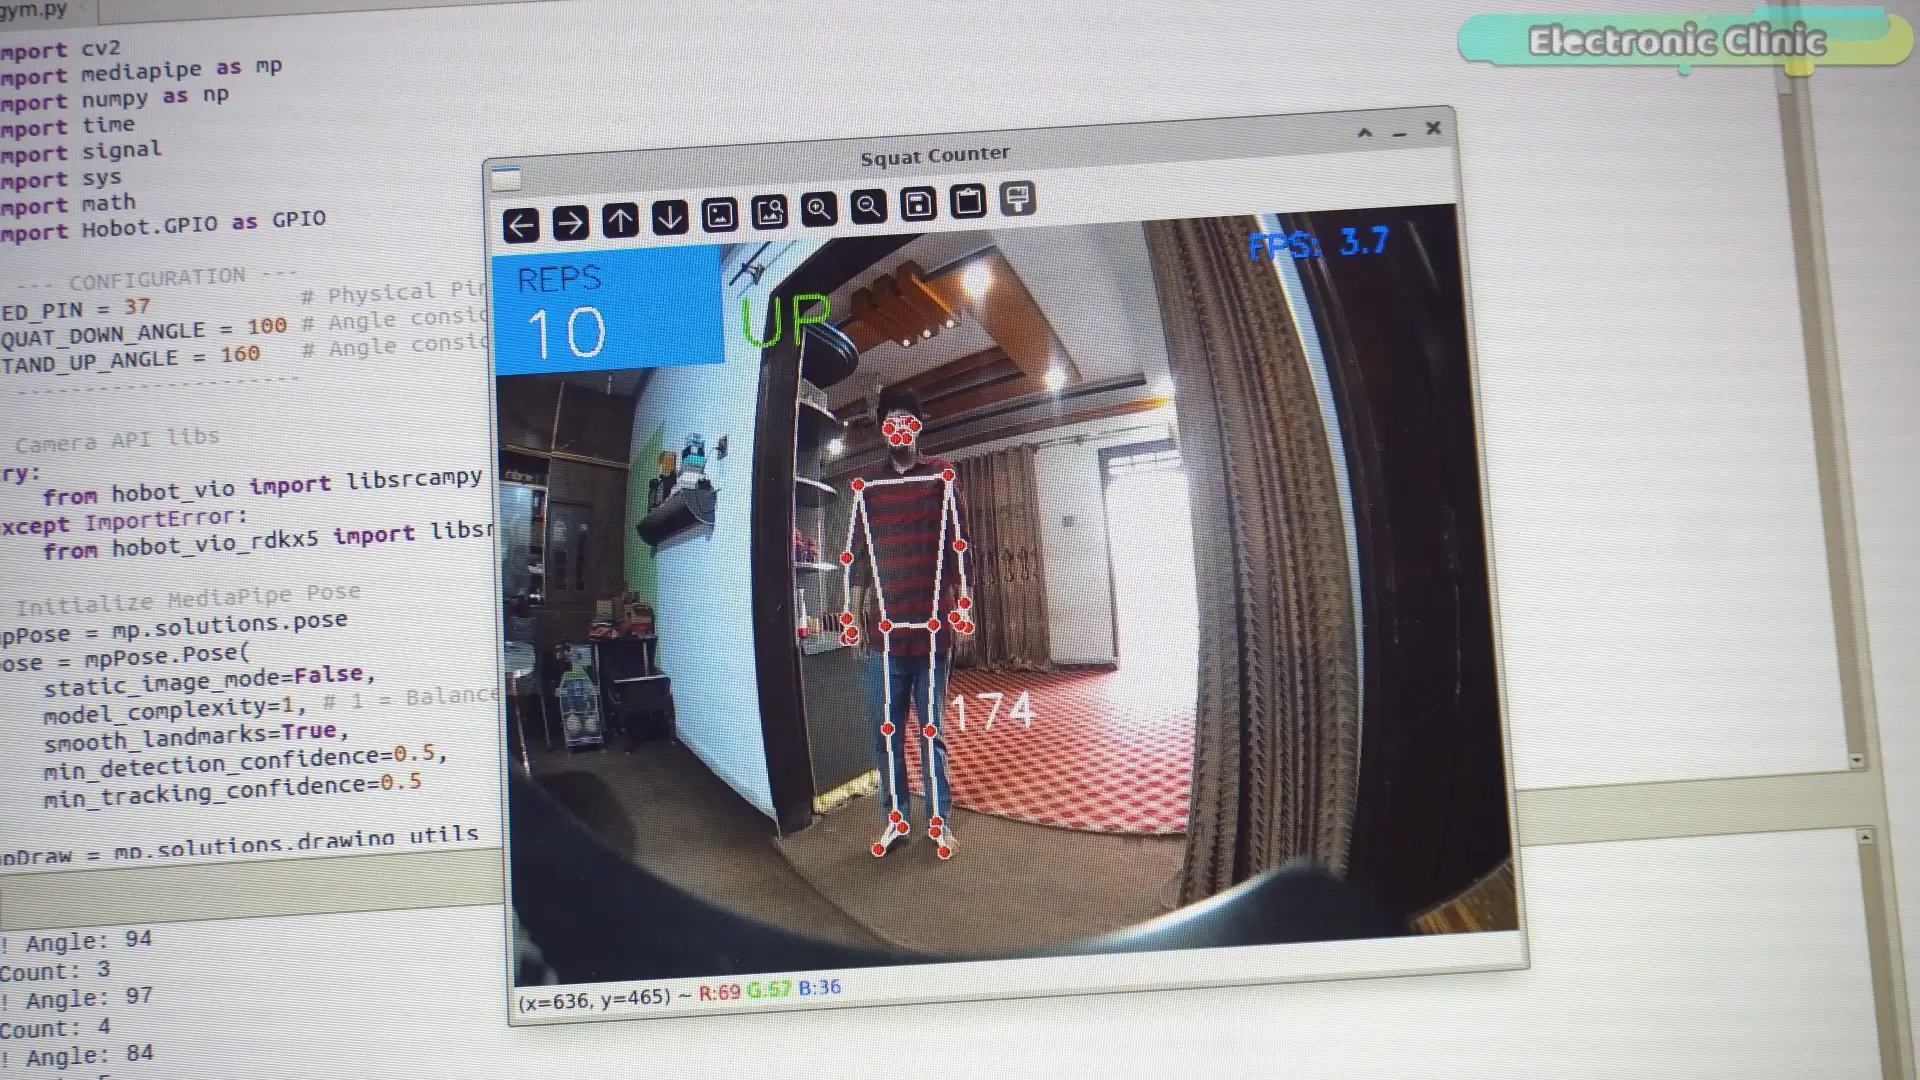
Which means it can become slow on embedded systems.
Especially when processing every video frame.
So the FPS may drop.
This is why professional systems use hardware AI accelerators.
And that brings us to the final method.
Method 3
Gym Level Squat Counter (BPU Powered)
Now we move to the most powerful solution.
Instead of running AI on the CPU…
We use the BPU of the RDK X5.
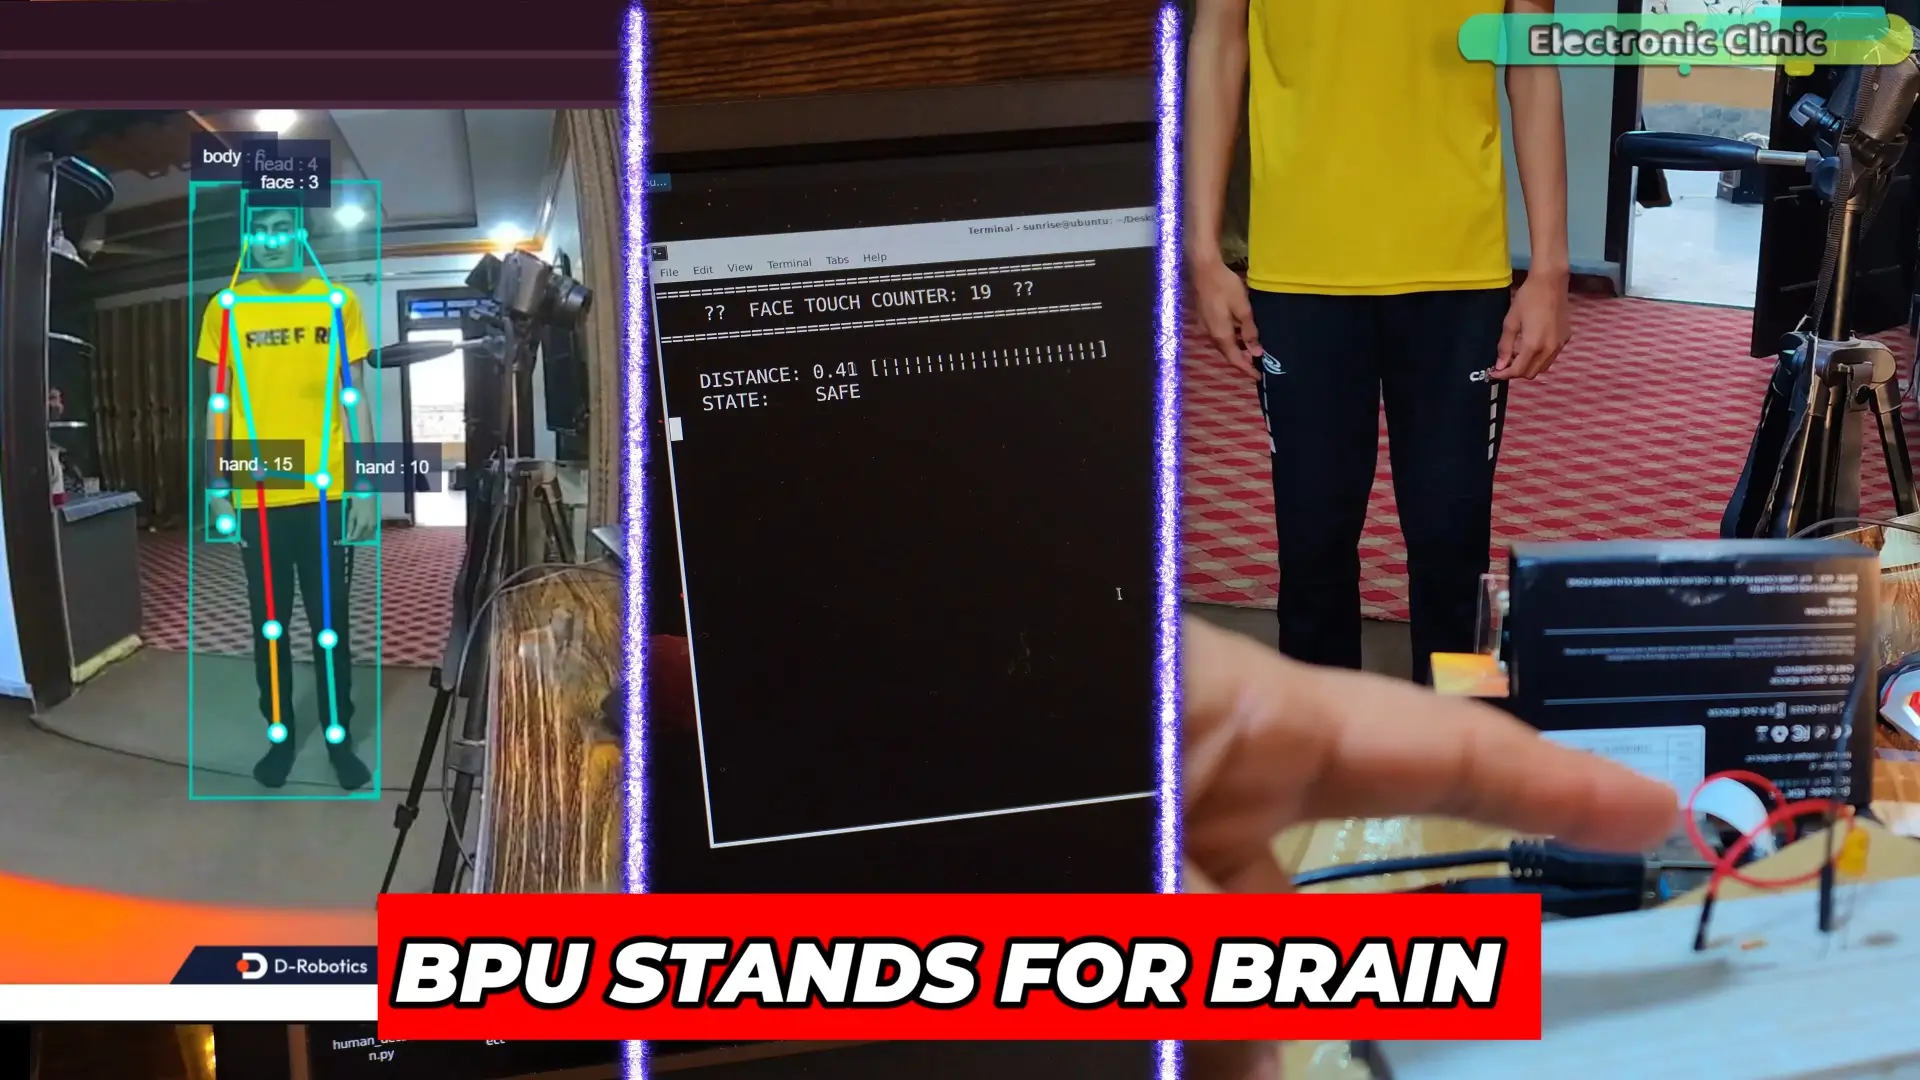
BPU stands for Brain Processing Unit.
It is designed specifically for deep learning workloads.
This means the AI model can run much faster and more efficiently.
In this setup we run a body detection and keypoint model optimized for the BPU.
The model detects:
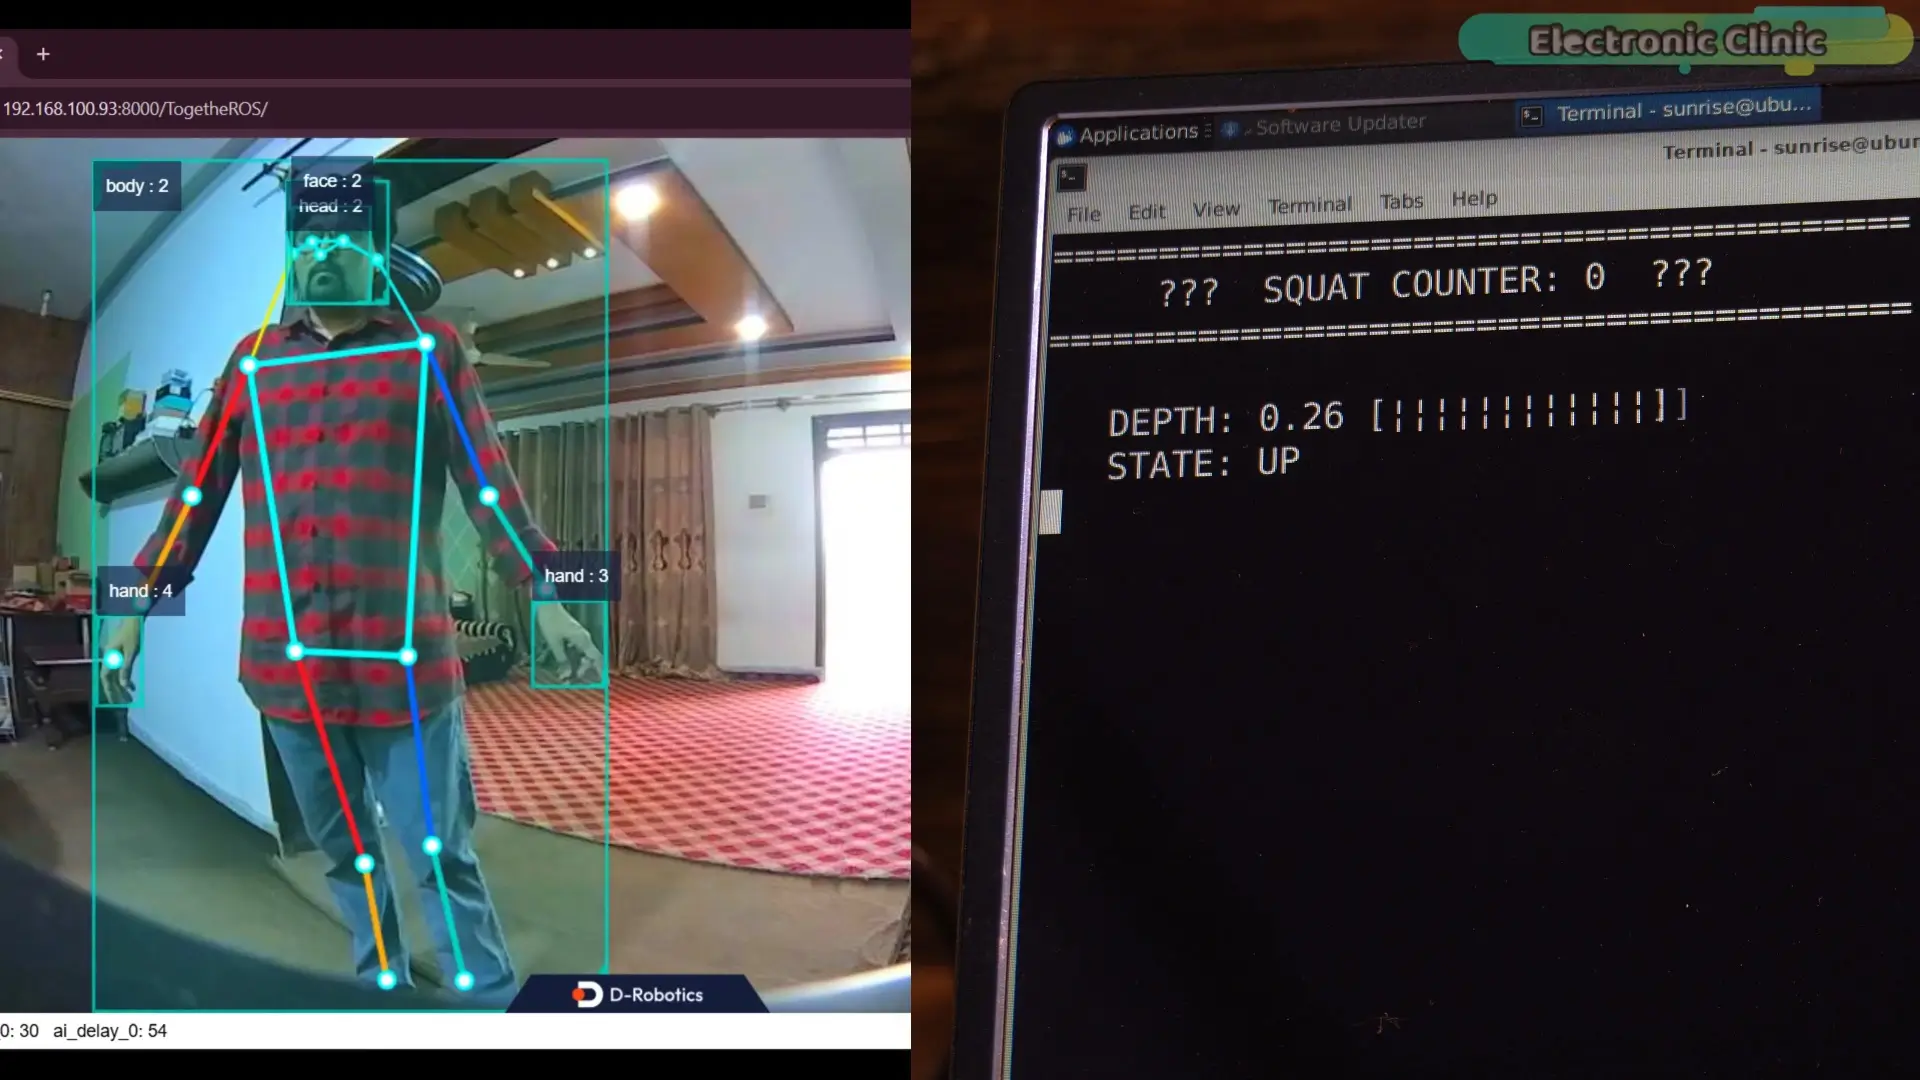
Body
Face
Hands
And full skeleton keypoints.
And the best part is…
The skeleton detection runs directly on the AI accelerator.
We track the hip, knee, and ankle joints.
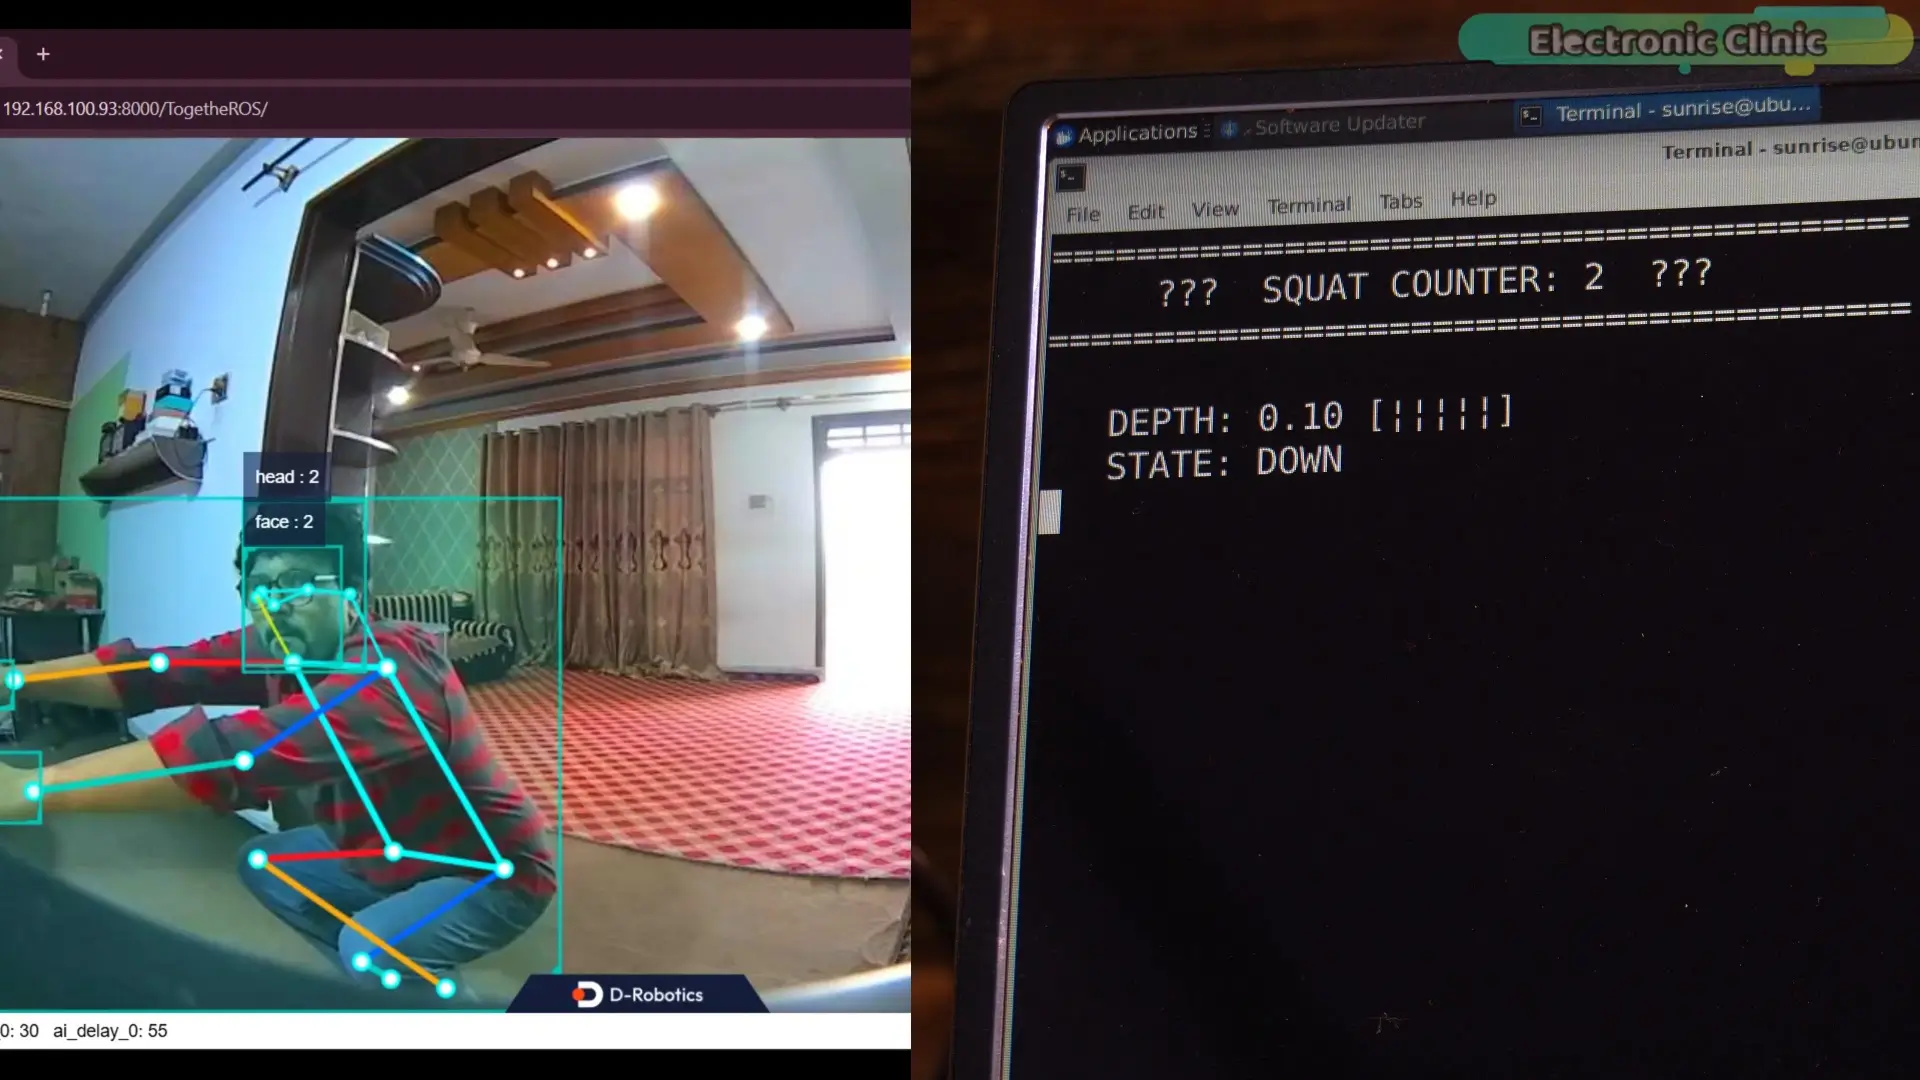
Calculate the squat angle.
And count repetitions in real time.
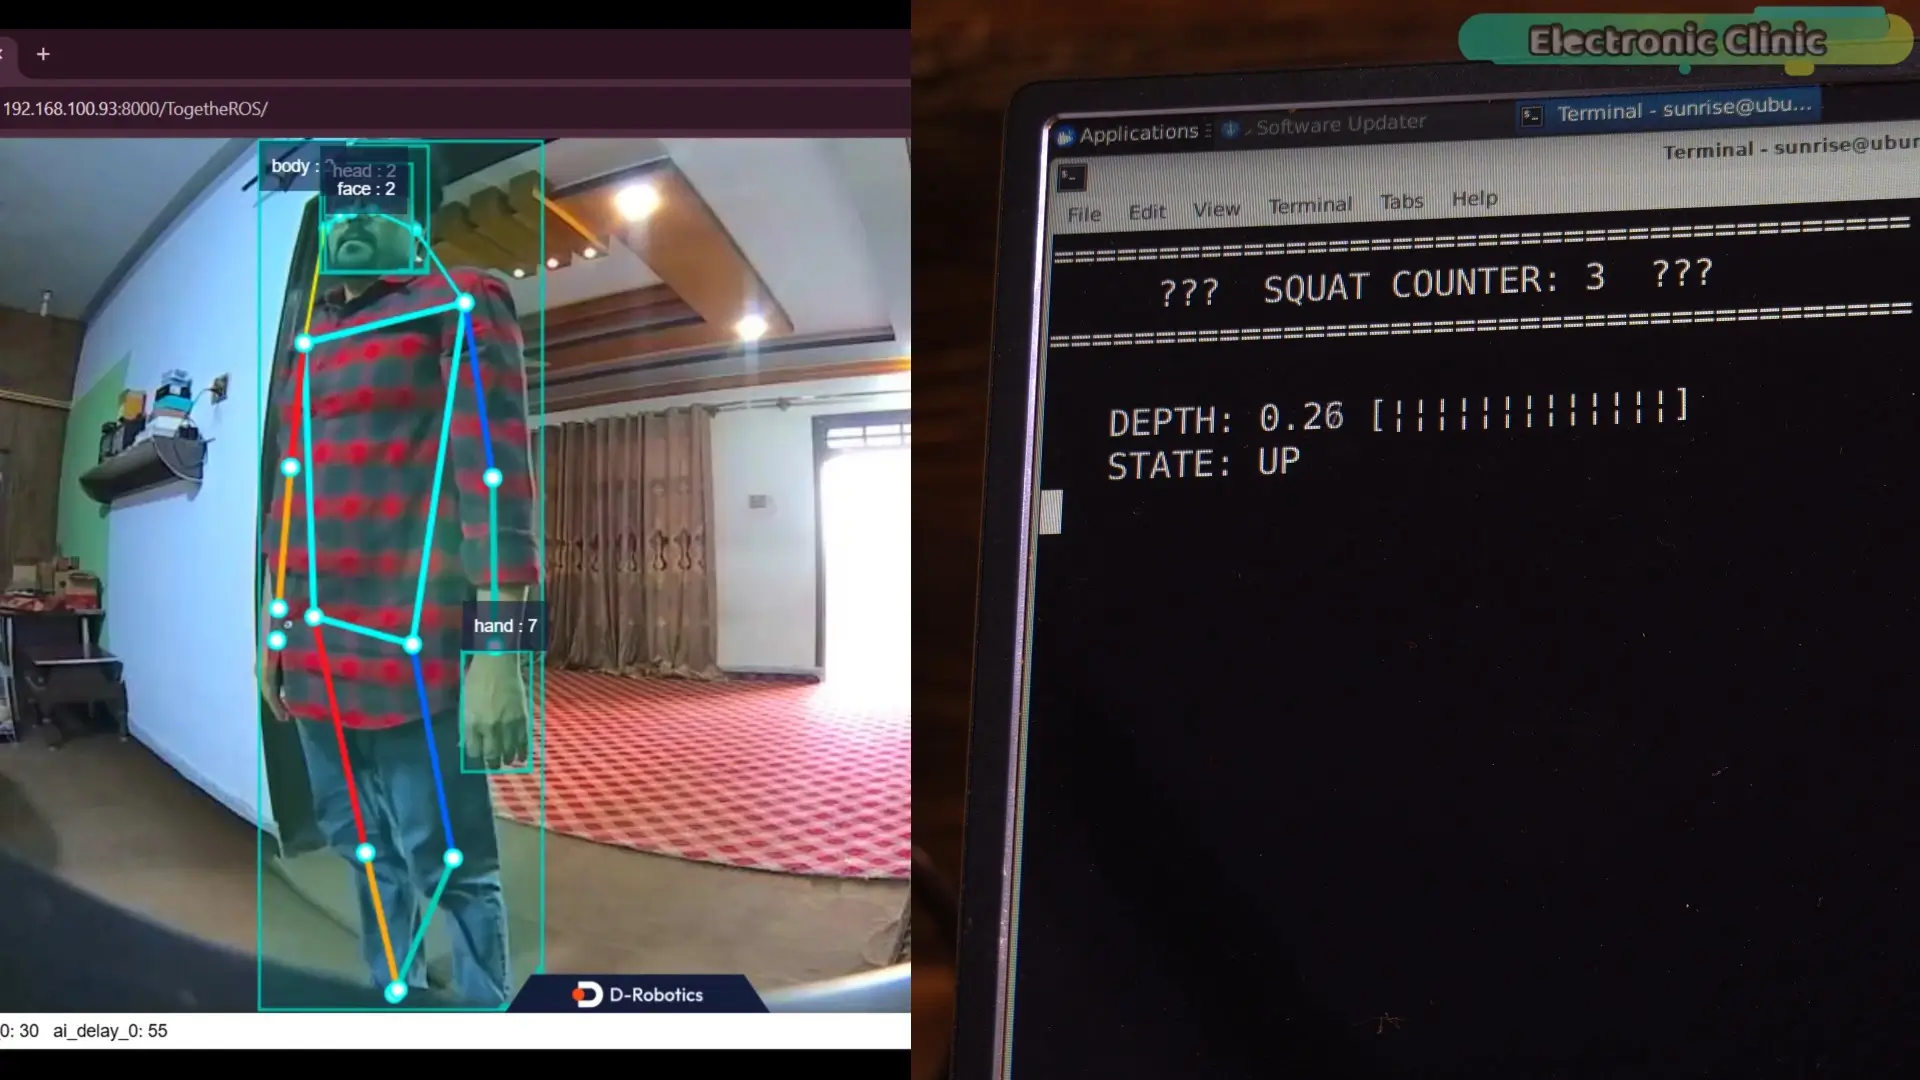
This method is fast, stable, and accurate.
This is the kind of system that could be used in:
Smart gyms
Fitness mirrors
AI trainers
Rehabilitation systems
As accurate, reliable, and efficient as this system is, building it can be quite tricky.
When I first started working on this project, it took me almost one full week to make everything work properly.
There were many things to configure.
Model settings…
AI pipeline…
ROS nodes…
And the keypoint detection system.
So it can get a little tricky, especially if you are doing this for the first time.
But don’t worry.
I have already prepared everything for you.
All the project files are ready to download from my Patreon page.
You just download the project…and you are basically good to go.
Along with the code, I also included a step-by-step guide document.
Inside that document, I explain every single step.
From creating the project directory…to copying the files…to running the system.
Everything is explained clearly so you don’t get stuck.
And trust me… this document will make your life much easier.
Because once you understand this workflow…you can use the same steps to build many other amazing AI projects.
For example:
AI security systems…
Gesture recognition…
Fitness tracking…
Or even smart robotics.
Final Comparison
Let’s quickly compare all three methods.
Method 1 — Bounding Box
Very simple
Beginner friendly
But not very accurate
Method 2 — MediaPipe Skeleton
More accurate
Better movement understanding
But slower on embedded hardware
Method 3 — BPU AI Model
Very fast
Very accurate
Hardware accelerated
This is the professional solution.
With systems like the RDK X5, we can build amazing AI fitness tools.
Smart gyms.
AI personal trainers.
Or even health monitoring systems.
So, that’s all for now.
Support me on Patreon:
If you enjoy my work and find these projects helpful, please consider supporting me on Patreon. With just $1, you can get access to all project source codes, schematics, and extra resources that I share with my supporters. Your support helps me continue creating new electronics tutorials, experiments, and open projects for the community. Thank you so much for being part of this journey and for supporting my work!
Watch Video Tutorial:
Discover more from Electronic Clinic
Subscribe to get the latest posts sent to your email.