Arduino Industrial level Product counting system objects counting
Last Updated on August 18, 2024 by Engr. Shahzada Fahad
Table of Contents
Product Counting Arduino-based Project Description:
Arduino based Product Counting system- In this tutorial, you will learn how to make your own Industrial level product counting system using Arduino, 16×2 LCD and an IR infrared sensor. This Project will also work with Arduino Mega. Object counters or Product counters are most commonly used in industries throughout the world, the project that we will work on today can be used to count different types of objects and products. In this tutorial, I will also explain how you can count objects/products that are actually touching each other. I will explain the whole idea through a SolidWorks 3d design.
Amazon Links:
Arduino Nano USB-C Type (Recommended)
*Disclosure: These are affiliate links. As an Amazon Associate I earn from qualifying purchases.
Product Counting Arduino Circuit Diagram:
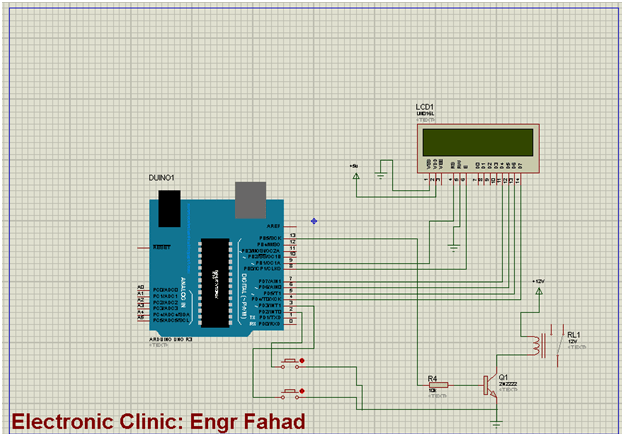
This is the simulation of the balls counting system. As you can see the
- 16×2 LCD pin number 1 is connected with the ground.
- Pin number 2 is connected with the 5volts.
- Pin number 3 which is the contrast pin of the LCD should be connected with a variable resistor, then the variable resistor can be used to control the lcd’s contrast. As this is just a simulation so that’s why there is no need to add a variable resistor.
- The rs pin of the LCD is connected with pin number 9 of the Arduino.
- Pin number 5 of the LCD is connected with the ground.
- The enable pin of the LCD is connected with pin number 8 of the Arduino.
- Pins 4, 5,6 and 7 of the Arduino are connected with the data pins D4 to D7 of the LCD.
16×2 LCD has basically 16 pins but as you can see pin number 15 and pin number 16 are not shown. During the real hardware connections, you need to connect pin number 15 with 5 volts and pin number 16 with the ground.
These two push buttons which are connected with pin number 2 and pin number 3 represents the infrared sensors. So this push button will be used for counting the balls, while this push button will be used to reset this relay.
A 12v relay will be used in this project; if you want you can also use a 5v relay. The type of the 12v relay I am using is SPDT. This type of the relay has 5 pins, two coil pins, common pin, normally open and normally closed pin. The 2n2222 NPN transistor emitter leg is connected with the ground while the collector is connected with the relay coil. While the other side of the relay coil is connected with the 12v as it’s a 12-volt relay…
A 10k resistor is connected with the base of the 2n2222 transistor. This transistor is controlled using pin number 13 of the Arduino. The purpose of this relay is to trigger the other circuits, it can be used to turn on a buzzer when the box is filled, or this relay can be used to trigger the pneumatic cylinder to push the box. For the Solidworks model explanation watch video given at the end of the Programming.
Download: Proteus Simulation
Download: SolidWorks model
Product counting Arduino Programming :
This is the complete Program of the product counting system. As in this project, the 16×2 LCD is used for displaying the number of the Products/objects counted. So to use this LCD we will need to include the LiquidCrystal library. So I started by adding the LiquidCrystal.h header file. # means that this is a preprocessor directive while .h means that this is a header file. The next I defined pins of the LCD.
|
1 2 3 4 5 6 7 8 9 10 11 12 |
#include <LiquidCrystal.h> #define rs 9 #define en 8 #define d4 7 #define d5 6 #define d6 5 #define d7 4 LiquidCrystal lcd(rs, en, d4, d5, d6, d7); int relay = 13; |
This relay will be used to signal another machine or turn on a light or a buzzer. This will signal the operator or another machine that the box is full. Then you can manually remove the box, or push it through pneumatic cylinder etc.
Then I defined two variables ballcount and tballs of the type unsigned integer and initially set these variable to zero. Finally, I defined two variables ballf and resetb. These variables are of the type integer.
|
1 2 3 4 |
unsigned int ballcount = 0; unsigned int tballs = 0; // total balls int ballf = 0; // ball flag. int resetb = 3; // to reset the relay , this can be laser or an infrared sensor. |
In the void setup function, first I activated the LCD and entered the number of columns and rows. As this is a 16×2 LCD. 16 columns and 2 rows. Then I printed a message “Tballs Current” using the lcd.print function. the lcd.print function is used to print strings on the LCD. Then I activated the interrupt on pin number 2 of the Arduino. Pin number 2 of the Arduino will be used for the products or objects counting. And finally using the pinMode function I told the controller which pins are input and which pins are output.
|
1 2 3 4 5 6 7 8 9 10 11 12 13 14 15 16 17 18 19 20 21 22 23 24 25 26 27 28 29 30 31 32 33 34 35 36 37 38 39 40 41 42 43 44 45 46 47 48 49 50 51 52 53 54 55 56 57 |
void setup() { // set up the LCD's number of columns and rows: lcd.begin(16, 2); // Print a message to the LCD. lcd.print("TBalls Current"); attachInterrupt(0, add, FALLING); pinMode(resetb, INPUT); digitalWrite(resetb, HIGH); pinMode( relay, OUTPUT); digitalWrite(relay, LOW); ballcount = 0; tballs = 0; } void loop() { if ( ballf == 1 ) // the lcd is updated only when ballf = 1, this way the controller won't be busy in printing the values on lcd again and again. { //Print out result to lcd lcd.clear(); lcd.print("TBalls Current"); lcd.setCursor(0,1); lcd.print(tballs); lcd.setCursor(8,1); lcd.print(ballcount); ballf = 0; } if ( digitalRead(resetb) == LOW) { digitalWrite(relay, LOW); } } void add() { ballf = 1; ballcount++; tballs = tballs + 1; if (ballcount >= 5) { digitalWrite(relay, HIGH); ballcount = 0; } } |
Watch Video Tutorial:
Discover more from Electronic Clinic
Subscribe to get the latest posts sent to your email.


