BotFather Telegram with ESP8266 to control an LED
Last Updated on September 18, 2024 by Engr. Shahzada Fahad
Table of Contents
ESP8266 interfacing with the BotFather Telegram:
BotFather Telegram with ESP8266 to control an LED- I have been controlling LEDs and other electronic devices using different types of controllers boards ( Arduino, esp8266, ESP32, Seeeduino Xiao, PLC, PIC, 8051, etc) and IoT platforms ( Blynk, Ubidots, Thingspeak, etc ). Again I am going to control the LED but this time I will use the Telegram and the controller board that I will use is the ESP8266 D1 Mini. In this tutorial we are going to control led using telegram messenger. Telegram is an instant messaging free client like whatsapp but it supports BOTS and it is actually a really good way of controlling your project from anywhere in the world for free and it is quite easy to use . We will be using an esp8266 microcontroller for this project. If you have not heard of it; it is basically an Arduino compatible board that has built-in Wi-Fi and it is not very expensive, one of the best things about this kind of a setup is that everything runs directly on the esp8266. So you do not need to setup any other software. The project I will be using to demonstrate is to control the two LEDs from the telegram automatically. Controlling lights is just one example of something you could do with this project. You could also control basically anything such as a relay, a motor, or even display a text on a screen basically anything at all.
Advantage of using telegram:
There are few advantages to using telegram a web interface hosted on the esp8266. One of the main advantages is that you do not need to worry about the IP address of the device because we would not be using it to access it. We can just go straight to telegram and that’s it. What I needed to do the telegram can be accessed from anywhere where you have an internet connection without having to worry about port forwarding or dynamic DNS.You can enable a type of authentication using telegrams built-in ID system.
Disadvantage of using telegram:
The main disadvantage is that it would not be as fast as a local web interface will be although it can be made quite fast. The other disadvantage is if your internet is down or if telegram has a service outage it just would not work.
Creating hardware Interface for BotFather Telegram:
First let’s take a look at the hardware that we will need for this project. The main thing that we need is an esp8266 microcontroller board, these come in a lot of different shapes and sizes and the one that I use for this project is Wemos which is one of the most basic models but I definitely recommend using a more Development Board style one because they have got a built-in voltage regulator and can be programmed directly from USB. So they are a lot easier to use to control the LED lights.
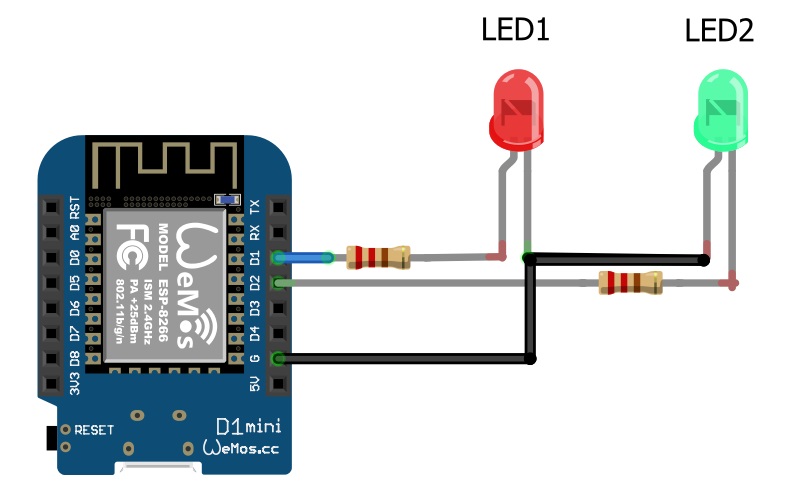
Now to interface the led with esp8266 we will connect 220 resistor with the D1 pin of the ESP8266 and connect the other terminal of the resistor with the led 1 which is red led and now similarly connect the second resistor with the D2 of the module and connect led 2 which is a green led with the other terminal of the resistor.
ESP8266 Interfacing with Botfather Telegram:
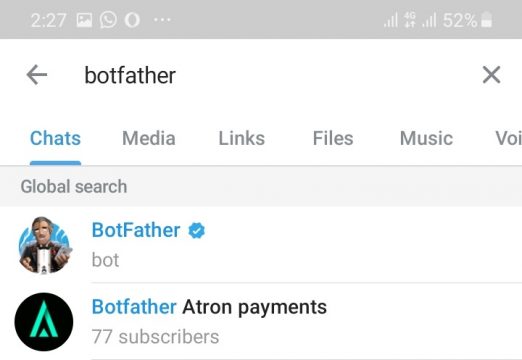
First of all, you need to start the telegram app by installing it on the phone because it requires a phone number for authorization. Once you have your account set up you can download a desktop and web client if you want and they work independently of the app. Next, we need to create a bot that will run on the esp8266 this is what will interact with to send the commands to the lights search for a user called botfather.
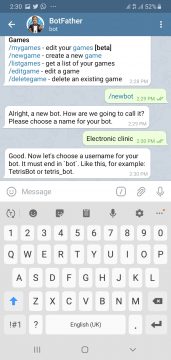
Now type in the new bot command.

The next thing we need is the user name of the bot this can be anything you want.
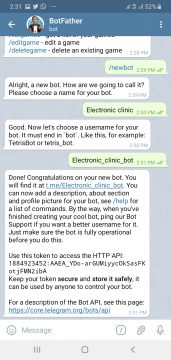
After that we need the bot ID this is almost like the address of the bot but this cannot have spaces it has to be unique and at most end in bot. The BotFather will then return your bot token which will need an Arduino sketch and also a link.
Telegram Setup for Arduino IDE:
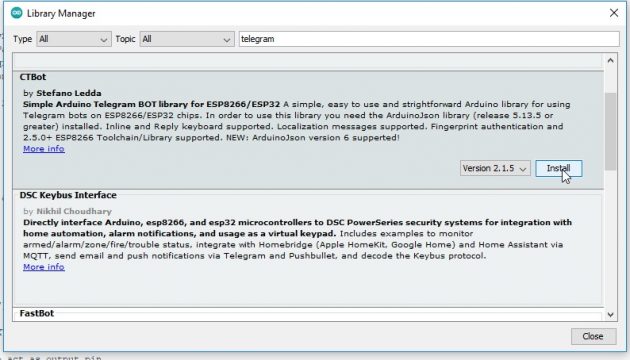
Next, we will take a look at the software setup we need to setup the Arduino IDE with the esp8266 libraries which we have already discussed in the previous tutorials. The next thing we need to do is install the libraries that we need for our sketch. So in the Arduino IDE go to the sketch menu, include a library, and then manage libraries and search for telegram and install the CTBot.
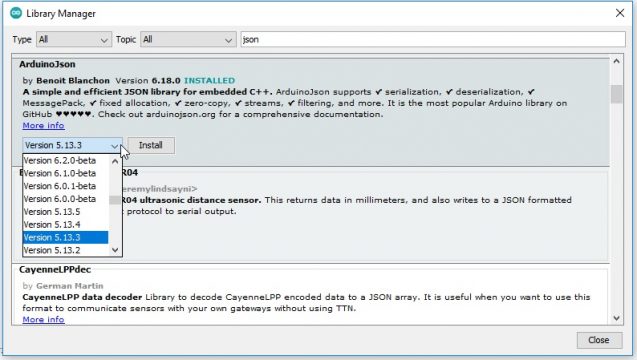
Next thing we need to install the Arduinojson library so just search for JSON make sure you install version 5.13.3 in because v6 is in beta at the moment and it does not work with the telegram library.
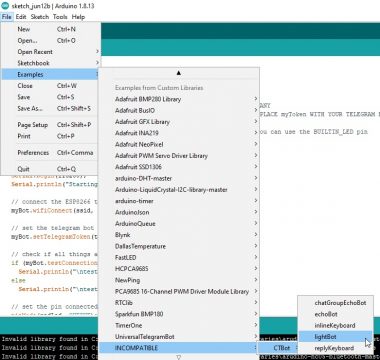
Now we will go to the examples in which we will select the CTBot and in CTBot we will select the lightBot.
BotFather Telegram ESP8266 Complete code:
|
1 2 3 4 5 6 7 8 9 10 11 12 13 14 15 16 17 18 19 20 21 22 23 24 25 26 27 28 29 30 31 32 33 34 35 36 37 38 39 40 41 42 43 44 45 46 47 48 49 50 51 52 53 54 55 56 57 58 59 60 61 62 63 64 65 66 67 68 69 70 71 |
#include "CTBot.h" CTBot myBot; String ssid = "mySSID"; // REPLACE mySSID WITH YOUR WIFI SSID String pass = "myPassword"; // REPLACE myPassword YOUR WIFI PASSWORD, IF ANY String token = "myToken"; // REPLACE myToken WITH YOUR TELEGRAM BOT TOKEN uint8_t led1 = D1; uint8_t led2 = D2; // the onboard ESP8266 LED. // If you have a NodeMCU you can use the BUILTIN_LED pin // (replace 2 with BUILTIN_LED) void setup() { // initialize the Serial Serial.begin(115200); Serial.println("Starting TelegramBot..."); // connect the ESP8266 to the desired access point myBot.wifiConnect(ssid, pass); // set the telegram bot token myBot.setTelegramToken(token); // check if all things are ok if (myBot.testConnection()) Serial.println("\ntestConnection OK"); else Serial.println("\ntestConnection NOK"); // set the pin connected to the LED to act as output pin pinMode(led1, OUTPUT); pinMode(led2, OUTPUT); //by default all the leds will be low digitalWrite(led1, LOW); // turn off the led (inverted logic!) digitalWrite(led2, LOW); // turn off the led (inverted logic!) } void loop() { // a variable to store telegram message data TBMessage msg; // if there is an incoming message... if (myBot.getNewMessage(msg)) { if (msg.text.equalsIgnoreCase("LED1 Turn on")) { // if the received message is "LIGHT ON"... digitalWrite(led1, HIGH); // turn on the LED (inverted logic!) myBot.sendMessage(msg.sender.id, "LED1 is now ON"); // notify the sender } else if (msg.text.equalsIgnoreCase("LED1 is OFF")) { // if the received message is "LIGHT OFF"... digitalWrite(led, LOW); // turn off the led (inverted logic!) myBot.sendMessage(msg.sender.id, "LED1 is now OFF"); // notify the sender } if (msg.text.equalsIgnoreCase("LED2 Turn on")) { // if the received message is "LIGHT ON"... digitalWrite(led2, HIGH); // turn on the LED (inverted logic!) myBot.sendMessage(msg.sender.id, "LED1 is now ON"); // notify the sender } else if (msg.text.equalsIgnoreCase("LED2 is OFF")) { // if the received message is "LIGHT OFF"... digitalWrite(led, LOW); // turn off the led (inverted logic!) myBot.sendMessage(msg.sender.id, "LED2 is now OFF"); // notify the sender } else { // otherwise... // generate the message for the sender String reply; reply = (String)"Welcome " + msg.sender.username + (String)". Try LIGHT ON or LIGHT OFF."; myBot.sendMessage(msg.sender.id, reply); // and send it } } // wait 500 milliseconds delay(500); } |
After uploading the code to the ESP8266 we will open the application in the telegram and when we write the LED1 turn on the led will turn ON and when we write the message the led1 turn OFF the led1 will turn off.
Discover more from Electronic Clinic
Subscribe to get the latest posts sent to your email.


Hello, load the program as it is, I compile it and load it and I have no errors. But it doesn’t work for me. When I open the monitor I get a message “testConnection NOK”, can you help me? Thank you