How to Use ESP32 Cam with Telegram to Send Images
Last Updated on May 11, 2026 by Engr. Shahzada Fahad
Table of Contents
ESP32 Cam with Telegram:
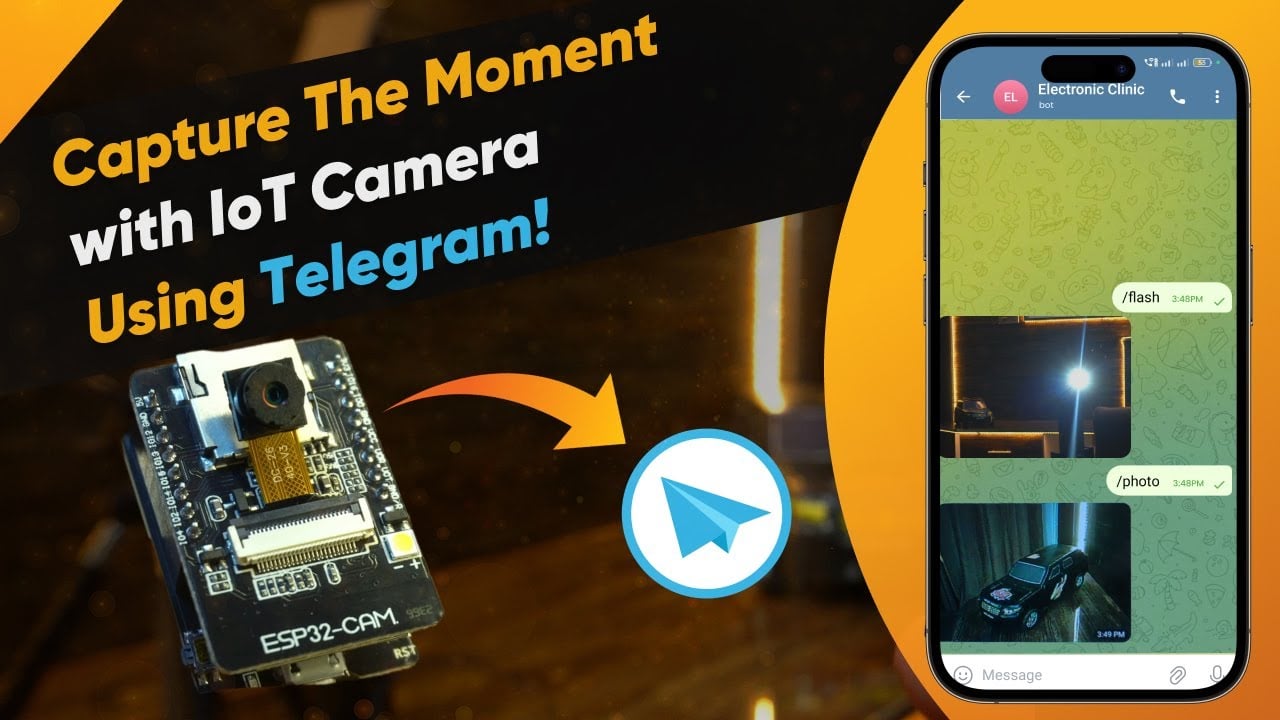
ESP32 Cam with Telegram App, Send images to Telegram- Today, we are going to make an IoT based Security Camera using ESP32 Cam Module and Telegram application.
But this is not just another security camera. It’s a camera with a twist. With a simple command, like ‘/flash,’ you can illuminate the night, ensuring you have a clear view of your surroundings whenever you need it.

And that’s not all. A tap on your Smartphone, using the command ‘/photo,’ unleashes the power of this incredible ESP32 Camera module, capturing high-quality images and instantly sending them to your Telegram app, right at your fingertips

This is a brilliant combination of hardware and software, unlocking a new level of control and security. It’s all about making your life safer and more convenient, 24/7. And since, this project is based on the IoT “Internet of things” so, you can request images from any part of the world provided if the internet connection is available.

This security camera is designed with portability in mind. You have the flexibility to power it using a single-cell lithium-ion battery, a LiPo battery, or a 4S lithium-ion battery pack, just like the one I’m using here with a 5V and 3A power supply. This setup has been invaluable for me, not only for this project but also for powering my Arduino-based projects that demand higher current.
For the sake of simplicity, I’ve opted not to include sensors like PIR motion sensors, microwave sensors, or ultrasonic sensors in this version. This way, beginners can dive right in and get started without any complexity.
But, stay tuned for my upcoming video and article where I’ll take this project to the next level by integrating one of these sensors, making it fully automatic. If you’re eager not to miss any of my future videos and project updates, don’t forget to hit that subscribe button!
So, without any further delay, let’s get started.
Amazon Links:
Disclosure: These are affiliate links. As an Amazon Associate I earn from qualifying purchases.

As I explained earlier, in this project, we are not using any sensors so there is no circuit diagram. All you need is the ESP32 Cam module and this ESP32 Camera development board for uploading the program. But, if you don’t have this development board then you can use the Arduino Uno for uploading the program. For this, you can read my getting started article on the ESP32 Camera module. But, I highly recommend, get yourself this ESP32 Camera development board, and trust me it will save a lot of your time. Now, let’s go ahead and setup the Arduino IDE.
ESP32 CAM in the Arduino IDE:
First of all, we will need to add the ESP32 Cam module in the Arduino IDE. Because, by default no ESP32 board is installed in the Arduino IDE and you can confirm this by going to the Tools Menu, then to Board, and you can see there is no ESP32 board.

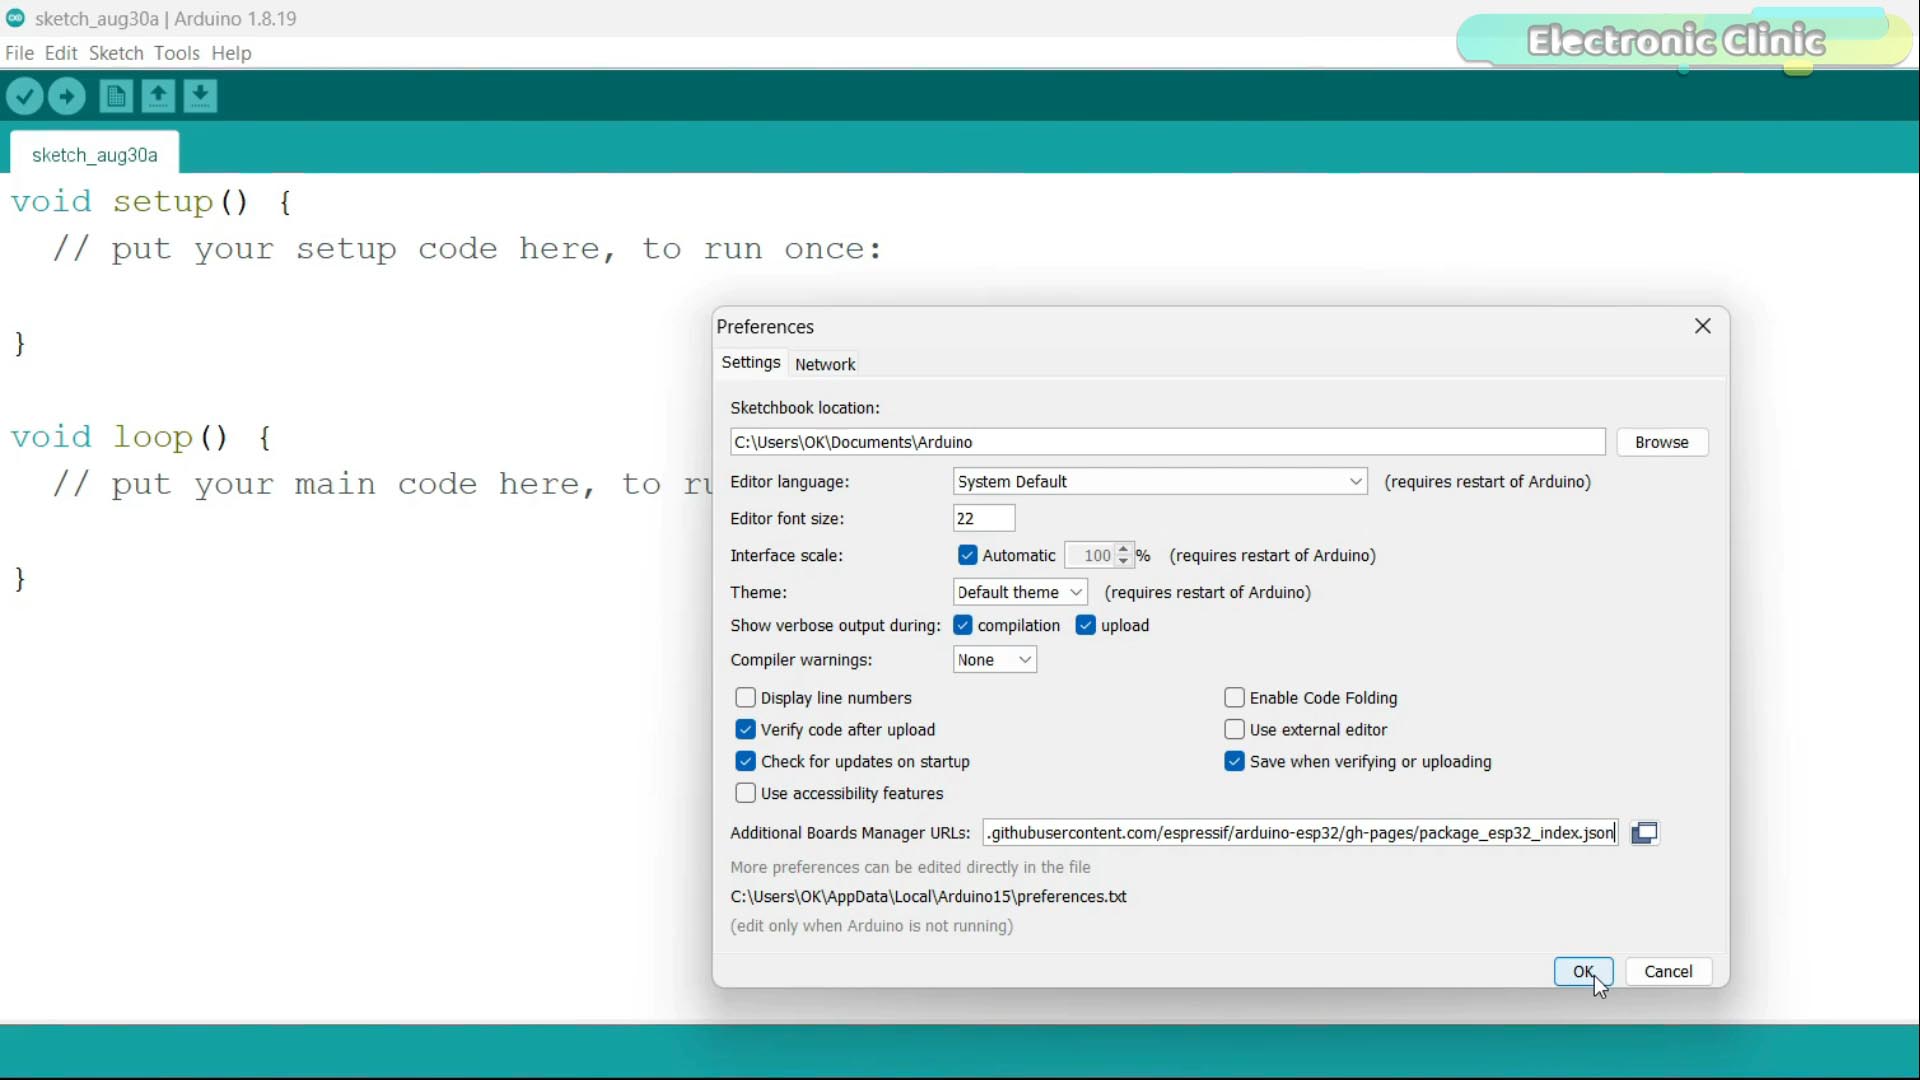
So, first we will need to add it in the boards list, for this copy this Board Manager URL link;
https://raw.githubusercontent.com/espressif/arduino-esp32/gh-pages/package_esp32_index.json
Then go back to the Arduino IDE, go to the File Menu, then preferences, and paste this link in the Additional Boards Manager URLs and click the Ok button.
Next, go to the Tools Menu, then Board and click on the Boards Manager. Search for the ESP32. You can see we have Arduino ESP32 Boards and ESP32 by Espressif Systems.

So, make sure you install this one and don’t forget to select the latest version. Finally, the board installation has been completed and now we can confirm this by going to the boards list.

You can see all the different variants of the ESP32 Boards have been added. Now, let’s go ahead and open the program.
Install the required libraries:
Before, you start the programming, first of all, make sure you install the required libraries in the Arduino IDE. For this, simply copy the library name > then go to the Sketch Menu > then to Include Library > and click on the manage libraries. Paste the library name in the search box and install it. As you can see in the image down below, I have already installed the UniversalTelegramBot library.

Follow the same exact steps for the other library.

It’s already installed but needs an update so let’s update it. It’s good to keep all your libraries updated. Anyway, after installing the ESP32 Board in the Arduino IDE and after installing all the required libraries then you can congratulate yourself, because you are done with the hard work. Let’s go ahead and take a look the programming.
ESP32 CAM with Telegram Programming:
|
1 2 3 4 5 6 7 8 9 10 11 12 13 14 15 16 17 18 19 20 21 22 23 24 25 26 27 28 29 30 31 32 33 34 35 36 37 38 39 40 41 42 43 44 45 46 47 48 49 50 51 52 53 54 55 56 57 58 59 60 61 62 63 64 65 66 67 68 69 70 71 72 73 74 75 76 77 78 79 80 81 82 83 84 85 86 87 88 89 90 91 92 93 94 95 96 97 98 99 100 101 102 103 104 105 106 107 108 109 110 111 112 113 114 115 116 117 118 119 120 121 122 123 124 125 126 127 128 129 130 131 132 133 134 135 136 137 138 139 140 141 142 143 144 145 146 147 148 149 150 151 152 153 154 155 156 157 158 159 160 161 162 163 164 165 166 167 168 169 170 171 172 173 174 175 176 177 178 179 180 181 182 183 184 185 186 187 188 189 190 191 192 193 194 195 196 197 198 199 200 201 202 203 204 205 206 207 208 209 210 211 212 213 214 215 216 217 218 219 220 221 222 223 224 225 226 227 228 229 230 231 232 233 234 235 236 237 238 239 240 241 242 243 244 245 246 247 248 249 250 251 252 253 254 255 256 257 258 259 260 261 262 |
#include <Arduino.h> #include <WiFi.h> #include <WiFiClientSecure.h> #include "soc/soc.h" #include "soc/rtc_cntl_reg.h" #include "esp_camera.h" #include <UniversalTelegramBot.h> #include <ArduinoJson.h> const char* ssid = "AndroidAP3DEC"; const char* password = "electroniclinic"; // Initialize Telegram BOT String BOTtoken = "6869476801:AAEOcKK7JYWUEkJkW4P5qomsQLbziHUKX4s"; // your Bot Token (Get from Botfather) // Use @myidbot to find out the chat ID of an individual or a group // Also note that you need to click "start" on a bot before it can // message you String CHAT_ID = "6213458614"; bool sendPhoto = false; WiFiClientSecure clientTCP; UniversalTelegramBot bot(BOTtoken, clientTCP); #define FLASH_LED_PIN 4 bool flashState = LOW; //Checks for new messages every 1 second. int botRequestDelay = 1000; unsigned long lastTimeBotRan; //CAMERA_MODEL_AI_THINKER #define PWDN_GPIO_NUM 32 #define RESET_GPIO_NUM -1 #define XCLK_GPIO_NUM 0 #define SIOD_GPIO_NUM 26 #define SIOC_GPIO_NUM 27 #define Y9_GPIO_NUM 35 #define Y8_GPIO_NUM 34 #define Y7_GPIO_NUM 39 #define Y6_GPIO_NUM 36 #define Y5_GPIO_NUM 21 #define Y4_GPIO_NUM 19 #define Y3_GPIO_NUM 18 #define Y2_GPIO_NUM 5 #define VSYNC_GPIO_NUM 25 #define HREF_GPIO_NUM 23 #define PCLK_GPIO_NUM 22 void configInitCamera(){ camera_config_t config; config.ledc_channel = LEDC_CHANNEL_0; config.ledc_timer = LEDC_TIMER_0; config.pin_d0 = Y2_GPIO_NUM; config.pin_d1 = Y3_GPIO_NUM; config.pin_d2 = Y4_GPIO_NUM; config.pin_d3 = Y5_GPIO_NUM; config.pin_d4 = Y6_GPIO_NUM; config.pin_d5 = Y7_GPIO_NUM; config.pin_d6 = Y8_GPIO_NUM; config.pin_d7 = Y9_GPIO_NUM; config.pin_xclk = XCLK_GPIO_NUM; config.pin_pclk = PCLK_GPIO_NUM; config.pin_vsync = VSYNC_GPIO_NUM; config.pin_href = HREF_GPIO_NUM; config.pin_sscb_sda = SIOD_GPIO_NUM; config.pin_sscb_scl = SIOC_GPIO_NUM; config.pin_pwdn = PWDN_GPIO_NUM; config.pin_reset = RESET_GPIO_NUM; config.xclk_freq_hz = 20000000; config.pixel_format = PIXFORMAT_JPEG; //init with high specs to pre-allocate larger buffers if(psramFound()){ config.frame_size = FRAMESIZE_UXGA; config.jpeg_quality = 10; //0-63 lower number means higher quality config.fb_count = 2; } else { config.frame_size = FRAMESIZE_SVGA; config.jpeg_quality = 12; //0-63 lower number means higher quality config.fb_count = 1; } // camera init esp_err_t err = esp_camera_init(&config); if (err != ESP_OK) { Serial.printf("Camera init failed with error 0x%x", err); delay(1000); ESP.restart(); } // Drop down frame size for higher initial frame rate sensor_t * s = esp_camera_sensor_get(); s->set_framesize(s, FRAMESIZE_CIF); // UXGA|SXGA|XGA|SVGA|VGA|CIF|QVGA|HQVGA|QQVGA } void handleNewMessages(int numNewMessages) { Serial.print("Handle New Messages: "); Serial.println(numNewMessages); for (int i = 0; i < numNewMessages; i++) { String chat_id = String(bot.messages[i].chat_id); if (chat_id != CHAT_ID){ bot.sendMessage(chat_id, "Unauthorized user", ""); continue; } // Print the received message String text = bot.messages[i].text; Serial.println(text); String from_name = bot.messages[i].from_name; if (text == "/start") { String welcome = "Welcome , " + from_name + "\n"; welcome += "Use the following commands to interact with the ESP32-CAM \n"; welcome += "/photo : takes a new photo\n"; welcome += "/flash : toggles flash LED \n"; bot.sendMessage(CHAT_ID, welcome, ""); } if (text == "/flash") { flashState = !flashState; digitalWrite(FLASH_LED_PIN, flashState); Serial.println("Change flash LED state"); } if (text == "/photo") { sendPhoto = true; Serial.println("New photo request"); } } } String sendPhotoTelegram() { const char* myDomain = "api.telegram.org"; String getAll = ""; String getBody = ""; camera_fb_t * fb = NULL; fb = esp_camera_fb_get(); if(!fb) { Serial.println("Camera capture failed"); delay(1000); ESP.restart(); return "Camera capture failed"; } Serial.println("Connect to " + String(myDomain)); if (clientTCP.connect(myDomain, 443)) { Serial.println("Connection successful"); String head = "--electroniclinic\r\nContent-Disposition: form-data; name=\"chat_id\"; \r\n\r\n" + CHAT_ID + "\r\n--electroniclinic\r\nContent-Disposition: form-data; name=\"photo\"; filename=\"esp32-cam.jpg\"\r\nContent-Type: image/jpeg\r\n\r\n"; String tail = "\r\n--electroniclinic--\r\n"; uint16_t imageLen = fb->len; uint16_t extraLen = head.length() + tail.length(); uint16_t totalLen = imageLen + extraLen; clientTCP.println("POST /bot"+BOTtoken+"/sendPhoto HTTP/1.1"); clientTCP.println("Host: " + String(myDomain)); clientTCP.println("Content-Length: " + String(totalLen)); clientTCP.println("Content-Type: multipart/form-data; boundary=electroniclinic"); clientTCP.println(); clientTCP.print(head); uint8_t *fbBuf = fb->buf; size_t fbLen = fb->len; for (size_t n=0;n<fbLen;n=n+1024) { if (n+1024<fbLen) { clientTCP.write(fbBuf, 1024); fbBuf += 1024; } else if (fbLen%1024>0) { size_t remainder = fbLen%1024; clientTCP.write(fbBuf, remainder); } } clientTCP.print(tail); esp_camera_fb_return(fb); int waitTime = 10000; // timeout 10 seconds long startTimer = millis(); boolean state = false; while ((startTimer + waitTime) > millis()){ Serial.print("."); delay(100); while (clientTCP.available()) { char c = clientTCP.read(); if (state==true) getBody += String(c); if (c == '\n') { if (getAll.length()==0) state=true; getAll = ""; } else if (c != '\r') getAll += String(c); startTimer = millis(); } if (getBody.length()>0) break; } clientTCP.stop(); Serial.println(getBody); } else { getBody="Connected to api.telegram.org failed."; Serial.println("Connected to api.telegram.org failed."); } return getBody; } void setup(){ WRITE_PERI_REG(RTC_CNTL_BROWN_OUT_REG, 0); // Init Serial Monitor Serial.begin(115200); // Set LED Flash as output pinMode(FLASH_LED_PIN, OUTPUT); digitalWrite(FLASH_LED_PIN, flashState); // Config and init the camera configInitCamera(); // Connect to Wi-Fi WiFi.mode(WIFI_STA); Serial.println(); Serial.print("Connecting to "); Serial.println(ssid); WiFi.begin(ssid, password); clientTCP.setCACert(TELEGRAM_CERTIFICATE_ROOT); // Add root certificate for api.telegram.org while (WiFi.status() != WL_CONNECTED) { Serial.print("."); delay(500); } Serial.println(); Serial.print("ESP32-CAM IP Address: "); Serial.println(WiFi.localIP()); } void loop() { if (sendPhoto) { Serial.println("Preparing photo"); sendPhotoTelegram(); sendPhoto = false; } if (millis() > lastTimeBotRan + botRequestDelay) { int numNewMessages = bot.getUpdates(bot.last_message_received + 1); while (numNewMessages) { Serial.println("got response"); handleNewMessages(numNewMessages); numNewMessages = bot.getUpdates(bot.last_message_received + 1); } lastTimeBotRan = millis(); } } |
Make sure you change the SSID and Password.
You will also need to change the BOTtoken and CHAT_ID. You will get it from the Telegram App which I will explain in a minute. So, when your code is ready then all you need is to connect your ESP32 Camera module to your Laptop or PC.

Select the ESP32 Wrover Module.
Upload speed: 921600
Flash frequency: 80Mhz
Flash Mode: “QIO”
Partition Scheme: Huge APP (3MB No OTA) and
Finally, select the port and upload the program.
I have already uploaded this program. Now, let’s setup the Telegram Application.
Telegram App Setup:
Open the Telegram application on your cell phone, click the search button, and then click on the BotFather.

Click on the Restart.

Click on the /newbot to create a new bot.

First choose a name for your bot and then press enter and then choose a username for your bot. it must end in ‘bot’. if incase you have any confusion, you can watch the video tutorial given at the end of this article.

When you press enter, you will get the congratulation message along with the BOTtoken.

6869476801:AAEOcKK7JYWUEkJkW4P5qomsQLbziHUKX4s this is the BOTtoken, simply copy it and paste in the programming next to the BOTtoken.

Click the back button. This time search for the idbot.

Click the IDBot and then press the /start.
Next, write the /getid

You will get the Chat ID, simply copy it and paste it next to the CHAT_ID in the programming and that’s it.

Click the back button, then click on the BotFather, and finally, click on your bot link and start controlling and monitoring your ESP32 Camera module.
Let me remind you one more time, for any confusion, you can watch the video tutorial given below. If you liked the video; don’t forget to subscribe my YouTube channel.
Watch Video Tutorial:
Troubleshooting — When the ESP32-CAM and Telegram Are Not Playing Nice
Problem 1: The code compiles and uploads fine but Telegram bot never responds to any command
You send /photo or /flash from Telegram and absolutely nothing happens. The ESP32-CAM is powered on, the Serial Monitor shows it connected to WiFi, but the bot just sits there silently. This is one of the most common issues with this project.
The first thing to check is your BOT token. Open the Arduino code and look at the BOTtoken variable. This token is generated by BotFather in Telegram and it looks something like 123456789:ABCDefGhIJklmNoPQRstuvWXyz. One wrong character anywhere in that string and the bot will never respond. Go back to Telegram, open BotFather, type /mybots, select your bot, and click API Token to copy it fresh. Paste it again carefully into your code and re-upload.
The second thing to check is the CHAT_ID. This is your personal Telegram user ID which tells the bot who is allowed to send it commands. If this is wrong, the bot receives your message but ignores it because you are not on its authorized list. To get your correct chat ID, open Telegram and search for a bot called IDBot or userinfobot, start it, and it will immediately reply with your numeric chat ID. Copy that exact number into your code.
Problem 2: Telegram bot responds but the /photo command returns an error instead of an image
The bot is responding which means the connection is working, but when you send /photo the bot replies with an error message or sends nothing at all. This is almost always a camera initialization problem.
The ESP32-CAM requires the correct camera model to be selected in the code. The most common model used in this project is the AI-Thinker ESP32-CAM, which needs CAMERA_MODEL_AI_THINKER defined in the code. If you have a different ESP32-CAM board such as the M5Camera or TTGO T-Camera, different pin definitions are needed and the wrong selection causes the camera to fail silently.
Power supply is the second most common cause. The ESP32-CAM draws significant current when taking a photo and connecting to WiFi at the same time — sometimes over 500mA in a brief burst. If you are powering it from a weak USB port or sharing power with other modules on a breadboard, the voltage can dip during this burst and the camera initialization fails. Use a dedicated 5V supply rated for at least 2A. This single change fixes the problem in the majority of cases.
Problem 3: /photo command works once but stops working after that — have to restart the ESP32-CAM to get another photo
This is a memory issue specific to the ESP32-CAM. When a photo is taken, the camera allocates a frame buffer in PSRAM to hold the image data. If that buffer is not properly released after the image is sent to Telegram, the next photo request finds no free memory and fails. Over time, repeated captures without proper cleanup exhaust all available memory.
The fix is to make sure fb_return() is called in the code immediately after the image has been sent. This function releases the frame buffer back to the camera driver. If you copied code from an old tutorial that is missing this line, add it right after the Telegram sendPhoto call. Also look for camera_fb_t *fb = NULL at the start of the capture function — the buffer should be initialized to NULL before each capture.
Problem 4: Images arrive in Telegram but they are completely black or very dark
Black images almost always mean the camera lens cap is still on — yes, it happens more than you would think — or the camera module is not getting enough initialization time before the first capture.
If there is no lens cap issue, add a short delay after camera initialization before allowing any photo commands. Something like a 2 second delay after the camera init line gives the OV2640 sensor time to adjust its exposure settings. Without this warm-up time, the first one or two photos come out very dark.
Also check if the /flash command works in your project. This command is supposed to turn on the built-in LED flash on GPIO4. If the LED turns on correctly when you send /flash but images are still dark, the issue is camera exposure settings. In the code, try changing the camera settings for brightness and automatic exposure control — set s->set_brightness(s, 1) and s->set_ae_level(s, 2) in the camera configuration section to boost exposure slightly.
Problem 5: The ESP32-CAM keeps disconnecting from WiFi and the bot stops responding after a few hours
For a security camera that you want running 24 hours a day, losing WiFi connection every few hours is a serious problem. The ESP32-CAM’s WiFi stack occasionally gets into a state where it stops receiving packets but does not know it has lost connection.
Add a watchdog mechanism to your code. In the main loop, check how long it has been since the last successful Telegram poll. If more than 60 seconds pass with no successful response from the Telegram server, trigger a WiFi reconnection by calling WiFi.disconnect() followed by WiFi.begin(). If the reconnection fails three times in a row, use ESP.restart() to do a clean full restart. This keeps the system running unattended for days or weeks without manual intervention.
Also make sure your router is not set to disconnect idle clients. Some home routers have an “idle timeout” feature for WiFi clients. Log into your router settings and either disable this feature or set the timeout to never for the ESP32-CAM’s MAC address.
Problem 6: I created the bot with BotFather but cannot find it to start a conversation
After creating the bot with BotFather, you need to find your bot by its username and send it the /start command before it will accept any messages from you. BotFather tells you the bot’s username when it is created — it ends with the word bot, for example MySecurityCameraBot.
In Telegram, tap the search icon at the top, type your bot’s exact username including the @ symbol, and select it from the results. Then tap Start at the bottom of the screen. This sends the /start command which activates the bot and adds your chat to its list. From that point the bot will respond to all your commands. If you skip the /start step the bot receives your messages but cannot reply to you.
Frequently Asked Questions
Is it safe to share the Telegram bot token in the code if I upload it to GitHub?
Never make your bot token or chat ID public. If someone else gets your bot token they can control your ESP32-CAM — requesting photos from it, turning the flash on and off, and potentially triggering any other commands you have programmed. Before pushing any ESP32-CAM Telegram project to GitHub, move the sensitive credentials to a separate header file called secrets.h and add that file to your .gitignore list. This way your code is shared publicly but your personal credentials stay private on your own computer.
Can I add multiple Telegram users to control the same ESP32-CAM?
Yes. In the code where the CHAT_ID is checked before processing a command, you can create a list of authorized chat IDs and check if the incoming message’s chat ID matches any of them. Something like defining an array of authorized IDs and using a loop to check membership. This lets your family members or trusted people all control the same camera from their own Telegram accounts without sharing credentials.
Can I make the camera send images automatically when motion is detected instead of waiting for a /photo command?
Absolutely and this is how a real security camera should work. Connect a PIR sensor or a microwave motion sensor to one of the available GPIO pins on the ESP32-CAM. In your code, check the sensor pin state in the main loop. When motion is detected, automatically trigger a photo capture and send it to Telegram using bot.sendPhoto() without waiting for any user command. You can combine both modes — automatic motion-triggered photos and manual /photo command — in the same project.
What is the maximum image size that Telegram accepts from a bot?
Telegram bots can send photos up to 10MB in size. The ESP32-CAM with OV2640 at UXGA resolution produces JPEG images of typically 50KB to 200KB depending on scene complexity, which is well within Telegram’s limit. If you set the camera to very high resolution and low JPEG compression, image sizes can reach 500KB to 1MB but will still send fine. For faster transmission especially over a slow WiFi connection, use a medium resolution like SVGA 800×600 and a JPEG quality setting of around 10 to 12 in the camera config. This produces clear images that send quickly.
Can this project work if my ESP32-CAM is behind a firewall or on a mobile data hotspot?
Yes — this is one of the biggest advantages of using Telegram over other approaches. The ESP32-CAM connects outward to Telegram’s servers over HTTPS port 443. This port is almost never blocked by firewalls or mobile data providers because it is the standard HTTPS port used by all websites. You do not need to set up port forwarding on your router, you do not need a static IP address, and you do not need any VPN. As long as the ESP32-CAM has any internet connection — home WiFi, office network, or a mobile hotspot — it will reach Telegram’s servers and the bot will work.
Is there a limit to how many photos I can request through the Telegram bot?
Telegram has rate limits on bot API calls — bots can send a maximum of 30 messages per second globally and 20 messages per minute to any individual chat. For a security camera sending photos on motion detection or on request, these limits are practically never reached. Even if someone manually spams the /photo command, each photo takes a second or two to capture and send, so the natural speed of the system keeps you well within Telegram’s limits. The only scenario where you might hit limits is if you automate photo sending faster than one every 3 seconds continuously.
If your Telegram bot is still not working after going through all these steps, leave a comment below with your exact error message from the Serial Monitor and I will help you track down the problem.
Discover more from Electronic Clinic
Subscribe to get the latest posts sent to your email.