ESP8266 Car Control using Android App and WiFi
Table of Contents
ESP8266 Car, Overview:
ESP8266 Car Control using Android App and WiFi- Hi Readers this is a very interesting project, in which we will see how to make a robot car controlled by a Smartphone, Yes! You heard that right. This Robot car can pair up with any smartphone that will be used as a transmitter or few call it remote.
So you might think, why can’t I simply buy instead of making this project made through complexities? The answer is very simple these homebuilt robot cars are customizable to the core, which means you can add extra features to the car which is not possible if you are buying ready-made cars.
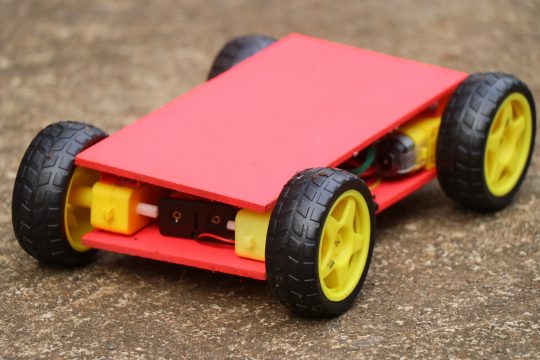
Now let us have a quick discussion of the features that our ESP8266 car possess, I have provided an image of the actual car that we will be building in this project.
This looks like a mini powerful car! Yes, it performs like its name. This Car is equipped with 4 gear motors that provide this mini beast the required torque.
There is a factor that everyone will consider while building off-road/semi off-road vehicles, as this falls under the category of semi off-road we are not much bothered about covering the entire car up so that no wet particles enter during its working.
Well, there is an option to make this off-road but that requires its entire body to be sealed, well in our case if we do the same we are blocking the communication signals that will be sent by the Nodemcu board to the smartphone, Hence this is the best configuration.
So we will look at the highlighting features of this car
- This is Controlled by Wi-Fi hence this device is functional with any smartphone or computer with Wi-Fi capability
- As this uses lithium-ion battery it has the capacity of 4000mah which is sufficient for long time working
- Speed of Motors can be changed as per the requirements
- Can be used for low-level surveillance applications
- The robotic arm, Camera, or other accessories can be coupled with this Robot
Components to make Wi-Fi car
The components necessary to build this robot is available in local electronics or you can buy from the links below
- NodeMcu /ESP8266
- Lithium-ion batteries
- Battery case
- L298N Motor driver
- 150RPM BO motors(4 pieces)
- Rubber wheels(4 pieces)
- Jumper wires
- Mini breadboard
- Small wooden pieces for building frame (10x20cm)
Gel-type super glue or as alternative metal clamps and screws can be used.
Amazon Links:
Rubber wheels
Other Tools and Components:
Super Starter kit for Beginners
PCB small portable drill machines
*Please Note: These are affiliate links. I may make a commission if you buy the components through these links. I would appreciate your support in this way!
Some Interesting things about ESP8266
ESP8266 also known by other names Nodemcu is one of the inexpensive microcontroller board that you can own and make wonderful projects.
ESP8266 and Nodemcu are 2 separate things, Nodemcu becomes capable to connect with Wifi using the small hardware called as ESP8266.
This board is well known for IoT projects, This Robot car doesn’t fall under the IoT category as we are not using internet to run our car, But that too can be done, more on that later. Now we will go through building phases to make this Robot
Building phase 1
Place BO motors on the corners of wooden board and couple them with gel type super glue, I would recommend using this as it does not leave any sticky mess between the surfaces.
I do not recommend using hot glue as it weakens the plastic body and the adhesive strength is not too high.
Once we have the motor ready we can start to make connections.
The logic here is very simple 2 motors run on same connections as we are making an 4WD car.
If you are not sure of exact terminals as in most of the cases motors + and – are not given because they matter only in the direction of rotation you can change them accordingly.
You can attach a wheel and connect battery so that you can mark the directions before soldering the wires.
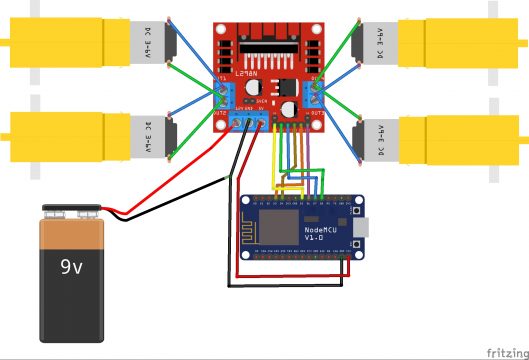
Once the circuit is complete we can add wheels to the motor shaft, If you are still not sure, refer this circuit diagram.
Circuit Diagram of WIFI car
This simple circuit diagram will help to build the circuit connections, as said earlier connecting terminals of motors in proper way is necessary as will be later connected to motor driver.
Building Phase 2
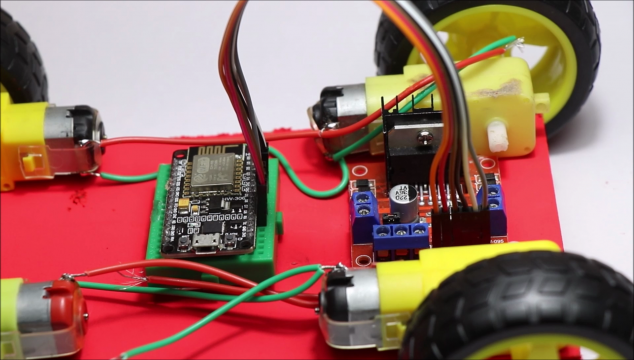
This step is all about gluing and connecting! We will add breadboard to the frame using double side adhesive that comes behind the board.
Why Motor Driver?
L298N motor driver is necessary to drive any motors via external power supply.
This is because power from the Microcontroller board is not sufficient enough to driver 4 motors while with the drivers you can easily connect such motors.
What we are using is a DUAL H bridge driver, it requires 12v dc supply and provides 5v supply that runs control board and motors.
It has 4 pins for signal input from board that gives directions for motor.
Take care of the placing as we are fitting all the parts in a limited space so to make this Robot compact.
Add jumper wires between Motor driver and breadboard, Just follow this Circuit connection.
D3 ->Input 4
D4 ->Input 3
D5 -> Enable A
D6 ->Enable A
D7->Input 2
D8 ->Input 1
This completes circuit, Don’t power this until you add some codes.
I recommend to add a switch between battery supply + and input pin.
cover that covers this entire wire connection, but before we will add codes to this project.
Codes for WIFI car
|
1 2 3 4 5 6 7 8 9 10 11 12 13 14 15 16 17 18 19 20 21 22 23 24 25 26 27 28 29 30 31 32 33 34 35 36 37 38 39 40 41 42 43 44 45 46 47 48 49 50 51 52 53 54 55 56 57 58 59 60 61 62 63 64 65 66 67 68 69 70 71 72 73 74 75 76 77 78 79 80 81 82 83 84 85 86 87 88 89 90 91 92 93 94 95 96 97 98 99 100 101 102 103 104 105 106 107 108 109 110 111 112 113 114 115 116 117 118 119 120 121 122 123 124 125 126 127 128 129 130 131 132 133 134 135 136 137 138 139 140 141 142 143 144 145 146 147 148 149 150 151 152 153 154 155 156 157 158 159 160 161 162 163 164 165 166 167 168 169 170 171 172 173 174 175 176 |
#define ENA 14 // Enable/speed motors Right GPIO14(D5) #define ENB 12 // Enable/speed motors Left GPIO12(D6) #define IN_1 15 // L298N in1 motors Rightx GPIO15(D8) #define IN_2 13 // L298N in2 motors Right GPIO13(D7) #define IN_3 2 // L298N in3 motors Left GPIO2(D4) #define IN_4 0 // L298N in4 motors Left GPIO0(D3) #include <ESP8266WiFi.h> #include <WiFiClient.h> #include <ESP8266WebServer.h> String command; //String to store app command state. int speedCar = 800; // 400 - 1023. int speed_Coeff = 3; const char* ssid = "Electroniclinic"; ESP8266WebServer server(80); void setup() { pinMode(ENA, OUTPUT); pinMode(ENB, OUTPUT); pinMode(IN_1, OUTPUT); pinMode(IN_2, OUTPUT); pinMode(IN_3, OUTPUT); pinMode(IN_4, OUTPUT); Serial.begin(115200); // Connecting WiFi WiFi.mode(WIFI_AP); WiFi.softAP(ssid); IPAddress myIP = WiFi.softAPIP(); Serial.print("AP IP address: "); Serial.println(myIP); // Starting WEB-server server.on ( "/", HTTP_handleRoot ); server.onNotFound ( HTTP_handleRoot ); server.begin(); } void goAhead(){ digitalWrite(IN_1, LOW); digitalWrite(IN_2, HIGH); analogWrite(ENA, speedCar); digitalWrite(IN_3, LOW); digitalWrite(IN_4, HIGH); analogWrite(ENB, speedCar); } void goBack(){ digitalWrite(IN_1, HIGH); digitalWrite(IN_2, LOW); analogWrite(ENA, speedCar); digitalWrite(IN_3, HIGH); digitalWrite(IN_4, LOW); analogWrite(ENB, speedCar); } void goRight(){ digitalWrite(IN_1, HIGH); digitalWrite(IN_2, LOW); analogWrite(ENA, speedCar); digitalWrite(IN_3, LOW); digitalWrite(IN_4, HIGH); analogWrite(ENB, speedCar); } void goLeft(){ digitalWrite(IN_1, LOW); digitalWrite(IN_2, HIGH); analogWrite(ENA, speedCar); digitalWrite(IN_3, HIGH); digitalWrite(IN_4, LOW); analogWrite(ENB, speedCar); } void goAheadRight(){ digitalWrite(IN_1, LOW); digitalWrite(IN_2, HIGH); analogWrite(ENA, speedCar/speed_Coeff); digitalWrite(IN_3, LOW); digitalWrite(IN_4, HIGH); analogWrite(ENB, speedCar); } void goAheadLeft(){ digitalWrite(IN_1, LOW); digitalWrite(IN_2, HIGH); analogWrite(ENA, speedCar); digitalWrite(IN_3, LOW); digitalWrite(IN_4, HIGH); analogWrite(ENB, speedCar/speed_Coeff); } void goBackRight(){ digitalWrite(IN_1, HIGH); digitalWrite(IN_2, LOW); analogWrite(ENA, speedCar/speed_Coeff); digitalWrite(IN_3, HIGH); digitalWrite(IN_4, LOW); analogWrite(ENB, speedCar); } void goBackLeft(){ digitalWrite(IN_1, HIGH); digitalWrite(IN_2, LOW); analogWrite(ENA, speedCar); digitalWrite(IN_3, HIGH); digitalWrite(IN_4, LOW); analogWrite(ENB, speedCar/speed_Coeff); } void stopRobot(){ digitalWrite(IN_1, LOW); digitalWrite(IN_2, LOW); analogWrite(ENA, speedCar); digitalWrite(IN_3, LOW); digitalWrite(IN_4, LOW); analogWrite(ENB, speedCar); } void loop() { server.handleClient(); command = server.arg("State"); if (command == "F") goAhead(); else if (command == "B") goBack(); else if (command == "L") goLeft(); else if (command == "R") goRight(); else if (command == "I") goAheadRight(); else if (command == "G") goAheadLeft(); else if (command == "J") goBackRight(); else if (command == "H") goBackLeft(); else if (command == "0") speedCar = 400; else if (command == "1") speedCar = 470; else if (command == "2") speedCar = 540; else if (command == "3") speedCar = 610; else if (command == "4") speedCar = 680; else if (command == "5") speedCar = 750; else if (command == "6") speedCar = 820; else if (command == "7") speedCar = 890; else if (command == "8") speedCar = 960; else if (command == "9") speedCar = 1023; else if (command == "S") stopRobot(); } void HTTP_handleRoot(void) { if( server.hasArg("State") ){ Serial.println(server.arg("State")); } server.send ( 200, "text/html", "" ); delay(1); } |
You can copy and paste this code on your Arduino IDE
Just follow the steps below
Please make sure you are not connecting battery supply to the board, it needs to be removed during the upload process
- Connect usb cable between Nodemcu and computer
- Open Arduino IDE
- Paste the above code
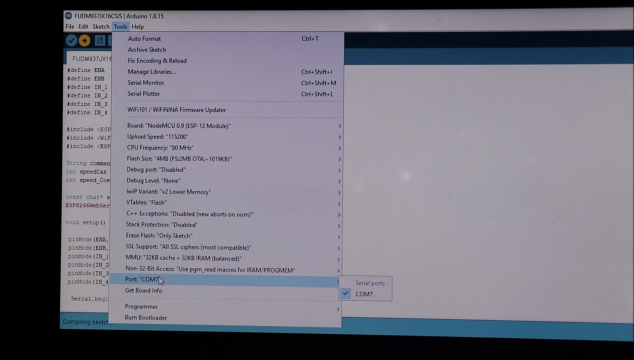
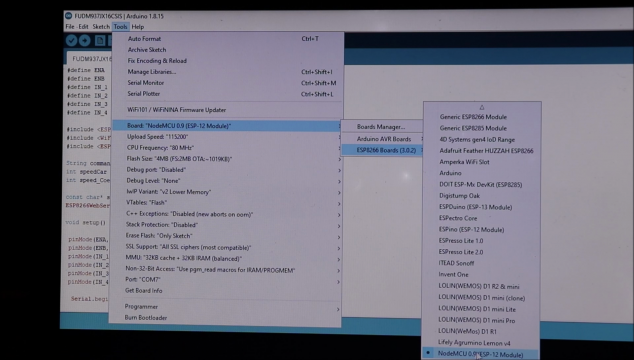
Check for port number as this may change from every computer.
Just check this by clicking on tools and port, in my case its COM7.
Now we need to select proper board type to do this select Tools->board and ESP8266 Boards(3.0.2) followed by selecting NodeMCU.
We have one small additional change that you should make before uploading, That is adding the drivers for ESP8266 wifi, You can do this by simply Clicking on tools->Board and then Boards manager, In the search column search for ESP8266 and install the driver that appears on the first List.
How to change Network Name
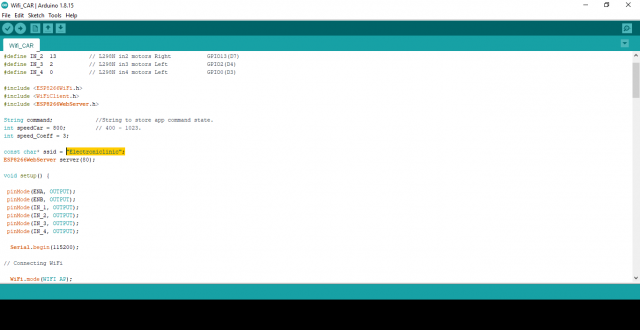
You can add your own network name by making changes in the highlighted line of the code.
Note: Make sure to remember this later as you will be connecting this network with smartphone.
Now you can click on upload button, after the code is uploading you can disconnect the cable.
Now connect power supply from the battery to the board and switch on the switch.
You can see lights glowing on both Nodemcu and motor driver.
Now to make the car work you need an application that runs on smartphone.
Download and install the application from below link.
Download the App: NodeMCU Car Make DIY
Once you have the application in your smartphone follow this steps for connection.
- Open Wi-Fi and search for available connections
- Click on the Nodemcu network
- Open the application
- Control the car using arrows
- Make runs on offroad mode too!
That was all about this Wi-Fi ESP8266 car, We hope you liked this idea. Check our previous interesting projects.
Watch Video Tutorial:




hello my wifi car is not work
Hello. I live in Brazil and successfully set up your project. Thanks for sharing. I would just like to modify the app a little bit. It’s possible? How can I create one? Abs.