Firebase Android Application Designing using Android Studio, ESP32 DHT11
Last Updated on August 24, 2024 by Engr. Shahzada Fahad
Firebase Android Application Project Description:
Firebase Android Application Designing using Android Studio, ESP32 DHT11- This is part 2 of my previous tutorial based on the ESP32 and Firebase. In which I explained how to set up your firebase database account for the ESP32 Wifi + Bluetooth module so that the Sensor data can be monitored in real-time from anywhere around the world. I highly recommend first watch this tutorial and then you can resume from here. Because, in this tutorial, I will be using the same Firebase Database account.
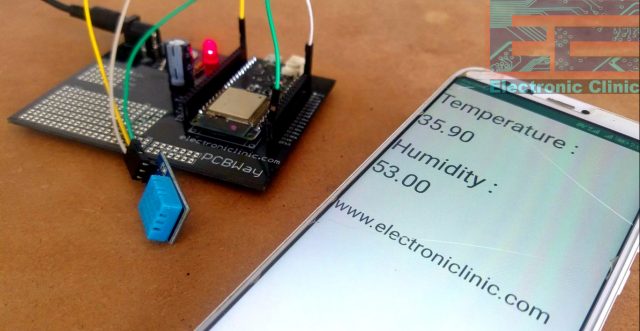
In this tutorial, which is version 2, you will learn how to design your own Firebase Android application using Android Studio. For the demonstration purposes, I have connected the DHT11 Temperature and Humidity Module with the ESP32 WiFi + Bluetooth Module. The Temperature and Humidity values from the ESP32 are sent to the Firebase Android application.
About the Sponsor “PCBWay”:

High quality & Only 24 Hours Build time
This ESP32 Power Supply PCB board is sponsored and manufactured by the PCBway Company, which is one of the most experienced PCB and PCB assembly manufacturer. They create high-quality PCBs at reasonable prices, Only 5 dollars for 10 PCBs and 30 dollars in total for 20 PCBs assembly; besides this the new members also get a 5 Dollars bonus. As you can see the quality is really great, the silkscreen is quite clear and the black solder mask looks amazing. I am 100% satisfied with their work.
The temperature and Humidity values which are sent using the ESP32 module can be monitored on the computer screen by opening your Google Firebase Database Account and can also be monitored on the Android cell phone using a specially designed Firebase application. This is an IoT Firebase Android application as this cell phone application works only if the internet connection is available.
If you watch the video tutorial given below and also read this article, you will be able to design your own Advanced level Firebase Android applications. The programming is very simple and can be easily modified by anyone.
Without any further delay let’s get started!!!
Amazon links:
ESP32 WiFi + Bluetooth Module(Recommended)
DHT11 Temperature and Humidity Module:
*Disclosure: These are affiliate links. As an Amazon Associate I earn from qualifying purchases.
Firebase Android Application, ESP32 and DHT11 Circuit Diagram:

Let’s first start with the 5v regulated power supply based on the LM7805 voltage regulator. This is the same 5v regulated power supply I have been using for the Nodemcu ESP8266 Wifi module.
J1 is the female power jack and this is where we connect a 12v adaptor, battery or a solar panel. Two 470uf decoupling capacitors are connected at the input and output sides of the voltage regulator. A 330-ohm resistor is connected in series with a 2.5v led. This is a current limiting resistor. The output of the voltage regulator is connected with the 5v pin of the ESP32 module and the ground of the power supply is connected with the ground of ESP32 module.
The DHT11 Temperature and Humidity Module VDD pin is connected with the ESP32 module 3.3V pin. The DATA pin of the DHT11 sensor is connected with the GPIO15. Pin 3 of the DHT11 sensor is not connected, while the last pin of the DHT11 sensor is connected with the ground.
About the ESP32 Power Supply PCB Board:
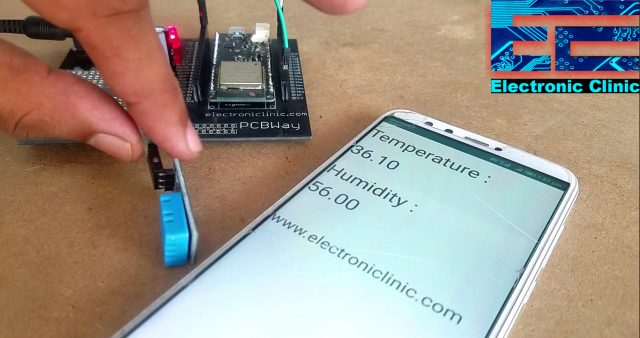
This is the ESP32 power supply board Manufactured by the PCBWay Company. I have already explained the designing and making of this board. Finally, I connected the DHT11 sensor with the ESP32 Wifi + Bluetooth Module as per the circuit diagram already explained.

The Yellow wire is the Data wire and is connected with the GPIO15. White wire is the ground wire and the Green wire is the 3.3V wire. Our hardware is ready.
Google Firebase Account Set Up:
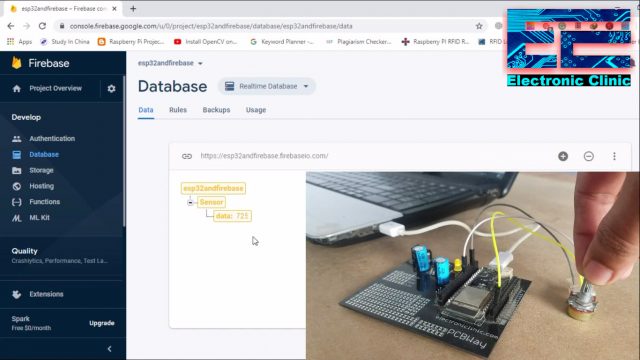
This is the Firebase account which I created in my previous tutorial; in this tutorial I used a variable resistor as the sensor. But, it really doesn’t matter which sensor you are using, the Firebase account set up will remain the same. So I will continue with the same Firebase account, so that you can easily follow all the steps. So after creating your firebase account, then the next step is to program the ESP32 module.
ESP32 and DT11 Firebase Programming:
Before, you start the programming, first of all, make sure you download all the necessary libraries from my website www.electroniclinic.com, you can find a link in the description. As you can see this is the same exact program which I used in my previous tutorial. This time I did a few changes that is added some code for the DHT11 Sensor. The purpose of this code is to read the Temperature and Humidity values and then send these values to the Google Firebase Database account, from where the values are then displayed on the android cell phone application.
|
1 2 3 4 5 6 7 8 9 10 11 12 13 14 15 16 17 18 19 20 21 22 23 24 25 26 27 28 29 30 31 32 33 34 35 36 37 38 39 40 41 42 43 44 45 46 47 48 49 50 51 52 53 54 55 56 57 58 59 60 61 62 63 64 65 66 67 68 69 70 71 72 73 74 75 76 77 78 79 80 81 82 83 84 85 86 87 |
/* * ESP32 and DHT11 Temperature and Humidity Sensor with the Firebase Android application * https://www.electroniclinic.com/ * Download Libraries * https://www.electroniclinic.com/arduino-libraries-download-and-projects-they-are-used-in-project-codes/ * This example is for FirebaseESP32 Arduino library v 3.7.3 and later * */ #include <WiFi.h> #include <FirebaseESP32.h> #include "DHTesp.h" #include<stdlib.h> #define DHTpin 15 DHTesp dht; char buff[10]; #define FIREBASE_HOST "https://esp32andfirebase.firebaseio.com/" #define FIREBASE_AUTH "gga1JXWY5rgyBHk56RSXLn3FPpajWfcq6itIM3nI" #define WIFI_SSID "fawadkhan" #define WIFI_PASSWORD "fawadkhan12" //Define FirebaseESP32 data object FirebaseData firebaseData; FirebaseJson json; String mytemp; String myhum; void setup() { Serial.begin(115200); dht.setup(DHTpin, DHTesp::DHT11); WiFi.begin(WIFI_SSID, WIFI_PASSWORD); Serial.print("Connecting to Wi-Fi"); while (WiFi.status() != WL_CONNECTED) { Serial.print("."); delay(300); } Serial.println(); Serial.print("Connected with IP: "); Serial.println(WiFi.localIP()); Serial.println(); Firebase.begin(FIREBASE_HOST, FIREBASE_AUTH); Firebase.reconnectWiFi(true); //Set database read timeout to 1 minute (max 15 minutes) Firebase.setReadTimeout(firebaseData, 1000 * 60); //tiny, small, medium, large and unlimited. //Size and its write timeout e.g. tiny (1s), small (10s), medium (30s) and large (60s). Firebase.setwriteSizeLimit(firebaseData, "tiny"); /* This option allows get and delete functions (PUT and DELETE HTTP requests) works for device connected behind the Firewall that allows only GET and POST requests. Firebase.enableClassicRequest(firebaseData, true); */ //String path = "/data"; Serial.println("------------------------------------"); Serial.println("Connected..."); } void loop() { delay(dht.getMinimumSamplingPeriod()); float humidity = dht.getHumidity(); float temperature = dht.getTemperature(); myhum = dtostrf(humidity,3,2,buff); mytemp = dtostrf(temperature,3,2,buff); Serial.println(myhum); Serial.println(mytemp); delay(100); json.set("/hum", myhum); json.set("/temp", mytemp); Firebase.updateNode(firebaseData,"/Sensor",json); } |
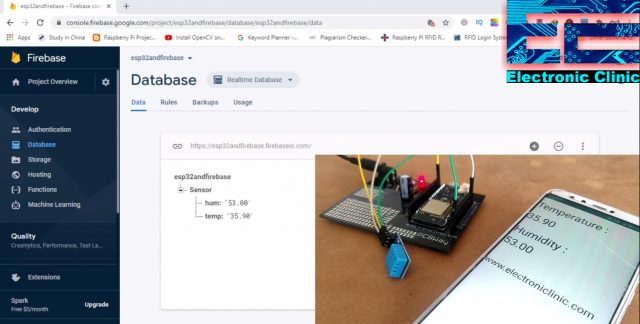
After uploading the above code, my next step was to confirm, if I can receive the Temperature and Humidity values in the Google Firebase Database. So, I opened my firebase account and turned ON my ESP32 Board. I successfully received the values.
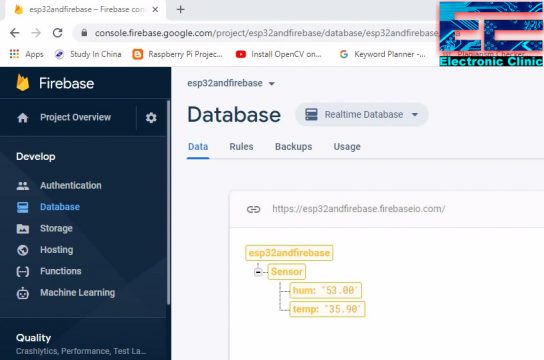
As you can see the code is working. Now, we can start working on the Firebase Android application designing using the Android Studio.
Firebase Android Application Designing in Android Studio:
Before you follow this tutorial, make sure you know the basics of how to work in Android Studio? If you don’t know then first read some articles or watch some videos and then you can resume from here. Because in this tutorial, I will not explain the most basics things like e.g, Android Studio installation etc.
Open your Android Student Software and Start a new Android Studio project.

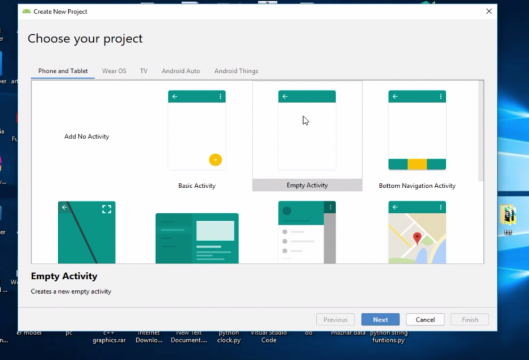
Create New Project window will open, while the Phone and Tablet Tab is selected, start by selecting the empty activity and click on the next button
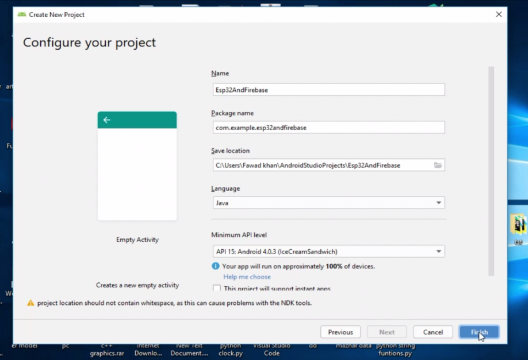
Fill up all the fields as per your project requirement. As you can see in the picture below, I entered my details as per my Firebase Account, your project name may be different, your Save location may be different. Select Java and select the same Minimum API Level. After filling all the fields you can go ahead and click on the Next button.
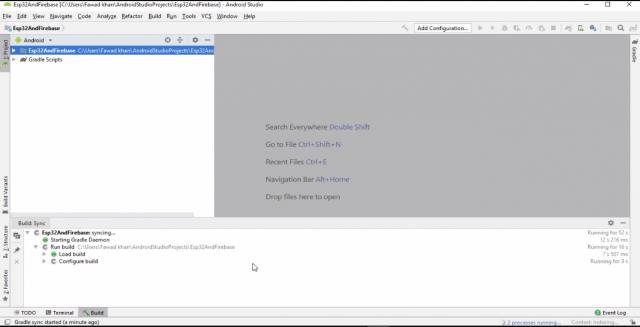
Wait for sync
Open the Google search engine and search for the Firebase console.

Go ahead click on the Firebase Console link. This will take you to the Google Firebase account.
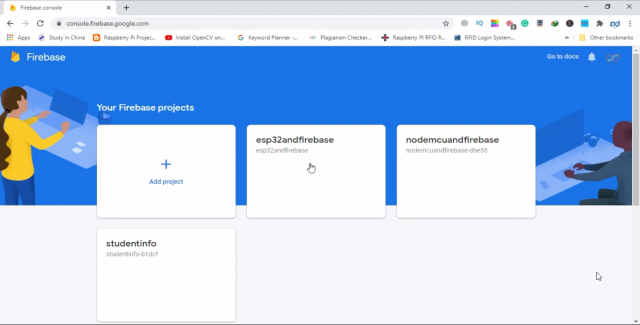
As you can see I already created the esp32andfirebase account in my previous tutorial, so I will click on this existing account. Click on project setting to add the app in the firebase app registration list.
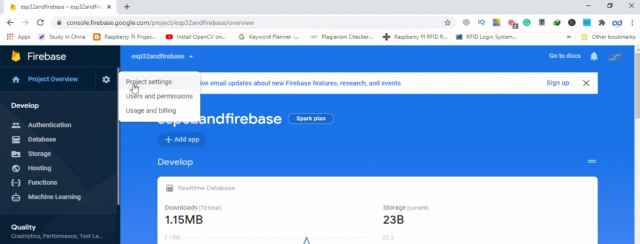
In project settings, select the general tab and in the bottom click on android icon.
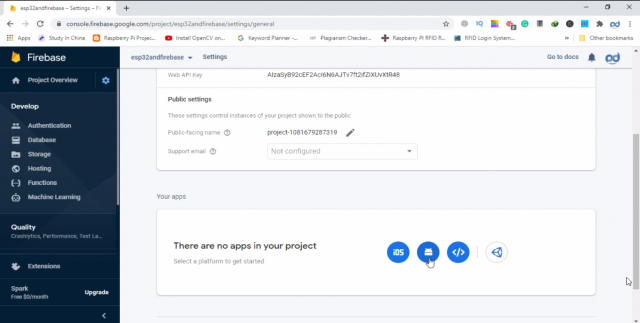
A new window will open add firebase to your android app

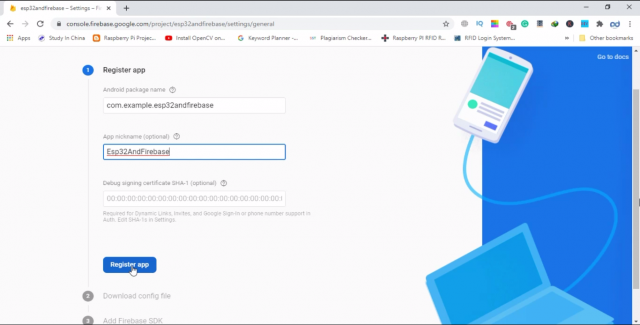
Copy the app package name and paste in firebase field and click on the register app

Download the google-services json file and click next


Congratulation message will displayed and then click on continue console.

Now copy the downloaded Google services json file to your android project.
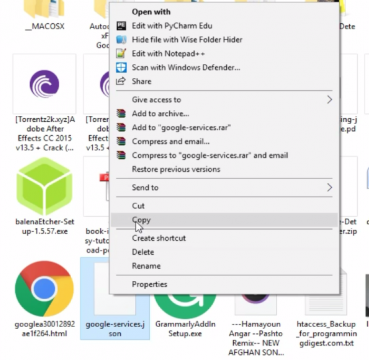
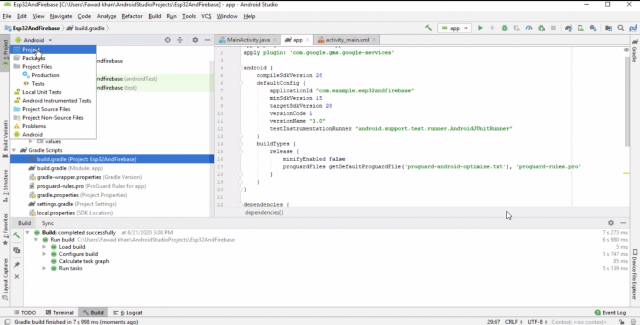
For copying the Google services json file first of all change from android to project
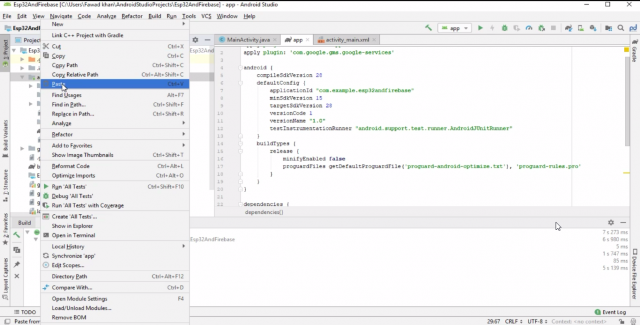
Then right click on app and paste the file
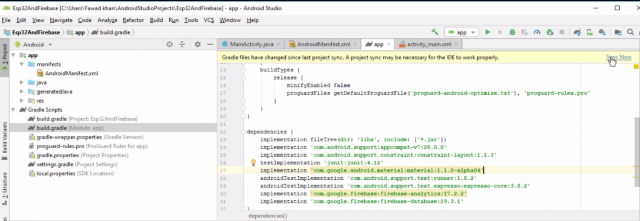
Now change from project to android again.

Now add the dependency and click on sync
|
1 2 3 4 5 6 7 8 9 10 11 12 13 14 |
dependencies { implementation fileTree(dir: 'libs', include: ['*.jar']) implementation 'com.android.support.constraint:constraint-layout:1.1.3' testImplementation 'junit:junit:4.12' implementation 'com.google.android.material:material:1.1.0-alpha04' androidTestImplementation 'com.android.support.test:runner:1.0.2' androidTestImplementation 'com.android.support.test.espresso:espresso-core:3.0.2' implementation 'com.google.firebase:firebase-analytics:17.4.3' implementation 'com.google.firebase:firebase-database:19.3.1' implementation 'com.google.firebase:firebase-auth:19.3.1' implementation 'com.google.firebase:firebase-core:17.4.2' } apply plugin: 'com.google.gms.google-services' |
Now we design the application open the activity_main.xml file and paste the below code
|
1 2 3 4 5 6 7 8 9 10 11 12 13 14 15 16 17 18 19 20 21 22 23 24 25 26 27 28 29 30 31 32 33 34 35 36 37 38 39 40 41 42 43 44 45 |
<?xml version="1.0" encoding="utf-8"?> <RelativeLayout xmlns:android="http://schemas.android.com/apk/res/android" xmlns:app="http://schemas.android.com/apk/res-auto" xmlns:tools="http://schemas.android.com/tools" android:layout_width="match_parent" android:layout_height="match_parent" tools:context=".MainActivity"> <TextView android:layout_width="match_parent" android:layout_height="wrap_content" android:text="Temperature : " android:textSize="40dp" android:layout_marginTop="20dp"/> <TextView android:id="@+id/temp" android:layout_width="match_parent" android:layout_height="wrap_content" android:text="0" android:textSize="40dp" android:layout_marginTop="90dp"/> <TextView android:layout_width="match_parent" android:layout_height="wrap_content" android:text="Humidity : " android:textSize="40dp" android:layout_marginTop="170dp"/> <TextView android:id="@+id/hum" android:layout_width="match_parent" android:layout_height="wrap_content" android:text="0" android:textSize="40dp" android:layout_marginTop="230dp"/> <TextView android:layout_width="match_parent" android:layout_height="wrap_content" android:text="www.electroniclinic.com" android:textSize="30dp" android:layout_marginTop="340dp"/> </RelativeLayout> |
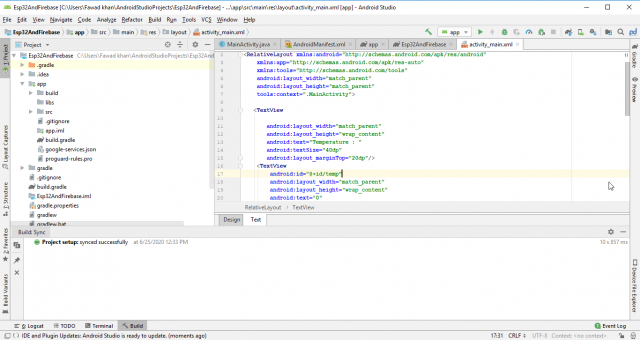
To check the design click on design

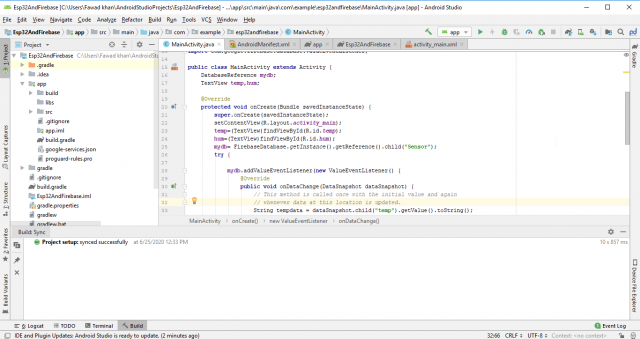
Now open the MainActivity.java file and paste the below code
|
1 2 3 4 5 6 7 8 9 10 11 12 13 14 15 16 17 18 19 20 21 22 23 24 25 26 27 28 29 30 31 32 33 34 35 36 37 38 39 40 41 42 43 44 45 46 47 48 49 50 51 52 53 54 |
package com.example.esp32andfirebase; import android.app.Activity; import android.os.Bundle; import android.util.Log; import android.widget.TextView; import com.google.firebase.database.DataSnapshot; import com.google.firebase.database.DatabaseError; import com.google.firebase.database.DatabaseReference; import com.google.firebase.database.FirebaseDatabase; import com.google.firebase.database.ValueEventListener; public class MainActivity extends Activity { DatabaseReference mydb; TextView temp,hum; @Override protected void onCreate(Bundle savedInstanceState) { super.onCreate(savedInstanceState); setContentView(R.layout.activity_main); temp=(TextView)findViewById(R.id.temp); hum=(TextView)findViewById(R.id.hum); mydb= FirebaseDatabase.getInstance().getReference().child("Sensor"); try { mydb.addValueEventListener(new ValueEventListener() { @Override public void onDataChange(DataSnapshot dataSnapshot) { // This method is called once with the initial value and again // whenever data at this location is updated. String tempdata = dataSnapshot.child("temp").getValue().toString(); String humdata = dataSnapshot.child("hum").getValue().toString(); temp.setText(tempdata); hum.setText(humdata); } @Override public void onCancelled(DatabaseError error) { // Failed to read value } }); } catch(Exception e) { } } } |
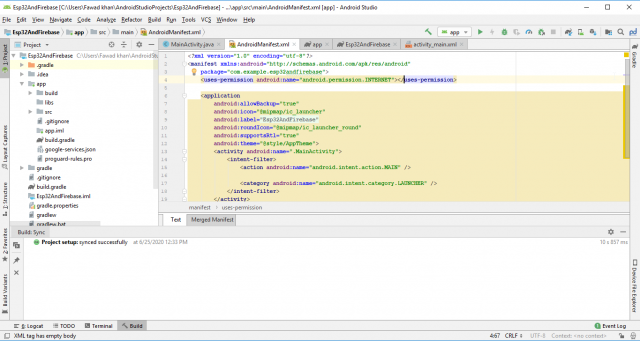
Open the manifest.xml file and past add user permission
|
1 2 3 4 5 6 7 8 9 10 11 12 13 14 15 16 17 18 19 20 21 22 |
<?xml version="1.0" encoding="utf-8"?> <manifest xmlns:android="http://schemas.android.com/apk/res/android" package="com.example.esp32andfirebase"> <uses-permission android:name="android.permission.INTERNET"></uses-permission> <application android:allowBackup="true" android:icon="@mipmap/ic_launcher" android:label="@string/app_name" android:roundIcon="@mipmap/ic_launcher_round" android:supportsRtl="true" android:theme="@style/AppTheme"> <activity android:name=".MainActivity"> <intent-filter> <action android:name="android.intent.action.MAIN" /> <category android:name="android.intent.category.LAUNCHER" /> </intent-filter> </activity> </application> </manifest> |
Now finally click on tools in tools click on firebase

A new panel will open, on right side in panel, click on realtime database. In realtime database click on save and retrieve data
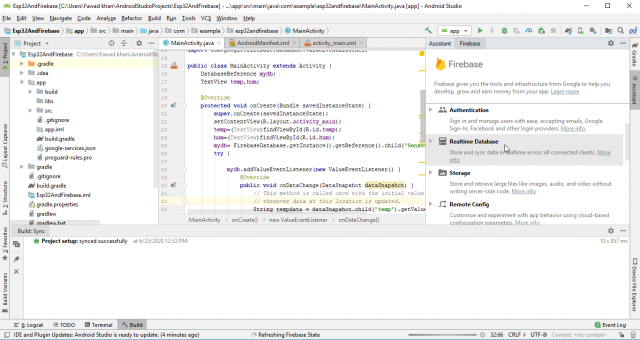
And then click on connect to firebase

And run your project I used my phone as an emulator you create your own emulator or use your phone as an emulator and click ok

The Firebase Android application is ready, now you can generate an APK file. So, after installing the APK file in my cell phone. Again I powered up my ESP32 board, and I was able to receive the Temperature and Humidity values on my cell phone application.
For the practical demonstration, watch video tutorial given below. If you have any questions regarding this project, let me know in a comment. Don’t forget to Subscribe to my website and YouTube Channel “Electronic Clinic”.
Watch Video Tutorial:

Other Firebase based Projects:
Arduino Firebase Database, Students Attendance system using RFID and GSM
Arduino Firebase project: send data to Firebase using Nodemcu esp8266, firebase library, auth, iot

Discover more from Electronic Clinic
Subscribe to get the latest posts sent to your email.


