TTP223 Touch sensor with Arduino, interfacing and Programming
Last Updated on August 17, 2024 by Engr. Shahzada Fahad
Table of Contents
TTP223 Touch sensor with Arduino:
The TTP223 is a touch pad detector IC that offers 1 touch key. The touching detection IC is
designed for replacing traditional direct button key with diverse pad size. Low power consumption and wide operating voltage are the contact key features for DC or AC applications. In this article, I will explain all the basic things like for example how to interface the TTP223 Touch sensor with the Arduino and then how to write a very basic Arduino program to control an LED using the TTP223 Touch sensor. We will also write a code for the TTP223 Touch sensor Debounce and in the end, we will control a relay using the TTP223 Touch sensor.
Without any further delay, let’s get started!!!
Amazon Links:
Arduino Nano USB-C Type (Recommended)
*Disclosure: These are affiliate links. As an Amazon Associate I earn from qualifying purchases.
TTP223 Touch sensor FEATURES
- Operating voltage 2.0V~5.5V
- Operating current @VDD=3V, no load, SLRFTB=1
- At low power mode typical 1.5uA, maximum 3.0uA
- At fast mode typical 3.5uA, maximum 7.0uA
- @VDD=3V, no load, SLRFTB=0
- At low power mode typical 2.0uA, maximum 4.0uA
- At fast mode typical 6.5uA, maximum 13.0uA
- The response time max about 60mS at fast mode, 220mS at low power mode @VDD=3V
- Sensitivity can adjust by the capacitance(0~50pF) outside
- Have two kinds of sampling length by pad option(SLRFTB pin)
- Stable touching detection of human body for replacing traditional direct switch key
- Provides Fast mode and Low Power mode selection by pad option (LPMB pin)
- Provides direct mode toggle mode by pad option(TOG pin)
- Open drain mode by bonding option, OPDO pin is open drain output, Q pin is CMOS output
- All output modes can be selected active high or active low by pad option(AHLB pin)
- Have the maximum on time 100sec by pad option(MOTB pin)
- Have external power on reset pin(RST pin)
- After power-on have about 0.5sec stable-time, during the time do not touch the key pad,
- And the function is disabled
- Auto calibration for life
- And the re-calibration period is about 4.0sec, when key has not be touched
APPLICATION
- Wide consumer products
- Waterproofed electric products
- Button key replacement
Interfacing TTP223 Touch sensor with Arduino:
Now we will interface the TTP223 touch sensor with the Arduino. We have to control the onboard LED with a touch sensor for this we will need an Arduino, the touch sensor, and three jumper wires male-to-female. If you don’t have these jumper wires you can also use a breadboard and three jumper wires male-to-male.
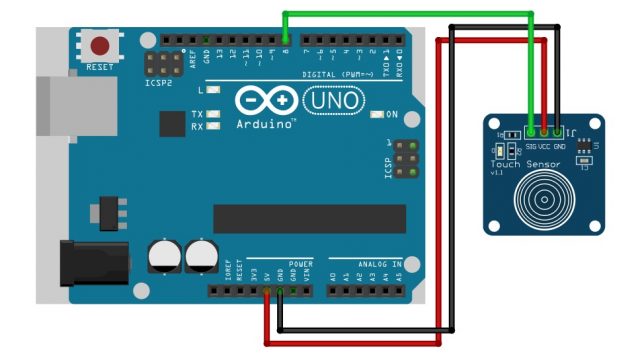
The first step is to connect your jumper wires to the TTP223 touch sensor PCB. The TTP223 touch sensor is actually a resistor when you touch the PCB the resistance will increase. Therefore the PCB can detect that you have touched the sensor and sends the signal HIGH to the Arduino. Now it is time to connect our TTP223 touch sensor to the Arduino. The red wire is connected to the 5V, the black wire is connected to the ground and the green wire is connected to digital pin 8. Our circuit is now complete.
TTP223 touch sensor Arduino Code:
|
1 2 3 4 5 6 7 8 9 10 11 12 13 14 15 16 17 18 19 20 |
void setup() { pinMode(8, INPUT); pinMode(LED_BUILTIN, OUTPUT); // Turn builtin LED off digitalWrite(LED_BUILTIN, LOW); } void loop() { if(digitalRead(8) == HIGH) { digitalWrite(LED_BUILTIN, HIGH); } else { digitalWrite(LED_BUILTIN, LOW); } delay(100); } |
Code Explanation:
Let’s have a look at the code the code is pretty straightforward. In which we have set pin number 8 as input which is connected with the TTP223 touch sensor. We use the LED_BUILTIN constant to define the built-in LED. We set it as an output the advantage of using LED_BUILTIN instead of pin 13 is that for the Arduino UNO. You have pin 13 for the built-in LED but for example, for the Arduino MEGA, it could be some different pin. So with this constant, you are absolutely sure that you have the correct pin for the built-in LED. Then we make sure that the LED is turned off by doing a digitalWrite to the LED_BUILTIN pin and set it to LOW. Then we continue to the very small loop() what we do is we read on pin number 8 to which our sensor is connected and check it if the value is HIGH if so, we turn the LED on and if not we turn it off then we wait for 100ms, and the loop continues. So basically it checks 10 times per second if the touch sensor has been touched and turns the LED on and off accordingly. Now I am going to upload this code to my Arduino. When I touch the sensor the LED on the Arduino board will be light up and when I remove the finger from the sensor it will be turned off.
Debounce to the TTP223 Touch Sensor:
We are now going to implement debounce on this circuit for this purpose we are going to add the so-called debounce to the TTP223 touch sensor. Debounce means that the touch is only triggered once in a defined period of time. To implement this we will make several changes to the code. First, we start with some new variables we have the “previousMillis” which is an “unsigned long”. Since we are going to store milliseconds in that and the same goes for the “elapsedMillis” then we have a “ledState” which is the state of the LED and that’s LOW because we want to turn it off. When we start here we have the debounce time in milliseconds and that’s the amount of time that has to be between two triggers of the touch sensor. So when I touch the touch sensor multiple times within these 1000ms the Arduino only sees it tapped once the setup() is basically the same we define pin 8 as an INPUT the LED_BUILTIN as an OUTPUT and we turn the built-in LED off so in the loop() something has changed we store first in “elapsedMillis” the number of milliseconds minus the previous milliseconds and these millis are the number of milliseconds. Since the Arduino was turned on then we have an if statement and instead of just checking whether pin number 8 is HIGH we also check if the elapsed time is larger than the debounce time if this is not the case we do not have to look any further because we only want our touch sensor to be triggered once every debounce time. So then we are going to check the “ledState” if it was HIGH we make it LOW or else we make it HIGH. So this toggles the LED and then we write this new “ledState” to the LED_BUILTIN pin so it goes ON or OFF depending on the “ledState” if so we store the “currentMillis” in the “previousMillis” and we do this so that this calculation here with the “elapsedMillis” here is the “previousMillis” is the same as this one, so we can see that there is enough time elapsed when we want to calculate this condition. I am now going to upload this code to the Arduino and show you what it looks like I have uploaded the debounce code to my Arduino and when the LED is off when I press gently on the touch sensor and wait for a second you see the LED goes on and off because of our “debounce” there is only one possibility to change every second. If I tap quickly you still see the LED is changing every second so the debounce prevents that we change the LED continuously and will blink if we increase the debounce time to for example 10 seconds you can only turn it on and off every 10 seconds.
TTP223 Touch Sensor Debounce Code:
|
1 2 3 4 5 6 7 8 9 10 11 12 13 14 15 16 17 18 19 20 21 22 23 24 25 26 27 28 29 30 31 32 33 34 35 36 37 38 39 |
unsigned long previousMillis = 0; // Previous millis unsigned long elapsedMillis = 0; // Elapesed millis since touch int ledState = LOW; // Current LED state int debounceTime = 1000; // Debounce time for the touch sensor void setup() { pinMode(8, INPUT); pinMode(LED_BUILTIN, OUTPUT); // Turn builtin LED off digitalWrite(LED_BUILTIN, LOW); } void loop() { // Calculate the elapsed seconds elapsedMillis = millis() - previousMillis; // If the sensor is touched AND // the elapsed time is larger than the given debounce time if(digitalRead(8) == HIGH && elapsedMillis > debounceTime) { // Set ledState to LOW if it was HIGH and vice versa if(ledState == HIGH) { ledState = LOW; } else { ledState = HIGH; } // send ledState to the builtin LED digitalWrite(LED_BUILTIN, ledState); // Store the current millis on the previous millis previousMillis = millis(); }; } |
TTP223 Touch sensor with Relay Module:
Now we will connect the touch sensor with the relay module. We will connect the signal pin of the relay module with pin number 9 of the Arduino. connect the VCC of the relay module with the 5V of the Arduino and the ground pin of the relay module with the ground of the Arduino. Now we will connect one pin of the switch with the common of relay and another pin with the light bulb. The second pin of the light bulb will be connected with the normally open of relay module.
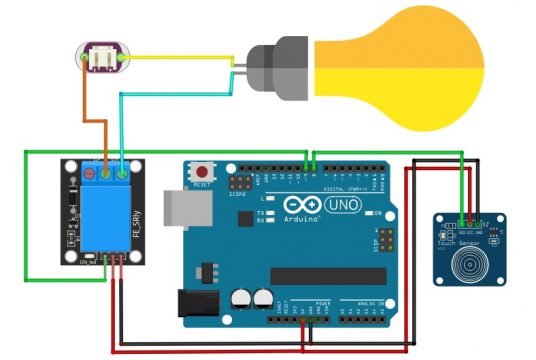
So when we will place a finger on the touch sensor it will activate the relay and the light bulb will be turned on and when we will remove the finger the light bulb will be turned off.
Control Relay using TTP223 Touch Sensor, Arduino Code:
|
1 2 3 4 5 6 7 8 9 10 11 12 13 14 15 16 |
int relay=9; void setup() { pinMode(8, INPUT); pinMode(relay, OUTPUT); } void loop() { if(digitalRead(8) == HIGH) { digitalWrite(relay, HIGH); } else { digitalWrite(relay, LOW); } delay(100); } |
Discover more from Electronic Clinic
Subscribe to get the latest posts sent to your email.


