Vibration sensor, Vibration measurement, vibration detector “SW 420”
Last Updated on August 18, 2024 by Engr. Shahzada Fahad
Table of Contents
Vibration Sensor Arduino Project Description:
This Tutorial is about the SW-420 vibration sensor Interfacing and Programming using Arduino Uno. In this tutorial, you will learn how to use a vibration sensor with Arduino and control an led when a certain pre-defined value is exceeded. This is an introductory tutorial and covers only the basics, covering the sensor pinouts, it’s interfacing with the Arduino and basic programming.
This SW-420 Sensor is quite famous and is used in different types of electronics projects, where the vibration is monitored. This sensor can be used in industries in different ways.
In this tutorial, we will cover,
- About the Sensor Interfacing.
- Sensor Arduino Programming and
- Testing
I have also used the same vibration sensor in the earthquake notification system using the Nodemcu ESP8266 WiFi module.
For the detailed discussion watch video tutorial.
Amazon Links:
Arduino Nano USB-C Type (Recommended)
*Disclosure: These are affiliate links. As an Amazon Associate I earn from qualifying purchases.
SW-420 Sensor Interfacing with Arduino:
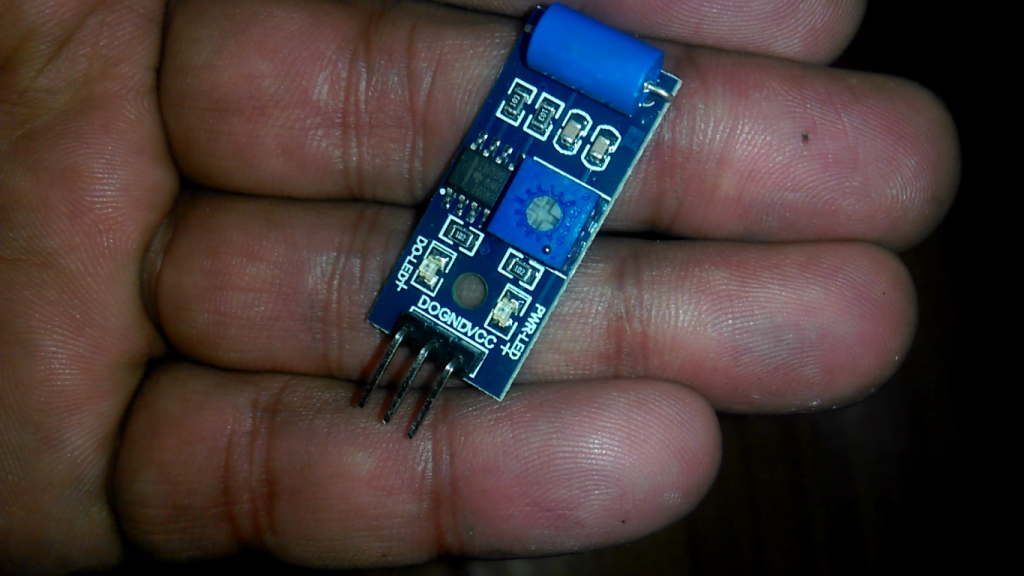
It has a total of 3 male headers clearly labeled with D0, GND, and Vcc.
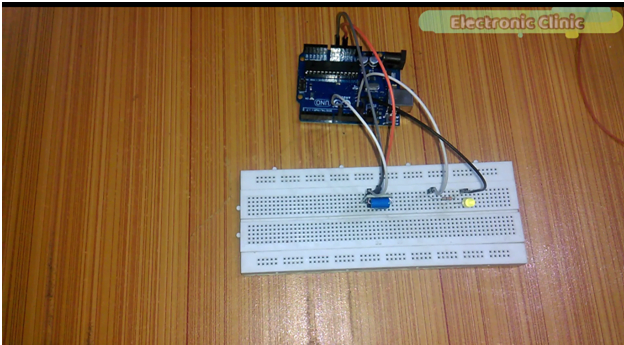
Insert the vibration sensor into the Vero board…now connect the D0 pin of the sensor with pin number 9 of the Arduino…connect the ground pin of the sensor with the ground pin of the Arduino….connect Vcc of the vibration sensor with the Arduino’s 5v…..insert led into the breadboard…connect a 330-ohm resistor on the anode side of the led, this is a current limiting resistor….connect the cathode side of the led with the Arduino’s ground…connect the anode side of the led with pin number 13….we are done with the interfacing.
Sw-420 Sensor Arduino Programming:
This is quite a simple program, no libraries are used in this tutorial. We need just a few lines of code. You can copy and paste the following code into the Arduino IDE.
|
1 2 3 4 5 6 7 8 9 10 11 12 13 14 15 16 17 18 19 20 21 22 23 24 25 |
int led = 13; int vs =9; // vibration sensor void setup(){ pinMode(led, OUTPUT); pinMode(vs, INPUT); Serial.begin(9600); } void loop(){ long measurement =vibration(); delay(50); Serial.println(measurement); if (measurement > 50){ digitalWrite(led, HIGH); } else{ digitalWrite(led, LOW); } } long vibration(){ long measurement=pulseIn (vs, HIGH); //wait for the pin to get HIGH and returns measurement return measurement; } |
Vibration sensor Arduino Code Explanation:
I started by defining pins for the LED and the Vibration sensor. The LED is connected with the Arduino’s pin number 13, and the sensor is connected with the Arduino’s pin number 9.
int led = 13;
int vs =9; // vibration sensor
As you know my friends, every Arduino program has at least two functions which are the void setup() and Void loop() functions. In the setup() function we do the basic settings e.g. activating the Serial communication, setting the pins as the input or output etc. As you can see inside the void setup() function, I set the led as the output and the Sensor as the input. Finally, I activated the Serial communication and selected 9600 as the Baud Rate.
void setup(){
pinMode(led, OUTPUT);
pinMode(vs, INPUT);
Serial.begin(9600);
}
the void loop() functions executes until we turn off the Arduino Board. The actual code is placed inside this fucntion.
void loop(){
long measurement =vibration();
delay(50);
Serial.println(measurement);
if (measurement > 50){
digitalWrite(led, HIGH);
}
else{
digitalWrite(led, LOW);
}
}
The vibration() function is a user-defined function and its return type is long.
long vibration(){
long measurement=pulseIn (vs, HIGH); //wait for the pin to get HIGH and returns measurement
return measurement;
}
Watch Video Tutorial:
Discover more from Electronic Clinic
Subscribe to get the latest posts sent to your email.


Sir what if I want to send the data on thingspeak cloud . Cn you please help me with the code
visit my youtube channel “Electronic Clinic” and watch my video on vibration monitoring using IoT.