Infrared Remote IR Receiver TSOP4838 with Raspberry Pi
Last Updated on August 3, 2022 by Engr. Shahzada Fahad
Table of Contents
TSOP4838 IR receiver with Raspberry pi:
Infrared Remote IR Receiver TSOP4838 with Raspberry Pi– TSOP4838 is an amazing IR Receiver module that can be used with Arduino and Raspberry Pi to control different electrical devices or you can build your own MP3 player which can be controlled using a TV remote or any other IR Remote controller. If you are working on a project in which you need to control something using an IR Remote then you will need the TSOP4838 IR receiver module. It is a member of a whole Family of IR receivers that are optimized for different frequencies. The TSOP4838 component is tuned to 38 kHz, which is more typical frequency range of the TV remote controls. Note that the pin assignment is different depending on the TSOP variant! You can also read my article in which I used an IR remote controller to control the speed of the DC Fan using Arduino.
Amazon Purchase Links:
Wireless Keyboard and Mouse for raspberry pi:
Night vision Camera for Raspberry Pi:
Oled HDMI touch display for raspberry pi:
Other Tools and Components:
Super Starter kit for Beginners
PCB small portable drill machines
*Please Note: These are affiliate links. I may make a commission if you buy the components through these links. I would appreciate your support in this way!
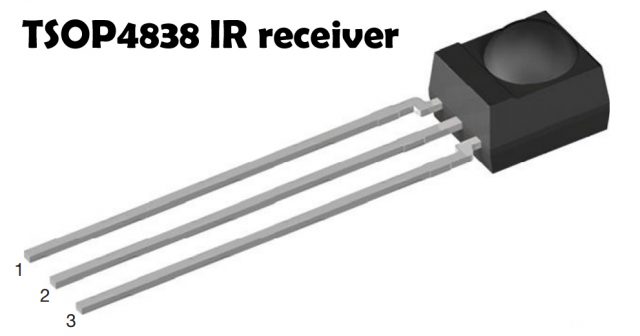
TSOP4838 PINOUT
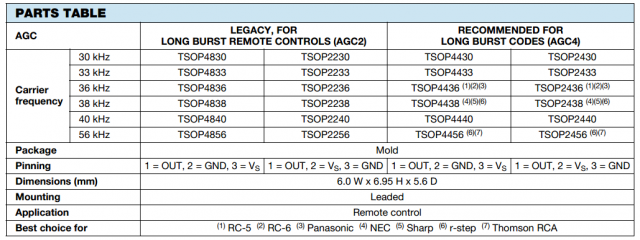
Pinning for TSOP44.., TSOP48..
1 = OUT, 2 = GND, 3 = VS
Pinning for TSOP22.., TSOP24..
1 = OUT, 2 = Vs, 3 = GND
TSOP4838 FEATURES
- Improved immunity against HF and RF noise
- Low supply current
- Photo detector and preamplifier in one package
- Internal filter for PCM frequency
- Supply voltage: 2.5 V to 5.5 V
- Improved immunity against optical noise
- Insensitive to supply voltage ripple and rnoise
- Material categorization:
The TSOP22.., TSOP48.., TSOP 24.., and TSOP44.. series are miniaturized IR receiver modules for infrared remote control systems. A PIN diode and a preamplifier are assembled on lead frame, the epoxy Package contains an IR filter. The demodulated output signal can be directly connected to a microprocessor for decoding.
The TSOP24.., TSOP44.. series devices are optimized to suppress almost all spurious pulses from Wi-Fi and CFL sources. They may suppress some data signals if continuously transmitted.
The TSOP22.., TSOP48.. series devices are provided primarily for compatibility with old AGC2 designs. New designs should prefer the TSOP24.., TSOP44.. series containing the newer AGC4.
These components have not been qualified according to automotive specifications.
TSOP4838 Interfacing with Raspberry Pi, Circuit Diagram:
The circuit corresponds to the suggestion from the datasheet (see Figure 1).
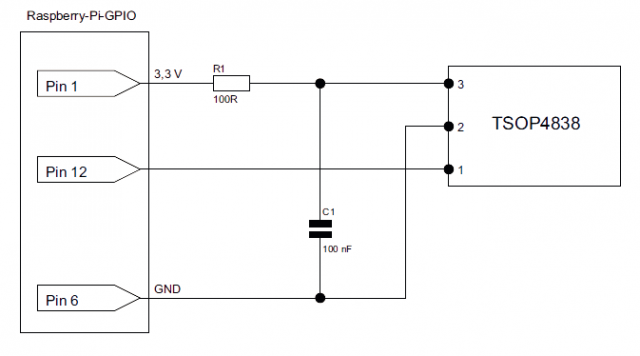
Both the resistor and the capacitor are optional; they only improve the electrical stability of the circuit. You can also use pins 1, 2 and 3 of the TSOP4838 with pins 6 (GND), 12 and 1 (3.3 V) of the P1 header of the Raspberry Pi.
Before doing this, you have to make a new device tree entry in the boot /config.txt. At the end of the file add the line dtoverlay = lirc-rpi, and restart the system. To try out the TSOP4838 IR receiver, you need the kernel module lirc_rpi and the mode2 command from the lirc package. You can use it to send signals in text mode read out the device file of the IR interface. Now all you need is a remote control Point it at the IR receiver and press a few buttons.
|
1 2 3 4 5 6 7 8 9 10 11 12 13 14 15 16 17 18 19 20 |
apt - get install lirc dmesg | grep lirc lirc_dev: IR Remote Control driver registered, major 251 lirc_rpi: module is from the staging directory, the quality is unknown, you have been warned. lirc_rpi lirc_rpi .0: lirc_dev: driver lirc_rpi registered at minor = 0 lirc_rpi: driver registered! input: lircd as / devices / virtual / input / input3 lirc_rpi: auto - detected active low receiver on GPIO pin 18 mode2 -d / dev / lirc0 space 1613 pulse 584 space 537 pulse 593 space 524 pulse 603 space 530 ... <Ctrl> + <C> |
mode2 is only intended for trying out the remote control. Once you have to find the codes of the IR remote then all you need is to write a few lines of code to check for the desired button and then using some conditions to perform a specific task.
Discover more from Electronic Clinic
Subscribe to get the latest posts sent to your email.