pH Sensor with Arduino, pH Sensor Calibration, pH meter, pH value of Liquids
Last Updated on August 16, 2024 by Engr. Shahzada Fahad
Table of Contents
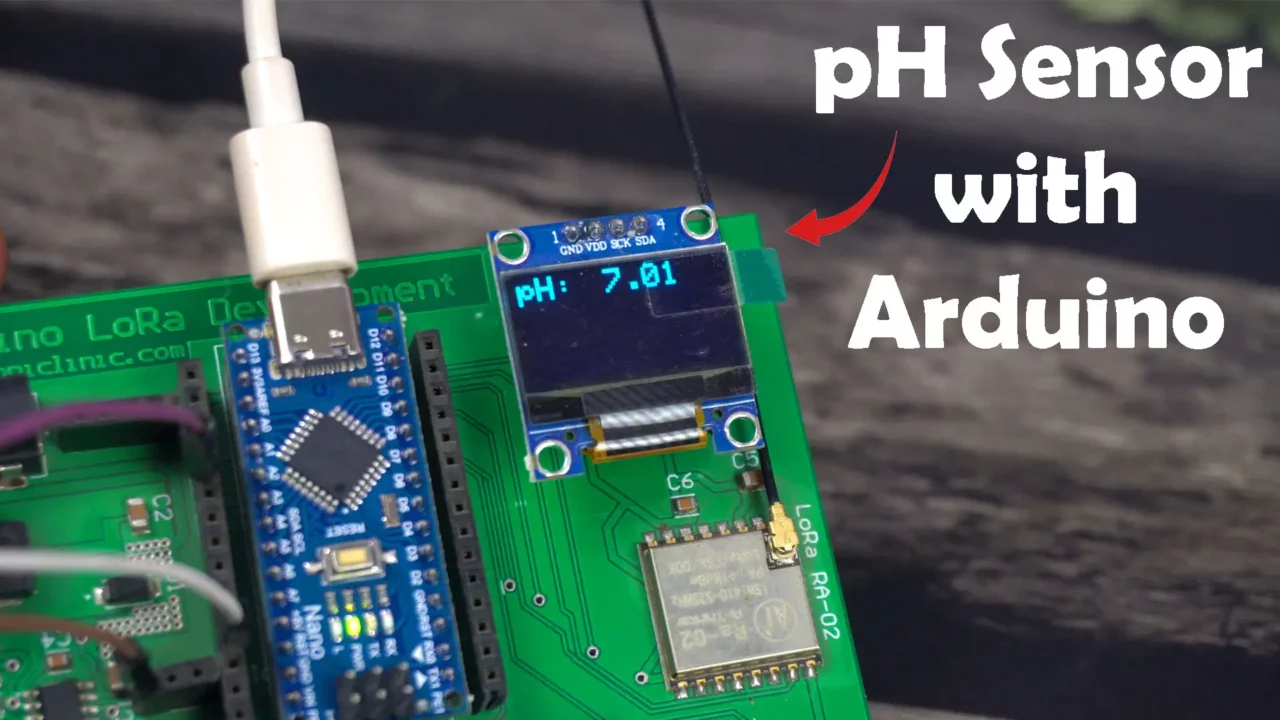
pH Sensor with Arduino:
pH Sensor with Arduino, pH Sensor Calibration, pH meter, pH value of Liquids- Recently, I got the Gravity Analog pH Sensor Kit V2 from the DFrobot. And let me tell you; this is the upgraded version of the pH meter V1 that we could only use with 5V compatible controller boards like Arduino, Raspberry pi, and other 5V compatible controller boards , whereas the pH Meter V2 is compatible with both 5V and 3.3V compatible controller boards like, ESP32, Raspberry Pi Pico, STM32, ESP8266, etc.

You can check my latest project on the ESP32 and pH Sensor based Hydroponic System.
The pH Sensor V2 kit includes:
- A product qualification card.
- A paper that gives you an introduction, technical details, and safety tips about pH sensor.
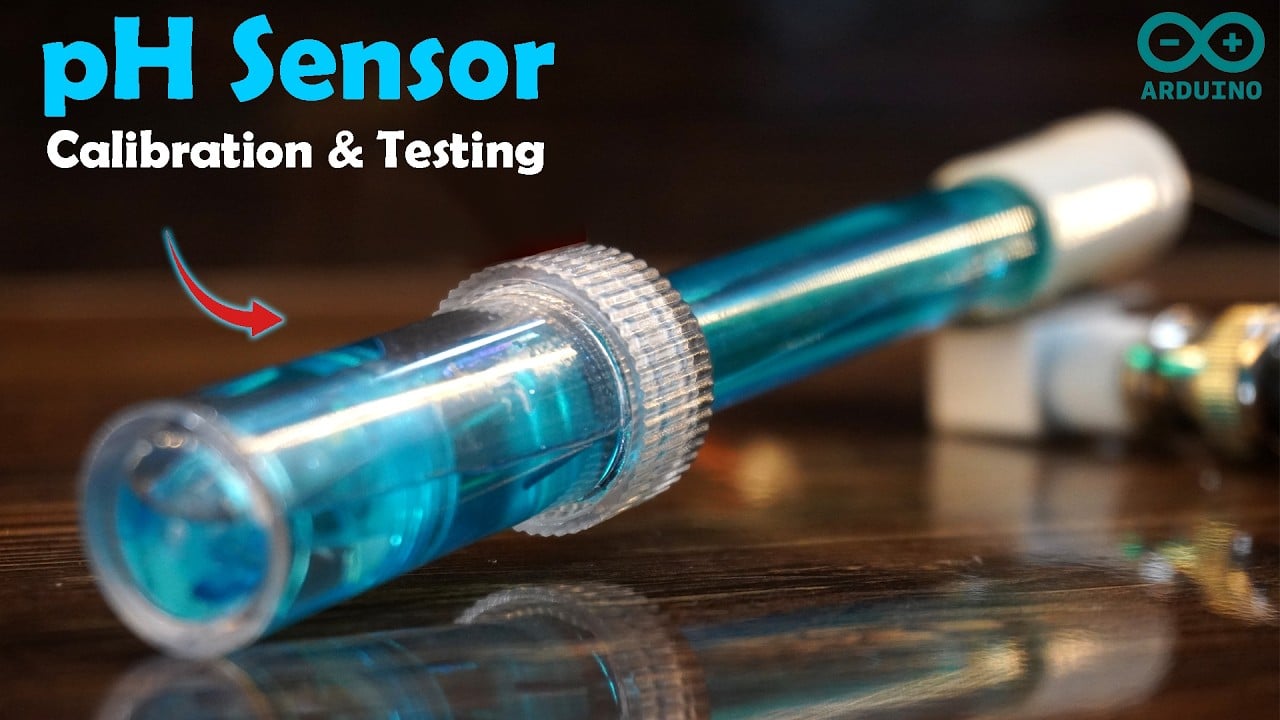
- A pH probe with the BNC connector.
pH Probe Specification:
Probe Type: Laboratory Grade
Detection Range: 0~14
Temperature Range: 5~60°C
Zero Point: 7±0.5
Response Time: <2min
Internal Resistance: <250MΩ
Probe Life: >0.5 years (depending on the frequency of use) and
Cable Length: 100cm
The pH sensor interface board or the signal conversion board. It must be kept dry and clean, otherwise, it will affect the input impedance, resulting in an inaccurate measurement.
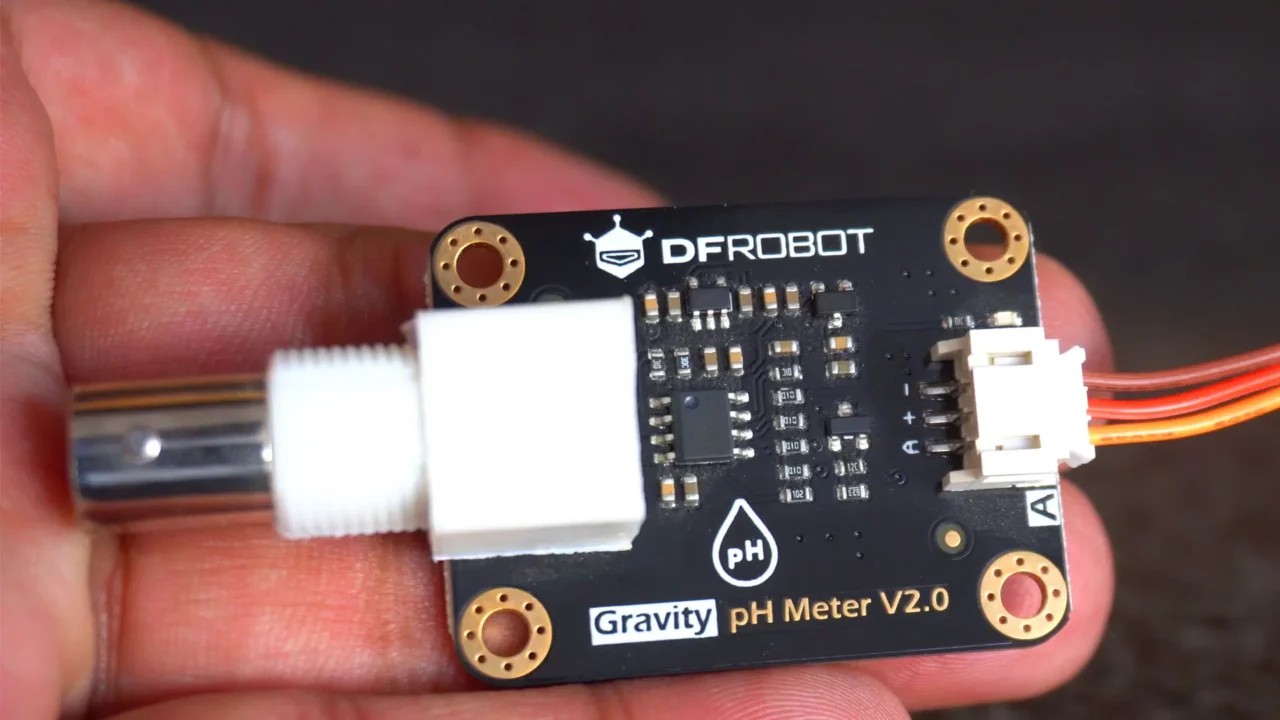
Signal Conversion Board Specification:
Supply Voltage: 3.3~5.5V
Output Voltage: 0~3.0V
Probe Connector: BNC
Signal Connector: PH2.0-3P
Measurement Accuracy: ±0.1@25℃
Dimension: 42mm*32mm/1.66*1.26in
Some wires and screws.
And standard buffer solutions 4.0 and 7.0.
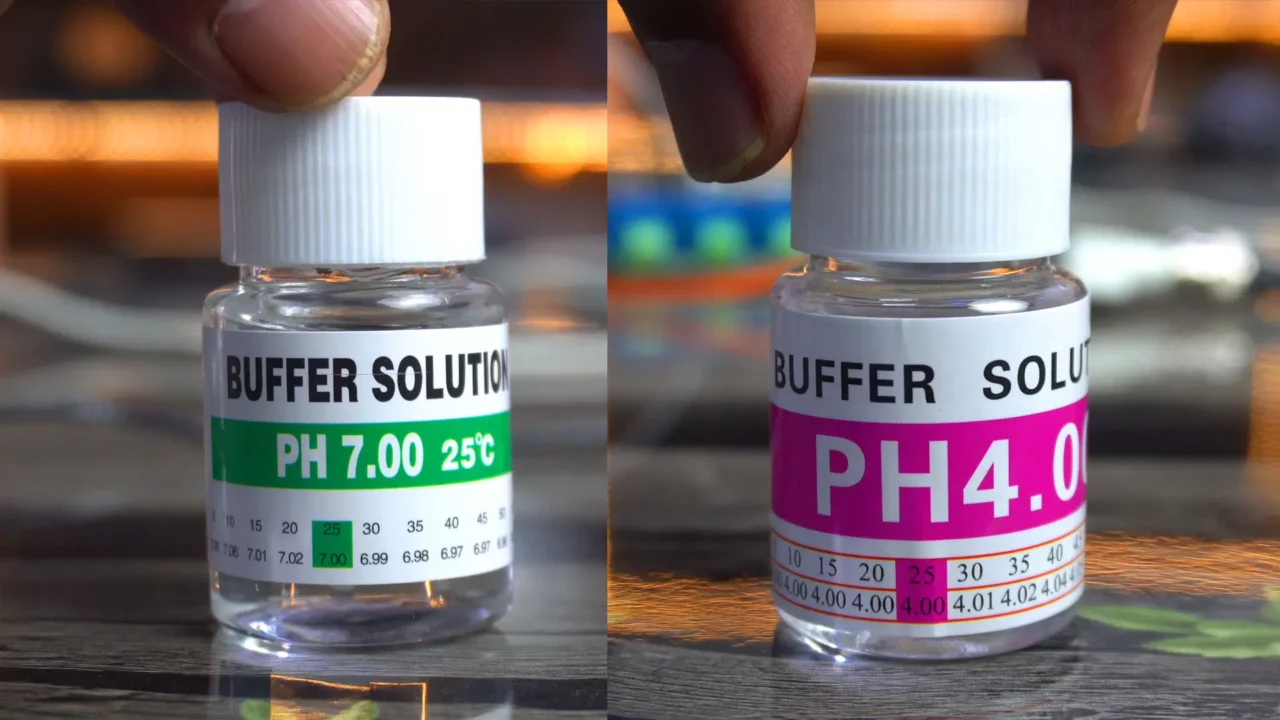
You can only measure the pH value of water or any other liquid accurately if your pH probe is correctly calibrated. This is only possible when you use buffer solutions to calibrate the pH probe. Without these buffer solutions, you can never properly calibrate the pH probe. So, that’s why I ordered this complete kit. But, you can also purchase buffer solutions without purchasing the entire kit. Anyway;
You will also need an Arduino board and an i2c supported SSD1306 Oled display module.
Amazon Links:
Arduino Nano USB C type (Recommended)
DFrobot Gravity pH Sensor Kit V2
*Disclosure: These are affiliate links. As an Amazon Associate I earn from qualifying purchases.
pH Sensor Interfacing with Arduino:
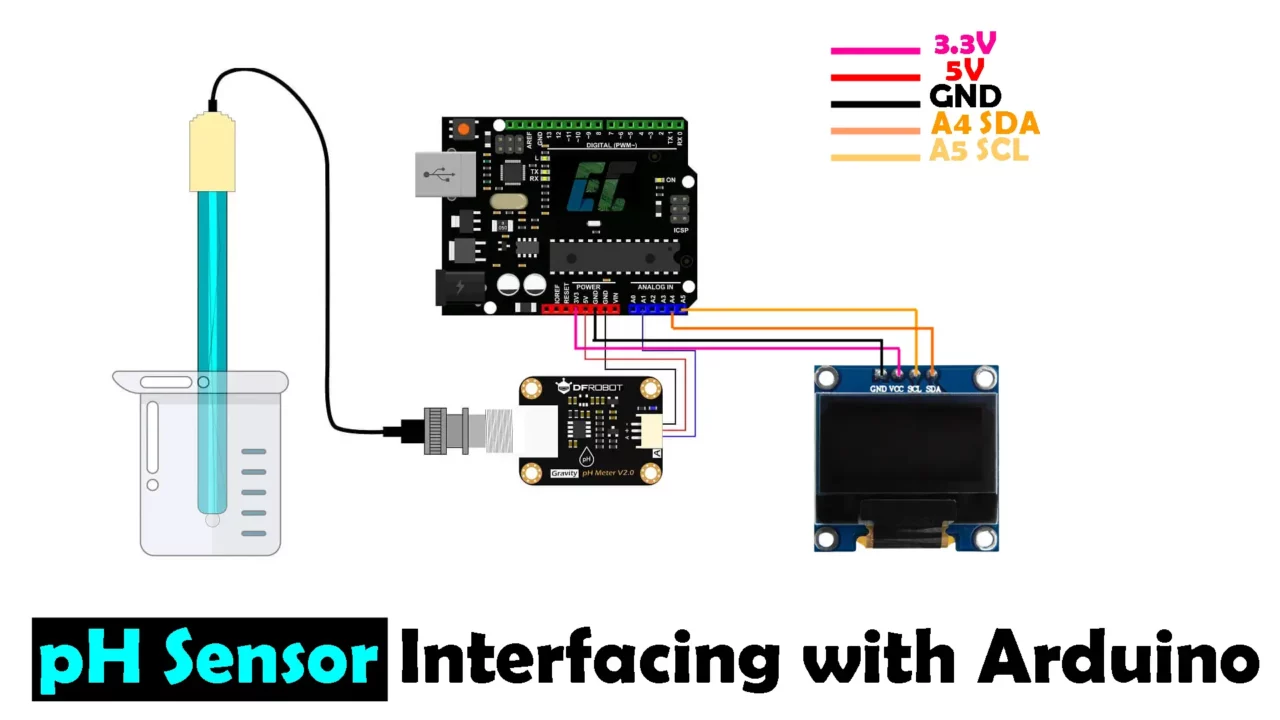
Connect the Red and Brown wires which are labeled as + and – on the interface board to the Arduino 5V and GND. Connect the Yellow wire which is labeled as A on the signal conversion / interface board to the Arduino analog pin A1.
Connect the VCC and GND pins of the SSD1306 Oled display module to the Arduino 3.3V and GND pins. Connect the SDA and SCL pins to the Arduino i2c pins A4 and A5. A4 is the SDA and A5 is the SCL.
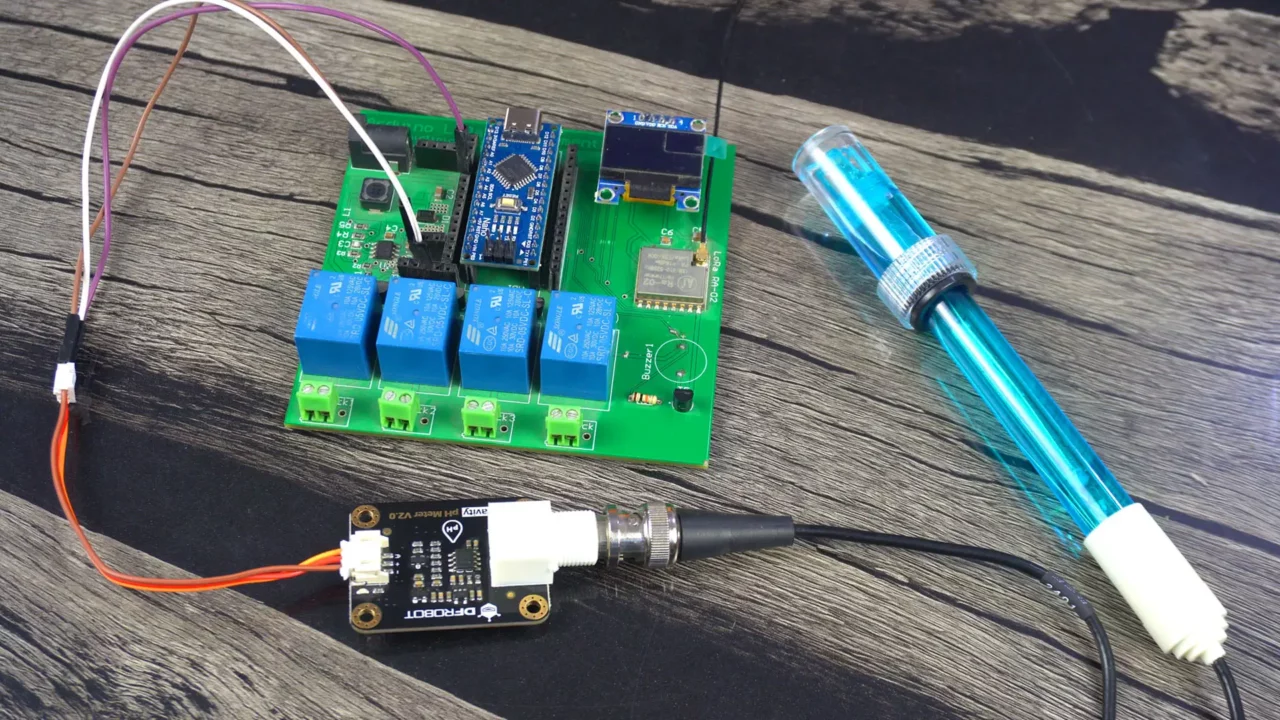
Our hardware setup is completed; so, let’s calibrate the pH Sensor.
pH Sensor Calibration:
For the pH Sensor/meter calibration; first connect the Arduino to your Laptop or PC.
For the libraries installation; read my previous article on the Hydroponic System.
Then upload the following program and open the Serial Monitor.
pH Sensor Arduino Program:
|
1 2 3 4 5 6 7 8 9 10 11 12 13 14 15 16 17 18 19 20 21 22 23 24 25 26 27 28 29 30 31 32 33 34 35 36 37 38 39 40 41 42 43 44 45 46 47 48 49 50 51 52 53 54 55 56 57 58 59 60 61 62 63 64 65 66 67 68 69 70 71 72 73 74 75 76 77 78 79 80 81 82 83 84 85 |
#include <Wire.h> #include <Adafruit_GFX.h> #include <Adafruit_SSD1306.h> #include <SimpleTimer.h> SimpleTimer timer; float calibration_value = 15.00 - 0.31; int pHsensor = A1; int phval = 0; unsigned long int avgval; int buffer_arr[10],temp; float ph_act; // for the OLED display #define SCREEN_WIDTH 128 // OLED display width, in pixels #define SCREEN_HEIGHT 64 // OLED display height, in pixels // Declaration for an SSD1306 display connected to I2C (SDA, SCL pins) #define OLED_RESET -1 // Reset pin # (or -1 if sharing Arduino reset pin) Adafruit_SSD1306 display(SCREEN_WIDTH, SCREEN_HEIGHT, &Wire, OLED_RESET); void setup() { Wire.begin(); Serial.begin(9600); pinMode(pHsensor, INPUT); display.begin(SSD1306_SWITCHCAPVCC, 0x3C); display.clearDisplay(); display.setTextColor(WHITE); timer.setInterval(500L, display_pHValue); } void loop() { timer.run(); // Initiates SimpleTimer for(int i=0;i<10;i++) { buffer_arr[i]=analogRead(pHsensor); delay(30); } for(int i=0;i<9;i++) { for(int j=i+1;j<10;j++) { if(buffer_arr[i]>buffer_arr[j]) { temp=buffer_arr[i]; buffer_arr[i]=buffer_arr[j]; buffer_arr[j]=temp; } } } avgval=0; for(int i=2;i<8;i++) avgval+=buffer_arr[i]; float volt=(float)avgval*5/1024.0/6; //Serial.print("Voltage: "); //Serial.println(volt); ph_act = -4.90 * volt + calibration_value; Serial.print("pH Val: "); Serial.println(ph_act); delay(1000); } void display_pHValue() { // Oled display display.clearDisplay(); display.setTextSize(2); display.setCursor(0,0); // column row display.print("pH:"); display.setTextSize(2); display.setCursor(55, 0); display.print(ph_act); display.display(); } |
Dip the pH probe in the pH 7 buffer solution.
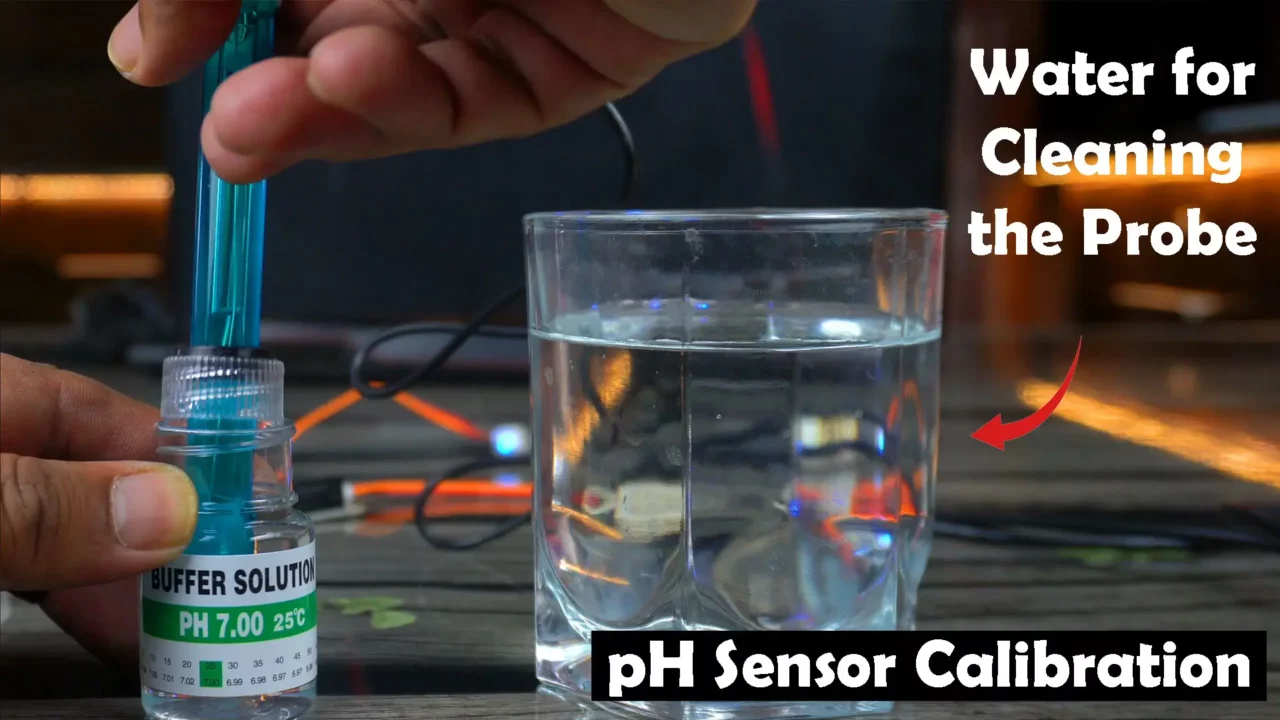
“Don’t forget to rinse the pH probe”.
Open the Serial monitor and wait for at least 2 to 5 minutes until the pH value gets stable.
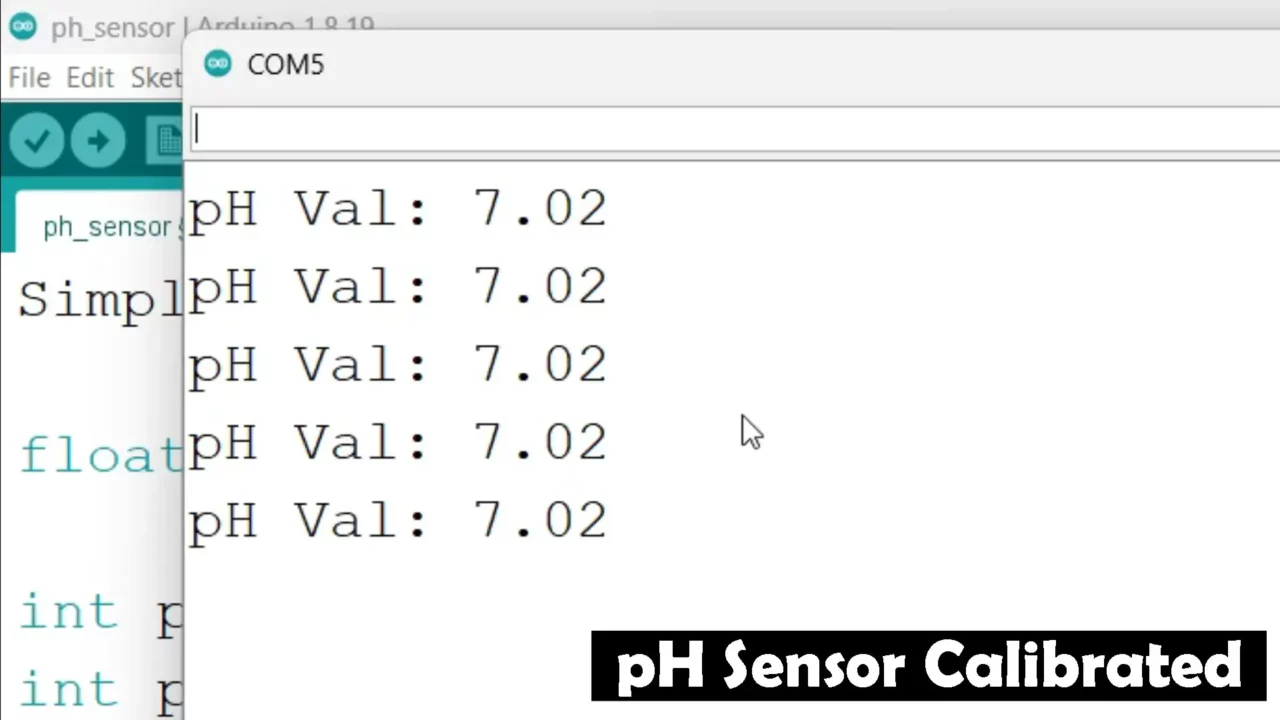
Right now you can see, the pH probe has successfully detected the pH 7 solution, this is because; I have already calibrated it.
If you get a wrong value, simply adjust the calibration value in the program until the pH probe reading matches the buffer solution. This process should take around 5 minutes.
float calibration_value = 15.00 – 0.31;
When you use buffer solutions, you need to clean the probe with water each time. Make sure there is not any pH 7 solution on the probe when you dip it into the pH 4 solution, and vice versa.
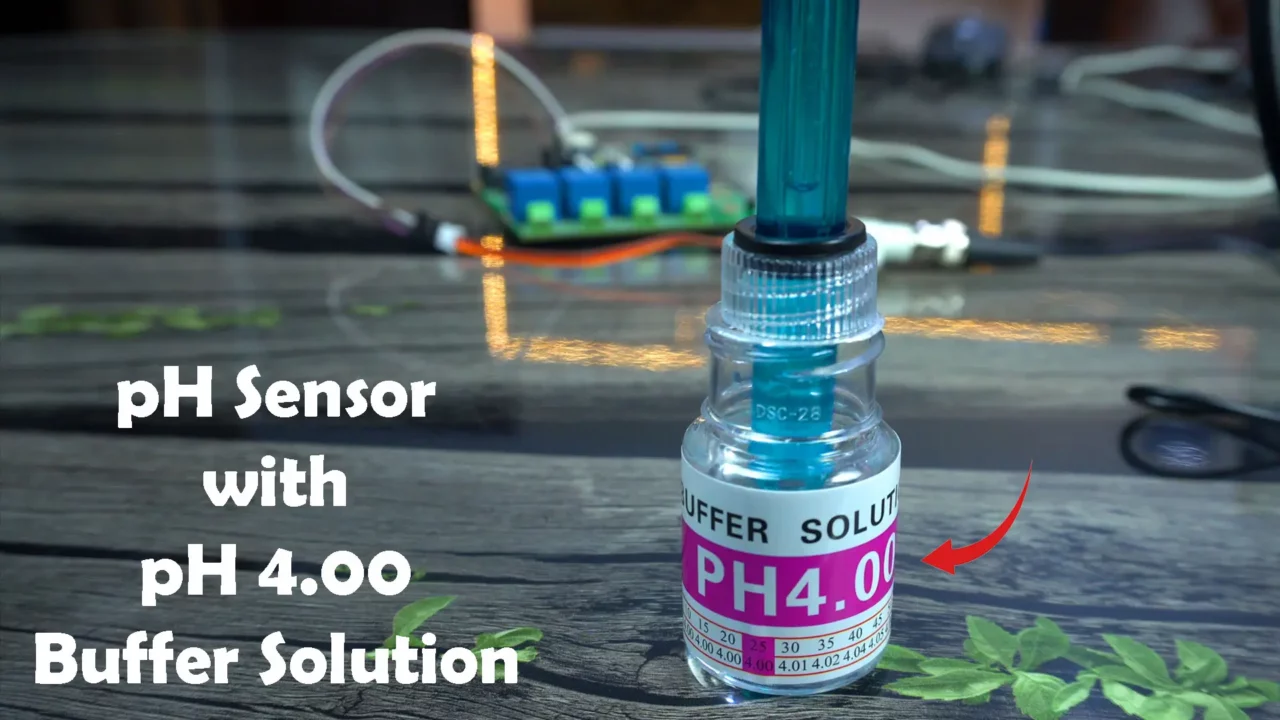
Anyway, after this, when you dip the pH probe into the pH 4 solution, it will automatically detect it. As per the manufacturer the pH Sensor response time is around 2 minutes, so, do not panic if you see wrong values at first; give the pH sensor some time to stabilize.
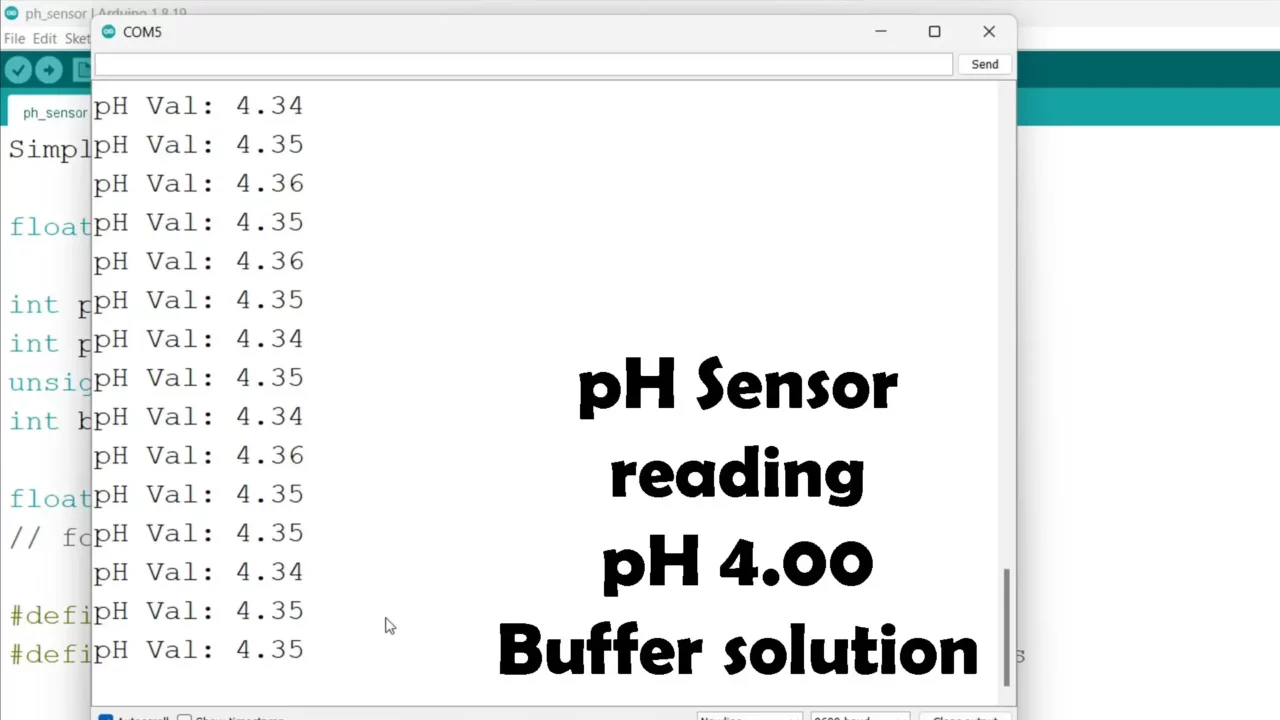
You can see it’s getting close to the pH 4 value; which means we have successfully calibrated the pH Probe.
Let’s dip it again in the pH 7 solution and let’s see if it can still successfully detect the pH 7 buffer solution.
Amazing, it successfully detected the pH 7 buffer solution. Now, let’s go ahead and check the pH values of different liquids.
Note: for every measurement, make sure you rinse the pH probe, and after you dip the pH probe in a liquid then wait for around 5 minutes. You should give enough time to the pH value to get stabilize. Following are the stabilized values.
Testing pH Value Using Arduino:
pH Value of Well Water:

After 5 minutes of waiting, the water pH value stabilized at 7.39.
pH Value of Milk:
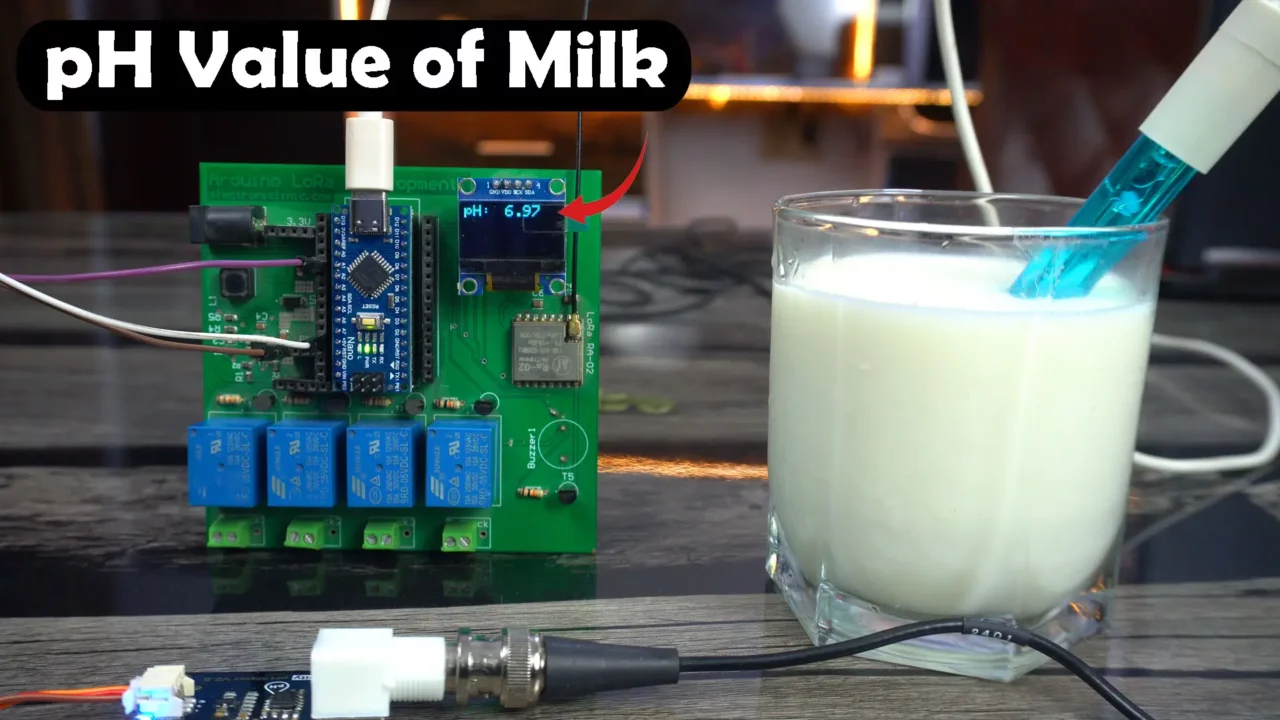
Stabilized pH value of Milk is 6.97.
pH Value of Shampoo:
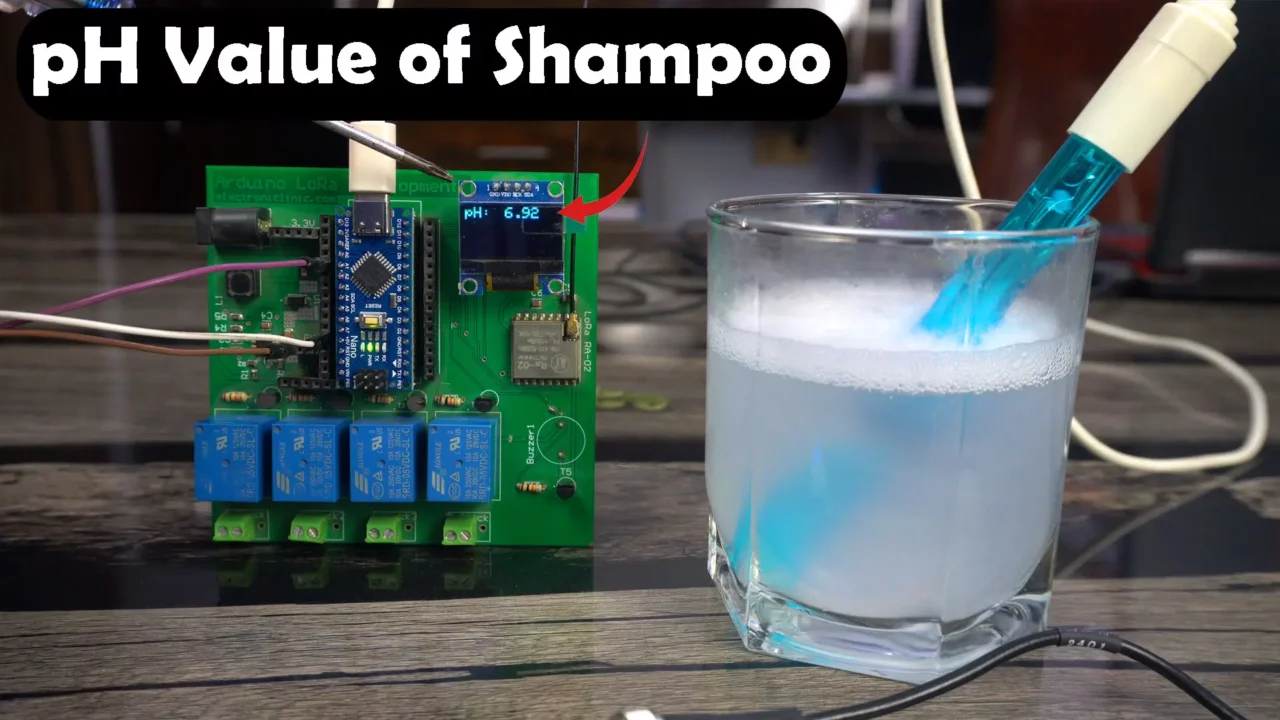
Stabilized pH value of Shampoo is 6.92.
pH Value of Baking Soda:
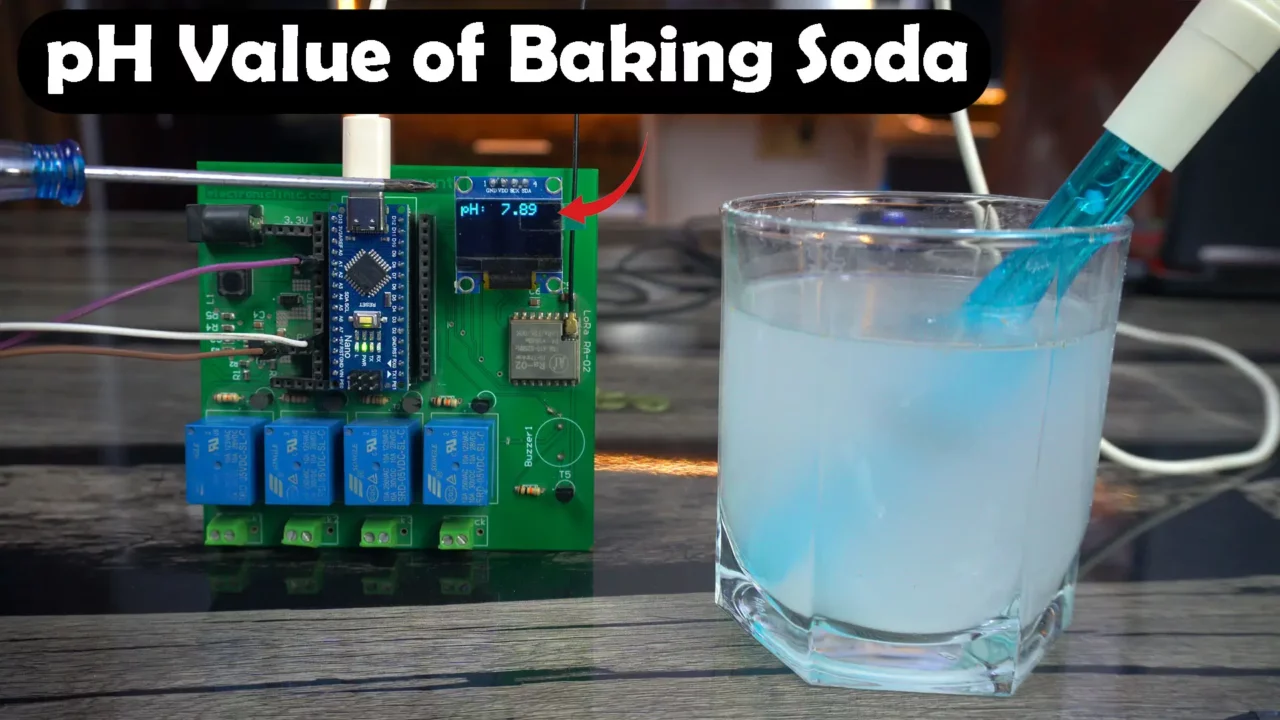
Stabilized pH value of Baking Soda is 7.89.
Watch Video Tutorial:
Discover more from Electronic Clinic
Subscribe to get the latest posts sent to your email.


Hi! I intend to interface the same pH sensor but using STM32. Also, I am requried to program it using bare metal code, or not using the Arduino Library. Do you by any chance have any idea on how to be able to do this? I’ve tried finding its datasheet but DFRobot seems not to provide the datasheet.