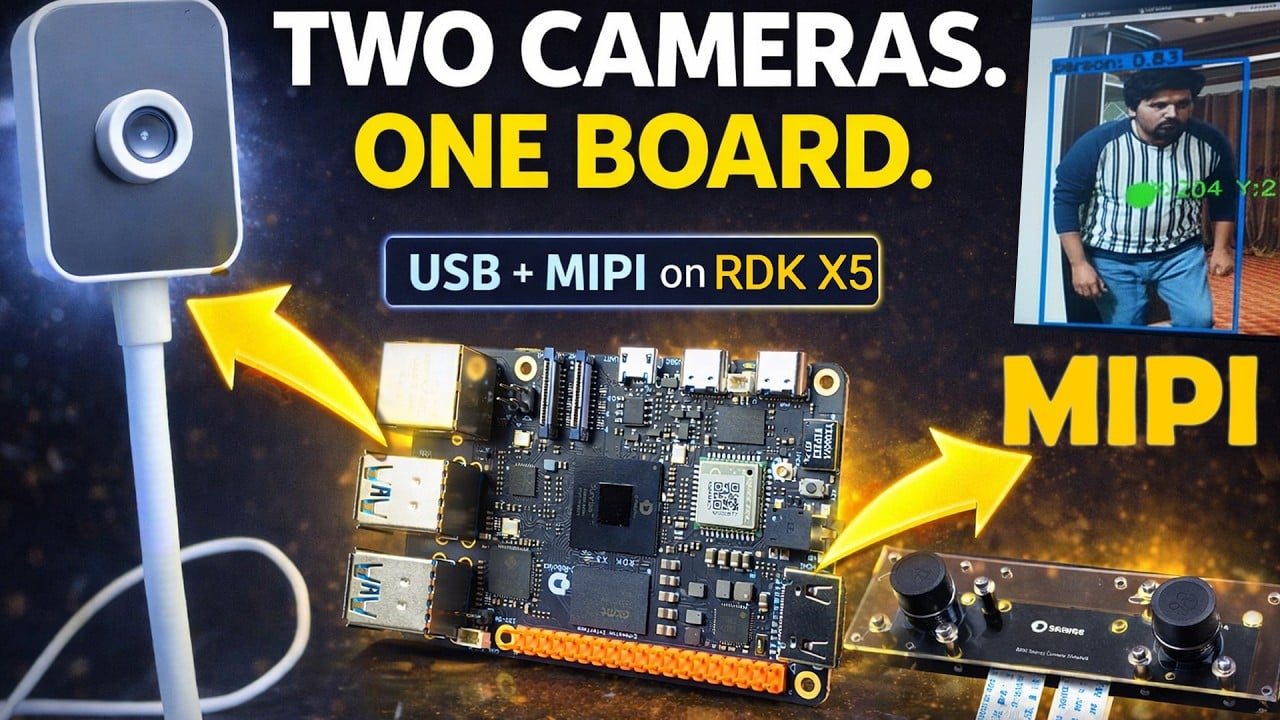
How to Use RDK X5 USB and MIPI Camera AI for Multi-Camera Vision
Last Updated on March 9, 2026 by Engr. Shahzada Fahad
Table of Contents
Description:
What if I told you that you can connect both MIPI and USB cameras to the RDK X5 and run high-performance AI in real-time without any external AI accelerator?
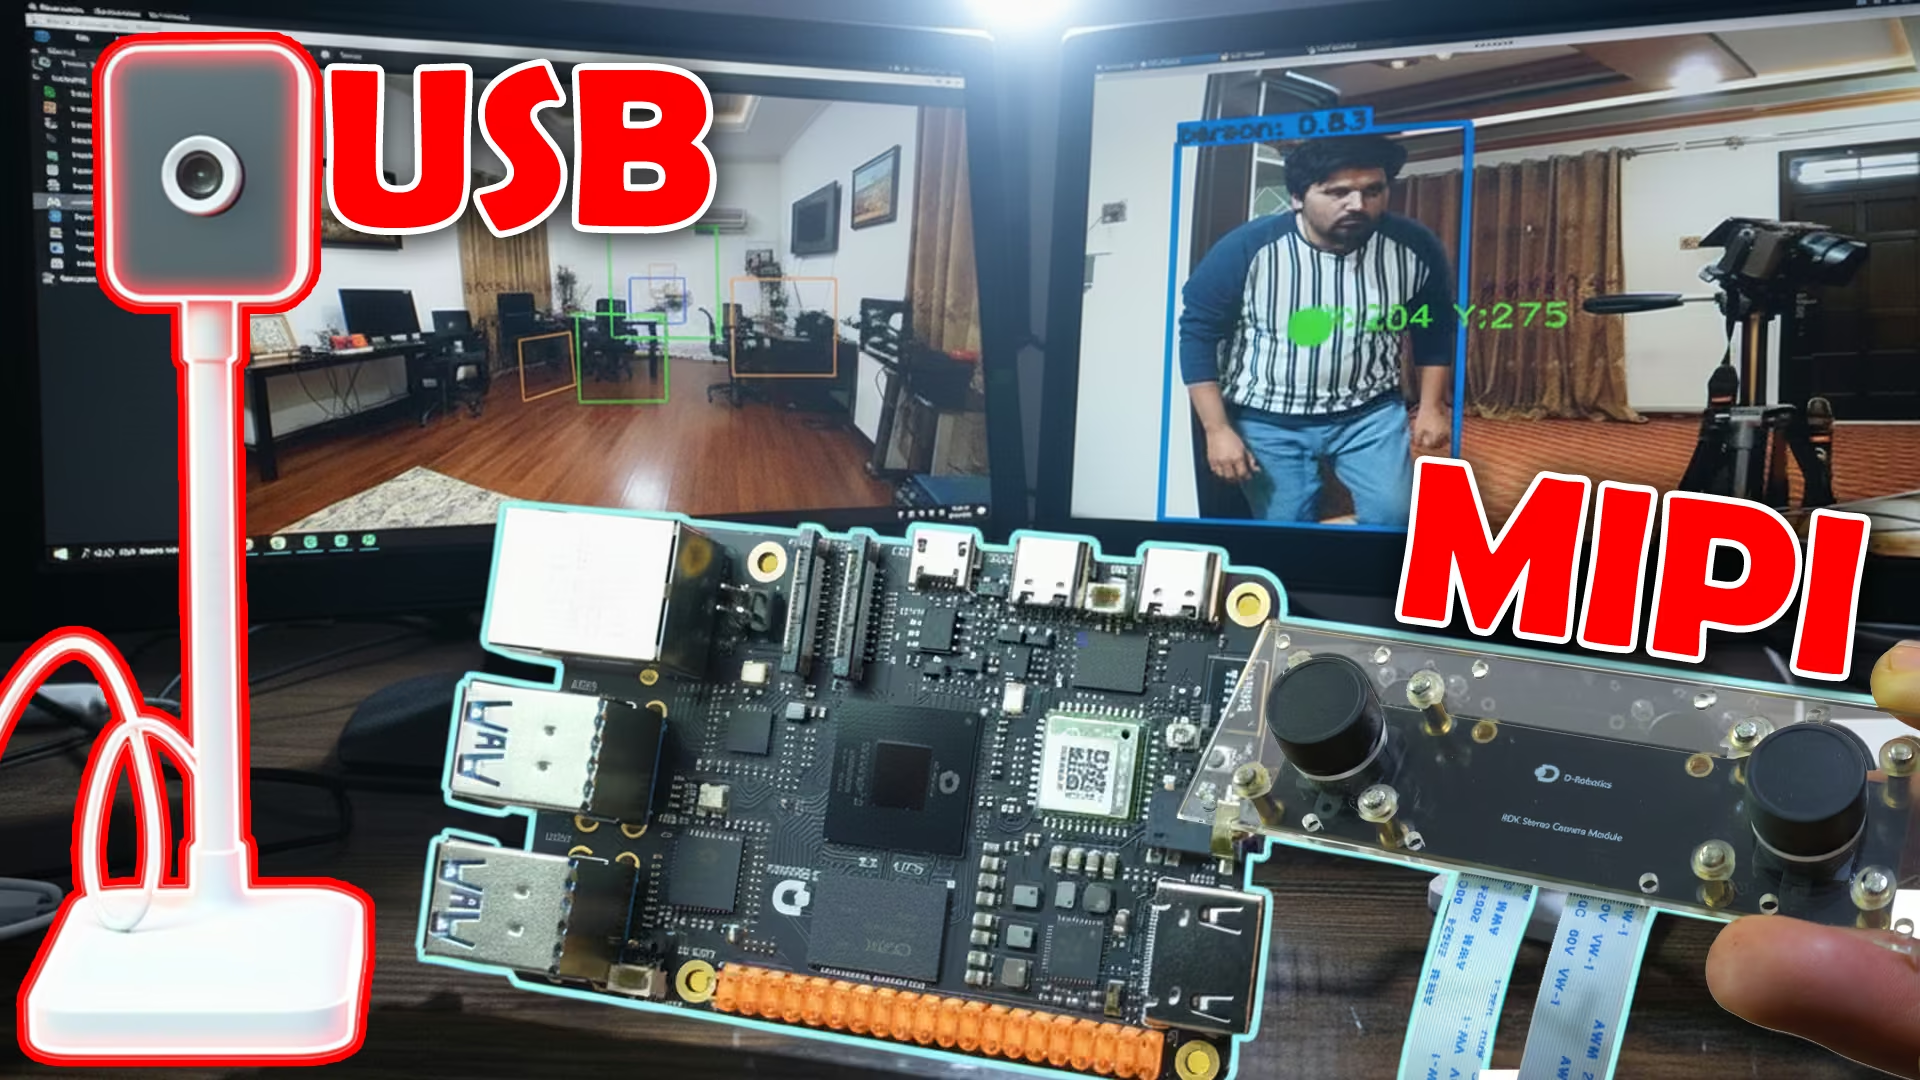
In this article, I will explain how to individually configure and use USB and MIPI cameras on the RDK X5.
You will also learn how to run both cameras at the same time, without any conflicts.
Let’s say YOLOv10 on the front camera and a completely different AI model on the rear camera.
Ideal for robotics, surveillance, and automotive AI applications.
Amazon Links:
Other Tools and Components:
ESP32 WiFi + Bluetooth Module (Recommended)
Arduino Nano USB C type (Recommended)
*Please Note: These are affiliate links. I may make a commission if you buy the components through these links. I would appreciate your support in this way!
Why RDK X5 Does Not Need an External AI Accelerator
In the previous article, you already saw what the RDK X5 is capable of.
But honestly; that was just a small glimpse.
The real power of the RDK X5 is this:
- You don’t need any external AI accelerator.
- You don’t need an AI HAT like Raspberry Pi.
The RDK X5 already has an onboard BPU “Brain Processing Unit”.
That means AI runs directly on the board, out of the box.
No extra hardware.
No complicated setup.
I have already demonstrated this in my previous articles and videos.
Using the RDK X5, you can build high-level AI projects very easily.
For example:
- Trash detection with high accuracy
- Fall detection
- A gym-level squats counter
- Monitoring whether a chair or bed is empty or occupied
- Smart CCTV system that starts recording automatically when a person stays in a specific area for a certain time
- “Don’t touch your face” detection
- And even Advanced Driver Assistance Systems “ADAS” using YOLOv10
Understanding How RDK X5 Sees the World
Before you can run YOLO, computer vision, or any AI model, you need to understand how the RDK X5 sees the world.
USB and MIPI are the primary and officially supported camera interfaces on the RDK X5; and they are more than enough for advanced AI projects.
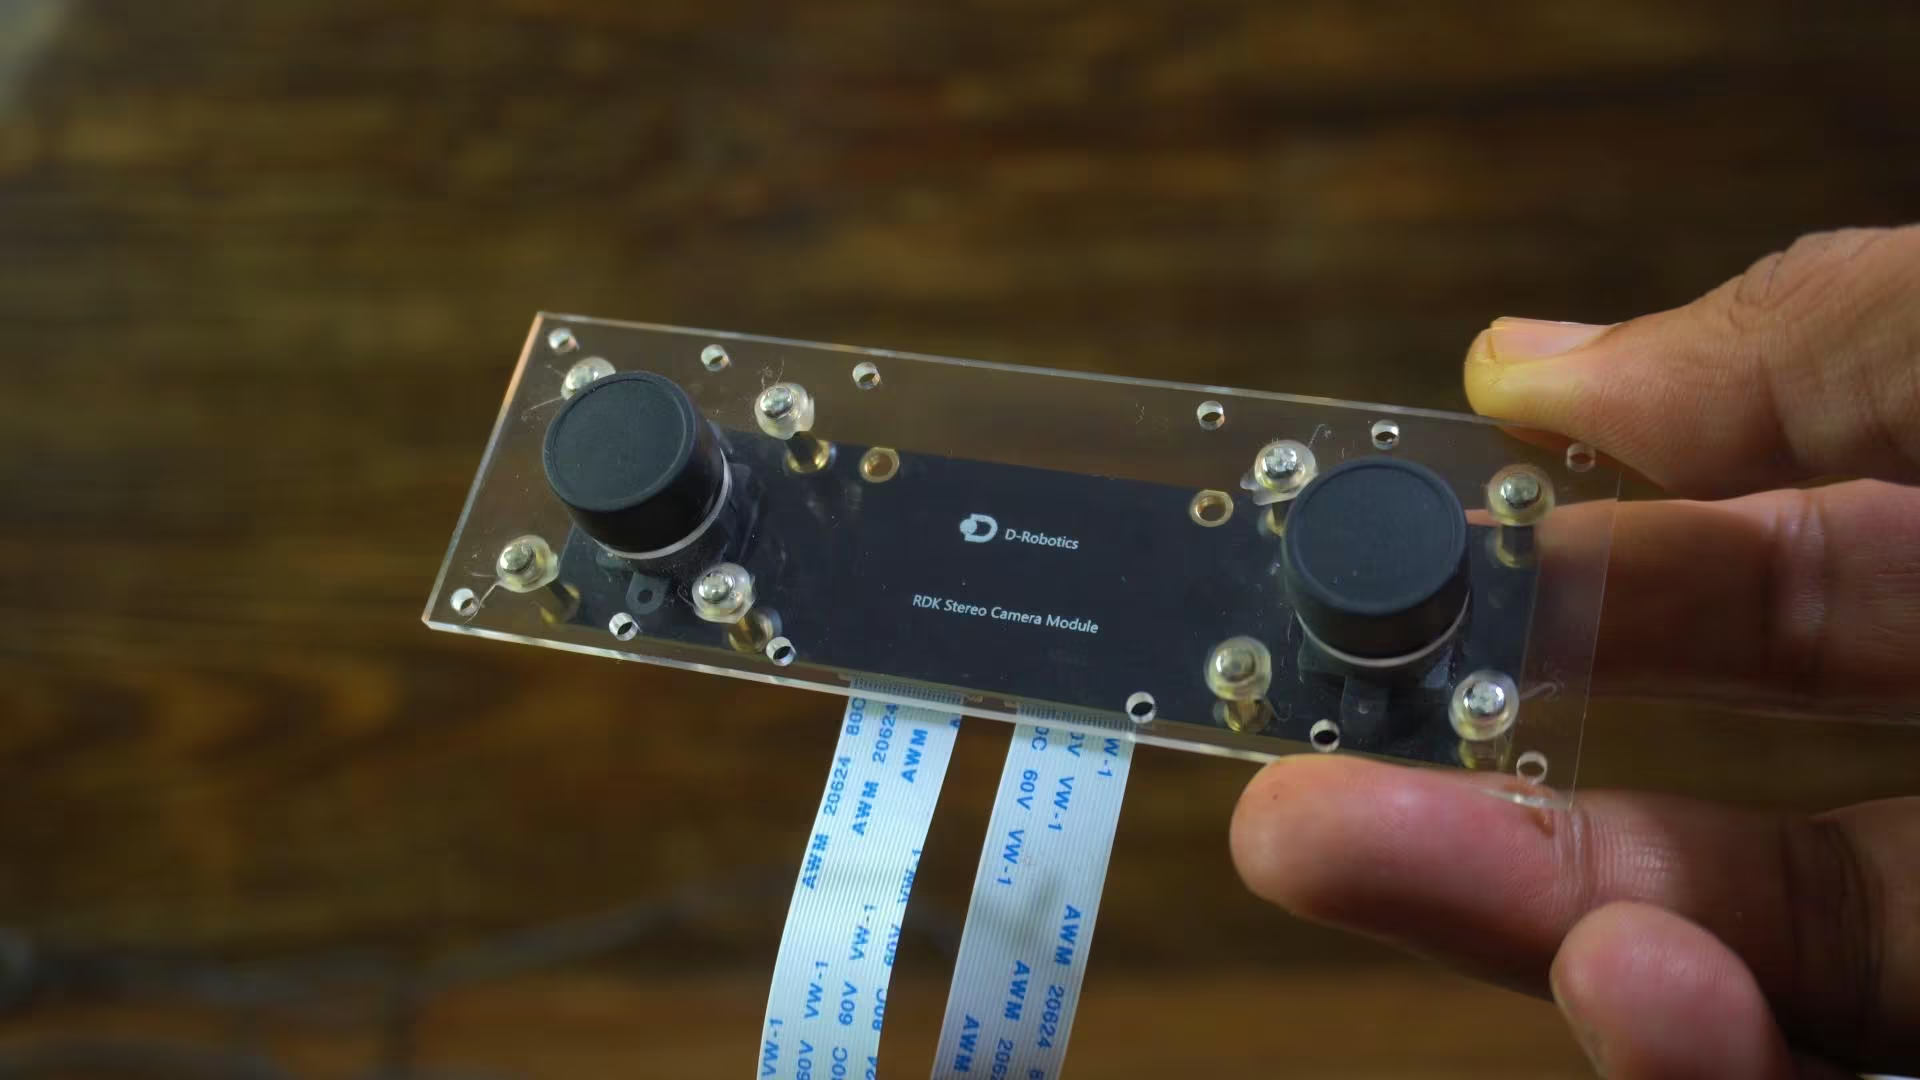
RDK Stereo Camera and MIPI CSI Interface
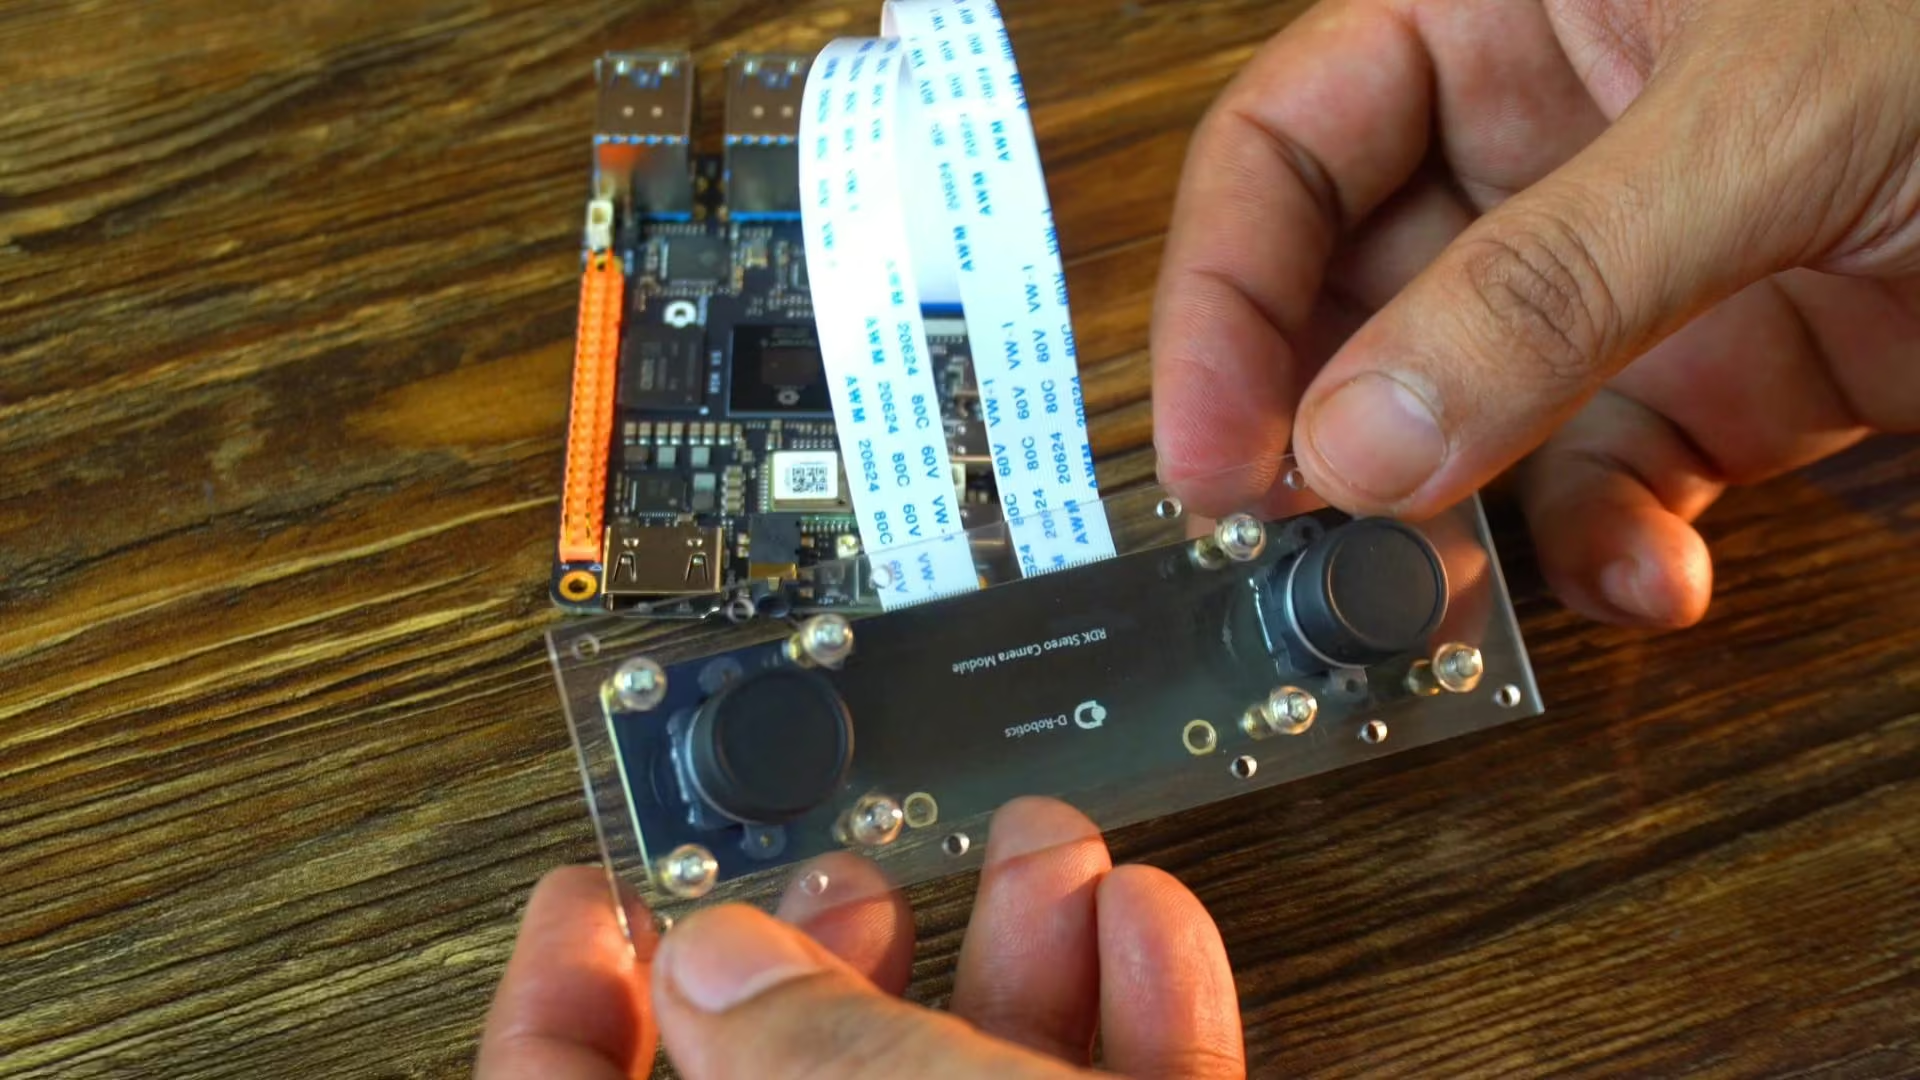
The RDK Stereo Camera Module designed for the RDK X5 actually contains two separate image sensors, and both connect via MIPI CSI interfaces on the board.
That means the stereo camera uses two MIPI camera connections simultaneously to capture left and right images for depth and stereo vision.
It’s a bit expensive than a USB camera, but it’s absolutely worth it.
Why I Am Covering Both USB and MIPI Cameras
I honestly don’t know which camera you have; or if you already have both cameras.
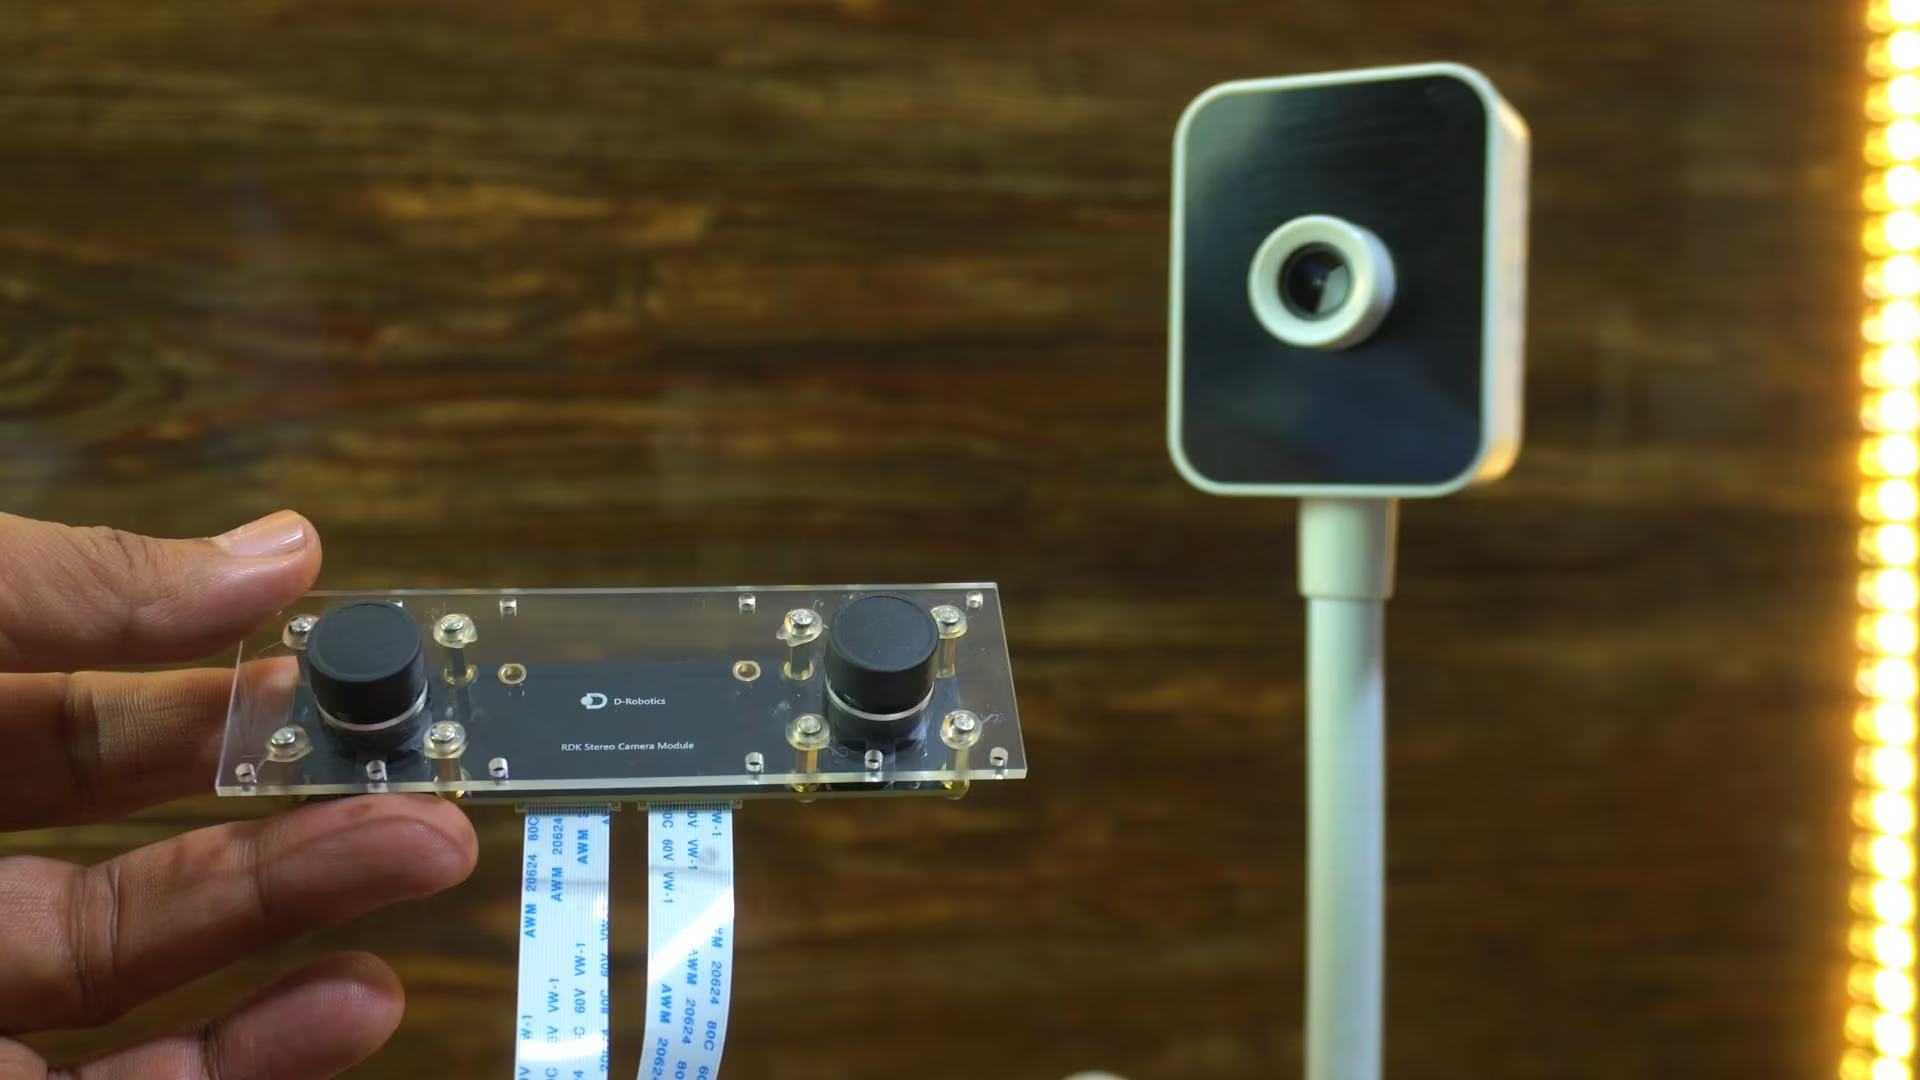
So I decided to show you how to use both of them properly.
This way, you can follow along no matter which camera you are using.
And in the upcoming videos and articles, I will be using the stereo camera for more advanced projects.
So, let’s start with the USB camera first.
USB Camera Requirements and Recommendations
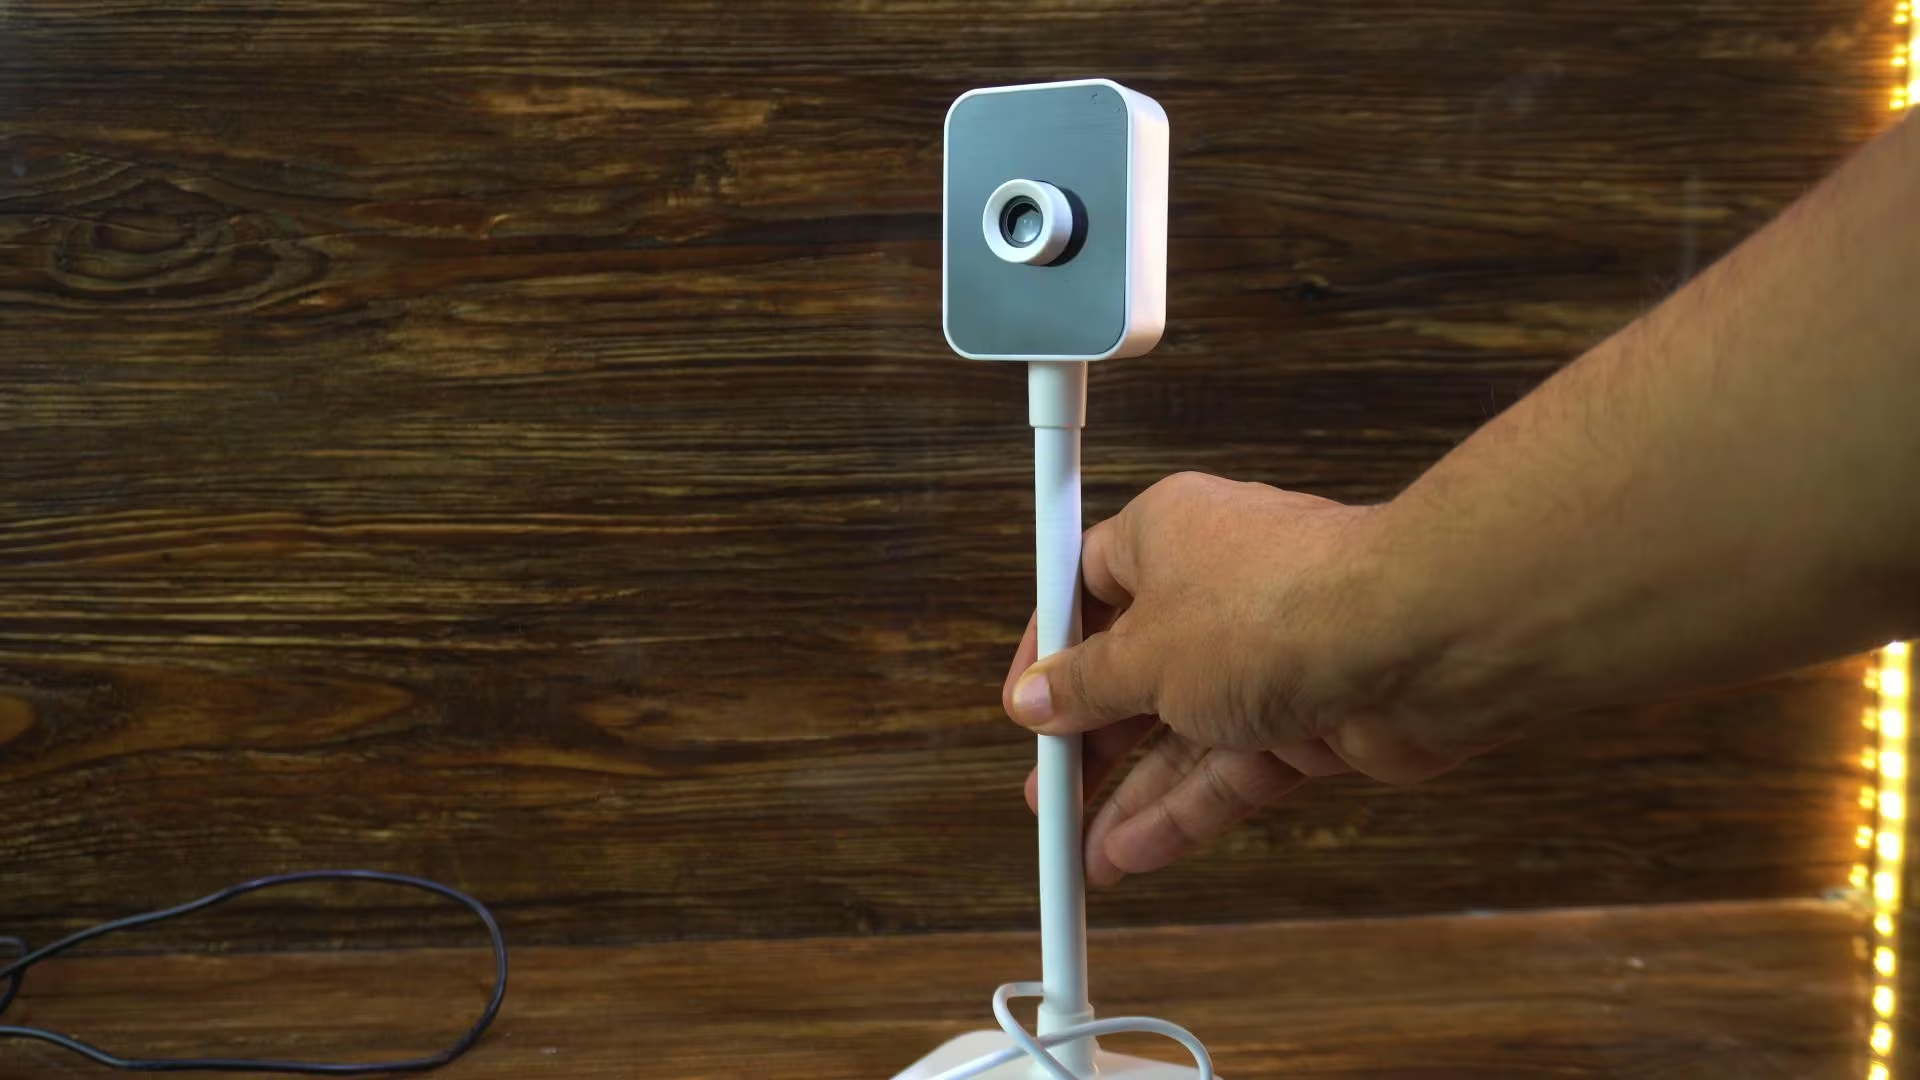
You don’t need to buy any fancy or expensive webcam for this.
Almost any USB webcam will work.
But of course, if you can afford it, I would recommend going for a good-quality HD webcam; because better image quality always gives better AI results.
The good thing is, USB cameras are easy to use, just plug them in, and you are ready to go.
Downloading the Camera Script Folder
You can download this folder from my Patreon page.

After downloading it, simply copy and paste the folder onto your desktop.
Inside this folder, you will find two more folders.
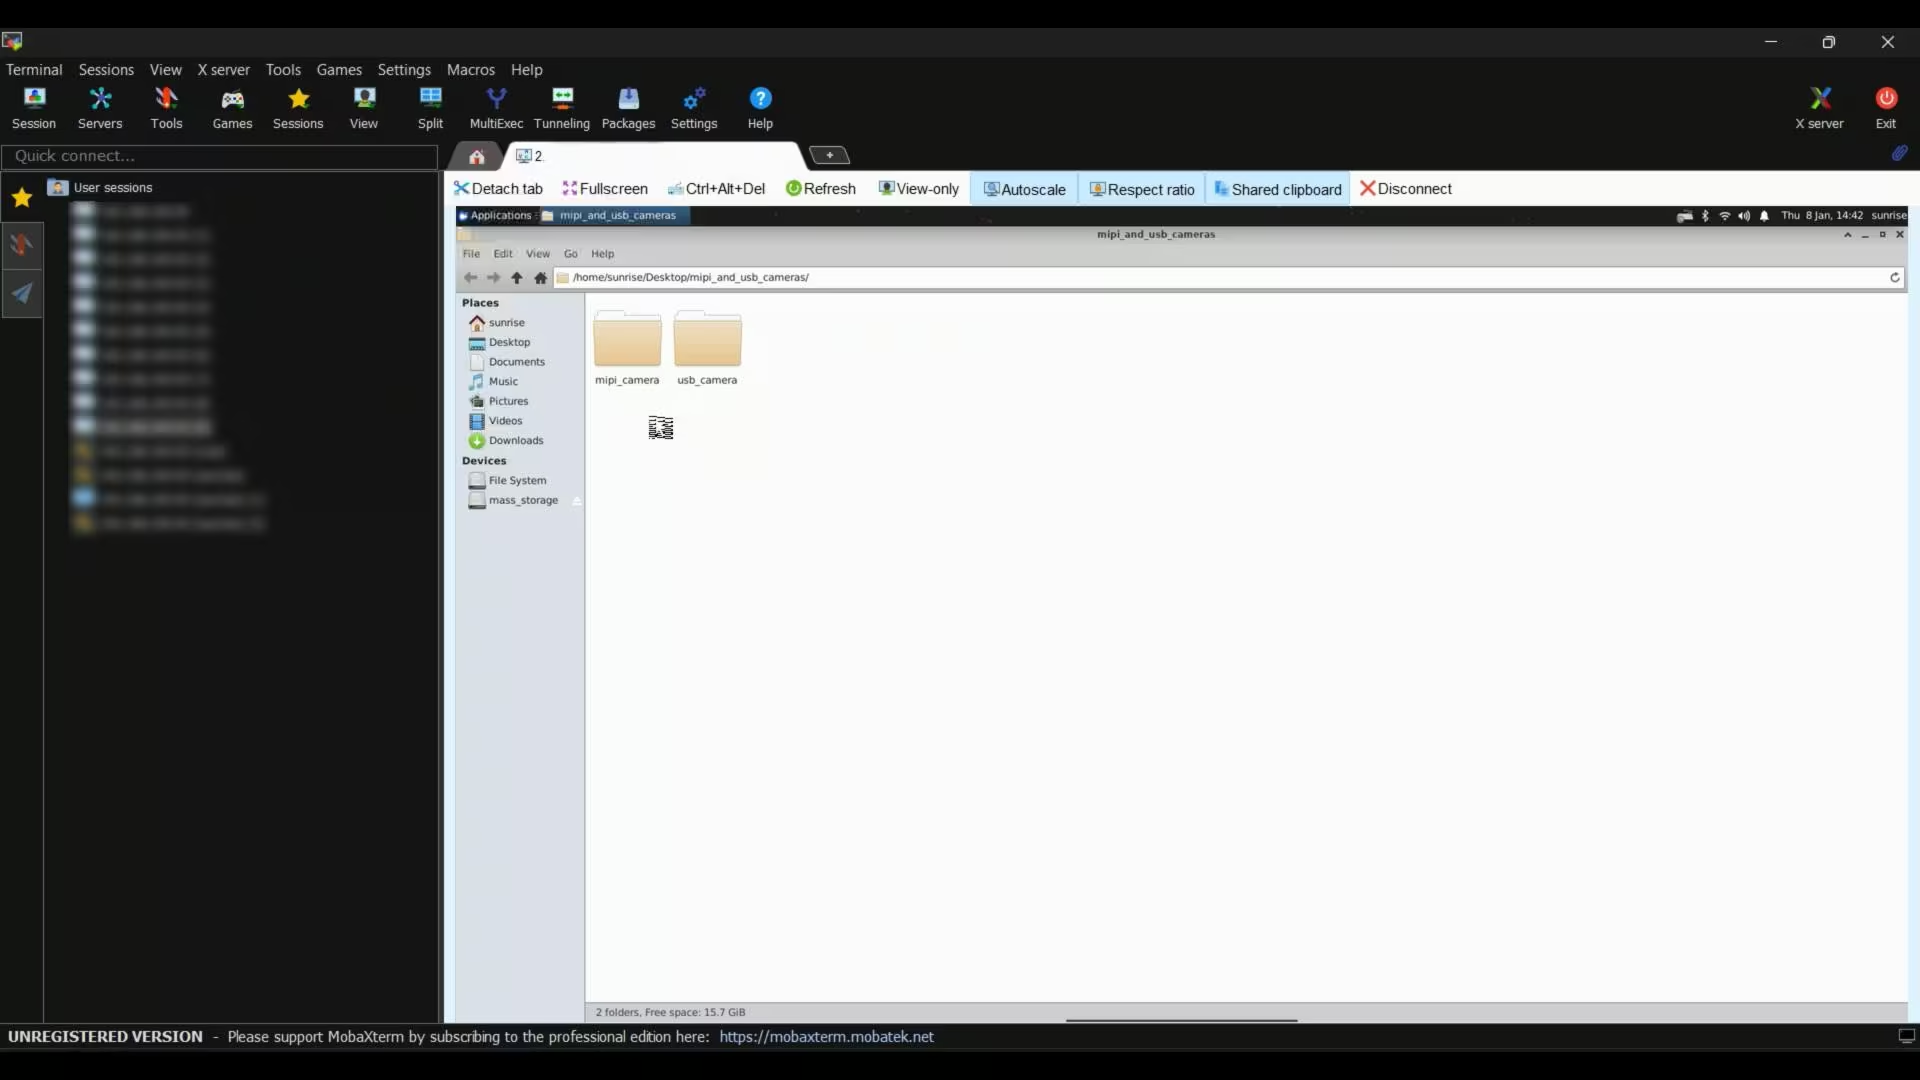
One folder contains scripts related to the MIPI camera, and the other folder contains scripts for the USB camera.
USB Camera with RDK X5:
So, let’s go ahead and open the USB camera folder first.
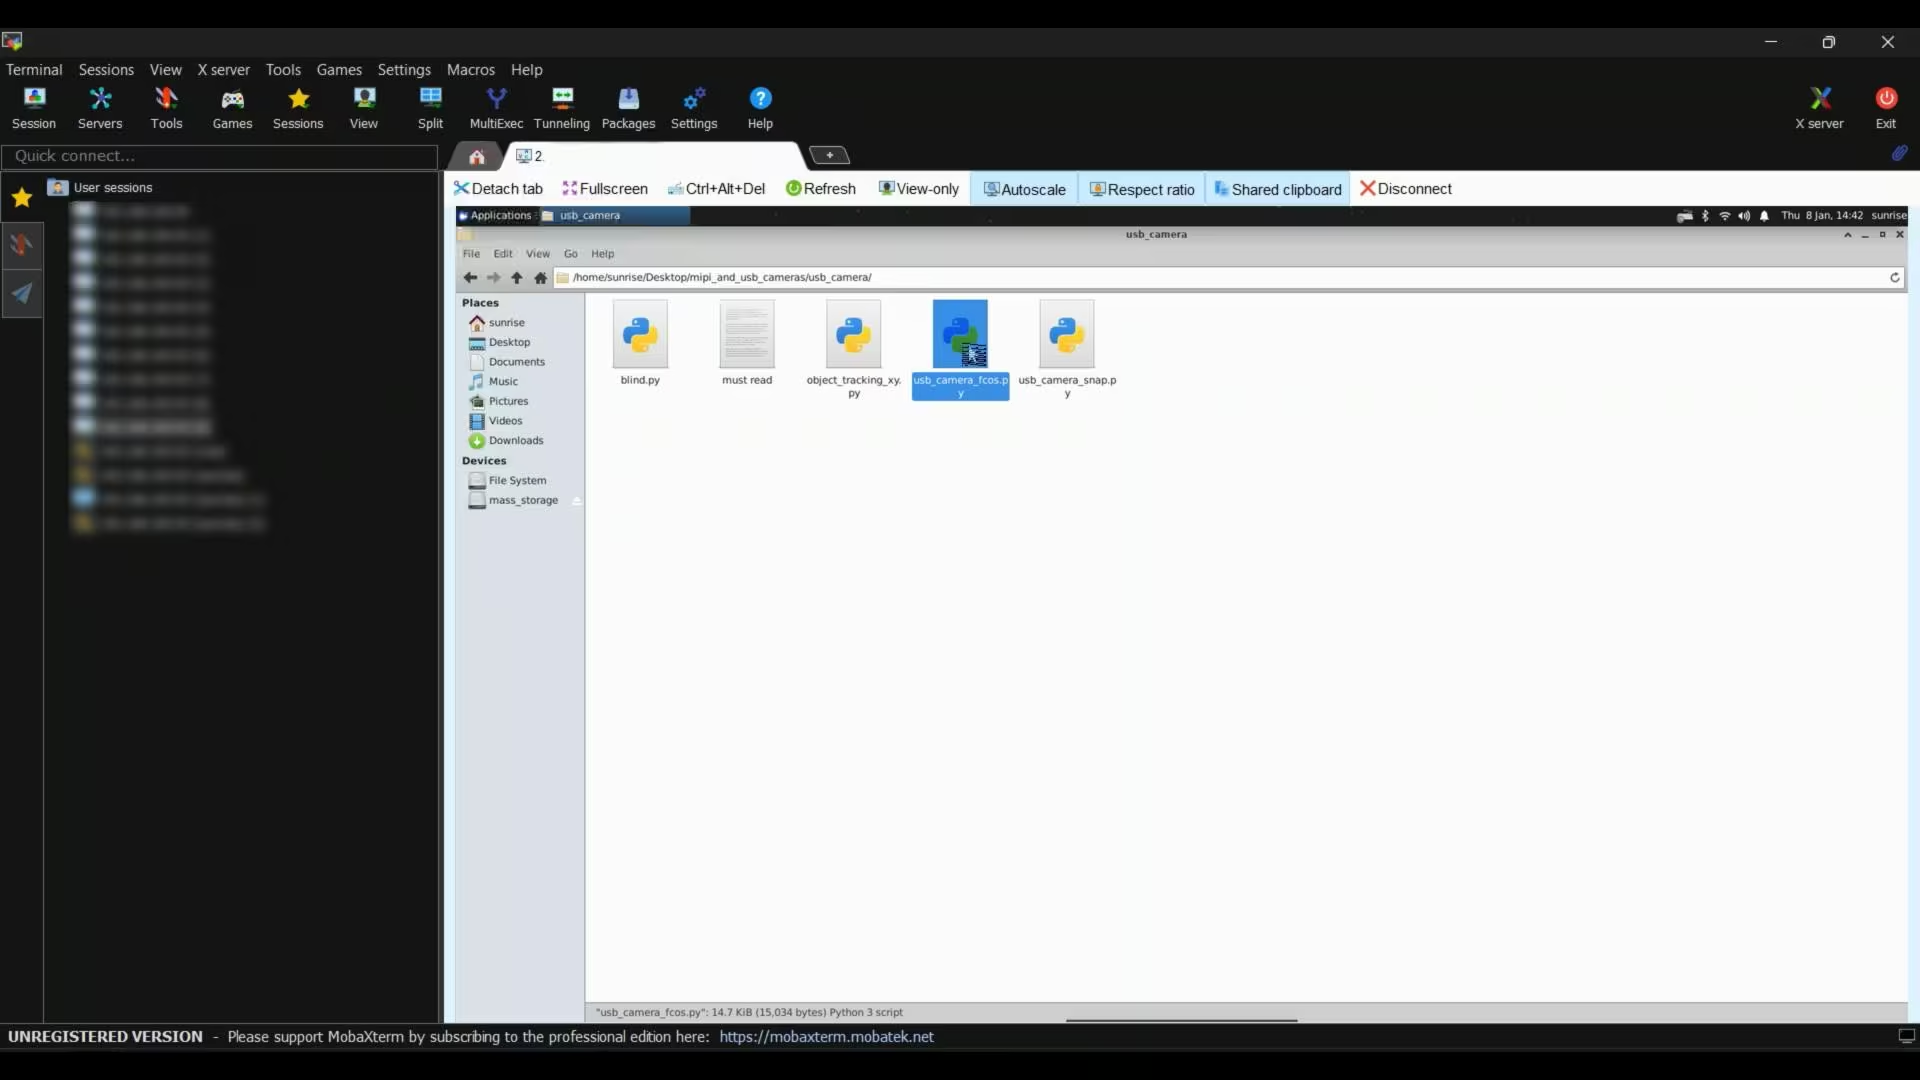
First, let’s open this basic python script.
RDK X5 USB Camera Basic Script:
|
1 2 3 4 5 6 7 8 9 10 11 12 13 14 15 16 17 18 19 20 21 22 23 24 25 26 27 28 29 30 31 32 33 34 35 36 37 38 39 40 41 42 43 44 45 46 47 48 49 50 51 52 53 54 55 56 57 58 59 60 61 62 63 64 65 66 67 68 69 70 71 72 73 74 75 76 77 78 79 80 81 82 83 84 85 86 87 88 89 90 91 92 93 94 95 96 97 98 99 100 101 102 103 104 105 106 107 108 109 110 111 112 113 114 115 116 117 118 119 120 121 122 123 124 125 126 127 128 129 130 131 132 133 134 135 136 137 138 139 140 141 142 143 144 145 146 147 148 149 150 151 152 153 154 155 156 157 158 159 160 161 162 163 164 165 166 167 168 169 170 171 172 173 174 175 176 177 178 179 180 181 182 183 184 185 186 187 188 189 190 191 192 193 194 195 196 197 198 199 200 201 202 203 204 205 206 207 208 209 210 211 212 213 214 215 216 217 218 219 220 221 222 223 224 225 226 227 228 229 230 231 232 233 234 235 236 237 238 239 240 241 242 243 244 245 246 247 248 249 250 251 252 253 254 255 256 257 258 259 260 261 262 263 264 265 266 267 268 269 270 271 272 273 274 275 276 277 278 279 280 281 282 283 284 285 286 287 288 289 290 291 292 293 294 295 296 297 298 299 300 301 302 303 304 305 306 307 308 309 310 311 312 313 314 315 316 317 318 319 320 321 322 323 324 325 326 327 328 329 330 331 332 333 334 335 336 337 338 339 340 341 342 343 344 345 346 347 348 349 350 351 352 353 354 355 356 357 358 359 360 361 362 363 364 365 366 367 368 369 370 371 372 373 374 375 376 377 378 379 380 381 382 383 384 385 386 387 388 389 390 391 392 393 394 395 396 397 398 399 400 401 402 403 |
#!/usr/bin/env python3 ################################################################################ # Copyright (c) 2024,D-Robotics. # # Licensed under the Apache License, Version 2.0 (the "License"); # you may not use this file except in compliance with the License. # You may obtain a copy of the License at # # http://www.apache.org/licenses/LICENSE-2.0 # # Unless required by applicable law or agreed to in writing, software # distributed under the License is distributed on an "AS IS" BASIS, # WITHOUT WARRANTIES OR CONDITIONS OF ANY KIND, either express or implied. # See the License for the specific language governing permissions and # limitations under the License. ################################################################################ import sys import signal import os try: from hobot_dnn import pyeasy_dnn as dnn except ImportError: from hobot_dnn_rdkx5 import pyeasy_dnn as dnn try: from hobot_vio import libsrcampy as srcampy except ImportError: from hobot_vio_rdkx5 import libsrcampy as srcampy import numpy as np import cv2 import colorsys from time import time import ctypes import json def signal_handler(signal, frame): print("\nExiting program") sys.exit(0) output_tensors = None fcos_postprocess_info = None class hbSysMem_t(ctypes.Structure): _fields_ = [ ("phyAddr",ctypes.c_double), ("virAddr",ctypes.c_void_p), ("memSize",ctypes.c_int) ] class hbDNNQuantiShift_yt(ctypes.Structure): _fields_ = [ ("shiftLen",ctypes.c_int), ("shiftData",ctypes.c_char_p) ] class hbDNNQuantiScale_t(ctypes.Structure): _fields_ = [ ("scaleLen",ctypes.c_int), ("scaleData",ctypes.POINTER(ctypes.c_float)), ("zeroPointLen",ctypes.c_int), ("zeroPointData",ctypes.c_char_p) ] class hbDNNTensorShape_t(ctypes.Structure): _fields_ = [ ("dimensionSize",ctypes.c_int * 8), ("numDimensions",ctypes.c_int) ] class hbDNNTensorProperties_t(ctypes.Structure): _fields_ = [ ("validShape",hbDNNTensorShape_t), ("alignedShape",hbDNNTensorShape_t), ("tensorLayout",ctypes.c_int), ("tensorType",ctypes.c_int), ("shift",hbDNNQuantiShift_yt), ("scale",hbDNNQuantiScale_t), ("quantiType",ctypes.c_int), ("quantizeAxis", ctypes.c_int), ("alignedByteSize",ctypes.c_int), ("stride",ctypes.c_int * 8) ] class hbDNNTensor_t(ctypes.Structure): _fields_ = [ ("sysMem",hbSysMem_t * 4), ("properties",hbDNNTensorProperties_t) ] class FcosPostProcessInfo_t(ctypes.Structure): _fields_ = [ ("height",ctypes.c_int), ("width",ctypes.c_int), ("ori_height",ctypes.c_int), ("ori_width",ctypes.c_int), ("score_threshold",ctypes.c_float), ("nms_threshold",ctypes.c_float), ("nms_top_k",ctypes.c_int), ("is_pad_resize",ctypes.c_int) ] libpostprocess = ctypes.CDLL('/usr/lib/libpostprocess.so') get_Postprocess_result = libpostprocess.FcosPostProcess get_Postprocess_result.argtypes = [ctypes.POINTER(FcosPostProcessInfo_t)] get_Postprocess_result.restype = ctypes.c_char_p def get_TensorLayout(Layout): if Layout == "NCHW": return int(2) else: return int(0) def limit_display_cord(coor): coor[0] = max(min(1920, coor[0]), 0) # min coor is set to 2 not 0, leaving room for string display coor[1] = max(min(1080, coor[1]), 2) coor[2] = max(min(1920, coor[2]), 0) coor[3] = max(min(1080, coor[3]), 0) return coor # detection model class names def get_classes(): return np.array(["person", "bicycle", "car", "motorcycle", "airplane", "bus", "train", "truck", "boat", "traffic light", "fire hydrant", "stop sign", "parking meter", "bench", "bird", "cat", "dog", "horse", "sheep", "cow", "elephant", "bear", "zebra", "giraffe", "backpack", "umbrella", "handbag", "tie", "suitcase", "frisbee", "skis", "snowboard", "sports ball", "kite", "baseball bat", "baseball glove", "skateboard", "surfboard", "tennis racket", "bottle", "wine glass", "cup", "fork", "knife", "spoon", "bowl", "banana", "apple", "sandwich", "orange", "broccoli", "carrot", "hot dog", "pizza", "donut", "cake", "chair", "couch", "potted plant", "bed", "dining table", "toilet", "tv", "laptop", "mouse", "remote", "keyboard", "cell phone", "microwave", "oven", "toaster", "sink", "refrigerator", "book", "clock", "vase", "scissors", "teddy bear", "hair drier", "toothbrush"]) # bgr格式图片转换成 NV12格式 def bgr2nv12_opencv(image): height, width = image.shape[0], image.shape[1] area = height * width yuv420p = cv2.cvtColor(image, cv2.COLOR_BGR2YUV_I420).reshape((area * 3 // 2,)) y = yuv420p[:area] uv_planar = yuv420p[area:].reshape((2, area // 4)) uv_packed = uv_planar.transpose((1, 0)).reshape((area // 2,)) nv12 = np.zeros_like(yuv420p) nv12[:height * width] = y nv12[height * width:] = uv_packed return nv12 def draw_bboxs(image, bboxes, ori_w, ori_h, target_w, target_h, classes=get_classes()): """draw the bboxes in the original image and rescale the coordinates""" num_classes = len(classes) image_h, image_w, channel = image.shape hsv_tuples = [(1.0 * x / num_classes, 1., 1.) for x in range(num_classes)] colors = list(map(lambda x: colorsys.hsv_to_rgb(*x), hsv_tuples)) colors = list( map(lambda x: (int(x[0] * 255), int(x[1] * 255), int(x[2] * 255)), colors)) fontScale = 0.5 bbox_thick = int(0.6 * (image_h + image_w) / 600) # Scaling factors from original to target resolution scale_x = target_w / ori_w scale_y = target_h / ori_h for i, result in enumerate(bboxes): bbox = result['bbox'] # 矩形框位置信息 score = result['score'] # 得分 id = int(result['id']) # id name = result['name'] # 类别名称 # coor = limit_display_cord(bbox) coor = [round(i) for i in bbox] # Rescale the bbox coordinates coor[0] = int(coor[0] * scale_x) coor[1] = int(coor[1] * scale_y) coor[2] = int(coor[2] * scale_x) coor[3] = int(coor[3] * scale_y) bbox_color = colors[id] c1, c2 = (coor[0], coor[1]), (coor[2], coor[3]) cv2.rectangle(image, c1, c2, bbox_color, bbox_thick) classes_name = name bbox_mess = '%s: %.2f' % (classes_name, score) t_size = cv2.getTextSize(bbox_mess, 0, fontScale, thickness=bbox_thick // 2)[0] cv2.rectangle(image, c1, (c1[0] + t_size[0], c1[1] - t_size[1] - 3), bbox_color, -1) cv2.putText(image, bbox_mess, (c1[0], c1[1] - 2), cv2.FONT_HERSHEY_SIMPLEX, fontScale, (0, 0, 0), bbox_thick // 2, lineType=cv2.LINE_AA) print("{} is in the picture with confidence:{:.4f}".format( classes_name, score)) # cv2.imwrite("demo.jpg", image) return image def get_display_res(): if os.path.exists("/usr/bin/get_hdmi_res") == False: return 1920, 1080 import subprocess p = subprocess.Popen(["/usr/bin/get_hdmi_res"], stdout=subprocess.PIPE) result = p.communicate() res = result[0].split(b',') res[1] = max(min(int(res[1]), 1920), 0) res[0] = max(min(int(res[0]), 1080), 0) return int(res[1]), int(res[0]) def is_usb_camera(device): try: cap = cv2.VideoCapture(device) if not cap.isOpened(): return False cap.release() return True except Exception: return False def find_first_usb_camera(): video_devices = [os.path.join('/dev', dev) for dev in os.listdir('/dev') if dev.startswith('video')] for dev in video_devices: if is_usb_camera(dev): return dev return None def print_properties(pro): print("tensor type:", pro.tensor_type) print("data type:", pro.dtype) print("layout:", pro.layout) print("shape:", pro.shape) if __name__ == '__main__': signal.signal(signal.SIGINT, signal_handler) models = dnn.load('/app/model/basic/fcos_512x512_nv12.bin') # 打印输入 tensor 的属性 print_properties(models[0].inputs[0].properties) # 打印输出 tensor 的属性 print(len(models[0].outputs)) for output in models[0].outputs: print_properties(output.properties) if len(sys.argv) > 1: video_device = sys.argv[1] else: video_device = find_first_usb_camera() if video_device is None: print("No USB camera found.") sys.exit(-1) print(f"Opening video device: {video_device}") cap = cv2.VideoCapture(video_device) if(not cap.isOpened()): exit(-1) print("Open usb camera successfully") # 设置usb camera的输出图像格式为 MJPEG, 分辨率 640 x 480 # 可以通过 v4l2-ctl -d /dev/video8 --list-formats-ext 命令查看摄像头支持的分辨率 # 根据应用需求调整该采集图像的分辨率 codec = cv2.VideoWriter_fourcc( 'M', 'J', 'P', 'G' ) cap.set(cv2.CAP_PROP_FOURCC, codec) cap.set(cv2.CAP_PROP_FPS, 30) cap.set(cv2.CAP_PROP_FRAME_WIDTH, 640) cap.set(cv2.CAP_PROP_FRAME_HEIGHT, 480) # Get HDMI display object disp = srcampy.Display() # For the meaning of parameters, please refer to the relevant documents of HDMI display # disp_w, disp_h = get_display_res() resolution_list = disp.get_display_res() for res in resolution_list: # First, exclude 0 resolution and other invalid resolutions. if res[0] == 0 | res[1] == 0: break # If disp is set, it defaults to iterating to the smallest resolution for use. disp_w = res[0] disp_h = res[1] disp.display(0, disp_w, disp_h) # 获取结构体信息 fcos_postprocess_info = FcosPostProcessInfo_t() fcos_postprocess_info.height = 512 fcos_postprocess_info.width = 512 fcos_postprocess_info.ori_height = disp_h fcos_postprocess_info.ori_width = disp_w fcos_postprocess_info.score_threshold = 0.5 fcos_postprocess_info.nms_threshold = 0.6 fcos_postprocess_info.nms_top_k = 5 fcos_postprocess_info.is_pad_resize = 0 output_tensors = (hbDNNTensor_t * len(models[0].outputs))() for i in range(len(models[0].outputs)): output_tensors[i].properties.tensorLayout = get_TensorLayout(models[0].outputs[i].properties.layout) #print(output_tensors[i].properties.tensorLayout) if (len( models[0].outputs[i].properties.scale_data) == 0): output_tensors[i].properties.quantiType = 0 else: output_tensors[i].properties.quantiType = 2 scale_data_tmp = models[0].outputs[i].properties.scale_data.reshape(1, 1, 1, models[0].outputs[i].properties.shape[3]) output_tensors[i].properties.scale.scaleData = scale_data_tmp.ctypes.data_as(ctypes.POINTER(ctypes.c_float)) for j in range(len(models[0].outputs[i].properties.shape)): output_tensors[i].properties.validShape.dimensionSize[j] = models[0].outputs[i].properties.shape[j] output_tensors[i].properties.alignedShape.dimensionSize[j] = models[0].outputs[i].properties.shape[j] start_time = time() image_counter = 0 while True: _ ,frame = cap.read() # print(frame.shape) if frame is None: print("Failed to get image from usb camera") # 把图片缩放到模型的输入尺寸 # 获取算法模型的输入tensor 的尺寸 h, w = models[0].inputs[0].properties.shape[2], models[0].inputs[0].properties.shape[3] des_dim = (w, h) resized_data = cv2.resize(frame, des_dim, interpolation=cv2.INTER_AREA) nv12_data = bgr2nv12_opencv(resized_data) t0 = time() # Forward outputs = models[0].forward(nv12_data) t1 = time() # print("forward time is :", (t1 - t0)) # Do post process strides = [8, 16, 32, 64, 128] for i in range(len(strides)): if (output_tensors[i].properties.quantiType == 0): output_tensors[i].sysMem[0].virAddr = ctypes.cast(outputs[i].buffer.ctypes.data_as(ctypes.POINTER(ctypes.c_float)), ctypes.c_void_p) output_tensors[i + 5].sysMem[0].virAddr = ctypes.cast(outputs[i + 5].buffer.ctypes.data_as(ctypes.POINTER(ctypes.c_float)), ctypes.c_void_p) output_tensors[i + 10].sysMem[0].virAddr = ctypes.cast(outputs[i + 10].buffer.ctypes.data_as(ctypes.POINTER(ctypes.c_float)), ctypes.c_void_p) else: output_tensors[i].sysMem[0].virAddr = ctypes.cast(outputs[i].buffer.ctypes.data_as(ctypes.POINTER(ctypes.c_int32)), ctypes.c_void_p) output_tensors[i + 5].sysMem[0].virAddr = ctypes.cast(outputs[i + 5].buffer.ctypes.data_as(ctypes.POINTER(ctypes.c_int32)), ctypes.c_void_p) output_tensors[i + 10].sysMem[0].virAddr = ctypes.cast(outputs[i + 10].buffer.ctypes.data_as(ctypes.POINTER(ctypes.c_int32)), ctypes.c_void_p) libpostprocess.FcosdoProcess(output_tensors[i], output_tensors[i + 5], output_tensors[i + 10], ctypes.pointer(fcos_postprocess_info), i) result_str = get_Postprocess_result(ctypes.pointer(fcos_postprocess_info)) result_str = result_str.decode('utf-8') t2 = time() # print("FcosdoProcess time is :", (t2 - t1)) # print(result_str) # draw result # 解析JSON字符串 data = json.loads(result_str[14:]) if frame.shape[0]!=disp_h or frame.shape[1]!=disp_w: frame = cv2.resize(frame, (disp_w,disp_h), interpolation=cv2.INTER_AREA) # Draw bboxs # box_bgr = draw_bboxs(frame, data) box_bgr = draw_bboxs(frame, data, fcos_postprocess_info.width, fcos_postprocess_info.height, disp_w, disp_h) # cv2.imwrite("imf.jpg", box_bgr) # Convert to nv12 for HDMI display box_nv12 = bgr2nv12_opencv(box_bgr) disp.set_img(box_nv12.tobytes()) finish_time = time() image_counter += 1 if finish_time - start_time > 10: print(start_time, finish_time, image_counter) print("FPS: {:.2f}".format(image_counter / (finish_time - start_time))) start_time = finish_time image_counter = 0 |
This script is using the model called fcos_512x512_nv12.bin.
If you go to the same path on your RDK X5… /app/model/basic/ … You will find many more AI models available.
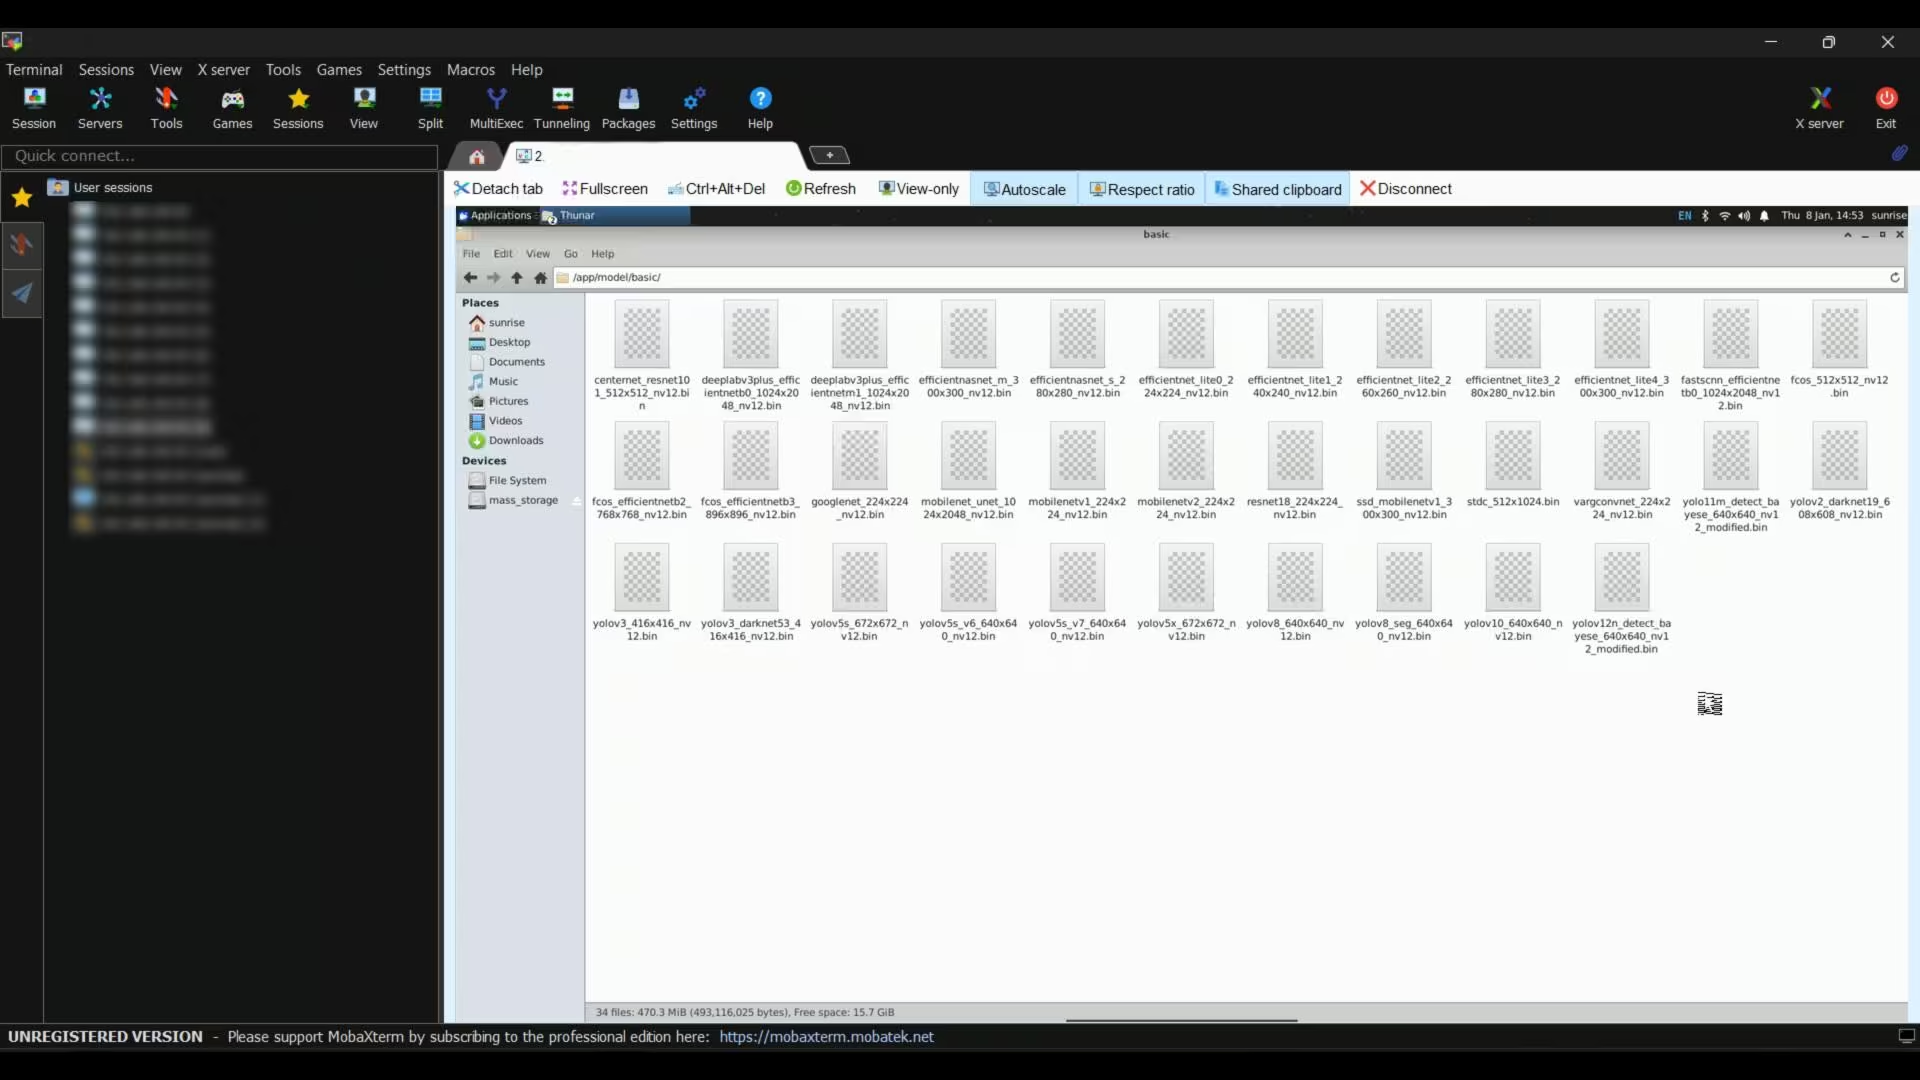
We will use these models later in this series to build different and more advanced projects.
But for now, let’s stick with this model; because it’s a really important one.
So, what is fcos_512x512_nv12.bin?
This is a real-time object detection model. It allows the RDK X5 to see and understand objects in front of the camera.
Using this model, you can:
- Detect people
- Detect common objects
- Track movement in real time
- Trigger actions based on detection results
For example:
- Turn ON a light when a person appears
- Start video recording automatically
- Control a robot when an object is detected
- Build smart surveillance or monitoring systems
The 512×512 resolution gives a good balance between accuracy and speed, and the NV12 format is optimized for the RDK X5 hardware, so everything runs fast and smoothly on the onboard BPU.
This makes it perfect for beginners, and also powerful enough for real-world AI projects.
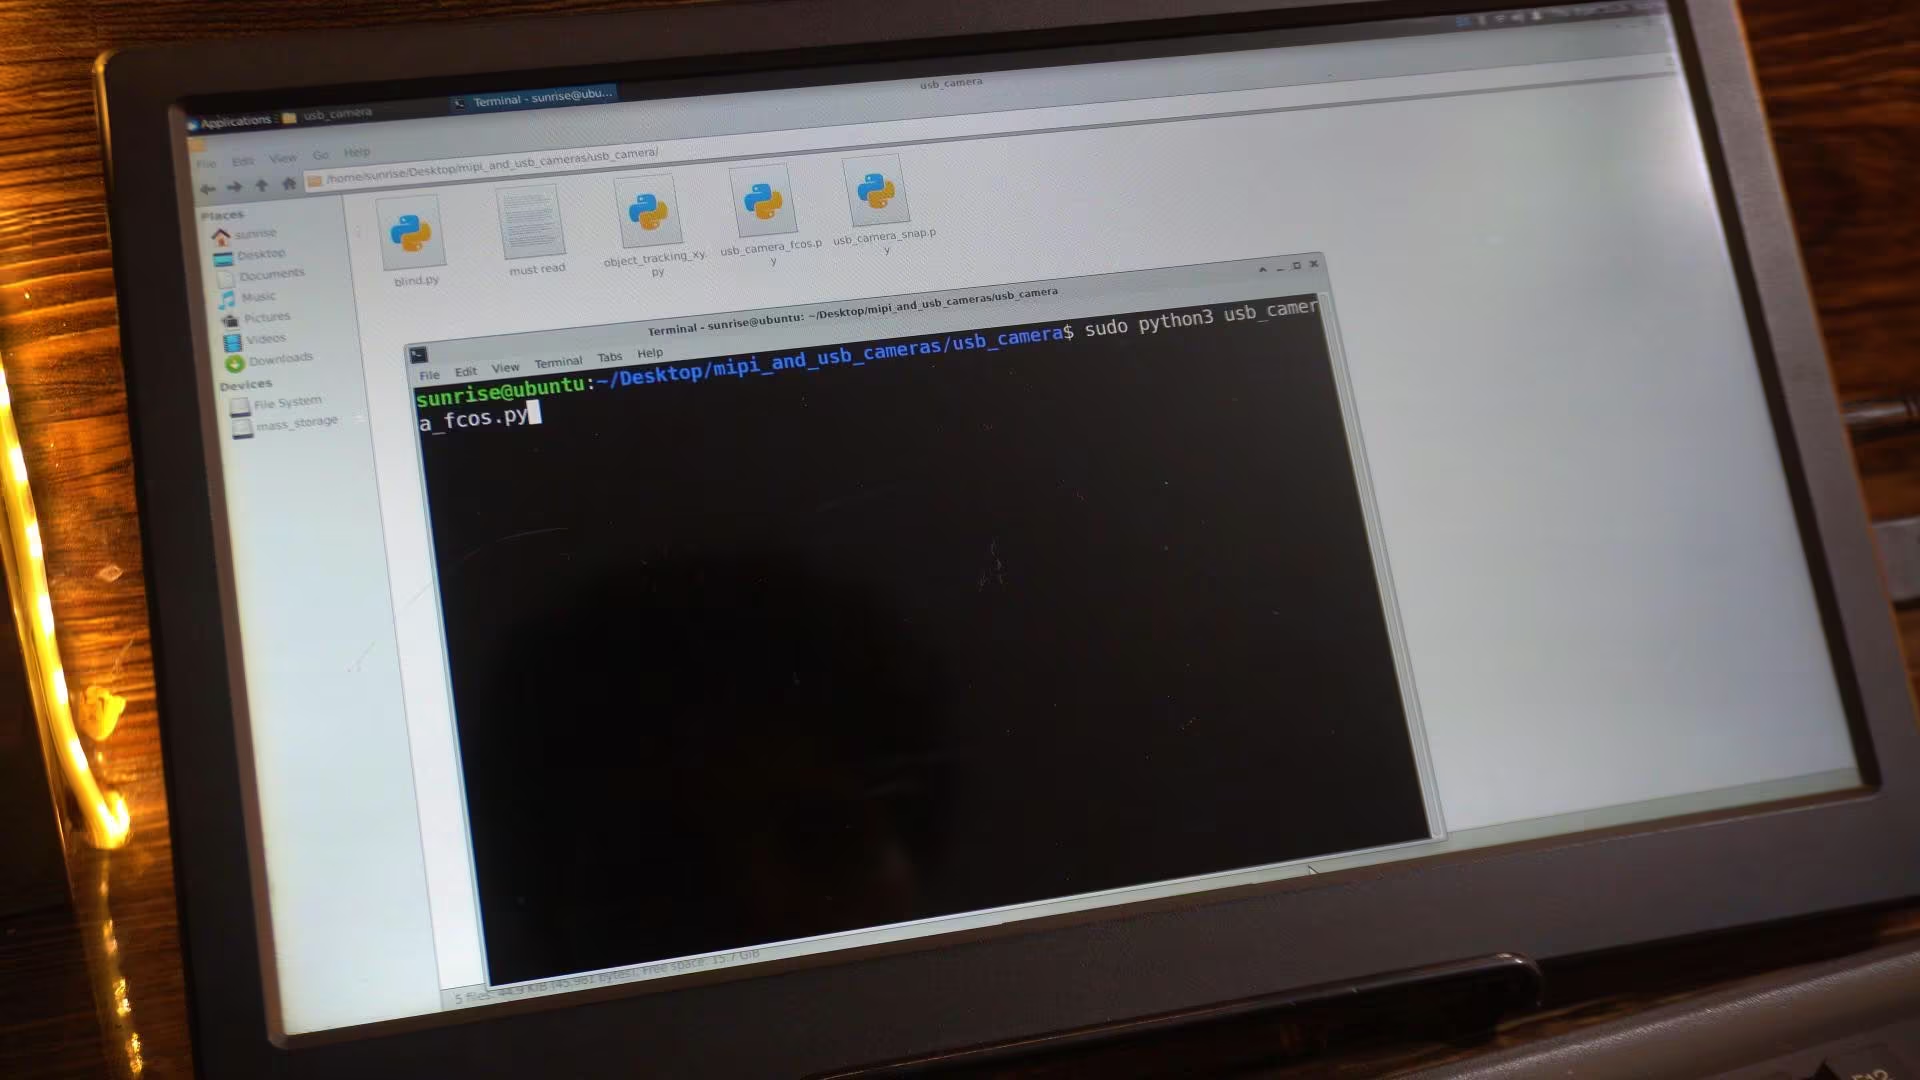
To run this script, make sure you are inside the same folder.
Right-click your mouse and select “Open Terminal Here”.
Then type this command:
|
1 |
sudo python3 usb_camera_fcos.py |
By default, this model detects all supported objects.
And by “all objects,” I mean the objects that are available in the COCO class list.
If you want to detect your own custom object, you will need to train your own dataset and model.
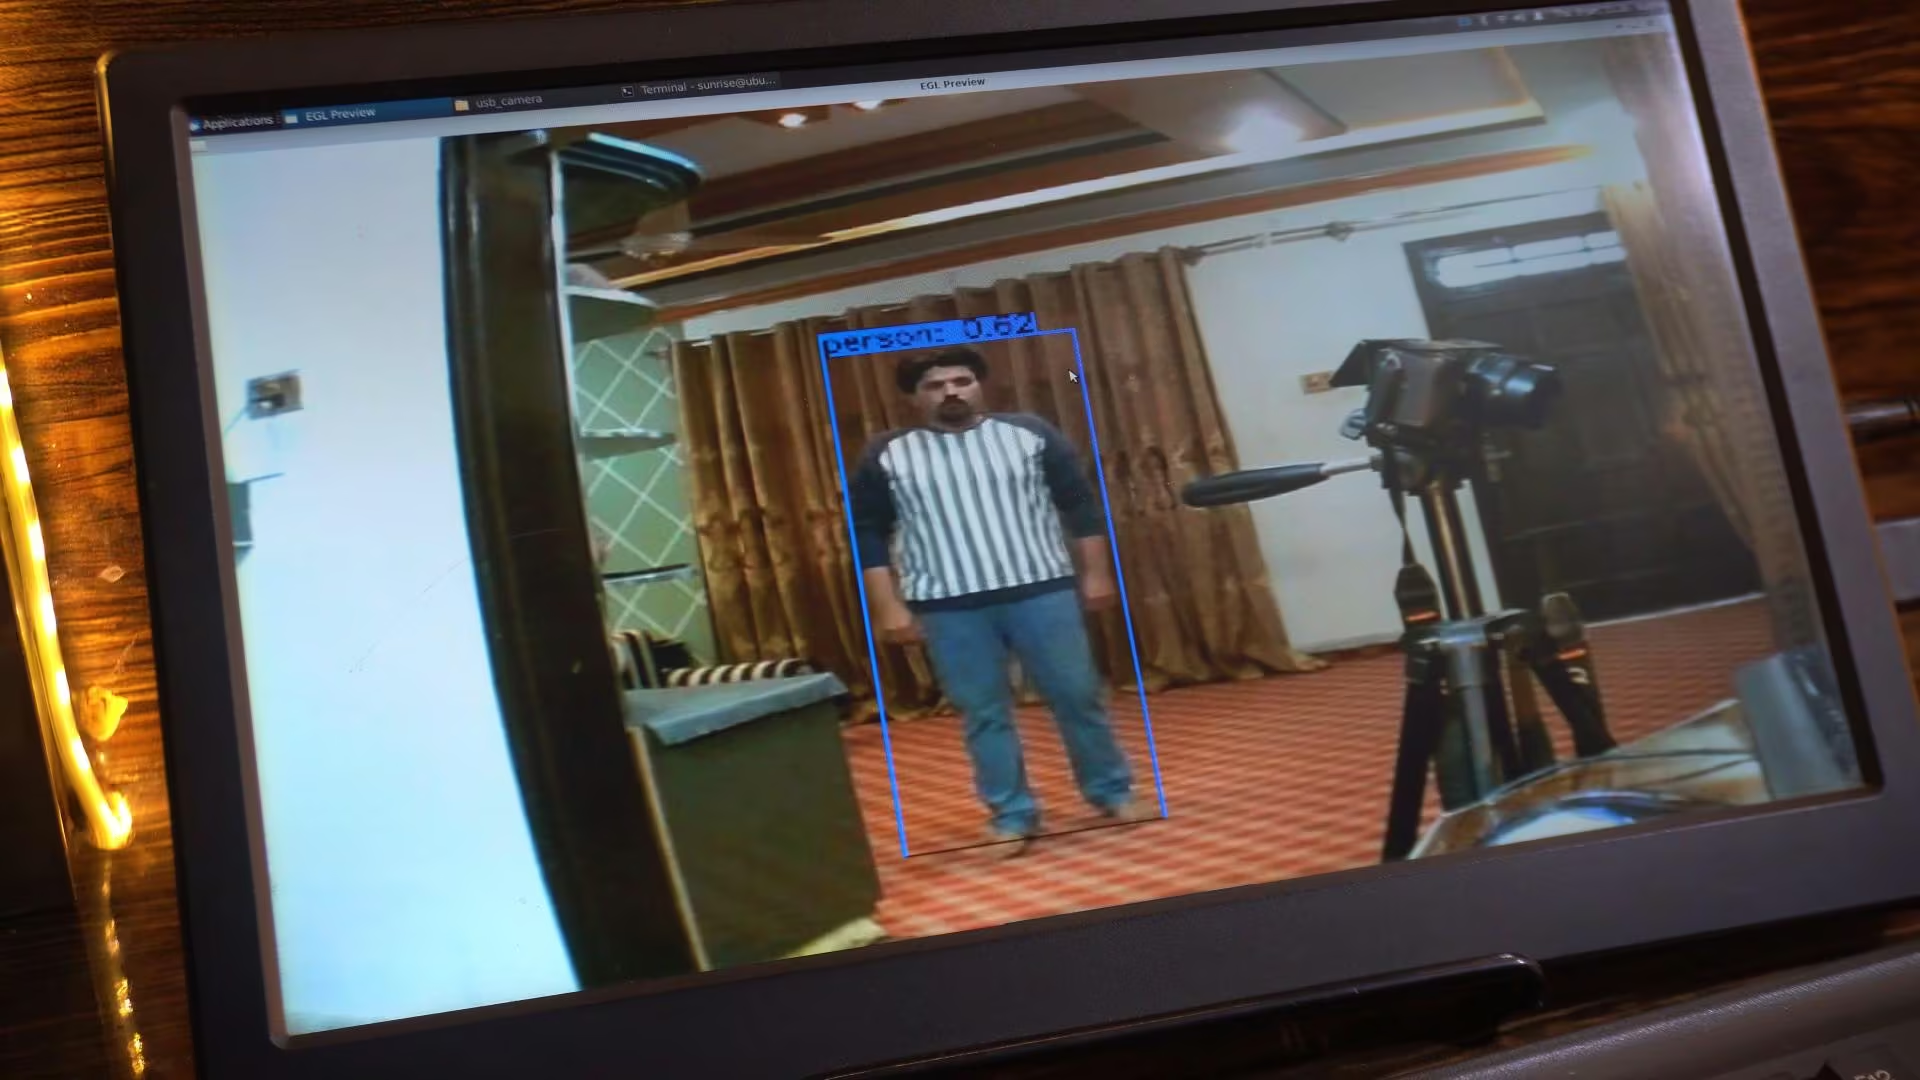
As you can see on the screen, the model is already creating a bounding box around me. And I have full control over its thickness and font size of the label.
I will explain and adjust all of these settings in just a moment.
Let’s open this other script.
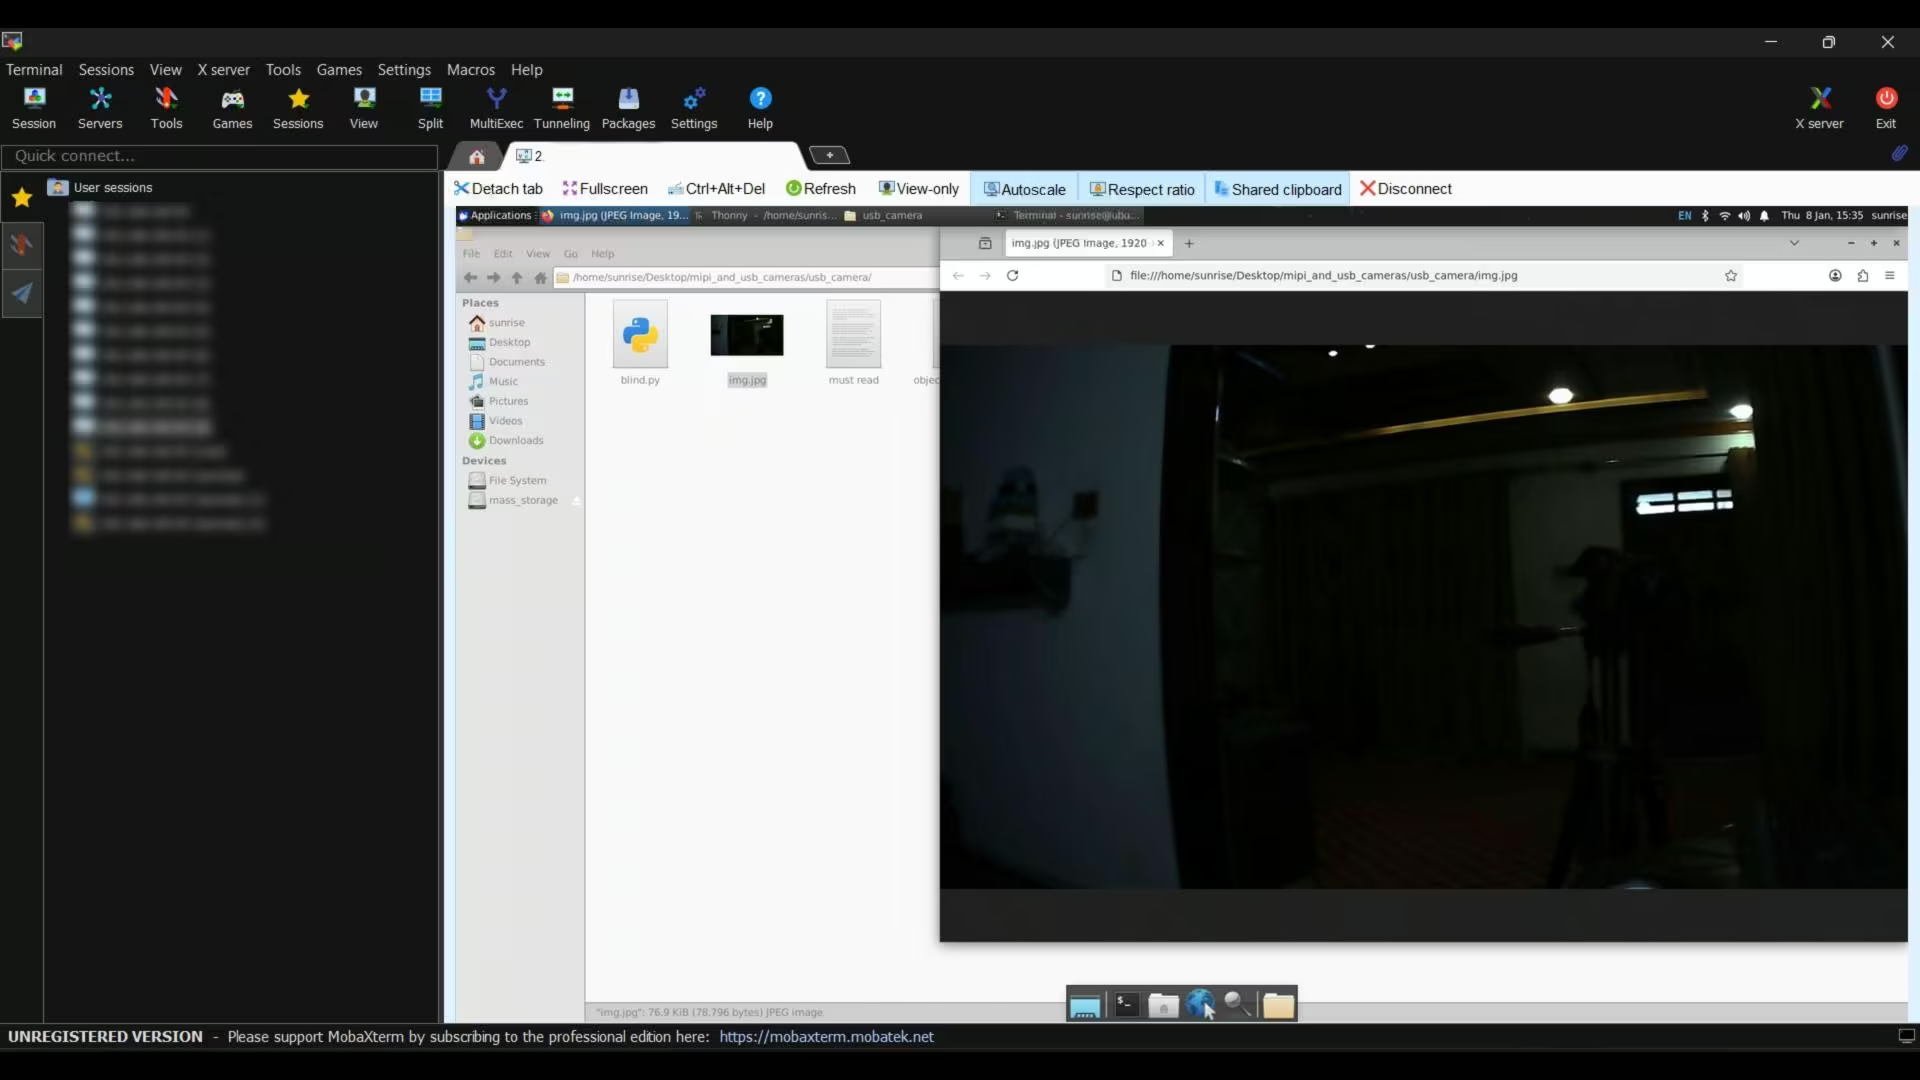
Capturing an Image on RDK X5 via USB Camera:
|
1 2 3 4 5 6 7 8 9 10 11 12 13 14 15 16 17 18 19 20 21 22 23 24 25 26 27 28 29 30 31 32 33 34 35 36 37 38 39 40 41 42 43 44 45 46 47 48 49 50 51 52 53 54 55 56 57 58 59 60 61 62 63 64 65 66 67 68 69 70 71 72 73 74 |
#!/usr/bin/env python3 ################################################################################ # Copyright (c) 2024,D-Robotics. # # Licensed under the Apache License, Version 2.0 (the "License"); # you may not use this file except in compliance with the License. # You may obtain a copy of the License at # # http://www.apache.org/licenses/LICENSE-2.0 # # Unless required by applicable law or agreed to in writing, software # distributed under the License is distributed on an "AS IS" BASIS, # WITHOUT WARRANTIES OR CONDITIONS OF ANY KIND, either express or implied. # See the License for the specific language governing permissions and # limitations under the License. ################################################################################ import os import sys import cv2 def is_usb_camera(device): try: cap = cv2.VideoCapture(device) if not cap.isOpened(): return False cap.release() return True except Exception: return False def find_first_usb_camera(): video_devices = [os.path.join('/dev', dev) for dev in os.listdir('/dev') if dev.startswith('video')] for dev in video_devices: if is_usb_camera(dev): return dev return None if __name__ == '__main__': if len(sys.argv) > 1: video_device = sys.argv[1] else: video_device = find_first_usb_camera() if video_device is None: print("No USB camera found.") sys.exit(-1) print(f"Opening video device: {video_device}") cap = cv2.VideoCapture(video_device) if not cap.isOpened(): print(f"Failed to open video device: {video_device}") sys.exit(-1) print("Open USB camera successfully") # 设置 USB camera 的输出图像格式为 MJPEG,分辨率 1920 x 1080 codec = cv2.VideoWriter_fourcc('M', 'J', 'P', 'G') cap.set(cv2.CAP_PROP_FOURCC, codec) cap.set(cv2.CAP_PROP_FPS, 30) cap.set(cv2.CAP_PROP_FRAME_WIDTH, 1920) cap.set(cv2.CAP_PROP_FRAME_HEIGHT, 1080) ret, frame = cap.read() if not ret or frame is None: print("Failed to get image from USB camera") sys.exit(-1) cv2.imwrite("img.jpg", frame) print("Image saved as img.jpg") cap.release() |
let me quickly explain what this script is doing. First, it imports some basic libraries like OpenCV, OS, and SYS, which are used to access the USB camera, interact with the system, and handle input arguments. Then, the script automatically checks which USB camera is connected to the system by scanning the /dev directory, finding all video devices, and selecting the first available USB camera that can be opened successfully. This is very useful because you don’t need to manually specify the camera device every time.
After that, the script opens the USB camera using OpenCV and sets some important parameters, such as the MJPEG format, 30 frames per second, and a Full HD resolution of 1920 by 1080, ensuring good image quality.
Finally, it captures a single frame from the USB camera and saves it as an image file called img.jpg. Overall, this script is mainly used to test the USB camera, verify that it is working properly, and confirm that the camera is correctly detected by the system before running any AI models on top of it.
Let’s run this script.
Type this command:
|
1 |
sudo python3 usb_camera_fcos.py |
As you can see, the moment I ran this script, it automatically captured this image.
Let’s open this other script.
Tracking Object on RDK X5 Via USB Camera:
|
1 2 3 4 5 6 7 8 9 10 11 12 13 14 15 16 17 18 19 20 21 22 23 24 25 26 27 28 29 30 31 32 33 34 35 36 37 38 39 40 41 42 43 44 45 46 47 48 49 50 51 52 53 54 55 56 57 58 59 60 61 62 63 64 65 66 67 68 69 70 71 72 73 74 75 76 77 78 79 80 81 82 83 84 85 86 87 88 89 90 91 92 93 94 95 96 97 98 99 100 101 102 103 104 105 106 107 108 109 110 111 112 113 114 115 116 117 118 119 120 121 122 123 124 125 126 127 128 129 130 131 132 133 134 135 136 137 138 139 140 141 142 143 144 145 146 147 148 149 150 151 152 153 154 155 156 157 158 159 160 161 162 163 164 165 166 167 168 169 170 171 172 173 174 175 176 177 178 179 180 181 182 183 184 185 186 187 188 189 190 191 192 193 194 195 196 197 198 199 200 201 202 203 204 205 206 207 208 209 210 211 212 213 214 215 216 217 218 219 220 221 222 223 224 225 226 227 228 229 230 231 232 233 234 235 236 237 238 239 240 241 242 243 244 245 246 247 248 249 250 251 252 253 254 255 256 257 258 259 260 261 262 263 264 265 266 267 268 269 270 271 272 273 274 275 276 277 278 279 280 281 282 283 284 285 286 |
#!/usr/bin/env python3 ################################################################################ # Copyright (c) 2024,D-Robotics. # Licensed under the Apache License, Version 2.0 ################################################################################ import sys import signal import os try: from hobot_dnn import pyeasy_dnn as dnn except ImportError: from hobot_dnn_rdkx5 import pyeasy_dnn as dnn try: from hobot_vio import libsrcampy as srcampy except ImportError: from hobot_vio_rdkx5 import libsrcampy as srcampy import numpy as np import cv2 import colorsys from time import time import ctypes import json # --- CONFIGURATION --- # Change this variable to the object you want to track. # Options include: "person", "cell phone", "cup", "bottle", "keyboard", "mouse", etc. TARGET_OBJECT = "person" # --------------------- def signal_handler(signal, frame): print("\nExiting program") sys.exit(0) output_tensors = None fcos_postprocess_info = None class hbSysMem_t(ctypes.Structure): _fields_ = [("phyAddr",ctypes.c_double), ("virAddr",ctypes.c_void_p), ("memSize",ctypes.c_int)] class hbDNNQuantiShift_yt(ctypes.Structure): _fields_ = [("shiftLen",ctypes.c_int), ("shiftData",ctypes.c_char_p)] class hbDNNQuantiScale_t(ctypes.Structure): _fields_ = [("scaleLen",ctypes.c_int), ("scaleData",ctypes.POINTER(ctypes.c_float)), ("zeroPointLen",ctypes.c_int), ("zeroPointData",ctypes.c_char_p)] class hbDNNTensorShape_t(ctypes.Structure): _fields_ = [("dimensionSize",ctypes.c_int * 8), ("numDimensions",ctypes.c_int)] class hbDNNTensorProperties_t(ctypes.Structure): _fields_ = [("validShape",hbDNNTensorShape_t), ("alignedShape",hbDNNTensorShape_t), ("tensorLayout",ctypes.c_int), ("tensorType",ctypes.c_int), ("shift",hbDNNQuantiShift_yt), ("scale",hbDNNQuantiScale_t), ("quantiType",ctypes.c_int), ("quantizeAxis", ctypes.c_int), ("alignedByteSize",ctypes.c_int), ("stride",ctypes.c_int * 8)] class hbDNNTensor_t(ctypes.Structure): _fields_ = [("sysMem",hbSysMem_t * 4), ("properties",hbDNNTensorProperties_t)] class FcosPostProcessInfo_t(ctypes.Structure): _fields_ = [("height",ctypes.c_int), ("width",ctypes.c_int), ("ori_height",ctypes.c_int), ("ori_width",ctypes.c_int), ("score_threshold",ctypes.c_float), ("nms_threshold",ctypes.c_float), ("nms_top_k",ctypes.c_int), ("is_pad_resize",ctypes.c_int)] libpostprocess = ctypes.CDLL('/usr/lib/libpostprocess.so') get_Postprocess_result = libpostprocess.FcosPostProcess get_Postprocess_result.argtypes = [ctypes.POINTER(FcosPostProcessInfo_t)] get_Postprocess_result.restype = ctypes.c_char_p def get_TensorLayout(Layout): if Layout == "NCHW": return int(2) else: return int(0) def get_classes(): return np.array(["person", "bicycle", "car", "motorcycle", "airplane", "bus", "train", "truck", "boat", "traffic light", "fire hydrant", "stop sign", "parking meter", "bench", "bird", "cat", "dog", "horse", "sheep", "cow", "elephant", "bear", "zebra", "giraffe", "backpack", "umbrella", "handbag", "tie", "suitcase", "frisbee", "skis", "snowboard", "sports ball", "kite", "baseball bat", "baseball glove", "skateboard", "surfboard", "tennis racket", "bottle", "wine glass", "cup", "fork", "knife", "spoon", "bowl", "banana", "apple", "sandwich", "orange", "broccoli", "carrot", "hot dog", "pizza", "donut", "cake", "chair", "couch", "potted plant", "bed", "dining table", "toilet", "tv", "laptop", "mouse", "remote", "keyboard", "cell phone", "microwave", "oven", "toaster", "sink", "refrigerator", "book", "clock", "vase", "scissors", "teddy bear", "hair drier", "toothbrush"]) def bgr2nv12_opencv(image): height, width = image.shape[0], image.shape[1] area = height * width yuv420p = cv2.cvtColor(image, cv2.COLOR_BGR2YUV_I420).reshape((area * 3 // 2,)) y = yuv420p[:area] uv_planar = yuv420p[area:].reshape((2, area // 4)) uv_packed = uv_planar.transpose((1, 0)).reshape((area // 2,)) nv12 = np.zeros_like(yuv420p) nv12[:height * width] = y nv12[height * width:] = uv_packed return nv12 def draw_bboxs(image, bboxes, ori_w, ori_h, target_w, target_h, classes=get_classes(), target_object=None): """draw the bboxes in the original image and rescale the coordinates""" num_classes = len(classes) image_h, image_w, channel = image.shape hsv_tuples = [(1.0 * x / num_classes, 1., 1.) for x in range(num_classes)] colors = list(map(lambda x: colorsys.hsv_to_rgb(*x), hsv_tuples)) colors = list(map(lambda x: (int(x[0] * 255), int(x[1] * 255), int(x[2] * 255)), colors)) fontScale = .8 bbox_thick = int(3 * (image_h + image_w) / 600) scale_x = target_w / ori_w scale_y = target_h / ori_h for i, result in enumerate(bboxes): name = result['name'] # Class name # --- MODIFICATION: Filter by Target Object --- if target_object is not None and name != target_object: continue # --------------------------------------------- bbox = result['bbox'] score = result['score'] id = int(result['id']) coor = [round(i) for i in bbox] coor[0] = int(coor[0] * scale_x) coor[1] = int(coor[1] * scale_y) coor[2] = int(coor[2] * scale_x) coor[3] = int(coor[3] * scale_y) # Draw Bounding Box bbox_color = colors[id] c1, c2 = (coor[0], coor[1]), (coor[2], coor[3]) cv2.rectangle(image, c1, c2, bbox_color, bbox_thick) # Draw Label bbox_mess = '%s: %.2f' % (name, score) t_size = cv2.getTextSize(bbox_mess, 0, fontScale, thickness=bbox_thick // 2)[0] cv2.rectangle(image, c1, (c1[0] + t_size[0], c1[1] - t_size[1] - 3), bbox_color, -1) cv2.putText(image, bbox_mess, (c1[0], c1[1] - 2), cv2.FONT_HERSHEY_SIMPLEX, fontScale, (0, 0, 0), bbox_thick // 2, lineType=cv2.LINE_AA) # --- MODIFICATION: Calculate Center and Draw Tracking Dot --- center_x = int((coor[0] + coor[2]) / 2) center_y = int((coor[1] + coor[3]) / 2) # 1. Draw Green Dot (BGR: 0, 255, 0) cv2.circle(image, (center_x, center_y), 20, (0, 255, 0), -1) # 2. Display XY values near the dot coords_text = f"X:{center_x} Y:{center_y}" cv2.putText(image, coords_text, (center_x + 10, center_y), cv2.FONT_HERSHEY_SIMPLEX, 1, (0, 255, 0), 2) print(f"Tracking {name} at Center X: {center_x}, Y: {center_y}") # ------------------------------------------------------------ return image def get_display_res(): if os.path.exists("/usr/bin/get_hdmi_res") == False: return 1920, 1080 import subprocess p = subprocess.Popen(["/usr/bin/get_hdmi_res"], stdout=subprocess.PIPE) result = p.communicate() res = result[0].split(b',') res[1] = max(min(int(res[1]), 1920), 0) res[0] = max(min(int(res[0]), 1080), 0) return int(res[1]), int(res[0]) def is_usb_camera(device): try: cap = cv2.VideoCapture(device) if not cap.isOpened(): return False cap.release() return True except Exception: return False def find_first_usb_camera(): video_devices = [os.path.join('/dev', dev) for dev in os.listdir('/dev') if dev.startswith('video')] for dev in video_devices: if is_usb_camera(dev): return dev return None def print_properties(pro): print("tensor type:", pro.tensor_type) print("data type:", pro.dtype) print("layout:", pro.layout) print("shape:", pro.shape) if __name__ == '__main__': signal.signal(signal.SIGINT, signal_handler) models = dnn.load('/app/model/basic/fcos_512x512_nv12.bin') print_properties(models[0].inputs[0].properties) for output in models[0].outputs: print_properties(output.properties) if len(sys.argv) > 1: video_device = sys.argv[1] else: video_device = find_first_usb_camera() if video_device is None: print("No USB camera found.") sys.exit(-1) print(f"Opening video device: {video_device}") cap = cv2.VideoCapture(video_device) if(not cap.isOpened()): exit(-1) codec = cv2.VideoWriter_fourcc( 'M', 'J', 'P', 'G' ) cap.set(cv2.CAP_PROP_FOURCC, codec) cap.set(cv2.CAP_PROP_FPS, 30) cap.set(cv2.CAP_PROP_FRAME_WIDTH, 640) cap.set(cv2.CAP_PROP_FRAME_HEIGHT, 480) disp = srcampy.Display() resolution_list = disp.get_display_res() for res in resolution_list: if res[0] == 0 | res[1] == 0: break disp_w = res[0] disp_h = res[1] disp.display(0, disp_w, disp_h) fcos_postprocess_info = FcosPostProcessInfo_t() fcos_postprocess_info.height = 512 fcos_postprocess_info.width = 512 fcos_postprocess_info.ori_height = disp_h fcos_postprocess_info.ori_width = disp_w fcos_postprocess_info.score_threshold = 0.5 fcos_postprocess_info.nms_threshold = 0.6 fcos_postprocess_info.nms_top_k = 5 fcos_postprocess_info.is_pad_resize = 0 output_tensors = (hbDNNTensor_t * len(models[0].outputs))() for i in range(len(models[0].outputs)): output_tensors[i].properties.tensorLayout = get_TensorLayout(models[0].outputs[i].properties.layout) if (len( models[0].outputs[i].properties.scale_data) == 0): output_tensors[i].properties.quantiType = 0 else: output_tensors[i].properties.quantiType = 2 scale_data_tmp = models[0].outputs[i].properties.scale_data.reshape(1, 1, 1, models[0].outputs[i].properties.shape[3]) output_tensors[i].properties.scale.scaleData = scale_data_tmp.ctypes.data_as(ctypes.POINTER(ctypes.c_float)) for j in range(len(models[0].outputs[i].properties.shape)): output_tensors[i].properties.validShape.dimensionSize[j] = models[0].outputs[i].properties.shape[j] output_tensors[i].properties.alignedShape.dimensionSize[j] = models[0].outputs[i].properties.shape[j] start_time = time() image_counter = 0 print(f"Start tracking object: {TARGET_OBJECT}") while True: _ ,frame = cap.read() if frame is None: print("Failed to get image from usb camera") continue h, w = models[0].inputs[0].properties.shape[2], models[0].inputs[0].properties.shape[3] des_dim = (w, h) resized_data = cv2.resize(frame, des_dim, interpolation=cv2.INTER_AREA) nv12_data = bgr2nv12_opencv(resized_data) outputs = models[0].forward(nv12_data) strides = [8, 16, 32, 64, 128] for i in range(len(strides)): if (output_tensors[i].properties.quantiType == 0): output_tensors[i].sysMem[0].virAddr = ctypes.cast(outputs[i].buffer.ctypes.data_as(ctypes.POINTER(ctypes.c_float)), ctypes.c_void_p) output_tensors[i + 5].sysMem[0].virAddr = ctypes.cast(outputs[i + 5].buffer.ctypes.data_as(ctypes.POINTER(ctypes.c_float)), ctypes.c_void_p) output_tensors[i + 10].sysMem[0].virAddr = ctypes.cast(outputs[i + 10].buffer.ctypes.data_as(ctypes.POINTER(ctypes.c_float)), ctypes.c_void_p) else: output_tensors[i].sysMem[0].virAddr = ctypes.cast(outputs[i].buffer.ctypes.data_as(ctypes.POINTER(ctypes.c_int32)), ctypes.c_void_p) output_tensors[i + 5].sysMem[0].virAddr = ctypes.cast(outputs[i + 5].buffer.ctypes.data_as(ctypes.POINTER(ctypes.c_int32)), ctypes.c_void_p) output_tensors[i + 10].sysMem[0].virAddr = ctypes.cast(outputs[i + 10].buffer.ctypes.data_as(ctypes.POINTER(ctypes.c_int32)), ctypes.c_void_p) libpostprocess.FcosdoProcess(output_tensors[i], output_tensors[i + 5], output_tensors[i + 10], ctypes.pointer(fcos_postprocess_info), i) result_str = get_Postprocess_result(ctypes.pointer(fcos_postprocess_info)) result_str = result_str.decode('utf-8') data = json.loads(result_str[14:]) if frame.shape[0]!=disp_h or frame.shape[1]!=disp_w: frame = cv2.resize(frame, (disp_w,disp_h), interpolation=cv2.INTER_AREA) # Pass TARGET_OBJECT to the draw function box_bgr = draw_bboxs(frame, data, fcos_postprocess_info.width, fcos_postprocess_info.height, disp_w, disp_h, target_object=TARGET_OBJECT) box_nv12 = bgr2nv12_opencv(box_bgr) disp.set_img(box_nv12.tobytes()) finish_time = time() image_counter += 1 if finish_time - start_time > 10: print(start_time, finish_time, image_counter) print("FPS: {:.2f}".format(image_counter / (finish_time - start_time))) start_time = finish_time image_counter = 0 |
I made some major improvements to the code, making it far more practical. Now, instead of detecting everything, I can track only the object I want. All we need to do is simply write the name of the object, and the model will focus only on that specific object.
Apart from this, if you want to make the font size smaller or larger, you can just change this value.
|
1 |
fontScale = .8 |
And if you want to increase or decrease the bounding box thickness, you can adjust this value as well.
|
1 |
bbox_thick = int(3 * (image_h + image_w) / 600) |
On top of that, we also draw a green dot on the detected object to clearly mark it, and you can easily control the size of this dot by changing this value here.
|
1 2 3 |
# 1. Draw Green Dot (BGR: 0, 255, 0) cv2.circle(image, (center_x, center_y), 20, (0, 255, 0), -1) |
This gives you full control over how the detection looks on the screen and makes it much easier to customize the output according to your project requirements.
To control a servo motor or a stepper motor, I have also extracted the X and Y coordinates of the detected object.
So now, let me run this code
so you can understand it more clearly.
Type this command:
|
1 |
sudo python3 object_tracking_xy.py |
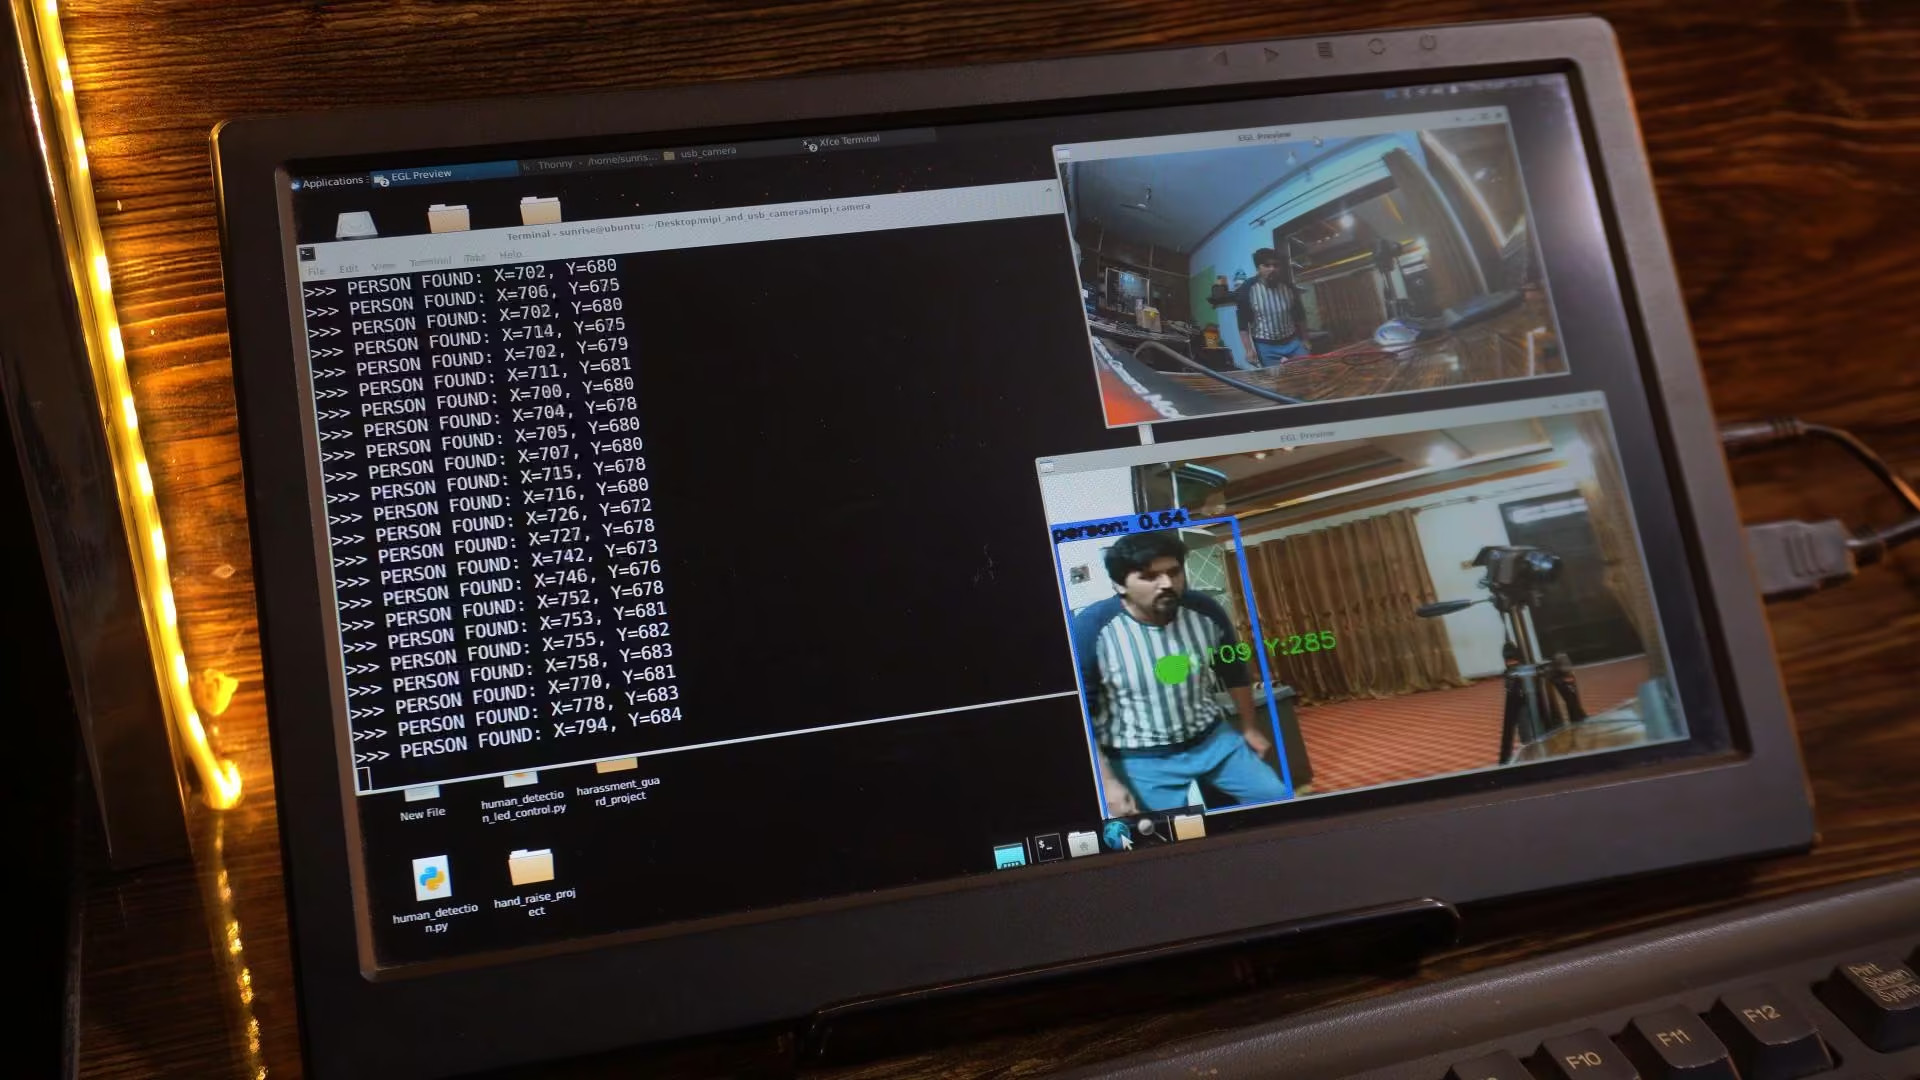
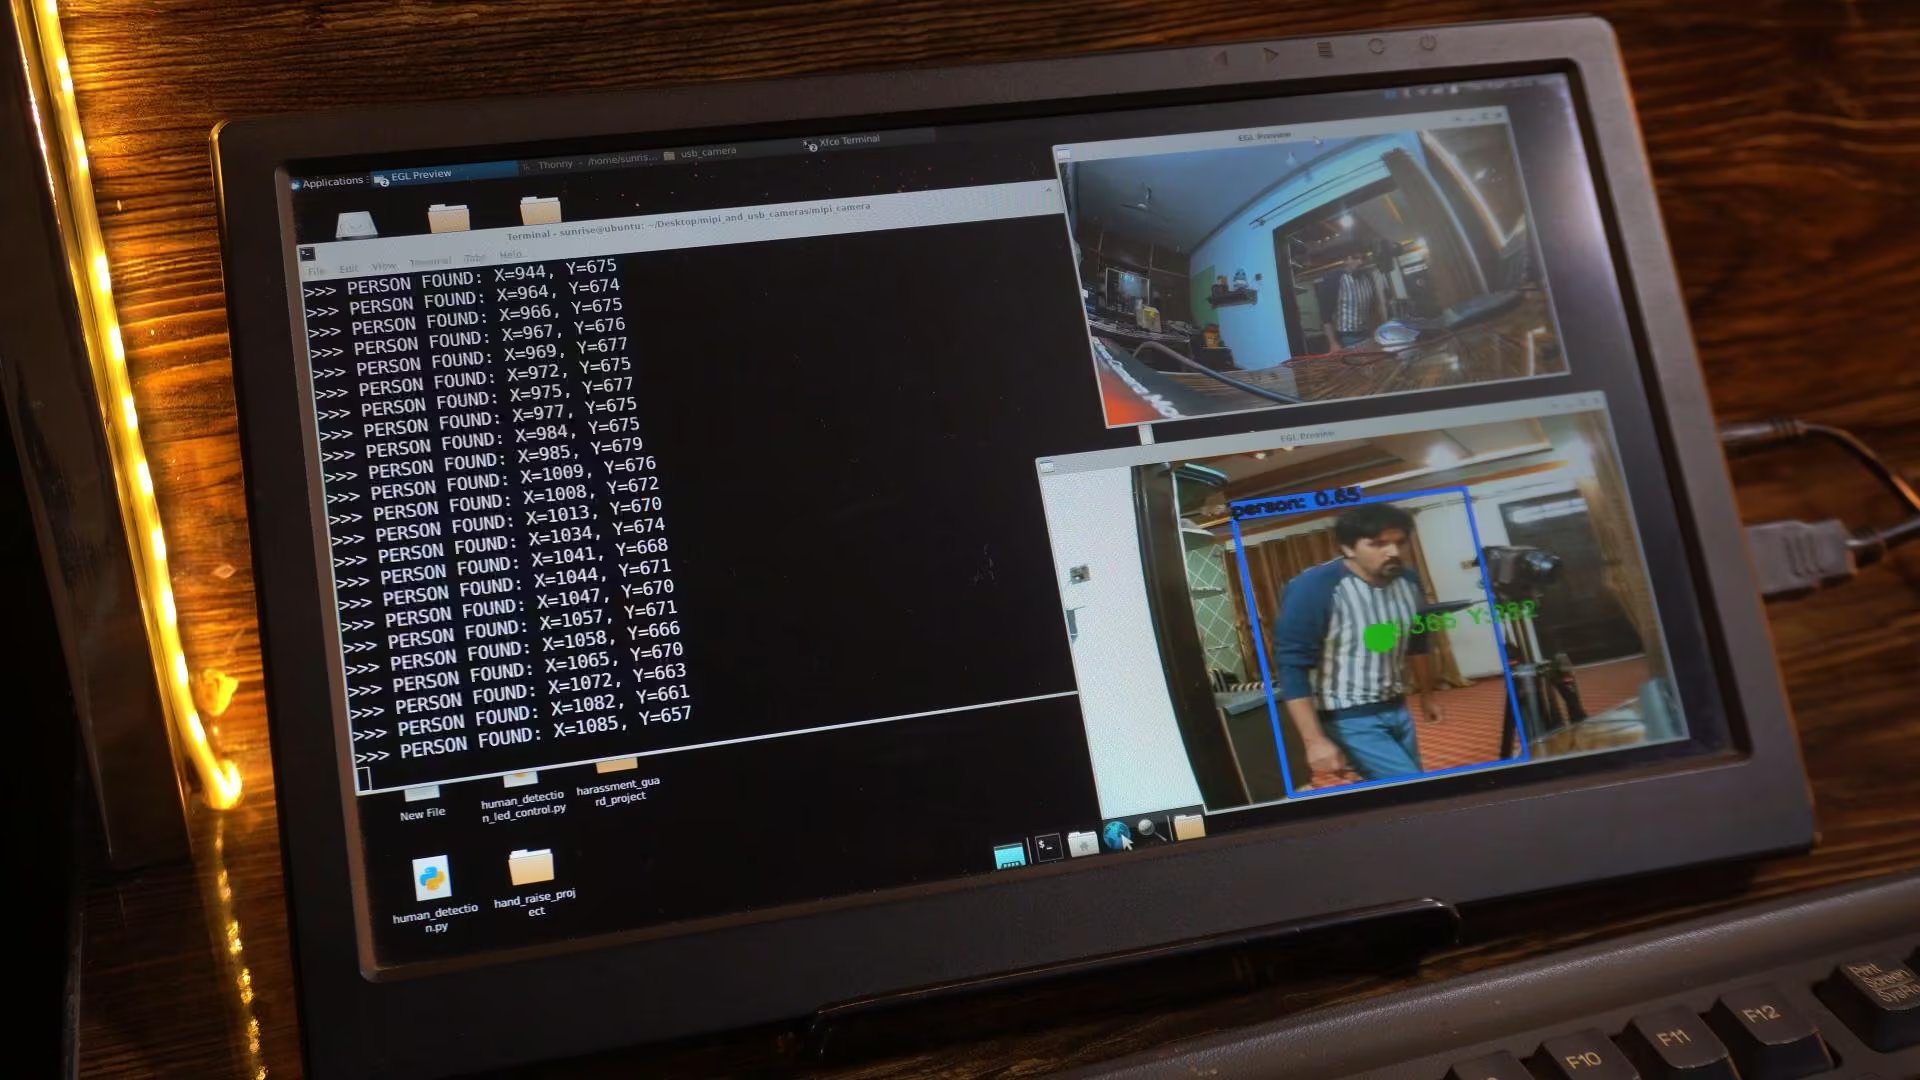
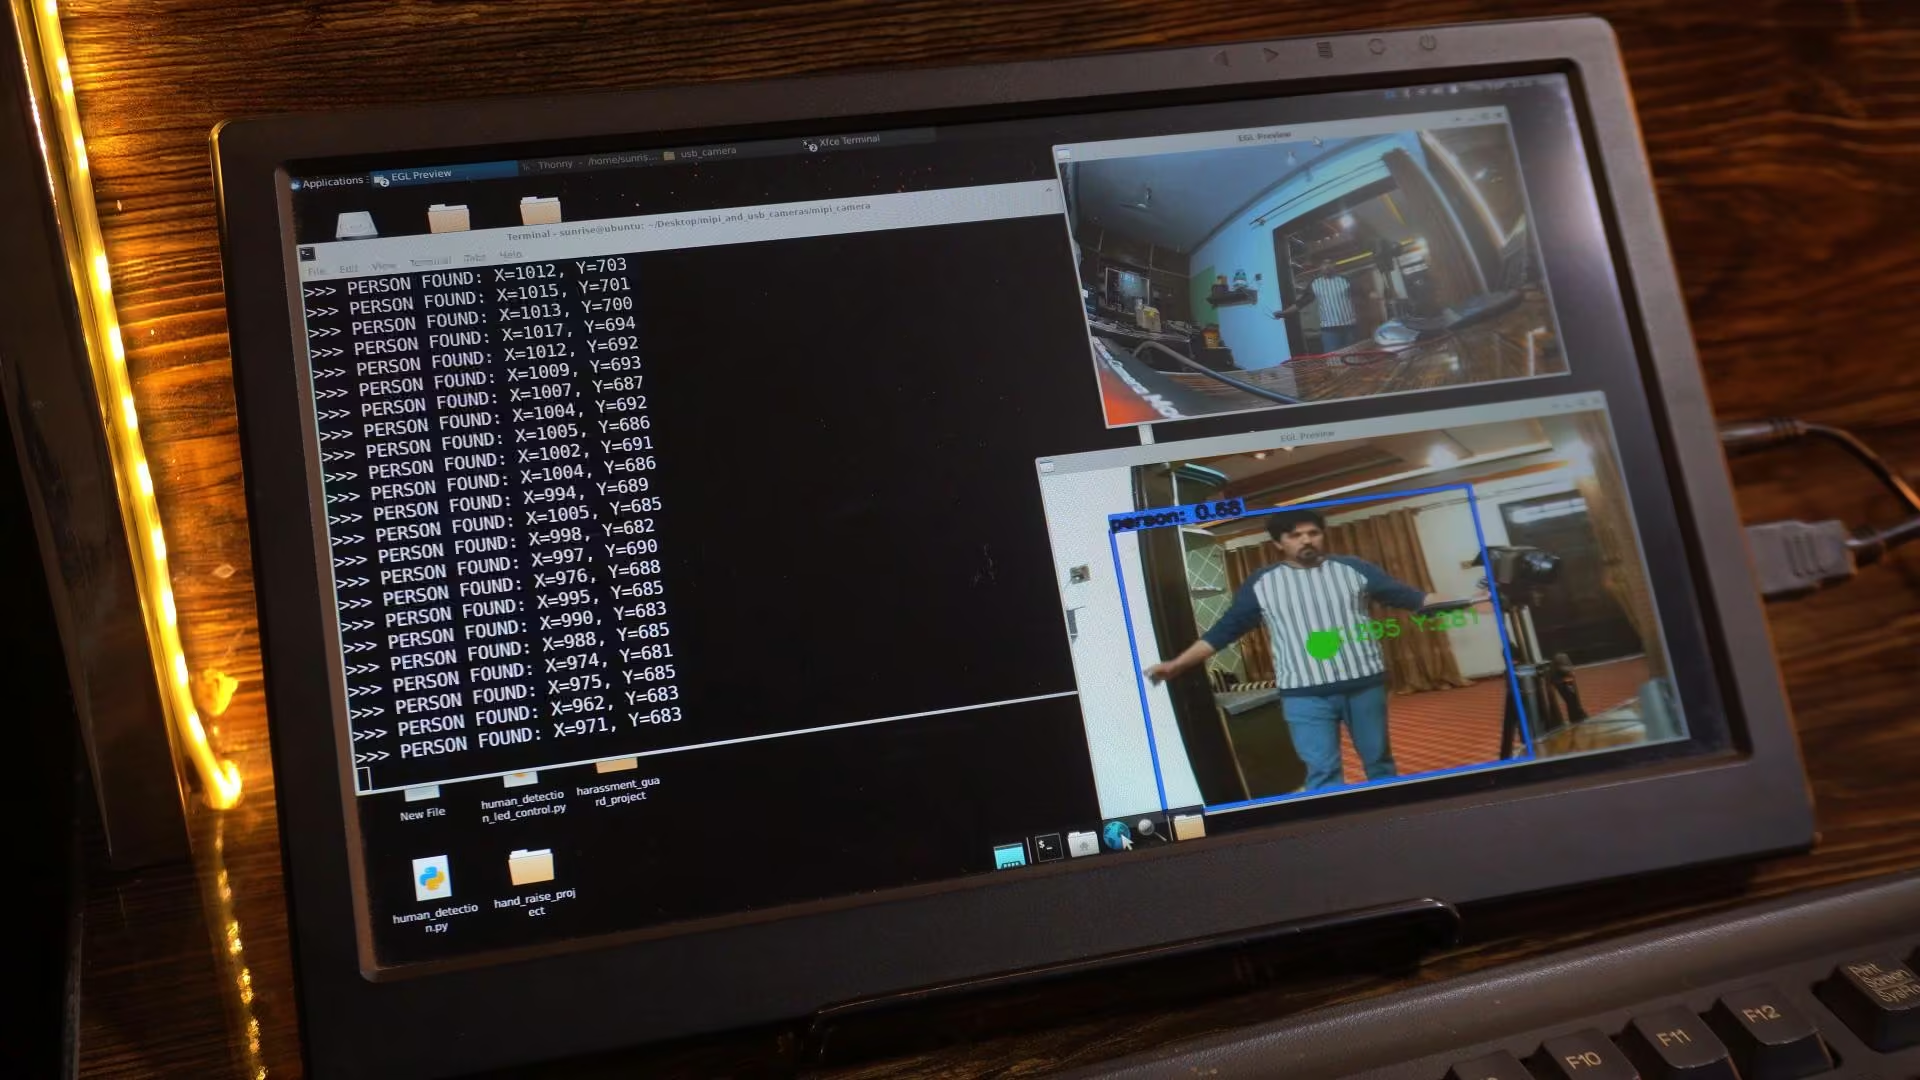
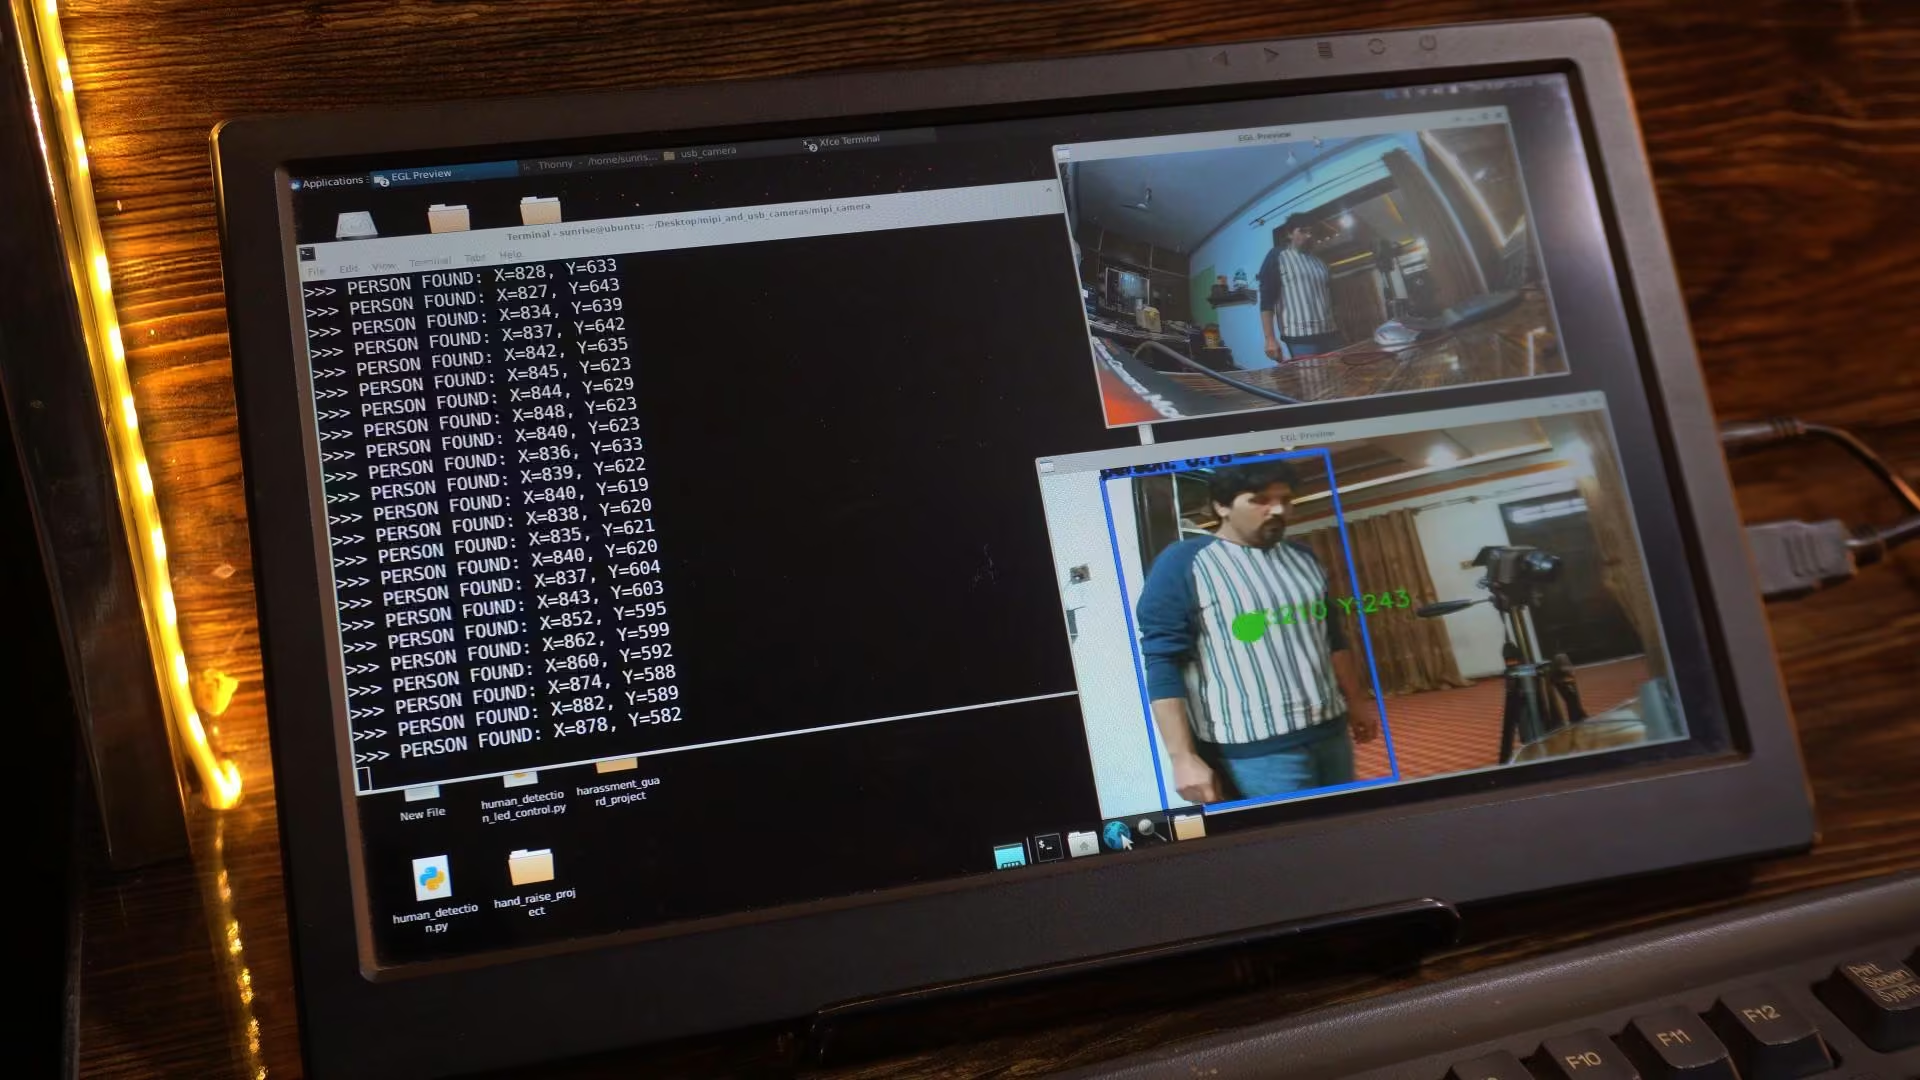
![]()
As I move in front of the camera, you can see the system detecting me in real time.
The bounding box follows my movement smoothly, and the green dot stays locked on the detected object.
You can also see the X and Y coordinates updating continuously as I move.
These values change in real time, which means they can be directly used to control a servo, a stepper motor, or any external hardware.
So basically, the camera doesn’t just see the object; It knows where the object is, and that’s what makes this setup so powerful for robotics and automation.
MIPI Camera with RDK X5:
Now, let’s move on to the MIPI camera and start with this basic script.
RDK X5 MIPI Camera Python Script:
|
1 2 3 4 5 6 7 8 9 10 11 12 13 14 15 16 17 18 19 20 21 22 23 24 25 26 27 28 29 30 31 32 33 34 35 36 37 38 39 40 41 42 43 44 45 46 47 48 49 50 51 52 53 54 55 56 57 58 59 60 61 62 63 64 65 66 67 68 69 70 71 72 73 74 75 76 77 78 79 80 81 82 83 84 85 86 87 88 89 90 91 92 93 94 95 96 97 98 99 100 101 102 103 104 105 106 107 108 109 110 111 112 113 114 115 116 117 118 119 120 121 122 123 124 125 126 127 128 129 130 131 132 133 134 135 136 137 138 139 140 141 142 143 144 145 146 147 148 149 150 151 152 153 154 155 156 157 158 159 160 161 162 163 164 165 166 167 168 169 170 171 172 173 174 175 176 177 178 179 180 181 182 183 184 185 186 187 188 189 190 191 192 193 194 195 196 197 198 199 200 201 202 203 204 205 206 207 208 209 210 211 212 213 214 215 216 217 218 219 220 221 222 223 224 225 226 227 228 229 230 231 232 233 234 235 236 237 238 239 240 241 242 243 244 245 246 247 248 249 250 251 252 253 254 255 256 257 258 259 260 261 262 263 264 265 266 267 268 269 270 271 272 273 274 275 276 277 278 279 280 281 282 283 284 285 286 287 288 289 290 291 292 293 294 295 296 297 298 299 300 301 302 303 304 305 306 307 308 309 310 311 312 313 314 315 316 317 318 319 320 321 322 323 324 325 326 327 328 329 330 331 332 333 334 335 336 337 338 339 340 341 342 343 344 345 346 347 348 349 350 351 352 353 354 355 356 357 358 359 360 361 362 363 364 365 366 367 368 369 370 371 372 373 374 375 376 377 378 379 380 381 382 383 384 385 386 387 388 389 390 391 392 393 394 395 396 397 398 399 400 401 402 403 404 405 406 407 408 409 410 411 412 413 414 415 416 417 418 419 420 |
#!/usr/bin/env python3 ################################################################################ # Copyright (c) 2024,D-Robotics. # # Licensed under the Apache License, Version 2.0 (the "License"); # you may not use this file except in compliance with the License. # You may obtain a copy of the License at # # http://www.apache.org/licenses/LICENSE-2.0 # # Unless required by applicable law or agreed to in writing, software # distributed under the License is distributed on an "AS IS" BASIS, # WITHOUT WARRANTIES OR CONDITIONS OF ANY KIND, either express or implied. # See the License for the specific language governing permissions and # limitations under the License. ################################################################################ import sys import signal import os import numpy as np import cv2 import colorsys from time import time,sleep import multiprocessing from threading import BoundedSemaphore import ctypes import json # Camera API libs try: from hobot_vio import libsrcampy as srcampy except ImportError: from hobot_vio_rdkx5 import libsrcampy as srcampy try: from hobot_dnn import pyeasy_dnn as dnn except ImportError: from hobot_dnn_rdkx5 import pyeasy_dnn as dnn import threading # sensor sensor_width = 1920 sensor_height = 1080 image_counter = None is_stop=False output_tensors = None fcos_postprocess_info = None # def signal_handler(signal, frame): # sys.exit(0) # global is_stop # print("Stopping!\n") # is_stop=True class hbSysMem_t(ctypes.Structure): _fields_ = [ ("phyAddr",ctypes.c_double), ("virAddr",ctypes.c_void_p), ("memSize",ctypes.c_int) ] class hbDNNQuantiShift_yt(ctypes.Structure): _fields_ = [ ("shiftLen",ctypes.c_int), ("shiftData",ctypes.c_char_p) ] class hbDNNQuantiScale_t(ctypes.Structure): _fields_ = [ ("scaleLen",ctypes.c_int), ("scaleData",ctypes.POINTER(ctypes.c_float)), ("zeroPointLen",ctypes.c_int), ("zeroPointData",ctypes.c_char_p) ] class hbDNNTensorShape_t(ctypes.Structure): _fields_ = [ ("dimensionSize",ctypes.c_int * 8), ("numDimensions",ctypes.c_int) ] class hbDNNTensorProperties_t(ctypes.Structure): _fields_ = [ ("validShape",hbDNNTensorShape_t), ("alignedShape",hbDNNTensorShape_t), ("tensorLayout",ctypes.c_int), ("tensorType",ctypes.c_int), ("shift",hbDNNQuantiShift_yt), ("scale",hbDNNQuantiScale_t), ("quantiType",ctypes.c_int), ("quantizeAxis", ctypes.c_int), ("alignedByteSize",ctypes.c_int), ("stride",ctypes.c_int * 8) ] class hbDNNTensor_t(ctypes.Structure): _fields_ = [ ("sysMem",hbSysMem_t * 4), ("properties",hbDNNTensorProperties_t) ] class FcosPostProcessInfo_t(ctypes.Structure): _fields_ = [ ("height",ctypes.c_int), ("width",ctypes.c_int), ("ori_height",ctypes.c_int), ("ori_width",ctypes.c_int), ("score_threshold",ctypes.c_float), ("nms_threshold",ctypes.c_float), ("nms_top_k",ctypes.c_int), ("is_pad_resize",ctypes.c_int) ] libpostprocess = ctypes.CDLL('/usr/lib/libpostprocess.so') get_Postprocess_result = libpostprocess.FcosPostProcess get_Postprocess_result.argtypes = [ctypes.POINTER(FcosPostProcessInfo_t)] get_Postprocess_result.restype = ctypes.c_char_p def get_TensorLayout(Layout): if Layout == "NCHW": return int(2) else: return int(0) is_stop=False def signal_handler(signal, frame): global is_stop print("Stopping!\n") is_stop=True sys.exit(0) def get_display_res(): disp_w_small=1920 disp_h_small=1080 disp = srcampy.Display() resolution_list = disp.get_display_res() if (sensor_width, sensor_height) in resolution_list: print(f"Resolution {sensor_width}x{sensor_height} exists in the list.") return int(sensor_width), int(sensor_height) else: print(f"Resolution {sensor_width}x{sensor_height} does not exist in the list.") for res in resolution_list: # Exclude 0 resolution first. if res[0] == 0 and res[1] == 0: break else: disp_w_small=res[0] disp_h_small=res[1] # If the disp_w、disp_h is not set or not in the list, default to iterating to the smallest resolution for use. if res[0] <= sensor_width and res[1] <= sensor_height: print(f"Resolution {res[0]}x{res[1]}.") return int(res[0]), int(res[1]) disp.close() return disp_w_small, disp_h_small disp_w, disp_h = get_display_res() # detection model class names def get_classes(): return np.array([ "person", "bicycle", "car", "motorcycle", "airplane", "bus", "train", "truck", "boat", "traffic light", "fire hydrant", "stop sign", "parking meter", "bench", "bird", "cat", "dog", "horse", "sheep", "cow", "elephant", "bear", "zebra", "giraffe", "backpack", "umbrella", "handbag", "tie", "suitcase", "frisbee", "skis", "snowboard", "sports ball", "kite", "baseball bat", "baseball glove", "skateboard", "surfboard", "tennis racket", "bottle", "wine glass", "cup", "fork", "knife", "spoon", "bowl", "banana", "apple", "sandwich", "orange", "broccoli", "carrot", "hot dog", "pizza", "donut", "cake", "chair", "couch", "potted plant", "bed", "dining table", "toilet", "tv", "laptop", "mouse", "remote", "keyboard", "cell phone", "microwave", "oven", "toaster", "sink", "refrigerator", "book", "clock", "vase", "scissors", "teddy bear", "hair drier", "toothbrush" ]) def get_hw(pro): if pro.layout == "NCHW": return pro.shape[2], pro.shape[3] else: return pro.shape[1], pro.shape[2] def print_properties(pro): print("tensor type:", pro.tensor_type) print("data type:", pro.dtype) print("layout:", pro.layout) print("shape:", pro.shape) class ParallelExector(object): def __init__(self, counter, parallel_num=4): global image_counter image_counter = counter self.parallel_num = parallel_num if parallel_num != 1: self._pool = multiprocessing.Pool(processes=self.parallel_num, maxtasksperchild=5) self.workers = BoundedSemaphore(self.parallel_num) def infer(self, output): if self.parallel_num == 1: run(output) else: self.workers.acquire() self._pool.apply_async(func=run, args=(output, ), callback=self.task_done, error_callback=print) def task_done(self, *args, **kwargs): """Called once task is done, releases the queue is blocked.""" self.workers.release() def close(self): if hasattr(self, "_pool"): self._pool.close() self._pool.join() def limit_display_cord(coor): coor[0] = max(min(disp_w, coor[0]), 0) # min coor is set to 2 not 0, leaving room for string display coor[1] = max(min(disp_h, coor[1]), 2) coor[2] = max(min(disp_w, coor[2]), 0) coor[3] = max(min(disp_h, coor[3]), 0) return coor def scale_bbox(bbox, input_w, input_h, output_w, output_h): scale_x = output_w / input_w scale_y = output_h / input_h x1 = int(bbox[0] * scale_x) y1 = int(bbox[1] * scale_y) x2 = int(bbox[2] * scale_x) y2 = int(bbox[3] * scale_y) return [x1, y1, x2, y2] def run(outputs): global image_counter strides = [8, 16, 32, 64, 128] for i in range(len(strides)): if (output_tensors[i].properties.quantiType == 0): output_tensors[i].sysMem[0].virAddr = ctypes.cast(outputs[i].ctypes.data_as(ctypes.POINTER(ctypes.c_float)), ctypes.c_void_p) output_tensors[i + 5].sysMem[0].virAddr = ctypes.cast(outputs[i + 5].ctypes.data_as(ctypes.POINTER(ctypes.c_float)), ctypes.c_void_p) output_tensors[i + 10].sysMem[0].virAddr = ctypes.cast(outputs[i + 10].ctypes.data_as(ctypes.POINTER(ctypes.c_float)), ctypes.c_void_p) else: output_tensors[i].sysMem[0].virAddr = ctypes.cast(outputs[i].ctypes.data_as(ctypes.POINTER(ctypes.c_int32)), ctypes.c_void_p) output_tensors[i + 5].sysMem[0].virAddr = ctypes.cast(outputs[i + 5].ctypes.data_as(ctypes.POINTER(ctypes.c_int32)), ctypes.c_void_p) output_tensors[i + 10].sysMem[0].virAddr = ctypes.cast(outputs[i + 10].ctypes.data_as(ctypes.POINTER(ctypes.c_int32)), ctypes.c_void_p) libpostprocess.FcosdoProcess(output_tensors[i], output_tensors[i + 5], output_tensors[i + 10], ctypes.pointer(fcos_postprocess_info), i) result_str = get_Postprocess_result(ctypes.pointer(fcos_postprocess_info)) result_str = result_str.decode('utf-8') # print(result_str) # draw result # 解析JSON字符串 data = json.loads(result_str[14:]) # 遍历每一个结果 for index, result in enumerate(data): bbox = result['bbox'] # 矩形框位置信息 score = result['score'] # 得分 id = int(result['id']) # id name = result['name'] # 类别名称 bbox = scale_bbox(bbox, 512, 512, disp_w, disp_h) coor = limit_display_cord(bbox) coor = [round(i) for i in coor] # get bbox score score = float(score) # concat bbox string bbox_string = '%s: %.2f' % (name, score) bbox_string = bbox_string.encode('gb2312') # concat bbox color box_color = colors[id] color_base = 0xFF000000 box_color_ARGB = color_base | (box_color[0]) << 16 | ( box_color[1]) << 8 | (box_color[2]) print("{} is in the picture with confidence:{:.4f}, bbox:{}".format(name, score, coor)) # if new frame come in, need to flush the display buffer. # For the meaning of parameters, please refer to the relevant documents of display api if index == 0: disp.set_graph_rect(coor[0], coor[1], coor[2], coor[3], 3, 1, box_color_ARGB) disp.set_graph_word(coor[0], coor[1] - 2, bbox_string, 3, 1, box_color_ARGB) else: disp.set_graph_rect(coor[0], coor[1], coor[2], coor[3], 3, 0, box_color_ARGB) disp.set_graph_word(coor[0], coor[1] - 2, bbox_string, 3, 0, box_color_ARGB) # fps timer and counter with image_counter.get_lock(): image_counter.value += 1 if image_counter.value == 100: finish_time = time() print( f"Total time cost for 100 frames: {finish_time - start_time}, fps: {100/(finish_time - start_time)}" ) if __name__ == '__main__': signal.signal(signal.SIGINT, signal_handler) models = dnn.load('/app/pydev_demo/models/fcos_512x512_nv12.bin') print("--- model input properties ---") # 打印输入 tensor 的属性 print_properties(models[0].inputs[0].properties) print("--- model output properties ---") # 打印输出 tensor 的属性 for output in models[0].outputs: print_properties(output.properties) # 获取结构体信息 fcos_postprocess_info = FcosPostProcessInfo_t() fcos_postprocess_info.height = 512 fcos_postprocess_info.width = 512 fcos_postprocess_info.ori_height = disp_h fcos_postprocess_info.ori_width = disp_w fcos_postprocess_info.score_threshold = 0.5 fcos_postprocess_info.nms_threshold = 0.6 fcos_postprocess_info.nms_top_k = 5 fcos_postprocess_info.is_pad_resize = 0 output_tensors = (hbDNNTensor_t * len(models[0].outputs))() for i in range(len(models[0].outputs)): output_tensors[i].properties.tensorLayout = get_TensorLayout(models[0].outputs[i].properties.layout) #print(output_tensors[i].properties.tensorLayout) if (len(models[0].outputs[i].properties.scale_data) == 0): output_tensors[i].properties.quantiType = 0 else: output_tensors[i].properties.quantiType = 2 scale_data_tmp = models[0].outputs[i].properties.scale_data.reshape(1, 1, 1, models[0].outputs[i].properties.shape[3]) output_tensors[i].properties.scale.scaleData = scale_data_tmp.ctypes.data_as(ctypes.POINTER(ctypes.c_float)) for j in range(len(models[0].outputs[i].properties.shape)): output_tensors[i].properties.validShape.dimensionSize[j] = models[0].outputs[i].properties.shape[j] output_tensors[i].properties.alignedShape.dimensionSize[j] = models[0].outputs[i].properties.shape[j] # Camera API, get camera object cam = srcampy.Camera() # get model info h, w = get_hw(models[0].inputs[0].properties) input_shape = (h, w) # Open f37 camera # For the meaning of parameters, please refer to the relevant documents of camera cam.open_cam(1, -1, -1, [w, disp_w], [h, disp_h],sensor_height,sensor_width) # Get HDMI display object disp = srcampy.Display() # For the meaning of parameters, please refer to the relevant documents of HDMI display disp.display(0, disp_w, disp_h) # bind camera directly to display srcampy.bind(cam, disp) # change disp for bbox display disp.display(3, disp_w, disp_h) # setup for box color and box string classes = get_classes() num_classes = len(classes) hsv_tuples = [(1.0 * x / num_classes, 1., 1.) for x in range(num_classes)] colors = list(map(lambda x: colorsys.hsv_to_rgb(*x), hsv_tuples)) colors = list( map(lambda x: (int(x[0] * 255), int(x[1] * 255), int(x[2] * 255)), colors)) # fps timer and counter start_time = time() image_counter = multiprocessing.Value("i", 0) # post process parallel executor parallel_exe = ParallelExector(image_counter) while not is_stop: # image_counter += 1 # Get image data with shape of 512x512 nv12 data from camera cam_start_time = time() img = cam.get_img(2, 512, 512) cam_finish_time = time() # Convert to numpy buffer_start_time = time() img = np.frombuffer(img, dtype=np.uint8) buffer_finish_time = time() # Forward infer_start_time = time() outputs = models[0].forward(img) infer_finish_time = time() output_array = [] for item in outputs: output_array.append(item.buffer) parallel_exe.infer(output_array) cam.close_cam() disp.close() |
In this example, we are using the same model, and by default, it detects all supported objects.
So let me run this script, so you can get a clear idea of how it works.
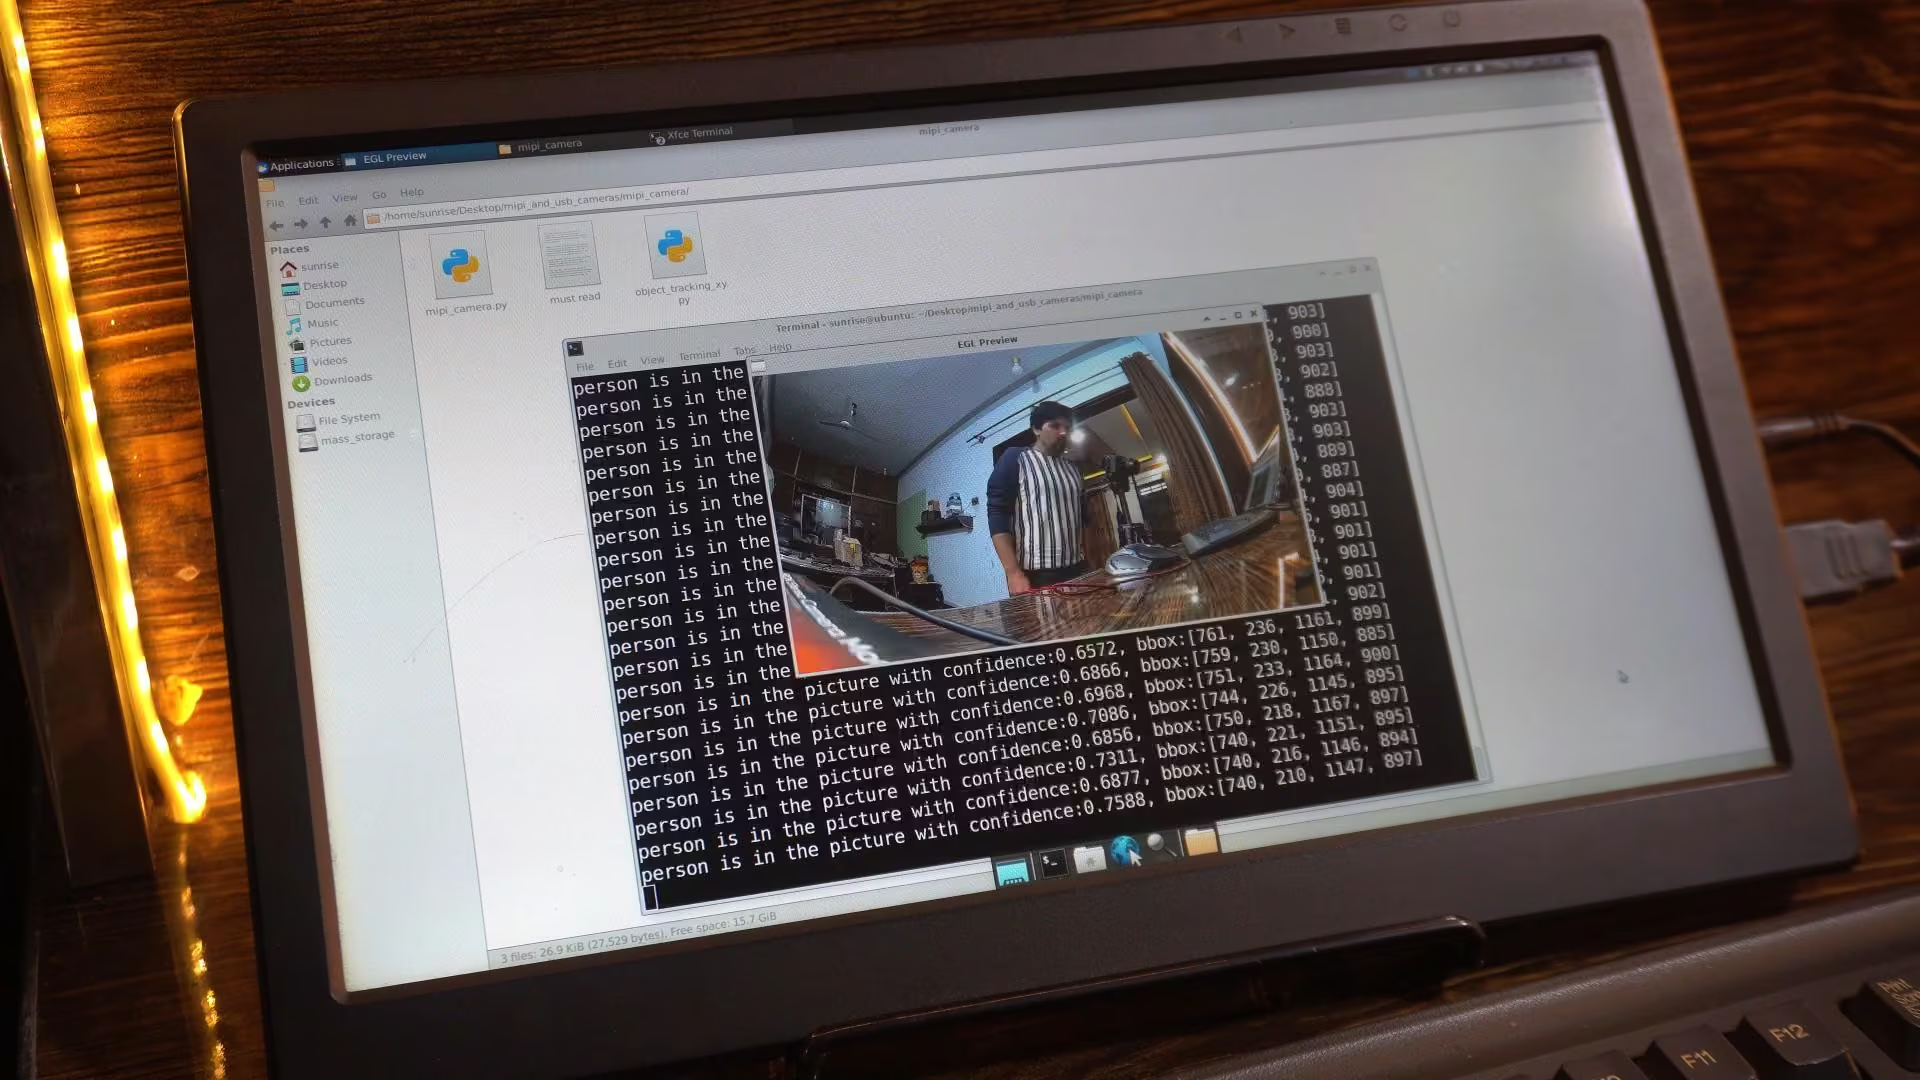
As you can see, the output looks almost exactly the same.
The only difference is that this time, we are using the MIPI camera instead of the USB camera.
- Same detection.
- Same AI power.
- Just a different camera interface.
Now, let’s open this other script.
Object Detection with XY Co-ordinates RDK X5:
|
1 2 3 4 5 6 7 8 9 10 11 12 13 14 15 16 17 18 19 20 21 22 23 24 25 26 27 28 29 30 31 32 33 34 35 36 37 38 39 40 41 42 43 44 45 46 47 48 49 50 51 52 53 54 55 56 57 58 59 60 61 62 63 64 65 66 67 68 69 70 71 72 73 74 75 76 77 78 79 80 81 82 83 84 85 86 87 88 89 90 91 92 93 94 95 96 97 98 99 100 101 102 103 104 105 106 107 108 109 110 111 112 113 114 115 116 117 118 119 120 121 122 123 124 125 126 127 128 129 130 131 132 133 134 135 136 137 138 139 140 141 142 143 144 145 146 147 148 149 150 151 152 153 154 155 156 157 158 159 160 161 162 163 164 165 166 167 168 169 170 171 172 173 174 175 176 177 178 179 180 181 182 183 184 185 186 187 188 189 190 191 192 193 194 195 196 197 198 199 200 201 202 203 204 205 206 207 208 209 210 211 212 213 214 215 216 217 218 219 220 221 222 223 224 225 226 227 228 229 230 231 232 233 234 235 236 237 238 239 240 241 242 243 244 245 246 247 248 249 250 251 252 253 254 255 256 257 258 259 260 261 262 263 264 265 266 267 268 269 270 271 272 273 274 275 276 277 278 279 280 281 282 283 284 285 286 287 288 289 290 291 292 293 294 295 296 297 |
#!/usr/bin/env python3 ################################################################################ # Copyright (c) 2024,D-Robotics. ################################################################################ import sys import signal import os import numpy as np import cv2 import colorsys from time import time,sleep import multiprocessing from threading import BoundedSemaphore import ctypes import json # Camera API libs try: from hobot_vio import libsrcampy as srcampy except ImportError: from hobot_vio_rdkx5 import libsrcampy as srcampy try: from hobot_dnn import pyeasy_dnn as dnn except ImportError: from hobot_dnn_rdkx5 import pyeasy_dnn as dnn import threading # ---------------- CONFIGURATION ---------------- # # Select the object you want to track here. TARGET_OBJECT = 'person' # ----------------------------------------------- # # sensor sensor_width = 1920 sensor_height = 1080 image_counter = None is_stop=False output_tensors = None fcos_postprocess_info = None class hbSysMem_t(ctypes.Structure): _fields_ = [("phyAddr",ctypes.c_double), ("virAddr",ctypes.c_void_p), ("memSize",ctypes.c_int)] class hbDNNQuantiShift_yt(ctypes.Structure): _fields_ = [("shiftLen",ctypes.c_int), ("shiftData",ctypes.c_char_p)] class hbDNNQuantiScale_t(ctypes.Structure): _fields_ = [("scaleLen",ctypes.c_int), ("scaleData",ctypes.POINTER(ctypes.c_float)), ("zeroPointLen",ctypes.c_int), ("zeroPointData",ctypes.c_char_p)] class hbDNNTensorShape_t(ctypes.Structure): _fields_ = [("dimensionSize",ctypes.c_int * 8), ("numDimensions",ctypes.c_int)] class hbDNNTensorProperties_t(ctypes.Structure): _fields_ = [("validShape",hbDNNTensorShape_t), ("alignedShape",hbDNNTensorShape_t), ("tensorLayout",ctypes.c_int), ("tensorType",ctypes.c_int), ("shift",hbDNNQuantiShift_yt), ("scale",hbDNNQuantiScale_t), ("quantiType",ctypes.c_int), ("quantizeAxis", ctypes.c_int), ("alignedByteSize",ctypes.c_int), ("stride",ctypes.c_int * 8)] class hbDNNTensor_t(ctypes.Structure): _fields_ = [("sysMem",hbSysMem_t * 4), ("properties",hbDNNTensorProperties_t)] class FcosPostProcessInfo_t(ctypes.Structure): _fields_ = [("height",ctypes.c_int), ("width",ctypes.c_int), ("ori_height",ctypes.c_int), ("ori_width",ctypes.c_int), ("score_threshold",ctypes.c_float), ("nms_threshold",ctypes.c_float), ("nms_top_k",ctypes.c_int), ("is_pad_resize",ctypes.c_int)] libpostprocess = ctypes.CDLL('/usr/lib/libpostprocess.so') get_Postprocess_result = libpostprocess.FcosPostProcess get_Postprocess_result.argtypes = [ctypes.POINTER(FcosPostProcessInfo_t)] get_Postprocess_result.restype = ctypes.c_char_p def get_TensorLayout(Layout): if Layout == "NCHW": return int(2) else: return int(0) def signal_handler(signal, frame): global is_stop print("Stopping!\n") is_stop=True sys.exit(0) def get_display_res(): disp_w_small=1920 disp_h_small=1080 disp = srcampy.Display() resolution_list = disp.get_display_res() if (sensor_width, sensor_height) in resolution_list: return int(sensor_width), int(sensor_height) else: for res in resolution_list: if res[0] == 0 and res[1] == 0: break else: disp_w_small, disp_h_small = res[0], res[1] if res[0] <= sensor_width and res[1] <= sensor_height: return int(res[0]), int(res[1]) disp.close() return disp_w_small, disp_h_small disp_w, disp_h = get_display_res() def get_classes(): return np.array(["person", "bicycle", "car", "motorcycle", "airplane", "bus", "train", "truck", "boat", "traffic light", "fire hydrant", "stop sign", "parking meter", "bench", "bird", "cat", "dog", "horse", "sheep", "cow", "elephant", "bear", "zebra", "giraffe", "backpack", "umbrella", "handbag", "tie", "suitcase", "frisbee", "skis", "snowboard", "sports ball", "kite", "baseball bat", "baseball glove", "skateboard", "surfboard", "tennis racket", "bottle", "wine glass", "cup", "fork", "knife", "spoon", "bowl", "banana", "apple", "sandwich", "orange", "broccoli", "carrot", "hot dog", "pizza", "donut", "cake", "chair", "couch", "potted plant", "bed", "dining table", "toilet", "tv", "laptop", "mouse", "remote", "keyboard", "cell phone", "microwave", "oven", "toaster", "sink", "refrigerator", "book", "clock", "vase", "scissors", "teddy bear", "hair drier", "toothbrush"]) def get_hw(pro): if pro.layout == "NCHW": return pro.shape[2], pro.shape[3] else: return pro.shape[1], pro.shape[2] def print_properties(pro): print("tensor type:", pro.tensor_type) print("data type:", pro.dtype) print("layout:", pro.layout) print("shape:", pro.shape) class ParallelExector(object): def __init__(self, counter, parallel_num=4): global image_counter image_counter = counter self.parallel_num = parallel_num if parallel_num != 1: self._pool = multiprocessing.Pool(processes=self.parallel_num, maxtasksperchild=5) self.workers = BoundedSemaphore(self.parallel_num) def infer(self, output): if self.parallel_num == 1: run(output) else: self.workers.acquire() self._pool.apply_async(func=run, args=(output, ), callback=self.task_done, error_callback=print) def task_done(self, *args, **kwargs): self.workers.release() def close(self): if hasattr(self, "_pool"): self._pool.close() self._pool.join() def limit_display_cord(coor): coor[0] = max(min(disp_w, coor[0]), 0) coor[1] = max(min(disp_h, coor[1]), 2) coor[2] = max(min(disp_w, coor[2]), 0) coor[3] = max(min(disp_h, coor[3]), 0) return coor def scale_bbox(bbox, input_w, input_h, output_w, output_h): scale_x = output_w / input_w scale_y = output_h / input_h return [int(bbox[0] * scale_x), int(bbox[1] * scale_y), int(bbox[2] * scale_x), int(bbox[3] * scale_y)] def run(outputs): global image_counter strides = [8, 16, 32, 64, 128] for i in range(len(strides)): if (output_tensors[i].properties.quantiType == 0): output_tensors[i].sysMem[0].virAddr = ctypes.cast(outputs[i].ctypes.data_as(ctypes.POINTER(ctypes.c_float)), ctypes.c_void_p) output_tensors[i + 5].sysMem[0].virAddr = ctypes.cast(outputs[i + 5].ctypes.data_as(ctypes.POINTER(ctypes.c_float)), ctypes.c_void_p) output_tensors[i + 10].sysMem[0].virAddr = ctypes.cast(outputs[i + 10].ctypes.data_as(ctypes.POINTER(ctypes.c_float)), ctypes.c_void_p) else: output_tensors[i].sysMem[0].virAddr = ctypes.cast(outputs[i].ctypes.data_as(ctypes.POINTER(ctypes.c_int32)), ctypes.c_void_p) output_tensors[i + 5].sysMem[0].virAddr = ctypes.cast(outputs[i + 5].ctypes.data_as(ctypes.POINTER(ctypes.c_int32)), ctypes.c_void_p) output_tensors[i + 10].sysMem[0].virAddr = ctypes.cast(outputs[i + 10].ctypes.data_as(ctypes.POINTER(ctypes.c_int32)), ctypes.c_void_p) libpostprocess.FcosdoProcess(output_tensors[i], output_tensors[i + 5], output_tensors[i + 10], ctypes.pointer(fcos_postprocess_info), i) result_str = get_Postprocess_result(ctypes.pointer(fcos_postprocess_info)) result_str = result_str.decode('utf-8') data = json.loads(result_str[14:]) # GREEN COLOR definition (ARGB) COLOR_GREEN_ARGB = 0xFF00FF00 for index, result in enumerate(data): bbox = result['bbox'] score = result['score'] id = int(result['id']) name = result['name'] bbox = scale_bbox(bbox, 512, 512, disp_w, disp_h) coor = limit_display_cord(bbox) coor = [round(i) for i in coor] score = float(score) bbox_string = '%s: %.2f' % (name, score) bbox_string = bbox_string.encode('gb2312') box_color = colors[id] color_base = 0xFF000000 box_color_ARGB = color_base | (box_color[0]) << 16 | (box_color[1]) << 8 | (box_color[2]) is_first_item = (index == 0) flush_flag = 1 if is_first_item else 0 # Draw Standard Box disp.set_graph_rect(coor[0], coor[1], coor[2], coor[3], 3, flush_flag, box_color_ARGB) disp.set_graph_word(coor[0], coor[1] - 2, bbox_string, 3, 0, box_color_ARGB) # --------------------------------------------------------- # SERVO CONTROL LOGIC: TARGET OBJECT TRACKING # --------------------------------------------------------- if name == TARGET_OBJECT: center_x = int((coor[0] + coor[2]) / 2) center_y = int((coor[1] + coor[3]) / 2) print(f">>> {TARGET_OBJECT.upper()} FOUND: X={center_x}, Y={center_y}") # Draw LARGE GREEN DOT # We make a box 40x40 pixels (20px radius) dot_radius = 20 # We set line width to 20 to make it extremely thick (essentially filled) line_thickness = 20 disp.set_graph_rect(center_x - dot_radius, center_y - dot_radius, center_x + dot_radius, center_y + dot_radius, line_thickness, 0, COLOR_GREEN_ARGB) # flag 0 (append) # Draw X,Y Text coord_str = f"X:{center_x} Y:{center_y}".encode('gb2312') disp.set_graph_word(center_x + 25, center_y, coord_str, 3, 0, COLOR_GREEN_ARGB) # --------------------------------------------------------- with image_counter.get_lock(): image_counter.value += 1 if image_counter.value == 100: finish_time = time() print(f"FPS: {100/(finish_time - start_time):.2f}") if __name__ == '__main__': signal.signal(signal.SIGINT, signal_handler) models = dnn.load('/app/pydev_demo/models/fcos_512x512_nv12.bin') print("--- model input properties ---") print_properties(models[0].inputs[0].properties) print("--- model output properties ---") for output in models[0].outputs: print_properties(output.properties) fcos_postprocess_info = FcosPostProcessInfo_t() fcos_postprocess_info.height = 512 fcos_postprocess_info.width = 512 fcos_postprocess_info.ori_height = disp_h fcos_postprocess_info.ori_width = disp_w fcos_postprocess_info.score_threshold = 0.5 fcos_postprocess_info.nms_threshold = 0.6 fcos_postprocess_info.nms_top_k = 5 fcos_postprocess_info.is_pad_resize = 0 output_tensors = (hbDNNTensor_t * len(models[0].outputs))() for i in range(len(models[0].outputs)): output_tensors[i].properties.tensorLayout = get_TensorLayout(models[0].outputs[i].properties.layout) if (len(models[0].outputs[i].properties.scale_data) == 0): output_tensors[i].properties.quantiType = 0 else: output_tensors[i].properties.quantiType = 2 scale_data_tmp = models[0].outputs[i].properties.scale_data.reshape(1, 1, 1, models[0].outputs[i].properties.shape[3]) output_tensors[i].properties.scale.scaleData = scale_data_tmp.ctypes.data_as(ctypes.POINTER(ctypes.c_float)) for j in range(len(models[0].outputs[i].properties.shape)): output_tensors[i].properties.validShape.dimensionSize[j] = models[0].outputs[i].properties.shape[j] output_tensors[i].properties.alignedShape.dimensionSize[j] = models[0].outputs[i].properties.shape[j] cam = srcampy.Camera() h, w = get_hw(models[0].inputs[0].properties) input_shape = (h, w) # Open Camera (Ensuring 2nd camera is used) # 1st arg: Pipe 1, 3rd arg: MIPI Port 1 cam.open_cam(1, -1, -1, [w, disp_w], [h, disp_h],sensor_height,sensor_width) disp = srcampy.Display() disp.display(0, disp_w, disp_h) srcampy.bind(cam, disp) disp.display(3, disp_w, disp_h) classes = get_classes() num_classes = len(classes) hsv_tuples = [(1.0 * x / num_classes, 1., 1.) for x in range(num_classes)] colors = list(map(lambda x: colorsys.hsv_to_rgb(*x), hsv_tuples)) colors = list(map(lambda x: (int(x[0] * 255), int(x[1] * 255), int(x[2] * 255)), colors)) start_time = time() image_counter = multiprocessing.Value("i", 0) parallel_exe = ParallelExector(image_counter) while not is_stop: cam_start_time = time() img = cam.get_img(2, 512, 512) cam_finish_time = time() buffer_start_time = time() img = np.frombuffer(img, dtype=np.uint8) buffer_finish_time = time() infer_start_time = time() outputs = models[0].forward(img) infer_finish_time = time() output_array = [] for item in outputs: output_array.append(item.buffer) parallel_exe.infer(output_array) cam.close_cam() disp.close() |
I have made the previous code much more practical in this version.
Using this script, you can specify the exact object you want to detect.
Just like the previous example, I have also extracted the X and Y coordinates of the detected object.
These X-Y values can be used to control servo motors, stepper motors, or trigger other external circuits, making this setup perfect for real-world robotics and automation projects.
Running both the Camera:
This camera is already open, so now let’s open the USB camera as well.
As you can see, both cameras are now active at the same time.
And this is where things get really interesting.
I can run different AI models on each camera.
One camera can be placed at the front, and the other one at the rear.
This gives you true multi-camera vision.
Front view, rear view; processed simultaneously.
Whether you are building a robot, a smart vehicle, or any advanced AI system, it completely depends on how you want to use it.
The RDK X5 gives you the flexibility; you just decide the logic.
All the scripts used in this article, along with their original source codes, are available for download on my Patreon page.
And in the upcoming articles, we will focus on building fully practical, real-world projects.
So, that’s all for.
Watch Video Tutorial:
Discover more from Electronic Clinic
Subscribe to get the latest posts sent to your email.