Soil Moisture Sensor with Arduino, Water Pump, Oled display, and Buzzer. Arduino Project
Table of Contents
Soil Moisture Sensor with Arduino:
Soil Moisture Sensor with Arduino, Water Pump, Oled display, and Buzzer. Arduino Project- In this article, you will learn how to make a Soil moisture monitoring system using Arduino, this new type of Soil moisture Sensor, SSD1306 I2C supported the Oled display module, and a 5V Buzzer.
The basic objective behind designing a soil moisture monitoring system is to ensure that water will be provided to plants on time and in a rightful quantity. If the soil moisture is too low, plants are at risk of being damaged, and if the soil moisture is high, even then plants are liable to be damaged.
I do not have that much knowledge about plants and in particular, have no idea as to how much water is provided to any particular plant. I just know that different soil moisture levels are required to be maintained for the better growth of different plants. So, before starting my work on the project, I decided to first study soil moisture.
I read articles by some professional botanists, and then I realized that I have always been
watering plants in the wrong quantity since inception.
I used to simply plug a water pipe, and did not stop watering a flower pot until it filled up to its brim.
Anyway, I have now come to know the recommended soil moisture values for different plants. The majority of plants thrive in soil having a moisture level that ranges between 20% to 60%. Any humidity level over 60% can potentially cause damage to the plant, which is relying on moisture from the soil to nourish. The 60% limit may vary.
Some experts believe that majority of flowers, trees, and shrubs require moisture levels between 20% to 40%, while if you are dealing with vegetables, then you need to maintain soil moisture between 40% to 80%.
I have two-night blooming jasmine plants, and I do not want to damage these plants as a result of over–watering. As night-blooming jasmine is a woody shrub, so I will maintain a soil moisture level between 20% to 40%.
So, keeping this percentage of soil moistening level in mind, I have carried out my programming in such a way that when soil moisture gets less than 25%, the buzzer starts to beep. I can also set the buzzer to turn ON at a 20% moisture level. However, I want the buzzer to run a bit early, so that I may water my plants on time. Before, I share with you the soil moisture specification, circuit diagram, and programming. First, let’s see this soil moisture monitoring system in action.
Altium Designer, Altium 365, & Octopart:
Altium 365 lets you hold the fastest design reviews ever. Share your designs from anywhere and with anyone with a single click. it’s easy, leave a comment tagging your teammate and they’ll instantly receive an email with a link to the design. Anyone you invite can open the design using a web browser. Using the browser interface, you’re able to comment, markup, cross probe, inspect, and more. Comments are attached directly to the project, making them viewable within Altium designer as well as through the browser interface. Design, share, and manufacture, all in the same space with nothing extra to install or configure. Connect to the platform directly from Altium Designer without changing how you already design electronics. Altium 365 requires no additional licenses and comes included with your subscription plan.
Get real-time component insights as you design with Octopart built into Altium 365. Octopart is the fastest search engine for electronic parts and gives you the most up-to-date part data like specs, datasheets, cad models, and how much the part costs at different amounts, etc. Right in the design environment so you can focus on your designs. Start with Altium Designer and Activate Altium 365. Search for electronic parts on Octopart.
Practical Demonstration:
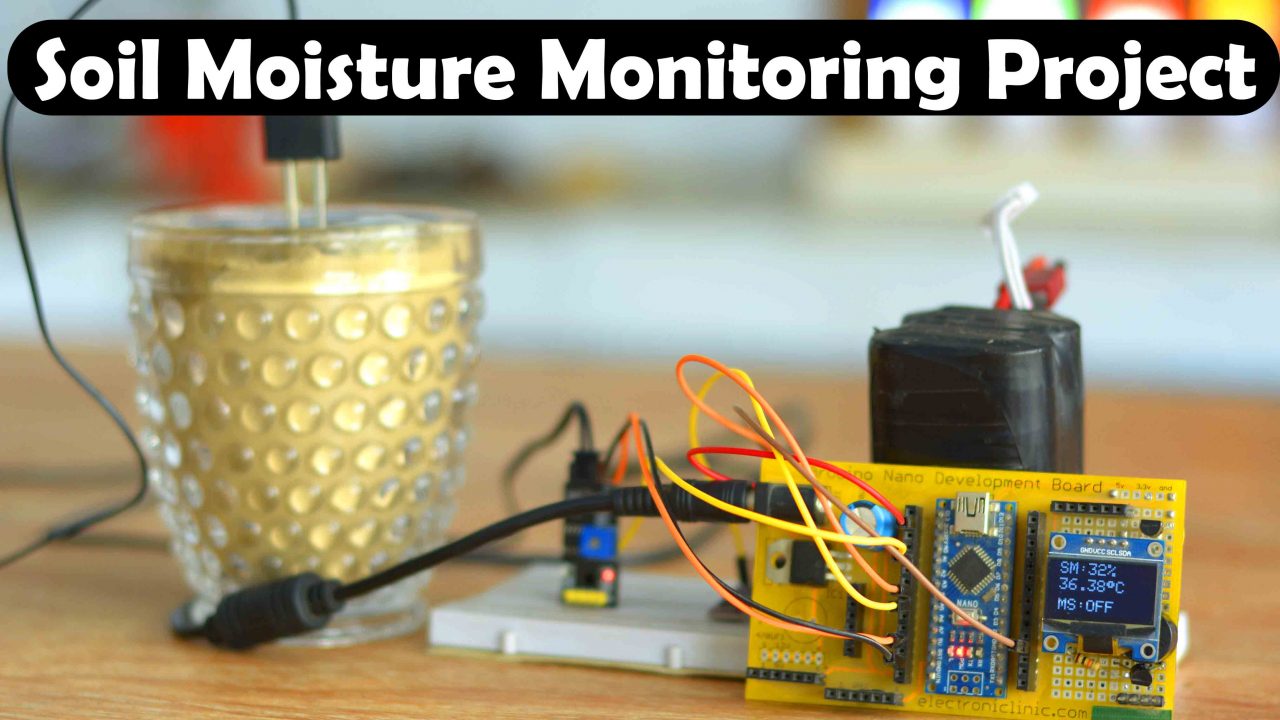
I connected the LM75A I2C supported Temperature Sensor, a 5V buzzer, SSD1306 Oled display, and the Soil moisture sensor as per the circuit diagram which I will explain in a minute. I have also added code for controlling a relay which you can use to turn ON and turn OFF the Water pump, I will talk about it when I will be explaining the code. Anyway, I powered up my soil moisture monitoring system using a 4S lithium-Ion battery pack. If you also want to make a 3S or 4S lithium-Ion battery pack then you can read my article on “how to make Lithium-Ion battery.
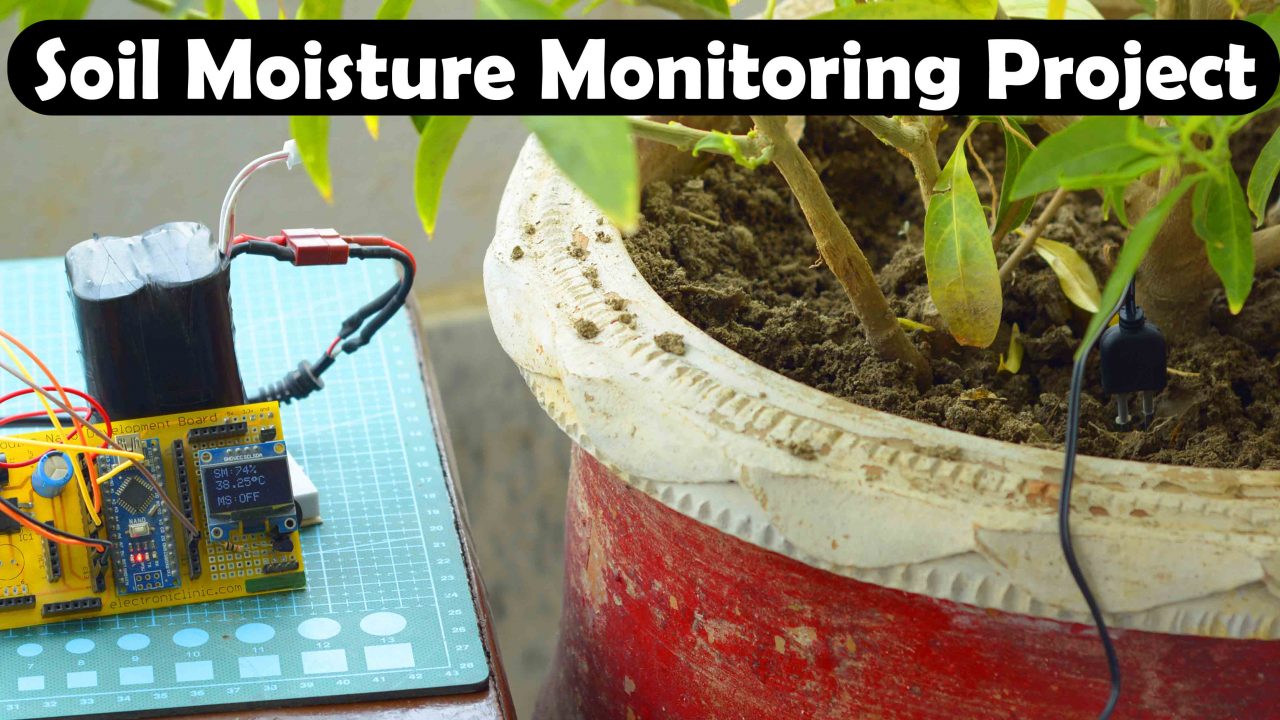
On the Oled display module, you can see the Soil moisture value, ambient temperature, and motor status. Right now you can hear the beeps “watch the video given at the end of this article” as the soil moisture value is below the set value. You can clearly see, that the soil is completely dry. Now, I am going to add some water and let’s see what happens.
This is pretty amazing, as soon as the moisture value reached the maximum limit of 40% the buzzer is turned off and also the motor status is changed from ON to OFF.
Guys, you might be thinking that a higher soil moisture value shows on the display. It is because initially, soil requires some time to absorb water. You can see some of the soil is still dry. When this dry soil absorbs water, then the moisture level surrounding the sensor will start to decrease. If the moisture ranges between 20% to 40%, the buzzer will not turn ON. But if the soil absorbs more water, and the moisture around the sensor probes drops below the 20% range then the buzzer will turn ON. Anyway, let us leave it like this for around 30 minutes and then we will see.
So, I am back after 30 minutes and you can see the moisture value has dropped, but it is still in the acceptable range. So, my initial testing has been completed, and now let’s check the soil moisture of the Night-blooming jasmine.
This is not the recommended soil moisture value, the value should be around 40%.
I am quite happy with the results, if you remove the buzzer and water pump, then you can also use this as the soil moisture meter, and then you can move around and check the soil moisture of different plants. I am sure by now, you might have got an idea of how does this system work. So, without any further delay let’s get started!!!
Amazon Links:
Arduino Nano USB-C Type (Recommended)
LM75A I2C supported Temperature Sensor
Other Tools and Components:
ESP32 WiFi + Bluetooth Module (Recommended)
Super Starter kit for Beginners
PCB small portable drill machines
*Please Note: These are affiliate links. I may make a commission if you buy the components through these links. I would appreciate your support in this way!
About the Soil Moisture Sensor:
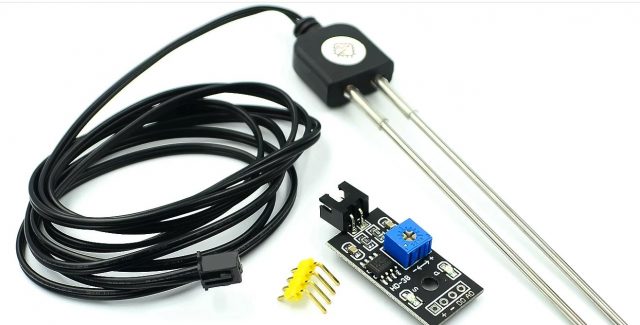
Here is my Soil moisture detection kit. Let’s first take a look at the interface circuit. The board is provided with this blue color potentiometer which is used to adjust the sensitivity. This board is also provided with the most stable LM393 comparator chip and with Onboard power and signal indicator LEDs to display the module’s working status. The working voltage of this module is from 3.3V to 12 volts. Because of this wide input voltage range, this Soil moisture sensor can be used with 3.3V and 5V, compatible controller boards.
All 4 headers are clearly labeled. The first pin is the Analog output pin and it should be connected with the Analog pin on the Arduino. The 2nd pin is the digital output put pin which can be connected with any digital pin on the Arduino or any other controller board. 3rd pin is the ground pin and the last pin is the VCC pin which you can connect with 3.3V or 5V.
The sensor probes are waterproofed and are made of highly corrosion-resistant material to ensure a long lifetime up to 6 months after being plugged into the soil. The Sensor Cable length is 1.3 meters.
Specifications:
Working Voltage: DC 3.3-12V
Working Current: <20m(Output Current:<30mA)
Module Size: 36X15X6mm
Sensor Pin Pitch:5mm
Sensor Cable Length:1.3meter/3.94ft
Sensor Connecting Port: XH2.54 2P
LM75A Temperature Sensor:
This is the CJMCU-75 I2C supported temperature sensor which is also known as LM75 or LM75A temperature sensor. With this temperature sensor, you can read temperatures in both Celsius and Fahrenheit. The temperature range is from -55 Celsius to +125 degrees Celsius.
The LM75A is an industrial standard digital temperature sensor with an integrated sigma-delta analog-to-digital converter (ADC). The LM75A provides 9-bit digital temperature readings with an accuracy of ±2°C from –25°C to 100°C and with an accuracy of ±3°C over –55°C to 125°C.
The LM75A operates with a single supply from 2.7 V to 5.5 V. Due to this wide range of input voltages it can be easily used with 3.3V compatible controller boards like esp8266, ESP32, etc., and 5V compatible controller boards.
Communication is accomplished over a 2-wire interface that operates up to 400 kHz. LM75A has three selectable logic address pins A0, A1, and A2, allowing up to eight LM75A devices to operate on the same 2-wire bus. A0, A1, and A2 can be used to set an I2C address. You can short any of these address pins with the VCC or ground. This way you will be able to connect 8 temperature sensors without any addressing conflict.
The LM75A has a dedicated over-temperature output (O.S.) with a programmable limit and hysteresis.
LM75A temperature sensor can be used in base stations, electronic test equipment, office electronics, personal computers, Environmental Monitoring, and any other system in which thermal management is critical to performance. Now, let’s take a look at the circuit diagram.
Soil Moisture Sensor Interfacing with Arduino:
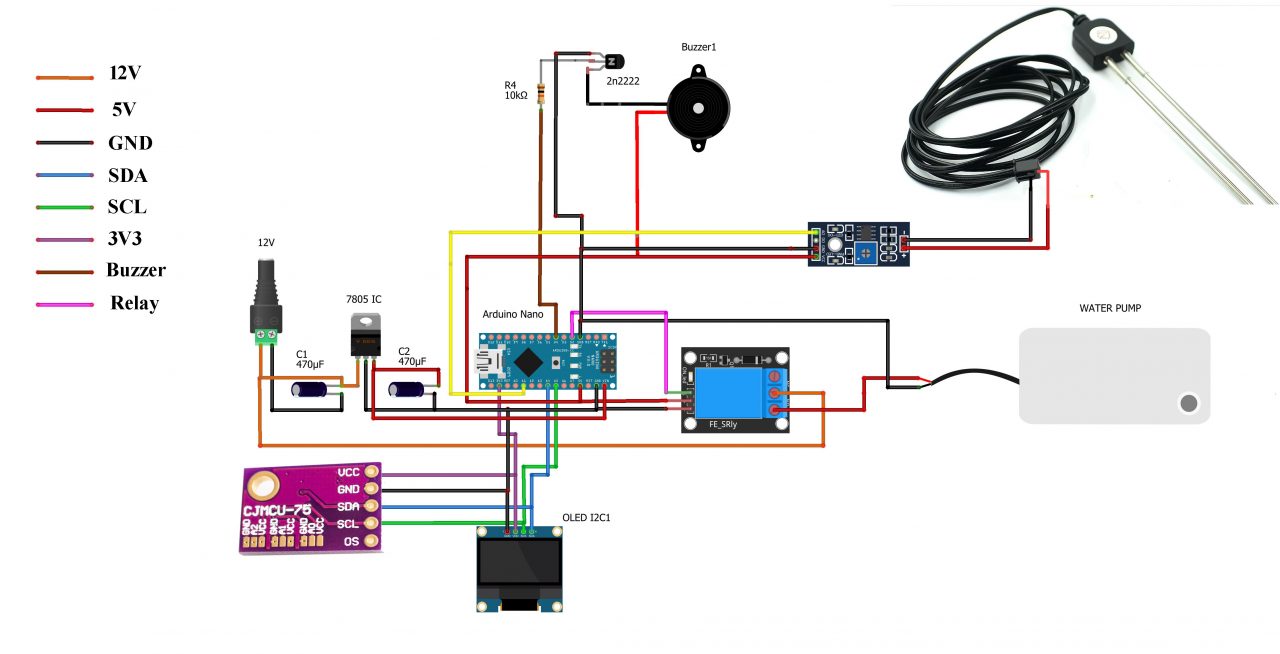
The analog output of the soil moisture sensor board is connected with the Analog pin A1. While the VCC and GND pins are connected with the Arduino’s 5V and GND.
The SCL and SDA pins of the LM75A temperature sensor and Oled display module are connected together and then connected with the Arduino A5 and A4 pins. A5 is the SCL and A4 is the SDA. While the VCC and GND pins are connected with the Arduino 3.3V and GND pins.
The 5V buzzer is controlled using the D4 pin of the Arduino. We use a 2n2222 NPN transistor and a 10K ohm resistor to control the 5V buzzer. The transistor and resistor make the driver circuit.
On the left side is the 5V regulated power supply based on the LM7805 voltage regulator. The output of the 5V regulated power supply is connected with the Vin pin of the Arduino. Since I am using a 7805 voltage regulator, so I can use voltages between 7 and 28 volts to power up the Arduino. Due to this wide input voltage range, I can use a 12V adaptor, a battery, a solar panel, etc. to power up the Arduino.
The 5V relay module input wire is connected with the Arduino digital pin 2. We use this relay to power up a 12DC water pump. So, that’s all about the circuit diagram and now let’s take a look at the programming.
Required Libraries:
Before, you start the programming, first of all, make sure you download all the necessary libraries. The Adafruit_GFX.h and Adafruit_SSD1306.h libraries I have been using for quite a long time and I have already explained how to download and use these libraries.
You will also need the LM75A library.
To add this library simply click on the Sketch menu and then go to Include Library and click on the Add ZIP library… browse to the desired location and select the zip folder and then finally click on the open button.
As I have already added this library so I will click on the cancel button.
Soil moisture sensor Arduino Programming:
|
1 2 3 4 5 6 7 8 9 10 11 12 13 14 15 16 17 18 19 20 21 22 23 24 25 26 27 28 29 30 31 32 33 34 35 36 37 38 39 40 41 42 43 44 45 46 47 48 49 50 51 52 53 54 55 56 57 58 59 60 61 62 63 64 65 66 67 68 69 70 71 72 73 74 75 76 77 78 79 80 81 82 83 84 85 86 87 88 89 90 91 92 93 94 95 96 97 98 99 100 101 102 103 104 |
#include <SPI.h> // include libraries #include <Wire.h> #include <Adafruit_GFX.h> #include <Adafruit_SSD1306.h> #include <LM75A.h> int msensor = A1; // moisture sensor is connected with the analog pin A1 of the Arduino int msvalue = 0; // moisture sensor value int mspercent; // moisture value in percentage int Relay = 13; // you can connect a dc or ac water pump int buzzer = 4; String stat=""; // Motor status boolean flag = false; // To avoid unnecessary repetition of code // Create I2C LM75A instance LM75A lm75a_sensor(false, // A0 LM75A pin state (connected to ground = false) false, // A1 LM75A pin state (connected to ground = false) false); // A2 LM75A pin state (connected to ground = false) // Equivalent to "LM75A lm75a_sensor;" #define SCREEN_WIDTH 128 // ORelay display width, in pixels #define SCREEN_HEIGHT 64 // ORelay display height, in pixels // Declaration for an SSD1306 display connected to I2C (SDA, SCL pins) #define ORelay_RESET -1 // Reset pin # (or -1 if sharing Arduino reset pin) Adafruit_SSD1306 display(SCREEN_WIDTH, SCREEN_HEIGHT, &Wire, ORelay_RESET); void setup() { Serial.begin(9600); pinMode(msensor, INPUT); pinMode(Relay, OUTPUT); display.begin(SSD1306_SWITCHCAPVCC, 0x3C); delay(2000); display.clearDisplay(); display.setTextColor(WHITE); pinMode(buzzer, OUTPUT); } void loop() { float temperature_in_degrees = lm75a_sensor.getTemperatureInDegrees(); if (temperature_in_degrees == INVALID_LM75A_TEMPERATURE) { Serial.println("Error while getting temperature"); } msvalue = analogRead(msensor); mspercent = map(msvalue,0,1023,100,0); // To display the soil moisture value in percentage if ( (mspercent < 20 ) && ( flag == false ) ) // motor activates only when moisture is below 20 { digitalWrite(Relay, HIGH); flag = true; stat="ON"; delay(1000); } if ( (mspercent>=40)&&(flag==true) ) // motor turns off when moisture increases above 59 { digitalWrite(Relay, LOW); digitalWrite(buzzer, LOW); flag = false; stat="OFF"; delay(1000); } if ( mspercent < 25 ) { digitalWrite(buzzer, HIGH); delay(1000); digitalWrite(buzzer, LOW); delay(1000); digitalWrite(buzzer, HIGH); delay(1000); digitalWrite(buzzer, LOW); delay(1000); } // all the other instructions are used to display the // soil moisture, ambient temperature, and Motor status display.clearDisplay(); display.setCursor(10,0); display.setTextSize(2); display.setTextColor(WHITE); display.print("SM:"+String(mspercent)+"%"); display.setCursor(10,20); display.setTextSize(2); //display.print("C: "); display.print(temperature_in_degrees); display.print((char)247); display.print("C"); display.setCursor(10,45); display.setTextSize(2); display.print("MS:"+stat); display.display(); delay(1000); } |
I started off by defining the pins and variables. The LM75A temperature sensor programming I have already explained in my previous video, I will provide a link in the description.
First, we read the sensor, and then in the next step, we map the sensor values to display the sensor readings in percentage. And then we use the if conditions to check if the soil moisture value is below 20% or above 40% and then accordingly we control the relay and buzzer. All these other instructions are used to display the desired data on the Oled display module. So, that’s all about the programming.







Hi..thank you for your sharing.I have try your project using arduino uno board for both end.Both serial monitor show “LoRa init succeeded.”My problem is,OLED display show random pixel at receiver and no respond for relay when the push button press. Please advise..Thanks