OCR Optical Character recognition using VB.net and Arduino
Last Updated on August 18, 2024 by Engr. Shahzada Fahad
Table of Contents
OCR Project Description:
This tutorial is based on the OCR “Optical character recognition” technology. In this project, the car number plates will be scanned using the OCR. For the Car number plates reading we will be making our own image processing application in visual basic .net“ VB.net”. The scanned numbers will be then compared with the pre-defined numbers and then display the car owner information and open and close the entrance accordingly using the electronic lock.
On the hardware side, the Arduino Uno will be used for controlling the door lock. The Arduino will do serial communication with the computer/laptop application.
About OCR:
Optical Character Recognition ( which is also known as the optical character reader, OCR) is the technology used for reading/scanning the text images, or any sheet or paper on which the text is written. In this tutorial, we will be using the same concept. We will be using a camera to scan the number plate in real-time and then we will compare the scanned number with the predefined numbers stored in the program.
Amazon Links:
Arduino Nano USB-C Type (Recommended)
12v Electronic Door Lock / Elock / Solenoid Lock:
*Disclosure: These are affiliate links. As an Amazon Associate I earn from qualifying purchases.
Images which will be used as the number plates:


Circuit Diagram:
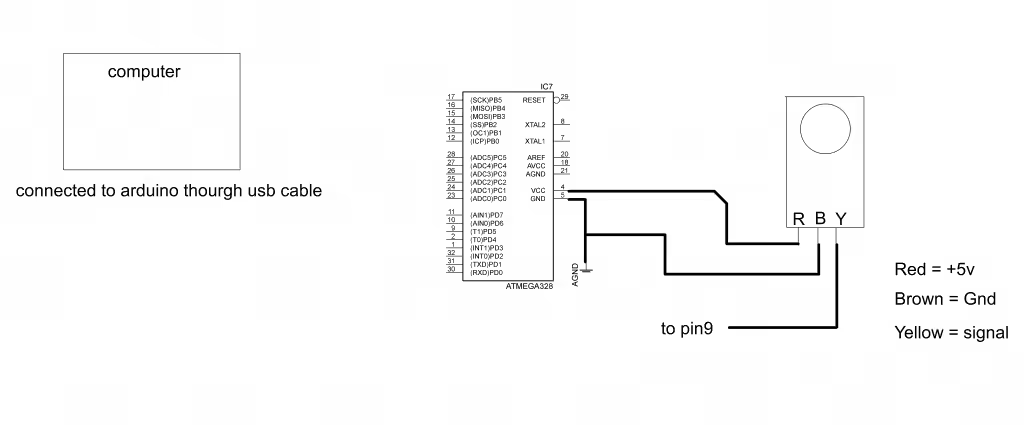
In the circuit diagram as you can see, I have used a Servo motor, but in the video, I controlled a door lock. The door lock is already explained in the video, so I decided to share with you the idea of how you can also control a servo motor.
If you are using a small servo motor then you can power the servo motor using the Arduino’s 5 volts. But if you are using a larger Servo motor then I highly recommend you should power the Servo motor using External power supply. You can make an external power supply based on the famous LM7805 voltage regulator. Make sure to add 470uf capacitors at the input and output sides of the voltage regulator for the best performance. You can watch my previous tutorials on how to use the Servo motor. you can find the related videos on my channel “Electronic Clinic”.
Arduino E Lock Programming:
This code is written for the Electronic Lock. I started by defining a Pin for the Electronic lock. So the electronic lock will be controlled using the Arduino’s Pin number 13. Then I defined a variable data of the type character. The variable data will be used to store the character received from the computer application.
|
1 2 |
int elock = 13; char data ; |
After defining the Variables and Pins, the next step is to tell the controller which pin is the input or output and which baud rate we are going to use. To set any pin of the Arduino Uno as input or output for this we use the built in function which is pinMode() function. This function takes two arguments as the input, the pin number or pin name which in our case is elock, and the status which can be input or output. As the electronic lock is an output device so that’s why we set it to OUTPUT.
For activating the Serial communication we use a function called Serial.begin(). Serail.begin function is also a built in function and it takes only one Argument as the input which is the Baud rate. As the Arduino Uno board will be doing serial communication with the computer so for this we will have to define the baud rate. I Selected 9600. If you want you can set any other Baud rate. Finally we turn off the electronic lock. The void setup function only executes one time, when the Arduino uno Or Mega board is powered up.
|
1 2 3 4 5 6 7 |
void setup() { pinMode( elock, OUTPUT); Serial.begin(9600); digitalWrite(elock, LOW); } |
The code inside the void loop function is very simple. All we are doing is just reading the serial port, store the received character in a variable data and then use some if condition to check if we have received the desired character to control open or close the electronic lock.
|
1 2 3 4 5 6 7 8 9 10 11 12 13 14 15 16 17 18 19 20 |
void loop() { if ( Serial.available() > 0 ) { data = Serial.read(); if ( data == 'c' ) { digitalWrite(elock, HIGH); } if ( data == 'd' ) { digitalWrite(elock, LOW); } } } |
OCR Computer application Program:
This is how the final form looks like after designing. For the EmguCv installation and settings and form designing and program explanation watch video Tutorial available at the end of this Article.

|
1 2 3 4 5 6 7 8 9 10 11 12 13 14 15 16 17 18 19 20 21 22 23 24 25 26 27 28 29 30 31 32 33 34 35 36 37 38 39 40 41 42 43 44 45 46 47 48 49 50 51 52 53 54 55 56 57 58 59 60 61 62 63 64 65 66 67 68 69 70 71 72 73 74 75 76 77 78 79 80 81 82 83 |
Imports Emgu.CV Imports Emgu.CV.Util Imports Emgu.CV.OCR Imports Emgu.CV.Structure Imports System.IO Imports System.IO.Ports Imports System.Threading Public Class Form1 Dim webcam As Capture = New Capture Dim ocr As Tesseract = New Tesseract("tessdata", "eng", Tesseract.OcrEngineMode.OEM_TESSERACT_ONLY = 500, whiteList:="ABCDEFGHIJKLMNOPQRSTUVWXYZ1234567890abcdefghijklmnopqrstuvwxyz") Dim pic As Bitmap = New Bitmap(270, 270) Dim gf As Graphics = Graphics.FromImage(pic) Dim data As String Dim search As String Private Sub Form1_Load(ByVal sender As System.Object, ByVal e As System.EventArgs) Handles MyBase.Load SerialPort1.Close() SerialPort1.PortName = "com5" SerialPort1.BaudRate = "9600" SerialPort1.DataBits = 8 SerialPort1.Parity = Parity.None SerialPort1.StopBits = StopBits.One SerialPort1.Handshake = Handshake.None SerialPort1.Encoding = System.Text.Encoding.Default End Sub Private Sub Timer1_Tick(ByVal sender As System.Object, ByVal e As System.EventArgs) Handles Timer1.Tick Dim photo As Image(Of Bgr, Byte) = webcam.QueryFrame 'gf.CopyFromScreen(New Point(Me.Location.X = PictureBox1.Location.X = 4, Me.Location.Y = PictureBox1.Location.Y = 30), New Point(0, 0), pic.Size) PictureBox1.Image = photo.ToBitmap ocr.Recognize(New Image(Of Bgr, Byte)(photo.ToBitmap)) RichTextBox1.Text = ocr.GetText data = RichTextBox1.Text If InStr(data, "LHR786") Or InStr(data, " lhr786") Or InStr(data, "Lhr786") Then Label1.Text = "registered" Label2.Text = "Jhon" Label3.Text = "13106-5256283-7" Label4.Text = "Corolla 2006" Label5.Text = "3322bv54676" ' SerialPort1.Open() ' SerialPort1.Write("1") ' SerialPort1.Close() ElseIf InStr(data, "ABC1") Or InStr(data, " abc1") Or InStr(data, "Abc1") Then Label1.Text = "registered" Label2.Text = "Afaq" Label3.Text = "13401-6756284-2" Label4.Text = "HONDA 2004" Label5.Text = "552Cbv76676" SerialPort1.Open() SerialPort1.Write("1") SerialPort1.Close() ElseIf InStr(data, "RWP4") Or InStr(data, " RWP 4") Or InStr(data, "rwp 4") Then Label1.Text = "un registered" Label2.Text = "No record" Label3.Text = "No record" Label4.Text = "No record" Label5.Text = "No record" End If End Sub Private Sub Label1_Click(ByVal sender As System.Object, ByVal e As System.EventArgs) Handles Label1.Click End Sub Private Sub Button1_Click(ByVal sender As System.Object, ByVal e As System.EventArgs) Handles Button1.Click SerialPort1.Open() SerialPort1.Write("1") SerialPort1.Close() End Sub End Class |
Watch Video Tutorial:
Other Image Processing Projects:
Arduino image processing Eye Pupil Tracking, how to make Haarcascade XML file
Arduino Image processing CCTV camera system using VB.net
Arduino Image Processing based Entrance lock Control System
Discover more from Electronic Clinic
Subscribe to get the latest posts sent to your email.


I need download this project
anbarasulg@gmail.com send this project me
i need this project plz send arduino prog. and accessory detail dilbag_singh86@yahoo.co.in
my picturebox didnt show my webcam direct view, can you helpme?
same issue…..any solution????
send me this project full zip file to akilanirmal2005@gmai.com please sir .that is amazing