Flexiforce pressure sensor or force sensitive resistor “FSR” Programming & calibration using Arduino
Last Updated on October 14, 2024 by Engr. Shahzada Fahad
Table of Contents
Flexiforce Sensor Description:
Flexiforce Pressure Sensor with Arduino– This Tutorial is about the FlexiForce sensor. In this tutorial I will show you the easiest and simplest way how to calibrate the FSR Sensor, During the calibration, we will be measuring some known weights with this sensor, I personally don’t recommend using flexiforce sensor for weight measurement, for weight measurement load cell is the best choice.
I have very detailed tutorials on weight measurement using load cell and hx711. if in case you want to watch this tutorial. In this tutorial, I will be using weights only for demonstration purposes. This tutorial covers the extreme basics, how to use the FSR sensor with Arduino, while in the upcoming tutorials we will be using this sensor in security-based projects, we will also be using this sensor in a plastic injection molding machine for pressure monitoring, we will also be using this in robots.
Note: Read my latest article on the Force Sensitive Resistor. In that article, I have explained how to remove noise and how to measure weight and pressure.
Amazon Links:
Arduino Nano USB-C Type (Recommended)
*Disclosure: These are affiliate links. As an Amazon Associate I earn from qualifying purchases
FlexiForce Sensor:

A flexiforce pressure sensor is also known as the force Sensoring Resistor. The Flexiforce sensor or force-sensing resistor or the FSR is made up of such type of material whose resistance changes when a force or pressure or mechanical stress is applied. A flexiforce pressure sensor is also known as force-sensitive resistor “FSR”. This is a type of Resistor. Want to know about different types of Resistors?
As you can see clearly in the picture, the force sensitive resistor or FSR has three legs or pins. The middle one is not used.
The circular area of the sensor is the effective area of the sensor, where the force or pressure will be applied. To apply the force or pressure exactly at this area I cut a piece of hard rubber in a circular shape and fix it using hot glue. Now our sensor is ready.
Arduino Flexiforce Sensor Circuit Diagram:
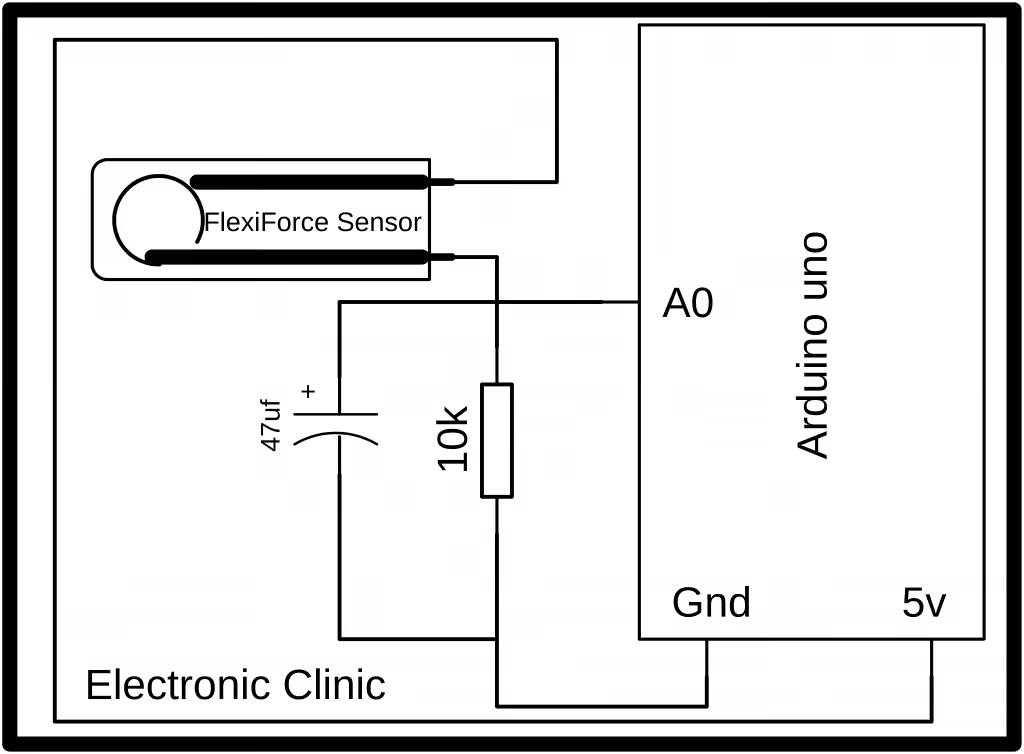
FlexiForce sensor is connected in series with a 10k resistor, you can try some other resistors like 1 megaohm or 3.3k if you want to measure high force or high pressure. The Flexiforce sensor and the 10k resistor makes a voltage divider, this way for different forces or pressure values we will get different voltages.
From this voltage variation which is due to the force or weight, we can calculate the weight in pounds or kgs. So make sure you have some known weights, I have 1kg and 3kg weights which I will use for the calibration. A 47uf capacitor is connected in parallel with the 10k resistor, you can use a small value capacitor, the purpose of this capacitor is to stop the voltage fluctuation and get stable values. We will read these voltages using the Arduino’s analog pin A0. Once again if you want to measure high pressure or weight then use a small value resistor.
For the Flexiforce sensor, interfacing watch my video tutorial available at the end.
Flexiforce Sensor Arduino Programming:
The code is very simple, consists of a few lines. The force-sensitive resistor or FSR is connected with the analog pin A0 of the Arduino. The same program will also run on the Arduino Mega, Arduino Pro Mini, and Arduino Micro. The purpose of the code given below is to send the FSR sensor values to the Serial Monitor as we bend the Sensor.
Multiple FSR Sensors can be connected and programmed in the same way.
|
1 2 3 4 5 6 7 8 9 10 11 12 13 14 15 16 17 18 19 20 21 22 23 24 25 26 |
float cf = 19.5; // caliberation factor int ffs1 = A0; // FlexiForce sensor is connected analog pin A0 of arduino or mega. int ffsdata = 0; float vout; void setup() { Serial.begin(9600); pinMode(ffs1, INPUT); } void loop() { ffsdata = analogRead(ffs1); vout = (ffsdata * 5.0) / 1023.0; vout = vout * cf ; Serial.print("Flexi Force sensor: "); Serial.print(vout,3); Serial.println(""); delay(100); } |
I uploaded the code given above, in the Arduino Uno Board. I started off by opening the Serial monitor, selected the desired baud rate as defined in the programming, and I was able to monitor the FSR sensor value on the screen. Above is the very basic programming.
You can modify this code and make amazing projects e.g.
Flexiforce Sensor based Security System.
Hit detection with an alert message and so on.
Watch Video Tutorial:
Discover more from Electronic Clinic
Subscribe to get the latest posts sent to your email.


What an awesome post ! Thanks you for sharing such a great content. Just one question, do you know if this method is valid por sensors like ‘SF15-600@10kg from LEANSTAR’ ? and do you know any multiplex or devices to define something like a bus of sensor in order to use just one arduino ? thanks you in advance, keep on it !