Force Sensitive Resistor FSR with Arduino
Last Updated on October 14, 2024 by Engr. Shahzada Fahad
Table of Contents
Description:
Force Sensitive Resistor FSR with Arduino- Today, we are going to use a force sensor with Arduino, and the information I am sharing with you, you will not find anywhere else.

I have seen most people use just a 10K-Ohm resistor with the force sensitive resistor. I am not saying using a 10K-Ohm resistor in series with FSR is wrong. But, why only a 10K resistor? What happens if we use a resistor value that’s either lower or higher than 10K-Ohms?
How do we make fluctuating readings stable? As you can see, even when I have not applied any pressure on the sensor, there is still noise. So, we will remove this noise on the hardware level, and we will also completely eliminate false triggering on the software level. Besides that, in the end, we will build a highly reliable weight and pressure monitoring system, where we will do calculations according to the FSR sensing area. So, without any further delay, let’s get started!!!
Note: For bend monitoring, read my article on Flex Sensor.
Amazon Links:
Arduino Nano USB C type (Recommended)
*Please Note: These are affiliate links. I may make a commission if you buy the components through these links. I would appreciate your support in this way!
Force Sensitive Resistor (FSR):
A Force Sensitive Resistor also known as a Force Sensor, or FSR for short is a type of simple and inexpensive transducer that converts mechanical forces such as weight, pressure, tension, and compression into an electrical signal. FSRs are commonly used in devices to measure things like weight or pressure.
You can find Force Sensors in many portable electronic devices, including electronic drums, where the FSRs detect how hard someone hits the drum pad and adjust the sound accordingly. They are also found in handheld gaming devices, where the sensors can detect the pressure of your touch or button press. They are also found in mobile phones, FSRs help in sensing how much pressure is applied to the screen, allowing for features like pressure-sensitive touchscreens. FSRs are used because they are small, flexible, and can easily fit into portable gadgets. These are available in different shapes, sizes, and ratings.

If you need more accuracy, then you should use FSRs with a circular sensing area. But if you need a larger sensing area and are okay with less accuracy, then you should go for rectangular FSRs.
This is called a force Sensitive Resistor (FSR) because it’s simply a variable resistor and it’s
Resistance decreases as the applied force increases.
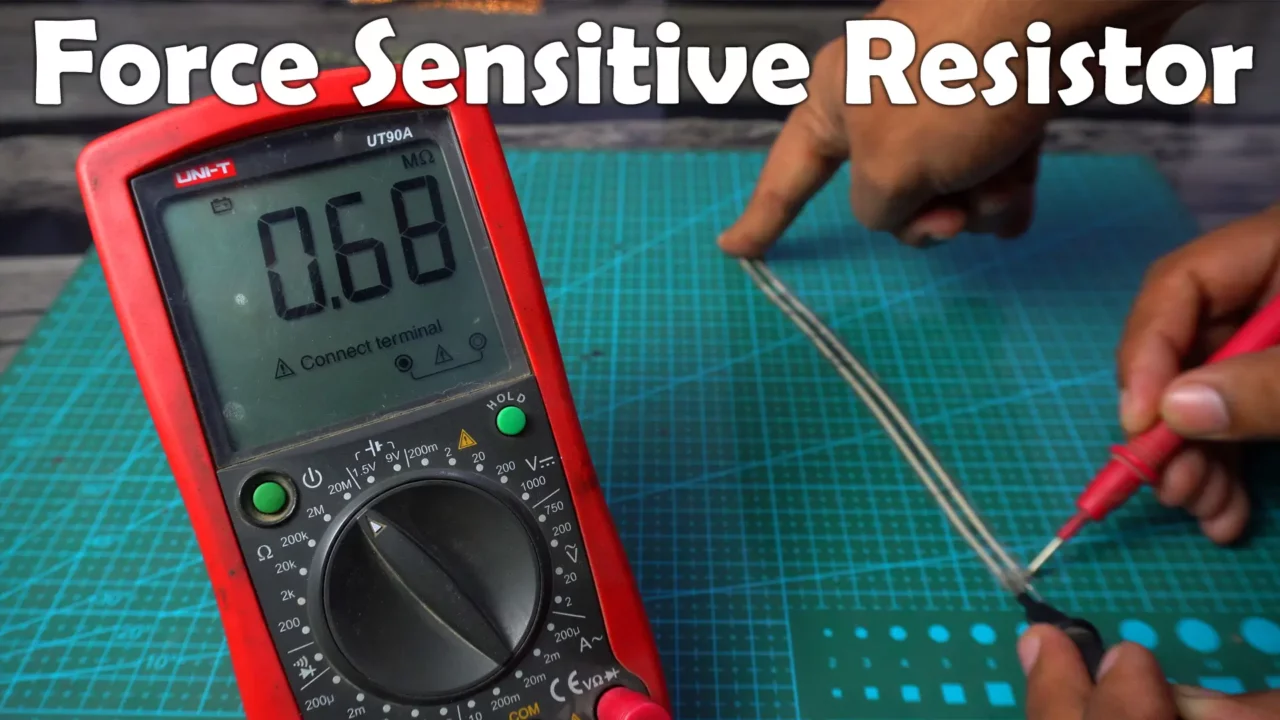
The one I have is the FlexiForce A201 Sensor.

A201 FSRs are trimmable, You can cut the body of the sensor along the trim lines to make it smaller, and then you can use a 3-pin male connector like this at the end to make it breadboard friendly.
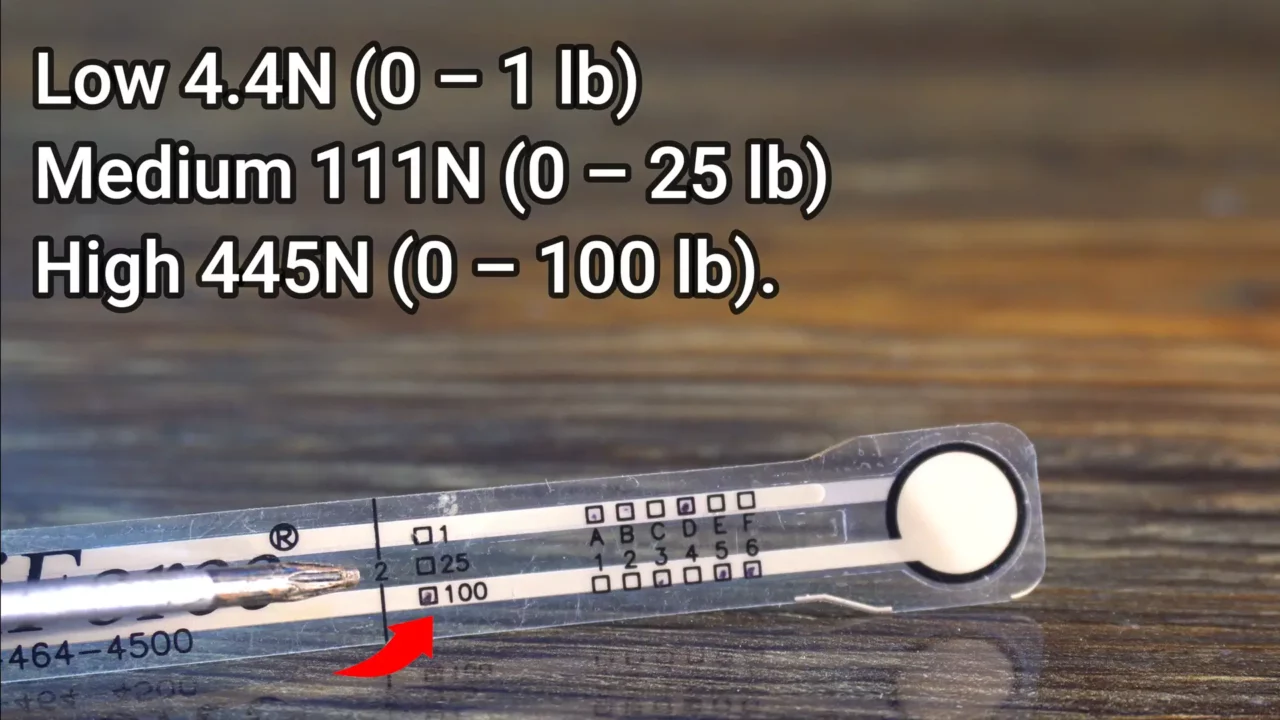
This particular type of the FSR is available in three force ranges:
| Low: | 4.4N (0 – 1 lb) |
| Medium: | 111N (0 – 25 lb) |
| High: | 445N (0 – 100 lb) |
And let me tell you these are just the approximate ranges. Anyway, with this particular Force Sensitive Resistor we can measure (0 to 100 lb) or (0 to 45.3592Kg).
On the right side you can see that circular area is the Sensing Area of the FSR sensor, where we will apply the force or pressure and its diameter is 9.53mm (0.375 in.).
Force Sensitive Resistor Specifications
FSR Properties
| Sensor Type: | Force Sensitive Resistor |
| Controlled By: | Flexiforce Adapter |
| Force Min: | 0 N |
| Force Max: | 444.8 N |
| Non-Linearity Max: | ± 3 % |
| Repeatability Error Max: | ± 2.5 % |
| Hysteresis Max: | 4.5 % |
| Long-Term Drift Max: | 5 % |
| Response Time Max: | 5 μs |
| Temperature Sensitivity Max: | 0.36 % per °C |
FSR Physical Properties
| Sensing Area: | 71.3 mm² |
| Lifespan: | 1 million actuations |
| IP Rating: | IP64 |
| Operating Temperature Min: | -9 °C |
| Operating Temperature Max: | 60 °C |
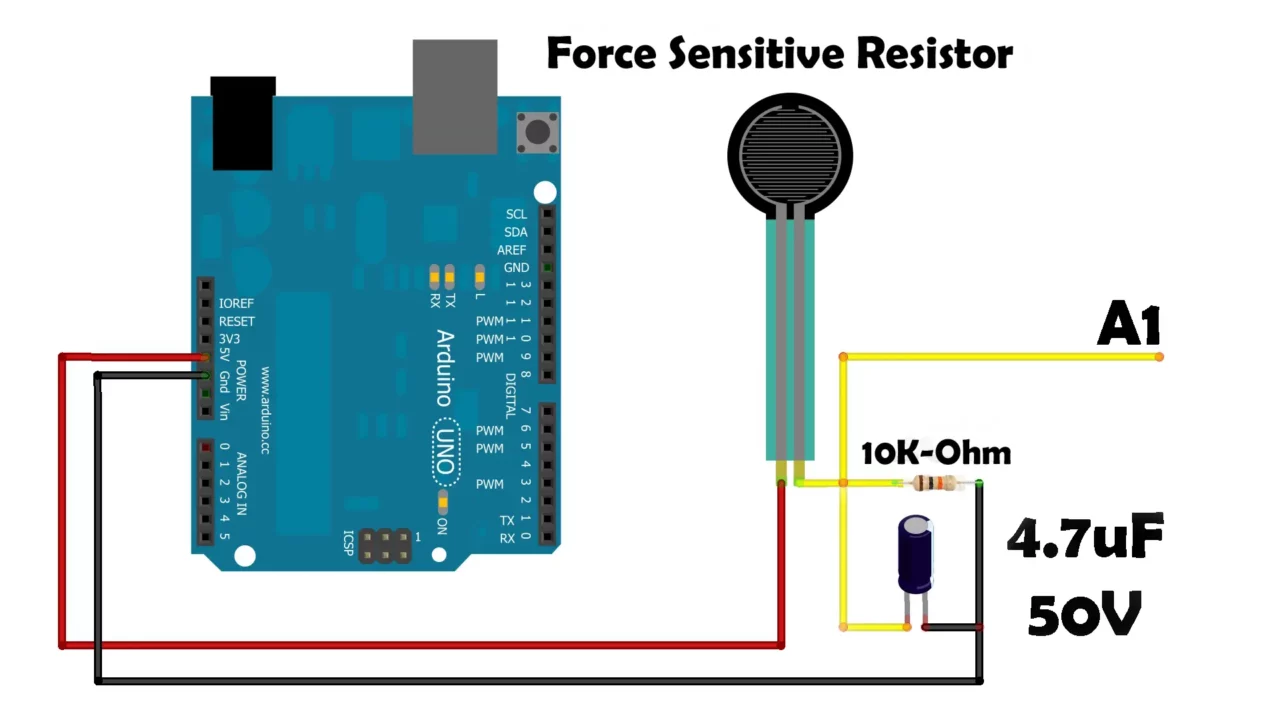
When no force or pressure is applied, the resistance is infinite. But when we apply force, the resistance starts to decrease. The more force or pressure we apply, the more the resistance drops. To read this change in resistance, we are going to connect a 10K ohm resistor in series.

Since both are resistors and do not have any polarity, you can place the 10K ohm resistor on either the right or left side of the FSR (Force Sensor). Anyway, this makes a simple voltage divider circuit. And now to connect it to the Arduino.
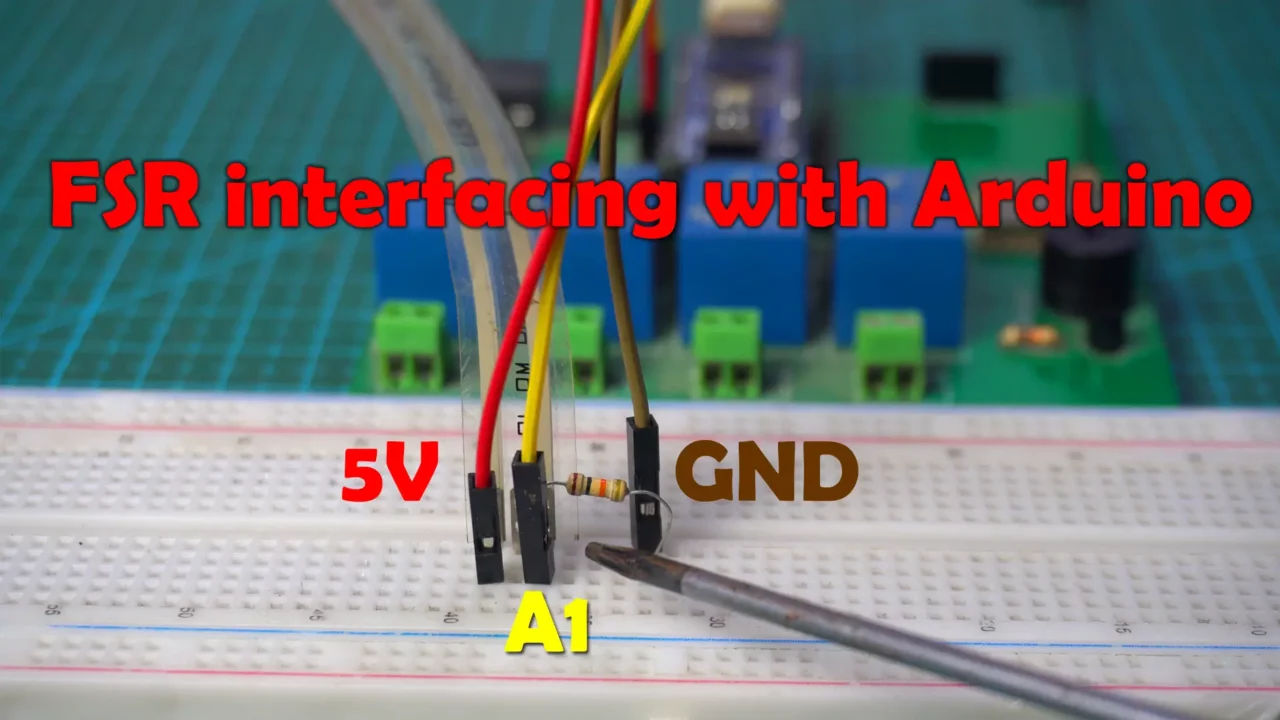
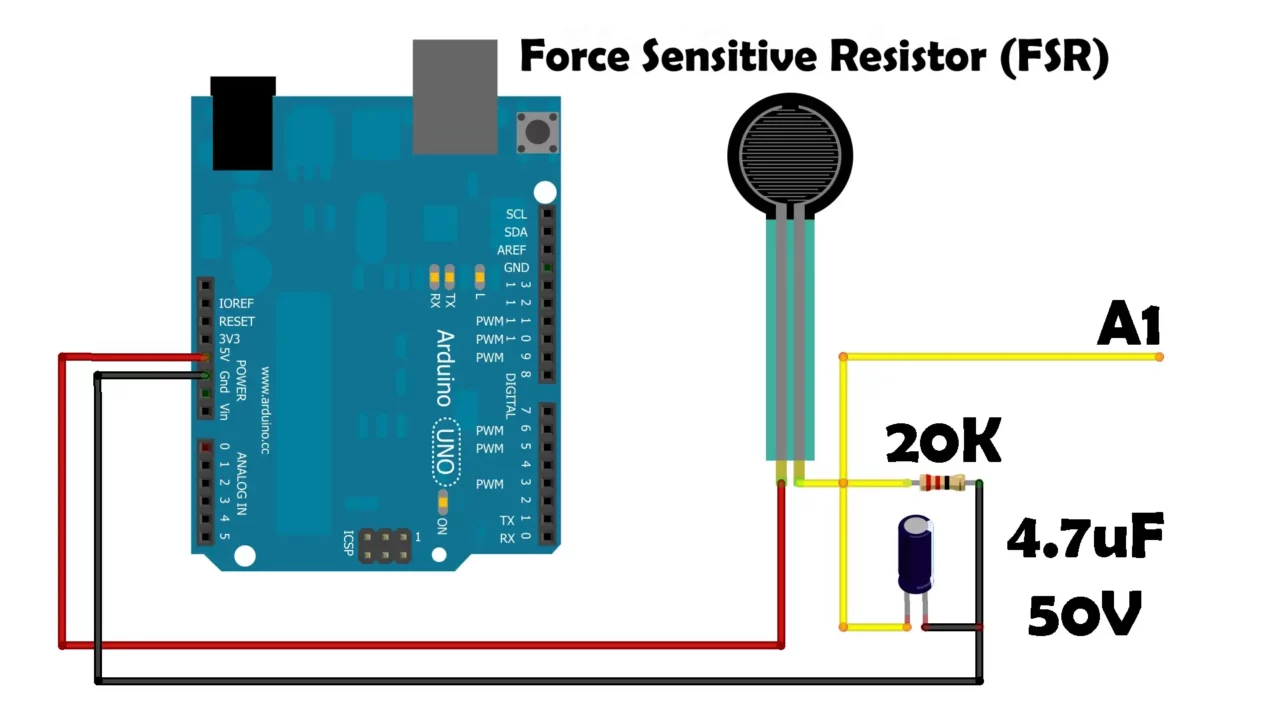
Simply, connect a wire from the middle of this voltage divider circuit to the Arduino Analog pin A1. Connect the other leg of the FSR to the Arduino 5V and connect the other end of the 10K resistor to the Arduino Gnd.
In this setup, the Arduino reads the voltage at pin A1. As pressure on the FSR increases, its resistance decreases, which changes the voltage at A1. The Arduino reads these changes as different values, allowing you to measure the force applied. For the connections you can follow this circuit diagram.
FSR interfacing with Arduino:

Now, let’s go ahead and take a look at the programming.
Force Sensitive Resistor Arduino Programming:
|
1 2 3 4 5 6 7 8 9 10 11 12 13 14 15 16 17 18 19 20 21 22 |
int FSR = A1; // FlexiForce sensor is connected analog pin A1 int FSRdata = 0; float vout; void setup() { Serial.begin(9600); pinMode(FSR, INPUT); } void loop() { FSRdata = analogRead(FSR); vout = (FSRdata * 5.0) / 1023.0; Serial.print("Force sensitive Resistor: "); Serial.print(vout,3); Serial.println(""); delay(100); } |
Code Explanation:
It’s a basic program that reads data from a Force Sensitive Resistor and converts it into a voltage value. FSR is connected to the analog pin A1.
In the loop() function, first we read the FSR and store the value in variable FSRdata . Then we convert this into voltage and store the value in variable vout and finally, we print the value on the Serial monitor at 100 milliseconds delay. I have already uploaded this program and now let’s watch this in action.
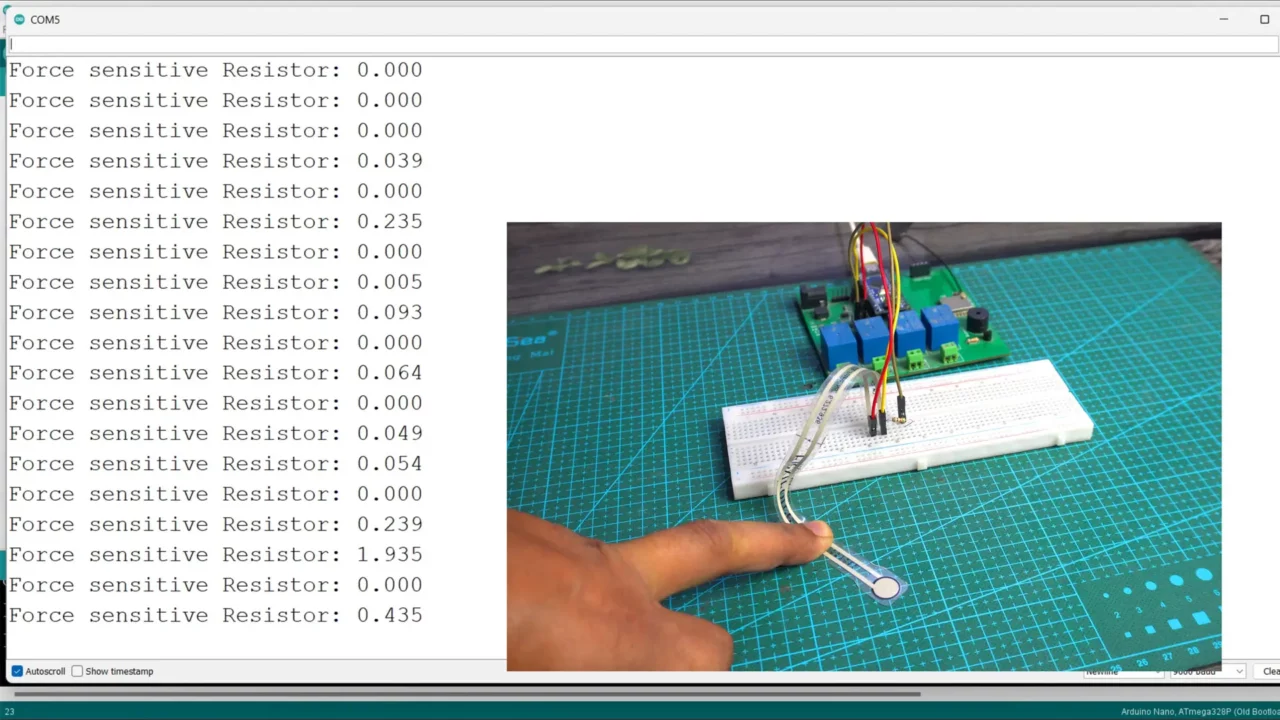
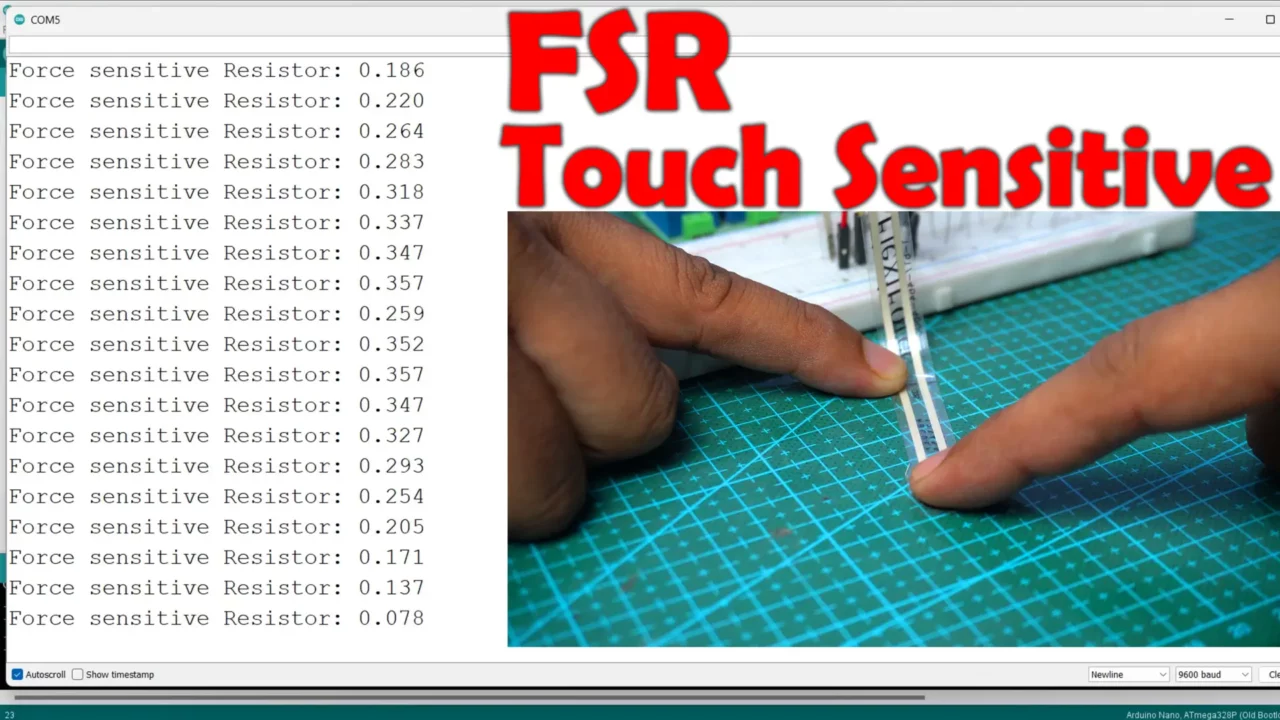
Practical Demonstration:
The values are fluctuating a lot, even though I haven’t applied any force yet. But, the sensor is working. When I apply force, the value increases, and when I release the force, the voltage value drops. Right now, there is a lot of noise in the signal, which is causing these fluctuations.

On the oscilloscope (DSO152 by Fnirsi), you can also see there is a lot of noise on the signal wire, which is why the values were fluctuating. Even without applying the force, you can clearly see the voltage levels on the oscilloscope. To remove this noise, let’s add a 4.7uF 50V capacitor.
I added the 4.7uF capacitor in parallel with the 10K-ohm resistor, which acts as a low-pass filter. For the connections, you can follow this circuit diagram.

Now, the noise has completely disappeared. When I press the force-sensitive resistor, I get a clean analog signal. Later in this article, we will also implement a software filter. Anyways, let’s check the values again on the Serial Monitor.
Output after adding a Capacitor:
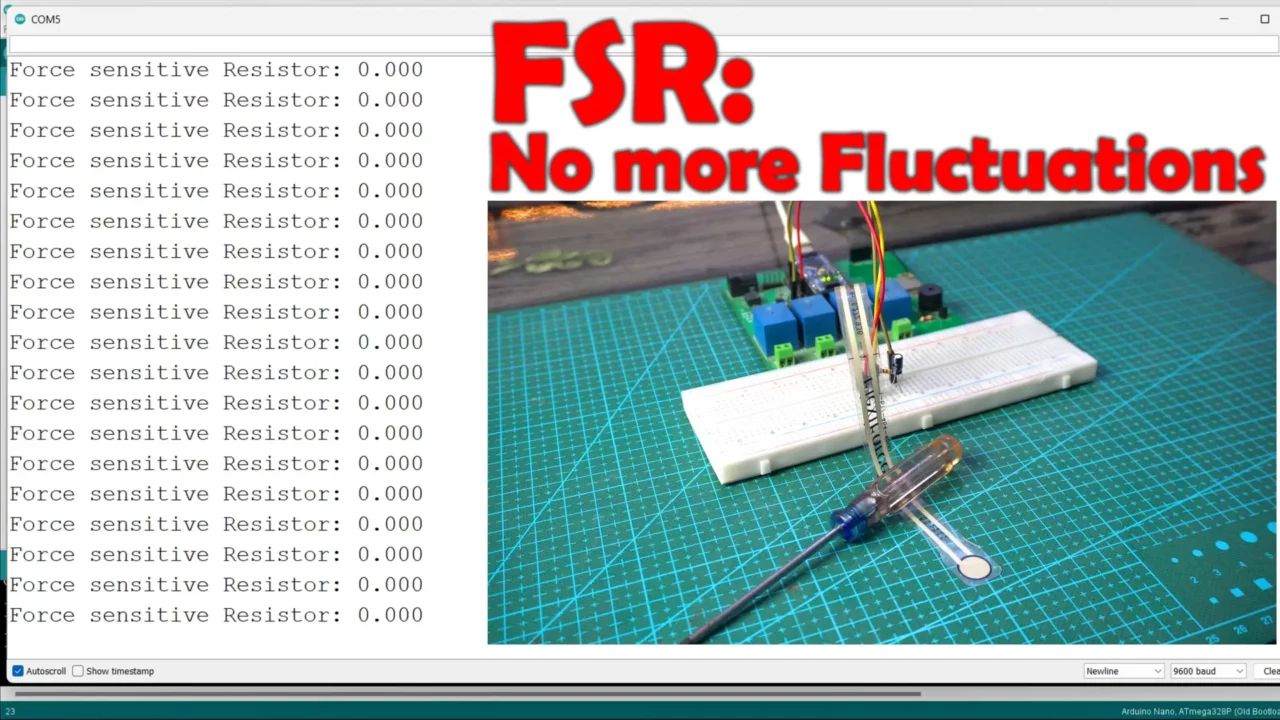
After adding the capacitor, you can see that the readings are no longer fluctuating. If you don’t want to use a capacitor, you can also filter out the noise using a filter equation in the program. I have already written quite a detailed article on software noise filtering.
Now, when I press on the force sensor, the voltage goes up. When I release it, the voltage drops back to zero. You can see that I have to apply quite a bit of force. That’s because I am using a 10K ohm resistor with the FSR.
Now you have an idea of how to use a Force Sensitive Resistor at a basic level.
Next, you need to decide whether you will be applying high or low pressure on the FSR. If you want to sense very light pressure, you will need to use a higher value resistor so there is more voltage drop across it. But if you want to measure heavier forces, you can stick with a 10K or even a lower value resistor.
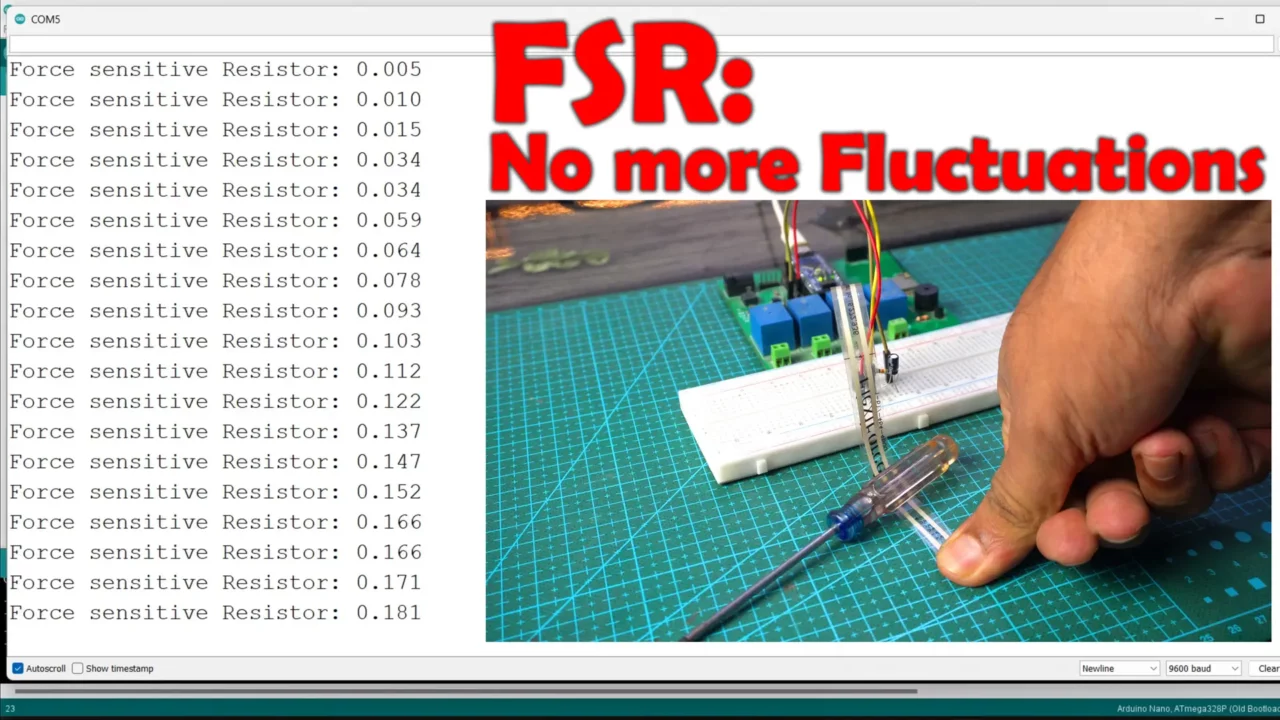
To make it more sensitive, I connected 10 resistors in series with the FSR. You could also use a single 100K resistor. If you want to make it extremely sensitive, you could go up to a 500K resistor or even higher. Let’s check the readings on the Serial Monitor.
The sensor is now much more sensitive. Earlier, I had to apply more force, but now it responds to even light pressure. If you want to generate higher voltage with even less force, you can use an even higher-value resistor in series with the force sensitive resistor.
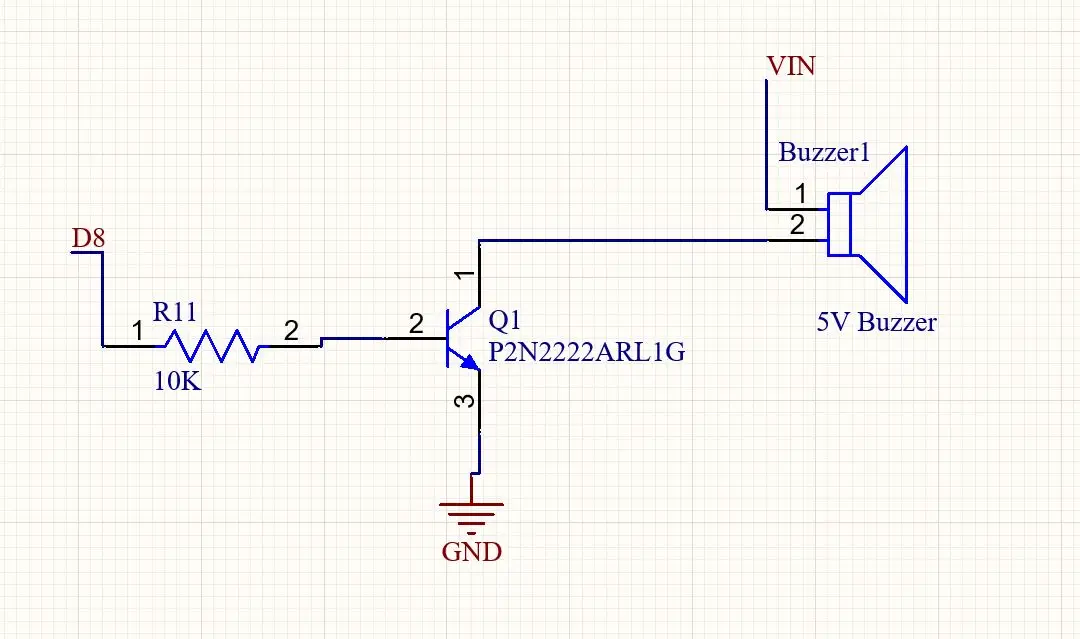
Anyway, the Force Sensitive Resistor is working well. Now, let’s use it to control a buzzer.
On this Arduino Nano development board, I already have a 5V buzzer which is connected to the Arduino digital pin D8. For the connections you can follow this circuit diagram.
FSR and Buzzer Code:
|
1 2 3 4 5 6 7 8 9 10 11 12 13 14 15 16 17 18 19 20 21 22 23 24 25 26 27 28 29 30 31 32 33 |
int FSR = A1; // FlexiForce sensor is connected analog pin A1 int FSRdata = 0; float vout; int Buzzer = 8; void setup() { Serial.begin(9600); pinMode(FSR, INPUT); pinMode(Buzzer, OUTPUT); digitalWrite(Buzzer, LOW); } void loop() { FSRdata = analogRead(FSR); vout = (FSRdata * 5.0) / 1023.0; if ( vout > 0.5 ) { digitalWrite(Buzzer, HIGH); } else digitalWrite(Buzzer, LOW); Serial.print("Force sensitive Resistor: "); Serial.print(vout,3); Serial.println(""); delay(100); } |
I slightly modified the previous code. I defined a Pin for the Buzzer. Next, inside the setup() function, using the pinMode() function I set it as OUTPUT.
Finally, in the loop() function, I added a condition that is if the voltage increase above 0.5 volts turn ON the buzzer else turn OFF the buzzer.
Note: For the practical demonstration, watch the video tutorial given at the end of this article.
Now, let’s move on to our final project, where we will measure force, weight, and pressure.
This is the final circuit diagram.
I do not have a 20K resistor so that why I connected a pair of 10K resistors in series with the Force Sensor.
FSR Arduino Final Program:
|
1 2 3 4 5 6 7 8 9 10 11 12 13 14 15 16 17 18 19 20 21 22 23 24 25 26 27 28 29 30 31 32 33 34 35 36 37 38 39 40 41 42 43 44 45 46 47 48 49 50 51 52 53 54 55 56 57 58 59 60 61 62 63 64 65 66 67 68 69 70 71 72 73 |
const int flexiForcePin = A1; // Analog pin A1 int flexiForceValue = 0; float weightLbs = 0.0; float weightKg = 0.0; float forceNewtons = 0.0; float pressurePsi = 0.0; int filteredValue = 0; // Initialize filtered value float alpha = 0.5; // Filter coefficient (0 < alpha < 1) // Area calculation based on diameter of 9.53 mm, working area of the FSR sensor const float diameterMm = 9.53; // Diameter in mm const float diameterInches = diameterMm / 25.4; // Convert diameter to inches const float radiusInches = diameterInches / 2; // Radius in inches const float areaInSquareInches = 3.14159 * radiusInches * radiusInches; // Area in square inches // Define calibration coefficients const float calibrationSlope = 0.13; const float calibrationIntercept = 0.0; int PreviousValue; unsigned long valueChangeTime; void setup() { Serial.begin(9600); pinMode(flexiForcePin, INPUT); } void loop() { flexiForceValue = analogRead(flexiForcePin); filteredValue = alpha * flexiForceValue + (1 - alpha) * filteredValue; // Filter equation // check if the pressure has changed and stays the same for 1 second if (filteredValue != PreviousValue) { if (millis() - valueChangeTime >= 1000) { PreviousValue = filteredValue; valueChangeTime = millis(); } } if( filteredValue == PreviousValue) { valueChangeTime = millis(); } // Apply the calibration equation to convert analog reading to pounds force weightLbs = calibrationSlope * PreviousValue + calibrationIntercept; // Convert pounds force to Newtons (1 lb = 4.44822 N) forceNewtons = weightLbs * 4.44822; // Convert Newtons to kilograms weightKg = forceNewtons / 9.80665; // Calculate pressure in psi pressurePsi = weightLbs / areaInSquareInches; Serial.print("Analog Reading: "); Serial.print(flexiForceValue); Serial.print(" -> Force N: "); Serial.print(forceNewtons); Serial.print(" Weight: "); Serial.print(weightKg); Serial.print(" kg, Pressure: "); Serial.print(pressurePsi); Serial.println(" psi"); } |
Code Explanation:
This program reads data from a Force sensor connected to Arduino and calculates force in Newton’s, weight in Kgs, and pressure in PSI. It also applies a filter for smoother readings and checks for stable values before sending it to the Serial monitor.
We know sensing area of the force sensitive resistor is 9.53mm.
|
1 2 3 4 5 6 7 |
const float diameterMm = 9.53; // Diameter in mm const float diameterInches = diameterMm / 25.4; // Convert diameter to inches const float radiusInches = diameterInches / 2; // Radius in inches const float areaInSquareInches = 3.14159 * radiusInches * radiusInches; // Area in square inches |
first we convert this into inches, then we find out the radius in inches, and finally using the above values we find the area in square inches.
|
1 2 3 4 5 6 7 8 9 10 11 12 13 14 15 |
const float calibrationSlope = 0.13; const float calibrationIntercept = 0.0; These are calibration co-efficient values. int PreviousValue; unsigned long valueChangeTime; These two variables are used with the timer. flexiForceValue = analogRead(flexiForcePin); filteredValue = alpha * flexiForceValue + (1 - alpha) * filteredValue; |
In the loop() function, first we read the Force Sensitive Resistor and then we apply a filter equation to further smooth the signal.
|
1 2 3 4 5 6 7 8 9 10 11 12 13 14 15 16 17 18 19 |
if (filteredValue != PreviousValue) { if (millis() - valueChangeTime >= 1000) { PreviousValue = filteredValue; valueChangeTime = millis(); } } if( filteredValue == PreviousValue) { valueChangeTime = millis(); } |
This set of instructions is used to check if the pressure has changed and stays the same for 1 second. Recommended value is 2 to 3 seconds, if you really don’t want any kind of false triggering.
|
1 2 3 4 5 6 7 8 9 10 11 |
// Convert pounds force to Newtons (1 lb = 4.44822 N) forceNewtons = weightLbs * 4.44822; // Convert Newtons to kilograms weightKg = forceNewtons / 9.80665; // Calculate pressure in psi pressurePsi = weightLbs / areaInSquareInches; |
After this we find force in Newtons, weight in Kgs, and pressure in PSI. Finally, we send the calculated values to the Serial Monitor.
Practical Demonstration:
I have three known weights: 2Kg, 3Kg, and 4Kg. We will use the force-sensitive resistor to measure these weights.
2Kg Weight: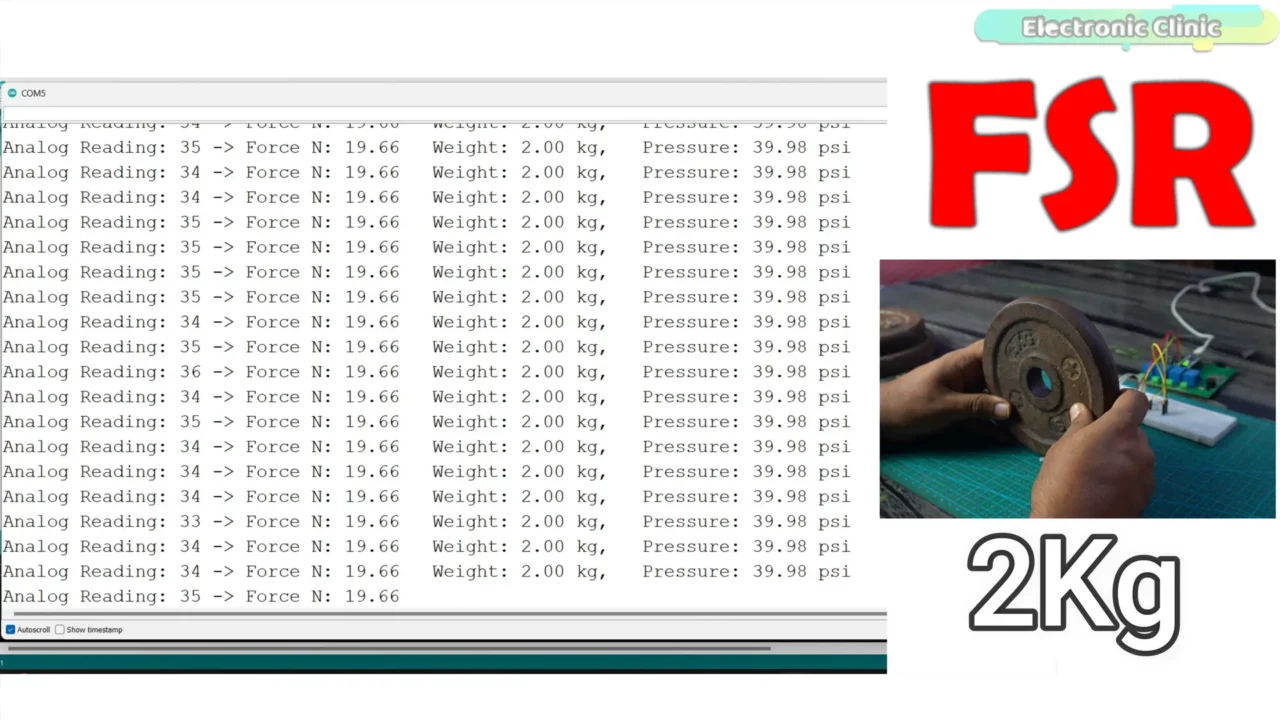 3Kg Weight:
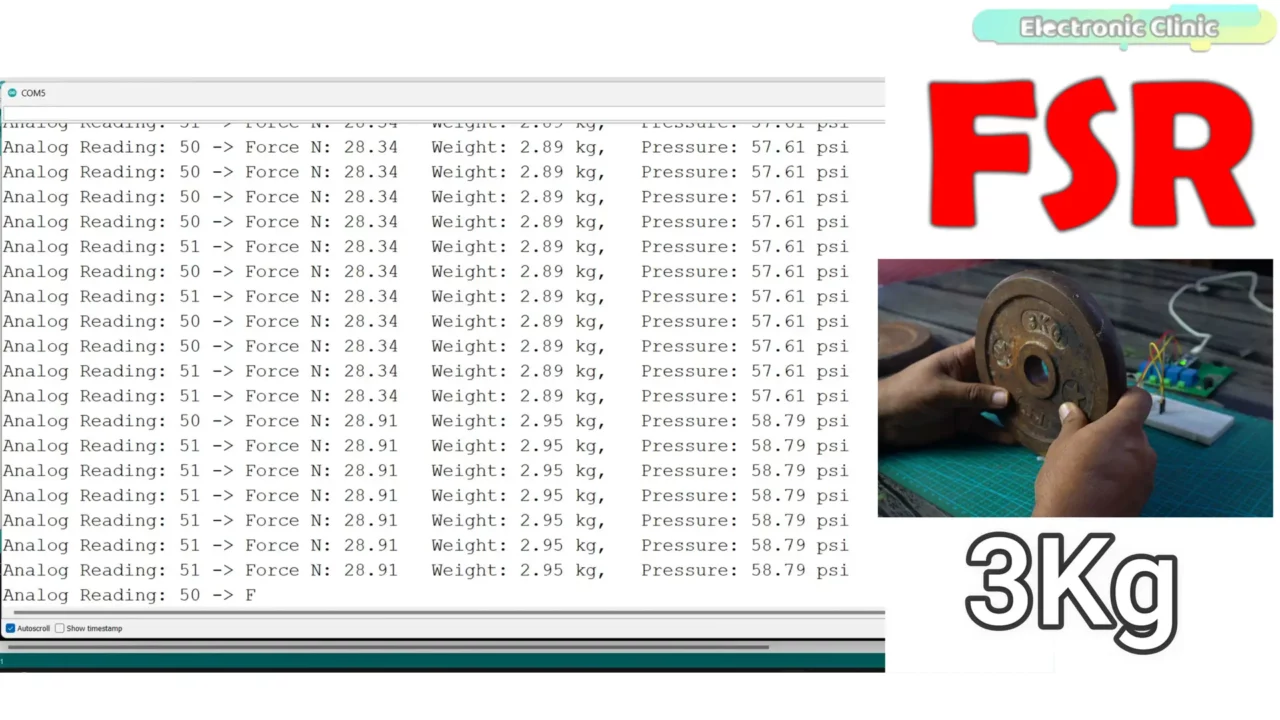 4Kg Weight:
Make sure that the weight, force, or pressure you are applying on the force sensitive resistor is spread out evenly over the FSR’s sensing area. And as I mentioned before;
Force Sensitive Resistors (FSRs) generally provide approximate values rather than precise measurements. They are great for detecting changes in force, pressure, or weight, but their readings can fluctuate, and they lack the accuracy and linearity needed for exact measurements.
They are commonly used in applications where relative changes are more important than exact values, such as sensing touch or detecting pressure variations.
For exact weight or pressure measurements, it’s better to use load cells or other more accurate sensors specifically designed for precise measurement. So, that’s all for now.
Don’t forget to subscribe my YouTube Channel (Electronic Clinic)
Watch Video Tutorial:

Discover more from Electronic Clinic
Subscribe to get the latest posts sent to your email.


Hi iwatched alit of your work,
I find it quite good
Actually I have a project on deadline but because I currently I don’t have time because I am working on many project and extra circular activities so I just hope
If you can help me out in providing the ready made project if you have so, or make it for me
I can you for your work, I know you are earning quite well but if you help me out I this difficult situation, i will thankful to you.
Your curious student