HX711 Load Cell Arduino | HX711 calibration | Weighing Scale | Strain Gauge
Last Updated on October 21, 2024 by Engr. Shahzada Fahad
Table of Contents
HX711 Load Cell Arduino:
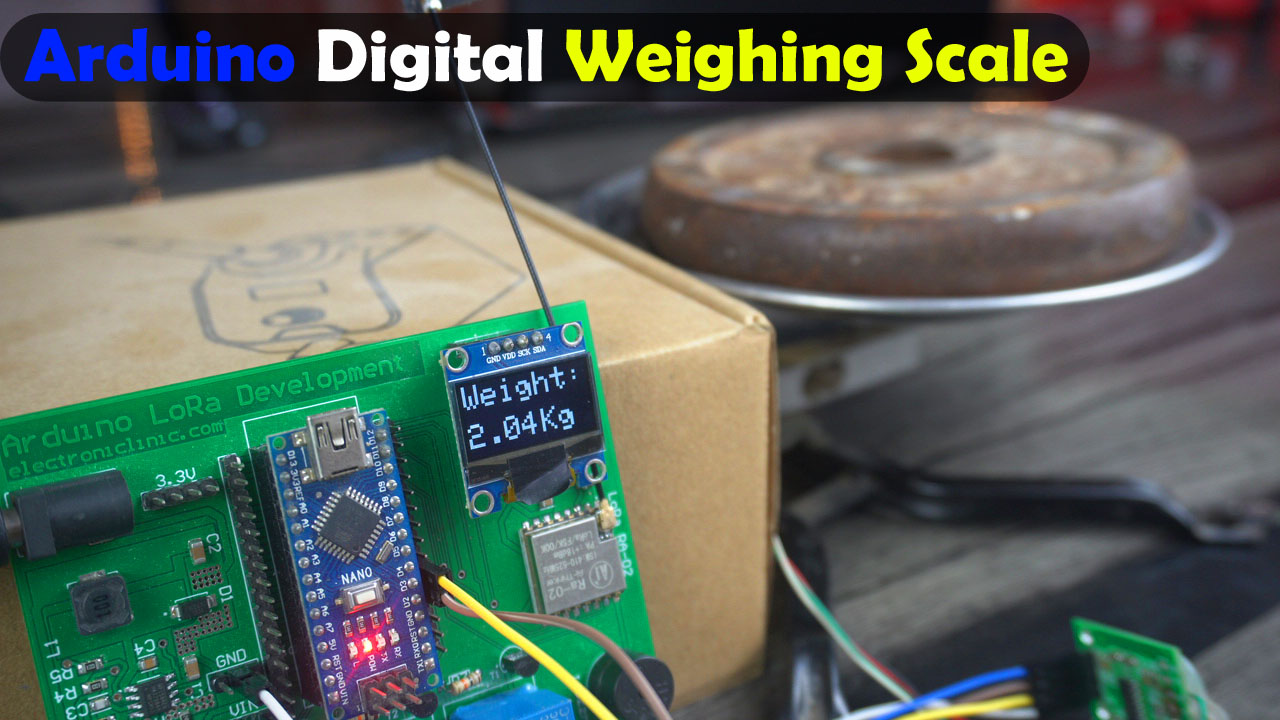
HX711 Load Cell Arduino- In today’s article, you will learn how to make yourself the most accurate Digital Weighing Scale using the HX711 Amplifier breakout board, a Load cell or Strain Gauge, Arduino Nano or Arduino Uno, and an i2c supported SSD1306 Oled display module.
It doesn’t matter if you have a 5Kg or 10Kg or any other load cell because the method I am going to explain can be implemented on similar load cells and HX711 amplifier boards.
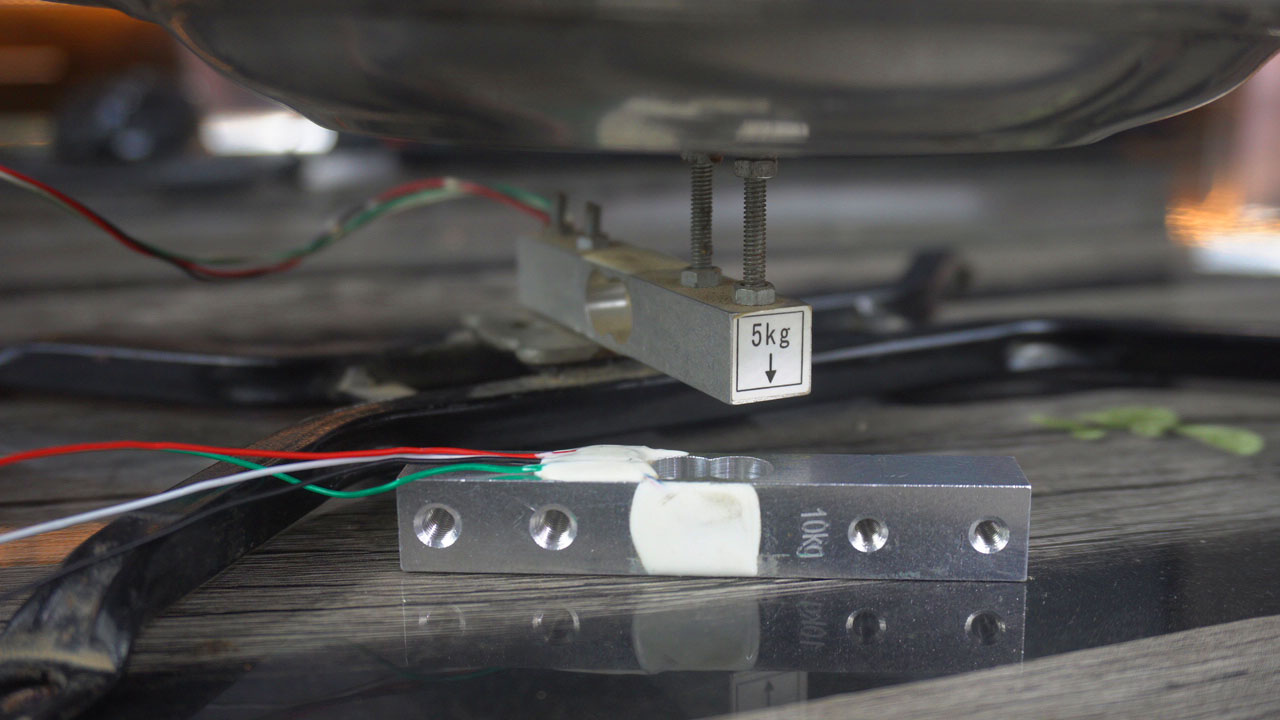
You can see, I have two load cells 5Kg and 10kg. They have got the same size and the same color wires.
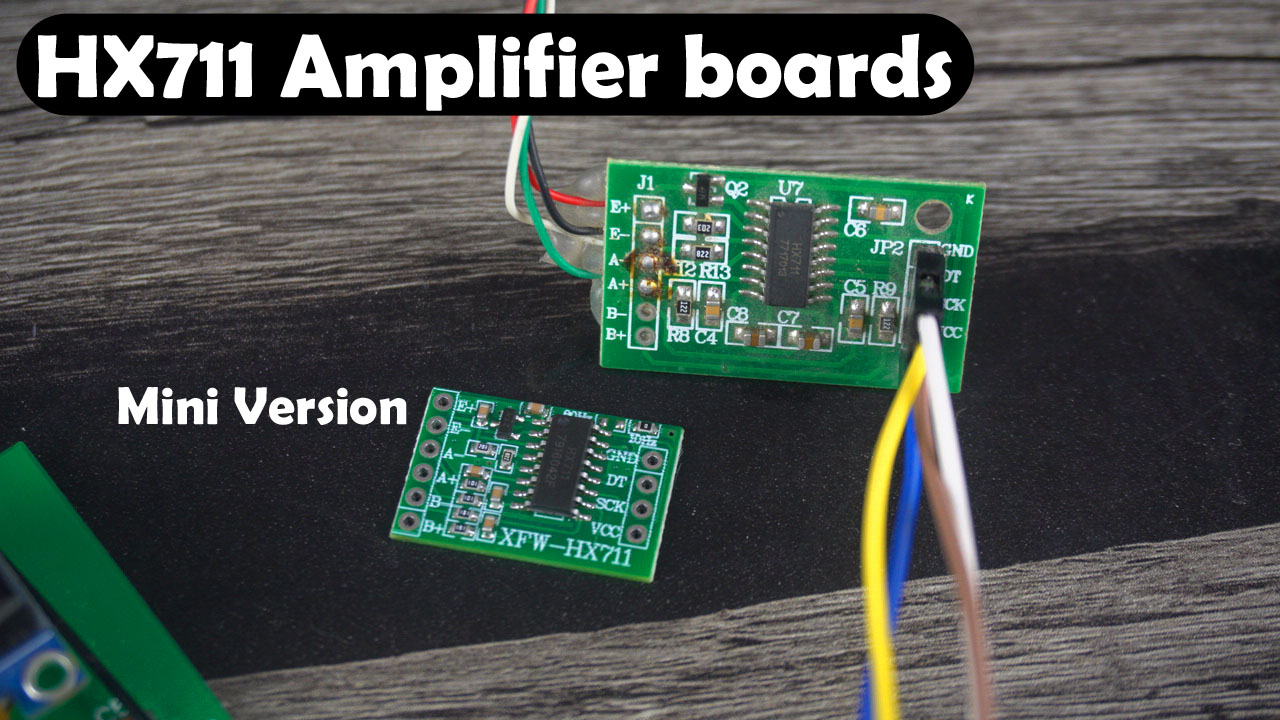
These are the HX711 breakout boards. This one is the mini version of the HX711 and the other one is slightly a bigger version. But it doesn’t matter as both the modules have got the same Pinouts. So, you can use any of these HX711 Amplifier boards with the load cell.
My digital weighing scale is highly accurate because I have calibrated it using just a single line of code. And of course I will explain the calibration process later in this article. And this is something that you are not supposed to skip otherwise you won’t get the correct weight values.
So, without any further delay let’s get started!!!
Note: Read my article on IoT Weighing Scale using ESP32 and the New Blynk V2.
Amazon Links:
Arduino Nano USB-C Type (Recommended)
*Disclosure: These are affiliate links. As an Amazon Associate I earn from qualifying purchases.
What is a Load cell or Strain Gauge?

A load cell, also known as a strain gauge, is a device used to measure force or weight. It converts the applied force into an electrical signal that can be measured and analyzed. Load cells are commonly used in various applications, such as industrial weighing scales, tension and compression measurement systems, material testing machines, and force monitoring devices.

The Wheatstone bridge is an essential component often used in load cell designs. The Wheatstone bridge configuration consists of four resistive elements, including strain gauges, arranged in a diamond shape.
When a force is applied, their resistance changes, causing an imbalance in the Wheatstone bridge. This imbalance results in a voltage difference at the output terminals.
By measuring this voltage difference, typically using an instrumentation amplifier like the HX711, the load cell can accurately determine the applied force or weight. The Wheatstone bridge configuration allows for precise measurement and compensation of any variations or environmental factors that could affect the load cell’s performance.
HX711 Amplifier:

Hx711 Amplifier Module has different gain values which are selectable 32, 64, and 128. Any of the mentioned gains can be selected and used in the programming. The hx711 is a 24 bit analog to digital converter “ADC”. Which has an amplifier that gives a maximum gain of 128 as per the datasheet. As you can see on the right side we have ground, DT, Sck, and Vcc. While on the left side we have E+, E-, A-, A+, B-, and B+. Now, let’s go ahead and take a look at the connections.
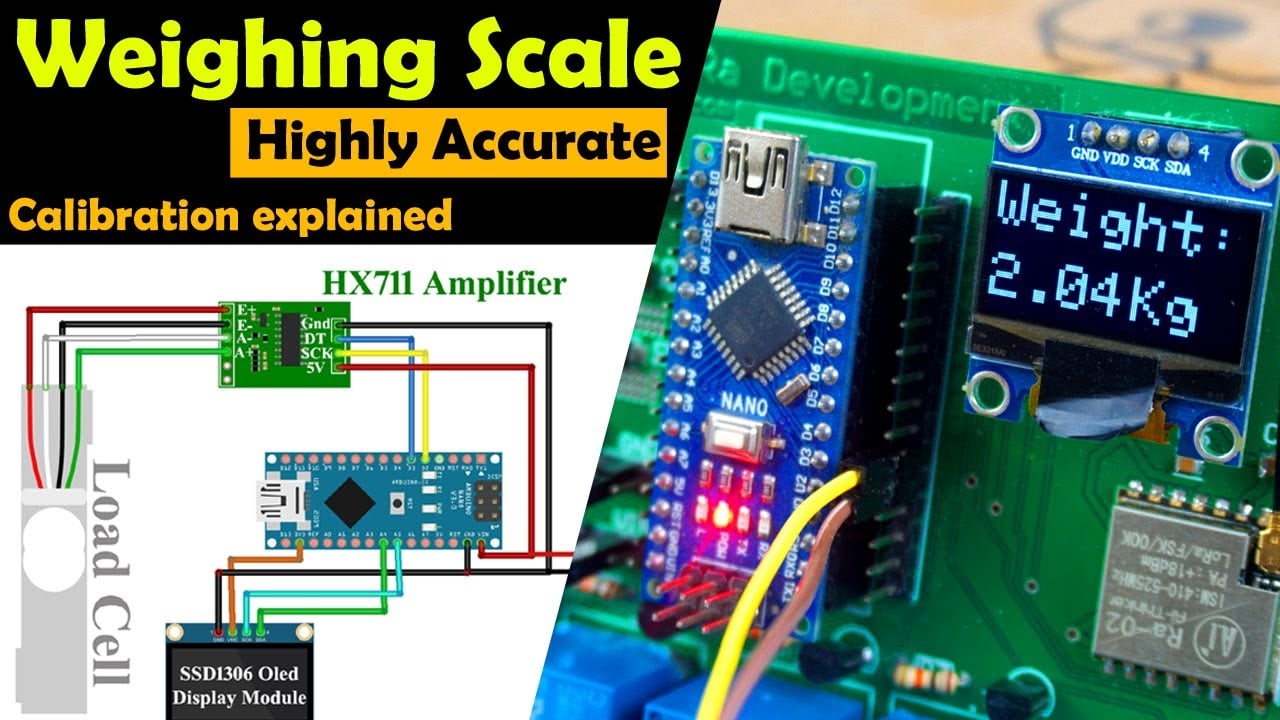
HX711 Load Cell interfacing with Arduino:

I screwed this 5Kg load cell to a metal frame that I salvaged from an Old scale. You can also fix your load cell on a wooden sheet. Anyway, while fixing the Load cell, pay a close attention to the Arrow head, it should be pointing in the downward direction. And on the top side I have attached a steel plate, for me this is the best setup I could think of.

Connect the Red and Black wires of the Load cell to the HX711 amplifier board E+ and E-.
Connect the White and Green wires of the Load cell to the HX711 Amplifier board A- and A+ respectively.
Connect the VCC and GND pins of the HX711 board to the Arduino 5V and GND. In my case I have connected these wires to the Arduino Vin and GND pins as these are connected to this 5V and 3A power supply.

Connect the SCK and DT pins to the Arduino pins 2 and 3 respectively.
Connect the VCC and GND pins of the SSD1306 Oled display module to the Arduino 3.3V and GND pins. Connect the SCL and SDA pins of the Oled display module to the Arduino A5 and A4 pins. A5 is the SCL and A4 is the SDA.
I will be using my designed Arduino and LoRa based development board for testing this project. Now, let’s go ahead and install the required libraries.
Altium Designer + Altium 365 + Octopart:

Altium 365 lets you hold the fastest design reviews ever. Share your designs from anywhere and with anyone with a single click. it’s easy, leave a comment tagging your teammate and they’ll instantly receive an email with a link to the design. Anyone you invite can open the design using a web browser. Using the browser interface, you’re able to comment, markup, cross probe, inspect, and more. Comments are attached directly to the project, making them viewable within Altium designer as well as through the browser interface. Design, share, and manufacture, all in the same space with nothing extra to install or configure. Connect to the platform directly from Altium Designer without changing how you already design electronics. Altium 365 requires no additional licenses and comes included with your subscription plan.
Get real-time component insights as you design with Octopart built into Altium 365. Octopart is the fastest search engine for electronic parts and gives you the most up-to-date part data like specs, datasheets, cad models, and how much the part costs at different amounts etc. Right in the design environment so you can focus on your designs. Start with Altium Designer and Activate Altium 365. Search for electronic parts on Octopart.
Required Libraries:
While the Arduino IDE is open, go to the Sketch Menu > then to Include Library > and click on the Add .ZIP Library.

Browse to the location and select this zip folder.

And click the Open button.
Next, we will install libraries for the SSD1306 Oled display module. For this, go to the sketch Menu > then to Include Library and this time click on the Manage libraries.

Search for the Adafruit_gfx library, you can see, I have already installed this library.

Next search for the Adafruit_SSD1306 library, you can see I have also installed this library.

HX711 Load Cell Arduino Programming:
|
1 2 3 4 5 6 7 8 9 10 11 12 13 14 15 16 17 18 19 20 21 22 23 24 25 26 27 28 29 30 31 32 33 34 35 36 37 38 39 40 41 42 43 44 45 46 47 48 49 50 51 52 53 54 55 56 57 58 59 60 61 62 63 64 |
#include "HX711.h" #include <Wire.h> #include <Adafruit_GFX.h> #include <Adafruit_SSD1306.h> #define DOUT 3 #define CLK 2 HX711 scale(DOUT, CLK); float weight; float calibration_factor = 419640; // for me this value works just perfect 419640 #define SCREEN_WIDTH 128 // OLED display width, in pixels #define SCREEN_HEIGHT 64 // OLED display height, in pixels // Declaration for an SSD1306 display connected to I2C (SDA, SCL pins) #define OLED_RESET -1 // Reset pin # (or -1 if sharing Arduino reset pin) Adafruit_SSD1306 display(SCREEN_WIDTH, SCREEN_HEIGHT, &Wire, OLED_RESET); void setup() { Serial.begin(9600); Serial.println("HX711 calibration sketch"); Serial.println("Remove all weight from scale"); Serial.println("After readings begin, place known weight on scale"); Serial.println("Press + or a to increase calibration factor"); Serial.println("Press - or z to decrease calibration factor"); scale.set_scale(); scale.tare(); //Reset the scale to 0 long zero_factor = scale.read_average(); //Get a baseline reading Serial.print("Zero factor: "); //This can be used to remove the need to tare the scale. Useful in permanent scale projects. Serial.println(zero_factor); display.begin(SSD1306_SWITCHCAPVCC, 0x3C); delay(2000); display.clearDisplay(); display.setTextColor(WHITE); } void loop() { scale.set_scale(calibration_factor); //Adjust to this calibration factor Serial.print("Reading: "); weight = scale.get_units(5); if(weight<0) { weight=0.00; } //Serial.print(scale.get_units(), 2); // Serial.print(" lbs"); //Change this to kg and re-adjust the calibration factor if you follow SI units like a sane person Serial.print("Kilogram:"); Serial.print( weight); Serial.print(" Kg"); Serial.print(" calibration_factor: "); Serial.print(calibration_factor); Serial.println(); display.clearDisplay(); display.setTextSize(3); display.setCursor(0,0); // column row display.print("Weight:"); display.setTextSize(3); display.setCursor(0,35); display.print(weight); display.setTextSize(3); display.setCursor(75,35); display.print("Kg"); display.display(); delay(100); } |
This is the final code. I have added the required libraries. I have defined the pins and variables.
|
1 |
float calibration_factor = 419640; |
This calibration_factor value may or may not work for you. Initially, you can start with this value, measure the weights of some known objects or things. If the measured weight value is ok then no problem, but if you get a wrong value then just play with this value until you get an accurate value.
It took me around 10 minutes to calibrate my weighing scale and I used a 2Kg weight during the calibration process.
|
1 2 3 4 5 6 7 8 9 |
#define SCREEN_WIDTH 128 // OLED display width, in pixels #define SCREEN_HEIGHT 64 // OLED display height, in pixels // Declaration for an SSD1306 display connected to I2C (SDA, SCL pins) #define OLED_RESET -1 // Reset pin # (or -1 if sharing Arduino reset pin) Adafruit_SSD1306 display(SCREEN_WIDTH, SCREEN_HEIGHT, &Wire, OLED_RESET); |
These lines of code is used for the Oled display module.
Inside the setup() function. You can see these two lines of code.
|
1 2 3 |
scale.set_scale(); scale.tare(); //Reset the scale to 0 |
These are used to reset the scale to 0. So, each time we restart the Arduino, the value will reset to zero. If you want to manually reset the scale using a button other than the reset button. Then you can add a condition in the loop() function. So, when a particular button is pressed, these two instructions are executed, and the value will reset to 0. Now, let’s go to the loop() function.
We simply calibrate the scale and using this instruction;
|
1 |
weight = scale.get_units(5); |
We measure the weight. And all the other instructions are used to print the values on the Serial monitor and Oled display module. So, that’s all for now.
Read my article on how to make a DIY commercial-level Weighing Scale using Arduino. I compared my created Diy weighing scale with the commercial scale and was amazed by the final results. Diy Scale Vs. Comercial Scale.
Watch Video Tutorial:
Discover more from Electronic Clinic
Subscribe to get the latest posts sent to your email.


Hi, I’m total new to this. How would you wire and modify this code to activate a relay (like B07V1YQQGL on Amazon) when a weight > 4kg and < 5kg is registered? I'm thinking, open cat food lid when cat of known weight sits on a load cell platform. My microchip cat feeder has just died and I'm looking for a cheaper alternative!
No need to reply to my comment above. I can see all I need in your ‘How to Make Arduino Development Board with 5v 3A Power Supply’ topic. Very helpful!