RFID & Fingerprint based Advanced Security System using Arduino
Last Updated on August 16, 2024 by Engr. Shahzada Fahad
Table of Contents
Advanced Security System:
RFID & Fingerprint based Advanced Security System using Arduino- Here is the Advanced Security System based on the PN532 RFID module, R557 Fingerprint module, Electronic Door Lock, I2C supported 16×2 LCD, 5V SPDT type relay and the Arduino Nano. Instead of using the Arduino Nano; you can also build the same project using Arduino Uno, Arduino Mega, and Arduino Pro Micro etc.
You might have seen in movies that, to open a door or a locker, two persons’ verification is required. So, this project also relies on a similar concept.
Because, in order to control this electronic door lock, you will need to perform both Fingerprint verification and scan an RFID card. If either of these steps is missing, the Door Lock will not open.
And not only that, you have only 15 seconds to complete both the RFID and Fingerprint verification. The 15 seconds time duration can be changed in the programming. So, anyway, after scanning the RFID card the 15 seconds timer is activated; the next person has to complete the Biometric verification within 15 seconds, otherwise, the system will reset. This is what makes this security system an advanced security system.
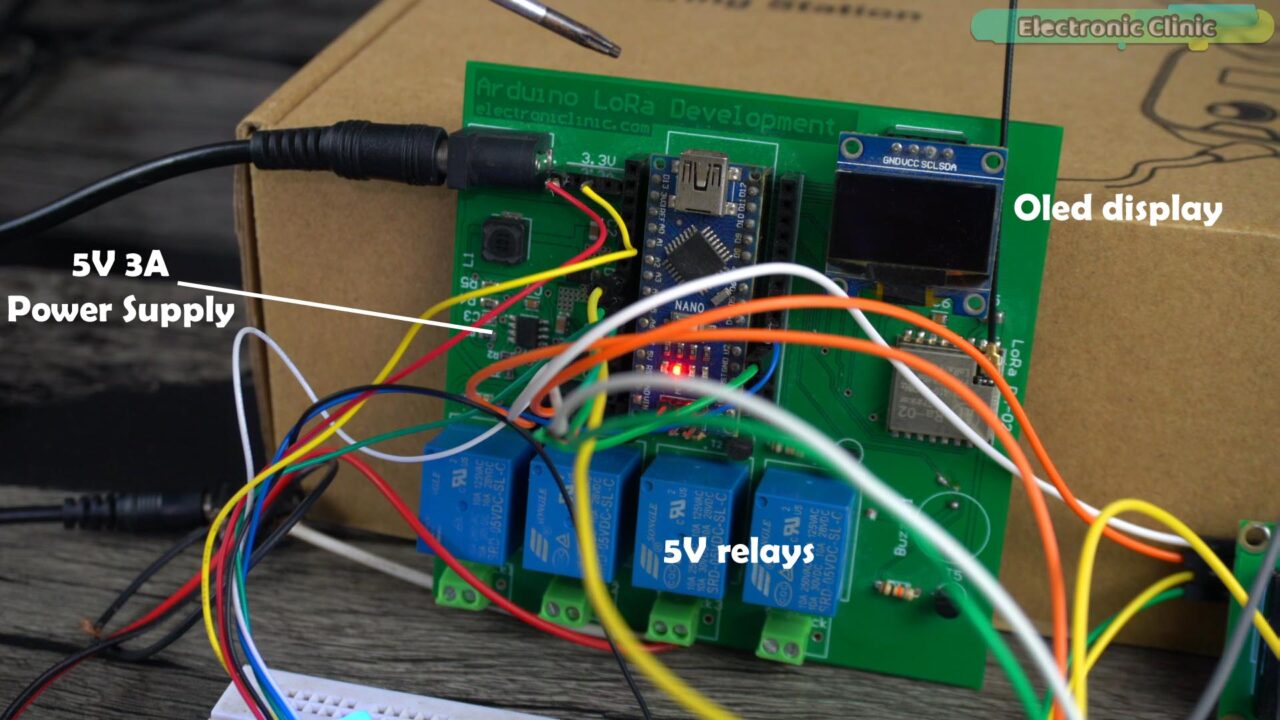
As usual, I am using my designed Arduino Nano and LoRa based development board, because it already has most of the electronics components which are needed for this project. It has a 5V and 3A powerful regulated power supply, an Oled display module, and 5V relays. Out of these 4 relays, I am using only 1 relay to control an electronic door lock.
Although this board has an Oled display module which I could use, but I have already used it in so many projects, so this time I decided why not to use this i2c supported 16×2 LCD.

So, anyway, you can see the project is ON, and you can see the message RFID Card is printed on the LCD. So, first we will need to scan the RFID card.

After scanning the RFID card the message “Place Finger” is printed on the 16×2 LCD. Now, we have 15 seconds to complete the biometric verification, let’s just not place the finger and let’s see what happens.
During the 15 seconds time duration, I didn’t place my finger, and the program automatically reset.

You can see the system is reset and again you can see the message RFID Card. It didn’t open the Door Lock. This is pretty amazing as the system is working.
This time round, let’s go ahead and complete both the verification steps and let’s see if the Electronic Door lock is going to open. So, first, I am going to scan my RFID card and then I will place my finger on the FingerPrint Module.

This is awesome, you can see the Electronic Door Lock just opened. Anyway, you can further modify this advanced security system. You can turn ON a buzzer if someone places a wrong finger or scans an invalid RFID card.
I am sure by now, you might have got an idea of how does this system work. So, without any further delay let’s get started!!!
Amazon Links:
Arduino Nano USB-C Type (Recommended)
*Disclosure: These are affiliate links. As an Amazon Associate I earn from qualifying purchases.
Advanced Security System Circuit Diagram:
For the technical specifications, Pinout, and how to get started with the PN532 RFID and R557 Fingerprint module, I highly recommend, you guys should read my getting started articles on these modules. Anyway, let me explain the connections.

Connect the RED and Yellow wires of the R557 Fingerprint module to the Arduino 3.3V. Connect the White wire to the Arduino GND. Connect the Green and Blue wires to the Arduino digital pins D2 and D3 respectively.
Connect the VCC and GND pins of the PN532 RFID module to the Arduino Vin and GND pins. The Vin and GND pins on the Arduino are connected to the 5V and 3A regulated power supply. So, apart from the Fingerprint module all the other electronics are powered up using this power supply. So, anyway, the SDA and SCL pins of the PN532 RFID module are connected to the Arduino A4 and A5 Pins. A4 is the SDA and A5 is the SCL.
This is the i2c version of the 16×2 LCD because it has this driver on its backside so you don’t need to connect a lot of wires. You only need to use 4 wires. All the 4 pins are properly labeled with GND, VCC, SDA, and SCL. Simply connect the VCC and GND pins to the Arduino Vin and GND pins; and connect the SDA and SCL pins to the Arduino A4 and A5 pins. A4 is the SDA and A5 is the SCL.
Connect the VCC and GND pins of the relay module to the Arduino Vin and GND pins. Connect the input pin to the Digital Pin 5 on the Arduino. Let me also tell you, this is a 5V SPDT type relay.
The GND wire of the the 12Vdc Electronic Door Lock is directly connected to the GND of 12Vdc power supply, whereas the Red wire of the Electronic Lock is connected to the 12V power supply voltage wire through this relay.
The Vin and GND wires in the circuit diagram are connected to the external 5V power supply.

Now let’s install the required libraries for the R557 fingerprint and the PN532 RFID modules.
Altium Designer, Altium 365, & Octopart:

Altium Designer is the world’s most trusted PCB design system. Altium Designer enables engineers to effortlessly connect with every facet of the electronics design process. Over 35 years of innovation and development focused on a truly unified design environment makes it the most widely used PCB design solution. With Altium Designer you can create PCB designs with an intuitive and powerful interface that connects you to every aspect of the electronics design process. Route it your way through any angle, tune for the delay, Push, Slide, and Walkaround faster than ever.
Easily work together with your mechanical team and forget about the days of swapping design files. Every design change stays in sync between Altium Designer and SOLIDWORKS, PTC Creo, Autodesk Inventor, Autodesk Fusion 360, or Siemens NX*.
Interact and collaborate with mechanical designers like never before in a photo-realistic, 3D design environment.
One of the best things about Altium Designer is that you can share your designs with your team members using Altium 365. They can check your design, leave comments, and if there are any issues, they can fix them from anywhere in the world. Altium Designer also uses the world’s fastest components search engine, Octopart, so you won’t have any difficulty in searching for components.
Altium Designer, Altium 365, and Octopart—unleashes the full potential of electronics design by seamlessly integrating design tools, collaboration platforms, and component databases. Together, they offer engineers a comprehensive and synchronized experience, leading to improved productivity, reduced errors, and accelerated innovation in the world of electronics design.
Required Libraries:
For this open the Arduino IDE. Click on the Sketch Menu, go to Include Library, and click on the manage libraries.

Search for the Adafruit_fingerprint library and install it.

You can see the Adafruit Fingerprint Sensor Library has been installed.
You will also need to install the LiquidCrystal_i2c library.

You can see I have also installed this library.
Download PN532 RFID Module Library:
Simply download the above WinRAR folder, extract it, and double-click to open the folder.
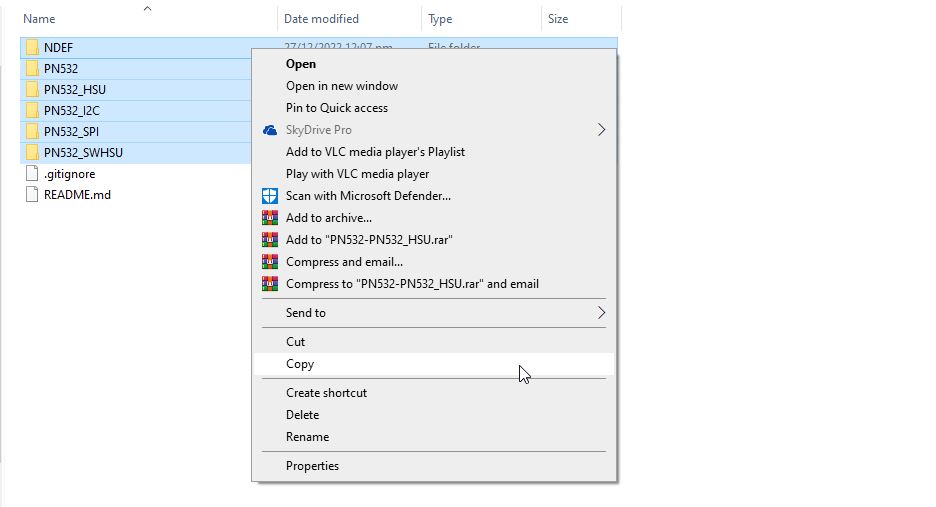
You can see inside this folder we have all the required libraries, so simply copy these folders and paste them into the Arduino libraries folder.
Advanced Security System Programming:
|
1 2 3 4 5 6 7 8 9 10 11 12 13 14 15 16 17 18 19 20 21 22 23 24 25 26 27 28 29 30 31 32 33 34 35 36 37 38 39 40 41 42 43 44 45 46 47 48 49 50 51 52 53 54 55 56 57 58 59 60 61 62 63 64 65 66 67 68 69 70 71 72 73 74 75 76 77 78 79 80 81 82 83 84 85 86 87 88 89 90 91 92 93 94 95 96 97 98 99 100 101 102 103 104 105 106 107 108 109 110 111 112 113 114 115 116 117 118 119 120 121 122 123 124 125 126 127 128 129 130 131 132 133 134 135 136 137 138 139 140 141 142 143 144 145 146 147 148 149 150 151 152 153 154 155 156 157 158 159 160 161 162 163 164 165 166 167 168 169 170 171 172 173 174 175 176 177 178 179 180 181 182 183 184 185 186 187 188 189 190 191 192 193 194 195 196 197 198 199 200 201 202 203 204 205 206 207 208 209 210 211 212 213 214 215 216 217 218 219 220 221 222 223 224 |
#include <Wire.h> #include <Adafruit_Fingerprint.h> #include <PN532_I2C.h> #include <PN532.h> #include <NfcAdapter.h> PN532_I2C pn532_i2c(Wire); #include <LiquidCrystal_I2C.h> LiquidCrystal_I2C lcd(0x27, 16, 2); // I2C address 0x27, 16 column and 2 rows #define LED_PIN 5 // relay is connected to pin 5 #define TIMEOUT_INTERVAL 15000 // 15000 millisecnds = 15 seconds NfcAdapter nfc = NfcAdapter(pn532_i2c); String tagId1 = "FA 5F 99 1A"; // RFID Tag id String tagId2= "C6 45 22 4B"; // rfid tag id String tagId = "None"; byte nuidPICC[4]; #if (defined(__AVR__) || defined(ESP8266)) && !defined(__AVR_ATmega2560__) SoftwareSerial mySerial(2, 3); #else // On Leonardo/M0/etc, others with hardware serial, use hardware serial! // #0 is green wire, #1 is white #define mySerial Serial1 #endif Adafruit_Fingerprint finger = Adafruit_Fingerprint(&mySerial); void setup() { Serial.begin(9600); //Serial1.begin(9600); pinMode(LED_PIN, OUTPUT); lcd.init(); // initialize the lcd lcd.backlight(); Serial.println("System initialized"); nfc.begin(); Serial.println("\n\nAdafruit finger detect test"); // set the data rate for the sensor serial port finger.begin(57600); delay(5); if (finger.verifyPassword()) { Serial.println("Found fingerprint sensor!"); } else { Serial.println("Did not find fingerprint sensor :("); while (1) { delay(1); } } // // Serial.println(F("Reading sensor parameters")); // finger.getParameters(); // Serial.print(F("Status: 0x")); Serial.println(finger.status_reg, HEX); // Serial.print(F("Sys ID: 0x")); Serial.println(finger.system_id, HEX); // Serial.print(F("Capacity: ")); Serial.println(finger.capacity); // Serial.print(F("Security level: ")); Serial.println(finger.security_level); // Serial.print(F("Device address: ")); Serial.println(finger.device_addr, HEX); // Serial.print(F("Packet len: ")); Serial.println(finger.packet_len); // Serial.print(F("Baud rate: ")); Serial.println(finger.baud_rate); // // finger.getTemplateCount(); // // if (finger.templateCount == 0) { // Serial.print("Sensor doesn't contain any fingerprint data. Please run the 'enroll' example."); // } // else { // Serial.println("Waiting for valid finger..."); // Serial.print("Sensor contains "); Serial.print(finger.templateCount); Serial.println(" templates"); // } } void loop() { lcd.clear(); // clear display lcd.setCursor(0, 0); // move cursor to (0, 0) lcd.print("RFID CARD"); delay(2000); readNFC(); if (tagId==tagId1) { lcd.clear(); // clear display lcd.setCursor(0, 0); // move cursor to (0, 0) lcd.print("Place Finger"); delay(2000); Serial.println("RFID tag detected!"); Serial.println("Place your finger on the sensor within 1 minute."); unsigned long startTime = millis(); while (millis() - startTime < TIMEOUT_INTERVAL) { getFingerprintID(); delay(50); //don't ned to run this at full speed. } Serial.println("Timeout. Please try again."); tagId = ""; } } uint8_t getFingerprintID() { uint8_t p = finger.getImage(); switch (p) { case FINGERPRINT_OK: Serial.println("Image taken"); break; case FINGERPRINT_NOFINGER: Serial.println("No finger detected"); finger.LEDcontrol(FINGERPRINT_LED_OFF, 0, FINGERPRINT_LED_BLUE); finger.LEDcontrol(FINGERPRINT_LED_OFF, 0, FINGERPRINT_LED_RED); return p; case FINGERPRINT_PACKETRECIEVEERR: Serial.println("Communication error"); return p; case FINGERPRINT_IMAGEFAIL: Serial.println("Imaging error"); return p; default: Serial.println("Unknown error"); return p; } // OK success! p = finger.image2Tz(); switch (p) { case FINGERPRINT_OK: Serial.println("Image converted"); break; case FINGERPRINT_IMAGEMESS: Serial.println("Image too messy"); return p; case FINGERPRINT_PACKETRECIEVEERR: Serial.println("Communication error"); return p; case FINGERPRINT_FEATUREFAIL: Serial.println("Could not find fingerprint features"); return p; case FINGERPRINT_INVALIDIMAGE: Serial.println("Could not find fingerprint features"); return p; default: Serial.println("Unknown error"); return p; } // OK converted! p = finger.fingerSearch(); if (p == FINGERPRINT_OK) { Serial.println("Found a print match!"); finger.LEDcontrol(FINGERPRINT_LED_FLASHING, 25, FINGERPRINT_LED_PURPLE, 10); delay(1000); if(finger.fingerID==2) { Serial.println("Fingerprint found!"); digitalWrite(LED_PIN, HIGH); lcd.clear(); // clear display lcd.setCursor(0, 0); // move cursor to (0, 0) lcd.print("LOCK Opened"); delay(5000); // LED remains ON for 2 seconds digitalWrite(LED_PIN, LOW); lcd.clear(); // clear display lcd.setCursor(0, 0); // move cursor to (0, 0) lcd.print("LOCK Closed"); } } else if (p == FINGERPRINT_PACKETRECIEVEERR) { Serial.println("Communication error"); return p; } else if (p == FINGERPRINT_NOTFOUND) { finger.LEDcontrol(FINGERPRINT_LED_FLASHING, 25, FINGERPRINT_LED_RED, 10); delay(1000); Serial.println("Did not find a match"); return p; } else { Serial.println("Unknown error"); return p; } // found a match! Serial.print("Found ID #"); Serial.print(finger.fingerID); Serial.print(" with confidence of "); Serial.println(finger.confidence); return finger.fingerID; } // returns -1 if failed, otherwise returns ID # int getFingerprintIDez() { uint8_t p = finger.getImage(); if (p != FINGERPRINT_OK) return -1; p = finger.image2Tz(); if (p != FINGERPRINT_OK) return -1; p = finger.fingerFastSearch(); if (p != FINGERPRINT_OK) return -1; // found a match! Serial.print("Found ID #"); Serial.print(finger.fingerID); Serial.print(" with confidence of "); Serial.println(finger.confidence); return finger.fingerID; } void readNFC() { if (nfc.tagPresent()) { NfcTag tag = nfc.read(); tag.print(); tagId = tag.getUidString(); Serial.println("Tag id"); Serial.println(tagId); } delay(1000); } |
This is the final program and there isn’t anything complicated, I have just combined the two projects. I am going to remind you one more time, you need to watch my getting started videos on the R557 Fingerprint module and the PN532 RFID module. Because, for this project you will need to enroll your finger and then you will be able to use the finger ID. I have covered this in the getting started video. Anyway, most of the instructions are well commented and I am sure you won’t face any issues.
Watch Video Tutorial:

Discover more from Electronic Clinic
Subscribe to get the latest posts sent to your email.


errror
System initialized
Didn’t find PN53x board