Sensors Data on Graphs using Arduino and vb.net
Last Updated on August 16, 2024 by Engr. Shahzada Fahad
Table of Contents
Description:
This is a very detailed step by step Tutorial on How to make your own Real-time Weather Station using Arduino, DHT11 Temperature and Humidity Sensor, and Visual Basic .net (vb.net). In this tutorial, you will learn how to read sensors’ values and then display these values on a Graph. This project is basically based on how to display the sensor’s data on graphs.
Recently, I posted another article, which I sent the Temperature and Humidity values to the ThingSpeak IoT Platform and displayed the values on the Charts. In this project, the Nodemcu ESP8266 WiFi Module is used.
In this tutorial, the famous dht11 Temperature and Humidity sensor will be used to access the temperature and humidity values. Then we will use these values to make a real-time weather station and display the temperature and humidity values on the Graph.
In this Tutorial, we will also cover the complete circuit diagram explanation, components soldering, Arduino Uno programming, visual basic application designing, and programming, and finally testing. This Tutorial will help you in the future, in designing advanced level projects.
For Complete step by step explanation Watch video Tutorial given at the end.
Amazon Links:
Arduino Nano USB-C Type (Recommended)
DHT11 Temperature and Humidity Module:
*Disclosure: These are affiliate links. As an Amazon Associate I earn from qualifying purchases
DHT11 Temperature and Humidity Sensor:

As we know that dht11 Temperature and Humidity Sensor has four pins, pin number1 is the Vdd power supply and can be connected with 5v. pin number2 is the data, pin number3 is not connected, and pin number4 is connected with the ground.
DHT11 connection with Arudino, Circuit Diagram:
Display Sensors data on Graphs

This is the basic connection diagram of the dht11 temperature and humidity sensor. This circuit diagram is designed in cadesoft eagle, if you want to learn how to make schematics and PCB, then watch my tutorial.
So as you know that the dht11 sensor has 4 pins, and out of 4 pins only the 3 pins are used. As you can see in the circuit diagram the pin number 3 is not connected. Pin number1 is connected with Arduino’s 5volt. Pin2 will be connected with pin12 of the Arduino. You can also see a 10K resistor, which is connected between pin1 and pin2. Pin number 3 is not connected and pin number 4 will be connected with the Arduino’s GND.
For the Circuit diagram complete explanation and Soldering Watch video Tutorial.
DHT11 Arduino and Vb.net Programm:
Display the Sensors data on graphs
This project is based on two programs, one program is written for the Arduino while another program is written for the computer application in vb.net.
DHT11 Arduino Programming:
|
1 2 3 4 5 6 7 8 9 10 11 12 13 14 15 16 17 18 19 20 21 22 23 24 25 26 27 28 29 30 31 32 33 34 35 36 37 38 39 40 41 42 43 44 45 46 47 48 49 50 51 52 53 54 55 56 57 58 59 60 61 62 63 64 65 66 67 |
#include "DHT.h" #define DHTPIN 12 // what pin we're connected to //Uncomment whatever the type of sensor we are using. #define DHTTYPE DHT11 // DHT 11 //#define DHTTYPE DHT22 // DHT 22 (AM2302) //#define DHTTYPE DHT21 // DHT 21 (AM2301) // Connect pin 1 (on the left) of the sensor to +5V // NOTE: If using a board with 3.3V logic like an Arduino Due connect pin 1 // to 3.3V instead of 5V! // Connect pin 2 of the sensor to whatever your DHTPIN is // pin3 of the sensor is not connected // Connect pin 4 (on the right) of the sensor to GROUND // Connect a 10K resistor from pin 2 (data) to pin 1 (power) of the sensor // Initialize DHT sensor for normal 16mhz Arduino DHT dht(DHTPIN, DHTTYPE); String TextForSms ; String humidity = " Humidity: %"; String temperature = " Temperature"; String sign = " *C"; char fromc; // character from computer void setup() { Serial.begin(9600); // Serial.println("DHT11 test!"); dht.begin(); } void loop() { // Wait a few seconds between measurements. delay(2000); // Reading temperature or humidity takes about 250 milliseconds! // Sensor readings may also be up to 2 seconds 'old' (its a very slow sensor) int h = dht.readHumidity(); // Read temperature as Celsius int t = dht.readTemperature(); // Read temperature as Fahrenheit int f = dht.readTemperature(true); // Check if any reads failed and exit early (to try again). if (isnan(h) || isnan(t) || isnan(f)) { Serial.println("Failed to read from DHT sensor!"); return; } // Compute heat index // Must send in temp in Fahrenheit! int hi = dht.computeHeatIndex(f, h); TextForSms = TextForSms + t + "," + h + ","; // sorry comma Serial.println(TextForSms); TextForSms = ""; delay(1000); } |
Application Designing and Programming:
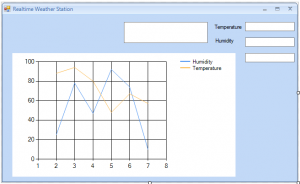
This is how the final form looks.
For the step b step application design watch video Tutorial given at the end of this article.
|
1 2 3 4 5 6 7 8 9 10 11 12 13 14 15 16 17 18 19 20 21 22 23 24 25 26 27 28 29 30 31 32 33 34 35 36 37 38 39 40 41 42 43 44 45 46 47 48 49 50 51 52 53 54 55 56 57 58 59 60 61 62 63 64 65 66 67 68 69 70 71 72 73 74 75 76 77 78 79 |
Imports System.IO Imports System.IO.Ports Public Class Form1 Dim value1 As Decimal Dim value2 As Decimal Private Sub Form1_Load(ByVal sender As System.Object, ByVal e As System.EventArgs) Handles MyBase.Load SerialPort1.Close() SerialPort1.PortName = "com8" SerialPort1.BaudRate = "9600" SerialPort1.DataBits = 8 SerialPort1.Parity = Parity.None SerialPort1.StopBits = StopBits.One SerialPort1.Handshake = Handshake.None SerialPort1.Encoding = System.Text.Encoding.Default SerialPort1.Open() End Sub Private Sub Timer1_Tick(ByVal sender As System.Object, ByVal e As System.EventArgs) Handles Timer1.Tick Dim s As String s = TextBox1.Text + "," + "," + "," + "," Dim somestring() As String ' Split string based on comma somestring = s.Split(New Char() {","c}) TextBox2.Text = somestring(0) Try value1 = Convert.ToDecimal(TextBox2.Text) Catch ex As Exception TextBox1.Text = "" End Try TextBox3.Text = somestring(1) Try value2 = Convert.ToDecimal(TextBox3.Text) Catch ex As Exception TextBox1.Text = "" End Try TextBox4.Text = somestring(2) Chart1.Series("Humidity").Points.AddY(value2) Chart1.Series("Temperature").Points.AddY(value1) TextBox1.Text = "" End Sub Private Sub DataReceived(ByVal sender As Object, ByVal e As SerialDataReceivedEventArgs) Handles SerialPort1.DataReceived Try Dim mydata As String = "" mydata = SerialPort1.ReadExisting() If TextBox1.InvokeRequired Then TextBox1.Invoke(DirectCast(Sub() TextBox1.Text &= mydata, MethodInvoker)) Else TextBox1.Text &= mydata End If Catch ex As Exception MessageBox.Show(ex.Message) End Try End Sub End Class |
Watch Video Tutorial:
Discover more from Electronic Clinic
Subscribe to get the latest posts sent to your email.


Dear Engr,
Many thanks your tutor, but when I use your method, my text box just receive first data and then the text box can not still work, can you teach me how to save this problem?
Best Regards,
for me, it works best. but if you don’t know how to handle the timer. then don’t use the timer, just use the textchanged event. there are so many other tutorials available on my channel, explaining how to split the string.